
CCSSL60 - Coffee machine V-ZUG - Free user manual and instructions
Find the device manual for free CCSSL60 V-ZUG in PDF.
| Product type | Automatic coffee machine with grinder |
| Brand | V-Zug |
| Model | CCSSL60 |
| Dimensions (W x H x D) | 594 x 375-454 x 412 mm |
| Weight | 26 kg |
| Power supply | 220-240 V~ 50/60 Hz, 1350 W, 10 A |
| Pump pressure | 15 bar |
| Water tank capacity | 1.8 L |
| Bean hopper capacity | Approx. 250 g |
| Milk container capacity | 750 ml max |
| Beverage types | Espresso, coffee, long coffee, cappuccino, latte macchiato, caffelatte, hot water |
| Grind adjustment | Knob with 7 settings (from fine to coarse) |
| Quantity programming | Yes, for coffee, milk and hot water |
| Special functions | Rinse, descaling, energy saving, auto shutdown, auto start, statistics |
| Maintenance | Removable brew unit, automatic milk circuit cleaning, emptying the grounds drawer |
| Safety | Auto shut-off, service flap lock, burn protection |
| Supplied accessories | Milk container, measure spoon, hardness test strip, hot water spout |
| Repairability | Recommended original spare parts, customer service |
Frequently Asked Questions - CCSSL60 V-ZUG
User questions about CCSSL60 V-ZUG
0 question about this device. Answer the ones you know or ask your own.
Ask a new question about this device
Download the instructions for your Coffee machine in PDF format for free! Find your manual CCSSL60 - V-ZUG and take your electronic device back in hand. On this page are published all the documents necessary for the use of your device. CCSSL60 by V-ZUG.
USER MANUAL CCSSL60 V-ZUG
natural_image
Pure electrical circuit lines without any symbols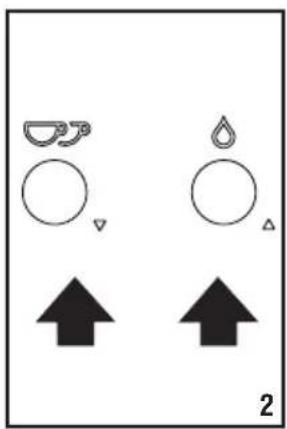
natural_image
Two sets of icons: one with a droplet and triangle, the other with a droplet and triangle, each pointing upward (no text or symbols)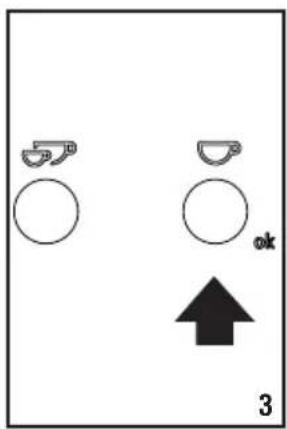
natural_image
Line drawing of a coffee maker with a cup inside, no text or symbols present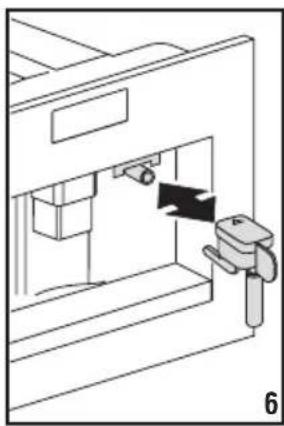
natural_image
Technical line drawing of a mechanical device with a handle and internal components (no text or symbols)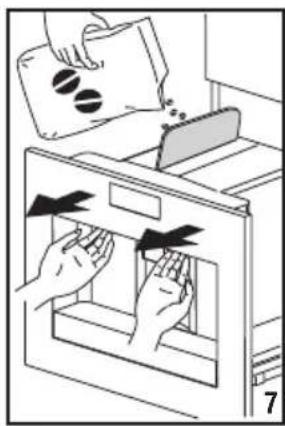
natural_image
Illustration of hands removing or removing a device into an oven (no text or symbols present)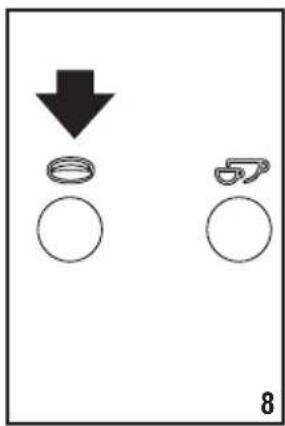
natural_image
Simple diagram showing a downward arrow, a ring, and a small object with a handle, all above blank circles (no text or symbols)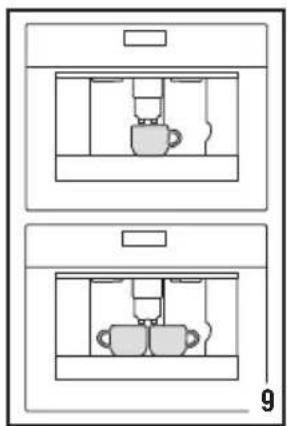
natural_image
Two identical rectangular cabinets with internal compartments showing two cups, no text or symbols present.
natural_image
Diagram showing a hand inserting a container into a storage unit with a downward arrow indicating motion (no text or symbols)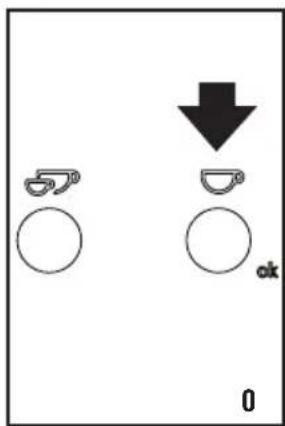
natural_image
Diagram showing a hand inserting a device into a machine, with no visible text or symbols.
natural_image
Line drawing of a hand opening a door with a black arrow indicating rotation (no text or symbols)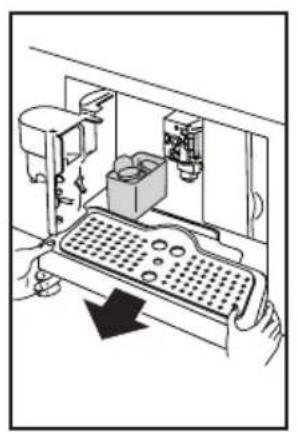
natural_image
Diagram of a computer monitor with a keyboard and mouse, showing internal components and a hand holding the screen (no text or symbols present)
natural_image
Line drawing of a mechanical assembly with a magnified inset showing a hand operating a tool (no text or symbols)
natural_image
Diagram of a mechanical device with a lever and base, showing a component with a black arrow pointing to a circular opening (no text or symbols present)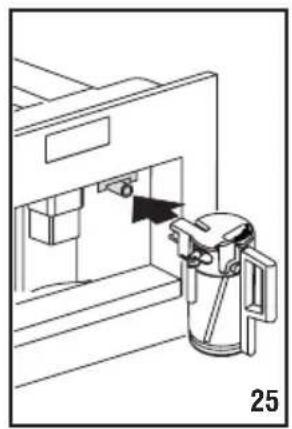
natural_image
Diagram of a mechanical device with a lever and handle, showing internal components (no text or symbols)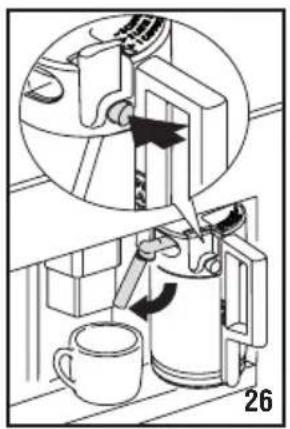
natural_image
Diagram of a coffee maker with a cup and a stand, showing mechanical components and a magnified view (no text or symbols)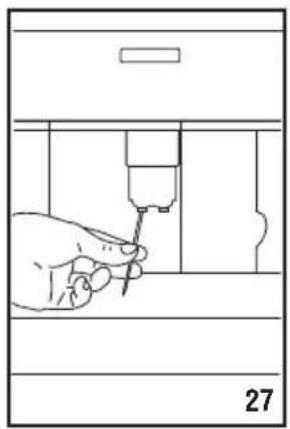
natural_image
Line drawing of a hand using a tool to apply or install a component, no text or symbols present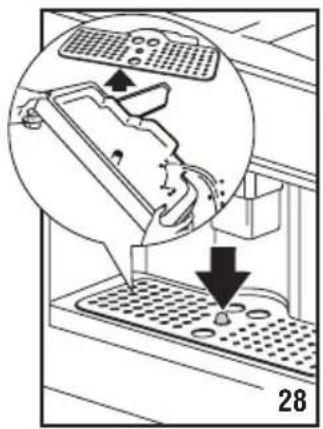
natural_image
Line drawing of a hand placing a component into a window frame (no text or symbols)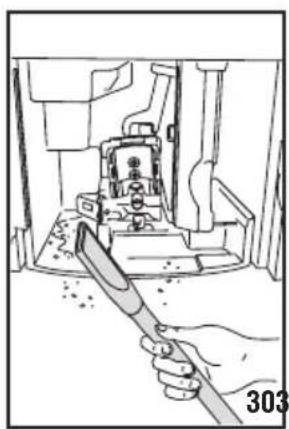
natural_image
Illustration of a hand using a tool to clean or store items inside a container (no text or symbols visible)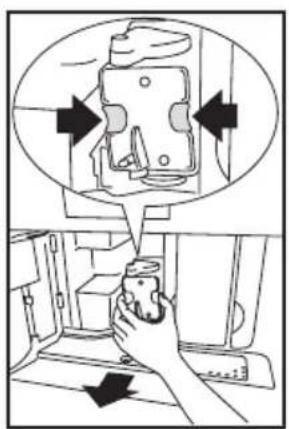
CONTENTS
INTRODUCTION 7
Symbols used in these instructions ....7
Letters in brackets 7
Troubleshooting and repairs 7
SAFETY 7
Fundamental safety warnings....7
Designated use 7
Instructions 7
DESCRIPTION 8
Description of the appliance 8
Description of the control panel ....8
Description of milk container and accessories ....8
PRELIMINARY CHECKS 8
Checking the appliance 8
Installing the appliance ....8
Connecting the appliance ....8
DISPOSAL....9
BUILT-IN INSTALLATION 9
USING THE APPLIANCE FOR THE FIRST TIME ....12
TURNING ON AND HEATING UP 12
MAKING COFFEE USING COFFEE BEANS ....12
CHANGING THE QUANTITY OF COFFEE IN THE CUP .....13
Programming quantity ....13
CHANGING THE QUANTITY OF HOT WATER 14
MAKING CAPPUCCINO 14
CHANGING THE QUANTITY OF MILK AND COFFEE FOR CAPPUCCINO ....15
MAKING LATTE MACCHIATO OR CAFFELATTE ....15
CHANGING THE QUANTITY OF COFFEE AND MILK FOR LATTE MACCHIATO/CAFFELATTE ....15
CLEANING 15
Cleaning the machine ....15
Cleaning the grounds container 15
Cleaning the drip tray 15
Cleaning the water tank 16
Cleaning the spouts ....16
Cleaning the pre-ground coffee funnel 16
Cleaning the inside of the coffee machine ....16
Cleaning the infuser 16
Cleaning the milk container 16
MENU SETTINGS....17
Rinsing ....17
Setting the language ....17
Energy Saving 17
Adjust time 18
Auto-start 18
Auto-off (Standby) 18
Setting the temperature ....18
Setting water hardness 18
Statistics function 19
Default values 19
Descaling 19
TURNING THE APPLIANCE OFF 19
TECHNICAL DATA 20
DISPLAYED MESSAGES 21
TROUBLESHOOTING 22
INTRODUCTION
Symbols used in these instructions
Important warnings are identified by these symbols.
Failure to observe the instructions could result in electric shock, serious injury, burns, fire or damage to the appliance.

Danger!
Failure to observe the warning could result in possibly life threatening injury from electric shock.

Important!
Failure to observe the warning could result in injury or damage to the appliance.

Danger of burns!
Failure to observe the warning could result in scalds or burns.

e note:
This symbol identifies important advice or information for the user.
Letters in brackets
The letters in brackets refer to the legend in the Description of the Appliance on page 3.
Troubleshooting and repairs
In the event of problems, follow the information given in the sections "Displayed messages" and "Troubleshooting". If this does not resolve the problem, you should consult Customer Services. For repairs, contact Customer Services only.
SAFETY
Fundamental safety warnings

Important! This is an household appliance only.
It is not intended to be used in:
- staff kitchen areas in shops, offices and other working environments;
- farm houses;
- by clients in hotels, motels and other residential type environments;
• bed and breakfast type environments.

Danger! This is an electrical appliance, it is therefore
important to respect the following safety warnings:
• Never touch the appliance with damp hands.
• Never touch the plug with damp hands.
• Make sure the socket used is freely accessible at all times, enabling the appliance to be unplugged when necessary.
- If the appliance is faulty, do not attempt to repair. Turn it off using the main switch (A23), unplug from the mains socket and contact Customer Services.

Important! Keep all packaging (plastic bags, polysty-n) away from children.

Important! The appliance is not intended for use by (including children) with reduced physical, sensory or capabilities, or lack of experience and knowledge, unless it has been given supervision or instruction concerning use of appliance by a person responsible for their safety. Children are supervised to ensure they do not play with the

Danger of burns! This appliance produces hot water m may form while it is in operation.
Avoid contact with splashes of water or hot steam. Use knobs and handles.

Important! Do not hold on to the coffee machine out of the cabinet.
Do not rest recipients containing liquids or inflammable or corrosive materials on top of the appliance. Place the accessories required to make the coffee (the measure for example) in the special holder. Do not rest large objects which could obstruct movement or unstable objects on the appliance.

Important! Do not use the appliance when extracted.
Make sure the appliance is inactive before extracting it. The only exception is adjusting the coffee mill which must be done with the machine extracted (see section "Adjusting the coffee mill").

note: Use original or manufacturer recommen-
ded accessories and spare parts only.
Designated use
This appliance is designed and made to prepare coffee and heat drinks. All other use is considered improper.
This appliance is not suitable for commercial use.
The manufacturer is not liable for damage deriving from improper use of the appliance.
This appliance can be installed over a built-in oven if the latter is fitted with a cooling fan at the rear (maximum microwave power: 3 kW).
Instructions
Read these instructions carefully before using the appliance.
- Keep these instructions.
- Failure to respect these instructions may result in burns or damage to the appliance.
The manufacturer is not liable for damage deriving from failure to respect these instructions.

Please note: The appliance has a cooling fan.
This comes on whenever coffee, steam or hot water is delivered. After several minutes, the fan goes off automatically.
DESCRIPTION
Description of the appliance
(page 3 - A)
A1. Cup tray
A2. Service door
A3. Coffee guide
A4. Waste coffee container
A5. Infuser
A6. Cup tray lights
A7. On-Off/stand-by button
A8. Control panel
A9. Tray
A10. Hot water and steam nozzle
A11. IEC connector
A12. Water tank
A13. Coffee spout (adjustable height)
A14. Drip tray
A15. Bean container lid
A16. Bean container
A17. Grinding adjustment dial
A18. Pre-ground coffee funnel door
A19. Measure
A20. Measure compartment
A21. Pre-ground coffee funnel
A22. Power cable
A23. Main switch
Description of the control panel
(page 3 - B)
B1. Display: guides the user in using the appliance.
B2. button to select the coffee taste
B3. button to select the type of coffee (espresso, coffee, long coffee)
B4. /OK button to make one cup of coffee and confirm the selected function
B5. /button to make two cups of coffee and scroll backwards through the menu to display the various modes
B6. /△ button to deliver hot water and scroll forwards through the menu to display the various modes
B7. P / ESC button to enable or disable menu parameter setting
mode and exit from the chosen mode
B8. button to make cappuccino
B9. button to make latte macchiato
B10. Button to make caffelatte
Description of milk container and accessories
(page 3 - C)
C1. Froth regulator
C2. Milk container handle
C3. CLEAN button
C4. Milk intake tube
C5. Frothed milk spout
C6. Milk frother
C7. Hot water spout
PRELIMINARY CHECKS
Checking the appliance
After removing the packaging, make sure the product is complete and undamaged and that all accessories are present.
Do not use the appliance if it is visibly damaged.
Contact Customer Services.
Installing the appliance

Important!
- Installation must be performed by a qualified professional in compliance with legislation in force in the country of installation (see section "Built-in installation").
- The packing elements (plastic bags, polystyrene foam, etc.) should be kept out of reach of children.
- Never install the appliance in rooms where the temperature may drop to 0°C or lower.
- Customise the water hardness as soon as possible following the instructions in the "Setting water hardness" section.
Connecting the appliance

Danger! Check that the mains power supply voltage
corresponds to the value indicated on the rating plate on the bottom of the appliance.
Connect the appliance to an efficiently earthed and correctly installed socket with a minimum current rating of 10A only.
If the power socket does not match the plug on the appliance, have the socket replaced with a suitable type by a qualified professional.
To comply with safety directives, an omnipolar switch with a minimum contact distance of 3 mm must be installed.
Do not use multiple sockets or extensions.

Important! Safety cutout devices must be included in the mains power supply in compliance with the installation regulations in the country concerned.
DISPOSAL
Electrical appliances must not be disposed of as household waste.
Appliances with this symbol are covered by European Directive 2002/96/EC.
All unused electric and electronic appliances must
be disposed of separately from household waste by taking them to special state authorised centres.
Disposing of the unused appliance correctly avoids damage to the environment and a risk to health.
For more information on disposing of the unused appliance, contact the local administration, the waste disposal department or the shop where the appliance was bought.
BUILT-IN INSTALLATION
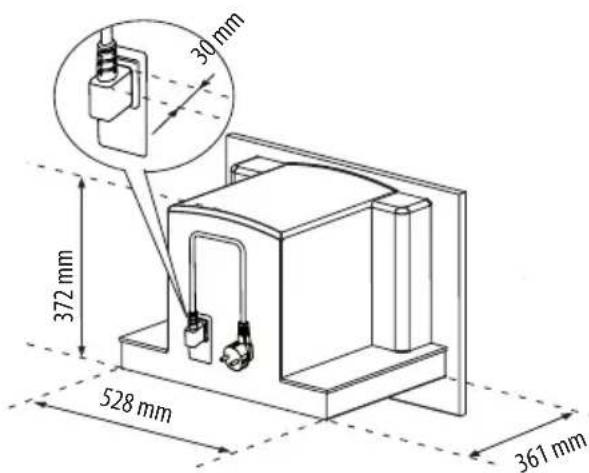
Verify the minimum measurements required for correct installation of the appliance.
The coffee machine must be installed in a column and the column must be firmly fixed to the wall with commercially available brackets.

Important!
- Important: all installation or maintenance operations must be performed with the appliance disconnected from the mains electricity supply.
- Kitchen furniture in direct contact with the appliance must be heat resistant (65°C min).
• To guarantee correct ventilation, leave a gap at the bottom of the cabinet (see measurements in figure).
H 454 MM
EN
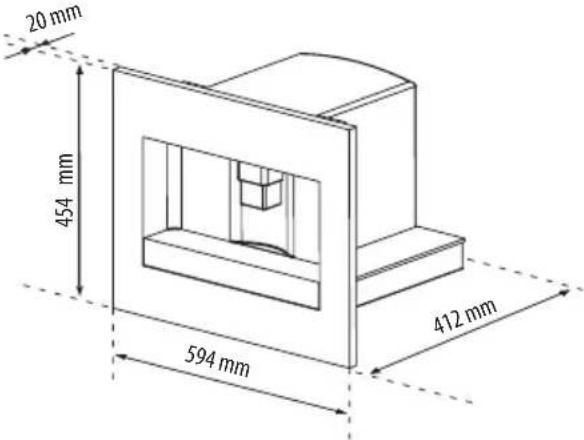
H 378 MM
H 375 MM
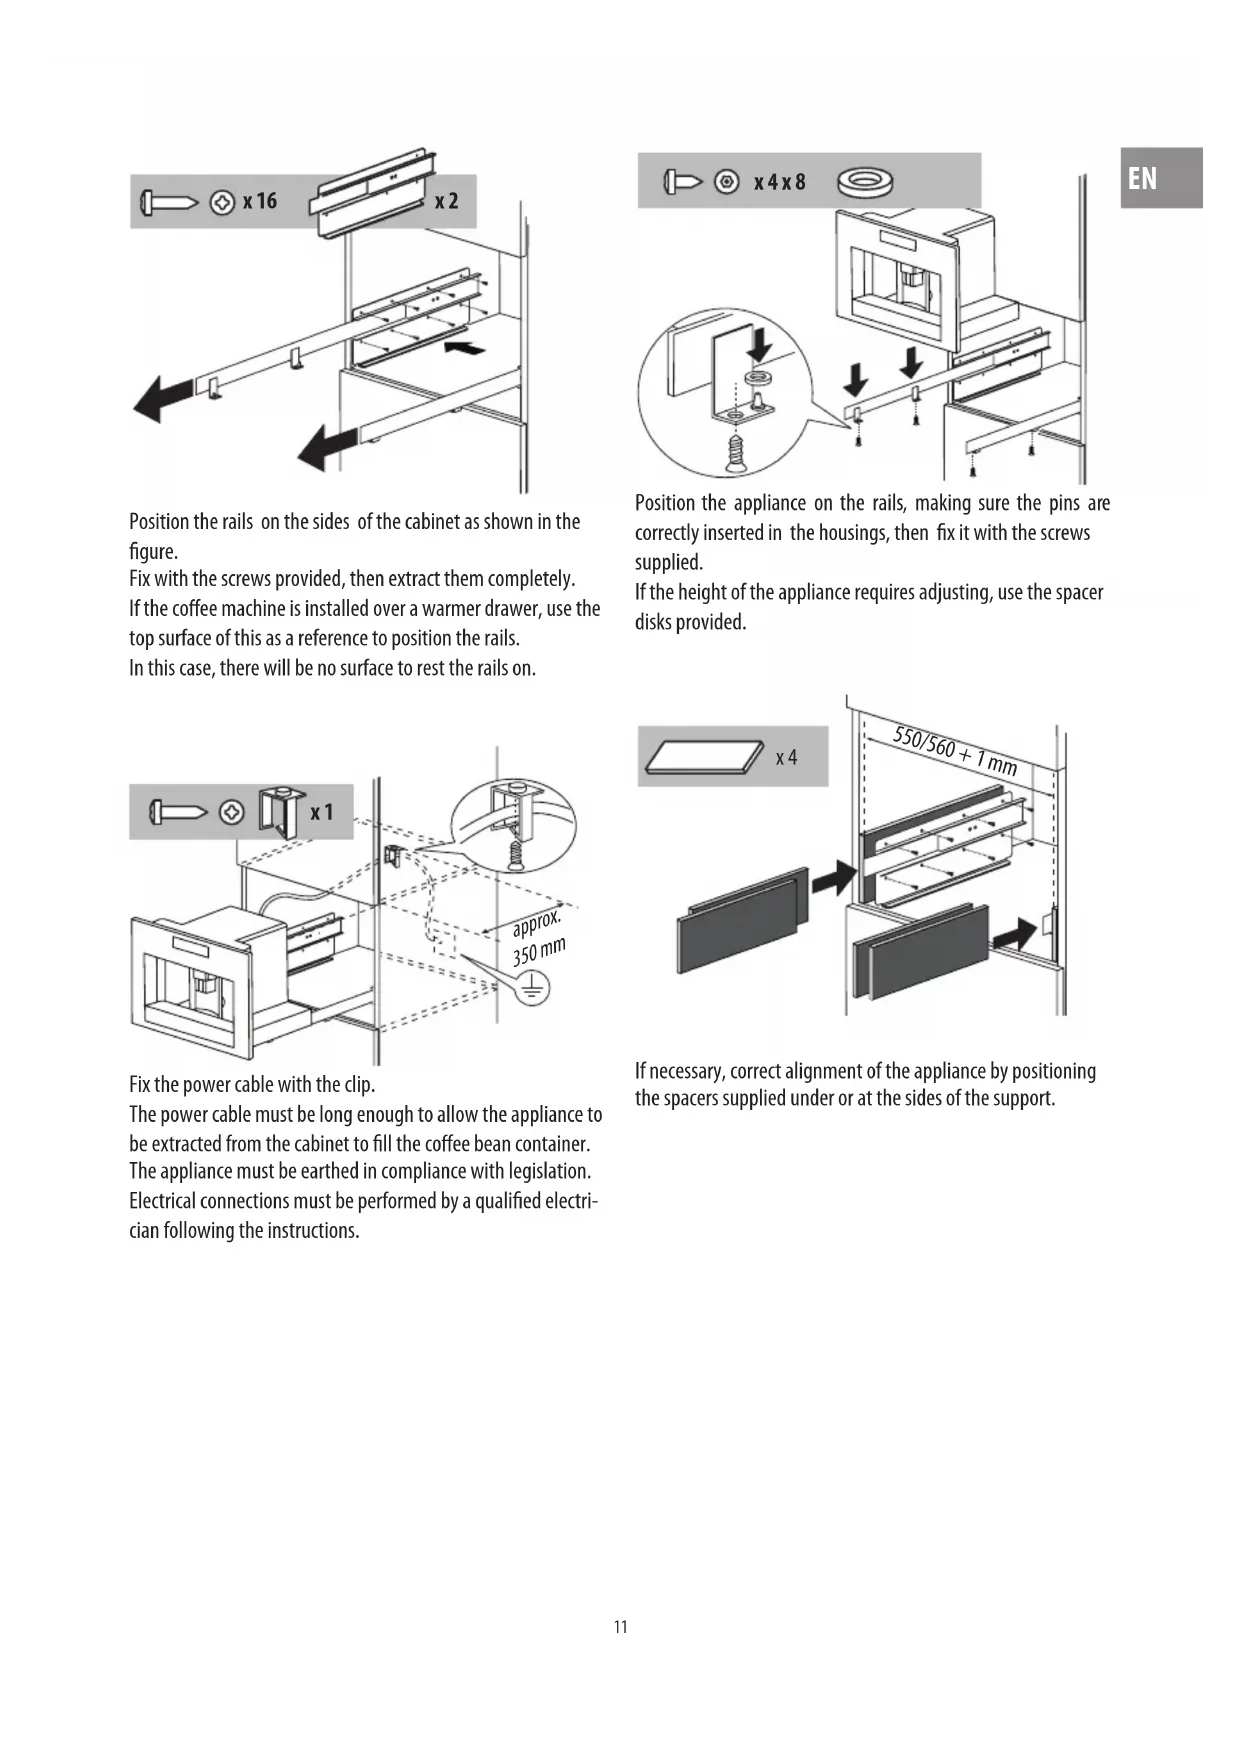
Position the rails on the sides of the cabinet as shown in the figure.
Fix with the screws provided, then extract them completely. If the coffee machine is installed over a warmer drawer, use the top surface of this as a reference to position the rails. In this case, there will be no surface to rest the rails on.
Fix the power cable with the clip.
The power cable must be long enough to allow the appliance to be extracted from the cabinet to fill the coffee bean container. The appliance must be earthed in compliance with legislation. Electrical connections must be performed by a qualified electrician following the instructions.
Position the appliance on the rails, making sure the pins are correctly inserted in the housings, then fix it with the screws supplied.
If the height of the appliance requires adjusting, use the spacer disks provided.
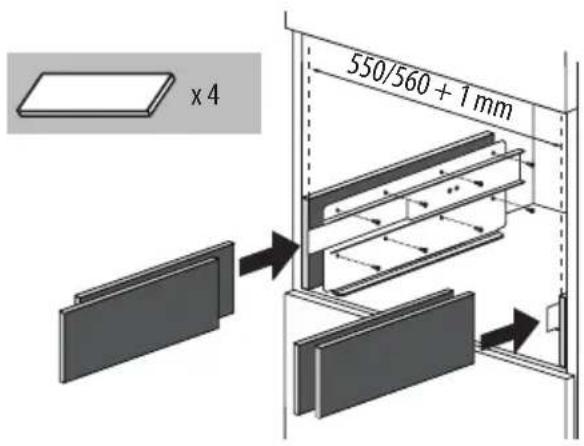
If necessary, correct alignment of the appliance by positioning the spacers supplied under or at the sides of the support.
USINg THE APPLIANCE FOR THE FIRST TIME
- Coffee has been used to factory test the appliance and it is therefore completely normal for there to be traces of coffee in the mill.
-
Customise water hardness as soon as possible following the instructions in the "Setting water hardness" section.
-
Connect the appliance to the mains electricity supply and place the main switch (A23) in position I.
-
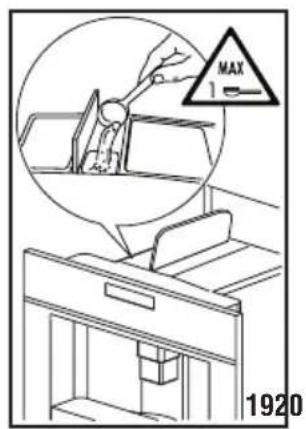
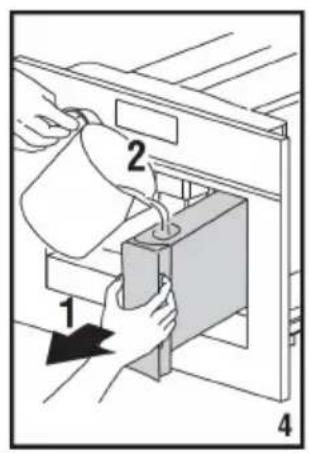
After 5 seconds, the appliance displays "FILL TANK". Extract the water tank (fig. 4), rinse and fill with fresh water without exceeding the MAX line. Replace and push as far as it will go.
- You must first choose the language (the languages scroll through at intervals of about 3 seconds):
When the message "PRESS OK TO SET ENGLISH" is displayed, press the OK button (B4) (fig. 3) for 3 seconds until "ENGLISH SET" is displayed. If you set the wrong language, follow the instructions in the "Setting the language" section. If your language is not available, select one from those displayed (the instructions refer to English).
Then follow the instructions displayed:
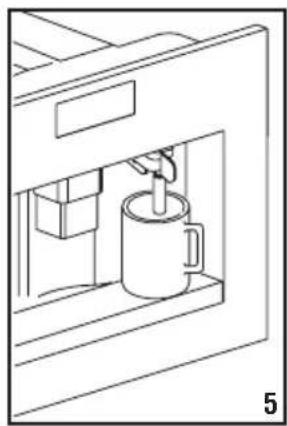
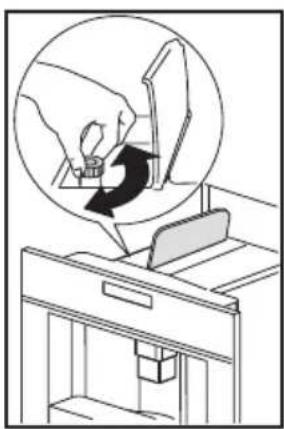
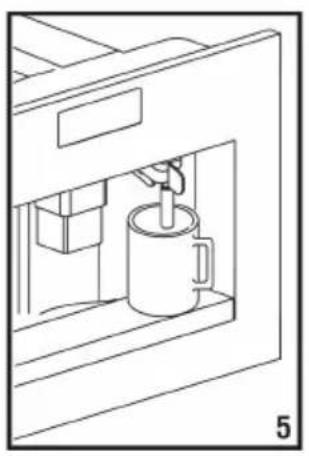
- Place a cup under the hot water spout (fig. 5).
(If the hot water spout is not inserted, the appliance displays "INSERT WATER SPOUT". Attach the spout as shown in figure 6. The machine displays "HOT WATER PRESS OK". Press the OK button (B4), a little water comes out of the spout.
- After that the machine displays "TURNING OFF PLEASE WAIT" and goes off.
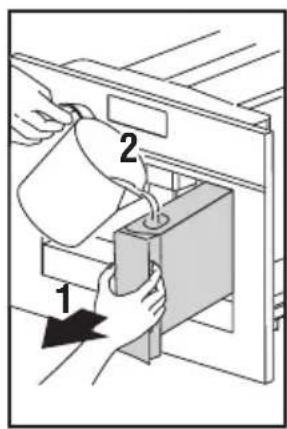
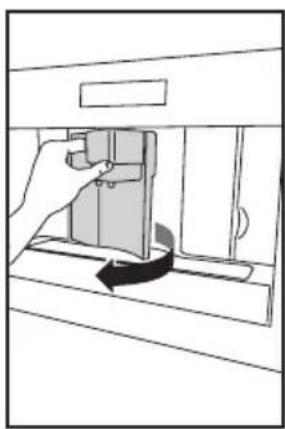
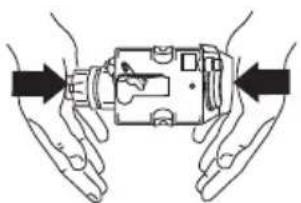
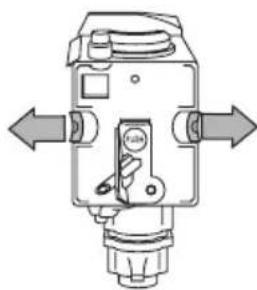
- Extract the appliance by pulling it out using the handles (fig. 7). Open the lid and fill the container with coffee beans, then close the lid and push the appliance in.
The coffee machine is now ready for normal use.

Important! Never introduce pre-ground coffee, freeze dried coffee, caramelised beans or anything else which could damage the appliance.

Please note: When using the appliance for the first time, you need to make 4-5 cups of coffee and 4-5 cappuccinos before the appliance gives satisfactory results.

Please note: Each time you turn the coffee machine on by the main switch (A23), it performs a SELF-DIAGNOSIS cycle and then goes off. To turn it on again, press the ON/OFF/standby button (A7) (fig. 1)
TURNING ON AND HEATING UP
Each time the appliance is turned on, it performs an automatic preheat and rinse cycle which cannot be interrupted.
The appliance is ready for use only after completion of this cycle.

Danger of burns! During rinsing, a little hot water
flows from the coffee spouts.
To turn the appliance on, press the ON/OFF/standby button (A7) (fig. 1). The message "HEATING UP PLEASE WAIT" is displayed. When heating is complete, the message changes to "RINSING". The appliance is at temperature when the message "COFFEE STANDARD" is displayed.
MAKING COFFEE USING COFFEE BEANS
- The appliance is preset to make coffee with a standard taste. You can choose coffee with an extra-mild, mild, standard, strong or extra-strong taste. There is also a pre-ground coffee option. To choose the required taste, press the button (B2) (fig. 8) a number of times. The required coffee taste is displayed.
- Place 1 cup under the spouts to make 1 coffee (fig. 9) or 2 cups for 2 coffees (fig. 9).
Lower the spouts as near as possible to the cup for a creamier coffee (fig. 10).
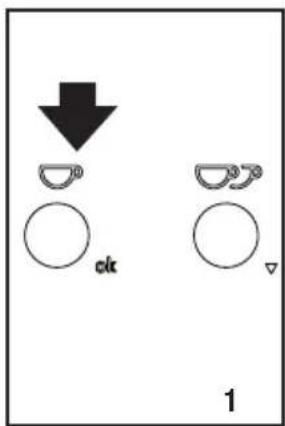
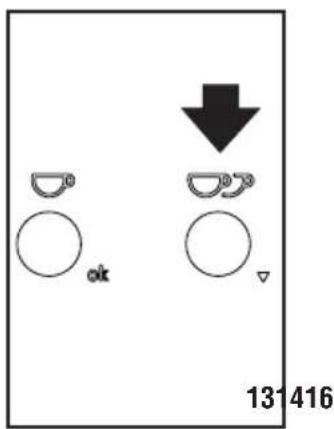
- Press the button (B3) (fig. 11) to select the type of coffee (espresso, coffee, long coffee).
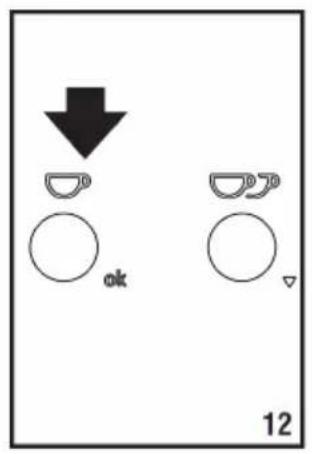
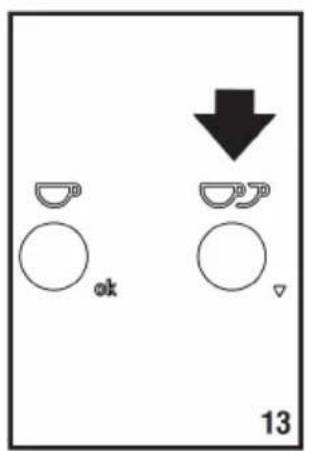
Now press the button (B4) (fig. 12) if you want to make one coffee and the button (B5) (fig. 13) if you want to make 2 coffees. The appliance now grinds the beans and starts delivering the coffee into the cup. Once the set amount of coffee has been delivered, the machine stops delivery automatically and expels the exhausted coffee grounds into the grounds container.
- After a few seconds, the appliance is ready for use again.
- To turn the appliance off, press the ON/OFF/standby button (A7) (fig. 1).
(Before going off, the appliance performs an automatic rinse cycle. Take care to avoid scalds).
NOTE 1: If the coffee is delivered a drop at a time or not at all, see section "Adjusting the coffee mill".
NOTE 2: If the coffee is delivered too fast and the cream is not satisfactory, see section "Adjusting the coffee mill".
NOTE 3: Tips for a hotter coffee:
- Proceed as described in the section "Changing and setting menu parameters", "rinsing" function.
- Unless preheated, do not use excessively thick cups as they will absorb too much heat.
• Preheat the cups by rinsing them with hot water.
NOTE 4: Coffee delivery can be interrupted at any moment by re-
pressing the previously selected button which remains lit during the operation.
NOTE 5: As soon as delivery is finished, to increase the quantity of coffee in the cup, just keep pressing the previously selected button within 3 seconds after delivery has finished.
NOTE 6: When the appliance displays "FILL TANK", fill the tank with water or the appliance will not deliver coffee.
(It is normal for there to be a little water left in the tank).
NOTE 7: After about 14 single (or 7 double) coffees, the appliance displays "EMPTY GROUNDS CONTAINER".
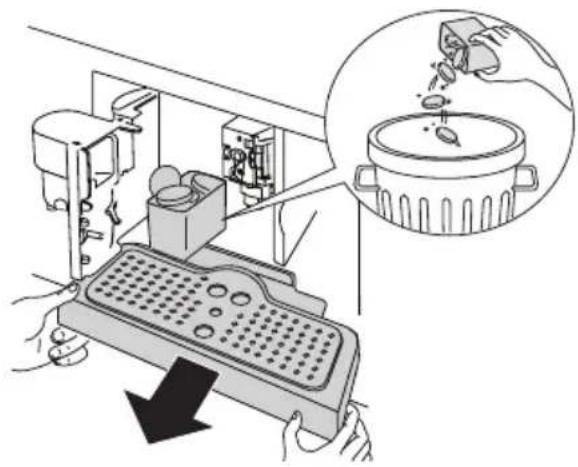
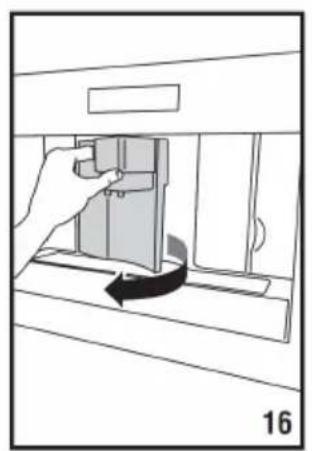
To clean, open the service door on the front of the appliance by pulling the spout (fig. 16), extract the drip tray (fig. 17) and clean.
natural_image
Illustration of a kitchen appliance with a downward arrow indicating a drop, and an inset showing food being added to a pot (no text or symbols present)When cleaning, always extract the drip tray completely.

Important! When extracting the drip tray, the groun-
ds container MUST always be emptied.
If this is not done, the machine may be clogged.
NOTE 8: Never extract the water tank while the machine is delivering coffee.
If it is removed, it will not be possible to make the coffee and the appliance will display some messages (see page 21).
CHANGING THE QUANTITY OF COFFEE IN THE CUP
The appliance is set by default to make a standard quantity of coffee.
To select the quantity of coffee, press the (B3) button repeatedly until the message corresponding to the required quantity of coffee is displayed:
| Corresponding coffee quantity (ml) | |
| ESPRESSO | ≈ 30 |
| COFFEE | ≈ 110 |
| LONG COFFEE | ≈ 150 |
Programming quantity
To modify the quantity of coffee delivered, proceed as follows:
-
Place a cup under the coffee spouts (fig. 9).
-
Keep the (B4) button pressed until the message "PROGRAM QUANTITY" is displayed and coffee delivery begins. Then release the button.
-
As soon as the coffee in the cup reaches the required level, press the same button again.
The quantity set has now been programmed.
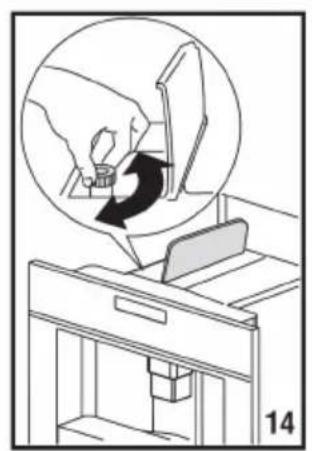
The coffee mill is preset in the factory and should not require adjusting.
However, if after making the first few coffees you find that delivery is either too fast or too slow (a drop at a time), this can be corrected by adjusting the grinding adjustment dial (fig. 14).

Important! The grinding adjustment dial must only be turned when the coffee mill is in operation.
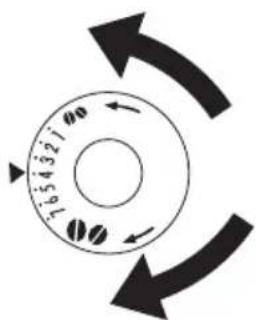
For slower delivery and creamier coffee, turn one click anti-clockwise (finer pre-ground coffee).
For faster delivery (not a drop at a time), turn one click clockwise (coarser pre-ground coffee).
MAKING ESPRESSO COFFEE WITH PRE-GROUND COFFEE (INSTEAD OF BEANS)
- Press the 📊 button (B2) (fig. 8) and select the pre-ground coffee function.
- Extract the machine by pulling it outwards using the handles (fig. 7).
- Lift the central lid, place one measure of pre-ground coffee in the funnel (fig. 19), push the appliance in then proceed as described in the section "Making coffee using coffee beans".
Please note: You can make just one coffee at a time by pressing the button (B4) (fig. 12).
- After using the machine with pre-ground coffee, back to making coffee using beans, disable the pre-ground coffee function by pressing the button (B2) (fig. 8)
again.
NOTE 1: Never introduce pre-ground coffee when the machine is off or it could spread through the inside of the appliance.
NOTE 2: Never add more than 1 measure, otherwise the appliance will not make the coffee.
NOTE 3: Use the measure provided only.
NOTE 4: Introduce only pre-ground coffee for espresso coffee machines into the funnel.
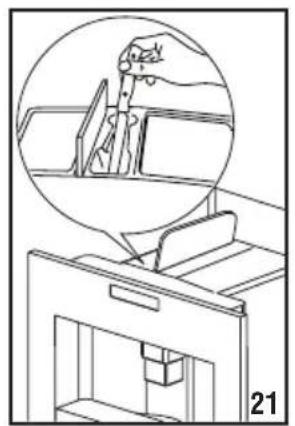
NOTE 5: If more than one measure of pre-ground coffee is used and the funnel clogs, push the coffee down with a knife (fig. 21) then remove and clean the infuser and machine as described in the "Cleaning the infuser" chapter.
DELIVERING HOT WATER
• Make sure the water spout is in place (fig. 6).
• Position a container under the spout.
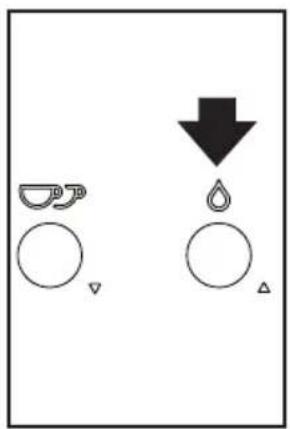
• Press the (B6) button (fig. 20).
The message "HOT WATER" is displayed and hot water flows out of the hot water spout into the container below.
You should not deliver hot water for more than 2 minutes at a time.
To interrupt the flow, press the button (B6).
The appliance stops delivery once the set quantity is reached.
CHANgINg THE QUANTITY OF HOT WATER
The appliance is set by default to automatically deliver 250 ml.
To modify these quantities, proceed as follows:
- Position a container under the spout.
- Press the 🔒 button (B6) again until "HOT WATER PROGRAM QUANTITY" is displayed, then release the button.
- When the hot water in the cup reaches the required level, press the button (B6) again.
The machine is now reprogrammed with the new quantity.
MAKING CAPPUCCINO
- Select the taste of the coffee you want to use to make the cappuccino by pressing the button (B2).
- Remove the lid of the milk container.
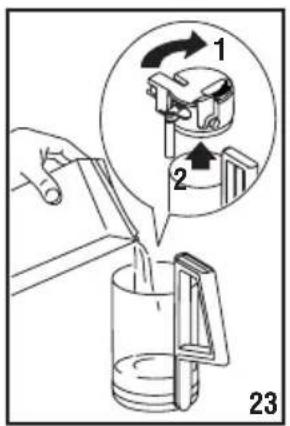
- Fill the container with about 100 grams of milk for each cappuccino to be prepared (fig. 23). Never exceed the MAX level (corresponding to about 750 ml) marked on the container.
You should ideally use skimmed or semi-skimmed milk at refrigerator temperature (about 5°C).
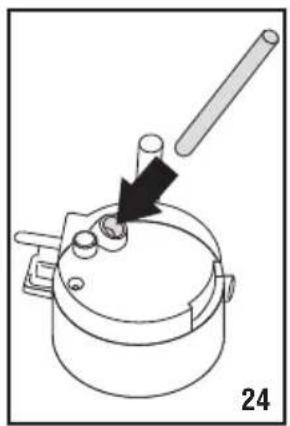
• Make sure the intake tube is correctly inserted in the rubber washer (fig. 24) then replace the milk container lid.
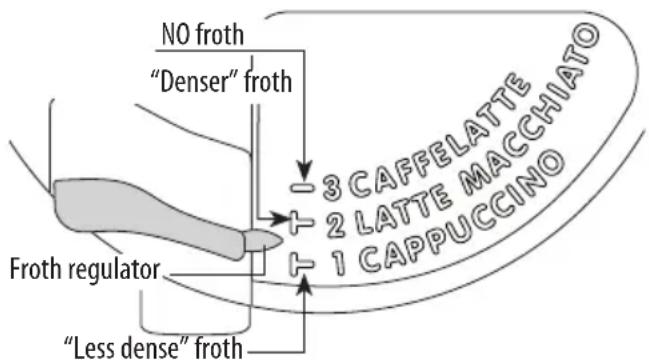
Position the froth regulator between the words cappuccino
and caffelatte printed on the milk container lid.
The quantity of froth can be adjusted by moving the regulator towards the word "caffelatte" for a denser froth.
Moving it towards the word "cappuccino" obtains a less dense froth.
- Remove the hot water spout (fig. 6) and attach the milk container to the nozzle (fig. 25).
- Position the milk tube as shown in fig. 26 and then place a sufficiently large cup under the coffee and milk spouts.
- Press the 📋 button (B8). "CAPPUCCINO" is displayed and after a few seconds, frothed milk flows out of the milk spout into the cup below. (Delivery stops automatically).
• The appliance delivers coffee. - The cappuccino is now ready. Sweeten to taste and, if desired, sprinkle the froth with a little cocoa powder.
NOTE 1: While making cappuccino, the flow of frothed milk or coffee can be interrupted by pressing the 📋 button (B8).
NOTE 2: If the milk in the container finishes while delivering frothed milk, remove the container and add milk.
Reattach and press the 📋 button (B8) to request a cappuccino again.
NOTE 3: To ensure the complete cleanliness and hygiene of the milk frother, always clean the circuits in the milk container lid after making cappuccino. "PRESS CLEAN" flashes on the display.
• Place a recipient under the milk spout (fig. 26).
- Press the CLEAN button on the lid (C3) and hold down for at least 5 seconds (fig. 26) to start the cleaning function.
The appliance displays the message "CLEANING UNDER-WAY" above a progress bar. You should not release the CLEAN button until the bar is complete indicating that cleaning is concluded. When the CLEAN button is released, the function stops. After cleaning, remove the milk container and place in the refrigerator. The milk should not be left out of the refrigerator for more than 15 minutes.
NOTE 4: To change the quantity of coffee or frothed milk the appliance delivers automatically into the cup, proceed as described in the section "Changing the quantity of milk and coffee for cappuccino".
CHANGING THE QUANTITY OF MILK AND COFFEE FOR CAPPUCCINO
The appliance is set by default to automatically deliver standard quantities.
To change these quantities, proceed as follows:
- Place a cup under the coffee spouts and milk spout.
- Hold the button (B8) until the message "MILK FOR CAPPUCCINO PROGRAM QUANTITY" is displayed.
- Release the button. The appliance starts delivering milk.
- Once the required quantity of milk has been delivered into the cup, press the button (B8) again.
- After a few seconds, the appliance starts delivering coffee into the cup and the message "COFFEE F. CAPPUCCINO PROGRAM QUANTITY" is displayed.
- Once the required quantity of coffee has been delivered into the cup, press the button (B8) again. Coffee delivery stops.
The machine is now reprogrammed with the new milk and coffee quantities.
MAKING LATTE MACCHIATO OR CAFFELATTE
• Prepare the appliance as described to make cappuccino.
- Before attaching the milk container to the nozzle, position the froth regulator between the words CAPPUCCINO and CAFFELATTE printed on the milk container lid.
If the froth is not satisfactory, move the regulator slightly until you obtain the required froth.
- Press the 📜 button (B9) to request a latte macchiato.
or
- Press the 📌 button (B10) to request a caffelatte and after a few seconds, frothed milk flows out of the milk spout into the cup below. (Delivery stops automatically). Milk delivery stops and the appliance starts delivering coffee.
CHANGING THE QUANTITY OF COFFEE AND MILK FOR LATTE MACCHIATO/CAFFELATTE
The appliance is set by default to deliver standard quantities of coffee or milk.
To change these quantities, proceed as follows:
- Fill the container with milk up to the maximum level indicated on the container.
- Press the button corresponding to the p want to modify, latte macchiato (B9) or caffelatte (B10) for at least 8 seconds until the appliance displays "MILK FOR MACCHIATO PROGRAM QUANTITY" or "MILK FOR CAFFELATTE PROGRAM QUANTITY"
Then release the button.
The appliance starts delivering milk.
• Once the required quantity of milk has been delivered, press
the button selected previously. Milk delivery stops and the quantity is memorised.
- After a few seconds, the appliance delivers coffee into the cup and displays "COFFEE FOR MACCHIATO PROGRAM QUANTITY" or "COFFEE FOR CAFFELATTE PROGRAM QUANTITY".
- Once the required quantity of coffee has been delivered, press the button selected previously. Coffee delivery stops and the quantity is memorised.
The appliance is now reprogrammed with the new settings and the message "COFFEE STANDARD" is displayed.
CLEANING
Cleaning the machine
Do not use solvents or abrasive detergents to clean the coffee machine. A soft damp cloth will suffice.
NEVER wash any of the components of the coffee machine in the dishwasher.
The following parts of the machine must be cleaned regularly:
• coffee grounds container (A4),
- drip tray (A14),
• water tank (A12),
• coffee spouts (A13),
• pre-ground coffee funnel (A21),
- inside of the machine, accessible after opening the service door (A2),
• infuser (A5).
Cleaning the coffee grounds container
When "EMPTY GROUNDS CONTAINER" is displayed, the grounds container must be emptied and cleaned.
To clean:
- open the service door on the front of the appliance (fig. 16), extract the drip tray (fig. 17) and clean.
• Clean the grounds container thoroughly.

Important! When extracting the drip tray, the groun-
ds container must always be emptied.
Cleaning the drip tray

Important! If the drip tray is not emptied the water
prepar might overflow.
This could damage the machine.
The drip tray is fitted with a level indicator (red) showing the level of water it contains (fig. 28).
Before the indicator protrudes from the cup tray, the drip tray must be emptied and cleaned.
To remove the tray:
-
Open the service door (fig. 16).
-
Remove the drip tray and the grounds container (fig. 17).
- Empty the drip tray and grounds container (A4) and wash them.
- Replace the drip tray complete with grounds container (A4).
- Close the service door.
Cleaning the water tank
- Clean the water tank (A12) regularly (about once a month) with a damp cloth and a little mild washing up liquid.
- Remove all traces of washing up liquid.
Cleaning the spouts
- Clean the nozzles periodically using a sponge (fig. 29).
- Check regularly that the holes in the coffee spout are not blocked. If necessary, remove coffee deposits with a too-thpick (fig. 27).
Cleaning the pre-ground coffee funnel
Check regularly (about once a month) that the pre-ground coffee funnel is not blocked (fig. 21).

Danger! Before performing any cleaning operations, the machine must be turned off by pressing the main switch (A23) and unplugged from the mains power supply. Never immerse the coffee machine in water.
Cleaning the inside of the coffee machine
- Check regularly (about once a week) that the inside of the appliance is not dirty.
If necessary, remove coffee deposits with a sponge. - Remove the residues with a vacuum cleaner (fig. 30).
Cleaning the infuser
The infuser must be cleaned at least once a month.

Important! The infuser (A5) must not be removed when the appliance is on. Do not use force to remove the infuser.
- Make sure the machine is correctly turned off (see "Turning off").
- Open the service door (fig. 16).
- Remove the drip tray and grounds container (fig. 17).
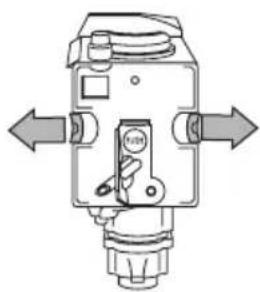
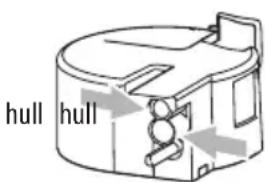
- Press the two red release buttons inwards and at the same time pull the infuser outwards (fig. 31).

Important! Do not use washing up liquid to clean the infuser. It would remove the lubricant applied to the inside of
the piston.
- Soak the infuser in water for about 5 minutes, then rinse.
- After cleaning, replace the infuser (A5) by sliding it onto the internal support and pin at the bottom, then push the PUSH symbol fully in until it clicks into place.

natural_image
Technical line drawing of a mechanical assembly with a directional arrow indicating motion (no text or symbols present)
Please note: If you encounter difficulty inserting the infuser, before inserting it you must adapt it to the right dimension by pressing it forcefully from the bottom and top as shown in the figure.
natural_image
Illustration of two hands holding a device with arrows indicating direction (no text or symbols)- Once inserted, make sure the two red buttons have snapped out.
natural_image
Technical line drawing of a mechanical device with directional arrows indicating movement or force (no text or symbols)-
Replace the drip tray and grounds container.
-
Close the service door.
Cleaning the milk container

Important! Always clean the tubes inside the milk container (C) when you prepare milk.
If there is still milk in the container, do not leave it out of the
refrigerator for longer than strictly necessary.
Clean the container each time you prepare milk as described in Note 3 in the section "Making cappuccino".
All components are dishwasher safe, placing them in the top basket of the dishwasher.
- Turn the lid of the milk container clockwise then remove it.
- Remove the milk spout and intake tube.

-
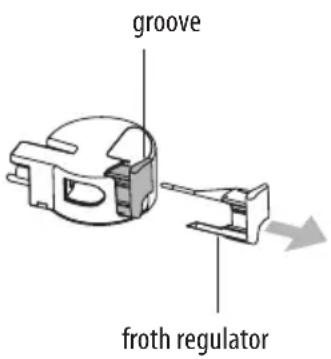
Remove the froth regulator by pulling it outwards.
-
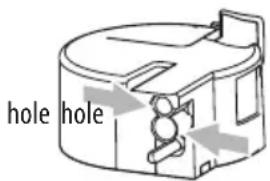
Wash all the components thoroughly with hot water and mild washing-up liquid. Make sure there are no milk residues left inside the holes and the groove on the fine end of the froth regulator.
-
Check that the intake tube and spout are not clogged with milk residues.
-
Replace the froth regulator, milk spout and intake tube.
-
Replace the milk container lid.
MENU SETTINGS
When you access the settings menu by pressing the P / ESC button (B7), the following menu items are available: Rinsing, Set language, Energy Saving, Adjust time, Auto-start, Auto-off, Set temperature, Water hardness, Statistics, Default values, Descale.
Rinsing
This function enables you to obtain hotter coffee.
Proceed as follows:
- When you turn the appliance on, if you want to make a small cup of coffee (less than 60 cc), preheat the cup by rinsing it with hot water.
- If on the other hand more than 2/3 minutes have passed since the last coffee was made, before requesting another coffee, you must preheat the infuser by first pressing the P / ESC button (B7) to enter the menu then the ▽ and △ buttons (B5 and B6) to select the "RINSING" function.
Press the OK button (B4). "RINSING PRESS OK" is displayed. Press the OK button (B4) again.
Deliver the water into the underlying drip tray or alternatively use this water to fill (and then empty) the cup to be used for the coffee to preheat it.
Setting the language
To modify the language of the display, proceed as follows:
- Press the P / ESC button (B7) to enter the settings menu.
- Press the ▽ and △ buttons (B5 and B6) until "SET LANGUAGE" is displayed;
- Press the OK button (B4);
- Press the ▽ and △ buttons (B5 and B6) until the required language is displayed;
- Press the OK button (B4) to confirm;
- Press the P/ESC button (B7) to exit the menu.
Alternatively, hold the P / ESC button (B7) down for 10 seconds. The languages scroll through.
Hold the OK button (B4) down for 5 seconds to confirm. The appliance goes off.
Energy Saving
Use this function to enable or disable Energy Saving.
When enabled, the function reduces energy consumption in compliance with European regulations.
To enable or disable the function, proceed as follows:
- Press the P / ESC button (B7) to enter the settings menu.
- Press the ▽ and △ buttons (B5 and B6) until "ENERGY SAVING" is displayed;
- Press the OK button (B4). "DISABLE?" is displayed (or "ENABLE?" if the function has already been disabled).
- Press the OK button (B4) to enable or disable the function or the P / ESC button (B7) to exit the menu.

Please note: A few seconds may elapse between
"ENERGY SAVING ENABLED" mode and delivery of the first drink; "PREPARATION UNDERWAY" is displayed.
Adjust time
To adjust the time on the display, proceed as follows:
- Press the P / ESC button (B7) to enter the settings menu.
- Press the ▽ and △ buttons (B5 and B6) until "ADJUST TIME" is displayed;
- Press the OK button (B4). The hours flash on the display;
- Press the ▽ and △ buttons (B5 and B6) to change the hours;
- Press the OK button (B4) to confirm. The minutes flash on the display;
- Press the ▽ and △ buttons (B5 and B6) to change the minutes;
- Press the OK button (B4) to confirm;
- Press the P / ESC button (B7) to exit the settings menu.
Auto-start
You can set the auto-start time in order to have the appliance ready at a certain time (for example in the morning) so you can make coffee immediately.

Please note:
To enable this function, the time must be set correctly.
To enable Auto-on, proceed as follows:
- Press the P / ESC button (B7) to enter the settings menu.
- Press the ▽ and △ buttons (B5 and B6) until "AUTO-START" is displayed;
- Press the OK button (B4). "ENABLE?" is displayed;
- Press the OK button (B4). The hours flash on the display;
- Press the ▽ and △ buttons (B5 and B6) to choose the hours;
- Press the OK button (B4) to confirm. The minutes flash on the display;
- Press the ▽ and △ buttons (B5 and B6) to change the minutes;
- Press the OK button (B4) to confirm. "ENABLED" appears under "AUTO-START".
- Press the P/ ESC button (B7) to exit the menu.
To disable the function: - Press the P / ESC button (B7) to enter the settings menu.
- Press the ▽ and △ buttons (B5 and B6) until "AUTO-START" is displayed;
- Press the OK button (B4). "DISABLE?" is displayed;
- Press the OK button (B4) to confirm;
- Press the P/ ESC button (B7) to exit the menu. "DISABLED" is displayed.
Auto-off (Standby)
The appliance is set by default to go off if not used for two hours.
The time can be changed so that the appliance switches off after 15 or 30 minutes, or after 1, 2 or 3 hours.
To re-programme Auto-off, proceed as follows:
- Press the P / ESC button (B7) to enter the settings menu.
- Press the ▽ and △ buttons (B5 and B6) until "AUTO-OFF" is displayed;
- Press the OK button (B4);
- Press the ▽ and △ buttons (B5 and B6) until the required time (15 or 30 minutes, or 1, 2 or 3 hours) is displayed;
- Press the OK button (B4) to confirm;
- Press the P/ESC button (B7) to exit the menu.
Auto-off is programmed.
Setting the temperature
To modify the temperature of the water used to make the coffee, proceed as follows:
- Press the P / ESC button (B7) to enter the settings menu.
- Press the ▽ and △ buttons (B5 and B6) until "SET TEMPERATURE" is displayed;
- Press the OK button (B4);
- Press the ▽ and △ buttons (B5 and B6) until the required temperature is displayed (● = low, ●●●●● = high);
- Press the OK button (B4) to confirm;
- Press the P/ESC button (B7) to exit the menu.
Setting water hardness
The operating period can be extended if required, making descaling less frequent by programming the machine on the basis of the real lime content in the water used.
Proceed as follows:
- Remove the "Total Hardness Test" strip (attached to page 2) from its packaging then dip it fully in the water for a few seconds.
Remove and wait about 30 seconds (until it changes colour and forms red squares).
- Turn the appliance on by pressing the ON/OFF/standby button (A7).
- Press the P / ESC button (B7) to enter the menu and then the ▽ and △ buttons (B5 and B6) until "WATER HARDNESS" is displayed.
- Press the OK button (B4);
- Press the ▽ and △ buttons (B5 and B6) until the number coincides with the number of red squares on the test strip (for example, if there are 3 red squares on the test strip, select the message "WATER HARDNESS ●●●".
• Press the OK button (B4) to confirm.
The coffee machine is now programmed to provide the de-scale warning when actually necessary.
Statistics function
This displays statistics relating to the machine.
To display, proceed as follows:
- Press the P / ESC button (B7) to enter the settings menu.
- Press the ▽ and △ buttons (B5 and B6) until "STATISTICS" is displayed;
- Press the OK button (B4);
- By pressing the ▽ and △ buttons (B5 and B6), you can check:
- how many coffees have been made;
- how many milk drinks have been made;
- the total number of litres of water delivered.
- how many times the machine has been descaled.
- Press the P/ ESC button (B7) twice to exit the menu.
Default values (reset)
This resets all menu settings and programmed quantities back to the default values (with the exception of the language which remains as set).
To reset the default values, proceed as follows:
- Press the P /ESC button (B7) to enter the menu;
- Press the ▽ and △ buttons (B5 and B6) until "DEFAULT VALUES" is displayed;
- Press the OK button (B4);
- "CONFIRM?" is displayed;
- Press the OK button (B4) to confirm and exit.
Descaling
Descale the machine when the message "DESCALE" flashes on the display.

Important!
Descaler contains acids which may irritate the skin and eyes. It is vital to respect the manufacturer's safety warnings given on the descaler pack and the warnings relating to the procedure to follow in the event of contact with the skin and eyes.

Please note:
Use lactic acid bacteria based descaler, for example De'Longhi SKU: 5513214981.
Under no circumstances should you use sulphamic or acetic based descalers. Their use invalidates the guarantee.
Failure to descale the appliance as described above also invalidates the guarantee.
- Turn the machine on.
- Enter the settings menu by pressing the P / ESC button (B7). Press the ▽ and △ buttons (B5 and B6) until "DESCALE" is displayed;
- Press the OK button (B4) and "CONFIRM?" is displayed,
- Before confirming, empty the water tank completely (A12).
Pour the descaler diluted with water (respecting the proportions indicated on the descaler pack) into the water tank and put the water tank back in the appliance.

Danger of burns!
Hot water containing acid flows out of the hot water spout.
Avoid contact with splashes of water.
- Place an empty container with a minimum capacity of 1.5 litres under the hot water spout.
- Confirm with the OK button (B4).
- After confirming by pressing OK, the message "DESCALING UNDERWAY" is displayed.
The descale programme starts and the descaler liquid comes out of the water spout.
The descale programme automatically performs a series of rinses and pauses to remove limescale deposits from inside the machine.
After about 30 minutes, the message "RINSING FILL TANK" is displayed.
-
The appliance is now ready for rinsing through with clean water. Remove the water tank, empty, rinse under running water, fill with clean water and replace. " RINSING PRESS OK" is displayed.
-
Empty the container used to collect the descaler solution and replace it under the hot water spout.
-
Press the OK button (B4) to start rinsing.
Hot water flows out of the spout and the message "RINSING PLEASE WAIT" is displayed.
-
When the water tank is completely empty, the message "RINSING COMPLETE PRESS OK" is displayed.
-
Press the OK button (B4). The appliance goes off automatically.
TURNING THE APPLIANCE OFF
Each time the appliance is turned off, it performs an automatic rinse cycle which cannot be interrupted.

Danger of burns! During rinsing, a little hot water
flows from the coffee spouts.
Avoid contact with splashes of water.
To turn the appliance off, press the ON/OFF/standby button (A7).
The appliance performs a rinse cycle then goes off.

Please note: If the appliance is not used for an exten-
ded period, place the main switch on the back of the appliance (A23) in the 0 position.
TECHNICAL DATA
Voltage: 220-240 V\~50/60 Hz max. 10A
Absorbed power: 1350W
Pressure: 15 bars
Water tank capacity: 1.8 litres
Size: LxHxD: 594x 375/378/454x412 mm
Weight: 26 kg

The appliance complies with the following EC direc-
tives:
- Low Voltage Directive 2006/95/EC and subsequent amendments;
• EMC Directive 2004/108/EC and subsequent amendments;
Materials and accessories coming into contact with food conform to European regulation (EC) no. 1935/2004.
EN
| DISPLAYED MESSAgE POSSIBLE CAUSE SOLUTION | ||
| FILL TANK The water tank is empty or positioned incorrectly. | Fill the tank with water and/or insert it correctly, pushing it as far as it will go. | |
| GROUND TOO FINE ADJUST MILL (alternating with) PRESS OK | The grinding is too fine and the coffee is delivered too slowly. | Turn the grinding adjustment dial one click clockwise towards “7”. |
| GROUND TOO FINE ADJUST MILL (alternating with) PRESS OK (then) FILL TANK | The tank has been removed during delivery.There is air in the hydraulic circuit. | Insert the tank and press the OK button (B4).“HOT WATER PRESS OK” is displayed.Press the OK button (B9) again.The appliance is once again ready for use. |
| EMPTY GROUNDS CONTAINER | The grounds container (A4) is too full or more than three days have passed since you last made coffee (this guarantees correct hygiene of the machine). | Empty the grounds container and clean, then replace.Important: when removing the drip tray, the grounds container MUST be emptied, even if it contains few grounds.If this is not done, when you make the next coffees, the grounds container may fill up more than expected and clog the machine. |
| INSERT GROUNDS CONTAINER | Aftercleaning, the grounds container has not been replaced. | Open the service door and insert the grounds container. |
| ADD PRE-GROUND COFFEE | The “pre-ground coffee” function has been selected without placing any pre-ground coffee in the funnel.The funnel (A21) is blocked. | Extract the appliance and place pre-ground coffee in the funnel.Empty the funnel with the help of a knife as described in the section “Cleaning the pre-ground coffee funnel”. |
| DESCALE(alternating with) COFFEE STANDARD | The machine must be descaled. | The descaling procedure described in the “Descaling” section needs to be performed as soon as possible. |
| LESS COFFEE | Too much coffee has been used. | Select a milder taste or reduce the quantity of pre-ground coffee, then make the coffee again. |
| FILL BEANS CONTAINER | The coffee beans have run out. | Fill the beans container |
| INSERT INFUSER ASSEMBLY | The infuser has not been replaced after cleaning. | Insert the infuser as described in the section “Cleaning the infuser”. |
| CLOSE DOOR | The service door is open | Close the service door. |
| GENERAL ALARM | The inside of the appliance is very dirty. | Clean the inside of the appliance thoroughly, as described in the section “Cleaning and maintenance”.If the message is still displayed after cleaning, contact a service centre. |
| EMPTY CIRCUIT FILL CIRCUIT alternating with HOT WATER PRESS OK | The water circuit is empty | Connect the hot water nozzle (A10) and press OK to deliver water from it, until it flows out normally. |
| PROBLEM POSSIBLE CAUSE SOLUTION | ||
| The coffee is not hot The cups were not preheated.The infuser has cooled down because 2/3 minutes have elapsed since the last coffee was made.The set temperature is too low. | Warm the cups by rinsing them with hot water.Before making coffee, preheat the infuser by selecting the RINSING function in the menu.Change the set temperature (see section “Changing coffee temperature”). | |
| The coffee is not creamy enough. | The coffee is ground too coarsely.Wrong type of coffee | Turn the grinding adjustment dial one click anticlockwise towards “1” while the coffee mill is in operation (fig. 14).Use a type of coffee for espresso coffee machines. |
| The coffee is delivered too slowly or a drop at a time. | The coffee is ground too finely. Turn the grinding adjustment dial one click clockwise towards “7” while the coffee mill is in operation (fig. 14).Continue one click at a time until coffee delivery is satisfactory.The effect is only visible after delivering 2 coffees. | |
| The coffee is delivered too quickly. | The coffee is ground too coarsely. Turn the grinding adjustment dial one click anticlockwise towards “1” while the coffee mill is in operation (fig. 14).Avoid turning the grinding adjustment dial excessively otherwise when you select two cups, the coffee may be delivered a drop at a time.The effect is only visible after delivering 2 coffees. | |
| Coffee does not come out of one of the spouts | The spouts are blocked. Clean the spouts with a toothpick (fig. 27). | |
| The coffee does not come out of the spouts, but from around the service door (A2). | The holes in the spouts are clogged with dry coffee dust.The coffee guide (A3) inside the service door is blocked. | If necessary, remove coffee deposits with a toothpick, sponge or stiff bristled kitchen brush (fig. 27-29).Thoroughly clean the coffee guide (A3), particularly near the hinges. |
| Water comes out of the spouts instead of coffee. | The pre-ground coffee may be blocked in the funnel (A21). | Clean the funnel (A21) with a wooden or plastic fork, clean the inside of the machine. |
| The milk does not come out of the milk spout (C5). | The intake tube is not inserted or is inserted incorrectly. | Insert the intake tube (C4) in the rubber washer in the milk container lid (fig. 24). |
| The milk is not well frothed. | The milk container lid is dirty.The froth regulator is not positioned correctly. | Clean the milk container lid as described in the section “Cleaning the milk container”.Adjust following the instructions in the section “Making cappuccino”. |
| The milk contains bubbles or squirts out of the milk spout. | The milk is not cold enough or is not semi-skimmed.The froth regulator is incorrectly adjusted.The milk container lid is dirty. | You should ideally use skimmed or semi-skimmed milk at refrigerator temperature (about 5°C).If the result is not as you wished, try changing brand of milk.Move the froth regulator slightly towards the word "CAFFELATTE" (see section "Making cappuccino").Clean the milk container lid as described in the section "Cleaning the milk container". |
EN
Inhalt
EINFÜHRUNG....7
natural_image
Illustration of a kitchen appliance with hands operating it, showing a downward arrow and a magnified view of food being added (no text or symbols present)natural_image
Technical line drawing of a mechanical assembly with a directional arrow indicating motion (no text or symbols present)
natural_image
Illustration of two hands holding a mechanical device with arrows indicating direction (no text or symbols)natural_image
Technical line drawing of a mechanical device with directional arrows indicating movement or force (no text or symbols)natural_image
Illustration of a kitchen appliance with hands operating it, showing a downward arrow and a magnified view of food being added (no text or symbols present)natural_image
Technical line drawing of a mechanical assembly with a directional arrow indicating motion (no text or symbols present)
natural_image
Illustration of two hands holding a mechanical device with arrows indicating direction (no text or symbols)natural_image
Technical line drawing of a mechanical device with directional arrows indicating movement or force (no text or symbols)MENU PARAMÈTRES
natural_image
Illustration of a kitchen appliance with hands operating it, showing a pan and a pot (no text or symbols)natural_image
Technical line drawing of a mechanical assembly with no visible text or symbolsnatural_image
Illustration of two hands holding a mechanical device with arrows indicating direction (no text or symbols)natural_image
Technical diagram of a mechanical device with directional arrows indicating movement or force (no text or symbols present)INBOUW-INSTALLATIE 9
HET APPARAAT VOOR DE EERSTE MAAL GEBRUIKEN ...... 12
INSCHAKELEN EN OPWARMEN.... 12
KOFFIE MAKEN MET KOFFIEBONEN 12
HET APPARAAT UITSCHAKELEN....20
natural_image
Illustration of a kitchen appliance with hands operating it, showing a downward arrow and a magnified view of food being added (no text or symbols present)natural_image
Technical line drawing of a mechanical assembly with no visible text or symbols
natural_image
Illustration of two hands holding a mechanical device with arrows indicating direction (no text or symbols)natural_image
Technical line drawing of a mechanical device with directional arrows indicating movement or force (no text or symbols)heT appaRaaT ulTsChakelen
natural_image
Illustration of a kitchen appliance with a pot and lid, showing a hand pressing down with a downward arrow (no text or symbols)natural_image
Technical line drawing of a mechanical assembly with a directional arrow indicating motion (no text or symbols present)
natural_image
Illustration of two hands holding a mechanical device with arrows indicating direction (no text or symbols)natural_image
Technical line drawing of a mechanical device with directional arrows indicating movement or force (no text or symbols)Fare for forbrenning!
Hvis ikke advarselen tas hensyn til, er det fare for skålding eller forbrenninger.

Fest strømkabelen med klipset.
natural_image
Illustration of a kitchen appliance with hands operating it, showing a pan and a pot (no text or symbols present)Dra alltid ut dryppskålen helt när du rengjør.

natural_image
Technical line drawing of a mechanical assembly with a directional arrow indicating motion (no text or symbols present)
natural_image
Illustration of two hands holding a mechanical device with arrows indicating direction (no text or symbols)natural_image
Technical line drawing of a mechanical device with directional arrows indicating movement or force (no text or symbols)- Sett på plass dryppskålen og grutbeholderen.
- Lukk serviceluken.
MENYINNSTILLINGER
Fare for forbrenning!
(I STÄLLET FÖR BÖNOR)....13
TILLHANDAHÄLLANDE AV VARMVATTEN ....14
ÄNDRING AV MÄNGDEN VARMVATTEN 14
TILLAGNING AV CAPPUCCINO ....14
ÄNDRING AV MÄNGDEN MJÖLK OCH KAFFE
FÖR CAPPUCCINO 15
TILLAGNING AV LATTE MACCHIATO ELLER CAFFELATTE .....15
ÄNDRING AV MÄNGDEN KAFFE OCH MJÖLK
FÖR LATTE MACCHIATO/CAFFELATTE 15
RENGÖRING 15
natural_image
Illustration of a kitchen appliance with hands operating it, showing a downward arrow and a magnified view of food being added (no text or symbols present)I samband med rengöring ska du alltid dra ut droppbrickan helt.

natural_image
Technical line drawing of a mechanical assembly with a directional arrow indicating motion (no text or symbols present)
natural_image
Illustration of two hands holding a mechanical device with arrows indicating direction (no text or symbols)natural_image
Technical line drawing of a mechanical device with directional arrows indicating movement or force (no text or symbols)用电缆夹固定电源线。
natural_image
Illustration of a kitchen appliance with hands operating it, showing a downward arrow and a magnified view of food being added (no text or symbols present)清洗时,必须总是将滴水盘完全取下。

重要!取下滴水盘时,咖啡渣盒必
须总是已清空的状态。
否则可能会堵塞机器。
natural_image
Technical line drawing of a mechanical assembly with a directional arrow indicating motion (no text or symbols present)
natural_image
Illustration of two hands holding a mechanical device with arrows indicating direction (no text or symbols)- 插入之后,确认两个红色按钮已卡住。
natural_image
Technical line drawing of a mechanical device with directional arrows indicating movement or force (no text or symbols)!in for BRIMAG don't be
הכלה
J75A.353-0
| הכלה | הכלההכלה | הכלההכלה |
| (27)-(1) | (27)-(1) | (27)-(1) |
| (27)-(1) | (27)-(1) | (27)-(1) |
| (27)-(1) | (27)-(1) | (27)-(1) |
| (27)-(1) | (27)-(1) | (27)-(1) |
| (27)-(1) | (27)-(1) | (27)-(1) |
| (27)-(29)-(1) | (27)-(1) | (27)-(1) |
| (27)-(29)-(1) | (27)-(1) | (27)-(1) |
| (27)-(29)-(1) | (27)-(1) | (27)-(1) |
| (27)-(29)-(1) | (27)-(1) | (27)-(1) |
| (30)-(1) | (30)-(1) | (30)-(1) |
| (30)-(1) | (30)-(1) | (30)-(1) |
| (30)-(1) | (30)-(1) | (30)-(1) |
| (30)-(1) | (30)-(1) | (30)-(1) |
| (30)-(1) | (30)-(1) | (30)-(1) |
| (40)-(1) | (40)-(1) | (40)-(1) |
| (40)-(1) | (40)-(1) | (40)-(1) |
| (40)-(1) | (40)-(1) | (40)-(1) |
| (40)-(1) | (40)-(1) | (40)-(1) |
| (40)-(1) | (40)-(1) | (40)-(1) |
| - (5°C)-(1) | - (5°C)-(1) | - (5°C)-(1) |
| - (5°C)-(1) | - (5°C)-(1) | - (5°C)-(1) |
| - (5°C)-(1) | - (5°C)-(1) | - (5°C)-(1) |
| - (5°C)-(1) | - (5°C)-(1) | - (5°C)-(1) |
| - (5°C)-(1) | - (5°C)-(1) |
.הכלההוּרָהוּרָהוּרָהוּרָהוּרָהוּרָהוּרָהוּרָהוּרָהוּרָהוּרָהוּרָהוּרָהוּרָהוּרָה
natural_image
Mechanical component diagram showing a lever mechanism with no visible text or symbolsnatural_image
Diagram of a cylindrical device with internal components and directional arrows, no readable text or symbols present.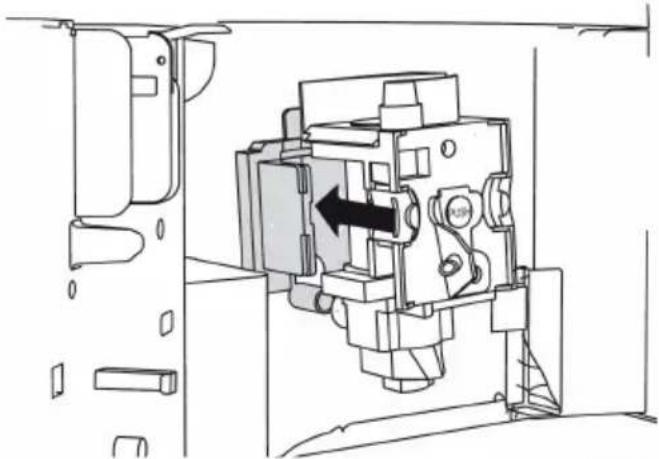
natural_image
Technical line drawing of a mechanical assembly with an arrow indicating direction (no text or symbols present)!הכלה ⓘ
natural_image
Illustration of two hands holding a mechanical device with arrows indicating direction (no text or symbols)natural_image
Technical line drawing of a mechanical device with directional arrows indicating movement (no text or symbols)natural_image
Illustration of hands operating a kitchen appliance with a magnified inset showing food being added (no text or symbols)natural_image
Pure electrical circuit lines without any symbols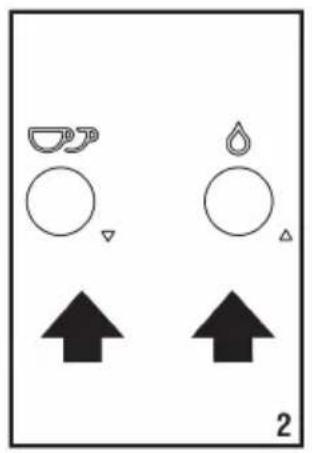
natural_image
Two identical icons: one with a cup and droplet, the other with a circle and water droplet, each pointing upward (no text or symbols)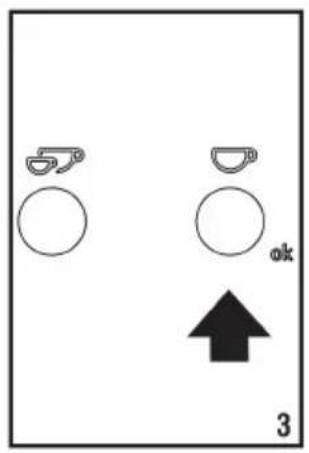
natural_image
Line drawing of a coffee maker with a mug inside a container (no text or symbols)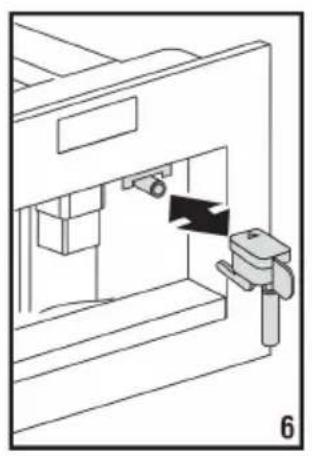
natural_image
Technical line drawing of a mechanical device with a handle and internal components (no text or symbols)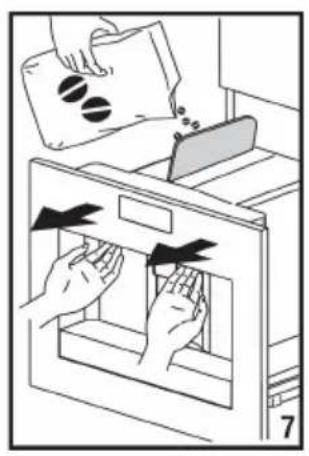
natural_image
Illustration of hands removing a file into an oven (no text or symbols present)
natural_image
Simple diagram showing a downward arrow, a ring, and a chain link on circles (no text or symbols)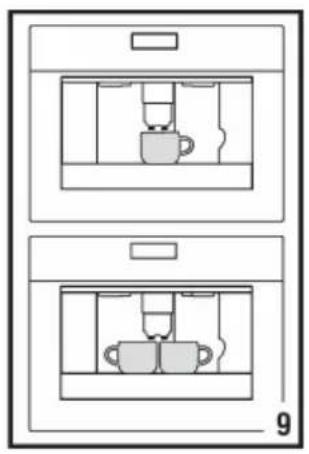
natural_image
Diagram of two identical storage cabinets with one containing a coffee cup and the other showing two cups (no text or symbols)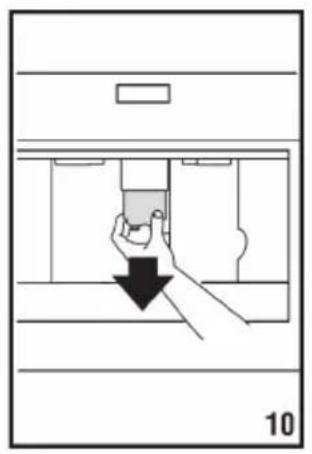
natural_image
Diagram showing a hand inserting a device into a container with a black arrow indicating direction (no text or symbols)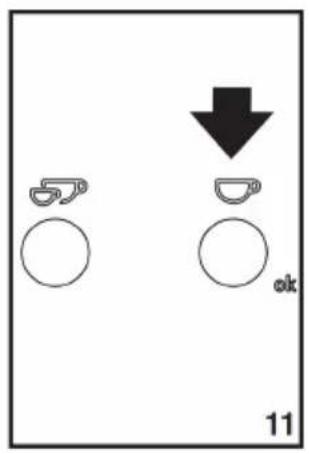
natural_image
Illustration of a hand using a tool to press or install a component, with no visible text or symbols.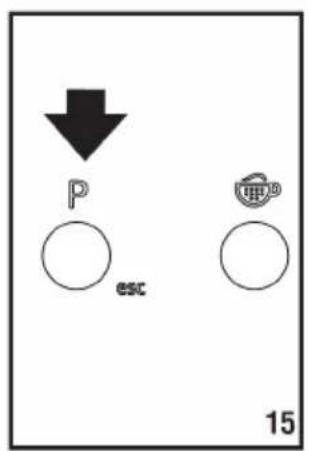
natural_image
Diagram of a hand inserting a device into a cabinet, with an arrow indicating rotation (no text or symbols present)תְבָרִי אַלְאָה
) n '6 - B(
תְבָרִי הַלְה
)ny '6
natural_image
Pure technical line drawing of a mechanical or electrical component layout without any text, numbers, or symbols
- CONTENTS
- INTRODUCTION
- Symbols used in these instructions
- Danger!
- Important!
- Danger of burns!
- e note:
- Letters in brackets
- Troubleshooting and repairs
- SAFETY
- Fundamental safety warnings
- Important! This is an household appliance only.
- Danger! This is an electrical appliance, it is therefore
- Important! Keep all packaging (plastic bags, polysty-n) away from children.
- Danger of burns! This appliance produces hot water m may form while it is in operation.
- Important! Do not hold on to the coffee machine out of the cabinet.
- Important! Do not use the appliance when extracted.
- note: Use original or manufacturer recommen-
- Designated use
- Instructions
- DESCRIPTION
- Description of the appliance
- Description of the control panel
- Description of milk container and accessories
- PRELIMINARY CHECKS
- Checking the appliance
- Installing the appliance
- Connecting the appliance
- DISPOSAL
- BUILT-IN INSTALLATION
- H 454 MM
- USINg THE APPLIANCE FOR THE FIRST TIME
- TURNING ON AND HEATING UP
- MAKING COFFEE USING COFFEE BEANS
- CHANGING THE QUANTITY OF COFFEE IN THE CUP
- Programming quantity
- MAKING ESPRESSO COFFEE WITH PRE-GROUND COFFEE (INSTEAD OF BEANS)
- DELIVERING HOT WATER
- CHANgINg THE QUANTITY OF HOT WATER
- MAKING CAPPUCCINO
- CHANGING THE QUANTITY OF MILK AND COFFEE FOR CAPPUCCINO
- MAKING LATTE MACCHIATO OR CAFFELATTE
- CHANGING THE QUANTITY OF COFFEE AND MILK FOR LATTE MACCHIATO/CAFFELATTE
- CLEANING
- Cleaning the machine
- Cleaning the coffee grounds container
- Cleaning the drip tray
- Cleaning the water tank
- Cleaning the spouts
- Cleaning the pre-ground coffee funnel
- Cleaning the inside of the coffee machine
- Cleaning the infuser
- Cleaning the milk container
- MENU SETTINGS
- Rinsing
- Setting the language
- Energy Saving
- Adjust time
- Auto-start
- Please note:
- Auto-off (Standby)
- Setting the temperature
- Setting water hardness
- Statistics function
- Default values (reset)
- Descaling
- TURNING THE APPLIANCE OFF
- Danger of burns! During rinsing, a little hot water
- TECHNICAL DATA
- Inhalt
- MENU PARAMÈTRES
- heT appaRaaT ulTsChakelen
- Fare for forbrenning!
- MENYINNSTILLINGER
- !הכלה ⓘ
- תְבָרִי אַלְאָה
- תְבָרִי הַלְה
Brand : V-ZUG
Model : CCSSL60
Category : Coffee machine