
MCXC15 - Audio System YAMAHA - Free user manual and instructions
Find the device manual for free MCXC15 YAMAHA in PDF.
| Product Type | Audio control unit (client) for MusicCAST system |
| Power supply | AC adapter LSE0215C1240 (supplied) |
| Display | LCD 128 x 32 dots |
| Remote control | Wireless infrared |
| Supported audio formats | MP3 (MPEG-1 Audio Layer 3), PCM |
| Simultaneous playback capacity | Up to 7 clients (max 5 wireless) |
| Playback functions | Repeat, shuffle, bookmarking, FAVORITES keys |
| Programming | ON/OFF timers |
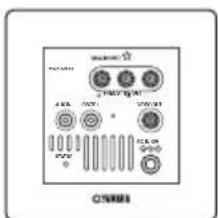
| External connection | YAMAHA AV audio-video link for integrated control |
| Usage | For domestic use only |
| Installation | By a qualified technician, at least 10 cm clearance around |
| Maintenance and cleaning | Dry, clean cloth, do not use chemical solvents |
| Safety | Disconnect during thunderstorms, do not open the unit, do not expose to rain or moisture |
| Spare parts and repairability | Refer all repairs to YAMAHA qualified service, do not attempt to modify the unit |
| General information | System requires the MCX-1000 server and optionally the MCX-CA15 amplifier |
Frequently Asked Questions - MCXC15 YAMAHA
User questions about MCXC15 YAMAHA
0 question about this device. Answer the ones you know or ask your own.
Ask a new question about this device
Download the instructions for your Audio System in PDF format for free! Find your manual MCXC15 - YAMAHA and take your electronic device back in hand. On this page are published all the documents necessary for the use of your device. MCXC15 by YAMAHA.
USER MANUAL MCXC15 YAMAHA
Distributed Audio Controller
1 To assure the finest performance, please read this manual carefully. Keep it in a safe place for future reference.
2 Install these units in a well ventilated, cool, dry, clean place — away from direct sunlight, heat sources, vibration, dust, moisture, and/or cold. Allow ventilation space of at least 10cm on the top, bottom, left and right. Also make sure the rear of these units is not touching the opposite wall.
3 Locate these units away from other electrical appliances, motors, or transformers to avoid humming sounds.
4 Do not expose these units to sudden temperature changes from cold to hot, and do not locate these units in an environment with high humidity (i.e. a room with a humidifier) to prevent condensation inside these units, which may cause an electrical shock, fire, damage to these units, and/or personal injury.
5 Avoid installing these units where foreign objects may fall onto these units and/or these units may be exposed to liquid dripping or splashing. On the top of these units, do NOT place:
- Other components, as they may cause damage and/or discoloration on the surface of these units.
- Burning objects (i.e. candles), as they may cause fire, damage to these units, and/or personal injury.
- Containers with liquid in them, as they may fall and liquid may cause electrical shock to the user and/or damage to these units.
6 Do not cover these units with a newspaper, tablecloth, curtain, etc. in order not to obstruct heat radiation. If the temperature inside these units rises, it may cause fire, damage to these units, and/or personal injury.
7 Do not plug these units into a wall outlet until all connections are complete.
8 Do not operate these units upside-down. They may overheat, possibly causing damage.
9 Do not use force on switches, knobs and/or cords.
10 When disconnecting the power cord from the wall outlet, grasp the plug; do not pull the cord.
11 Do not clean these units with chemical solvents; this might damage the finish. Use a clean, dry cloth.
12 Only the voltage specified on these units must be used. Using these units with a higher voltage than specified is dangerous and may cause fire, damage to these units, and/or personal injury. YAMAHA will not be held responsible for any damage resulting from use of these units with a voltage other than that specified.
13 To prevent damage by lightning, disconnect the power cord from the wall outlet during an electrical storm.
14 Do not attempt to modify or fix these units. Contact qualified YAMAHA service personnel when any service is needed. The cabinet should never be opened for any reason.
15 When not planning to use these units for long periods of time (i.e. when going on vacation), disconnect the AC power plug from the wall outlet.
16 Be sure to read the "TROUBLESHOOTING" section in the MCX-C15 Owner's Manual or MCX-CA15 Owner's Manual on common operating errors before concluding that one or both of these units are faulty.
17 Before moving these units, press on the MCX-C15 to place them in the sleep mode, and disconnect the AC power plug from the wall outlet.
18 Be sure to use the AC adaptor (LSE0215C1240) supplied with the MCX-C15. Using an AC adaptor other than the one provided may cause fire or damage to these units.
19 These units are designed for home use only. Never use these units in a car, etc. Doing so may cause these units to malfunction.
These units are not disconnected from the AC power source as long as they are connected to the wall outlet, even if the unit itself is turned off. This state is called the sleep mode. In this state, these units are designed to consume a very small quantity of power.
WARNING
TO REDUCE THE RISK OF FIRE OR ELECTRIC SHOCK,DO NOT EXPOSE THESE UNITS TO RAIN OR MOISTURE.
IMPORTANT
Please record the serial number of these units in the space below.
MODEL:
Serial No.:
MODEL:
Serial No.:
The serial number is located on the rear of each unit. Retain this Owner's Manual in a safe place for future reference.
SPECIAL INSTRUCTIONS FOR U.K. MODEL
IMPORTANT
The wires in this mains lead are coloured in accordance with the following code:
GREEN-and-YELLOW: Earth
BLUE: Neutral
BROWN: Live
As the colours of the wires in the mains lead of each unit may not correspond with the coloured markings identifying the terminals in your plug, proceed as follows: The wire which is coloured GREEN-and-YELLOW must be connected to the terminal in the plug which is marked by the letter
E or the safety earth symbol or coloured GREEN or GREEN - and YELLOW. The wire which is coloured BLUE must be connected to the terminal which is marked with the letter N or coloured BLACK. The wire which is coloured BROWN must be connected to the terminal which is marked with the letter L or coloured RED.
For U.K. customers
If the socket outlets in your home are not suitable for the plug supplied with this appliance, it should be cut off and an appropriate 3 pin plug fitted. For details, refer to the instructions above.
Note: The plug severed from the mains lead must be destroyed, as a plug with a bared flexible cord is hazardous if engaged in a live socket outlet.
For Canadian Customers
To prevent electric shock, match the wide blade of the plug to the wide slot and fully insert.
This Class B digital apparatus complies with Canadian ICES-003.
CAUTION
Danger of explosion if battery is incorrectly replaced. Replace only with the same or equivalent type.
CONTENTS
INTRODUCTION
FEATURES 2
MusicCAST SYSTEM OVERVIEW.....3
The server 4
The client 4
The amplifier 4
LISTENING TO MUSIC
TURING ON THE POWER .5
Using the remote control 6
Using the front panel controller. 6
LISTENING TO SONGS STORED
ON THE SERVER 7
Adjusting the volume 9
Adjusting the tone. 10
Switching the time display mode 11
ADDITIONAL INFORMATION
BEYOND THE BASICS. 12
Frequently used functions. 12
Handy functions. 12
Listening to external components. 12
System options. 13
Display settings 13
System settings 13
Other 13
QUICK MENU REFERENCE 14
FEATURES
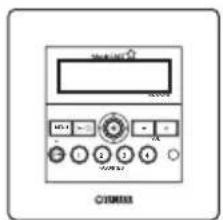
The MusicCAST MCX-C15 Distributed Audio Controller (hereafter, "the client") is designed to work in conjunction with the MusicCAST MCX-1000 Digital Audio Server (hereafter, "the server") to allow you to store and listen to your entire music collection. With multiple clients, you and others can simultaneously access and enjoy your music collection from up to seven different locations. The client is designed to bring you the following features:
Instant access to all music data stored on an MCX-1000 server
Simultaneous playback from multiple locations (when using multiple clients)
Modern in-wall design with paintable face plate to match every interior
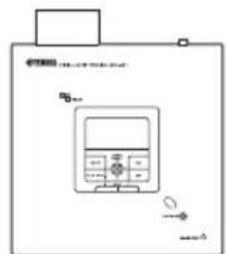
Easy-to-read LCD (128 x 32 dots)
IR wireless remote control
Repeat, Random,Bookmark and Auto Play functions
Four assignable FAVORITES buttons for direct playback of your favorite music
Playback and sleep timers
Output selection mode for volume and tone settings
AV link functionality for integrated control of YAMAHA AV receivers
About this manual
indicates a tip for your operation.
- This manual explains how to perform basic operations using your MusicCAST system. For a full explanation of the MCX-1000 Digital Audio Server and MCX-C15 Distributed Audio Controller, please refer to the MCX-1000 Owner's Manual and MCX-C15 Owner's Manual respectively.
- For details regarding client installation and network configuration, refer to the Install Manual provided.
- This manual explains how to use the various functions of the client using the remote control. While many functions are accessible from the client's front panel, some functions are only accessible from the remote control.
- This manual is printed prior to production. Design and specifications are subject to change in part as a result of improvements, etc. In case of differences between the manual and the product, the product has priority.
This unit must be installed by a qualified technician as indicated in the Install Manual provided. Do not attempt to install this unit yourself.

Fraunhofer
MPEG Layer-3 audio coding technology licensed from Fraunhofer IIS and Thomson
This product contains AVE-TCP from ACCESS CO.LTD.
Copyright © 1996-2002 ACCESS CO., LTD
We Want You Listening For A Lifetime
YAMAHA and the Electronic Industries Association's Consumer Electronics Group want you to get the most out of your equipment by playing it at a safe level. One that lets the sound come through loud and clear without annoying blaring or distortion – and, most importantly, without affecting your sensitive hearing. Since hearing damage from loud sounds is often undetectable until it is too late, YAMAHA and the Electronic Industries Association's Consumer Electronics Group recommend you to avoid prolonged exposure from excessive volume levels.

MusicCAST SYSTEM OVERVIEW
With a variety of network configuration methods possible using a Local Area Network (LAN), the MusicCAST system allows everyone in the family to store their music collection in one central location for playback from other locations around your home. Once music data is stored, you can have fun creating playlists, bookmark songs, and even register your favorite music for instant access at the press of a button. The advanced MusicCAST system is comprised of a server and its connected clients, and the MCX-CA15 optional amplifier can be connected to provide power to speakers and external components.

#
- You can combine up to seven wired and wireless connections as long as you use no more than five wireless connections.
- Compared with wireless networks, wired networks can carry data over greater distances and to more clients. The server supports simultaneous playback for seven clients over a wired network.
Notes
- The actual number of CDs the server can store depends on the format in which you choose to store songs. Typically, the server can store approximately 1,000 CDs on its 80 GB hard disk drive if you choose to store the songs in MP3 format only, or approximately 100 CDs in PCM format.
- The server can supply different songs to multiple clients simultaneously for up to seven clients via a combination of wired and wireless connections. Depending on a number of factors, such as the playback format you are using and the strength of the network signal available, it may be advisable to reduce the number of clients on which you are listening to playback if you encounter problems with playback.
- To ensure smooth playback, select a low MP3 bitrate when storing songs. See "Set the MusicCAST server data storage format" in the MCX-1000 Owner's Manual, page 121.
The server
MCX-1000 Digital Audio Server
The server can store approximately 1,000 music CDs in MP3 format or 100 music CDs in PCM format on its internal hard disk drive for playback from the server or its connected clients. The server automatically stores song, artist and album names as well as genre information for each CD during the recording process, allowing easy access to your music without the need to enter any data manually. Once stored, songs can be selected, sorted and played in a variety of quick and simple ways. The server can supply different songs to multiple clients simultaneously, as well as supply songs in linear PCM format to one client at a time.
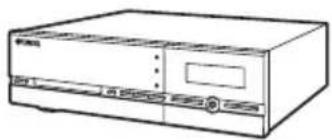
The client
MCX-C15 Distributed Audio Controller (wired type)
MCX-A10 Digital Audio Terminal (wireless or wired type)
Clients themselves do not store or record any music data. Instead, they connect to the server to retrieve stored music. This allows you to install a server in your living room, and clients in your bedroom and children's rooms, and listen to music stored on the server from each of these locations. The client also allows you to select, sort and play songs in a variety of the ways, just like the server.
The amplifier
MCX-CA15 Distributed Audio Amplifier
The MCX-CA15 Distributed Audio Amplifier can work as a stand alone amplifier for integration with your existing audio system or paired with your client to complete the MusicCAST system. As a companion to your MCX-C15, the MCX-CA15 functions as a power amplifier and DC power distributor. It provides power to all connected speakers, and can display your MCX-C15's on-screen display (OSD) on a TV or monitor connected to the MCX-C15. The MCX-CA15 is fully controllable from your MCX-C15.
Before using your client for the first time, you must upgrade the MusicCAST system and make the appropriate network settings. For details on network settings, refer to "BEFORE USING THE MusicCAST SYSTEM" and "CONFIGURING THE CLIENT" in the Install Manual provided.
When your client is ready for operation, turn on the power.
The client has two operation modes:
On The client is connected to a power source and is in operation mode.
Sleep The client is connected to a power source and activates only when the unit is operated or it receives an infrared signal from the client's remote control.

or
Before proceeding, make sure the power to the MCX-1000 server is turned on.
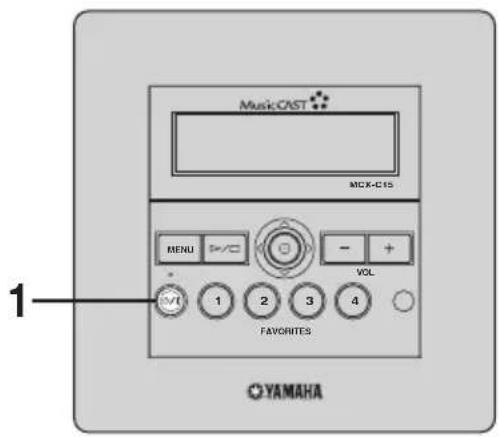
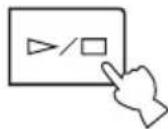
1 Press on either the remote control or front panel.
The client turns on and the MusicCAST Startup screen is displayed.

2 The client attempts to connect to the server, and the following screen is displayed.
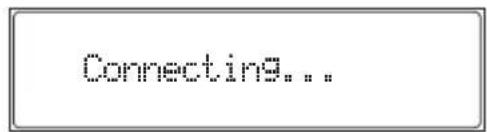
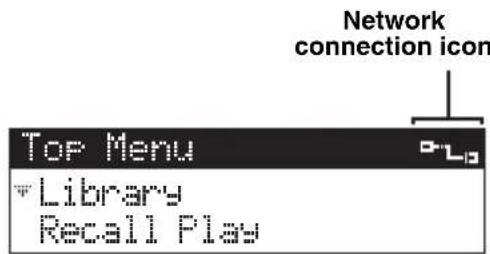
3 If the client is able to make a connection, the Top Menu screen appears and the network connection icon appears in the top right corner of the display.
If the client is unable to connect to the server, it continues displaying the "Connecting..." message. Press any button on the client to cancel the connection process, then check that your client network connection settings are correct (see the Owner's Manual on the CD-ROM, page 55).
Note
If no operation is performed for 30 minutes, the client automatically switches to sleep mode. Press SELECT or to reactivate the client.
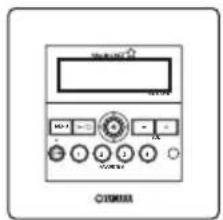
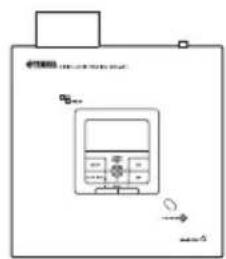
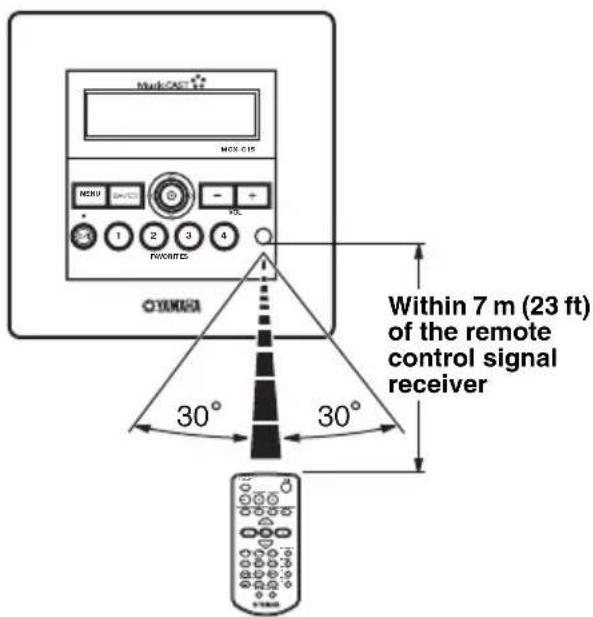
Using the remote control
The remote control transmits a directional infrared beam. Be sure to aim the remote control directly at the remote control signal receiver on the front panel during operation.
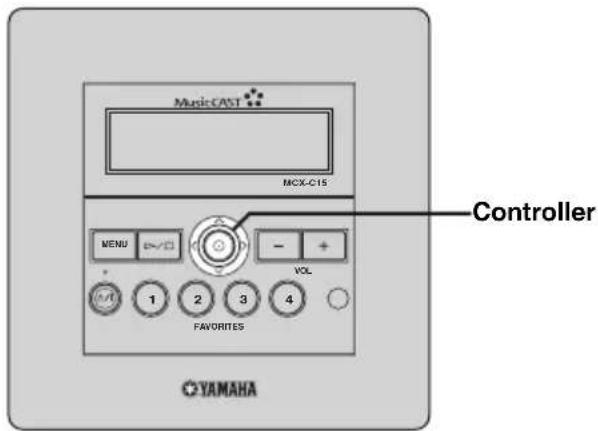
Using the front panel controller
Moving the controller in the directions indicated on the front panel of the client performs the same action as pressing the equivalent cursor key on the remote control. For example, pushing the client controller upwards produces the same result as pressing on the remote control. Pushing the controller directly into the front panel has the same effect as pressing SELECT on the remote control.
Handling the remote control
- Do not spill water or other liquids on the remote control.
- Do not drop the remote control.
-
Do not leave or store the remote control in the following types of conditions:
-
high humidity, such as near a bath
- high temperature, such as near a heater or stove
extremely low temperatures
-dustyplaces
CAUTIONS
- If remote control operation of this unit causes abnormal operation of any other component, change the placement of that component.
- Make sure the remote control signal receiver is not exposed to direct sunlight or strong light. Such exposure may inhibit the remote control's functionality.
LISTENING TO SONGS STORED ON THE SERVER
Two kinds of files are available for playback from your client: MP3 (MPEG-1 Audio Layer 3) and PCM (Pulse Code Modulation).
MP3 files do not take up a large amount of space, enabling you to store approximately 1,000 CDs on the server.
PCM files provide better sound quality during playback, they require large amounts of space. You can store approximately 100 CDs in PCM format. The client displays an " " (asterisk) next to the names of songs stored in this format. If the server is set to distribute PCM files, you can play back PCM files on one client at a time. For details, see the MCX-1000 Owner's Manual, page 125.
Playback groups
The client retrieves and plays back music files stored on the server. You can play back songs grouped by artist, album or genre, as well as play back songs at random, from pre-chosen lists or in playback groups. Playback groups are defined by your playback selection. For example, selecting an album from the "Albums" menu for playback sets albums as the playback group. Further, you can choose to play back groups repeatedly (see the Owner's Manual, page 20), play back songs at random from within a playback group (see the Owner's Manual, page 21), or play back all of the songs in the currently selected group (see the Owner's Manual, page 22).
The steps below describe how to access a song directly from the "Artists" library, but can also be used to choose songs from the following libraries:
Artists To search for songs by artist.
Albums To search for songs by album.
Genres To search for songs by genre.
All Songs To display a list of all
registered songs in alphabetical order.
Playlists To view all registered playlists.
Song Statistics To view statistics on songs that have been played.
Bookmarks To view bookmarked songs.
External Inputs To select an optical, coaxial or analog input source connected to the server or an AV receiver connected to the server.
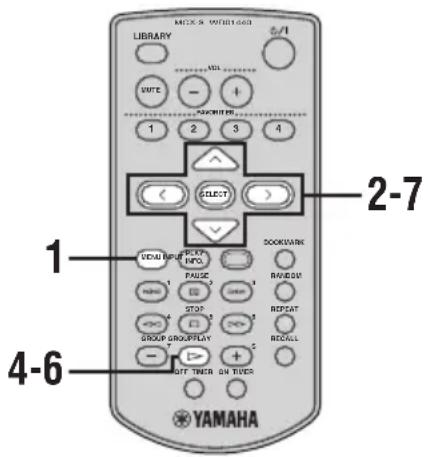
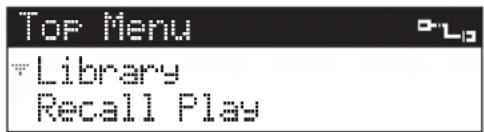
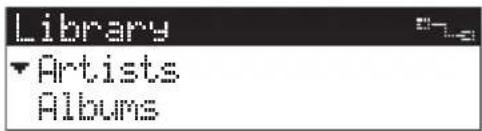
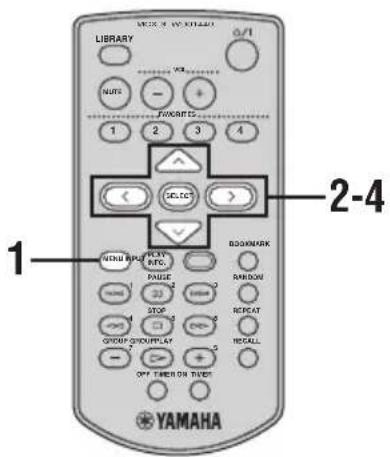
1 Press and hold MENU until the Top Menu screen is displayed.
2 Press / to choose "Library" and press SELECT.
3 Press / to choose "Artists" and press SELECT.
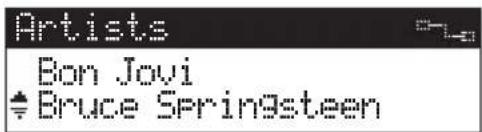
A list of all artists stored in the server is displayed in alphabetical order.
4 Press / to choose an artist.
Press SELECT to display all of the albums assigned to the artist.
Press to begin playback of all songs by the artist in alphabetical order.
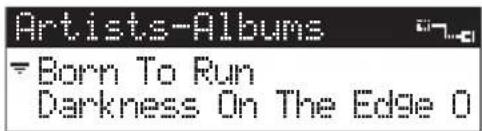
5 Press / to choose the name of the album you want to listen to.
Press SELECT to display all of the songs on the album.
Press to begin playback of the entire album.
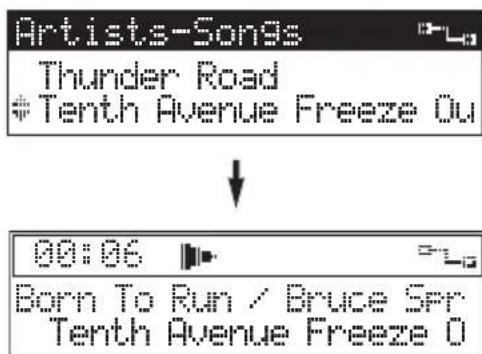
6 Press / to choose a specific song and press SELECT or to begin playback.
7 Press < if you want to return to the List screen.
中
When playback of the selected song is finished, playback of the next song stored in the library begins.
To stop playback
Press
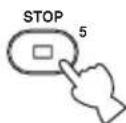
or
Remote control Front panel
To pause playback
Press . Press again to resume playback.
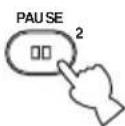
Remote control
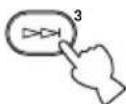
To search within a song
To search forward during playback, press . To search backward, press . The client does not output any sound during these operations. You cannot search any farther than the beginning or end of a song using these buttons.
and
Remote control
Remote control
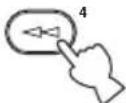
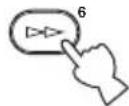
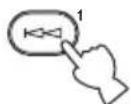
To skip songs
Playback skips to the next song each time you press .To skip to the beginning of the song currently being played,press < < 一 once.To skip to the beginning of the previous song,press < < 一 twice. You cannot skip through songs when playback is paused.
Remote control
and
Remote control
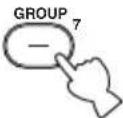
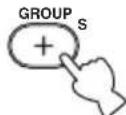
To skip playback groups
Press ^+ (GROUP) to skip to the next item in the playback group see "Playback groups", page 7). Press-(GROUP) to skip to the previous item. If only one item is registered in a playback group, pressing - (GROUP)/+(GROUP) does not have any effect.
Remote control
and
Remote control
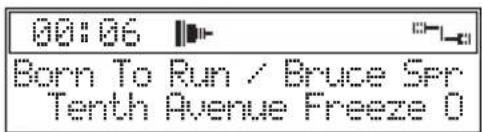
To display song information
Press PLAY INFO. during playback to switch to the Play Info screen.

Remote control
Adjusting the volume
Use the following procedure to increase or decrease the volume level of the output from the client.
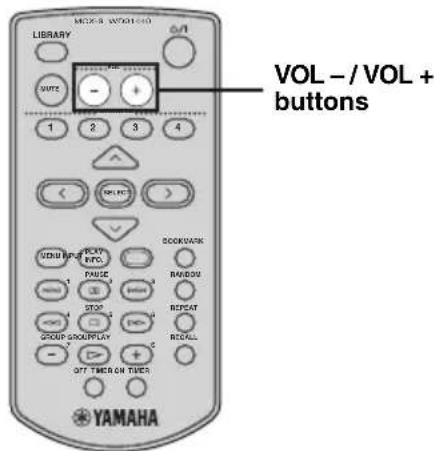
or
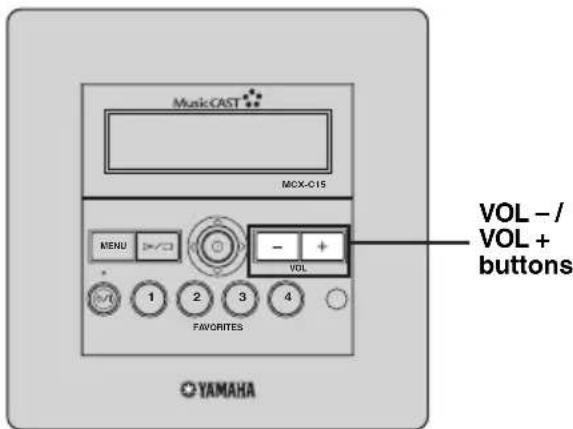
Press VOL + or VOL - to increase or decrease the volume level.
The volume level changes accordingly.
Adjusting the tone
You can adjust the nature of the sound output by the client. You can change these settings to create sound with strong deep bass, or to emphasize the treble.
4 Use to increase the value of the setting, and use < to decrease the value. Press SELECT or MENU to confirm the value you have set and return to the Tone screen.
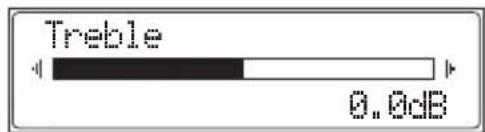
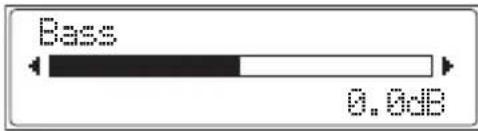
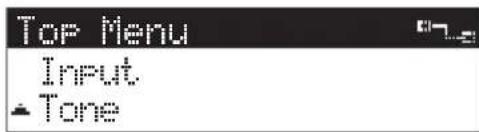
1 Press and hold MENU until the Top Menu screen is displayed.
2 Press / to choose "Tone" and press SELECT.
3 Press / to choose "Treble" or "Bass" and press SELECT.
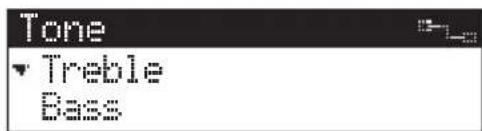
Treble Adjusts the treble for sound output by the client.
Bass Adjusts the bass for sound output by the client.
Switching the time display mode
You can change the time display on the Play Info screen so that it displays either the time elapsed since playback began for the song currently being played, or the time remaining until playback of the song is complete.
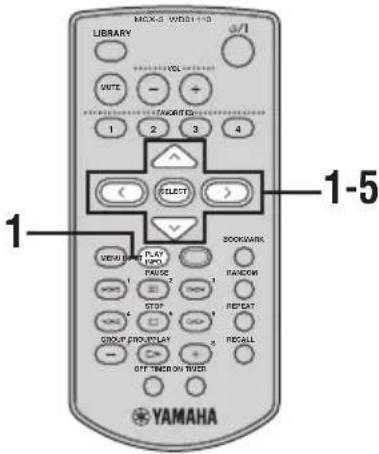
1 Press PLAY INFO. to display the Play Info screen during playback, then press >.
2 Press / to choose "Time" and press SELECT.

3 Press / to choose a time mode.
ELAP Displays the time elapsed since the beginning of the song.
REM Displays the time remaining until the end of the song.
4 Press SELECT to confirm.
5 Press < to return to the Play Info screen.
BEYOND THE BASICS
In addition to playing songs grouped by artist, album or genre, your client has many other advanced capabilities, such as random playback and external component control. This section provides a brief summary of these additional functions and their page references in the Owner's Manual available on the Owner's Manual CD-ROM provided.
Frequently used functions
Repeat playback mode
Use this function for repeated playback of a single song or all of the songs in a playback group (page 20).
Random playback mode
Use this function for random playback of songs within the selected playback group (page 21).
■ Group playback mode
Use this function to define the range of songs for playback when using the normal, Repeat and Random playback modes (page 22).
Handy functions
■ FAVORITES function
Use this function to instantly access your favorite music from the following (page 23):
- T h e s e r v e r
- External inputs from the server (analog or digital)
- Tuner presets from a YAMAHA AV receiver connected to the server
Audio input signals from the MCX-CA15 - Inputs of an AV-linked YAMAHA AV receiver
Song statistics function
Use this function to display statistical data about the songs and albums stored on the server (page 29).
Using playlists
Use this function to access playlists created on the server for playback (page 30).
Recall Play function
Use this function to continue listening to the song currently being played back from the client or the server on another client (page 31).
■ Bookmark function
Use this function to store your favorite songs in a temporary list for easy access (page 33).
Using the OFF and ON Timer functions
You can use the OFF and ON Timer functions to automatically stop and start playback at the designated time (pages 36 and 37).
■ Broadcast function
You can use this function to enjoy the same song from different locations around your home (page 39).
Listening to external components
■ Listening to components connected to the MCX-CA15
You can use your client to enjoy audio from an external component, such as a CD player or control amplifier connected to the AUDIO IN jack on the MCX-CA15 (page 41).
■ Listening to YAMAHA AV receiver radio station presets
You can use your client to enjoy radio station presets on a YAMAHA AV receiver connected to the server (page 42).
Using YAMAHA AV link technology
You can use this technology to control YAMAHA AV receivers from your client (page 43).
■ Listening to components connected to the server
You can use your client to enjoy audio from an external component connected to the server (page 46).
System options
Auto Play function
Use this function to automatically resume playback of the last song the client played before it was placed in sleep mode (page 47).
Auto Level Control function
Use this function to automatically reduce or increase the base volume level of each song to a theoretical average during playback (page 47).
Selecting the output
Use this function to select the output control method of the client (page 48).
Sleep mode
If you will not be using your client for an extended period, you can place it in sleep mode (page 49).
Display settings
Adjusting the display contrast
Depending on the location of your client, you may want to alter the contrast of the display for easier viewing (page 50).
■ Screen Saver function
The client features an on-screen display Screen Saver function (page 51).
System settings
■ Checking system information
You can check the system information for your client, such as the firmware version currently being used (page 52).
Other
Troubleshooting
If you are having difficulty with your client, refer to the "TROUBLESHOOTING" section (page 56).
Glossary
If you are unfamiliar with the terminology relating to MusicCAST, refer to the "GLOSSARY" section (page 60).
QUICK MENU REFERENCE
The following chart is a convenient reference guide for finding menus and their lists of parameters when you want to perform an operation on the client in a hurry.
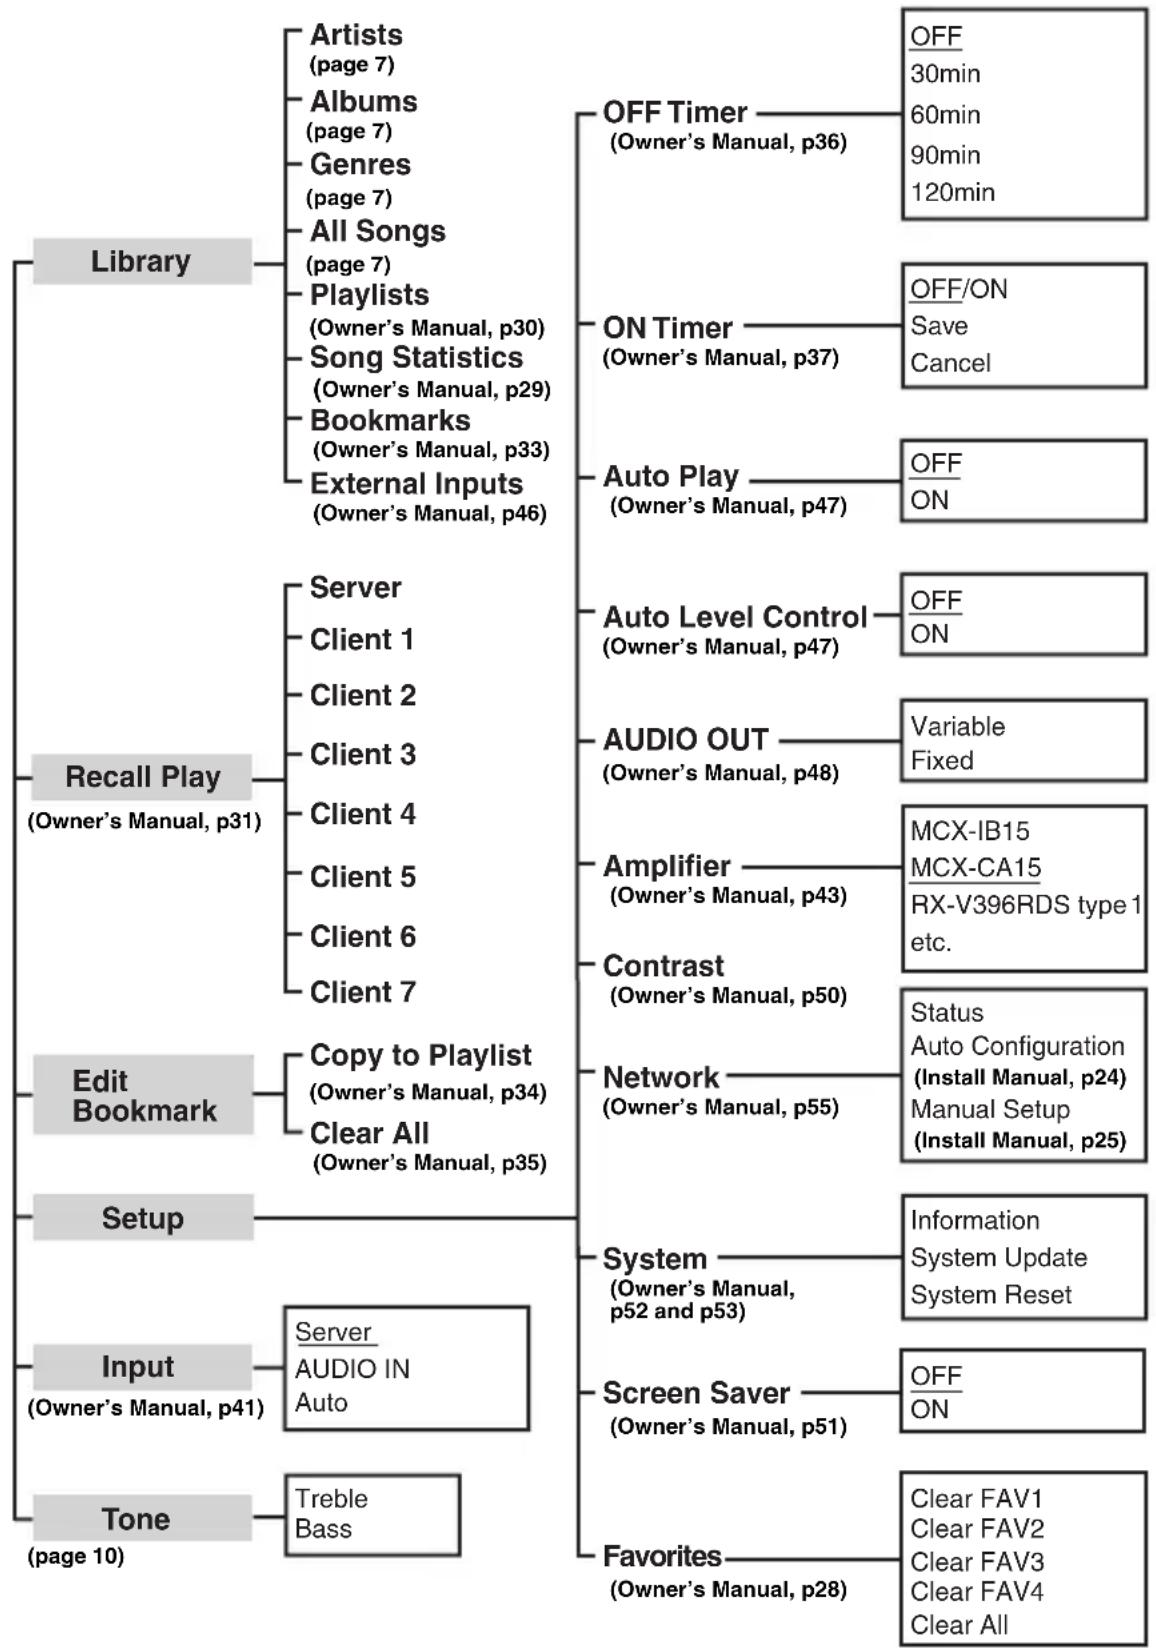
* Default settings for the client are underlined.
ATTENTION: VEUILLEZ LIRE CE QUI SUIT AVANT D'UTILISER L'APPAREIL.
Copyright © 1996-2002 ACCESS CO., LTD
PRÉSENTATION DU SYSTEME MusicCAST
Copyright © 1996-2002 ACCESS CO., LTD
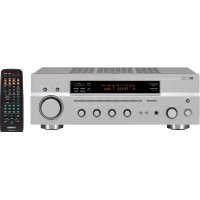
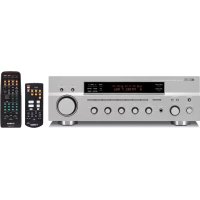
MCX-CA15 Distributed Audio Amplifier
Copyright © 1996-2002 ACCESS CO., LTD
ÖVERSIKT ÖVER MusicCAST-SYSTEMET

MCX-CA15 Distributed Audio Amplifier

MCX-CA15 Distributed Audio Amplifier
Copyright © 1996-2002 ACCESS CO., LTD
IDEAS GENERALES DEL MusicCAST SYSTEM

MCX-CA15 Distributed Audio Amplifier
Copyright © 1996-2002 ACCESS CO., LTD
MusicCAST SYSTEM OVERZICH
MCX-C15 Distributed Audio Controller (network over bedrading)
MCX-A10 Digital Audio Terminal (network over bedrading of draadloos)
MCX-CA15 Distributed Audio Amplifier
© 2004 YAMAHA CORPORATION All rights reserved.
- WARNING
- IMPORTANT
- SPECIAL INSTRUCTIONS FOR U.K. MODEL
- For U.K. customers
- For Canadian Customers
- CAUTION
- CONTENTS
- INTRODUCTION
- LISTENING TO MUSIC
- ADDITIONAL INFORMATION
- FEATURES
- About this manual
- Fraunhofer
- We Want You Listening For A Lifetime
- MusicCAST SYSTEM OVERVIEW
- #
- Notes
- The server
- The client
- The amplifier
- Note
- Using the remote control
- Using the front panel controller
- Handling the remote control
- CAUTIONS
- LISTENING TO SONGS STORED ON THE SERVER
- Playback groups
- Press / to choose "Artists" and press SELECT.
- Press / to choose an artist.
- Press / to choose the name of the album you want to listen to.
- Press / to choose a specific song and press SELECT or to begin playback.
- Press < if you want to return to the List screen.
- To stop playback
- To pause playback
- To search within a song
- To skip songs
- To skip playback groups
- To display song information
- Adjusting the volume
- Press VOL + or VOL - to increase or decrease the volume level.
- Adjusting the tone
- Switching the time display mode
- BEYOND THE BASICS
- Frequently used functions
- Repeat playback mode
- Random playback mode
- ■ Group playback mode
- Handy functions
- ■ FAVORITES function
- Song statistics function
- Using playlists
- Recall Play function
- ■ Bookmark function
- Using the OFF and ON Timer functions
- ■ Broadcast function
- Listening to external components
- ■ Listening to components connected to the MCX-CA15
- ■ Listening to YAMAHA AV receiver radio station presets
- Using YAMAHA AV link technology
- ■ Listening to components connected to the server
- System options
- Auto Play function
- Auto Level Control function
- Selecting the output
- Sleep mode
- Display settings
- Adjusting the display contrast
- ■ Screen Saver function
- System settings
- ■ Checking system information
- Other
- Troubleshooting
- Glossary
- QUICK MENU REFERENCE
- ATTENTION: VEUILLEZ LIRE CE QUI SUIT AVANT D'UTILISER L'APPAREIL.
- PRÉSENTATION DU SYSTEME MusicCAST
- ÖVERSIKT ÖVER MusicCAST-SYSTEMET
- IDEAS GENERALES DEL MusicCAST SYSTEM
- MusicCAST SYSTEM OVERZICH
Brand : YAMAHA
Model : MCXC15
Category : Audio System