IR130 - Radio Auna - Free user manual and instructions
Find the device manual for free IR130 Auna in PDF.

User questions about IR130 Auna
0 question about this device. Answer the ones you know or ask your own.
Ask a new question about this device
Download the instructions for your Radio in PDF format for free! Find your manual IR130 - Auna and take your electronic device back in hand. On this page are published all the documents necessary for the use of your device. IR130 by Auna.
USER MANUAL IR130 Auna
text_image
QR code image containing encoded data, no visible human-readable textINHALTSVERZEICHNIS
Technische Daten 3
Connecting to Network

Would you like to configure Network now? Yes NO
text_image
Windows Media Player Now Playing Library Rip Burn Music > Playlists > Playlist4 Playlists Create Playlist 1 Like Humans Do... 1 Playlist4 Library Recently Added Artist Album Songs Genre Year Rating Create Playlist Ctrl+N Create Auto Playlist Music Pictures Video Recorded TV Other Add to Library... Media Sharing... Apply Media Information Changes Add Favorites to List When Dragging More Options... Help with Using the Library Edit in List Panetext_image
Media Sharing Share music, pictures, and video on your network. Learn more about sharing. Sharing settings ✓ Share my media to: Settings... Unknown Device Allow Deny Customize... How does sharing change firewall settings? OK Cancel ApplyWECKER EINSTELLEN
Member of Berlin Brands Group
Handwerkerstr. 11
15366 Dahlwitz-Hoppegarten
Deutschland
natural_image
Symbol of a trash bin crossed with a diagonal line, representing no waste or discharge (no text or labels)Congratulations on your purchase. Please read the following instructions carefully and follow them to prevent potential damage. We accept no liability for damage caused by disregarding the instructions and improper use. Please scan the QR code to access the latest operating instructions and further information about the product.

text_image
QR code image containing encoded data, no visible human-readable textCONTENTS
TechnicalData 19
Safety Instructions 20
Device Overview 22
Remote control 24
Commissioning and Settings 25
Main Menu and Functions 26
Media Centre 27
Set Alarm Clock 29
Set Sleep Timer 30
Settings 30
Add Favourite URL 31
Streaming from Mobile Devices 31
Disposal Instructions 32
Declaration of conformity 32
TECHNICALDATA
| Article number 10009125, 10022777 | |
| Power supply (power adapter) AC 230-240 V ~ 50 Hz (DC 5V) | |
| FM frequency 88-108 MHz | |
| WiFi standard | 802.11 b/g/n |
| WiFi frequency | 2402-2480 MHz |
SAFETY INSTRUCTIONS
General instructions
- Lightning - If you do not use the device for a longer period of time or in the event of electrical storms, unplug the device from the power outlet or disconnect the device from the antenna connection. This prevents damage to the product due to lightning and overvoltage.
• Overloading - Do not overload electrical outlets, extension cords or integral sockets as this may result in a fire or electric shock. - Foreign objects and liquid entry - Never push objects of any kind into the unit through openings as they may touch dangerous voltage points or short out parts that could cause a fire or electric shock. Never spill liquids of any kind on the unit.
- Repair and maintenance - Do not attempt to service this product yourself as opening or removing covers may expose you to dangerous voltages or other hazards. Leave all maintenance work to qualified service personnel.
- Damage requiring servicing - Unplug the appliance from the wall outlet and refer servicing to qualified service personnel when any of the following situations occur:
a) If the mains cable or plug is damaged.
b) If liquid has been spilled or objects have fallen onto the product.
c) If the product has been exposed to rain or water.
d) If the product has been dropped or damaged.
e) If the product has a significantly reduced performance.
- Spare parts - If spare parts are needed, make sure that the specialist company replacing the parts only uses spare parts that are approved by the manufacturer or have the same characteristics as the original part. Unauthorised substitutions may result in fire, electric shock or other hazards.
- Heat - Do not install near any heat sources such as radiators, heat registers, stoves, or other products (including amplifiers).
Special notes
- Children over 8 years as well as mentally, sensory and physically impaired persons may only use the device if they have been informed in detail about the functions and safety precautions by a supervisor responsible for them beforehand and understand the associated risks.
- Children should be supervised to ensure that they do not play with the device. Make sure that children and babies do not play with plastic bags or other packaging materials.
- Make sure that the mains plug/mains adapter always remains easily accessible so that the unit can be quickly disconnected from the mains in an emergency.
- When you are no longer using the device, switch it off and pull the plug out of the socket.
DEVICE OVERVIEW
text_image
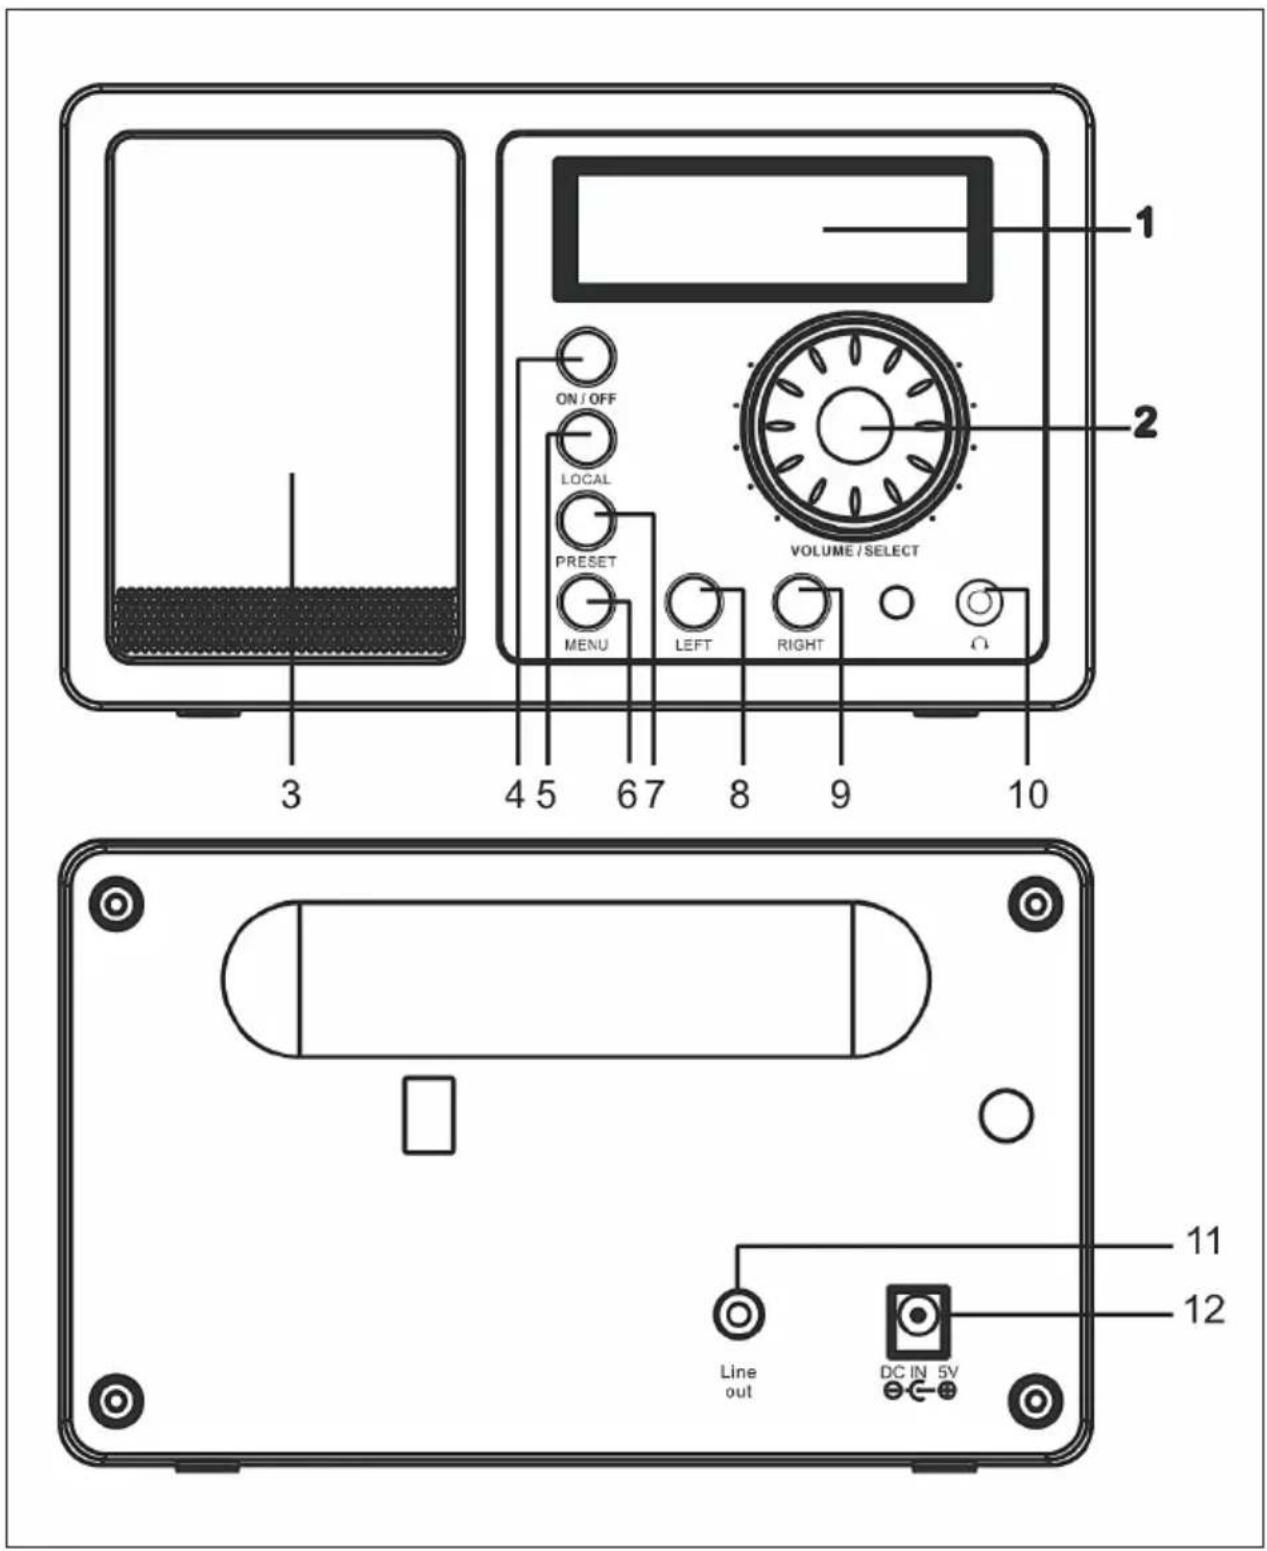
1 2 ON/OFF LOCAL PRESET MENU LEFT RIGHT VOLUME/SELECT 3 4 5 6 7 8 9 10 Line out DC IN 5V 11 12| 1 | Display | 7 | PRESET: Save station as a favourite (keep pressed), press briefly to call up a station. |
| 2 | VOLUME / SELECT: Turn to change the volume. Press to confirm current selection. | 8 | LEFT: Go to previous menu / previous station |
| 3 | Speaker | 9 | RIGHT: Go to the next menu / next station. |
| 4 | ON/OFF: Switch the unit on and off. | 10 | Headphone connection |
| 5 | LOCAL: Search for local stations. | 11 | Line output |
| 6 | MENU: Call up the menu. | 12 | DC power connection |
Note: Only use the power supply unit supplied. A power supply unit with deviating voltage values can damage the unit and endanger you.
REMOTE CONTROL
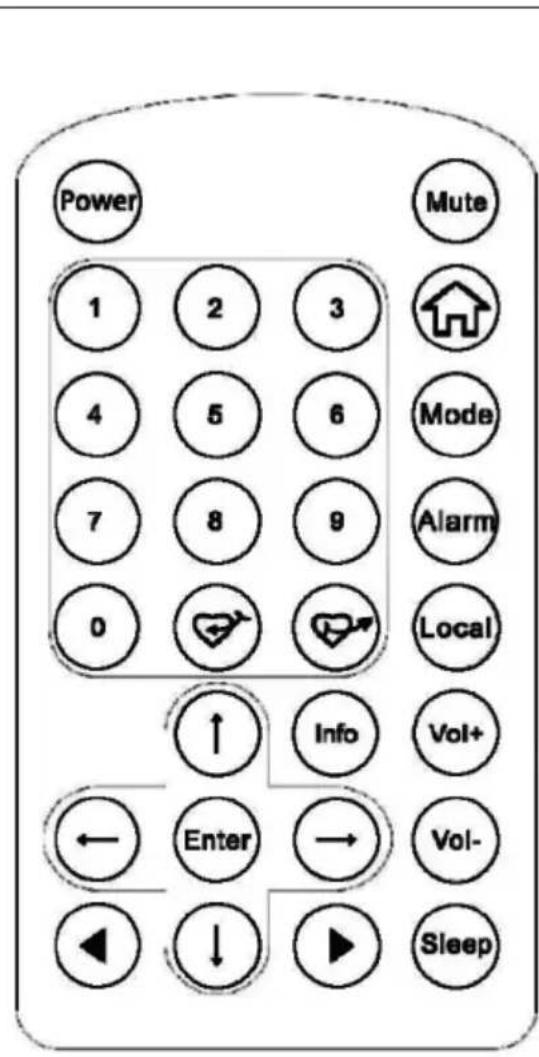
Switch on the unit, insert the batteries into the remote control and hold the remote control towards the IR sensor on the front of the unit. The distance between remote control and unit should not exceed 7 m
text_image
Power Mute 1 2 3 4 5 6 7 8 9 0 Local ↑ Info Vol+ ← Enter → Vol- ← ↓ ▶ Sleep| Power Standby / Switch on | |
| Mute Mute | |
| 0-9 Numeric keys for memory allocation (1-99) (for letters and symbols, see Appendix A) | |
| To main menu: | |
| Mode Switch between Internet Radio and Media Centre functions | |
| Alarm Set alarm times for 2 alarms | |
| + (1-99) | Call up the station (select preset with the numeric key) |
| Local Search for local station in Internet Radio mode | |
| Info Station information | |
| ↑↓←→ | Arrow keys for navigation |
| Enter Confirm current selection | |
| Previous / next station / title | |
| Vol+/ Vol- Change volume | |
| Sleep Sleep timer | |
COMMISSIONING AND SETTINGS
Follow these steps to connect the radio to your WiFi network.
- Switch on the radio: Plug the power cable of the mains unit into the DC power connector on the back of the unit and then switch on the unit.
- The display switches on and the following is displayed in succession:
Welcome
Connecting to Network
- Use the wheel or arrow keys to select YES to set the network:
Would you like to configure Network now? Yes NO
- Select ADD/REMOVE AP and in the submenu select ADD AP (AP = Access Point = your WLAN router)
Add/Remove AP
AP:[ ]
Add AP
Remove AP
The environment is scanned for available APs and finally a list is displayed. Select your WiFi router from this and press SELECT to connect.
5.
Add/Remove AP
AP:[]
-
You will be asked to enter your router/WLAN password in the last step. Enter this using VOLUME/SELECT or the numeric keypad on the remote control. Please note that the password is case-sensitive.
-
After the connection has been successfully established, the display shows:
Association complete
- The device generally indicates the connection setup with the symbol ( 1 ) in the upper left corner of the display. If the connection is established, the symbol appears in the same place, indicating the connection quality.
MAIN MENU AND FUNCTIONS
Press MENU on the device or on the remote control to display the main menu. The main menu appears with the items: My Favourites, Internet Radio, Media Centre, Alarm Clock, Sleep Timer, Settings. Scroll (turn) each with the SELECT wheel and select (press).
My Favourites
- Press on the remote control or press and hold PRESET on the unit to save the current station as a favourite. The newly added station is added to the bottom of the list.
- Press or PRESET (briefly) to call up the list. Scroll with the arrow keys or enter the index number of the desired station using the numeric keypad on the remote control. Press SELECT to call up the highlighted station.
- Press RIGHT or on the remote control while a channel is highlighted in the list to access the options menu. Here you have the option of moving the respective channel up or down in the list or removing it from the list.
Internet Radio
In the Internet Radio menu, you will find the SKYTUNE, SEARCH and HISTORY options.
- Select SKYTUNE to choose from a wide selection of radio stations (worldwide). In the submenu you can choose between local filter and filter by genre. You can set your region under SETTINGS (in the main menu) for easier filtering in the future.
- Select SEARCH to search for a specific station by name.
- The last stations called up (max. 99) are stored under HISTORY.
MEDIA CENTRE
UPNP
You can stream media content from UPnP-enabled devices (usually computers) via Windows Media Player, for example.
Finding and playing media files via radio and UPnP
Once you have set up the UPnP server to share media files with the radio, you can play them through it as follows:
- Press MENU to go to the top menu level. Select "Media Player" -> "UPnP".
- Press SELECT and the radio will search for available UPnP servers. Note that it may take a few seconds for the search to be completed. The radio will display '[Empty]' during the search and will also display '[Empty]' if no UPnP server is found.
- If there are several UPnP servers, select your UPnP server by turning the control after a successful search. D
Note: The radio will now initially not connect to the server, but will announce a connection failure (Access denied). Follow the steps described on the following page. The next time you try to connect, you can choose between the subcategories MUSIC, PLAYLISTS, etc. under UPnP.
Set up Windows PC for the radio to access audio files via UPnP server:
- If your operating system is Microsoft Windows XP, use Windows Media Player 11 (WMP11) as a UPnP (Universal Plug and Play) media server. Windows Media Player 11 can also be downloaded from the Microsoft website and then installed.
- After installation, WMP 11 creates a media library with all available files on your PC. To add new files to the library, select Select File > Add to Library > Advanced Options, click Add, select the desired files and confirm your selection by clicking OK.
- You must now connect the Internet Radio to Windows Media Player 11. To do this, configure it so that the radio can access the media library.
- Your PC will now ask you whether the attempted connection to the UPnP server should be allowed. To allow access to the media files, click on the Library tab of Windows Media Player 11 and select Media Sharing... to open the Media Sharing window.

text_image
Windows Media Player Now Playing Library Rip Burn Music Playlists Playlist4 Create Playlist Create Auto Playlist ● Music Pictures Video Recorded TV Other Add to Library... Media Sharing... Apply Media Information Changes Add Favorites to List When Dragging More Options... Help with Using the Library Playlists Create Playlist 1 Like Humans Do... 1 Playlist4 Library Recently Added Artist Album Songs Genre Year RatingSelect Media Sharing and check Unknown Device. Click on Allow.

text_image
Media Sharing Share music, pictures, and video on your network. Learn more about sharing. Sharing settings ✓ Share my media to: Settings... Unknown Device Allow Deny Customize... How does sharing change firewall settings? OK Cancel ApplySET ALARM CLOCK
Select ALARM in the main menu or press the "ALARM" button on the remote control. Select between ALARM1 and ALARM2 to set the independently adjustable alarm times. Follow the alarm wizard to edit the individual parameters:
• TIME: Set the alarm time.
- SOUND: Select between WAKE TO RADIO (=radio alarm clock) and WAKE TO MELODY (standard melody)
- REPEAT: Set the repeat frequency of the alarm.
• ALARM VOL.: Setting the alarm volume
After setting, press LEFT or ← to exit the settings menu and make sure the alarm clock is activated. In this case, the alarm clock symbol appears on the display.
SET SLEEP TIMER
Press SLEEP several times to activate the sleep timer and set the sleep time (15 to 180 minutes). When the sleep timer is activated, the symbol z^z appears on the display.
SETTINGS
Network
Add/Remove AP
- Add AP: Add Access Point
- Remove AP: Remove Access Point
AP: [ ]: Select this option if you have several routers and want to switch between them
Signal: Displays the signal strength (of the signal received by the radio from the router). Change the location of the unit if the signal is weaker than -70 dBm.
IP: Set the IP of the device dynamically or statically, depending on your network configuration. Standard: DYNAMIC.
DNS: Set the DNS of the device dynamically or statically, depending on your network configuration. Standard: DYNAMIC.
WiFi Channels: Set the WiFi channels here (default: Europe & UK).
Date and time: Set the time and date manually here or select USE NETWORK TIME so that the unit automatically obtains the date and time from the network.
Language: German / English / Chinese
Local radio: Standard; Europe/UK. Change to have direct access to the local channels via the Skytune path.
Playback setup: Select a playback mode for UPnP streaming (Repeat, Repeat All, Shuffle).
DLNA settings: Name the radio to make it easier for DLNA servers to find.
Resume when power on: Activate this function so that the unit automatically recalls the last frequency heard the next time it is switched on.
Dimmer: Set the mode (Normal / Energy Saving) and brightness (Bright/Dim) of the display illumination.
When the unit is in standby mode, you can adjust the display illumination with the SELECT wheel.
Information: Display of system and network information.
Software update: Check from time to time if new firmware versions are available. These are
downloaded from the device and installed.
Restore factory settings: ATTENTION - All settings and stored stations will be deleted.
ADD FAVOURITE URL
- Connect your computer to the same network where your radio is registered.
- Press INFO on the remote control (or go to Menu -> Settings -> Information) and open the IP Info.
- Open a web browser on your computer (Internet Explorer, Firefox, Chrome, Safari) and enter the IP address of the radio in the address line.
- In the table that appears, you can enter the names and URLs (web addresses) of up to 99 stations. These are synchronised with the favourites list on the radio.
STREAMING FROM MOBILE DEVICES
The unit supports streaming via UPnP and iOS. Connect to iRADIO-XXXXX respectively from your smartphone or tablet.
DISPOSAL INSTRUCTIONS

natural_image
Symbol of a trash bin crossed with a diagonal line, representing no waste or discharge (no text or labels)If there is a legal regulation in your country regarding the disposal of electrical and electronic equipment, this symbol on the product or on the packaging indicates that this product must not be disposed of with household waste. Instead, it must be taken to a collection point for the recycling of electrical and electronic equipment. By disposing of this product in accordance with the regulations, you protect the environment and the health of those around you from negative consequences. For information on recycling and disposal of this product, contact your local government or household waste disposal service.
This product contains batteries. If there is a legal regulation in your country regarding the disposal of batteries, the batteries must not be disposed of in household waste. Consult your local regulations for the disposal of batteries. By disposing of this product in accordance with the regulations, you are protecting the environment and the health of those around you from negative consequences.
DECLARATION OF CONFORMITY

text_image
CE UK CAManufacturer:
Chal-Tec GmbH, Wallstraße 16, 10179 Berlin, Germany.
Importer for Great Britain:
Berlin Brands Group UK Ltd
PO Box 1145
Oxford, OX1 9UW
United Kingdom
Chal-Tec GmbH hereby declares that the radio system type IR-130 complies with Directive 2014/53/EU. The full text of the EU declaration of conformity is available at the following internet address: use. berlin/10022777
Cher client, chère cliente,
text_image
QR code image containing encoded data, no visible human-readable textSOMMAIRE
Fiche technique 33
text_image
Power Mute 1 2 3 4 5 6 7 8 9 0 Local ↑ Info Vol+ Enter → Vol- ↓ ↓ ▶ SleepWould you like to configure Network now? Yes NO
text_image
Windows Media Player Now Playing Library Rip Burn Music > Playlists > Playlist4 Playlists Create Playlist 1 Like Humans Do... 1 Playlist4 Library Recently Added Artist Album Songs Genre Year Rating Create Playlist Ctrl+N Create Auto Playlist Music Pictures Video Recorded TV Other Add to Library... Media Sharing... Apply Media Information Changes Add Favorites to List When Dragging More Options... Help with Using the Library Edit in List Panetext_image
Media Sharing Share music, pictures, and video on your network. Learn more about sharing. Sharing settings ✓ Share my media to: Settings... Unknown Device Allow Deny Customize... How does sharing change firewall settings? OK Cancel ApplyRÉGLAGE DE L'ALARME
natural_image
Symbol of a trash bin crossed out by a diagonal line, with no text or labels present.DÉCLARATION DE CONFORMITÉ

text_image
CE UK CAFabricant :
Chal-Tec GmbH, Wallstraße 16, 10179 Berlin, Allemagne.
Berlin Brands Group UK Ltd
PO Box 1145
Oxford, OX1 9UW
United Kingdom
text_image
QR code image containing encoded data, no visible human-readable textÍNDICE
TDatos técnicos 47
text_image
Power Mute 1 2 3 4 5 6 7 8 9 0 Local ↑ Info Vol+ Enter → Vol- ↓ ▶ SleepWould you like to configure Network now? Yes NO
text_image
Windows Media Player Now Playing Library Rip Burn Music > Playlists > Playlist4 Playlists Create Playlist 1 Like Humans Do... 1 Playlist4 Library Recently Added Artist Album Songs Genre Year Rating Create Playlist Ctrl+N Create Auto Playlist Music Pictures Video Recorded TV Other Add to Library... Media Sharing... Apply Media Information Changes Add Favorites to List When Dragging More Options... Help with Using the Library Edit in List Panetext_image
Media Sharing Share music, pictures, and video on your network. Learn more about sharing. Sharing settings ✓ Share my media to: Settings... Unknown Device Allow Deny Customize... How does sharing change firewall settings? OK Cancel Applynatural_image
Symbol of a trash bin crossed with a diagonal line, no text or labels presentBerlin Brands Group UK Ltd
PO Box 1145
Oxford, OX1 9UW
Reino Unido
text_image
QR code image containing encoded data, no visible human-readable textINDICE
Dati tecnici 61
text_image
Power Mute 1 2 3 4 5 6 7 8 9 0 Local ↑ Info Vol+ ← Enter → Vol- ◀ ↓ ▶ SleepWould you like to configure Network now? Yes NO
text_image
Windows Media Player Now Playing Library Rip Burn Music Playlists Playlist4 Create Playlist Create Auto Playlist ● Music Pictures Video Recorded TV Other Add to Library... Media Sharing... Apply Media Information Changes Add Favorites to List When Dragging More Options... Help with Using the Library Playlists Create Playlist 1 Like Humans Do... 1 Playlist4 Library Recently Added Artist Album Songs Genre Year Ratingtext_image
Media Sharing Share music, pictures, and video on your network. Learn more about sharing. Sharing settings ✓ Share my media to: Settings... Unknown Device Allow Deny Customize... How does sharing change firewall settings? OK Cancel ApplyIMPOSTARE LA SVEGLIA
natural_image
Symbol of a trash bin crossed with a diagonal line, representing no waste or discharge (no text or labels)Berlin Brands Group UK Ltd
PO Box 1145
Oxford, OX1 9UW
United Kingdom