Patagonia DAB+ - Radio Auna - Free user manual and instructions
Find the device manual for free Patagonia DAB+ Auna in PDF.

User questions about Patagonia DAB+ Auna
0 question about this device. Answer the ones you know or ask your own.
Ask a new question about this device
Download the instructions for your Radio in PDF format for free! Find your manual Patagonia DAB+ - Auna and take your electronic device back in hand. On this page are published all the documents necessary for the use of your device. Patagonia DAB+ by Auna.
USER MANUAL Patagonia DAB+ Auna
Patagonia DAB+ Kurbelradio Crank Radio Radio à manivelle Radio de manivela Radio a manovella 10037798 10037799 10037800
a u
www.auna-multimedia.com

bar
| Category | Value | |---|---| | Category 1 | 100 | | Category 2 | 100 | | Category 3 | 100 | | Category 4 | 100 | | Category 5 | 100 | | Category 6 | 100 | | Category 7 | 100 | | Category 8 | 100 | | Category 9 | 100 | | Category 10 | 100 | | Category 11 | 100 | | Category 12 | 100 | | Category 13 | 100 | | Category 14 | 100 | | Category 15 | 100 | | Category 16 | 100 | | Category 17 | 100 | | Category 18 | 100 | | Category 19 | 100 | | Category 20 | 100 | | Category 21 | 100 | | Category 22 | 100 | | Category 23 | 100 | | Category 24 | 100 | | Category 25 | 100 | | Category 26 | 100 | | Category 27 | 100 | | Category 28 | 100 | | Category 29 | 100 | | Category 30 | 100 | | Category 31 | 100 | | Category 32 | 100 | | Category 33 | 100 | | Category 34 | 100 | | Category 35 | 100 | | Category 36 | 100 | | Category 37 | 100 | | Category 38 | 100 | | Category 39 | 100 | | Category 40 | 100 | | Category 41 | 100 | | Category 42 | 100 | | Category 43 | 100 | | Category 44 | 100 | | Category 45 | 100 | | Category 46 | 100 | | Category 47 | 100 | | Category 48 | 100 | | Category 49 | 100 | | Category 50 | 100 | | Category 51 | 100 | | Category 52 | 100 | | Category 53 | 100 | | Category 54 | 100 | | Category 55 | 100 | | Category 56 | 100 | | Category 57 | 100 | | Category 58 | 100 | | Category 59 | 100 | | Category 60 | 100 | | Category 61 | 100 | | Category 62 | 100 | | Category 63 | 100 | | Category 64 | 100 | | Category 65 | 100 | | Category 66 | 100 | | Category 67 | 100 | | Category 68 | 100 | | Category 69 | 100 | | Category 70 | 100 | | Category 71 | 100 | | Category 72 | 100 | | Category 73 | 100 | | Category 74 | 100 | | Category 75 | 100 | | Category 76 | 100 | | Category 77 | 100 | | Category 78 | 100 | | Category 79 | 100 | | Category 80 | 100 | | Category 81 | 100 | | Category 82 | 100 | | Category 83 | 100 | | Category 84 | 100 | | Category 85 | 100 | | Category 86 | 100 | | Category 87 | 100 | | Category 88 | 100 | | Category 89 | 100 | | Category 90 | 100 | | Category 91 | 100 | | Category 92 | 100 | | Category 93 | 100 | | Category 94 | 100 | | Category 95 | 100 | | Category 96 | 100 | | Category 97 | 100 | | Category 98 | 100 | | Category 99 | 100 | | Total (Total) |text_image
QR code image containing encoded data, no visible human-readable textINHALT
natural_image
Technical line drawing of a mechanical component with no visible text or symbols19
text_image
12 13 14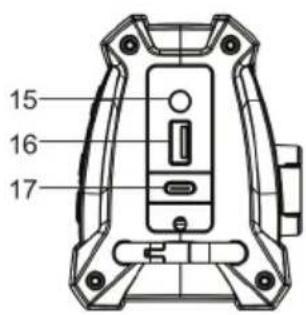
text_image
15 16 17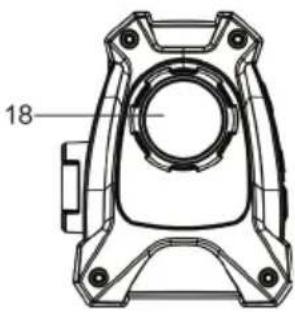
natural_image
Technical line drawing of a mechanical component with no visible text or symbolsnatural_image
Technical line drawing of a mechanical component with no visible text or symbolsHandkurbel
text_image
Scanning...Einschalten
text_image
Diagram showing connections between a device component, cable, and electrical outlet with labeled ports and connection pointsnatural_image
Technical line drawing of a vehicle chassis with no visible text or symbolsPaneel oben
Member of Berlin Brands Group
Handwerkerstr. 11
15366 Dahlwitz-Hoppegarten
Deutschland
natural_image
Symbol of a trash bin crossed with a diagonal line, no text or labels presentBerlin Brands Group UK Limited PO Box 42 272 Kensington High Street London, W8 6ND United Kingdom
Congratulations on purchasing this equipment. Please read this manual carefully and take care of the following hints to avoid damages. Any failure caused by ignoring the items and cautions mentioned in the instruction manual are not covered by our warranty and any liability. Scan the QR code to get access to the latest user manual and other information about the product.

text_image
QR code image containing encoded data, no visible human-readable textCONTENTS
Technical Data 24
Safety Instructions 25
Product Overview 27
Power Source 28
Clock Setting 30
DAB/FM-Radio 31
Charging the Internal Battery 33
Charging your Smart Phone or Portable Device 35
Charge / No AA Alert LED Indicator 36
Using the Flashlight/ Siren (SOS) 36
Use Earbuds 37
Care and Maintenance 37
Disposal Considerations 38
Declaration of Conformity 38
TECHNICAL DATA
| Item number 10037798, 100 | 37799, 10037800 |
| Power supply DC input: 5 V | 1000 mARechargeable battery 3.7 V 2500 mAh |
| Radio DAB/DAB+ and FM (RDS)Frequencies FM 87.5-108MHz | DAB/DAB+ Band III: 174.928 MHz (5A)-239.200 MHz (13F) |
| Presets FM 20 presets | DAB/DAB+ 20 presets |
| Weight 0.98 kg | |
| Operational Temperature 0 | °C–40 °C |
SAFETY INSTRUCTIONS
Before you use it, please read the following safety instructions.
- Read all the safety information and instructions before using the product. When passing this product to some one, include all documents.
- If you do not follow the operating instructions provided, it may compromise the safety of your product and this may invalidate the warranty.
- The internal battery in this product is not user replaceable. Do not expose the battery to excessive heat or naked flames. Ensure adequate ventilation and airflow around the product, particularly when charging. Dispose of the product in accordance with local environment all rules.
- Using the product in rooms or climates with high humidity and temperatures may cause condensation to form inside the product, which can damage the product. Use the product in moderate climates only.
- Do not use your product in extremely hot or cold temperatures. Keep the device away from heat sources, such as radiators or gas/electric fires. Do not expose your product to naked flames, such as lighted candles.
- To charge your product, only connect it to a supply source that meets the safety
- Isolation requirements of EN 62368-1 or EN 60950-1 for an accessible safety extra low voltage circuit. For this connection, use either the supplied USB Type-C cable or a suitably CE approved power adapter with the correct USB output rating.
- Power the product using an external 5V DC 1A power supply. The maximum output is 1A, protected by an internal circuit.
- Before you charge your product, ensure that the available supply voltage corresponds with the required operation at voltage of the product.
- Disconnect your product from the charging power supply if you will not use your product for a long period of time (for example, if you are going on holiday).
- Always unplug your product from the charging power supply before cleaning. When cleaning the product, do not use any type of abrasive pad or abrasive cleaning solutions as these may damage the product's surface.
- To reduce the risk of electric shock, do not remove any screws. The product does not contain any user-service able parts inside. Product repairs should only be carried out by authorised personnel.
On waterproof performance of this product
- The water resistant specifications of this product are equivalent to IPX4 in IEC 60529 "Degrees of protection against ingress of water (IP Code)", which specifies the degree of protection provided against the entry of water. The product cannot be used in water.
- Unless the unit is used correctly, water may get into the product and cause fire, electrocution, or malfunctions. Note the following cautions carefully and use correctly.
IPX4: Protected against water splashing from any direction.
Liquids that the water resistant performance specifications apply to
| Applicable Fresh water, tap water | |
| Not applicable Liquids other than those above (examples:soapy water, detergent water, water with bath agents, shampoo, hot spring water, pool water, seawater, etc.) | |
| The water resistant performance is based on measurements performed under the conditions described above. Note that malfunctions resulting from water immersion caused by customer misuse are not covered by the warranty. |
To maintain water resistant performance
Carefully note the precautions below to ensure proper use.
- Do not splash water forcibly into the sound output holes.
- Do not fall into the water, and do not use underwater.
- Do not allow the product to remain wet in a cold environment, as the water may freeze. To prevent malfunction, make sure to wipe off any water after use.
- Do not place the product in water or use it in a humid place such as a bathroom.
- Do not drop expose it to mechanical shock. Doing so may deform or damage the product, resulting in deterioration of water resistance performance.
- Use a soft dry cloth to wipe off any water that gets on the product. If water remains in the speaker output holes, the speaker may become muffled or completely inaudible. If this happens, position the Speaker holes facing downward, and shake several times to get the water out.
PRODUCT OVERVIEW
text_image
8 9 10 11 S35 SELECT 1 2 3 4 5 6 7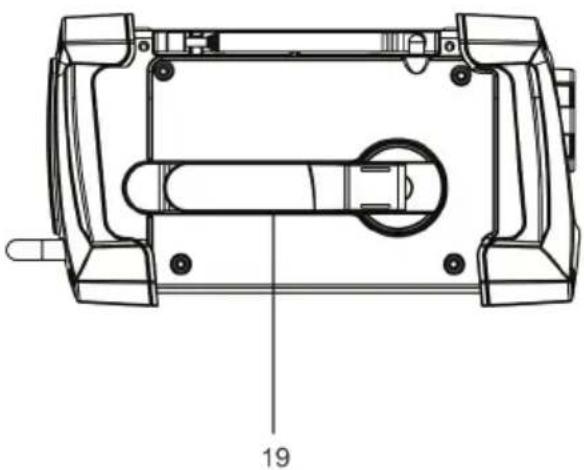
natural_image
Technical line drawing of a mechanical component with no visible text or symbols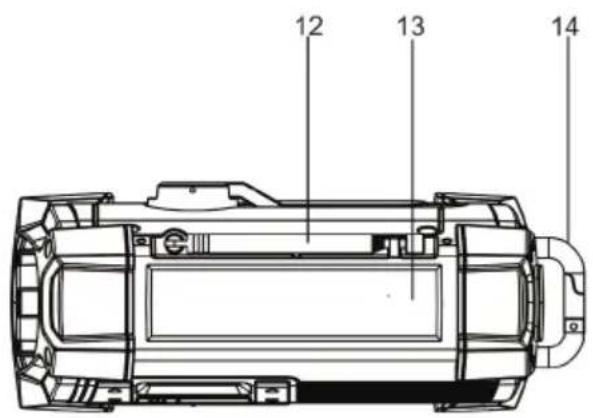
text_image
12 13 14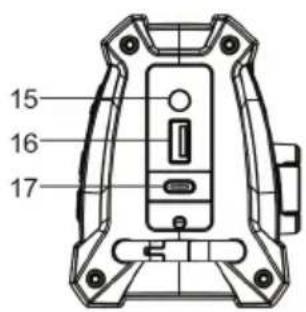
text_image
15 16 17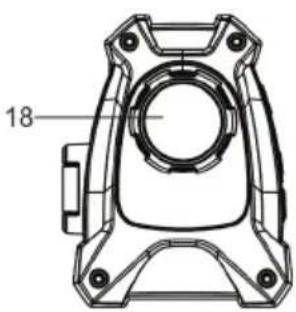
natural_image
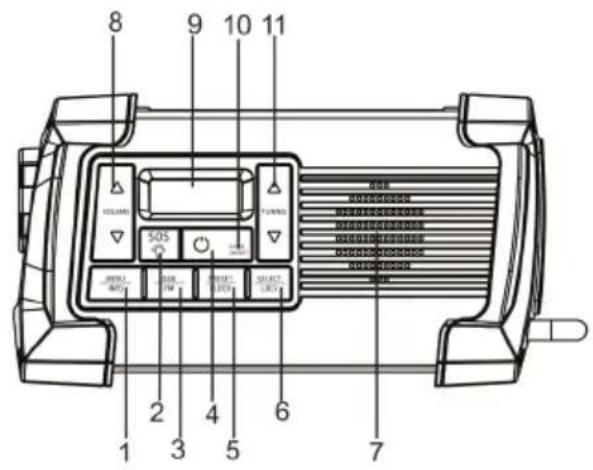
Technical line drawing of a mechanical component with no visible text or symbols1 MENU/INFO Button
2 Flashlight ON/OFF Switch
SOS Siren ON/OFF Switch
3 DAB/FM Button
4 Power On/Standby Button
5 Preset /Clock Button
6 Select / Lock Button
7 Speaker
8 Volume (∧/∨) Button
9 LCD Display
10 Charging Indicator for Built-in Battery
11 TUNING (∧/∨) Button
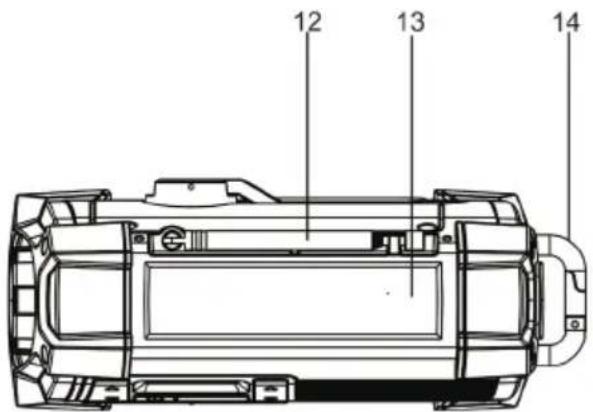
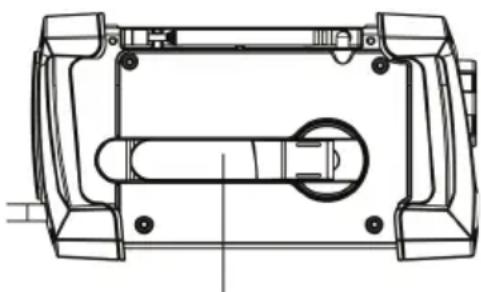
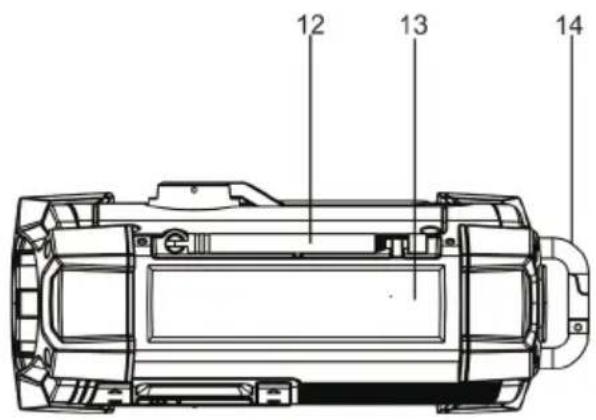
12 Rotary Telescopic Antenna
13 Solar Panel
14 Backband buckle
15 Headphone Jack
16 USB Charging Port
17 Type-C Input Jack
18 LED Flashlight
19 Hand Crank
POWER SOURCE
This radio is designed to operate on multiple powered sources. There are three ways to power the unit.
- The icon is displayed when the battery is charging. The Charge indicator lights in RED.
- When icon is displayed, the battery charge is low and requires charging.
A 3.7 V DC rechargeable lithium battery is included with the product and comes pre-installed in the unit.
- Lift the Hand Crank handle outward until it's fully extended. Rotating the Hand Crank either clockwise or counterclockwise to begin charging the internal battery. The red CHARGE LED on the front panel will light red while you are turning the Hand Crank.
natural_image
Technical line drawing of a mechanical housing or enclosure with internal components (no text or symbols)hand crank
- Continue turning the Crank to generate electricity to charge the battery. More power is generated the longer you turn the crank handle, and the Radio listening time will be extended (Radio reception only).
Note: Turn the Hand Crank continuously in a clockwise or counterclockwise direction at 100-150 RPM (1-2 complete turns per second) to generate constant power and charge the internal battery. It may require up to 5-6 minutes of cranking if the battery is completely drained and the LCD clock display and LED light do not work.
- Press the Power On/Standby button to turn on the unit for operation.
Lithium Battery Safety Instructions
- Use only chargers rated for Lithium cells. Be sure the charger's voltage and current settings are correct for the battery pack being charged.
- Charge batteries on a fireproof surface away from flammable items or liquids.
- Batteries should NEVER be left unattended while charging. Only adults should charge the batteries.
- Follow the manufacturer's instructions for charging the product and do not charge longer than recommended. Unplug the charger when the battery is charged.
Solar power
Put the unit in direct sunlight, making sure the solar panel of the unit is facing towards the sun. If the sunlight is strong enough, the red CHARGE LED on the front panel of the unit will light up red indicating the unit is charging. More power is generated the longer you leave the unit in direct sunlight, and the Radio listening time will be extended (Radio reception only).
Note: If the battery is completely drained (LCD clock display and LED light do not work), it may require very long exposure to direct sunlight in order to charge the battery using the solar panel. You should use one of the other power modes available if you need to use the radio immediately.
TYPE-C USB port charging
- Connect the Type-C cable to the Type-C port.
- Connect the other end of the Type-C cable to a power outlet, using a USB power adapter. You can also charge the battery by connecting Type-C cable to a computer's USB port. The red CHARGE LED on the front panel of the unit will light up red indicating the unit is charging.
- Press the Power button to turn on the unit. To turn off, press the Power button again.
Notes
- The USB power adaptor (not included) described above is the same type commonly used with smartphones. A USB Type-A to Type-C USB cord is also required for charging the unit via the Type-C USB jack located on the side of the unit.
- You may experience noise or reduced reception if you are operating the radio when using the USB Type-C charging port. This interference is caused by the adaptor you are using and not a defect with the product. We recommend using another adaptor, preferably a linear type or refrain from using the radio until the internal battery is fully charged.
Low battery indicator
When using battery power to operate this unit and the battery power becomes weak, the low battery icon will appear & flashing on LCD display. You are recommended to charge the rechargeable battery.
Power button
- Press and hold the power button ⏻ to go to the standby mode.
- Press Power button ⏻ again to turn on the unit.
- Standby mode: Press and hold the power button ⏻ 3 seconds to power off.
CLOCK SETTING
When the unit is in standby mode:
- Press the CLOCK button, the day digits will flash on the display.
- Press the TUNING ( / ) button repeatedly to adjust the day digits, then press the SELECT button to confirm. The month digits will flash on the display.
- Press the TUNING ( / ) button repeatedly buttons to adjust the month digits, then press the SELECT Button to confirm. The year digits will flash on the display.
- Press the TUNING (∧/∨) button repeatedly to adjust the year digits, then press the SELECT Button to confirm. The hour digits will flash on the display.
- Press the TUNING (∧/∨) button repeatedly to adjust the hour digits, then press the SELECT button to confirm. The minute digits will flash on the display.
- Press the TUNING (∧/∨) button repeatedly to adjust the minute digits, and then press the SELECT button to confirm.
The time is now set
Note: If the unit was reset or if you are charging a completely dead battery, you need to set the clock again.
DAB/FM-RADIO
Turn on power
Turn on the DAB Digital Radio by pressing the Power On/Standby Button. The First time the DAB Digital Radio is switched, it will start up DAB mode. It will automatically scan for the available radio stations.
Listening to DAB radio or FM radio
Changing digital stations
- Press the DAB/FM button select 'DAB radio' The first time you select DAB radio, will perform an autotune to find all available stations and will tune into one when finished.
- Press the TUNING ( / ) button browse through the list of available digital stations.
- Press the Select Button to change the station.
Changing FM stations
Seek tuning
- Press the DAB/FM button to Select 'FM radio'.
- Press the TUNING (∧/∨) button to find FM radio station that has a strong signal.
Storing a preset
You can store up to 20 DAB and 20 FM for quick access. Storing presets to the preset list
- Tune to the radio station you want to store.
- Press and hold PRESET button until the preset list is displayed.
- Press TUNING ( / ) button repeatedly to adjust the preset numbers, then press the SELECT button to choose a preset number, then press the select button to confirm it.
If there is already a radio station saved to the preset you've selected, the new station replaces it
Listening to presets
To listen to any preset, press the PRESET button to open the preset list. Press the TUNING (∧/∨) buttons to select the list of presets. Then press the SELECT Button and Select to choose a preset number
Changing your preferred language
You can select the language that uses for menus and options.
Scanning...

- Press and hold the Menu Button for 2 seconds to view the main menu.
- Press TUNING (∧/∨) and Select to choose 'System' > 'Language'.
- Press TUNING (∧/∨) and Select to select a menu language.
Carrying out a factory reset
Resetting all presets, stored stations and resets all other options to default settings.
- Press and hold the Menu Button for 2 seconds to view the main menu.
- Press TUNING (∧/∨) and Select to choose 'System' > 'Factory Reset'.
- Press TUNING ( / ) and Select 'Yes' to reset factory settings. if you do not want to reset your factory settings, Select 'No'.
DAB settings: You can only see the DAB settings when you have selected 'DAB' as the radio source.
Full scan
You can use the 'Scan' (auto tune) function to automatically scan for new digital radio stations and remove inactive ones.
To carry out an auto tune:
- Press and hold the Menu Button for 2 seconds to view the main menu.
- Press TUNING (∧/∨) Button and Select to choose 'Scan'. The number of stations will be displayed during the auto tune.
When the auto tune has finished, will tune to the last station that you were listening to. If the last station you were listening to is no longer available, will tune into the first station in the alphabetical list.
Manual tuning
To manually check the signal strength of a known channel:
- Press and hold the Menu button.
- Press TUNING (∧/∨) button and Select to choose 'Manual tune'.
- Press TUNING (∧/∨) button and Select to choose the channel.
FM radio settings: You can only see the FM radio settings when you have selected 'FM' as the radio source.
FM scan
You can choose whether automatically stops at the next available FM station or the next available FM station with a strong signal when scanning for an FM station. To change the FM scan setting:
- Press and hold the Menu Button for 2 seconds to view the main menu.
- Press TUNING ( / ) and Select to choose 'Scan Setting'.
- Select between 'Strong Stations' or 'All Stations'.
Volume adjustment: Turn the Volume (∧/∨) Button to adjust the volume.
CHARGING THE INTERNAL BATTERY
Dynamo charging
- When you turn the hand crank, the built-in dynamo will start to generate electricity. The Lithium battery of the unit will be charged automatically as long as you turn the hand crank.
- While charging, the CHARGE LED on the front panel of the unit will light up red.
Note: While the intensity of the battery power is limited, the low battery indicator on LCD display is flashing, the internal rechargeable Lithium battery is low and needs to be charged. Rotate the Hand Crank again to begin charging the internal battery.
Computer USB charging.
- Use a standard USB type A to USB type C cable. Plug one end with USB type A into the computer USB port. Plug the other end with USB type C into USB-type-C jack of the unit. It will start to charge the Lithium battery automatically when your computer is ON.
- While charging, the CHARGE LED on front panel of the unit will light up red. It will turn to green when the battery is fully charged.
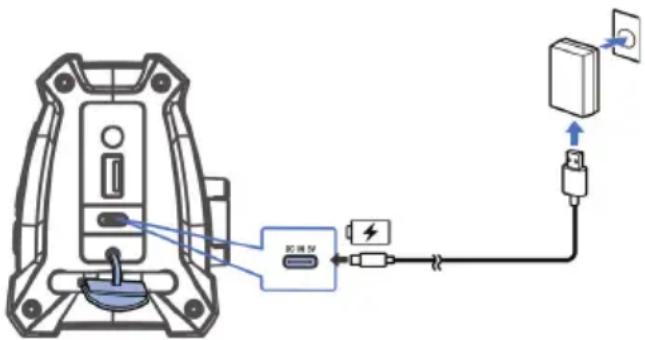
text_image
Diagram showing connections between a device component, a USB port, and an electrical outlet with power supply- We recommend you charge the Lithium battery for 3 - 4 hours prior to use. Please do not charge the battery longer than recommendation as it will shorten the battery life.
- The radio should not be used while charging with your computer.
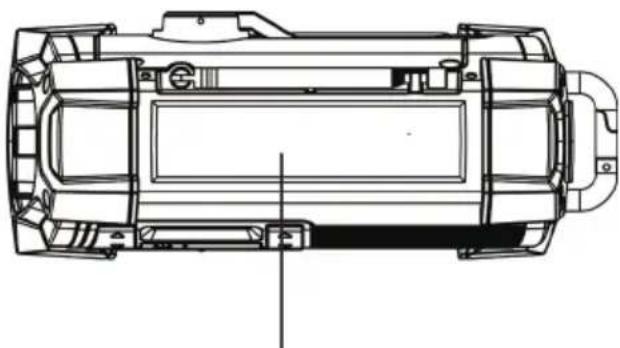
Solar charging
The solar panel is located on the top of the unit. Reposition the unit so the top panel is facing towards the sun for optimal charging if necessary.
- Put the unit in direct sunlight and the unit will begin charging the internal rechargeable battery automatically.
- While charging, the CHARGE LED on the front panel of the unit will light up red.. It will turn to green when the battery is fully charged.
natural_image
Technical line drawing of a vehicle chassis with no visible text or symbolstop panel
NOTE: The unit can only be charged using outdoor sunlight. Indoor incandescent lights and lamps are not strong enough to charge the rechargeable battery properly.
CHARGING YOUR SMART PHONE OR PORTABLE DEVICE
The unit is in standby or power off mode.
This unit features a USB port for charging your portable device (iPod, iPhone, Android phone, etc.) When used with the USB charging cord that came with your device.
- Fully charge the built-in rechargeable lithium battery prior to attaching the device to be charged.
- Plug one end of the USB cable (not included) into the USB port located on the side of unit, Plug the other end of the cord into the device you wish to charge.
- Observe the battery charge indicator on your device and the charging will start immediately.
- It is recommended that you fully charge the internal Li-ion battery prior to attempting to charge a mobile device with the USB port. The USB port is only capable of delivering the amount of power that is left in the internal Li-ion battery.
- Unplug the cable when your device is charged or when the internal Li-ion battery of the is drained.
CAUTION:
Before charging, please refer to the user manual of the device you wish to charge to make sure the charging current required does not exceed 1Amp (1,000 mA) of charging current. Overloading the charge circuit may cause damage.
Notes:
- Some smart phones and portable devices use proprietary USB connections and circuitry, so they may not charge when plugged into the USB port. Please refer to your device user manual before you attempt to charge them.
- It is normal for the product to be warm while the USB port is in use and charging your smart phone or portable device.
- The unit will switch to from charging mode to standby mode automatically if internal Li-ion battery is drained.
- After removing the external device you attached to product for charging, wait for 10 – 15 seconds before powering on the unit.
- In some cases, the internal battery may not fully charge your portable device. It's recommended that if you start to get intermittent charge indications, unplug the device and fully recharge the internal battery
of the product before attempting to charge your portable device again. See the "Charging the Internal Battery" section above for more information.
CHARGE / NO AA ALERT LED INDICATOR
Battery Charge LED
Battery Charging via USB
• LED lights Red during charging.
• LED lights Green when fully charged.
Battery Charging via Crank
• LED lights Red during charging.
Battery Charging via Solar
- LED lights Red during charging (Must be outdoors and under strong/direct sunlight)
USING THE FLASHLIGHT/ SIREN (SOS)
The LED flashlight is built into the side of the unit.
The product features 2 selections for the LED Flashlight. Press the LED Flashlight button once for High, again for Blinking for SOS (Morse Code Distress Signal, three short flashes, three long flashes, repeatedly.) and one more time to shut the Flashlight off.
NOTE: When the flashlight is used for extended periods of time and causes the battery to drain, the flashlight may no longer work even though the display still shows the time.
Siren (SOS)
- In any mode you can hold the Flashlight button 3sec for Blinking for SOS (Morse Code Distress Signal, three short flashes, three long flashes, repeatedly) for alarm will sound.
- Press the Flashlight button again to turn off SOS.
USE EARBUDS
(not included)
Inserting the plug of your earbuds into the earbuds jack will enable you to listen in private. When using earbuds, the speakers will be disconnected. Read this Important Information before using your earbuds.
- Avoid extended play at very high volume as it may impair your hearing.
- If you experience ringing in your ears, reduce the volume or shut off the unit.
- Keep the volume at a reasonable level even if your headset is an open-air type designed to allow you to hear outside sounds. Please note that excessively high volume may still block outside sounds.
CARE AND MAINTENANCE
- Do not subject the unit to excessive force, shock, dust or extreme temperature.
- Do not tamper the internal components of the unit.
- Clean your unit with a damp (never wet) cloth. Solvent or detergent should never be used.
- Avoid leaving your unit in direct sunlight or in hot, humid or dusty places.
- Keep your unit away from heating appliances and sources of electrical noise such as fluorescent lamps or motors.
DISPOSAL CONSIDERATIONS
natural_image
Symbol of a trash bin crossed with a diagonal line, no text or numbers presentIf there is a legal regulation for the disposal of electrical and electronic devices in your country, this symbol on the product or on the packaging indicates that this product must not be disposed of with household waste. Instead, it must be taken to a collection point for the recycling of electrical and electronic equipment. By disposing of it in accordance with the rules, you are protecting the environment and the health of your fellow human beings from negative consequences. For information about the recycling and disposal of this product, please contact your local authority or your household waste disposal service.
This product contains batteries. If there is a legal regulation for the disposal of batteries in your country, the batteries must not be disposed of with household waste. Find out about local regulations for disposing of batteries. By disposing of them in accordance with the rules, you are protecting the environment and the health of your fellow human beings from negative consequences.
DECLARATION OF CONFORMITY

text_image
CE UK CAManufacturer:
Chal-Tec GmbH, Wallstrasse 16, 10179 Berlin, Germany.
Importer for Great Britain:
Berlin Brands Group UK Limited PO Box 42
272 Kensington High Street
London, W8 6ND
United Kingdom
Hereby, Chal-Tec GmbH declares that the radio equipment type Patagonia DAB+ is in compliance with Directive 2014/53/EU. The full text of the EU declaration of conformity is available at the following internet address: use.berlin/10037798
For Great Britain: Hereby, Chal-Tec GmbH declares that the radio equipment type Patagonia DAB+ is in compliance with the relevant statutory requirements. The full text of the declaration of conformity is available at the following internet address: use.berlin/10037798
Cher client, chère cliente,
text_image
QR code image containing encoded data, no visible human-readable textSOMMAIRE
Fiche technique 40
natural_image
Technical line drawing of a mechanical component with no visible text or symbols19
text_image
12 13 14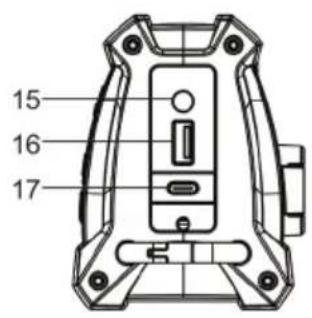
text_image
15 16 17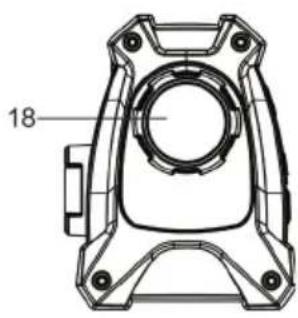
natural_image
Technical line drawing of a mechanical component with no visible text or symbolsnatural_image
Technical line drawing of a mechanical housing or enclosure with internal components and mounting holes (no text or symbols)Manivelle
text_image
Scanning...Allumer
text_image
Diagram showing connection between a device with labeled components including a USB port, battery, and electrical outletnatural_image
Technical line drawing of a vehicle chassis with no visible text or symbolsPanneau frontal
natural_image
Symbol of a trash bin crossed with a diagonal line, no text or labels presentDÉCLARATION DE CONFORMITÉ

text_image
CE UK CAFabricant :
Chal-Tec GmbH, Wallstraße 16, 10179 Berlin, Allemagne.
Berlin Brands Group UK Limited PO Box 42
272 Kensington High Street
London, W8 6ND
United Kingdom
text_image
QR code image containing encoded data, no visible human-readable textINDICE
Dati tecnici 58
natural_image
Technical line drawing of a mechanical component with no visible text or symbols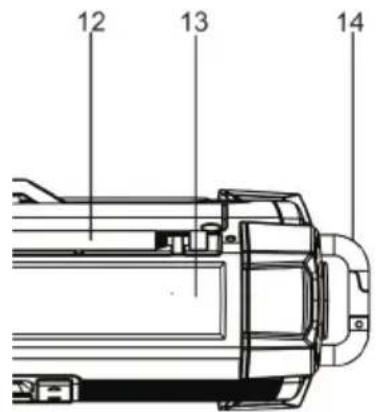
text_image
12 13 14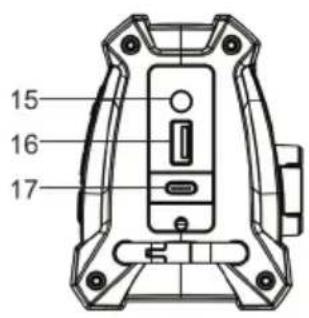
text_image
15 16 17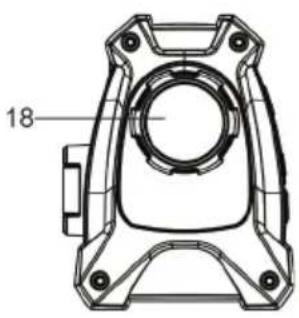
natural_image
Technical line drawing of a mechanical component with no visible text or symbolsnatural_image
Technical line drawing of a mechanical housing or enclosure with internal components and mounting holes (no text or symbols)Manovella
text_image
Scanning...Accensione
text_image
Diagram showing a device connection with labeled components including a USB port, battery, and power outletnatural_image
Technical line drawing of a vehicle chassis with no visible text or symbolsPannello frontale
natural_image
Symbol of a trash bin crossed with a diagonal line, no text or labels presentBerlin Brands Group UK Limited PO Box 42
272 Kensington High Street
London, W8 6ND
United Kingdom
text_image
QR code image containing encoded data, no visible human-readable textCONTENIDO
Datos técnicos 76
natural_image
Technical line drawing of a mechanical component with no visible text or symbols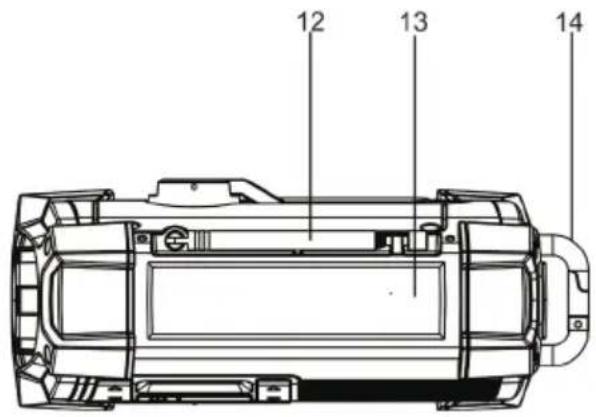
text_image
12 13 14
text_image
15 16 17
natural_image
Technical line drawing of a mechanical component with no visible text or symbolsnatural_image
Technical line drawing of a mechanical component with no visible text or symbolsManivela
text_image
Scanning...Encendido
text_image
Diagram showing connections between a device component, cable, and electrical outlet with labeled ports and connection pointsnatural_image
Technical line drawing of a vehicle chassis with no visible text or symbolsPanel frontal
natural_image
Symbol of a trash bin crossed with a diagonal line, no text or labels presentBerlin Brands Group UK Limited PO Box 42
272 Kensington High Street
London, W8 6ND
United Kingdom