
Northfork - Radio Auna - Free user manual and instructions
Find the device manual for free Northfork Auna in PDF.

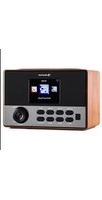
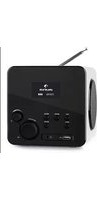
| Product type | Clock radio with CD player, Bluetooth, DAB+ and FM |
| Brand | Auna |
| Model | Northfork |
| Power supply | 230-240 V~ 50/60 Hz |
| Power output | 40 W (2 x 15 W RMS) |
| Radio frequencies | FM 88.8-108 MHz, DAB/DAB+ 174-239 MHz |
| Bluetooth | Version 2.1, frequency 2402-2480 MHz |
| CD player | Yes, MP3 compatible |
| USB port | Yes, for music playback and charging (5 V 2.1 A) |
| Wireless charging | Yes, 9 V 1 A |
| AUX input | Yes (3.5 mm jack) |
| Line-In input | Yes |
| Headphone jack | Yes |
| Functions | Alarm clock, sleep timer, alarm repeat, LCD display, remote control, bass/treble settings |
| Antenna | Telescopic |
| Safety | Do not expose to water, do not block ventilation, unplug during thunderstorms |
| Maintenance and cleaning | Clean with a dry cloth, do not touch the CD lens |
| Spare parts and repairability | Repair by qualified personnel only |
| Supplied accessories | Remote control (button cell battery included) |
Frequently Asked Questions - Northfork Auna
User questions about Northfork Auna
0 question about this device. Answer the ones you know or ask your own.
Ask a new question about this device
Download the instructions for your Radio in PDF format for free! Find your manual Northfork - Auna and take your electronic device back in hand. On this page are published all the documents necessary for the use of your device. Northfork by Auna.
USER MANUAL Northfork Auna
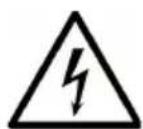
The lighting flash and arrow head within the triangle is warning sign alerting you of dangerous voltage inside the product
CAUTION
RISK OF ELECTRIC SHOCK DO NOT OPEN
CAUTION:TO REDUCE THE RISK OF ELECTRIC SHOCK DO NOT REMOVE COVER (OR BACK).NO USER SERVICIABLE PARTS INSIDE.REFER SERVICING TO QUALIFIED SERVICE PERSONNEL.

The exclamation point within the triangle is a warning sign alerting you of important instructions accompanying the product
Congratulations on purchasing this equipment. Please read this manual carefully and take care of the following hints to avoid damages. Any failure caused by ignoring the items and cautions mentioned in the instruction manual are not covered by our warranty and any liability. Scan the QR code to get access to the latest user manual and other information about the product.

CONTENTS
Technical Data 27
Description of Parts 31
Getting started 33
DAB Radio Mode 36
FM Radio 38
BT mode 40
CD Player 41
MP3 Disc Section 42
Playing Music via USB 43
Wireless Charger Function 44
AUX Input jack 44
LINE INPUT jack 45
Phones jack 45
Disposal Considerations 46
Declaration of Conformity 46
TECHNICAL DATA
| Item number 1003 | 4079 |
| Power supply | 230-240 V~ 50/60 Hz |
| Power rating | 40 W |
| RMS power | 2 x 15 W |
| Radiofrequency FM: 88.8-108 MHz DAB/DAB+: 174-239 MHz | |
| BT Frequency 2402-2480 MHz Version 2.1 | |
WARNING

The lighting flash and arrow head within the triangle is warning sign alerting you of dangerous voltage inside the product
CAUTION
RISK OF ELECTRIC SHOCK DO NOT OPEN
CAUTION:TO REDUCE THE RISK OF ELECTRIC SHOCK DO NOT REMOVE COVER (OR BACK).NO USER SERVICIABLE PARTS INSIDE.REFER SERVICING TO QUALIFIED SERVICE PERSONNEL.

The exclamation point within the triangle is a warning sign alerting you of important instructions accompanying the product
CAUTION: TO REDUCE THE RISK OF ELECTRIC SHOCK AND SERIOUS PERSONAL INJURY,DO NOT REMOVE ANY COVER.NO USER-SERVICABLE
PARTS INSIDE. REFER SERVICING TO QUALIFIED SERVICE PERSONNEL ONLY.
WARNING. TO REDUCE THE RISK OF FIRE OR ELECTRICAL SHOCK, DO NOT EXPOSE THIS PRODUCT TO WATER, RAIN OR MOISTURE.
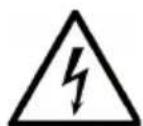
Triangle with lightning plus explanation as follows: DANGEROUS VOLTAGE: The lightning flash with arrowhead symbol within the equilateral triangle is intended to alert the user to the presence of uninsulated dangerous voltage within the product's enclosure that may be of sufficient magnitude to constitute a risk of electric shock to persons.

Triangle with exclamation point plus explanation as follows: ATTENTION: The exclamation point within the equilateral triangle is intended to alert the user to the presence of important operating and maintenance (servicing) instructions in the literature accompanying this product.

CAUTION: Danger of personal injury
Never touch or look into the optical lens within the CD compartment. This is a CLASS-1 laser product.

CAUTION: Danger of hearing damage
To avoid possible hearing damage, do not listen to this Retro turntable at high volume levels for long periods of time. Always keep the volume within reasonable limits.
- Read these instructions.
- Keep these instructions.
- Heed all warnings.
- Follow all instructions.
- Do not use this apparatus near water.
- Clean only with dry cloth.
- Do not block any ventilation openings. Install in accordance with the manufacturer's instructions.
- Do not install near any heat sources such as radiators, heat registers, stoves, or other apparatus (including amplifiers) that produce heat.
- Protect the power cord from being walked on or pinched, particularly at plugs, convenience receptacles, and the Point where they exit from the apparatus.
- Only use attachments/accessories specified by the manufacturer.
- Use only with the cart, stand, tripod, bracket, or table specified by the manufacturer or sold with the apparatus. When a cart is used, use caution when moving the cart/apparatus combination to avoid injury from tip-over.
- Unplug this apparatus during lightning storms or when unused for long periods of time.
- Refer all servicing to qualified service personnel. Servicing is required when the apparatus has been damaged in anyway, such as power-supply cord or plug is damaged, liquid has been spilled or objects have fallen into the apparatus, apparatus has been exposed to rain or moisture, does not operate normally, or has been dropped.
- Apparatus shall not be exposed to dripping or splashing.
- Do not place any sources of danger on the apparatus (e.g. liquid filled objects, lighted candles).
- Where the MAINS plug (or AC/DC adaptor) or an appliance coupler is used as the disconnect device, the disconnect device shall remain readily operable.
- Make sure there is enough free space around the product for ventilation.
- Batteries (battery pack or batteries installed) shall not be exposed to excessive heat such as sunshine, fire or the like.
- The rating label is placed on the back side of apparatus. CAUTION
Danger of explosion if battery is incorrectly replaced.
Replace only with the same or equivalent type
Battery warning
-
Do not ingest the battery (chemical burn hazard)
-
The remote control supplied with this product contains a coin/button cell battery. If the coin/button cell battery is swallowed, it can cause severe internal burns in just 2 hours and can lead to death.
- Keep new and used batteries away from children.
- If the battery compartment does not close securely, stop using the product and keep it away from children.
- If you think batteries may have been swallowed or placed inside any part of the body, seek immediate medical attention.
Special safety instructions
- Never remove the casing of this apparatus.
- Never lubricate any part of this apparatus.
- Never place this apparatus on other electrical equipment.
- Keep this apparatus away from direct sunlight, naked Fames or heat.
- Never look into the laser beam inside this apparatus.
- Ensure that you always have easy access to the power cord, plug or adaptor to disconnect this apparatus from the power
- The apparatus shall not be exposed to dripping or splashing and no liquid-filled objects, such as vases, shall be placed on the apparatus.
- To ensure complete disconnection from the power input, the mains plug of the apparatus shall be disconnected from the mains.
- The mains plug of the apparatus must not be obstructed OR must be easily accessed during intended use.
- Minimum distances 10cm around the apparatus for sufficient ventilations
- The ventilation should not be impeded by covering the ventilation openings with items, such as newspapers, table-cloths, curtains, etc.
- No naked flame sources such as lighted candles should be placed on the apparatus
- Attention should be drawn to environmental aspects of battery disposal
The use of apparatus in moderate climates.
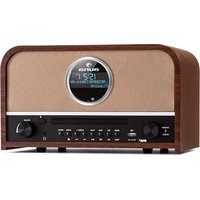
DESCRIPTION OF PARTS
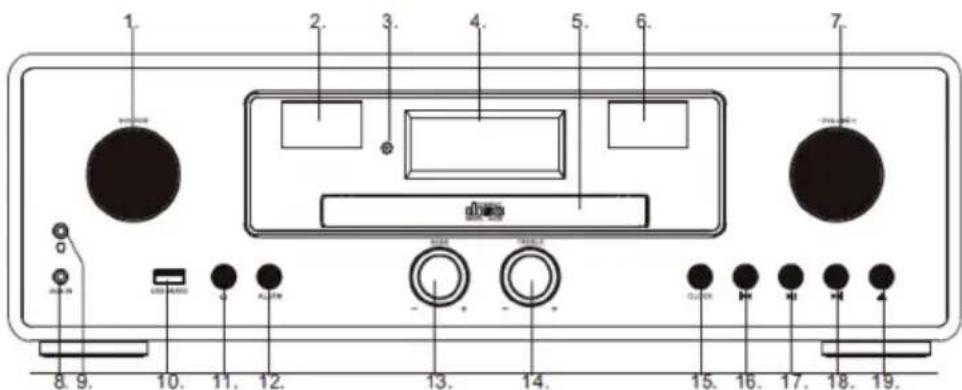
1 Source knob:
Turn this knob to source: DABFM-CD-USB-BT-LINE
2 VU meter
3 Remote receiver
4 LCD display
5 CD door
6 VU Meter
7 Volume knob
8 Line in jack
9 Earphone jack10.
10 USB slot
11 Power ON/OFF button
12 Info / Alarm
13 Bass adjust knob
14 Treble adjust knob
15 Menu / clock
16 Prev button
17 Play/Pause/Enter
18 Next button
19 CD Open/close button
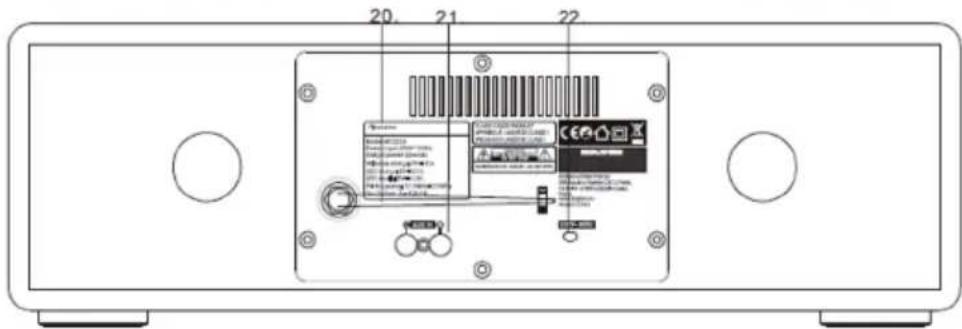
20 Radio ant
21 AUX in
22 AC power cable
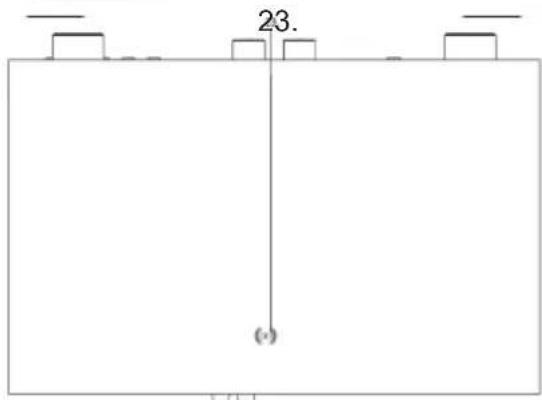
23 Wireless charging
Remote control
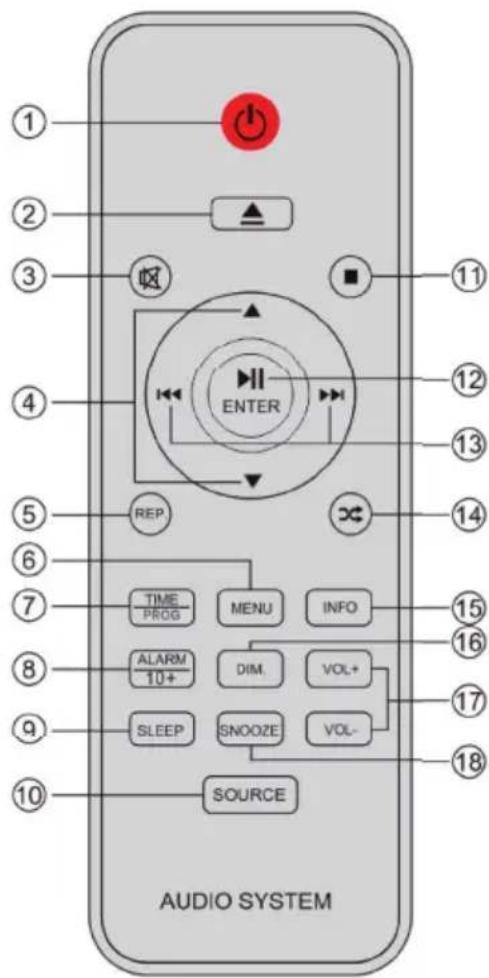
1 Power on/off
10 Source
Place the unit in the desired position and unravel the mains cable. Insert the cable into the supply socket and switch on if applicable.
Auto standby
When playing media from a connected device, the Tower automatically switches to standby if:
- No button is pressed for 10 minutes,
- No audio from a connected device for 10 minutes.
Battery power
- Be sure that the batteries are inserted correctly to avoid damage to the appliance. Always remove the batteries when appliance will not be used for a long period of time, as this will cause leakage to the batteries and subsequently damage to your set.
- Use batteries of the same type. Never use different types of batteries together.
- Do not throw the battery into the fire, or exposed to sunshine or the like.
- If the liquid contained in the batteries comes in contact with eyes or skin, wash the area immediately and carefully with clear water and consult a doctor.
Notes:
- Before using the unit, check that the local mains supply is compatible with the unit 230V (50Hz).
- Do not plug or unplug the power cable when your hands wet.
- When planning not to use this unit for long periods of time (i.e., Vacation etc.) disconnect the plug from the wall outlet.
- When disconnecting the power cord from the wall outlet, grasp the plug; do not pull the cord in order to avoid shock risks caused by the damaged cable.
Operation
Press the POWER button to turn ON/OFF the unit.
Adjusting the volume
Rotate the Volume knob clockwise to increase the volume.
Rotate the Volume knob anti-clockwise to decrease the volume.
Check the display, which will confirm the volume setting.
Mute Function
Press the MUTE button on remote control, The volume is muted and the "Volume Muted" will appear on LCD display. Press this button again to cancel the mute function.
Clock and Timers
Setting the clock and date
After the unit is plugged into a mains supply or following a mains power failure, the display will show the current time and date on the LCD display. The unit should be in standby mode to set the current clock.
- Press CLOCK button, "Time setup" displayed, press ENTER to confirm, "time wizard interval" displayed.
- Press / to select "24H" or "12H", Press ENTER confirm the hour digits on the display will blink.
- Press / to set the hour, press ENTER confirm, the minutes digits on the display will blink.
- Press / to set the minutes, press ENTER confirm, the Year digits on the display will blink
- Press / to set the Year, press ENTER confirm, the Month digits on the display will blink.
- Press / to set the Month, press ENTER confirm, the Day digits on the display will blink.
- Press / to set the Day, press ENTER confirm. press / the select save "YES/NO"
Setting Alarm
Note: Check that the radio has the correct time and date before you set an alarm.
This unit may be used as an alarm clock. The BT device, CD/USB device or DAB/FM radio is activated to play at a preset time.
- Press POWER button to switch the unit to standby mode.
- Make sure that you have set the clock correctly.
- Press ALARM button in shutdown state; press ALARM twice to set Alarm 2.
- "Alarm 1 (or 2) Setup" is displayed. Press the ENTER button to select.
- "Alarm 1 (or 2) Wizard On time" is displayed and the hour digits for the alarm will flash.
-
Press / repeatedly to set hour. Press ENTER to confirm.
-
Press / to set minute,Press ENTER to confirm.
- Press select the Alarm volume from 0 to 30, Press ENTER to confirm.
- Press to scroll to OFF/CD/DAB/FM/USB/BUZZER status. Press ENTER to confirm.
- Press / button to scroll to the duration for the alarm. You can choose from 15, 30, 45, 60, minutes. Press the ENTER button to select. Press / to select YES and press ENTER to save the alarm,
- The display will show the current time and Alarm 1 (or Alarm 2 or at the same time)
Snoopze
- Whenever the alarm (alarm 1, alarm 2) comes on, it can be temporarily suspended for a short period of approximately 9 minutes, by pressing the "SNOOZE" key once.
- The alarm (alarm 1, alarm 2) will then automatically come on again after approximately 9 minutes "snooze" period has ended.
- And the "snoopze" symbol will show on the display to remind that the snooze function is active.
- To deactivate the snooze, press and release the "POWER"key once.
Sleep Timer
- Repeatedly press the SLEEP button, you can set 90/80/70/60/50/40/30/20/10 minutes. This is useful for sleeping to music at night.
- If you want to cancel the sleep mode, repeatedly press SLEEP to select OFF, the sleep mode will cancel.
Display Backlight
You can press the DIM button adjust the display backlight brightness, there are 3 options available, High, Medium and Low.
DAB RADIO MODE
Carefully extend the telescopic aerial.
Press the POWER button to turn on the unit, it will auto into DAB mode.
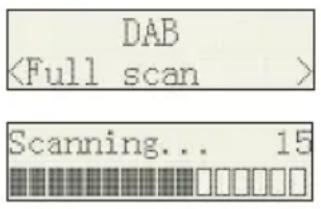
Auto Scan
- Rotate the SOURCE knob to select "DAB MODE".(if unit not in DAB mode).If this is the first time the unit has entered DAB Mode, it will automatically start an 'Auto Scan' to search for available stations. (Once DAB Mode has been used before, the unit will automatically select the previously played station)
- Press ENTER button to automatically start auto scan to search for available station. During the scanning process, the lower line of the display shows a bar graph indicating the progress of the scan.
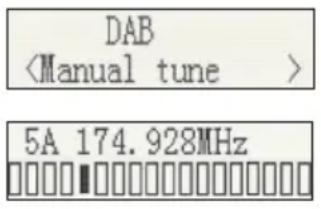
Manual Scan
- Rotate the SOURCE key on main unit to select "DAB MODE".
- Press the or button to select "Manual tune", press the ENTER button to enter the service menu.
- Press or to tune in the desired channel. The graph will indicate the signal strength.
- Press MENU or [ ] to exit scan.
- If no stations are found, please ensure the aerial is extended and test the reception by doing another auto scan in a different location.
DRC(Dynamic Range Control)
Dynamic Range Control (also known as DRC) is a technology used to help make quieter sounds easier to hear in a noisy environment.
- In DAB mode, press the / button to select "DRC", press the ENTER button to display "*" to the top right.
- Press MENU to confirm the setting. The display will return to normal. DRC OFF - DRC is switched off, broadcast DRC will be ignored. DRC LOW - DRC level is set to 1/2 that sent by broadcaster. DRC HIGH - DRC level is used as sent by broadcaster.
Prune (To Remove Stations That are Listed But Unavailable)
In DAB mode, press or to display the "Prune" submenu, press ENTER button to select the Prune option.
System (DAB)
In DAB mode, press / to show the "SYSTEM" submenu, press the ENTER button to go to the system setting submenu.
- Language
Press ENTER to go to language selection; the default source language is English, the selected language will have * displayed at the top right. Users may choose between "Deutsch", "Italiano" and "Français".
- Factory Reset
Press ENTER to go to factory reset. If you wish to perform the reset operation, push the / until "YES" is highlighted on the display and press. A full reset of your radio will be performed. All resets and station lists will be erased.
- SW Version
Press ENTER to view DAB software version. Press Menu or . The display will return to normal.
Note: If there are no operations after 30 seconds, the display will return to normal.
Preset
- Preset Recall: In DAB mode, press / to select "Preset Recall", then press [ENTER] to tune to the station stored in preset memory.
Note: If you have not previously stored a preset station and the preset button is pressed, "Empty preset" will be displayed.
- Preset Store: You may store your preferred DAB stations to the preset station memories. There are 20 memory presets in your radio. Presets are remembered by your radio in the event of a power failure.
The procedure for setting presets and using them to tune stations is the same for DAB modes:
In DAB mode, select the desired wave band. Press to view the stored stations, press or to tune to the required station as previously described, and then press ENTER to select the desired preset number under which you will store the station. Press ENTER to confirm.
FM RADIO
Carefully extend the telescopic aerial to its full length.
Auto Scan
- Rotate the SOURCE knob to select "FM Mode".
- Long press the button, and your radio will scan and stop automatically when it finds a station of sufficient signal strength.
- After a few seconds, the display will update. The display will show the station frequency. If the signal is strong enough and the station signal contains RDS data, then the radio will display the station name.
- To find other stations, press and hold the button as before.
- To scan the FM band in the opposite direction (high frequencies to low frequencies), press the button and hold for 2 seconds.
- When the waveband end is reached, your radio will recommence tuning from the opposite waveband end.
Manual Scan
- Rotate the SOURCE knob on the main unit to select "FM Mode".
- Select FM mode as previously described, if required.
- Press / to tune to a station. Each press of the tuning button will change the frequency up or down by 100kHz .
- When the waveband end is reached, the radio will recommence tuning from the opposite waveband end. If no stations are found, please ensure the aerial is extended and test the reception by doing another auto scan in a different location.
Menu
- Scan Setting
- In FM mode, press MENU, enter the FM menu setting, then press or to select [Scan setting], then press ENTER to select the sensitivity setting:
| 1 Scan Setting | |
| In FM mode, press MENU, enter the FM menu setting, then press or to select [Scan setting], then press ENTER to select the sensitivity setting | |
| 1.1 All stations: ~15dB | FM <Scan setting> |
| Scan setting <All stations> | |
| ▶ | Scan setting <Strong stations> |
| 2 Audio Settings | |
| 2.1 Stereo allowed: | FM <Audio setting> |
| Audio setting <Stereo allowed> | |
| 2.2 Forced mono | FM <Audio setting> |
| Audio setting <Stereo allowed> | |
| Scan setting <Strong station> | |
| 3 PRESET | |
| 3.1 Preset Recall (Choose the Station): Press ENTER, tune to the station stored in preset memory | Preset Recall <1:90.5MHz> |
| 90.5MHz | |
| 3.2 Preset Recall (Choose the Station) | |
| You may store your preferred FM stations to the preset station memories. There are 20 memory presets in your radio. Presets are remembered by your radio in the event of a power failure. The procedure for setting presets and using them to tune stations is the same for DAB modes: In FM mode, select the desired wave band. Press ⇌ ⇌ to view the stored stations, press or to tune to the required station as previously described, and then press ENTER to select the preset number under which you will store the station. Press ENTER to confirm. | Preset Store <1:90.5MHz> |
| Preset 1 stored | |
BT MODE
You must follow several steps to connect your mobile phone:
- Activate BT from your mobile phone (please refer to your phone's user manual)
- Press the POWER button to turn on the unit.
- Rotate the SOURCE knob to select the BT mode It will be ready to pair automatically.
- Use your mobile phone to search for the BT device named "Auna Northfork"
- Your mobile phone will find "Auna Northfork" and will present the option to connect or not. Please connect to it using the password "0000" (if any). When you are successfully connected, the BT indicator "BT connected" appears on the LCD display.
Automatically Connecting with Your Phone
Pairing is only needed the first time the unit and phone are used together. When the unit and phone have been paired once, they will automatically connect when the unit is on and BT is activated on the phone. The next time you power on, the unit will automatically connect to the most recently connected mobile phone.
Play from BT Device
After successful BT connection, press the button to play. Press the or button to skip the tracks backwards or forwards. To pause or resume play, press the button again. Press and hold the button to disconnect BT.
CD PLAYER
NOTE: Never touch the laser lens inside the CD compartment. Clean the laser lens using a CD cleaner disc if it becomes dirty.
- Press the POWER button to turn on the unit.
- Rotate the SOURCE knob to select the CD function.
- Press the button to open the CD door and insert a CD into the tray (with printed label side facing up).
- Press the button again to close the CD DOOR and the disc will rotate for a few seconds, then play the 1st track automatically.
- To temporarily stop playback, press the button, and to resume playback, press it again.
- Press the button to STOP play.
Reverse/forward
- The and buttons are used to jump to a different track number or to scan disc tracks at high speed.
- Press the 四 button once to hear the beginning of the current track. Press it two or more times to hear previous tracks on the disc.
- Press the button to hear the next tracks on the disc.
- Press and hold the button. The current track will be scanned and move backwards to the previous track(s); When the desired track section is found, release the button and normal play will resume.
- Press and hold the button, the current track will be scanned and move forward to the next track(s). When the desired track section is found, release the selected button and normal playback will resume.
Repeat function
The CD REPEAT button may be used to repeat a single track or repeat all tracks on a compact disc.
- Press the REPEAT button once during playback, the "REPEAT ONE" sign will appear on the LCD display for about 2 seconds. The same track will be repeated over and over.
- Press the REPEAT button a second time to repeat all tracks. The "REPEAT ALL" sign will appear on the LCD display for about 2 seconds.
- To cancel REPEAT PLAY, press the REPEAT button repeatedly until "REPEAT OFF" appears on the LCD display for about 2 seconds.
Program Function
The Program feature may be used to program up to 20 tracks to play in a selected order.
- While in the stop mode only (CD is not playing), press the PROG button, and the LCD display will show the wording "P 01" and "T 01" starts to flash.
- Press the and buttons to allocate the desired track.
- Press the PROG button to select and store the track into memory.
- Repeat step 2 to 3 to select up to 20 tracks.
- To play the selected tracks (in the program mode), press the button.
- Press the button to hear the previous program track or press the button to hear the next program track.
Note: After all programmed tracks have been played, the CD player will return to the stop mode.
- Press the button to exit program play mode.
MP3 DISC SECTION
- Press the POWER button to turn on the unit.
- Rotate the SOURCE knob to select CD Mode.
- Close the CD Door. The disc will rotate for a few seconds and then play the 1st track automatically.
- Press the and buttons to choose a track.
- To temporarily stop playback, press the button. To resume, press the button again.
- Press the button to stop play.
Note: Because MP3 discs have a large capacity, disc access times are a little longer.
Repeat Playing Function
Single track repeat: Press the REPEAT button once to repeat a single track. The display appears as "Repeat one".
Whole Disc Repeat: In Play mode, press the REPEAT button 2 times to repeatedly play all tracks on the disc. The display will show "Repeat All". To cancel repeat play, press the REPEAT button repeatedly until the "Repeat off" sign appears.
Programmed play
The tracks on the disc can be programmed to play in any order (up to 20 tracks can be programmed).
Note: this can only be done while in Stop mode.
- Press the PROG button while in Stop mode. "P01" "F01" will appear on the display and "T001" will flash.
- Press either the or button to select the desired tracks in the album, then press the PROG button to store in the memory.
- The first track number is now stored in memory, and the program number changes to "P02", waiting for your next selection.
- Repeat Steps 1 - 3 to program additional tracks.
After programming is finished, press the button, and programmed play begins from the first programmed track. The player stops automatically after all programmed tracks have been played. (Press the button twice to cancel the programmed tracks memory).
This device has been developed using the latest technical advances in the USB field. However, given the wide range of USB storage device types that are currently on the market, we unfortunately cannot guarantee full compatibility with all USB storage devices. For this reason, in rare cases, there may be problems in playing back files from USB storage devices. This is not due to device malfunction.
- Press the POWER button to turn on the unit.
- Rotate the SOURCE knob to select the USB mode, 'USB' appears on the display.
- Connect a USB storage device directly into the USB port. The display briefly shows the number of folders and then the total number of tracks. Playback will automatically start after a few seconds.
- Operation of the control buttons is the same as for MP3 playback. Please refer to MP3 DISC SECTION operations as described previously.
NOTES:
- Always directly connect a USB storage medium to the USB port to prevent any malfunctions.
-
The USB port is not designed for charging external devices.
-
Important: Switch the device to a different operating mode before you remove the USB storage device.
WIRELESS CHARGER FUNCTION
Simply place your wireless charging device on the wireless charger area indicated on the top surface and charging will begin on contact. Output power is 9V = 1.1A
USB Charging (5V Out)
The USB port is designed for charging external devices, such as smart phones.
Output power is 5V = 2.1A .
AUX INPUT JACK
- Press the POWER button to turn on the unit.
- Rotate SOURCE knob to select the Aux-In mode. 'Aux-In' will appear on the LCD display.
- Connect the AUX connect wire from the AUX out jack of your personal player (e.g. portable MP3 player) to the AUX input jack.
- Start playback from your personal player.
LINE INPUT JACK
- Press the POWER button to turn on the unit.
- Rotate SOURCE knob to select the Line-In mode. 'Line-In' will appear on the LCD display.
- Connect the Line in connect wire from the line out jack of your personal player (e.g. portable MP3 player) to the Line input jack.
- Start playback from your personal player.
PHONES JACK
- Rotate the volume to set a low volume
- Insert the headphones to the Phone jack.
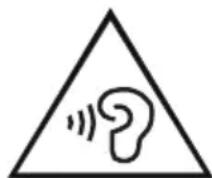
Caution: Risk of hearing impairment
Set a low volume on the playback device before connecting the headphones to the sound source. Avoid excessive volume, particularly over extended periods or frequent use.

If there is a legal regulation for the disposal of electrical and electronic devices in your country, this symbol on the product or on the packaging indicates that this product must not be disposed of with household waste. Instead, it must be taken to a collection point for the recycling of electrical and electronic equipment. By disposing of it in accordance with the rules, you are protecting the environment and the health of your fellow human beings from negative consequences. For information about the recycling and disposal of this product, please contact your local authority or your household waste disposal service.
DECLARATION OF CONFORMITY
CE UK CA
Manufacturer:
Chal-Tec GmbH, Wallstrasse 16, 10179 Berlin, Germany.
Importer for Great Britain:
Berlin Brands Group UK Ltd PO Box 1145 Oxford, OX1 9UW United Kingdom
Hereby, Chal-Tec GmbH declares that the radio equipment type [Bezeichnung] is in compliance with Directive 2014/53/EU. The full text of the EU declaration of conformity is available at the following internet address: use.berlin/10034079
For Great Britain: Hereby, Chal-Tec GmbH declares that the radio equipment type [Bezeichnung] is in compliance with the relevant statutory requirements. The full text of the declaration of conformity is available at the following internet address: use.berlin/10034079
Chere cliente, cher client,
The lighting flash and arrow head within the triangle is warning sign alerting you of dangerous voltage inside the product
CAUTION
RISK OF ELECTRIC SHOCK DO NOT OPEN
CAUTION:TO REDUCE THE RISK OF ELECTRIC SHOCK DO NOT REMOVE COVER (OR BACK).NO USER SERVICIABLE PARTS INSIDE.REFER SERVICING TO QUALIFIED SERVICE PERSONNEL.

The exclamation point within the triangle is a warning sign alerting you of important instructions accompanying the product
ATTENTION : POUR RÉDUIRE LES RISQUES DE CHOÇS ÉLECTRIQUES, NE DEMIONTEZ AUCUN Cache. L'APPAREIL NE CONTIEN AUCUNE PIECE À ENTRETENIR. ADRESSEVOUS UNIQUÉMENT À DES PERSONNELS QUALIFIÉS POUR LA MAINTENANCE. MISE EN GARDE / POUR RÉDUIRE LE RISQUE D'INCENDIE ET DE CHOC ÉLECTRIQUE, NE PLONGEZ PAS L'APPAREIL DANS L'EAU ET NE L'EXPOSEZ PAS À LA PLUIE OU À L'HUMIDITÉ.

The lighting flash and arrow head within the triangle is warning sign alerting you of dangerous voltage inside the product
CAUTION
RISK OF ELECTRIC SHOCK DO NOT OPEN
CAUTION:TO REDUCE THE RISK OF ELECTRIC SHOCK DO NOT REMOVE COVER (OR BACK).NO USER SERVICIABLE PARTS INSIDE.REFER SERVICING TO QUALIFIED SERVICE PERSONNEL.

The exclamation point within the triangle is a warning sign alerting you of important instructions accompanying the product
ATENCION: NO ABRIR LA CARCASA PARA EVITAR UNA DESCARGA ELECTRICA Y LESIONES PERSONALES GRAVES. EN EL INTERIOR NO EXISTE NINGUN COMPONENTE QUE EL CLIENTE PUEDA REPARAR. CONTACTE EXCLUSIVANTE CON UN SERVICIO TECNICO CUALIFICADO. ADVERTENCIA. PARA REDUCIR EL PELIGRO DE INCENDIO O DESCARGA ELECTRICA, NO EXPONGA EL APARATO AL AGUA, A LA LLUVIA O A LA HUMEDAD.
Desenrolle la antenna telescopia completeness.
Modos de repetition:
The lighting flash and arrow head within the triangle is warning sign alerting you of dangerous voltage inside the product
CAUTION
RISK OF ELECTRIC SHOCK DO NOT OPEN
CAUTION:TO REDUCE THE RISK OF ELECTRIC SHOCK DO NOT REMOVE COVER (OR BACK).NO USER SERVICIABLE PARTS INSIDE.REFER SERVICING TO QUALIFIED SERVICE PERSONNEL.

The exclamation point within the triangle is a warning sign alerting you of important instructions accompanying the product
ATTENZIONE: NON APRIRE L'ALLOGGIAMENTO, IN MODO DA EVITARE FOLGORAZIONI E SERIES LESIONI. ALL'INTERNO NON CI SONO COMPONENTI CHE NECESITANO DELLA MANUTENZIONE DA PARTE DELL'UTENTE. RIVOLGERSI ESCLUSIVAMENTE A TECHNICI QUALIFICATI. AVERTIMENO: PER RIDURRE IL RISCHIO DI INCENDI E FOLGORAZIONI, NON ESPORRE IL DISPOSITIVO A PIOGGIA, ACQUA O UMIDITA.


- CAUTION
- RISK OF ELECTRIC SHOCK DO NOT OPEN
- CONTENTS
- TECHNICAL DATA
- WARNING
- CAUTION: Danger of personal injury
- CAUTION: Danger of hearing damage
- Battery warning
- Special safety instructions
- DESCRIPTION OF PARTS
- Remote control
- Auto standby
- Battery power
- Notes:
- Operation
- Adjusting the volume
- Mute Function
- Clock and Timers
- Setting Alarm
- Snoopze
- Sleep Timer
- Display Backlight
- DAB RADIO MODE
- Auto Scan
- Manual Scan
- DRC(Dynamic Range Control)
- Prune (To Remove Stations That are Listed But Unavailable)
- System (DAB)
- Preset
- FM RADIO
- Menu
- BT MODE
- Automatically Connecting with Your Phone
- Play from BT Device
- CD PLAYER
- Reverse/forward
- Repeat function
- Program Function
- MP3 DISC SECTION
- Repeat Playing Function
- Programmed play
- WIRELESS CHARGER FUNCTION
- USB Charging (5V Out)
- AUX INPUT JACK
- LINE INPUT JACK
- PHONES JACK
- Caution: Risk of hearing impairment
- DECLARATION OF CONFORMITY
- CE UK CA
- Manufacturer:
- Importer for Great Britain:
- Chere cliente, cher client,
- Modos de repetition:
Brand : Auna
Model : Northfork
Category : Radio