
BMR050 - Radio MAKITA - Free user manual and instructions
Find the device manual for free BMR050 MAKITA in PDF.
| Product Type | Portable radio with flashlight |
| Brand | Makita |
| Model | BMR050 |
| Power Source | Lithium-ion battery 14.4 V / 18 V DC (slide system) |
| Dimensions (L x W x H) | 263 x 75 x 196 mm (with BL1430 battery) |
| Weight (with battery) | 0.95 kg (BL1415) / 1.14 kg (BL1430) / 1.01 kg (BL1815) / 1.23 kg (BL1830) |
| Compatible Battery Type | Makita BL1415, BL1430, BL1815, BL1830 series (14.4 V / 18 V) |
| Radio Only Battery Life (18 V, 100 mW) | 11 h (BL1415/BL1815) / 25 h (BL1430/BL1830) |
| Light Only Battery Life | 3.5 h (BL1415/BL1815) / 8.5 h (BL1430/BL1830) |
| Radio + Light Battery Life | 2.5 h (BL1415/BL1815) / 6 h (BL1430/BL1830) |
| Output Power | 3.0 W at 18 V |
| Speaker | ø 51 mm, 8 Ω, 3 W |
| AM Frequency Range | 522 – 1 629 kHz |
| FM Frequency Range | 87.5 – 108 MHz |
| Flashlight | 3 LEDs of 1.4 W each, swivel head (150°, 6 positions) |
| Display | Backlit LCD |
| Preset Memory | 3 stations per band (AM/FM) |
| Maintenance | Clean with soft cloth; repairs exclusively by Makita authorized center |
| Safety | Do not immerse, avoid metal dust, use only specified charger |
| Protection Rating | Humidity < 90% (not immersible) |
Frequently Asked Questions - BMR050 MAKITA
User questions about BMR050 MAKITA
0 question about this device. Answer the ones you know or ask your own.
Ask a new question about this device
Download the instructions for your Radio in PDF format for free! Find your manual BMR050 - MAKITA and take your electronic device back in hand. On this page are published all the documents necessary for the use of your device. BMR050 by MAKITA.
USER MANUAL BMR050 MAKITA
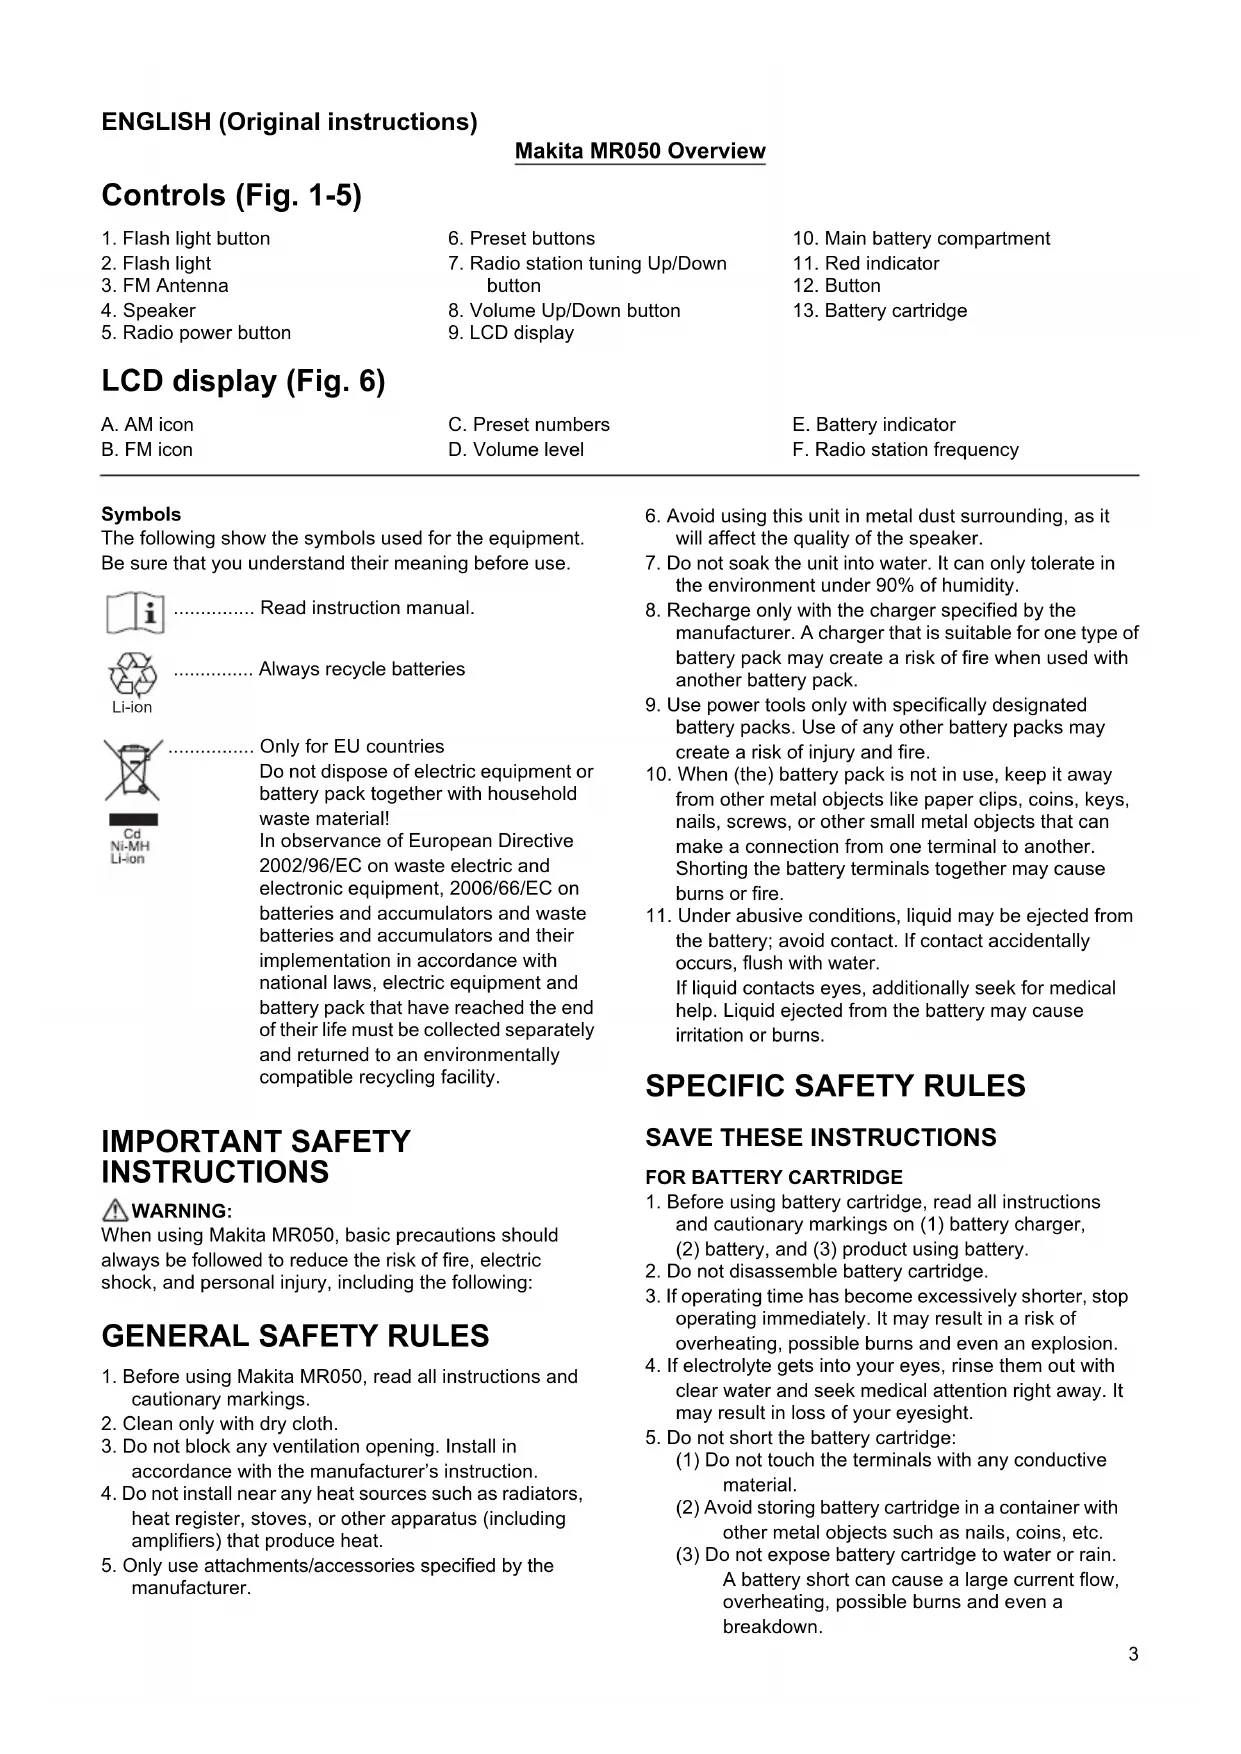
GB Flashlight Radio Instruction manual
-
Flash light button
-
Preset buttons
-
Main battery compartment
-
Flash light
-
Radio station tuning Up/Down button
-
Red indicator
-
FM Antenna
-
Volume Up/Down button
-
Button
-
Speaker
-
LCD display
-
Battery cartridge
-
Radio power button
LCD display (Fig. 6)
A.AMicon
C. Preset numbers
E. Battery indicator
B. FM icon
D. Volume level
F. Radio station frequency
Symbols
The following show the symbols used for the equipment. Be sure that you understand their meaning before use.

Read instruction manual.

Li-ion
Always recycle batteries

Only for EU countries
Do not dispose of electric equipment or battery pack together with household waste material!
In observance of European Directive 2002/96/EC on waste electric and electronic equipment, 2006/66/EC on batteries and accumulators and waste batteries and accumulators and their implementation in accordance with national laws, electric equipment and battery pack that have reached the end of their life must be collected separately and returned to an environmentally compatible recycling facility.
IMPORTANT SAFETY INSTRUCTIONS
WARNING:
When using Makita MR050, basic precautions should always be followed to reduce the risk of fire, electric shock, and personal injury, including the following:
GENERAL SAFETY RULES
- Before using Makita MR050, read all instructions and cautionary markings.
- Clean only with dry cloth.
- Do not block any ventilation opening. Install in accordance with the manufacturer's instruction.
- Do not install near any heat sources such as radiators, heat register, stoves, or other apparatus (including amplifiers) that produce heat.
-
Only use attachments/accessories specified by the manufacturer.
-
Avoid using this unit in metal dust surrounding, as it will affect the quality of the speaker.
- Do not soak the unit into water. It can only tolerate in the environment under 90% of humidity.
- Recharge only with the charger specified by the manufacturer. A charger that is suitable for one type of battery pack may create a risk of fire when used with another battery pack.
- Use power tools only with specifically designated battery packs. Use of any other battery packs may create a risk of injury and fire.
- When (the) battery pack is not in use, keep it away from other metal objects like paper clips, coins, keys, nails, screws, or other small metal objects that can make a connection from one terminal to another. Shorting the battery terminals together may cause burns or fire.
- Under abusive conditions, liquid may be ejected from the battery; avoid contact. If contact accidentally occurs, flush with water.
If liquid contacts eyes, additionally seek for medical help. Liquid ejected from the battery may cause irritation or burns.
SPECIFIC SAFETY RULES
SAVE THESE INSTRUCTIONS
FOR BATTERY CARTRIDGE
-
Before using battery cartridge, read all instructions and cautionary markings on (1) battery charger, (2) battery, and (3) product using battery.
-
Do not disassemble battery cartridge.
-
If operating time has become excessively shorter, stop operating immediately. It may result in a risk of overheating, possible burns and even an explosion.
-
If electrolyte gets into your eyes, rinse them out with clear water and seek medical attention right away. It may result in loss of your eyesight.
-
Do not short the battery cartridge:
(1) Do not touch the terminals with any conductive material.
(2) Avoid storing battery cartridge in a container with other metal objects such as nails, coins, etc.
(3) Do not expose battery cartridge to water or rain. A battery short can cause a large current flow, overheating, possible burns and even a breakdown.
- Do not store the tool and battery cartridge in locations where the temperature may reach or exceed 50^ (122^) .
- Do not incinerate the battery cartridge even if it is severely damaged or is completely worn out. The battery cartridge can explode in a fire.
- Be careful not to drop or strike battery.
- Do not use dropped or struck battery. (Do not use a damaged battery.)
SAVE THESE INSTRUCTIONS
Tips for maintaining maximum battery life
- Charge the battery cartridge before completely discharged. Always stop tool operation and charge the battery cartridge when you notice less tool power.
- Never recharge a fully charged battery cartridge.
Overcharging shortens the battery service life.
- Charge the battery cartridge with room temperature at 10^ - 40^ (50^ - 104^) . Let a heated battery cartridge cool down before charging it.
- Charge the battery cartridge once in every six months if you do not use it for a long period of time.
Installing or removing the slide battery cartridge (Fig. 5)
WARNING:
Recharge only with the charger specified for the battery.
Use of any other batteries may create a risk of fire.
- Always switch off the tool before installing or removing of the battery cartridge.
- To remove the battery cartridge, slide it from the tool while pressing the button on the front of the cartridge.
- To install the battery cartridge, align the tongue on the battery cartridge with the groove in the housing and slip it into place.
Always insert it all the way until it locks in place with a click. If you can see the red indicator on the upper side of the button, it is not locked completely. Install it fully until the red indicator cannot be seen. If not, it may accidentally fall out of the tool, causing injury to you or to someone around you.
Battery life indication
There is a battery icon [ ] on the LCD indicating the battery life.

Battery life is more than 30% .

Battery life is less than 30% .

Battery life is less than 10%

battery is almost dying out. You should charge the battery immediately
Operating the radio
WARNING:
Avoid using this unit in metal dust surrounding, as it will affect the quality of the speaker.
WARNING:
Do not soak the unit into water. It can only tolerate in the environment under 90% of humidity.
This unit equips with three tuning methods- Scan tuning, Manual tuning and Memory presets recall.
Scan tuning
- Press the Radio power button [ ]to turn on the radio.
- Select the desired waveband (i.e. AM/FM) by brief pressing the Power button [ ]
Note:
Make sure the antenna has been extended for the best FM reception. For AM band, rotate the radio horizontally to get the best signal.
Important:
Try to avoid operating the radio next to computer screen and other equipment which will cause interference to the radio.
- Press and hold the Radio Station Tuning Up/Down button [over 0.5 seconds. The frequency will stop at the next available station.
- Press the Volume Up/Down button [ ] to get the optimal sound level. LCD display will show sound level changes (0-40 steps).
- To turn off the radio, press and hold the Power button until OFF is shown on the LCD display.
Manual tuning
- Press the Radio power button [ ]to turn on the radio.
- Select the desired waveband (i.e. AM/FM) by brief pressing the Power button [
Note:
Make sure the antenna has been extended for the best FM reception. For AM (MW) band, rotate the radio to get the best signal.
- Press the Tuning Up/Down Control [ ] until the desired frequency shown on the display.
- Press the Volume Up/Down button [ ] to get the optimal sound level.
- To turn off the radio, press and hold the Radio power button until OFF is shown on the LCD display.
Storing stations in presets memories
There are 3 memory presets for each waveband.
- Press the Radio power button [ ] to turn on the radio.
- Tune to desired station using the steps previously described.
- Press and hold the desired Preset button (approx. 3 sec) until the preset number stop flashing on the display. The preset number will appear in the display and the station will be stored under chosen preset button.
- Repeat this procedure for the remaining presets.
Note:
Stations stored in preset memories can be overwritten by following above procedures.
Recall stations from preset memories
- Press the Radio power button [ ] to turn on the radio.
- Select the desired waveband.
- Press the desired Preset button, the preset number and station frequency will appear in the display.
System reset
If your radio fails to work properly, or some digits on the display are missing or incomplete, carry out the following procedure.
Note:
To reset the system, you must put the radio in OFF mode.
- Press the Radio power button [ ] to turn off the radio.
- Press and hold both the preset button 3 [ ] and the Radio power button [ for approximately 5 seconds. When the LCD shows a display of all the icons, all the preset memories are back to factory default.
Specifications
Using flash light (Fig. 7)

WARNING:
To reduce the risk of injury, do not look directly into the light when the work light is on.

WARNING:
To reduce the risk of injury, DO NOT operate work light without bezel assembly in place.
Using and adjusting the pivot head
Press the flash light button [to switch on/off the flashlight when the radio is either on or off.
Note:
The pivot head can pivot to a range of 150 degrees and can be adjusted in 6 stages. Pivot head to desired position. Allow the detent to snap into place.
Important:
Do not forcibly pivot the head.
LCD back light
Press any control buttons, LCD display will illuminate for approx. 10 seconds.
| Model BMR050 | ||||
| Power source D.C.14.4 V/18 V | ||||
| LED 1.4 W x 3 | ||||
| Tuning Frequency Range | AM: 522-1,629 kHz | |||
| FM: 87.5-108 MHz | ||||
| Speaker ø51 mm 8 Ω 3 W | ||||
| Output Power (18 V) 3.0 W | ||||
| Only Radio Only | Light Radio/Light | |||
| Operating time (with radio output power 100 mW) | BL1415 1 | hours 3.5 hours 2.5 hours | ||
| BL1430 25 | hours 8.5 hours | 6 hours | ||
| BL1815 11 | hours 3.5 hours 2.5 hours | |||
| BL1830 25 | hours 8.5 hours | 6 hours | ||
| Dimension (With Battery BL1430) | 263 mm x 75 mm x 196 mm | |||
| Net weight | 0.95 kg (with battery BL1415) | |||
| 1.14 kg (with battery BL1430) | ||||
| 1.01 kg (with battery BL1815) | ||||
| 1.23 kg (with battery BL1830) | ||||
Maintenance
To maintain product safety and reliability, repairs, maintenance or adjustment should be carried out by a Makita Authorized Service Center.
Gjelder bare for EU-land
Móvo yia tics xwpe ts EC
Mny aToppiTTETOV nEeKpiko
EoTIAIOHO TNV pTATApia 已 _ i 1E ta
OIKIAKa aToppipmaata!
UuWvAe Tnv EupwTAikn O8nyia
2002/96/EK TEPi aTOBAAHTWV
NekpKOu KAI NkEeTPOVIKOU
EoTIAIOU, TIV 2006/66/EK TEPi
PTAPIW KAI OoOwpeUTW V KAI TOW
AToBANTWV TWT MTAATAPIW V KAI TOW
OoOwpeUTW V KAI TIV EVoWnatow
Touc OTNV eVIKn VOpOTeia, O
NekpKOc EOTIAIOOC KNI MIIATAPIA
Tou Exouv PAtoeI OTO TEAC TNS ZWC
Touc TTPEIE VA UALEyovTAl EExwpiota
KAI VA ETIOTpePovTAl OE EYkATAOAEIC
TEPIBaALovTKn avakukwong.
AToeun OaOwv oE TpoetIeVyeEc VnEs
He BbIbpaBbIaBte 3neKtpoo6OpyDObaHne HJIN aKKMyJIaTOpbI BMcTe C 6bITOBbIM Mycopom!
B COOTBeTCTBnC eBponeeckoI
DInpeKtB0B 2002/96/EC o6 yTuN3aunr
3JIeKtpuYeCKoro n 3JIeKtpOHNO
O6OpyDoBaHn, DInpeKtB0B 2006/66/EC o
6bTaapex n AKKymJYTopax, a TaKe
NCIOJIb3OBAHHbIX 6bTaapex n
aKKymJYTopax, n IN npIMeHnR B
COOTBeTCTBnC MeCTHBIMN 3aKOHAMn
3JIeKtpOo6OpyDoBaHnE n AKKymJYTopbl,
cPoK 3KcnJIyatauHN KOTOpbIX NCTeK,
DOJNXHbI yTuIN3OBbIBaTBcR OTeJIbHO
6e3OnaChbIM dJa OKpyKaIOUeN cpeDbI
cnOCo6oM.
BAJHbIE NHCTPyKlNiN IOTEXHNKE B3OPACHOCTN
PPEIOCTEPEXEHNE:
Bo n36eKaHHe pncKa Bo3ropaHn, nopaxeHn 3JIeKtpuYeCKM TOKOM IINI NOnyueHn TpaMbI npi nCNoJIb3ObaHm Makita MR050 cIeJeT co6JIoDaTb OCHOBHbIe npabIIa TexHnKn 6e3OnaChocTn, yKa3aHHbIe HIXKe.
OBUSHNE INPABUNA TEXHNIKINBE3ONACHOCTN
1.перд ncpoьзовим Makita MR050 npoHTaTe BCE nHCTpykunn npdUnpexkaOuue HaDnucn.
2. OuHauTe ToIbKO cyXo caIeTko.
3.He 6nokpyuTe BeHTnIaHOnHHbE OTBepCTna. YcTaHOBIne B COOTBeTCTBUN C INHCTpyKUraMn N3ROTOBUTeJIa.
4. He yctaHaBnBaIe TBe B6JIn3N NcTOUHKnOB TeTNa, HAnpImep, paDnATOpOB, oObrpeBaTeJe, neeH n DpyrNX np6OpOB (BkJIIOyA yCNIHTeN), Bbipa6aTaBbAoUx TEnNo.
5. IcnoJb3yIte ToJIbKO HacaIKn/DonONHITeNBHbIe npHaIaJIeXHOCrN, yka3aHHBe npOn3BoUHTeIeM.
6.ИзбeraиTe экспунатуци усточВа B MecTax CKОПЛЕнЯ Металлп ueckои Пьл,在ТК AkТо мokET NOВЛЯТь Ha KauectBo pa6OыДиHamИka.
7. He donyckaite nonaandaHna BObI Ha yctpoiCTBO. Oho BbldepxnBaet He 6oJee 90% BnaXHOCTn.
8. 3apjkaite akymyIaTOp TOnbKO 3apJHbIM yCTpoiCTBOM, yka3aHHbIM n3rOToBHTeJeM. 3apJHOe yCTpoiCTBO, NOxOJaUeE dNp OdHOrTo Tnna aKKymyIaTOPOB, MoKET npINBeCTN K NoXkapy npN erO INcNoJIb30BaHN C DpyTm AKKymyIaTOpHbIM 6nOKOM.
9. IcnoJb3yIte 3JIeKTPoHnHCTpymeHT ToIbKO C yka3aHHbIMN aKKMyJrTOpHBIMN 6nOKAMN. IcnoJb3OBAHHe npRnx aKKMyJrTOpHBIX 6nOKOB MOKeT npBecTN K TpaBMe HnNoXkapY.
10. Korda aKKymyIaTOpHbI 6nOK He nCNoJIb3yETcra, xpaHInTe erO OTdEINbHO OT metaJIINuCeKnx npEdMeTob,TaKnx KaK CKePENK,MOHeTbI,KIIOUH, TBO3DN, WpyNt NII dpyrIe He6OJIbUWe MeTaJIINuCeKne npEdMeTbI, KOToPbIE MOrY IpnBecTN K 3aKopauHaBaHHo KOHTaKTOB aKKymJrAToPHOrO 6noka MExdy co6oN. KopOTkoe 3aMbIkaHne MeJx dy KOHTaKTaMn aKKymJrAToPA MoXeT pINBeCTN K OXKOrAM NII NOkApy.
11. Пи Нрравиьом образецни з Akумл对接а может потув кдость. Изberаite Контака с не. B счuaе контака с кожев ромоют mectо контака обльные мкolyесгов Воры. B счuae поаданя в гда, оратпесь К врач. Адкость иЗ Akумл对接а может ВьзВаы.
paэдражени пи oxоги.
CNEUΦNUECKNE INPABUNATEXHNI B3ONACHOCTN
COXPAHNTE DAHHbIE NHCTPYKcN
ДЯ AKKUMYJIATOPHO BLOKA
- Перед Исторistically Актумларогу Stokа, почиайся в几乎所有 посни. надимся (1) заюном устор; (2) пос и (3) устор; актумларога.
- He pa36npaIte aKkMyJrTOpHbI 6nok.
- Ecnn Bpemra60tbi 3HaunTeNbHO cokpaTnIOcb, HemeIeHHo npeKpatnte pa6Oy. B npotNBHom CJIyae MoKeT BO3HKnHyTb nepepeB, YTO npINBeTe K OXkOram N daKe K B3pbBy.
4.B Cnyae nonadaHna 3neKtpoJNTa B INa3a npOMOnTe Hx 60nbWM KOnuYeCTBOM YnCTOu BObl N HeMeDnEHNO 6bpaTnTEcb K BpaCy. 3To MoKeT npUBeCTN K notepe 3peHna. - He 3aMbikaTe KOHTaKTbI aKKyMyJrTOphoro 6noka MeKdy cO6oN:
(1) He npikacaiTecb K KOHTaKTam KaKIMN-Jn60 TOKONpOBOJUIMM INpeDMeTAMN.
(2) 136eTaTe XpaHnTb AKKyMnyTOpHbI 6NOK B KOHTeHHepe BmecTe C DpyrIMM MeTaJIHueCKMn PpeDMeTaM, TaKIMN KaK TBO3n, MOHeTb I T.
(3) He donyckaTe nonadaHna Ha akKymyIaTOPbI 6nOK BOdBi INN DOxJa. 3AmbikaHne KOHTaKTob aKKymyIaTOPHorO 6noka Mexky cO6oM MoKeT npNBecrK Bo3HKnHOBeHHIO 60nbIoro Toka, nepepeBy, Bo3MOxHbIM OXOram I daJke pa3pbIby 6noka.
- He xpaHnTe INHCTpyMeHT N aKKyMyJrTOpHbI 6NOK B MeCTax, Ie TEMpePaTypa MOKeT DOCTuRaTb NIN npebblaTaB 50^ (122°F).
7.He 6pocaIte aKkyMylTOpHbI 6IOK B OROH,daKe ecIn OH CNJIbHO IOBpeXKeH INN NOJHOCtBu BO BbIeIN 3 CTPOA. AkkyMylTOpHbI 6IOK MoKET B3OpBaTbcr NOD DeINCTBnEM ORHa. - He poHnIte n He yIapAryTe aKkymyIaTOp.
9.He nCnoJIb3yIte aKKymyIaTOp,ecn OH naIaI nn noDBepraIcYnapam.(Henb3ryncnoIb3ObaTb nobpeJdeHHbI aKKymyIaTOp).
COXPAHNTE DAHHbIE NHCTPYKcIN
CoBeTbI no o6ecneueHnO MaKcHMaJIbHOro cPoka cnJx6bl aKKymyIaTOPa
- 3apjkaTe aKKyMJIaTOpHbI 6JOK do TOrO, KaK OH noJIHOCTbIO pa3pIaNTcR. B cIyuae notePm MoUHOCTn npn 3KcnIpyatauIN HcTpyMeHTa, ppeKpaTIne pa60Ty n 3apJdnte aKKyMJIaTOpHbI 6JOK.
- HnKOrIa He 3apJxKaIte NOnHocTbIO 3apJxKeHHbI aKKymyIaTOpHbI 6NoK. IpeEzapJaKa cokpaIaet cpoK cnXkbI 6Noka.
- 3apjKaIe aKkMyJrTOpHbI 6nok npu KOMHaTHoI TempepaType oT 10^-40^ (50°F - 104°F). Ipeed 3apjKOaIte ropJeMy aKkMyJrTOpHomy 6nOKy OCTbITb.
- EcIn yctpoNCTBO He nCNOJIb3yETcB TeueHne DnITeINbHO BpeMeHN, 3apKaIte aKKMyJrTOpHbI 6nOK OINH pa3 B WeCTb MeCraJeB.
YcTaHOBka n ChrTne cDbXHoro aKKymyIaTOPHoro 6Joka (Pnc.5)
I PENEOCTEPEXEHNIE:
3apjkaTe aKkMyIaTOp TOnbKO 3apJdHbIM yCTpOJIcTBOM, yKa3aHHbIM dIЯ daHHoro aKKMyIaTopa. IcNoJIb3OBaHne dpyrnx aKkMyIaTOpOB MoXeT npINBeCTn K noKapy.
- 06aTeNbHo BbIKIIOHaTe INHCTpyMeHT nepeyctahOBKo n N3BHeHnEm aKKymJrTOpHOrO 6noka.
-ДяСнТЯ AkKуМЛТOPHOrO 6IOKa HaxMITE KHOKNy Ha NlueBOI CTOpOHe n CdBnHbTe 6JOK.
-Дя установки akkyмлгторно 6лoka coBmectnte BbICTyн 6лoka c пa3OM b KOpnyce n 3aDbHbTe erо Ha MeCTO.
Bcerda yctaHaBnBaIte 6loK do ynopa TaK, YTObI OH 3aФнксрOBaIcRa Ha MeTe Do ueJHka. EcIn Bbl MoKeTe BNDetb KpaChbI INDnKaTOp Ha BepxHeu qactN KnaBnU, aKKymJIaTOpHbI 6LOK He NOJIHOCTbIO UCTaHOBNeH Ha MeTe. YCTaHOBtE erO do KOHca TaK, YTObI KpaCHbI INDnKaTOp 6bl Ne BnDEH. B npOTNBHom cnyae aKKymJIaTOpHbI 6LOK MOXET BbINaCTb N3 IHCTpyMeHTa n HAHeCTn TpaBMy Bam INI dpyrIM JIOdM.
Hndnkaunca npka cnjxkbiaakymyTopa
HaKK-3Kpahe haxoHntc cIMBON aKKymyTopa [ ] OTO6paKaHouu npckero Cnyk6bl.
He donyckaIte nonaHaHbI Ha yctpoiCTBO. OHO BbIepKnBaET He 60nee 90% BnaXHoCTn.
YcTpoIcTBOpEpycMaTpnaBaET Pn CnOco6a HAcTpoIKN -HAcTpoIka MeTOOM cKaHIpOBaHnry, pyuHa HAcTpoIka N Bbl3OB IpeBapNTeJIbHO yCTaHOBNeHHbIX HAcTpoEK.
HactpoJaMeToJOMcKaHnpOBaHn
- Haxmnte KhoNky nTaHnna paAnonpneMHnka [ ] JIra ero BKJIIOUeHnI.
- Bb6epTe Heo6xOuMbI dHaNa3oH (AM/FM) KpaTKM HaaKaTHe M KHONK NITaHne [ ]
Приимechanical:
IyUwero npnema CnHaHa FM BbDnHbTe aHTeHHy. Ia nana30Ha AM nobepnTe paDnOpnemHnK rop3oHTaJIbHO, TTo6bl o6cneuHTb 6OJee CnJIbHbI cnHnI.
Baxho:
He peKOMeHnyeTcNcONb3OBAbTppaIIOnpnemHNK pAOM C MOHITOPOM KOMNbIOTepa IpyrUm o6OpyIOBaHnEM, KOtOpoe MoKET Bbl3BaTb NOMEXn dJa paAnOpnpneMHnka.
- Haxmnte u ydepKnBaHte KhoNky HacTpoKn paAnOpnpemMnka BBepx/Bn3 NO dnaNa3OHy [ ] He MeHee 0,5 cekyHdbI. POnck YactOtbl PpeKpaNTcra Ha cJeDyUoSei DoCTyHoi CTaHcnn.
- Haxmnte KhONky yBEnuyeHn/ymHeHbueHn rPOMKoCTn [ ]dIyNoJIyuEHHN ONTIMaJIbHOrO yPoBHa 3Byka.Ha JKK-ekpaHe 6yDet OTo6paKaTbcra n3MeHeHne rPOMKOCTn 3Byka (ypOBeH 0 - 40).
5.ДЯВыкючehнpaДиОпрсмнИкаHAЖМTe uYdePkBaIte KHONky NITaHne [ ]do NOЯВпeня cIMBOna OFF (BbIKn.) Ha XX-3KpaHe.
PychaHaNacTpoiKa
- Haxmnte KhoNky nTaHna paDnOpnpemHnka [ ]ДЯ erO BkHoueHnY.
- Bb6epTe Heo6xOuMbI dHaNa3OH (AM/FM) KpaTKM HxaKaTHe M KhoNk nTuTaHne [ ]
Примеанne:
Iywero npema CnHana FM BbDnHbTe aHTEHy.
Iy ana30Ha AM (MW) nobepnTe paAnOpneMnK,
TO6bl noJyntb 6Oonee cnHbNc HnAn.
3. HaximaiTe KhoNky HactpoKn BBepx/BHn3 no dnaNa3OHy [ ]do nepexoJa Ha JKeNaeMyu qactOTy, KOtopa8 Bydet OTo6paKaTbCn Ha 3KpaHe.
4. Haxmnte KhoNky yBeIuyeHnry/YMeHbUeHnry rPOMKoCTn [ ]ДЯ NOJIyueHnry ONTImaJIbHOrO ypoBHa 3Byka.
5.ДЯ BbIKNoHEnpaDNOpnpEeMHnKaHaKMnTe uYdePKNBaIte KHOKNy NITAHNpaDNOpnpEeMHnKa [ ]do NOBHeHcNMBOa OFF (BbIKn.) Ha KK-3KpaHe.
CoxpaHeHne cTaHcN B nAmrTn B KaueCTBe npeDbapntbHoH NaCTpOKn
Дя Каду Диana3OHa DoCTyHNo 3 npedBapnteHbIX HacTpoiKn.
- Haxmnte KhoNky nHTaHna paDnOpnpemHnka [ ]ДЯ erO BkHoueHnY.
- HactpoTeCb Ha Heo6xOIMyIO CTaHcIIO C NOMOuBo OINCAHHbIX BblJE NyHKTOB.
- Haxmte u ydepkBaIte Heo6xOdmyH KHOky npedBapntbHOH HAcTpoKn (OKOIO 3 cE), noka coxpaHeHHbHomep npedBapntbHOH HAcTpoKn He nepeCTaHET MIRATb Ha 3KpaHe.Homep npedBapntbHOH HAcTPOKn NOBNTcH Ha 3KpaHe n CTAHZyIDet COXPAHeHa NOB BbIBpaHHoH KHOKN npedBapntbHOH HAcTPOKn.
4.ПОВТОРИЕ ПОЮЕДУР ДЯ NOCTABUNXCSIпедварпгельнix HAcTpoEk.
Приимechан: С�лары:
CTaHcHm, coXpaHeHHbIe B KaueCTBe npeBapHTbHO HAcTpoKn, MoXHO I3MeHHTb, BblONHNB ONICAHbIe Bblwe npOceDpybl.
BbI3OB cTaHcN n3 naMaTn cyHKcNn npEdBaPnteJbHoN HacTpOKn
- HaxMnTe KhoNky nTaHna paAnOpnpemHnka [ ]ДЯ erO BKNoUeHnA.
- BbI6epnTe Heo6xoDnMbI dnaNa3OH.
- HaxmTe Heo6xOuMMyIO KHOnKy IpeBapntbHoi HacTpoKN - Ha 3KpaHe OTo6pa3rTc8 3aHaHHbI Homep n Yactota cTaHcN.
C6poc cnCTembl
Ecn paHnoepnemHK pa6oTaET HeHaJneKaUIM 06pa3OM IIN HeKOTOpBie UΦpbl Ha 3KpaHe OTCyTCTByOT IIN HENONHbIe, BbINONHITe CNeDyOuIIOPOUeDpy.
Приимейчени:
Длгсбрca снстемы Heo6xOДмо NepeBecTN paHnONpHemHK B pexm OFF (BbIKl.).
- Haxmnte KhoNky nntaHna paDnOpnpMnHa [O] Jra erO BbIKJIOueHna.
- OndHOBpeMeHHo HAXMNTe N ydepxuBaHTe KHOKN npedBapntelbHOJ yCTaHOBKn 3 [③] nNtAHn paAnOpnpemHnka [⑤] B TeHeHne 5 cekHyd. Korda Ha KK-ekpaHe OTO6pa3rTcB Ce CmBOJIb, BCE npedBapntelbHo COxpaHeHHbIe HAcTpOuKn BepHyTCa K 3HaueHnM NO yMOJTuHaHIO.
McnoJb3OBAHne fOHaPra (Pnc. 7)

IPEDOCTEPEKHENE:
IINKHeHnPcKa NOnyHeHn TpaMbI He CMOTpTe HENOCpeDCTBeHHo Ha CBET BKNHOeHHoro Oohapra.

IPEDOCTEPEXEHNE:
IINKHeHnPnCKaNoIyHnTpaMbHE nCNOJb3yUte foHAp6e3 yCTaHOBJeHHoro 0oKa.
IcnoJb3OBAHne n perylnpOBka NOBOPTHoI ROJOBKn
HaKMTe KHOkny foHapra [ ]ДЯ erO BKIOUcEHn/ BbIKNoUcEHn, KOrda paAnOnpneMHNK BKIOUcEH nIIN BbIKNoUcEH.
韋國國國國國國國國國國國國國國國國國國國國國國國國國國國國國國國國國國國國國國國國國國國國國國國國國國國國國國國國國國國國國國國國國國國國國國國國國國國國國國國國國國國國國國國國國國國國國國國國國國國國国
默马尼里尔格是孕和大3个

- GB Flashlight Radio Instruction manual
- LCD display (Fig. 6)
- Symbols
- IMPORTANT SAFETY INSTRUCTIONS
- WARNING:
- GENERAL SAFETY RULES
- SPECIFIC SAFETY RULES
- SAVE THESE INSTRUCTIONS
- FOR BATTERY CARTRIDGE
- Tips for maintaining maximum battery life
- Installing or removing the slide battery cartridge (Fig. 5)
- Battery life indication
- Operating the radio
- Scan tuning
- Note:
- Important:
- Manual tuning
- Storing stations in presets memories
- Recall stations from preset memories
- System reset
- Specifications
- Using flash light (Fig. 7)
- Using and adjusting the pivot head
- LCD back light
- Maintenance
- AToeun OaOwv oE TpoetIeVyeEc VnEs
- BAJHbIE NHCTPyKlNiN IOTEXHNKE B3OPACHOCTN
- PPEIOCTEPEXEHNE:
- OBUSHNE INPABUNA TEXHNIKINBE3ONACHOCTN
- CNEUΦNUECKNE INPABUNATEXHNI B3ONACHOCTN
- COXPAHNTE DAHHbIE NHCTPYKcN
- ДЯ AKKUMYJIATOPHO BLOKA
- COXPAHNTE DAHHbIE NHCTPYKcIN
- CoBeTbI no o6ecneueHnO MaKcHMaJIbHOro cPoka cnJx6bl aKKymyIaTOPa
- YcTaHOBka n ChrTne cDbXHoro aKKymyIaTOPHoro 6Joka (Pnc.5)
- I PENEOCTEPEXEHNIE:
- Hndnkaunca npka cnjxkbiaakymyTopa
- HactpoJaMeToJOMcKaHnpOBaHn
- Приимechanical:
- Baxho:
- PychaHaNacTpoiKa
- Примеанne:
- CoxpaHeHne cTaHcN B nAmrTn B KaueCTBe npeDbapntbHoH NaCTpOKn
- Приимechан: С�лары:
- BbI3OB cTaHcN n3 naMaTn cyHKcNn npEdBaPnteJbHoN HacTpOKn
- C6poc cnCTembl
- Приимейчени:
- Длгсбрca снстемы Heo6xOДмо NepeBecTN paHnONpHemHK B pexm OFF (BbIKl.).
- McnoJb3OBAHne fOHaPra (Pnc. 7)
- IPEDOCTEPEKHENE:
- IPEDOCTEPEXEHNE:
- IcnoJb3OBAHne n perylnpOBka NOBOPTHoI ROJOBKn
- 韋國國國國國國國國國國國國國國國國國國國國國國國國國國國國國國國國國國國國國國國國國國國國國國國國國國國國國國國國國國國國國國國國國國國國國國國國國國國國國國國國國國國國國國國國國國國國國國國國國國國國国
Brand : MAKITA
Model : BMR050
Category : Radio