RDM1150 - Shredder REXEL - Free user manual and instructions
Find the device manual for free RDM1150 REXEL in PDF.
| Product type | Document shredder |
| Brand | Rexel |
| Model | RDM1150 |
| Anti-jam technology | Mercury |
| Lubrication system | Automatic (self-oiling) |
| Bin type | Door for bin (bin not removable) |
| Casters | Yes |
| Switch | On/off at the rear |
| Control buttons | Auto start, reverse, continuous forward |
| LED indicators | Anti-jam (blue), bin full (red), door open (red), cooling (red), oil level (red/green), auto oiling (green) |
| Safety | Automatic stop when door is opened, thermal protection |
| Compatibility | Paper only (no CDs, credit cards, paper clips, staples) |
| Warranty | 2 years (parts and labor), 20 years on cutters |
| Included accessories | 60 ml oil bottle |
| Optional accessories | Recycled waste bag (2102441), lubricating sheets (2101949), Rexel oil (1760049) |
| Maintenance | Automatic lubrication, use Rexel oil |
Frequently Asked Questions - RDM1150 REXEL
User questions about RDM1150 REXEL
0 question about this device. Answer the ones you know or ask your own.
Ask a new question about this device
Download the instructions for your Shredder in PDF format for free! Find your manual RDM1150 - REXEL and take your electronic device back in hand. On this page are published all the documents necessary for the use of your device. RDM1150 by REXEL.
USER MANUAL RDM1150 REXEL
To register and activate the warranty go to www.rexeleurope.com/shredders
Mercury
GB Instruction Manual
Models RDM1150, RDM1170, RDSM750, RDSM770 and RSM1130 cannot shred CDs, credit cards, paper clips or staples.
English 4
Français 8
Deutsch 12
Italiano 16
Nederlands 20
Español 24
Português 28
Türkçe 32
Ελληνικά 36
Dansk 40
Suomi 44
Norsk 48
Svenska 52
Polski 56
Česky 60
Magyar 64
Русский 68
text_image
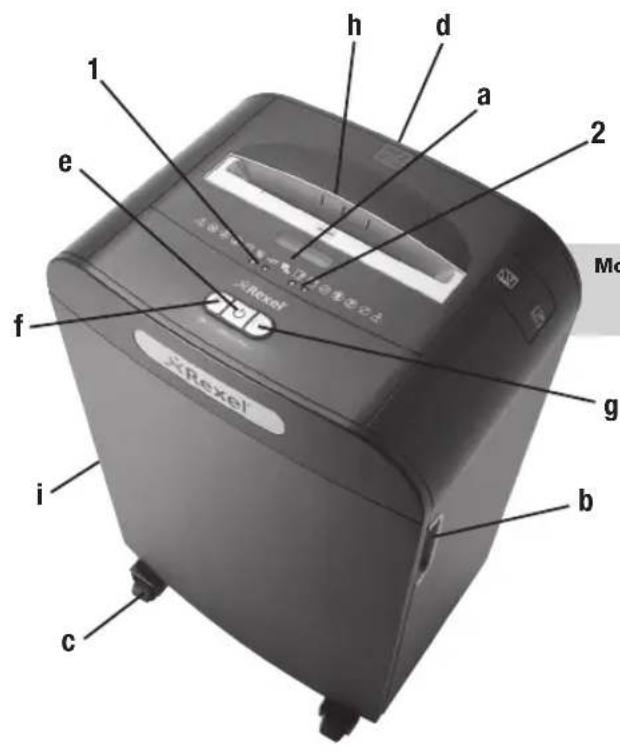
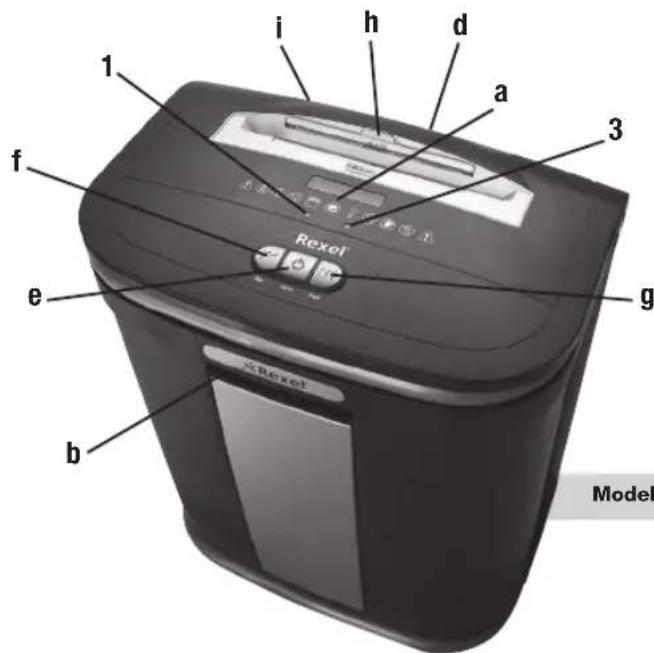
1 2 h d a e f g Mo b i cModels: RDS2250, RDX1850, RDS2270, RDX2070, RDM1150, RDM1170, RDSM750, RDSM770
text_image
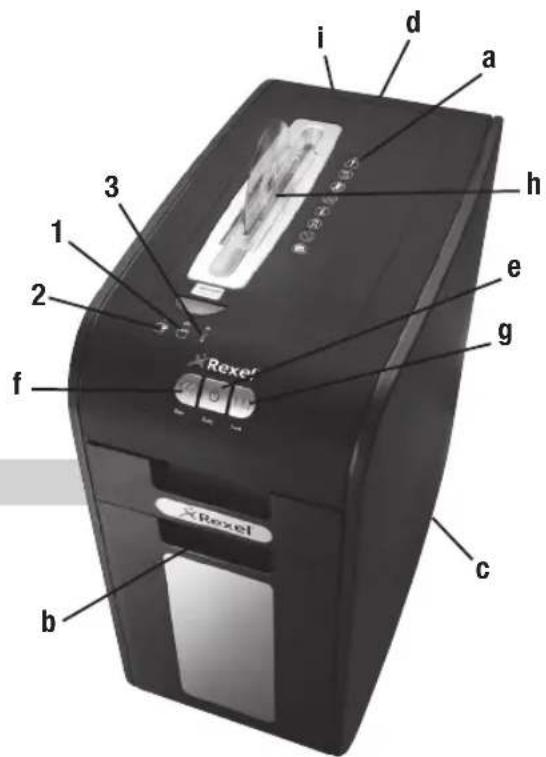
i d a h 3 1 2 f g e b c RexelModels: RSS2232, RSX1632
text_image
i h d a 1 3 f g Rexel e b ModelModels: RSS2030, RSX1630, RSM1130


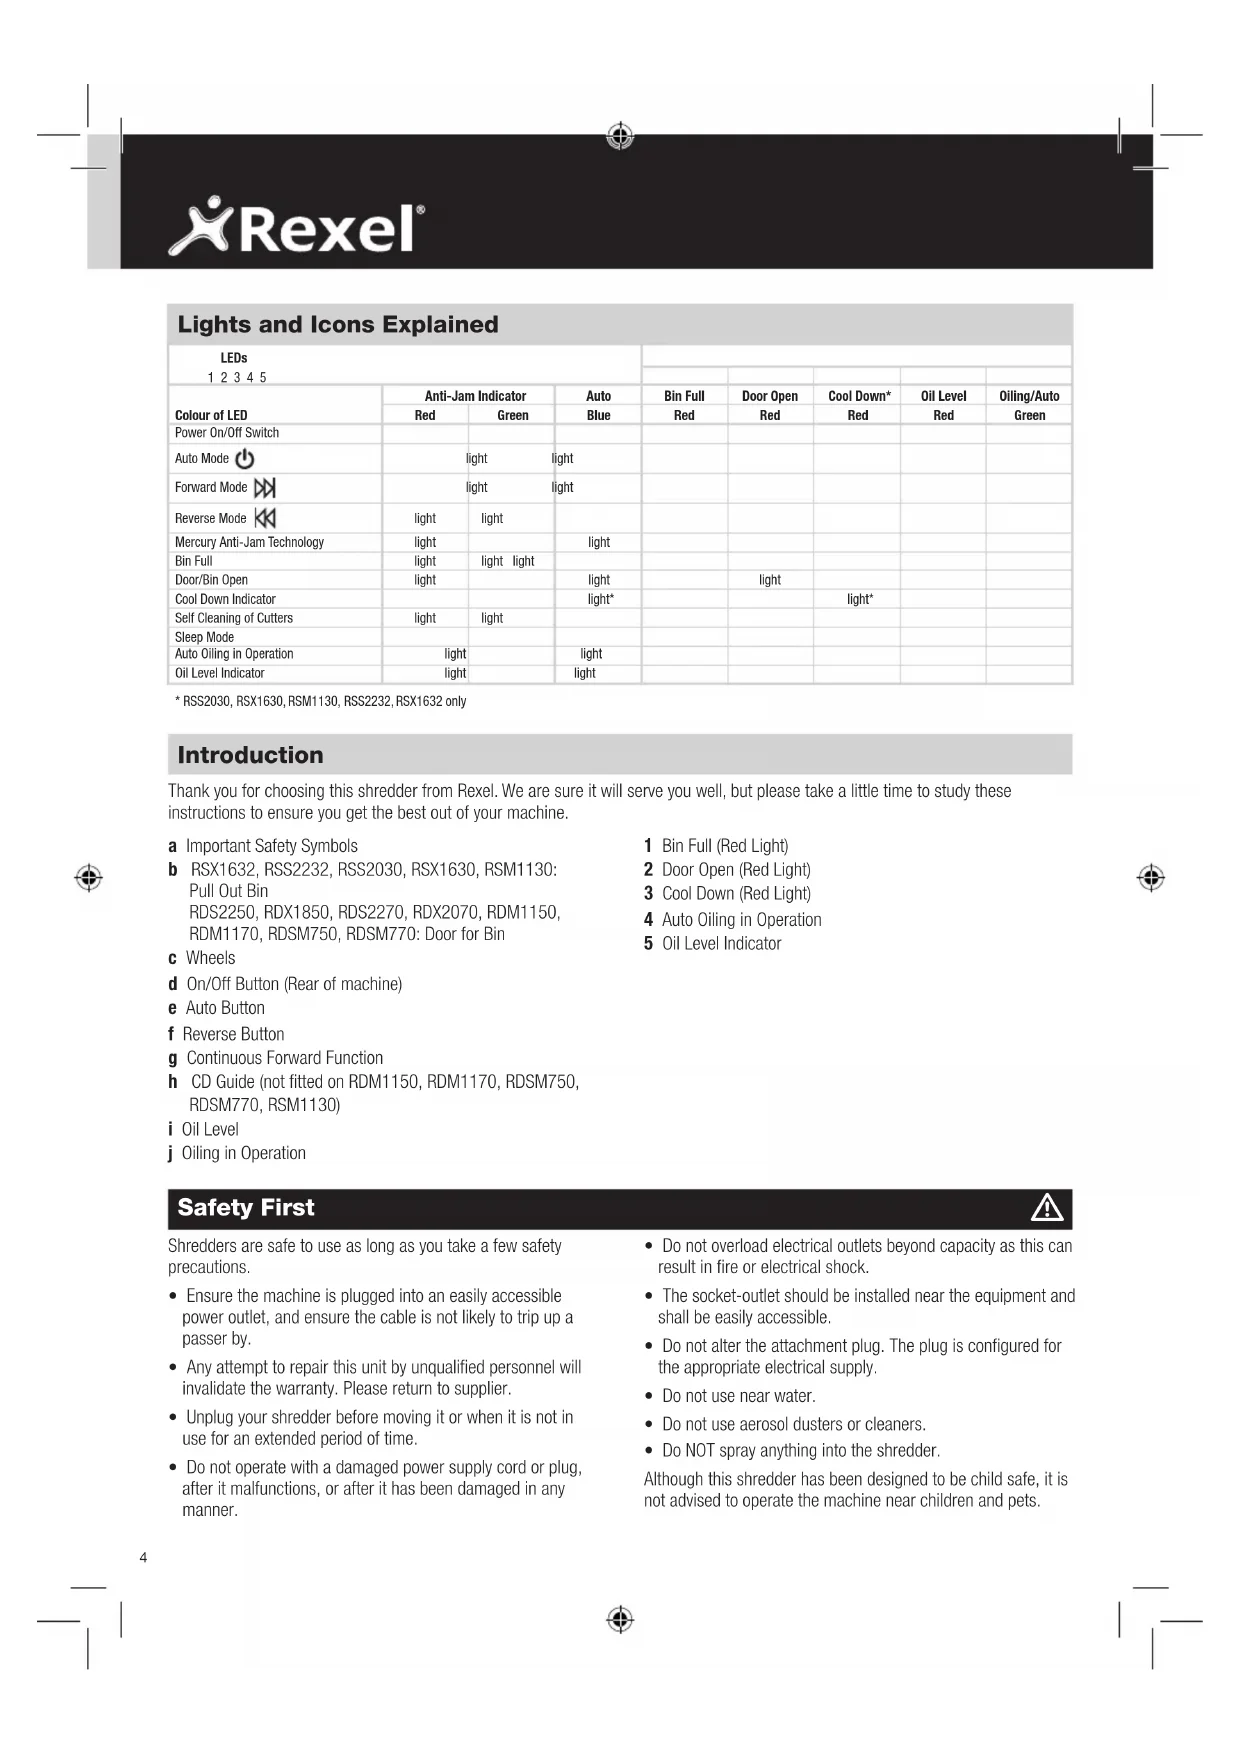
Lights and Icons Explained
| LEDs1 2 3 4 5 | ||||||||
| Colour of LED | Anti-Jam Indicator | AutoBlue | Bin FullRed | Door OpenRed | Cool Down*Red | Oil LevelRed | Oiling/AutoGreen | |
| Red | Green | |||||||
| Power On/Off Switch | ||||||||
| Auto Mode | light | light | ||||||
| Forward Mode | light | light | ||||||
| Reverse Mode | light | light | ||||||
| Mercury Anti-Jam Technology | light | light | ||||||
| Bin Full | light | light light | ||||||
| Door/Bin Open | light | light | light | |||||
| Cool Down Indicator | light* | light* | ||||||
| Self Cleaning of Cutters | light | light | ||||||
| Sleep Mode | ||||||||
| Auto Oiling in Operation | light | light | ||||||
| Oil Level Indicator | light | light | ||||||
* RSS2030, RSX1630, RSM1130, RSS2232, RSX1632 only
Introduction
Thank you for choosing this shredder from Rexel. We are sure it will serve you well, but please take a little time to study these instructions to ensure you get the best out of your machine.
a Important Safety Symbols
b RSX1632, RSS2232, RSS2030, RSX1630, RSM1130: Pull Out Bin
RDS2250, RDX1850, RDS2270, RDX2070, RDM1150, RDM1170, RDSM750, RDSM770: Door for Bin
c Wheels
d On/Off Button (Rear of machine)
e Auto Button
f Reverse Button
g Continuous Forward Function
h CD Guide (not fitted on RDM1150, RDM1170, RDSM750, RDSM770, RSM1130)
i Oil Level
j Oiling in Operation
1 Bin Full (Red Light)
2 Door Open (Red Light)
3 Cool Down (Red Light)
4 Auto Oiling in Operation
5 Oil Level Indicator
Safety First

Shredders are safe to use as long as you take a few safety precautions.
- Ensure the machine is plugged into an easily accessible power outlet, and ensure the cable is not likely to trip up a passer by.
- Any attempt to repair this unit by unqualified personnel will invalidate the warranty. Please return to supplier.
- Unplug your shredder before moving it or when it is not in use for an extended period of time.
-
Do not operate with a damaged power supply cord or plug, after it malfunctions, or after it has been damaged in any manner.
-
Do not overload electrical outlets beyond capacity as this can result in fire or electrical shock.
- The socket-outlet should be installed near the equipment and shall be easily accessible.
- Do not alter the attachment plug. The plug is configured for the appropriate electrical supply.
- Do not use near water.
- Do not use aerosol dusters or cleaners.
- Do NOT spray anything into the shredder.
Although this shredder has been designed to be child safe, it is not advised to operate the machine near children and pets.
Shredder Control Panel


ReverseForwardAuto

Safety First

This means you should be careful because long hair can become entangled in the cutting head.

This means don't reach into the feed opening of the cutting head.

This means be careful of ties and other loose clothing which could become entangled in the cutting head.

This means keep children away from shredder.

This means be careful of loose jewelry which could become entangeld in the cutting head.

This means the door is open.

This means the bin is full.

This means no aerosols.

This means machine is cooling down.

This means oil level.

This means oiling in operation.
RSM1130, RDM1150 and RDSM750 only.

This means do not shred credit cards.

This means do not shred paper clips.

This means do not shred staples.

This means do not shred CDs.
Door Open Safety Function
If the door is opened during shredding as a safety precaution the shredder will instantly stop, and the door open symbol/indicator will glow red.
Rare Occasions of Jamming
In the unlikely event of the shredder jamming, use the reverse function to unblock the shredder (see Reverse function section). Alternating between the reverse and continuous forward functions will help unblock the feed area.
Initial Setup
The shredder is designed to automatically lubricate the cutting mechanism as required to ensure the product continues to work to its maximum performance and to extend the product life. Before turning on the machine for the first time, please open the oil reservoir cap on the head of the shredder (j) and pour in the 60ml bottle of oil provided as standard. This is sufficient to allow the shredder to start for the first time and to operate continuously for approximately 1 hour shredding before the reservoir will need refilling. Press and hold down the Auto button (f) for 5 seconds to start the pump and prime the system. This operation is only required the very first time the shredder is used. When the 'Oil Refill' indicator is illuminated, flip up the oil reservoir cap (j) and refill the oil reservoir using a bottle of standard Rexel oil (1760049). The automatic oiling operation lasts approximately 2 seconds and you will hear the distribution pump during this time. Auto-oiling operates after 15 minutes of shredding.
Mercury Anti-Jam Technology
Mercury Shredders will only shred stacks of paper that are within the shredder's sheet capacity. For example, a shredder with a capacity of 22 sheets will not allow the shredding of more sheets than this.
Sensors in the paper feed area measure the thickness of paper about to be shredded. The ability to shred or not is communicated through red and green lighting. Green means that the stack of paper is within the shredders sheet capacity and OK to shred. Red means that you have too much paper, remove some sheets in order to shred.
Given that you are unable to shred more sheets of paper than the shredder is capable of shredding, paper jams are prevented.
This prevents time wasted through reversing paper and unblocking jams not to mention the mess it can create.
Over Heating
If small office models (RSS2030, RSX1630, RSM1130, RSS2232 and RSX1632) are used continuously for long periods of time the shredder may overheat. If this occurs the thermometer symbol on the indicator panel will illuminate.
When the shredder is ready to be used again the thermometer symbol will not illuminate.
Rexel®
Operation
After unpacking the product, pull out the shredder bin or bag frame (depending on model) and remove the CD shard tray, which sits on top of the bag frame on departmental models or bin on small office models. Store this tray on the external location points (i) and use when you shred CD's or credit cards to separate waste for recycling (not applicable for RSM1130, RDM1150, RDM1170, RDSM750 and RDSM770 models).
2 Connect shredder to mains supply.
3 Ensure the on/off button on the back of the machine is in the on position (d).
4 To commence shredding, press the central Auto button (e). This will illuminate the anti jam indicator.
This sets the shredder into auto mode and initiates the Mercury anti-jam mechanism. The standby symbol will illuminate blue and the anti-jam indicator will glow green. You are now able to shred.
5 Insert paper to be shredded into the feed area. The Mercury anti jam mechanism will sense the thickness of the paper being shredded.
If the paper thickness is within the shredder's capacity, the motor will start and your documents will be shredded. Cutters will stop once the shredding process is complete.
If the paper thickness is greater than the shredder's sheet capacity, the anti-jam indicator will turn from green to red and the motor will not run.
6 If this happens, remove some of the sheets from the paper stack and re-try until the anti-jam indicator reverts back to green, the shredder will then automatically start and allow the paper to be shredded.
7 If the shredder is left in auto mode for more than 2 minutes without being used, the shredder will automatically turn back to standby mode in order to save power.
8 The shredder will automatically 'wake up' from sleep mode when paper is inserted into the shredder mouth. There is no need to press the Auto button (e).
Reverse Function
Should you wish to reverse the shredding direction whilst shredding a document, a reverse button (f) has been fitted for your convenience.
2 By pressing the reverse button the shredding cutters will change direction allowing the retrieval of the document being shredded. The anti-jam indicator will turn to red.
3 The reverse function will only run whilst the button is being pressed. When the reverse button has been released the shredder will revert to stand by mode.
4 To turn back to auto mode, press the auto button (e).
CD and Credit Card Shredding
Models RSM1130, RDM1150, RDM1170, RDSM750 and RDSM770 can not shred CD's or credit cards, therefore this section is not applicable to these three models. All other Mercury models can shred CD's and credit cards as follows:
A separate CD tray is provided to collect the shredded CD shards. Ensure that this is correctly mounted onto the bin rail or internal bin (small office models) before shredding CDs or credit cards. CD and credit card shards should be disposed of separately to paper.
2 Pull up the CD guide (h) located in the centre of the feed area and flip it into position over the shredder mouth.
3 For credit card shredding, switch the shredder to auto mode and insert the card in line with the arrow marked on the shredder mouth. Only shred 1 credit card at a time.
4 For CD shredding, extend the sides of the CD guide, switch the shredder to auto mode and place the CD into the centre of the CD slot. Only shred 1 CD at a time.
5 Empty the CD tray after 8 credit cards or CD's to avoid waste spilling over into the paper waste bin. Remove the CD tray before recommencing to shred paper.
Bin Full
When the bin is full the shredder will not function and the bin full symbol will illuminate red.
When this happens you must empty the bin.
- Pull open the bin to empty (RSS2030, RSX1630, RSM1130, RSS2232, RSX1632)
- Open the door and pull out the bag frame (RD2250, RDX1850, RDM1150, RDM1170, RDSM750, RDSM770, RDS2270, RDX2070)
Once the bin is empty, close the door/drawer and press the auto button to resume shredding.
Note: RSX1630, RSX1632, RDX1850, RDX2070, RDM1150, RDM1170, RDSM750, RDSM770 - Once the waste bag has been reinserted and/or cabinet door has been closed, the shredder will run in reverse for three seconds, stop for two seconds and then forward for three seconds to clear away any remaining paper from the cutter mechanism. This unique 'self-cleaning' mechanism is additional jam prevention technology from Rexel.
Shredder Accessories
We recommend that a paper waste sack for recycling shredded paper is used on all models. Please see the table below for the correct accessory code for your model.
Model Accessory Part Box Description Number Qty
| RSS2030RSX1630RSM1130 | Recycling Waste Sack 2102063 20Oil Sheets 2101949 20 | ||
| RSS2232RSX1632 | Recycling Waste Sack 2102505 50Oil Sheets 2101949 20 | ||
| RDS2250RDX1850*RDM1150*RDSM750* | Recycling Waste Sack 2102441 50AS1000 Plastic Waste Sack 40070Oil Sheets 2101949 20*Rexel Shredder Oil | 1001760049 | |
| RDS2270RDX2070*RDM1170*RDSM770* | Recycling Waste Sack 2102442 50AS1000 Plastic Waste Sack 40070Oil Sheets 2101949 20*Rexel Shredder Oil | 1001760049 |
Guarantee
ACCO Brands warrants its products and their parts against defects in materials and workmanship under normal use for a period of 24 months from the original date of purchase.
During this period we will repair or replace a defective product or part subject to the following warranty conditions:
The warranty applies only to defects in materials and workmanship under normal use and does not extend to damage to the Product or parts which result from:-
alteration, repair, modification or service carried out by anyone other than an authorised ACCO service centre.
accident, neglect, abuse or misuse owing to failure to comply with the normal operating procedures for a product of this type.
Nothing in this Warranty shall have the effect of excluding the liability of ACCO in respect of death and personal injury caused by the negligence of ACCO. This Warranty is offered (subject to these terms and conditions) in addition to, and does not affect your statutory rights.
Additional Guarantee
ACCO Brands guarantees the cutting blades of the shredder to be free from defects in material and workmanship for 10 years on the RSS2030, RSX1630, RSM1130, RSS2232 and RSX1632 and for 20 years on the RDS2250, RDX1850, RDM1150, RDM1170, RDSM750, RDSM770, RSS2270 and RDX2070 from the date of purchase by the original consumer.
* Please note that the cutter blades will be progressively worn down by shredding fastened sheets (staples and paperclips) - this is not covered in the warranty. With regards to CD shredding, Rexel departmental and small office shredders have been designed to shred up to 500 and 300 CDs respectively during the warranty period. Excessive cd shredding will wear the cutters and is not covered within the warranty.
**Models RSM1130, RDM1150, RDM1170, RDSM750 and RDSM770 have NOT been designed to shred CD's, credit cards, paper clips or staples. Any attempt to do so will invalidate this warranty.
These conditions shall in all respects be governed and construed in accordance with English Law and subject to the exclusive jurisdiction of the English Courts.
Dette betyr at maskinen kjøler ned.

Dette betyr oljenivå.

GB ACCO Service Division
Hereward Rise, Halesowen, West Midlands, B62 8AN
Tel: 0845 658 6000, Fax: 0870 421 5576
www.acco.co.uk/service
F ACCO France
Service Après-Vente
Tel: 0820 872 356, Fax: 03 80 68 60 49
D ACCO Deutschland
Arnoldstrasse 5, 73614 Schorndorf, Germany
Tel: +49 7181/887-420, Fax: +49 7181/887-498
E ACCO Iberia SL
P Isaac Peral 19, 28820 Coslada (Madrid)
Tel: 91 669 9391, Fax: 91 672 07 11
① ACCO Brands Italia Srl
⑤ ACCO Brands Nordic AB
DK Makadamgatan 5, 254 64 Helsingborg, Sweden
N Tel: +46 42 38 36 00, Fax: +46 42 38 36 10
⑯ service.nordic@acco.com
LV
EST
LT
Ref: CBT.6535
Issue: 2 (07/10)
CZ XERTEC a.s.
SK U Továren, 770/1b, 102 00, Praha 10, Ceska Republika
Tel: +420 271 741 800, Fax: +420 271 743 143
www.xertec.cz
PL SERWIS ACCO
AUS ACCO Australia Pty Ltd
Level 2, 8 Lord Street, Botany, NSW, Australia 2019
Tel: +61 2 9700 0180, Fax: +61 2 9700 0195
sales.au@acco.com
Ⓐ ACCO Österreich
Clonshaugh Business & Technology Park, Clonshaugh, Dublin 17, Ireland
Tel: 01 816 4300, Fax: 01 816 4302
information-ie@acco.co, www.accorexel.ie
IND GBC Asia Pte Ltd
PAK 47 Ayer Rajah Crescent, #05-08/17, Singapore 139947
BD Tel: +65 6776 0195, Fax: +65 6779 1041
webmaster@gbcasia.com.sg
UPN GBC-Japan K.K.
14F Harmony Tower, 1-32-2 Honcho, Nakano-ku, Tokyo 164-8721
Tel: (81)-03-5351-1801, Fax: (81)-03-5351-1831
serv@gbc-japan.co.jp, www.gbc-japan.co.jp

BRANDS
ACCO Brands Europe
Oxford House
Aylesbury HP21 8SZ
United Kingdom
www.accoeurope.com