406 - Thermostat Perel - Free user manual and instructions
Find the device manual for free 406 Perel in PDF.
| Brand | Perel |
| Model | 406 |
| Product type | Programmable digital thermostat |
| Power supply | 2 R6 batteries (1.5 V, not included) |
| Temperature range | 5 °C to 30 °C |
| Maximum resistive load | 5 A (at 230 V~) |
| Programming | 7 days, 24 hours, adjustable by time slot |
| Temperature modes | Comfort (CT) and Economy (ET) |
| Sensor | Built-in NTC, reads every minute |
| Main functions | Time/day setting, schedule programming, temporary manual and programmed override, absence mode (1-99 days), reset (RESET) |
| Recommended installation height | 160 cm |
| Recommended location | Partition wall, protected from direct sunlight, away from external doors and heat sources |
| Batteries | Replace with 2 R6 batteries (LR6/AA) |
| Disposal instructions | Do not dispose of with household waste; recycle at a waste disposal site in accordance with local regulations |
| Warranty | 24 months against manufacturing defects (EU consumer) |
| Standards | Compliant with stringent EU quality requirements |
Frequently Asked Questions - 406 Perel
User questions about 406 Perel
0 question about this device. Answer the ones you know or ask your own.
Ask a new question about this device
Download the instructions for your Thermostat in PDF format for free! Find your manual 406 - Perel and take your electronic device back in hand. On this page are published all the documents necessary for the use of your device. 406 by Perel.
USER MANUAL 406 Perel
PROGRAMMABLE THERMOSTAT
THERMOSTAT PROGRAMMABLE:
PROGRAMMEERBARE THERMO\$TAAT
TERMOSTATO PROGRAMABLE
PROGRAMMIERBARER THERMOSTAT
TERMOSTATO PROGRAMÁVEL
USER MANUAL 3
NOTICE D'EMPLOI 7
GEBRUIKERSHANDLEIDING 11
MANUAL DEL USUARIO 16
To all residents of the European Union
Important environmenta information about this product

This symbol on the device or the package indicates that disposal of the device after its lifecycle could harm the environment. Do not dispose of the unit (or batteries) as unsorted municipal waste; it should be taken to a specialized company for recycling. This device should be returned to your distributor or to a local recycling service. Respect the local environmental rules.
If in doubt, contact your local waste disposal authorities.
Thank you for choosing Per el! Please read the manual thoroughly before bringing this device into service. If the device was damaged in transit, do not install or use it and contact your dealer. Refer to the Velleman® Service and Quality Warranty on the final pages of this manual.
The digital programmable thermostat is battery operated. It has 7-days preset programs to suit most of the family's style. It can be easily adjusted to fit your own living style with few programming steps. The thermostat is operated by 2 X AA size batteries. It can therefore replay any mechanical standard 2-wire thermostat. Note that the maximal resistive bad is 5 amps.
2. In stallation
If you connect the thermostat to a 230VAC system, make sure the power is switched off and that only a person with good electrical knowledge does the installation. If you have a mechanical thermostat commented with 2 wires, just take away the old thermostat and replace it with this thermostat at. Connect the 2 wires to the terminals as shown in figure 1 to 3. If you do not have a previous thermostat that you wish to replace, install a 2-wire cable to the heating system (see fig. 1 to 3) or consult with your professional electrician. Before installing thermostat, install the thermostat on the location of the old thermostat:
- Place the thermostat as following:
a. About 160cm up from the floor on a wall with constant temperature in the house
b. Only on inside walls (not on a wall towards the outside door)
c. Not exposed to direct sunlight
d. Not close to a heater, furnace or ventilation outlet
e. Not close to a door toward the outside door
- Remove the front cover; unscrew the screwin the battery compartment.
Remove the front housing of the base.
- Unscrew the screw in the protective cover and remove the protective cover.
- Mount the base on the wall and make sure the hole on the wall is covered by the base with wires coming in through the protective cover hole.
- Loosenthe screw of the terminal block and install the wires in to the terminals
406
- Put the protective cover back to the base and lock the cover with the screw.
- Put the front housing back to the base and lock the front housing with screw.
- Install 2 x AA-size batteries into the battery compartment.
- Press the RESET key once and make sure it is working on initial condition.
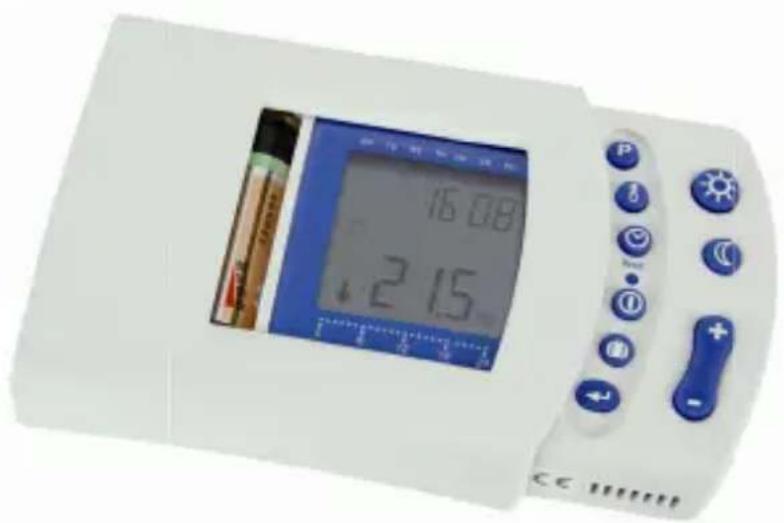
3. Description
| P | Program setup |
| I | Tempera ture reading |
| C | Clock set up |
| RESET | Reset button |
| I | Power ON / OFF button |
| D | Vacation temperature setup |
| ← | Enter button |
| Day temperature | |
| C | Night tem perature |
| + | Higher temperature |
| - | Lower temperature |
4. Operation
Setting the clock
After battery installation (2 x AA size) or pressing RESET or the ⑦ key, the thermostat will enter the time adjustment mode. The hour is flashing. Set the hour
with + or -. Press e infirm. The minutes are flashing. Press + or - to adjust t the minutes. Press o confirm the setting. The day is flashing. Press + or - to adjust day. Press key t o confirm the setting. The display will return into running mode.
Viewing the programs
The thermostat is a weekly programmable thermostat, 7 days with 24 hours can be set. Each hour can select ※ (comfort temperature or CT) or (evening temperature or ET) temperature. A weekly factory preset program is installed. This preset program is set for most families.
Heating and Climate Programming
Press the key. The Monday preset program at 0:00 is being displayed. Press ^+ or -. The display will show the temperature setting for each hour, e.g. Monday ET program is set at 0:00 - 5:59 and 8:00 - 15:59, CT program is set at 6:00 - 7:59 and 16:00 - 22:59. Note that the ET is set at 23:00 - 0:00.
Press the key to display the next day preset program. Press + or -. This will show the temperature setting for each hour. Repeat the above steps, each preset
406
program will display until Sunday. Once the Sunday program has been reviewed, press the key. The display will return into running mode.
Changing a preset program
The preset program may not be suited for your family. The program may be adjusted to suit your life style. The following instructions will allow you to change the preset program.
Press the key to enter the program viewing mode. Press the key to select the day of program to be modified.
Press + or - to select the hour. Press 日 or C to modify the temperature.
Example: Changing Saturday 12:00 - 16:59 CT to 12:00 - 16:59 ET.
- Press key to enter into program viewing mode.
- Press the + key to select the day (Saturday).
- Press the + key until 12:00 with CT setting.
- Press the key to change from the CT period to the ET period.
- Repeat step 3 and 4 to change 13:00 - 14:00 from CT period to ET period.
- Press to confirm setting. Press to return to running mode.
- You can check the programmed setting and confirm the setting.
Viewing and Modifying the 和 and Temperature
Press the key to view the CT or ET temperature mode. Press to change from CT viewing to ET viewing and press the key to change from ET viewing to CT viewing. The temperature is flashing at this moment. Press + or - to change CT or ET setting. Press the key to confirm the setting and to return to the running mode.
Setting the Temporary Manual Override Temperature
This function allows you to change the present temperature setting to a temporary temperature setting from 1 hour up to 48 hours. Press + or - to enter the manual override temperature mode. The temperature is flashing. Press + or - to select the override temperature. Press confirm the temperature setting. H1 will be displayed and flashing. Press + or - to select the hour (max. 48 hours) Press the key to confirm the setting.
Setting the Temporary O verride Program
This function allows you to temporary modify the CT temperature to an ET temperature setting until the next CT setting or to modify the ET temperature to a CT temperature setting until next ET setting. The unit is running at CT program period: Press to change ET to CT setting until next CT period. If the unit is running at ET program hour: Press 念 to change CT to ET setting until next ET program.
406
Setting the Vacation or Permanent Override Temperature
This function allows you to set your vacation temperature from 1 to 99 days or to set a permanent override temperature. Press the key and + or - key to select the number of days for your vacation period (max. 99 days). If you press -, the period will be permanently overridden. Press the key to confirm the vacation period. Press + or - key to select temperature. Press the key to confirm the override setting.
Cancelling the Manual Override
Press or to return to the running mode or press the key to turn off the unit.
Switching the unit ON and OFF
Press the ① key to turn the thermostat on or off.
Resetting the unit
Press the RESET key to reset the unit into initial clock setting mode. All previous programs will be reset to factory preset program.
The Sensor
This thermostat is features an advanced NTC warmth sensor on the bottom left side of the housing. In case you accidentally touch the sensor, wait a couple of minutes and let the sensor reach the ambient temperature. The thermostat takes the temperature every minute so an accurate temperature reading is obtained.
5. Technical Specifications
| power supply | 2 x AA-size batteries (not incl.) |
| temperature range | 5°C ~ 30°C |
Use this device with original accessories only. Velleman nv cannot be held responsible in the event of damage or injury resulted from (incorrect) use of this device. For more info concerning this product and the latest version of this manual, please visit our website www.perel.eu. The information in this manua I is subject to change without prior notice.
© COPYRIGHT NOTICE
The copyright to this manual is owned by Velleman nv. All worldwide rights reserved. No part of this manual or may be copied, reproduced, translated or reduced to any electronic medium or otherwise without the prior written consent of the copyright holder.
NOTICE D'EMPLOI
1. Introduction
Velleman® Service and Quality Warranty
Velleman® has over 35 years of experience in the electronics world and distributes its products in more than 85 countries.
All our products fulfil strict quality requirements and legal stipulations in the EU. In order to ensure the quality, our products regularly go through an extra quality check, both by an internal quality department and by specialized external organisations. If, all precautionary measures notwithstanding, problems should occur, please make appeal to our warranty (see guarantee conditions).
General Warranty Conditions Concerning Consumer Products (for EU):
- All consumer products are subject to a 24-month warranty on production flaws and defective material as from the original date of purchase.
- Velleman® can decide to replace an article with an equivalent article, or to refund the retail value totally or partially when the complaint is valid and a free repair or replacement of the article is impossible, or if the expenses are out of proportion. You will be delivered a replacing article or a refund at the value of 100% of the purchase price in case of a flaw occurred in the first year after the date of purchase and delivery, or a replacing article at 50% of the purchase price or a refund at the value of 50% of the retail value in case of a flaw occurred in the second year after the date of purchase and delivery.
- Not covered by warranty:
- all direct or indirect damage caused after delivery to the article (e.g. by oxidation, shocks, falls, dust, dirt, humidity...), and by the article, as well as its contents (e.g. data loss), compensation for loss of profits;
- frequently replaced consumable goods, parts or accessories such as batteries, lamps, rubber parts, drive belts... (unlimited list);
-
flaws resulting from fire, water damage, lightning, accident, natural disaster, etc.;
-
flaws caused deliberately, negligently or resulting from improper handling, negligent maintenance, abusive use or use contrary to the manufacturer's instructions;
-
damage caused by a commercial, professional or collective use of the article (the warranty validity will be reduced to six (6) months when the article is used professionally);
-
damage resulting from an inappropriate packing and shipping of the article;
-
all damage caused by modification, repair or alteration performed by a third party without written permission by Velleman.
-
Articles to be repaired must be delivered to your Velleman® dealer, solidly packed (preferably in the original packaging), and be completed with the original receipt of purchase and a clear flaw description.
- Hint: In order to save on cost and time, please reread the manual and check if the flaw is caused by obvious causes prior to presenting the article for
repair. Note that returning a non-defective article can also involve handling costs.
- Repairs occurring after warranty expiration are subject to shipping costs.
- The above conditions are without prejudice to all commercial warranties.
The above enumeration is subject to modification according to the article (see article's manual).