USER MANUAL SNM 33 B1 SILVERCREST
SEWING MACHINE SNM 33 B1
FR BE
MACHINE A COUDRE
Operation and Safety Notes
IAN 96965
FR BE
NL BE
DE AT CH
GB IE
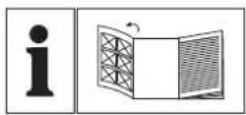

Before reading, unfold the page containing the illustrations and familiarise yourself with all functions of the device.
| FR / BE | Instructions d'utilisation et consignes de sécurité | Page | 5 |
| NL / BE | Bedienings- en veiligheidsinstructies | Pagina | 27 |
| DE / AT / CH | Bedienungs- und Sicherheitshinweise | Seite | 49 |
| GB / IE | Operation and Safety Notes | Page | 71 |
Présentation
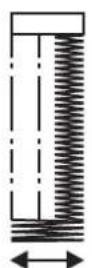
Point overlock standard: (B)
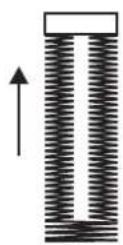
Point overlock double: (C)
CROWN Service Center
tekniHall Elektronik GmbH
Breitefeld 15
DE-64839 M nsterü
IAN 96965
sewingguide-service-be@teknihall.com
Fabricant
CROWN Service Center
teknihall Elektronik GmbH
Breitefeld 15
DE-64839 Munster
IAN 96965
sewingguide-service-be@teknihall.com
Vervaardiger
CROWN Service Center
teknihall Elektronik GmbH
Breitefeld 15
DE-64839 Munster
IAN 96965
sewingguide-service-de@teknihall.com
Hersteller
Introduction.
Intended use.. 72
Sewing machine components . 72
72
Technical data 73
Important safety instructions.. Page 74
Getting ready
Connecting machine to power source.. 75
Changing the bulb . 75
Fitting the snap-in sewing table.. 76
Inserting the needle.. 76
Two-step pressor foot lifter.. Page 77
77
Winding the lower thread.. 78
Inserting the bobbin.. 78
79
Thread tension
Bringing up the lower thread . Page 80
Sewing basics
Sewing/Useful applications.. Page 81
Matching the needle, fabric and thread.. Page 81
How to choose your stitch
Straight stitching and needle position.. Page 82
Zigzag stitching
Zip foot . Page 83
Blind stitch foot.. Page 84
Button sewing foot.. Page 84
Buttonhole foot . Page 85
Overlock stitches.. Page 85
3-step zig-zag Page 86
Stretch-stitch Page.87
Patch work.. Page 87
Monogramming and embroidering with embroidery hoop* Page 88
Applique 88
Scallop stitching
Twin needle Page 89
Maintenance
Maintenance.. Page 90
Storage.. Page 90
Trouble shooting guide Page 91
Disposal
Guarantee
Service
Service number Page 92
Manufacturer
Introduction
Congratulations on the purchase of your sewing machine. You have bought a top quality product which has been manufactured with great care.
These Operating Instructions contain all you need to know about using your sewing machine. However, if you still have any questions, please contact your dealer. We hope you enjoy your sewing machine and wish you success.
Before you use the sewing machine for the first time, it is essential that you make yourself fully familiar with the functions of the sewing machine and discover how to use the sewing machine correctly. Read the following Operating Instructions as well as the safety instructions. Keep these instructions in a safe place. When passing the sewing machine on to a third party, pass these instructions on, too.
Intended use
The sewing machine is intended
- for use as a movable machine,
- for sewing typical household textiles and ...
- only for private household use.
The sewing machine is not intended
- to be installed at a fixed location,
- for the processing of other materials (e.g. leather or other heavy materials such as tent or sail fabrics)
- for commercial or industrial use.
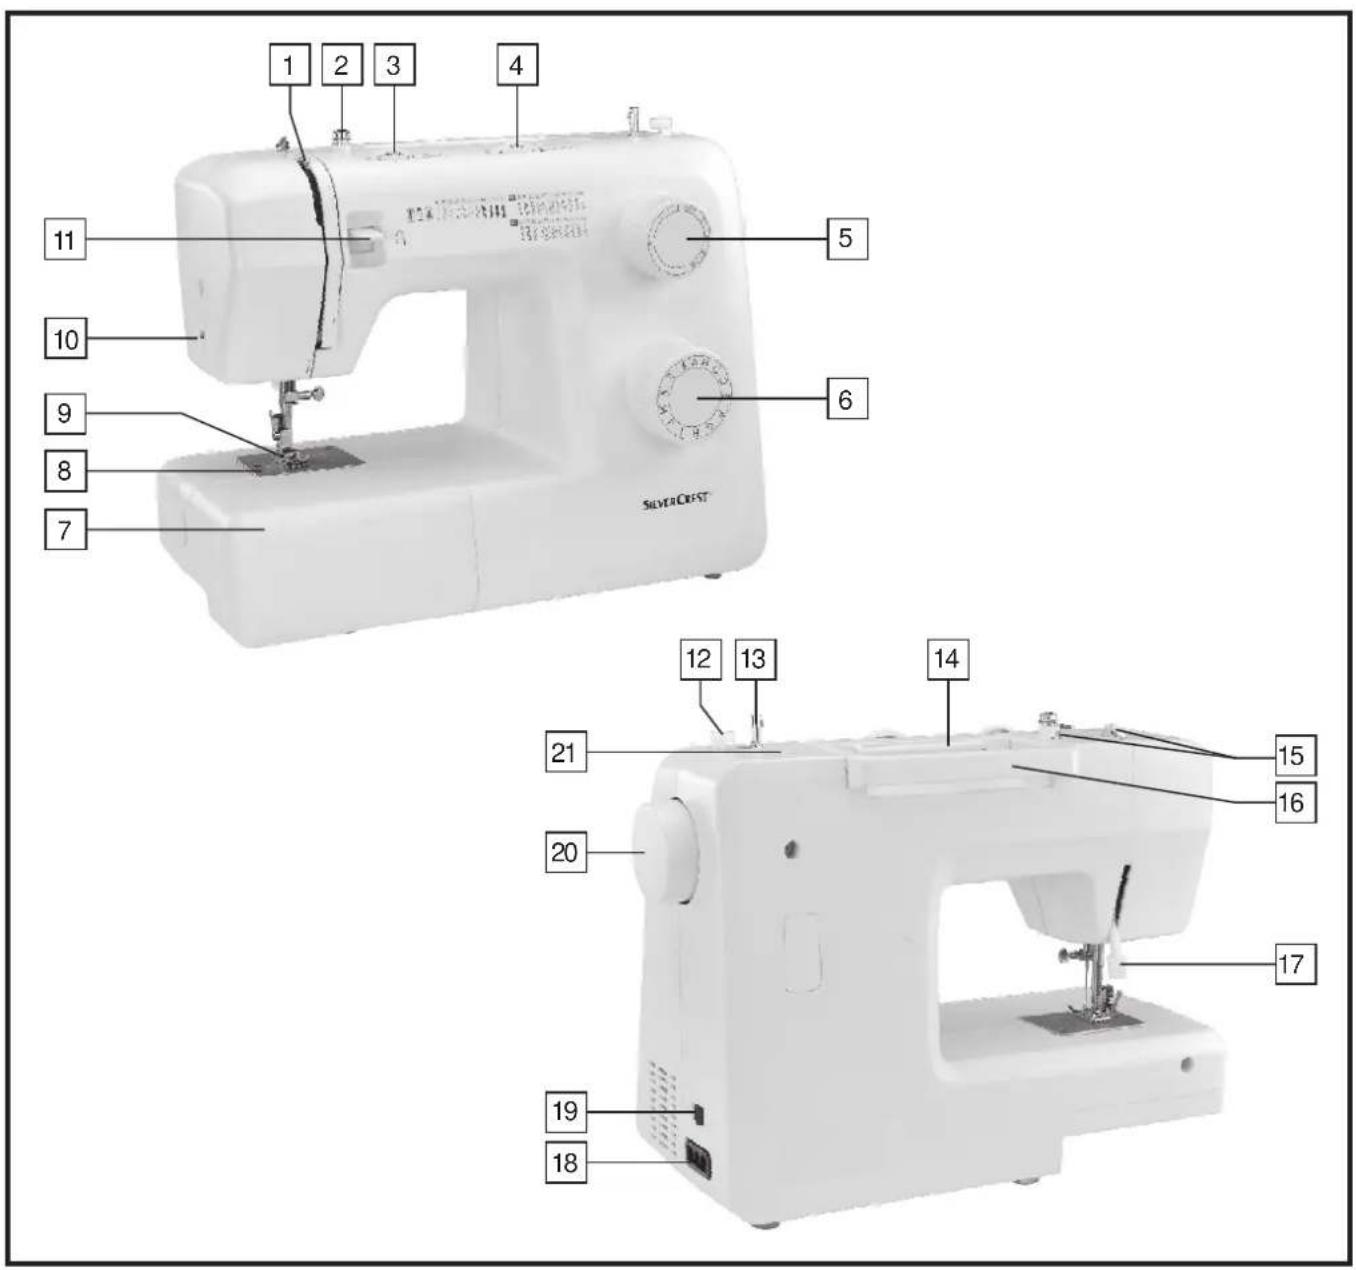
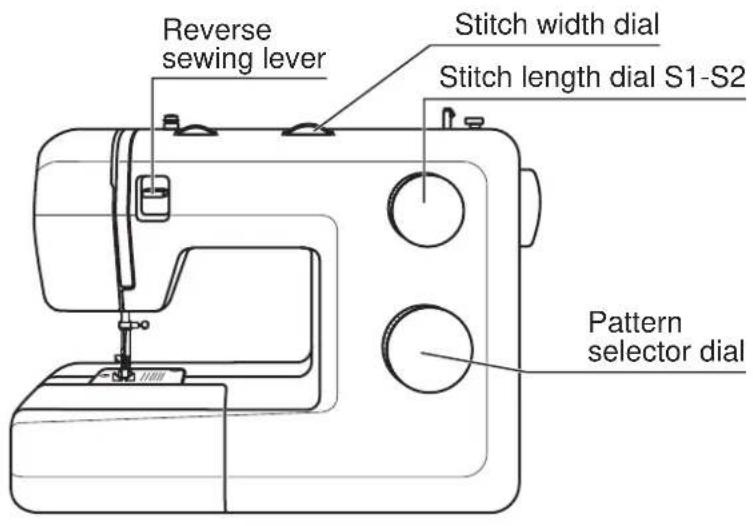
Sewing machine components
1 Thread take-up lever
2 Bobbin thread guide
3 Thread tension dial
4 Needle width dial
5Stitch length dial
6 Pattern selector dial
7 Sewing table
8 Needle plate
9 Presser foot
10 Thread cutting
11 Reverse sewing lever
12 Bobbin winder stopper
13 Bobbin winder spindle
14 Spool pin
15 Upper thread guide
16 Handle
17 Two-step presser foot lifter
18 Main plug socket
19 | Power switch
20 Hand wheel
21 Hole for second spool pin
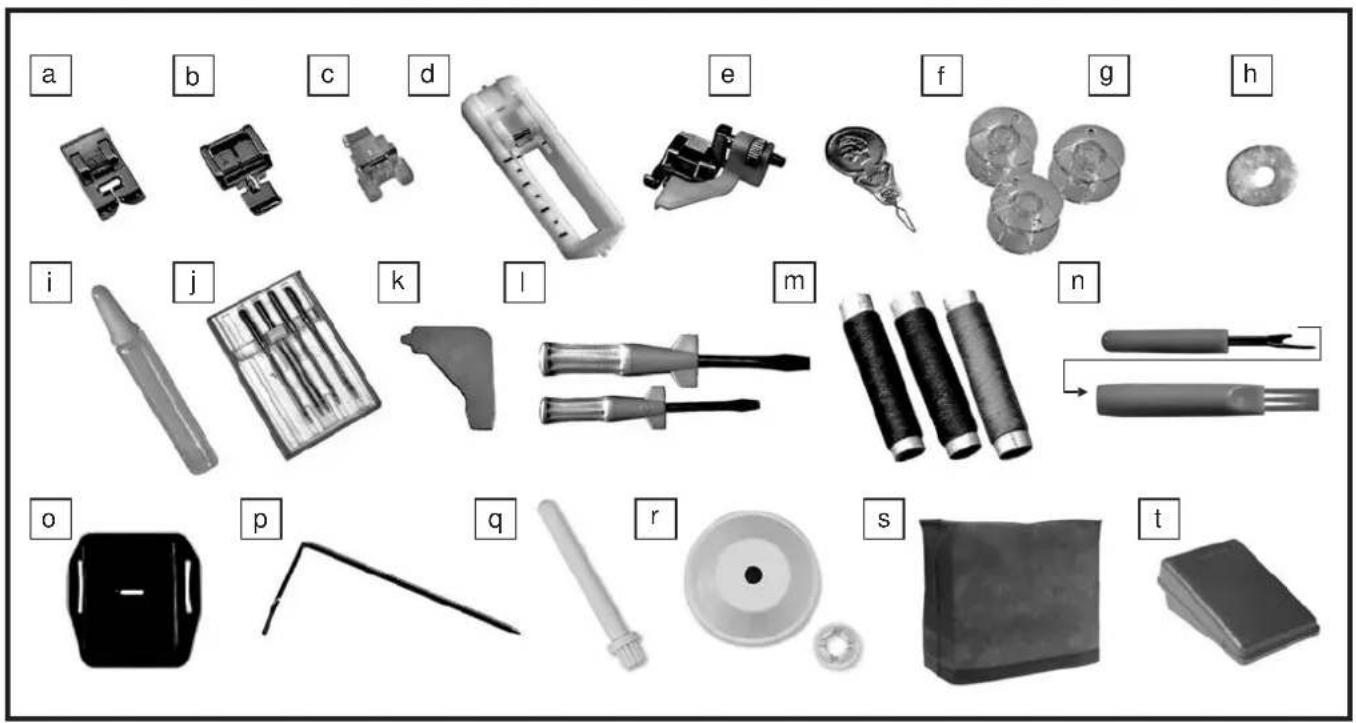
Accessories
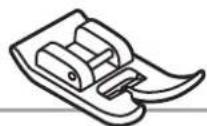
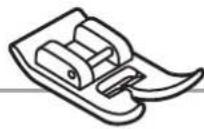
a All-purpose presser foot (already installed)
bZip foot
c Button sewing foot
d Buttonhole foot
e Blind stitch foot
f Needle threads
g Bobbins (4x) (1x already installed)
Felt cushion
i Oil bottle
j Needle box: 4x single needles (1x already installed), 1x twin needle
k L-screwdriver
Screwdrivers (large & small)
m Bobbins (1x blue, 1x pink, 1x yellow)
nStitch ripper / brush
0 Embroidery and darning plate
p Edge / quilt guide
Secondary spool pin
r Spool pin cap (large & small)
s Dust cover
Foot pedal / power plug
Technical data
| Rated voltage | 230 Volt/ 50 Hz |
| Power rating | - Machine | 70 Watt |
| - Sewing light | 15 Watt |
| - Total | 85 Watt |
| Dimensions | - When handle is folded down | A p p r \( \phi 3 \times 8.2 \times 12 \times 9 \times W8 \) 2 m m |
| Cable length | - Power cable | Approx. m8 |
| - Foot control cable | Approx. 1.4 m |
| Weight | - Machine | Approx. 5.6kg |
| Material | Aluminium / plastic |
| Operating components | - Mains power switch ON/OFF | Supplied |
| - Foot speedswing speed | Supplied |
| Display components | - Sewing light | Supplied |
| Looper system | Oscillating hook |
| Needle system | 130/705H |
| Interference-free | In acc. with EU Directive |
| TÜV approved | Yes |
| Product guarantees | 3 years |
| Protection class | II |
When using an electrical appliance, the basic safety instructions should always be followed. Read all Operating Instructions before using this sewing machine.
DANGER - To reduce the risk of electric shock:
- The sewing machine should never be left unattended when plugged in.
- Always remove the plug from the socket immediately after use as well as before cleaning and other maintenance.
- Always unplug the sewing machine before replacing the bulb. Replace the bulb with one of the same type and rated at 15 watts (220-240V).
WARNING - To reduce the risk of fire, electric shock, or injury to persons:
- Do not allow the sewing machine to be used as a toy. Close attention is necessary when the sewing machine is used near children.
- Use the swing machine only for those things described in the Operating Instructions.
- Do not use the sewing machine if it has a damaged electric cable or plug, if it is not working properly or if water has penetrated into its interior. In these cases return the appliance to the nearest authorized dealer or service centre for examination.
- Never operate the appliance with any ventilation openings blocked. Keep the ventilation openings of the sewing machine and foot pedal free from any accumulation of lint, dust, and loose cloth.
- There is the risk of injury because of the upwards and downwards movement of the needle when sewing. Always work with care and watch the area of work.
- Always use the proper stitch plate. The wrong plate can cause the needle to break.
- Do not use bent needles.
- Do not pull on the fabric while sewing. It may deflect the needle causing it to break.
- Always switch the sewing machine off when making any adjustments in the needle area, such as threading or changing the needle, threading the bobbin, or changing the presser foot etc.
- Always unplug the sewing machine from the electrical outlet before removing the cover, lubricating the machine or when undertaking any other servicing work described in the Operating Instructions.
- Never drop or insert any object into any opening.
- Do not use outdoors.
- Do not operate where aerosol spray products or oxygen are being used.
- To disconnect, turn the main switch to the off ("O") position, then remove the plug from the socket.
- Do not unplug by pulling on the cable. To unplug, grasp the plug, not the cord.
- The sound level under normal operating conditions is 75dB(A).
- Please turn off the machine or unplug if the machine is not operating properly.
- Never place anything on the foot pedal.
- If the supply cord that is fixed to the foot pedal is damaged, it must be replaced by the manufacturer or its service agent or a similar qualified person in order to avoid a hazard.
- This appliance can be used by children aged from 8 years and above and persons with reduced physical, sensory or mental capabilities or lack of experience and knowledge if they have been given supervision or instruction concerning use of the appliance in a safe way and understand the hazards involved. Children shall not play with the appliance.
- Cleaning and user maintenance shall not be made by children without supervision.
- Keep the Operating Instructions in a suitable place near the machine, and hand the Instructions over if you give the machine to a third party.
SAVE THESE INSTRUCTIONS
This sewing machine is intended for household use only.
Connecting machine to power source
Important:
Unplug power cable when machine is not in use.
Important:
Consult a qualified electrician if in doubt about connecting the machine to the power source. Unplug power cable if you are not using the power supply.
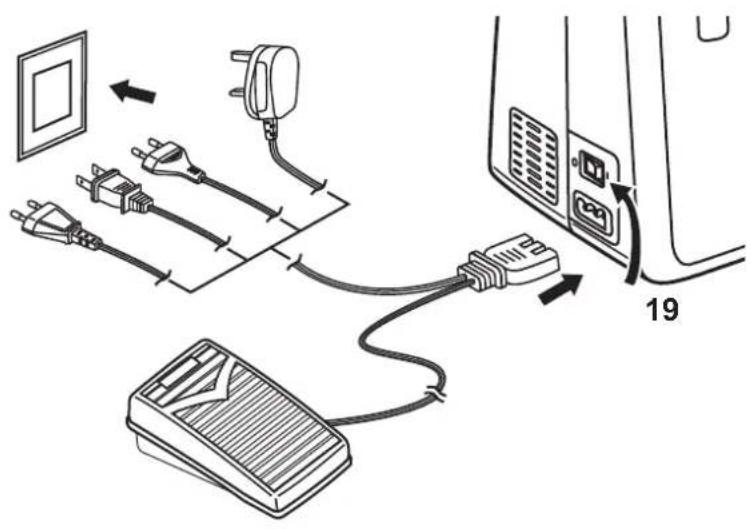
The sewing machine must be used with the ELECTRONIC foot pedal (t) KD2902/FC-2902D (220-240V).
Connect the machine to a power source as illustrated in the adjacent drawing.
Illumination
The machine is started and the light switched on by pressing the main switch (19) in position "I".
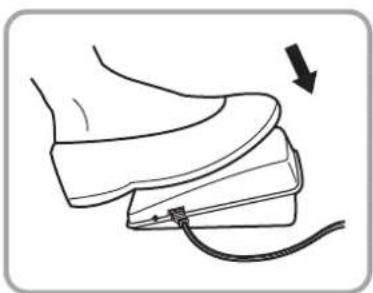
The operating speed of the machine is regulated with the pedal (t).
Changing the bulb

Disconnect the machine from the power supply by removing the plug from the mains socket!
- Loosen screw (A) as illustrated.
- Remove the cover (B).
- Unscrew the bulb (C) and fit a new one.
- Replace the cover and tighten screw.
Should there be any problem, ask your local dealer who will be able to advise you.
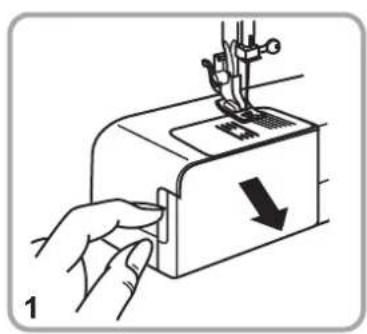
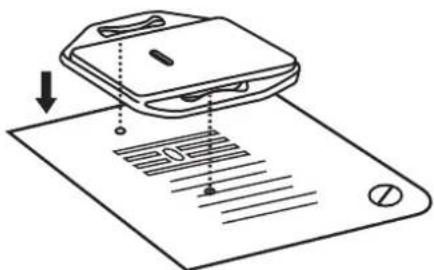
Installing the snap-in sewing table
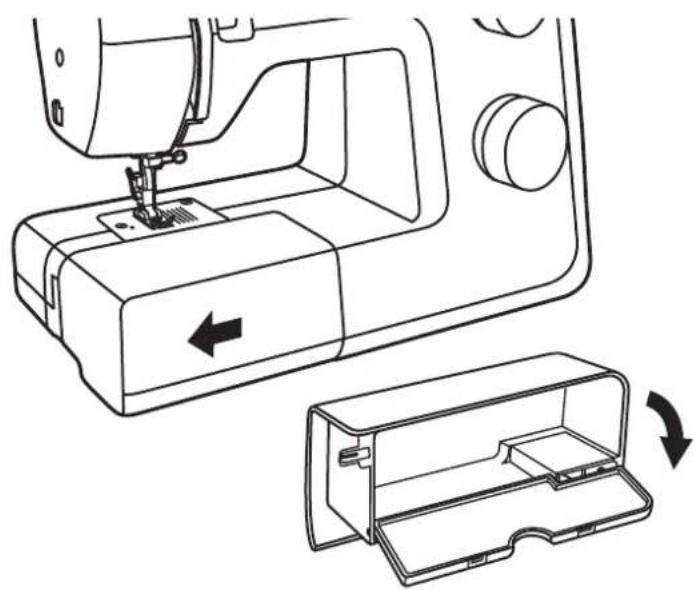
If you want to sew on the arm bed, pull out the snap-in sewing table (7) in the direction of the arrow.
The inside of the snap-in sewing table (7) can be utilised as an accessory box.
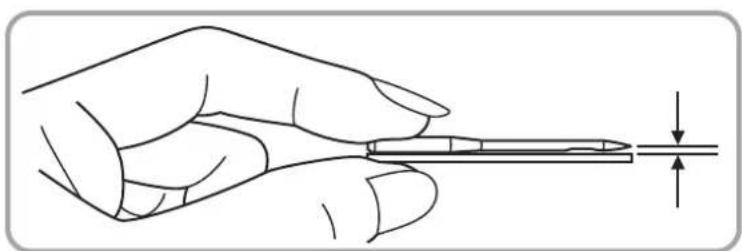
Inserting the needle
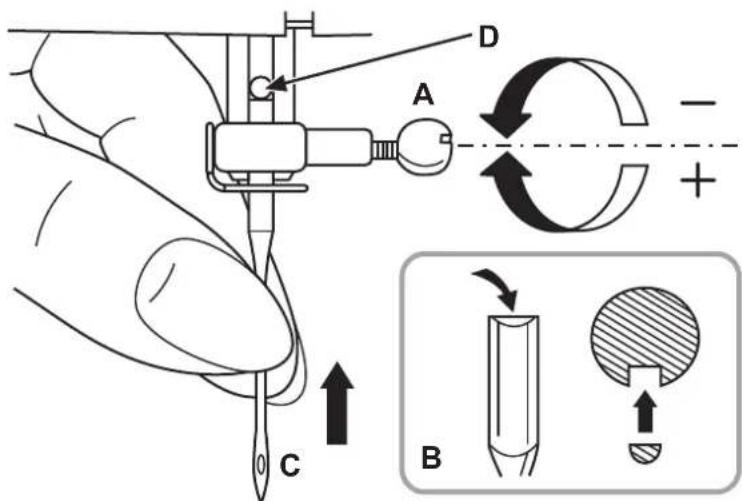
Important:
Turn power switch (19) to off ("O").
Change the needles regularly, especially at the first signs of problems when sewing.
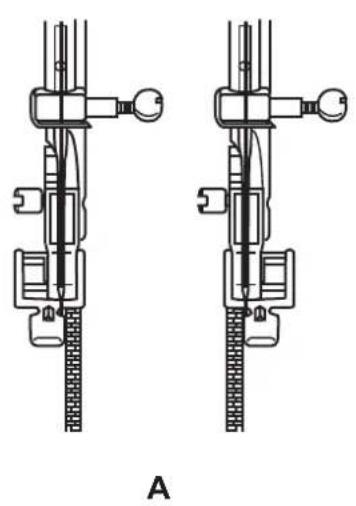
Insert the needle as in the illustration.
A. Loosen the needle clamp screw and tighten again after inserting the new needle.
B. The flat side of the shaft should be towards the back.
C/D. Insert the needle up to the stop at the end of the shaft.
Only use fully-functional needles:
Problems can occur with the use of:
- Bent needles
- Blunt needles
- Damaged points

When sewing thick fabrics, the passage of fabrics under the presser foot can be improved by raising the two-step presser foot lifter (17) further (arrow).
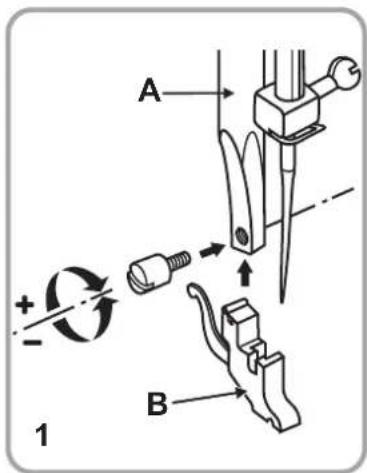
Important:
Turn the main switch (19) to off ("O") when carrying out all the operations!
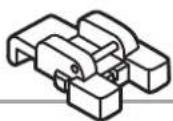
Raise the presser bar (A) by lifting the two-step presser foot lifter (17) Attach the presser foot holder (B) as illustrated.
Lower the presser foot bar (B) until the groove (C) is directly above the pin (D). Lower the presser foot bar (A) as far as it will go. The presser foot (a) will engage automatically.
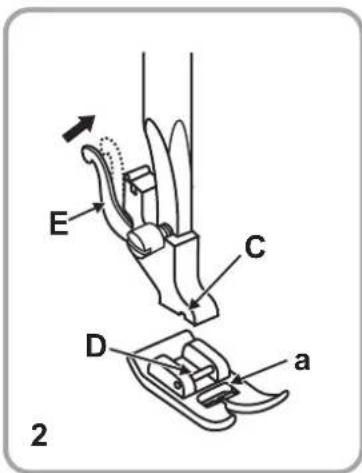
Raise the presser foot. Press the lever (E) gently towards the front and the presser foot disengages.
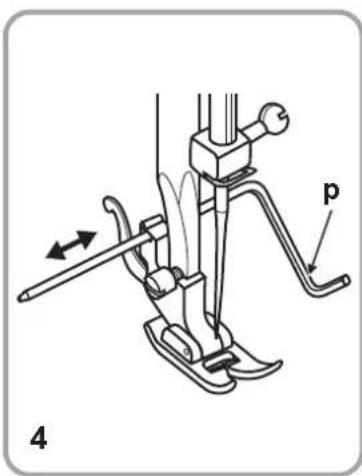
4. Inserting the edge/ quilt guide (p).
As shown in the illustration carefully insert the edge/ quilt guide (p) e.g. For hems, pleats, etc.
Winding the lower thread
Place the spool (m) on the spool pin (14) and hold it in place with a spool pin cap (r).
- Small spool pin cap for thin threads
Large spool pin cap for thick threads
Pull the thread from the spool into the thread guide, and up to the bobbin (2).
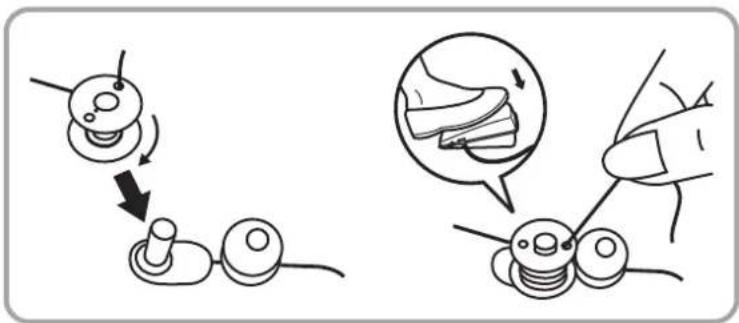
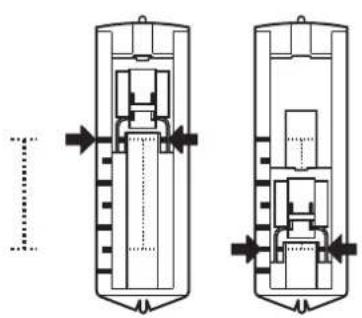
Pull the thread from the inside through a hole of the empty bobbin (g). Place the spool on the spool holder (13) and then push to the right into the filling position.
Hold the end of the thread. Press the pedal (t). Release the pedal (t) after a few turns. Release the thread and cut as close as possible to the spool. Press the pedal (t) again.
Once the spool is full, it rotates more slowly. Release the pedal (t). Replace the bobbin (g) into sewing position and remove it.
Note:
If the bobbin winder spindle (13) is in the winding position, the sewing process is automatically interrupted. To sew, push the bobbin winder spindle (13) to the left (sewing position).
Inserting the bobbin
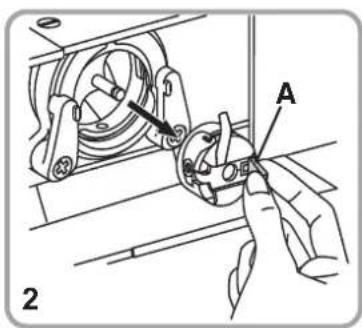
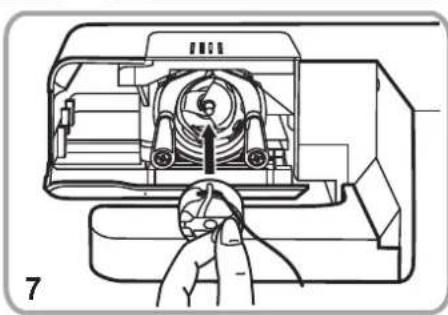
Important:
Turn power switch (19) to off ("O").
When inserting or removing the bobbin (g), the needle must be fully raised.
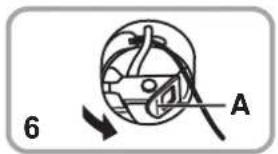
- Open the hinged cover.
- Pull the bobbin case tab (A) and remove the bobbin case.
- Hold the bobbin case with one hand.
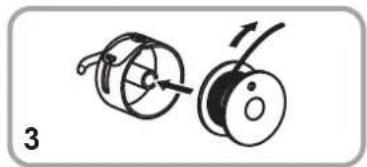
- Insert the bobbin (3) so that the thread runs in a clockwise direction (arrow). (4)
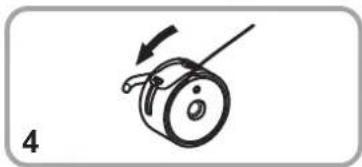
- Pull the thread into the slit and under the tension spring.
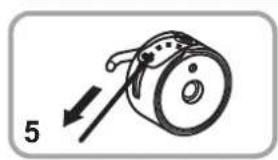
- Hold the bobbin case between the index finger and thumb on the bobbin case tab (A).
- Insert it into the shuttle race.
Note :
The method of bringing up the lower thread is explained on page 80.
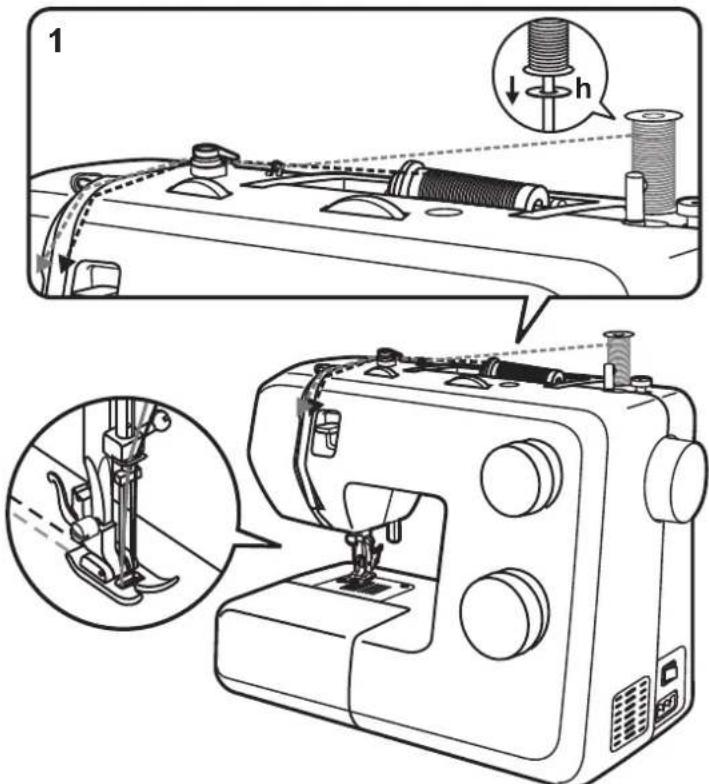
Threading the upper thread

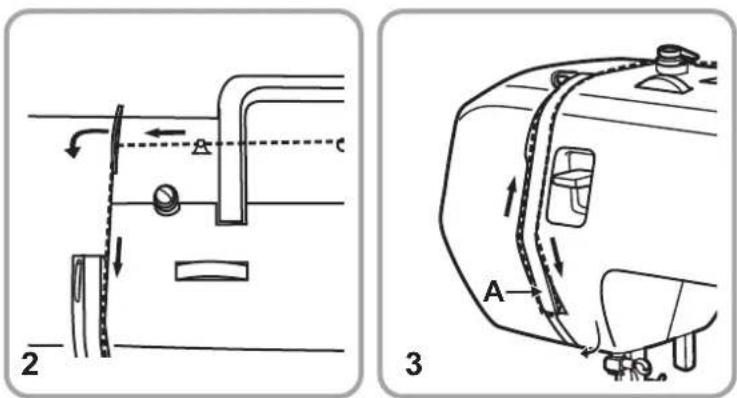
Important:
Set the main switch (19) to ("O"). Raise the presser foot bar by lifting the two-step presser foot lifter (17) and lift the thread lever (1) by turning the hand wheel (20) anti-clockwise. Follow the arrows and numbers on the sewing machine when threading.
- Place the spool (m) on the spool pin (14) and hold it in place with a spool pin cap (r).
- Small spool pin cap for thin threads
- Large spool pin cap for thick threads
- Guide the upper thread through the upper thread guide (15) from right to left, then move it forward into the right slot and guide it downwards.
- Guide it to the left under the guide lug (A) and then upwards again.
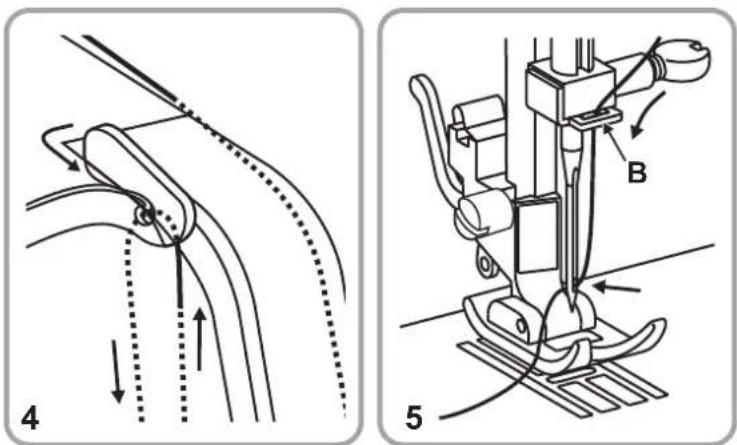
- Guide the thread from right to left through the thread lever (1) and then downwards.
- Guide the thread first behind the large, metal thread guide (B) and then through the eye of the needle. Always thread the needle from the front.
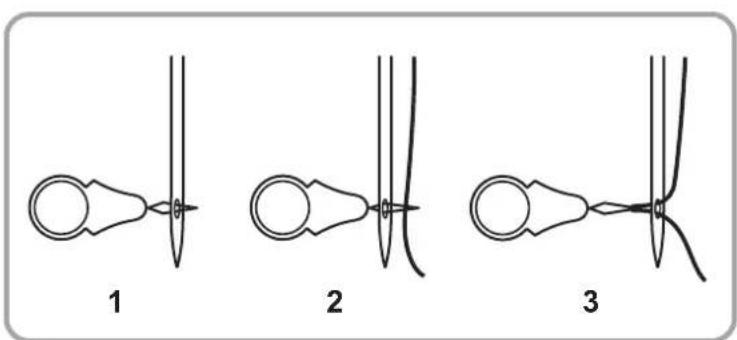
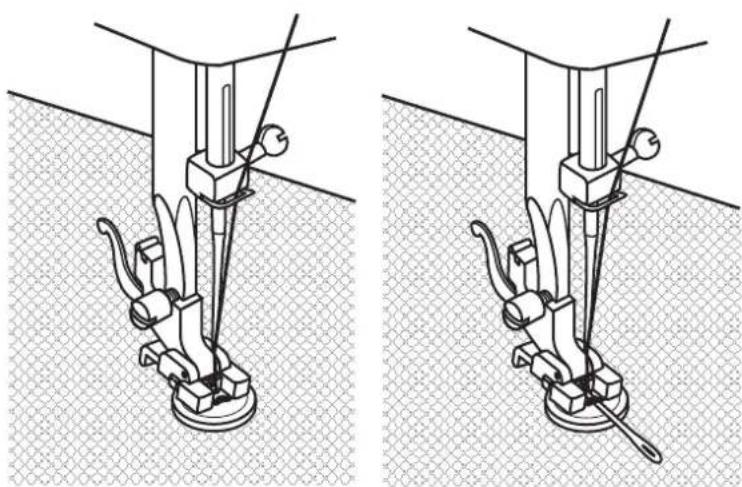
Needle threads
You can use the needle threadser (f) as a threading aid.
- Insert the needle threader (f) through the eye of the needle from back to front.
- Guide the upper thread through the wire loop of the needle threads.
- Pull the needle threads (f) together with the thread back through the eye of the needle.
Thread tension
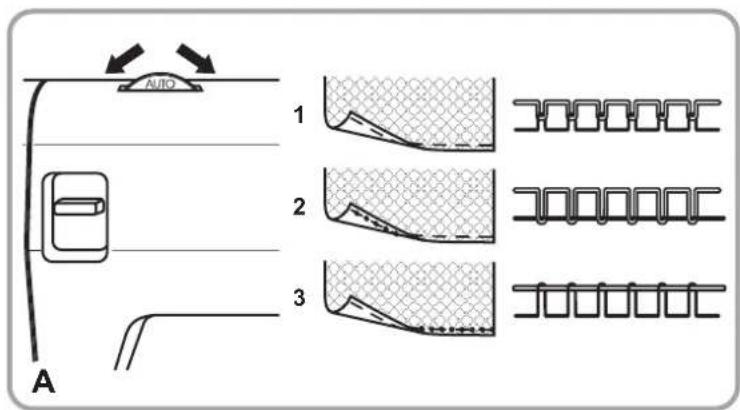
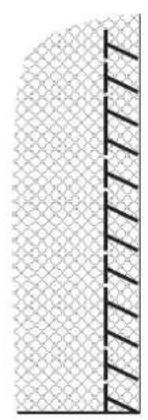
Upper thread tension (A)
Basic upper thread tension setting: "AUTO" To increase the tension, turn the dial to the next higher number. To reduce the tension, turn the dial to the next lower number.
- Normal thread tension
- Upper thread tension too loose
- Upper thread tension too tight
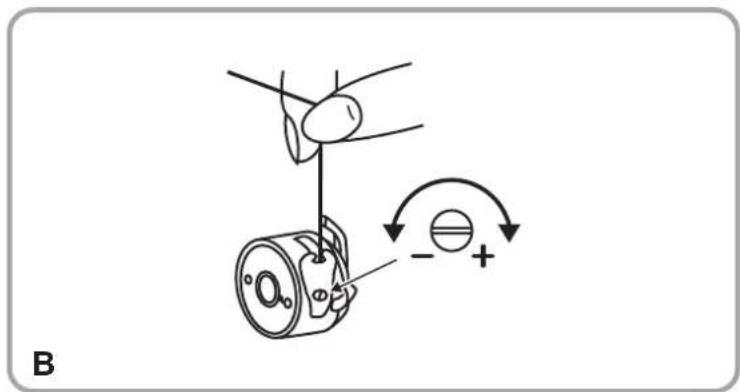
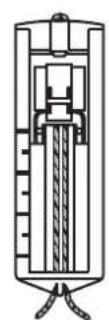
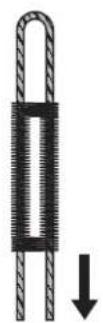
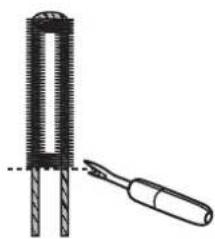
Lower thread tension (B)
Note:
The bobbin tension is adjusted correctly during manufacturing, therefore no changes are necessary.
To test the bobbin thread tension, the full bobbin is placed in the bobbin case. The bobbin case and gripper are then suspended by the end of the thread. If the tension is correct, the thread will unwind by about 5 to 10cm when gently swung and will then remain suspended. If the full bobbin case unwinds, the tension is too slack. If the tension is too tight, it hardly unwinds or does not unwind at all. To adjust, use the small screwdriver (I).
Bringing up the lower thread
Hold the end of the upper thread with the left hand. Turn the handwheel (20) in the anticlockwise direction until the needle is again raised (a complete revolution).
Pull on the upper thread to bring the lower thread up through the stitch plate hole. Lay both threads to the back under the presser foot.
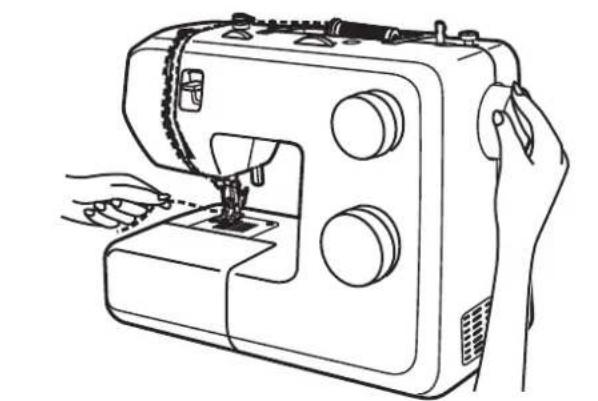
Sewing / Useful applications
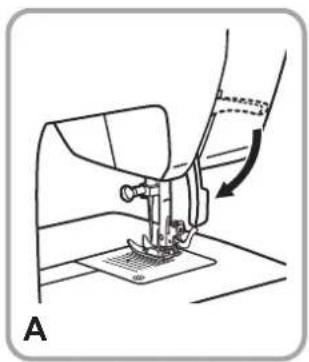
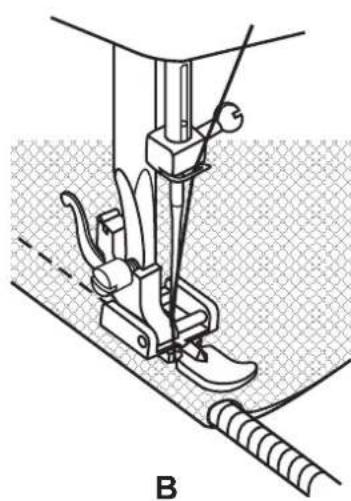
Sewing (A)
Once the sewing machine is correctly threaded and adjusted, lower the presser foot before sewing by lowering the two-step presser foot lifter (17). Press the control pedal (t) to start sewing.
Stitching (B)
At the end of seam, press down the reverse sewing lever (11). Sew a few reverse stitches. Release the lever and the machine will begin to sew forwards again
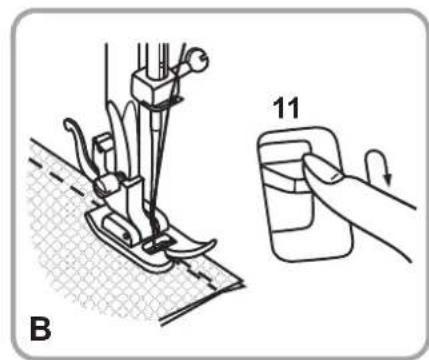
Releasing the material (C)
Turn the hand wheel (20) anticlockwise to put the thread lever (1) into its highest position. Lift the presser foot and pull the material back in order to release it.
Cutting the thread (C)
Hold the threads behind the presser foot with both hands; guide them to the thread cutter (10) and move your hands down.
Matching the needle, fabric and thread
NEEDLE, FABRIC, THREAD SELECTION GUIDE
| NEEDLE SIZE | FABRICS THREAD | |
| 9-11(65-75) | Lightweight fabrics: thin cottons, voile, serge, silk, muslin, Qiana, interlocks, cotton knits,jerseys, crepes, woven polyester, shirt & blouse fabrics. | Light-duty thread in cotton, nylon or polyester. |
| 12(80) | Medium weight fabrics:- cotton, satin, heavy muslin, sailcloth, double knits, light woollens. | Most threads sold are medium size and suitable for these fabrics and needle sizes. Use polyester threads on synthetic materials and cotton on natural woven fabrics for best results. Always use the same thread on top and bottom. |
| 14(90) | Medium weight fabrics: cotton duck, woollens, heavier knits, terrycloth, denims. |
| 16(100) | Heavyweight fabrics: canvas, woollens, canvas and quilted fabrics, denims, upholstery material (light and medium). |
| 18(110) | Heavy woollens, overcoat fabrics, upholstery fabrics, some leathers and vinyls. | Heavy duty thread, carpet thread (set the presser foot to high pressure-high numbers.) |
IMPORTANT: Match needle size to thread size and weight of fabric.
Note twin needle:
- Twin needles are used for decorative work.
- When sewing with twin needles, the stitch width dial (4) should be set at "2.5".
- The European needle size is 65, 70, 80 etc. The American and Japanese needle size is 9, 11, 12 etc.
- Replace the needle regularly and not later than the first thread breakage or skipped stitches.
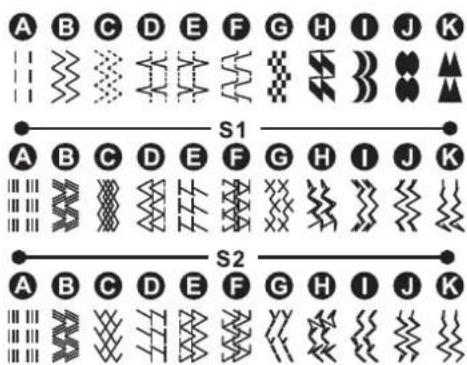
How to choose your stitch
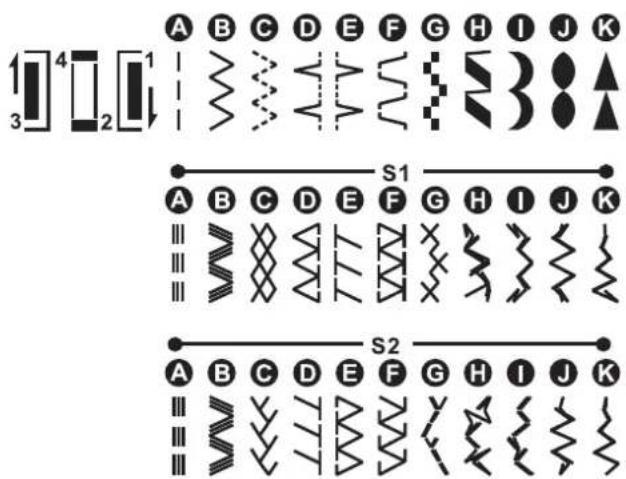
For straight stitch, turn the stitch selector dial (6) until it required letter "A" coincides with the mark. You can adjust the needle position from left to central by turning the stitch width dial.
For zigzag stitch, turn the stitch selector dial (6) until the required letter "B" coincides with the mark. Adjust the stitch length and stitch width according to the fabric being used.
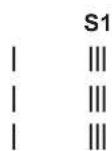
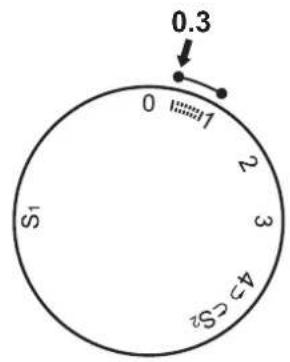
To obtain any of the other stitches shown in the upper row, turn the stitch selector dial until the required letter / stitch coincides with the mark Adjust the stitch length and the stitch width as required. In order to achieve an optimal result for the decorative stitches G-K of the first row, the stitch length should be set between "0.3" and a maximum of "0.5".
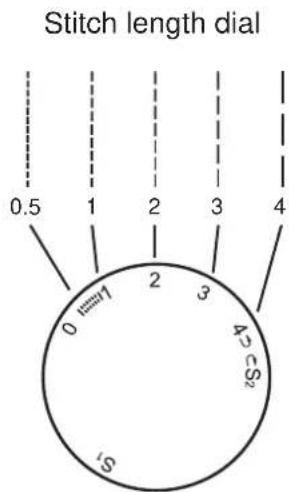
To obtain any of the stitches on the second row, turn the stitch length dial (5) to "S1". To obtain any of the stitches on the third row, turn the stitch length dial (5) to "S2", select the stitch desired with the stitch selector dial (6) and turn the stitch selector dial (6) until the required letter coincides with the mark. Set the stitch length as required.
Straight stitching and needle position
Turn the stitch selector dial (6) to "A" (straight stitch).
Generally speaking, the thicker the fabric, thread and needle, the longer the stitch should be.
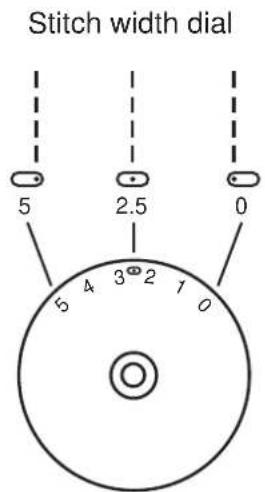
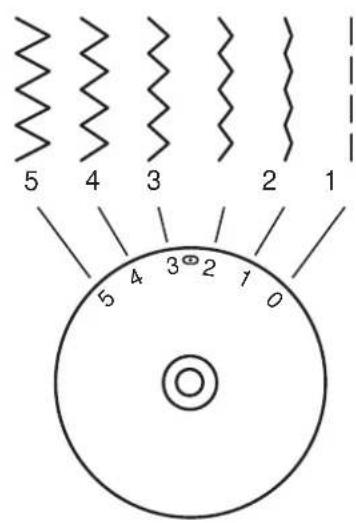
Select the needle position from left to right by changing the stitch width dial (4) from "0" to "5".
Zigzag stitching
Stitch width dial
Stitch length dial
Turn the stitch selector dial (6) to "B".
The function of stitch width dial (4)
The maximum stitch width for zigzag stitching is "5"; however, the stitch width can be reduced on any type of stitch. The width increases as you turn the stitch width dial (4) from "0" to "5".
The function of stitch length dial (5) while zigzagging
The density of zigzag stitches increases as the setting of the stitch length dial approaches "0". For a good zigzag stitch, a stitch width of 2.5 or less is used.
Satin stitch
When the stitch length is set between "0" - "1", the stitches are very close together producing the "satin stitch" which is used for making buttonholes and decorative stitches.
Fine fabric
When sewing very fine fabric, place a piece of fleece under the fabric.

| Stitch | Stitch width | Stitch length |
| A | 2.5 | 1~4 |
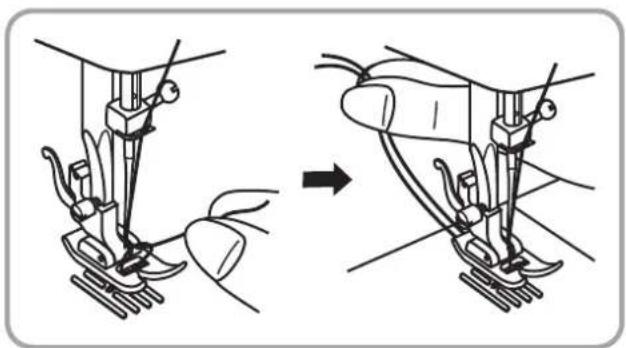
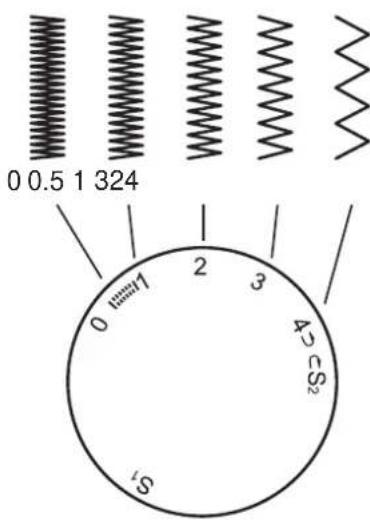
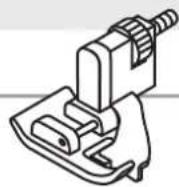
The zip foot (b) can be inserted to the right or left, depending on which side of the foot you are going to sew. (A)
To sew past the zip pull, leave the needle in the fabric, raise the presser foot and push the zip pull behind the presser foot.
It is also possible to sew in a length of cord. (B)
Set the stitch length dial (5) between "1" and "4" depending on the thickness of fabric.
| Stitch | Stitch width | Stitch length |
| D | 1 | ~ |
For hems, curtains, trousers, skirts, etc.
Blind stitch for elastic fabrics.
- Fold the fabric as illustrated with the left side uppermost.
- Place the reversed fabric under the presser foot. Turn the handwheel (20) forwards by hand until the needle is fully to the left. It should just pierce the fold of the fabric. If it does not, adjust the stitch width accordingly.
3/4. Adjust the guide (3) by turning the dial (4) so that the guide just rests against the fold.
Sew slowly and guide the fabric carefully so that its position does not change in relation to the guide.
| Stitch | Stitch width | Stitch length |
| B | 0 | ~ |
Install the embroidery and darning plate (o).
Position the work under the foot. Place the button on the marked position, lower the presser foot, adjust stitch width to "0" and first sew a few securing stitches in the left hole. Adjust the stitch width (usually between 3 and 4). Sew some check stitches with the handwheel (20) until the needle goes cleanly into the right hole of the button (vary the stitch width depending on the button) and sew on the button. Adjust the stitch width to "0" and sew a few securing stitches.
If a shank is required, place a darning needle on top of the button and sew. For buttons with 4 holes, sew through the front two holes first, push the work forward and then sew through the back two holes as described.

Stitch length
A
B
E
| Stitch | Stitch width | Stitch length |
| 10 | 5 | 0 |
Preparation:
Remove the presser foot and attach the buttonhole foot (d). Adjust the stitch length dial (5) to between "0.3" - "1". The density of the stitch depends on thickness of the fabric.
Note: Always test sew a buttonhole.
To prepare the fabric:
Measure the diameter of the button and add 0.3cm (1/8") for the bartacks. If you have a very thick button, add more to the diameter measurement. Mark the position and length of the buttonhole on the fabric. Raise the needle to its highest position. Position the fabric so that the needle is on the mark that is furthest from you.
Push the buttonhole foot (d) towards you as far as it will go. Lower the foot.
A. Turn the stitch selector dial (6) to "". Sew at moderate speed until you reach the end mark. Raise the needle to its highest position.
B. Turn the stitch selector dial (6) to " " and sew 5-6 bar tack stitches. Raise the needle to its highest position.
C. Turn the stitch selector dial (6) to "J" and sew the left side of the buttonhole to the mark at the end which is further from you. Raise the needle to its highest position.
D. Turn the stitch selector dial (6) to " " and sew a few bar tack stitches. Raise the needle to its highest position.
Lift the foot. Remove the fabric from under the foot and separate the threads. Draw the upper thread through the fabric to the ear and knot the upper and lower threads. Cut the centre of the buttonhole with the stitch ripper (n), being careful not to cut the stitches on either side.
Tips:
- Slightly reduce upper thread tension (3) to produce better results.
- It is recommended that you use a backing material such as yarn or fleece for fine, stretchy or knitted fabrics. The zigzag stitch must sew over the yarn (E).
A
B
C
| Stitch Stitch | width Stitch length |
| E, F 3~5 | S1, S2 | |
Note:
Use new needles or ball point needles.
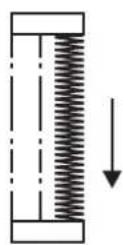
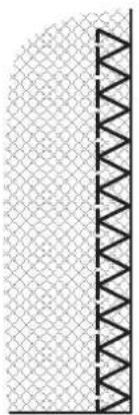
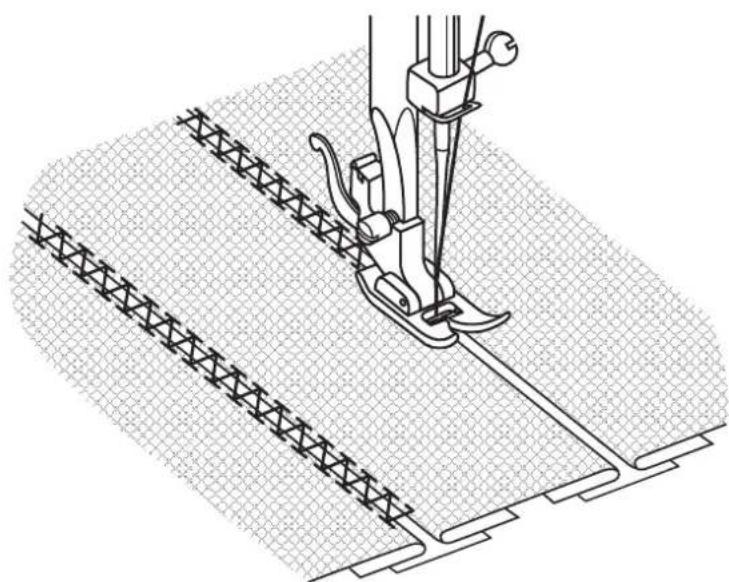
Seams, sewing and neatening visible hems.
Overlap stitch (A)
For fine knits,jerseys,neck edges,borders.
Standard overlock stitch (B)
For fine knits,jerseys,neck edges,borders.
Double overlock stitch (C)
For fine knits, handknits, seams.
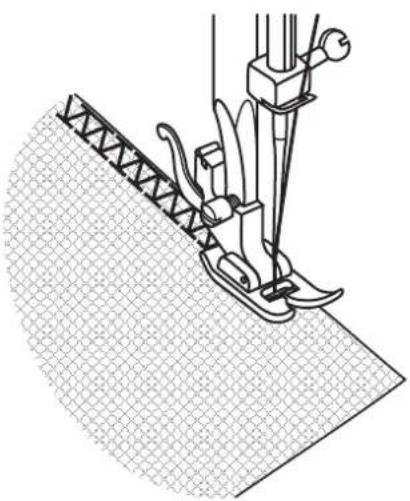
All overlock stitches are suitable for sewing and neatening edges and visible seams in one operation.
When neatening, the needle should just go over the edge of the fabric.
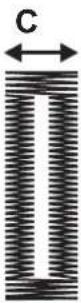
3-step zig-zag

1
2
| Stitch Stitch | width | Stitch length |
| C | 3 | ~ |
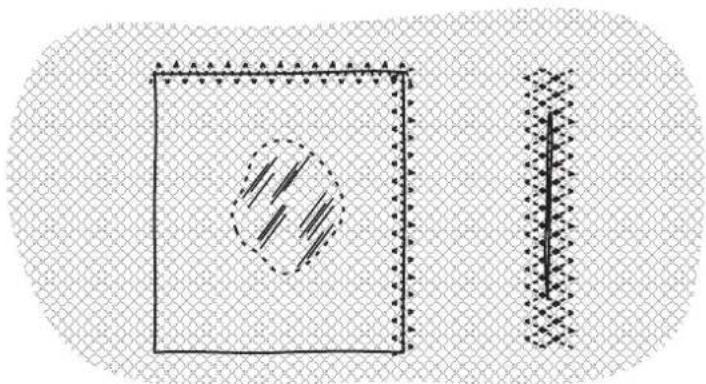
Sewing on lace and elastic, darning, mending, reinforcing edges.
- Place patch in position.
- When mending tears, it is advisable to use a piece of backing fabric as reinforcement. First sew over the centre and then just overlap on both sides. Depending on the type of fabric and damage, sew between 3 and 5 rows.
| Stitch Stitch | width | Stitch length |
| A | 2 | . |
Triple straight stitch: (A)
For hardwearing seams.
The machine sews two stitches forwards and one stitch backwards. This gives triple reinforcement.
A

B
| Stitch Stitch | width | Stitch length |
| B 3~5 S1, S2 | |
Triple zig-zag: (B)
For hardwearing seams, hems and decorative seams.
Triple zig-zag is suitable for firm fabrics like denim, corduroy, etc.
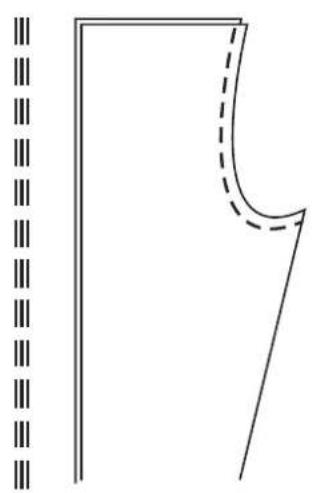
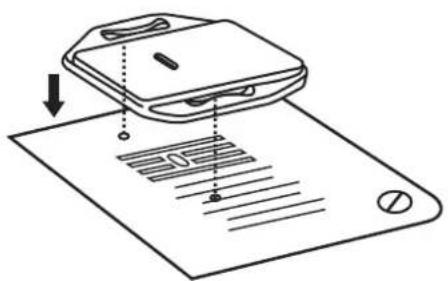
Patch work
| Stitch Stitch | width | Stitch | length |
| F 3~5 S | 1 | | |
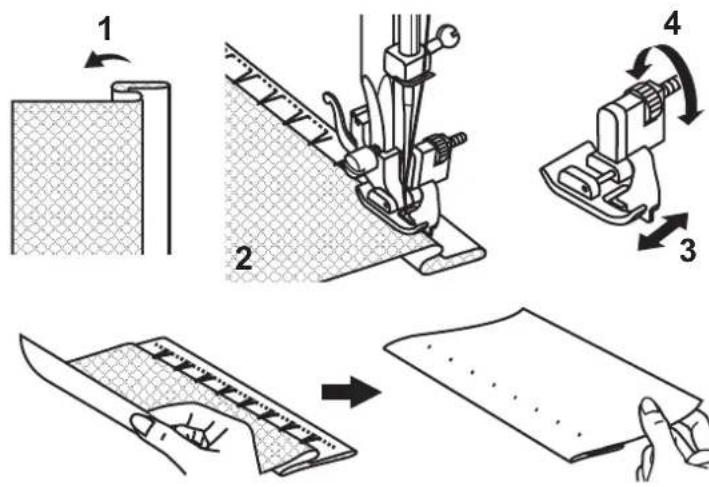
To join two pieces of fabric while leaving a space between their edges.
- Fold over the edges of the two pieces of fabric for the hem and tack the edges to a thin piece of paper leaving a small space between them.
- Stitch along the edge, pulling both threads slightly when beginning to sew.
- Use thicker than normal threads for sewing.
- After sewing, remove the tacking and the paper. Finish by tying knots on the reverse side at the beginning and the end of the seams.
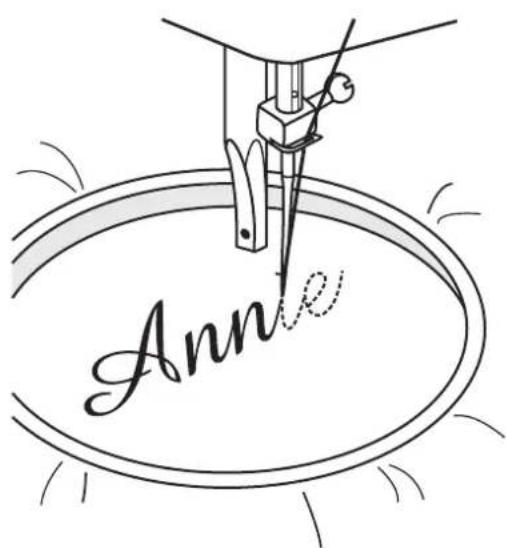
Monogramming and embroidering with embroidery hoop*
- The embroidery hoop is not supplied with the machine.
| Stitch Stitch | width | Stitch length |
| B | 1 | ~ |
Attach the embroidery and darning plate
- Remove the presser foot and the presser foot holder.
- Attach the embroidery and darning plate (o).
- Lower the two-step presser foot lifter (17) before starting to sew.
- Adjust the stitch width according to the size of lettering or design.
Preparation for monogramming and. embroidering\*
- Draw the desired lettering or design on the rear side of the fabric.
- Stretch the fabric between the embroidery hoop as firmly as possible.
- Place the fabric under the needle. Lower the two-step presser foot lifter (17).
- Turn the hand wheel (20) towards you to bring up the lower thread through the fabric. Sew a few securing stitches at the starting point.
- Hold the hoop with thumb and forefingers of both hands.
- Coordinate the sewing speed and the movement of hoop.
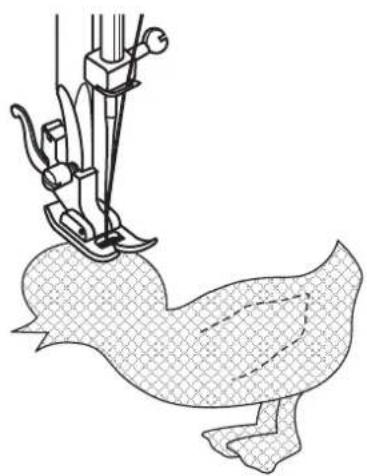
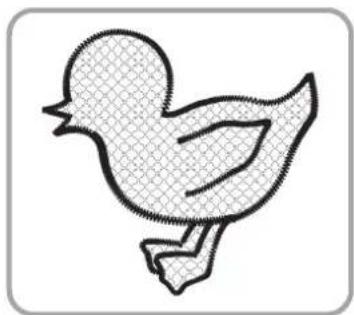
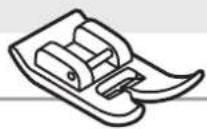
Applique
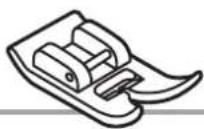
| Stitch Stitch | width Stitch | length |
| B 3~5 0.5~1 | |
- Cut out the applique design and tack it to the fabric.
- Sew slowly around the edge of the design.
- Trim excess material outside the stitching. Make sure not to cut any stitches.
- Remove the tacking thread.
- Tie top and bottom thread under the applique to avoid unravelling.
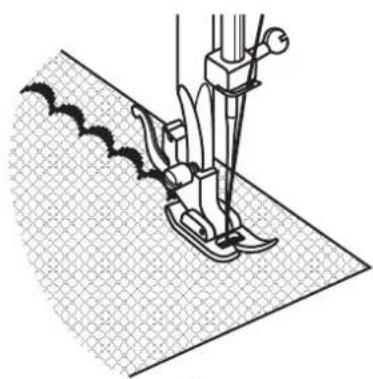
Scallop stitching
1

2
| Stitch Stitch | width | Stitch length |
| 1 | 3 | ~ |
You can produce a decorative edge with the scallop stitch.
- Sew the scallop stitch along the edge of the material.
- If desired, trim around the scallop with scissors to create a scalloped edge. Be careful not to cut the thread.
Twin needle

| Stitch | Stitch width | Stitch length |
| A | 2 | . |
Please note:
Set the stitch width before starting to sew. Carefully turn the hand wheel (20) to check that the twin needle enters the stitch hole without touching or even striking the stitch plate (8) or pressure foot.
When sewing with a twin needle (j) always advance and sew slowly to ensure quality stitching.
When sewing with a twin needle both threads must be of the same weight. You can use one or two colours.
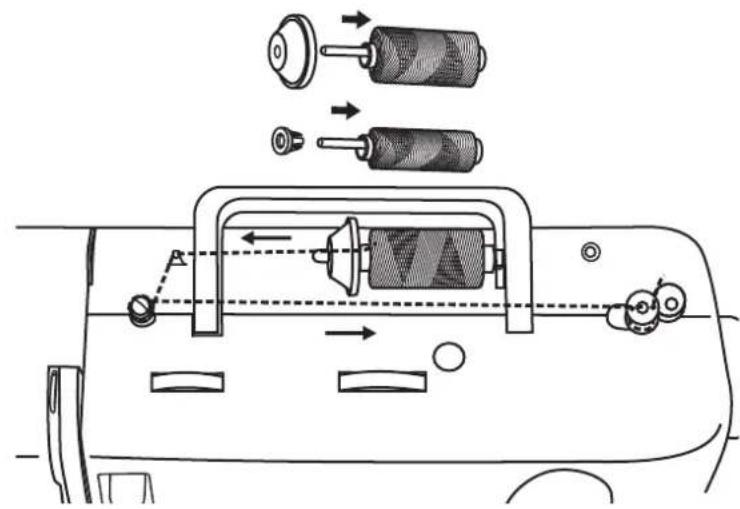
- Insert a spool (m) as usual onto the spool pin (14) and secure with a spool pin cap (r).
- Insert the secondary spool pin (q) into the hole provided for this purpose (21) on the top of the sewing machine. Place the felt cushion (h) on the secondary spool pin (q). Next insert another spool (m) on the secondary spool pin.
- Insert the twin needle (j).
- Thread both threads as usual.
- As the last step, thread one thread through the left needle and the other through the right needle.
Maintenance
Important:
Disconnect the machine from the electricity supply by removing the plug from the mains socket. When cleaning the machine, it must always be disconnected from the electricity supply.
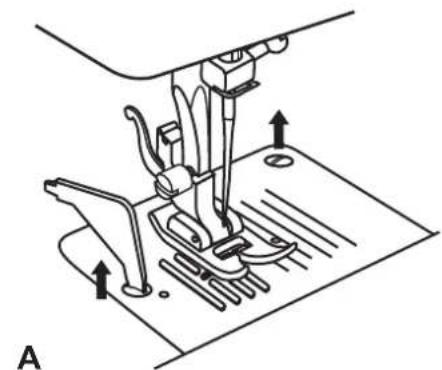
Removing the stitch plate (A):
Turn the handwheel (20) until the needle is fully raised. Open the hinged front cover and remove the stitch plate screws with the L-screwdriver (k).
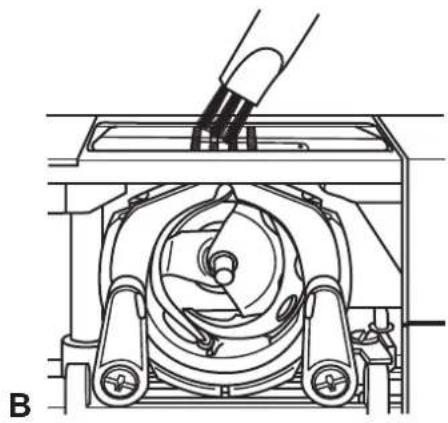
Cleaning the feed dog (B):
Remove the bobbin case and use the brush (n) supplied to clean the whole area.
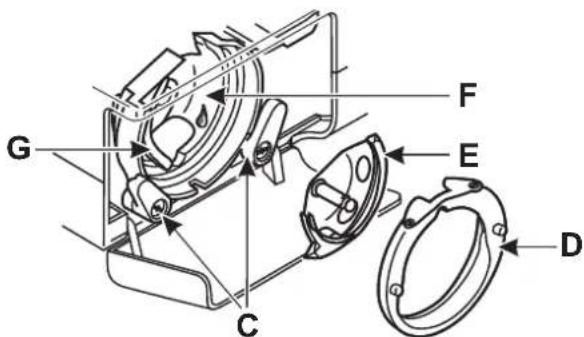
Cleaning and lubricating the catch (C-G):
Remove the bobbin case. Snap the two catch retaining arms (C) outwards. Remove the shuttle race cover (D) and the catch (E) and clean with a soft cloth. Lubricate at the points indicated (F) (1-2 drops) using sewing machine oil. Turn the handwheel until the shuttle race (G) is in the left position. Replace the catch (E). Replace the shuttle race cover and snap back the two catch retaining arms. Insert the bobbin case and bobbin and replace the stitch plate.
Important:
Fabric fluff and threads must be removed regularly.
Storage
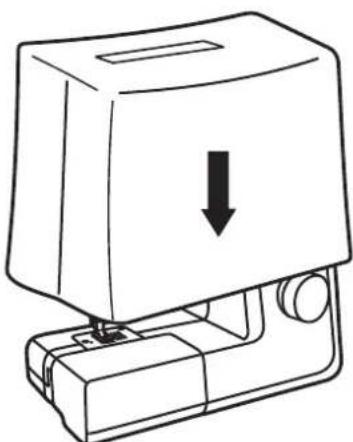
Always remove the power plug from the socket when not using the sewing machine. Use the dust cover (s) provided. Store the sewing machine in a dry location which children cannot access. If the sewing machine is not used for an extended period, it should be protected from excessive dust, dirt or moisture.
Trouble shooting guide
Problem Cause Correction
| Upper thread breaks | 1. The machine is not threaded correctly.
2. The thread tension is too tight.
3. The thread is too thick for the needle.
4. The needle is not inserted correctly.
5. The thread has become wound around the bobbin winder spindle (13).
6. The needle is damaged. | 1. Rethread the machine.
2. Reduce the thread tension (3). (lower number)
3. Use a larger needle.
4. Remove and reinsert the needle. (flat side towards the back)
5. Remove the bobbin (g) and unwind the thread.
6. Replace the needle. |
| Lower thread breaks | 1. The bobbin case is not inserted correctly.
2. The bobbin case is threaded wrongly. | 1. Remove and reinsert the bobbin case and pull on the thread. The thread should pull easily.
2. Check both bobbin (g) and bobbin case. |
| Skipped stitches | 1. The needle is not inserted correctly.
2. The needle is damaged.
3. The wrong size needle has been used.
4. The wrong presser foot is installed. | 1. Remove and reinsert needle. (flat side towards the back)
2. Replace the needle.
3. Choose a needle size to suit the thread and fabric.
4. Use the correct presser foot. |
| Needle breaks | 1. The needle is damaged.
2. The needle is not correctly inserted.
3. Fabric too thick/ needle size wrong.
4. The wrong presser foot is attached. | 1. Replace the needle.
2. Insert the needle correctly (flat side towards the back)
3. Choose a needle size to suit the thread and fabric.
4. Use the correct presser foot. |
| Loose stitches | 1. The machine is not correctly threaded.
2. The bobbin case is not correctly threaded.
3. Needle/ fabric/ thread combination is wrong.
4. Thread tension wrong. | 1. Thread the machine correctly.
2. Thread the bobbin case as illustrated.
3. The needle size must suit the fabric and thread.
4. Correct the thread tension. |
| Seams gather or pucker | 1. The needle is too thick for the fabric.
2. The stitch length is wrongly adjusted. | 1. Use a finer needle.
2. Check the thread tension. |
| Uneven stitches, uneven feed | 1. The thread is too weak.
2. The bobbin case is wrongly threaded
3. Fabric has been pulled when sewing. | 1. Use stronger thread.
2. Rethread the bobbin case and insert correctly.
3. Do not pull on the fabric. It must be automatically moved by the machine. |
| The machine is noisy | 1. The machine must be lubricated.
2. Fluff or oil have collected on the hook or needle bar.
3. Poor quality oil has been used.
4. The needle is damaged. | 1. Lubricate as described.
2. Clean the hook and feed dog as described.
3. Only use good quality sewing machine oil.
4. Replace the needle. |
| The machine jams | Thread is caught in the hook. | Remove the upper thread and bobbin case, turn the handwheel (20) backwards and forwards by hand and remove the thread remains. Lubricate as described. |
Disposal
- Dispos of devices with dangerous defects immediately and ensure that they can no longer be used.
- Do not dispose of the sewing machine in normal domestic waste.
- This product is subject to EU Directive 2012/19/EU.
- Dispose of the sewing machine at a registered waste disposal firm or through your local authority waste disposal facility.
- Observe the regulations currently in force. In case of doubt, consult your waste disposal facility.
- Please dispose of all packaging materials in an environmentally friendly manner.
Keep the sewing machine's transport packaging. It may be useful for storing the machine, but is particularly useful if you want to send the sewing machine away for repair. Most instances of damage occur when the machines are being transported.
Guarantee
There is a three year guarantee on this sewing machine starting from the purchase date. The device was inspected carefully and conscientiously before delivery. Please keep your receipt as proof of purchase. In case of a guarantee complaint, please call your service centre. This is the only way to ensure free shipment of your goods.
The guarantee scope only covers material or manufacturing defects; it does not cover wearing parts or damage to fragile parts e.g. switches. The product is only intended for private and not commercial use. In the event of misuse, improper handling, the use of force or any kind of interference which was not been performed by our service office, the guarantee will lapse. This guarantee does not limit your statutory rights.
Service number
These Operating Instructions cannot cover all possible applications.
For more information or in case of problems not covered or not covered in sufficient detail in these Operating Instructions, please contact the service number 00800 555 00 666 (free)
Please keep these Operating Instructions in a safe place and pass on to any future users.
Service-Address:
CROWN Service Center
teknihall Elektronik GmbH
Breitefeld 15
DE-64839 Munster
IAN 96965
sewingguide-service-gb@teknihall.com
Manufacturer
Please be aware that the following address is not a service address. Please first contact the service office stated above.
Crown Technics GmbH
Turmstraße 4
D-78467 Konstanz

FR Numéro de service pour les réclamations:
BE 0080055500666() Gratisuit
NL Servicenummer bij reclamaties:
BE 0080055500666() Gratis
DE Servicenummer bei Reklamationen:
AT 00800 555 00 666 (kostenfrei)
GB Service number for complaints:
IE 0080055500666()free
Version des informations. Stand van de informatie