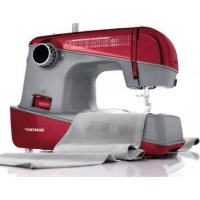
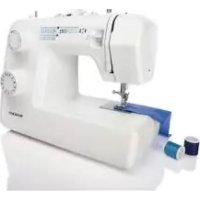
USER MANUAL SNM 33 B2 SILVERCREST
MACHINE A COUDRE SNM 33 B2
FR BE
MACHINE A COUDRE
Operation and Safety Notes
IAN 300024
FR BE
NL BE
DE AT CH
GB IE NI

FR BE
Before reading, unfold the page containing the illustrations and familiarise yourself with all functionsofthedevice.
Further helpful hints for using your Silvercrest sewing machine can be found under the following link or QR code.
Http://snm33b2.sewing.guide

Patchwork......Page 24
Point feston Page 26
Entretienetnettoyage
Entretien de la machine......Page 27
Stockage Page 27
Remédier aux petites pannes....Page 28
Elimination Page 29
Garantie Page 29
Serviceaprès-vente

natural_image
Line drawing of a foot wearing a seatbelt with a cable inserted, showing a hand holding the seat (no text or symbols)
Attention:
Sil'ondoitcoudresurlebraslibreseulement, ilfautalorsenleverlatable-rallonge(7)dans lesensdelaflèche.
Attention:
natural_image
Line drawing of a hand holding a pen or tool with a ruler, showing a measurement scale (no text or symbols)
Levierdupiedpresseuràdeuxpositions

natural_image
Line drawing of a sewing machine needle stitching fabric, showing mechanical components and fabric movement (no text or symbols)
Pourfaciliterl'insertiondetissustrésépais souslepied-de-biche, onpeutaugmenter l'espaceentrelepied-de-bicheetlaplaque àaiguille, enrelevantlelevierdupied-de-biched'uncran(18)(flèche).
Montagedusupportdupied-de-biche


Attention:
2. Miseenplacedupied-de-biche

natural_image
Illustration of a hand using a sewing machine to adjust a component with a downward arrow (no text or symbols)

natural_image
Illustration of two spools of thread, one with a curved arrow indicating rotation (no text or symbols)

natural_image
Simple line drawing of a mechanical component with an arrow indicating motion (no text or symbols)
natural_image
Simple line drawing of a mechanical component with an arrow indicating direction (no text or symbols)

natural_image
Technical line drawing of a mechanical device with a hand adjusting parts (no text or symbols)
Attention:


natural_image
Diagram of a mechanical component with dotted lines indicating motion, no text or symbols present


Attention:
Attention:
natural_image
Line drawing of a sewing machine being adjusted for the number of threads (no text or symbols present)
natural_image
Line drawing of a sewing machine needle stitching fabric, showing needle insertion and cutting path (no text or symbols)

Coudre(A)

natural_image
Technical line drawing of two mechanical assembly components (no text or symbols)
A

natural_image
Technical line drawing of a mechanical device with attached spring and base plate (no text or symbols)

LePiedpourFermetureàGlissièreinvisible permetdecoudredesfermeturesinvisibles surdesjupes,desrobesetsurune multitudedevêtementsetaccessoires.

natural_image
Technical line drawing of a mechanical assembly with no visible text or symbols

natural_image
Technical line drawing of a mechanical clamp or hook assembly mounted on a base, with no visible text or symbols.
natural_image
Diagram showing a hexagonal grid pattern on the left and a vertical wall with diagonal hatching (no text or symbols)
A
natural_image
Pure geometric pattern with a vertical line and triangular shapes, no text or symbols present
B

natural_image
Technical line drawing of a sewing machine needle stitching fabric (no text or symbols)
C
natural_image
Abstract geometric pattern with a square, dotted border, and vertical line (no text or symbols)
1

2
natural_image
Technical line drawing of a sewing machine needle stitching fabric strips (no text or symbols)

natural_image
Diagram of a surgical procedure on a bird's head, showing tool positioning and mesh pattern (no text or labels)

natural_image
Simple line drawing of a bird with patterned head and body, no text or symbols present
natural_image
Line drawing of a sewing machine needle stitching fabric (no text or symbols)
1

natural_image
Diagram of a sewing machine needle stitching fabric (no text or symbols)
2
natural_image
Technical line drawing of a sewing machine on a base plate, showing mechanical components and directional arrows (no text or symbols)

natural_image
Technical line drawing of a mechanical assembly with a hand inserting a component into a housing (no text or symbols)

Attention:
natural_image
Line drawing of a sewing machine with a downward arrow indicating compression or lifting (no text or symbols)
natural_image
Line drawing of a medical device with a cable inserted, showing no text or symbols
Opgepast:
Haaldestekkeruithetstopcontact.
Opgepast:
natural_image
Illustration of a hand holding a pen or tool with a measurement arrow indicating width (no text or symbols present)
natural_image
Line drawing of a sewing machine needle with a curved arrow indicating rotation (no text or symbols)

Opgepast:
Zetdeaan-/uitschakelaar(20)inde standUIT("O")voorudebovenstaande handelingenuitvoert.

natural_image
Illustration of a hand pressing down on a mechanical component with a downward arrow (no text or symbols)

natural_image
Diagram of two mechanical components: a wheel and a spool, with no visible text or symbols.

natural_image
Simple line drawing of a mechanical component with an arrow indicating motion (no text or symbols)

natural_image
Simple line drawing of a mechanical component with an arrow indicating direction (no text or symbols)

natural_image
Technical line drawing of a mechanical device with internal components and a hand adjusting parts (no text or symbols)

Opgepast:


natural_image
Diagram of a mechanical component with dotted lines indicating alignment or movement, no text or symbols present


Opgepast:
Opgelet:
natural_image
Line drawing of a sewing machine being adjusted for the number of threads (no text or symbols present)
natural_image
Line drawing of a sewing machine needle stitching fabric, showing cutting path and angle (no text or symbols)


Naaien(A)
natural_image
Technical line drawing of a mechanical device with no visible text or symbols
A

natural_image
Technical line drawing of a mechanical device with no visible text or symbols

natural_image
Technical line drawing of a sewing machine needle stitching fabric, showing base and stitching details (no text or symbols)
| Steek | Steekbreedte | Steeklengte |
| A | 2.5 | 1~4 |
natural_image
Technical illustration of two mechanical clamping or mounting assembly steps, showing tool positioning and mounting base (no text or symbols)
| SteekSteekbreedteSteeklengte |
| B | 0 | ~ |
natural_image
Technical line drawing of a mechanical housing or enclosure component (no text or symbols)


natural_image
Technical diagram of a cylindrical mechanical component with internal components and directional arrows, shown from two different angles (no text or labels)


| SteekSteekbreedteSteeklengte |
| 11.0 | 5 | 0 |
Voorbereidingen:
natural_image
Diagram showing a grid-patterned structure with a vertical boundary and diagonal hatching (no text or symbols)
A

natural_image
Pure geometric pattern with a vertical line and triangular hatching (no text or symbols)
B
natural_image
Technical line drawing of a sewing machine needle stitching fabric (no text or symbols)
C
| SteekSteek | breedte | Steeklengte |
| E,F3~5S | 1,S2 | |
Nb:
natural_image
Diagram showing a square with a dotted circle and diagonal lines inside, alongside a vertical striped line on a grid background (no text or symbols)
1
2
natural_image
Two technical diagrams labeled A and B showing garment patterned surfaces with no text or symbols
natural_image
Technical line drawing of a sewing machine needle stitching fabric strips (no text or symbols)
| SteekSteek | breedte | Steeklengte |
| F3~5S1 | | |

| SteekSteekbreedteSteeklengte |
| B | 1 | ~ |
natural_image
Medical illustration showing surgical instruments manipulating a patient's abdomen (no text or labels)
natural_image
Simple line drawing of a bird with patterned head and wings (no text or symbols)
| SteekSteekbreedteSteeklengte |
| B3~50.5~1 | |
natural_image
Line drawing of a sewing machine needle stitching fabric (no text or symbols)
1

natural_image
Illustration of a sewing machine needle stitching fabric (no text or symbols)
2
natural_image
Line drawing of a sewing machine with a downward arrow indicating compression or lifting (no text or symbols)
natural_image
Diagram of a foot wearing a seatbelt with a cable inserted, showing a hand holding the seat (no text or symbols present)
Achtung:
Achtung:
natural_image
Illustration of a hand holding a pen or tool with a ruler, showing a measurement scale (no text or symbols present)
natural_image
Line drawing of a sewing machine needle stitching fabric, showing mechanical components and fabric movement (no text or symbols)

Achtung:

natural_image
Illustration of a sewing machine needle being adjusted with a hand (no text or symbols)

natural_image
Diagram of two mechanical components with directional arrows indicating motion (no text or symbols)
natural_image
Simple line drawing of a mechanical component with an arrow indicating motion (no text or symbols)
natural_image
Simple line drawing of a mechanical component with an arrow indicating direction (no text or symbols)
natural_image
Technical line drawing of a mechanical device with internal components and a hand adjusting parts (no text or symbols)
Achtung:

natural_image
Diagram of a mechanical component with dotted lines indicating motion, no text or symbols present

Achtung:
Achtung:
natural_image
Line drawing of a sewing machine being sewn, showing the process from base to top view (no text or symbols)
natural_image
Line drawing of a sewing machine needle stitching fabric, showing needle insertion and cutting path (no text or symbols)
Nähen(A)
natural_image
Technical line drawing of two mechanical assembly components (no text or symbols)
A

natural_image
Technical line drawing of a sewing machine needle stitching fabric, showing base and stitching details (no text or symbols)

natural_image
Technical line drawing of a mechanical assembly with no visible text or symbols

natural_image
Technical line drawing of a mechanical clamp or clamping device mounted on a base, with no visible text or symbols.
natural_image
Isometric line drawing of a rectangular electronic component with internal compartments (no text or symbols)
Stichlänge

natural_image
Technical diagram of a mechanical device with cross-sectional views and internal components (no text or labels)
A

B

C

E

natural_image
Technical line drawing of a screwdriver and a cylindrical component (no text or symbols)
natural_image
Diagram showing a hexagonal grid pattern with a vertical wall and diagonal hatching (no text or symbols)
A

natural_image
Pure geometric pattern with a vertical line and triangular shapes, no text or symbols present.
B

natural_image
Technical line drawing of a sewing machine needle stitching fabric (no text or symbols)
C
natural_image
Abstract geometric pattern with a square, dotted border, and vertical line (no text or symbols)
1
2
natural_image
Technical line drawing of a sewing machine needle stitching fabric strips (no text or symbols)
natural_image
Diagram of a surgical procedure on a duck, showing tool positioning and mesh pattern (no text or labels)
natural_image
Simple line drawing of a duck with patterned beak (no text or symbols)
natural_image
Line drawing of a sewing machine needle stitching fabric (no text or symbols)
1
natural_image
Diagram of a sewing machine needle stitching fabric (no text or symbols)
2
natural_image
Line drawing of a sewing machine with a downward arrow indicating compression or lifting (no text or symbols)
Intended use......Page 81
Sewing machine components ......Page 81
Accessories Page 81
Technical data Page 82
Important safety instructions Page83
Gettingready
Connecting machine to power source....Page 84
Changing the bulb Page 84
Fitting the snap-in sewing table....Page 85
Inserting the needle....Page 85
Two-step presser foot lifter....Page 86
Attaching the presser foot holder Page 86
Winding the lower thread....Page 87
Inserting the bobbin....Page 87
Threading the upper thread....Page 88
Automatic needle threader Page89
Thread tension Page 90
Bringing up the lower thread Page 90
Sewingbasics
Sewing / Useful applications ......Page 91
Matchingtheneedle,fabricandthreadPage92......
Howtochooseyourstitch Page93
Straight stitching and needle position....Page 93
Zigzag stitching Page94
Zipper foot Page94
Invisiblezipperapplication Page95
Blind stitch foot....Page 96
Buttonsewingfoot Page96
Buttonholefoot Page 97
Overlock stitches....Page98
3-step zig-zag......Page98
Stretch-stitchPage9.9
Patch work......Page99
Monogrammingandembroideringwithembroideryhoop* Page100
Applique Page 101
Scallop stitching Page 101
Maintenance
Maintenance......Page102
Storage Page102
Trouble shooting guide....Page103
Disposal Page 104
Guarantee......Page 104
Service
Service number Page 104
Manufacturer......Page 104
Introduction
Congratulations the purchase of your sewing machine. You have bought at top quality product which has been manufactured with great care.
TheseOperatingInstructionscontainallyyouneedtoknowaboutusingyoursewingmachine.However,if youstillhaveanyquestions,pleasecontactyourdealer.Wehopeyouenjoyyoursewingmachineand wishyousuccess.
Beforeyouusethesewingmachineforthefirsttime,itisessentialthatyoumakeyourselffullyfamiliar withthefunctionsofthesewingmachineanddiscoverhowtousethesewingmachinecorrectly.Read thefollowingOperatingInstructionsaswellasthesafetyinstructions.Keeptheseinstructionsinasafe place.Whenpassingthesewingmachineontoathirdparty,passthesinstructionson,too.
Intendeduse
Thesewingmachineis... intended
-foruseasamovablemachine,
-forsewingtypicalhouseholdtextilesand...
-onlyforprivatehouseholduse.
Thesewingmachineis... notintended
-tobeinstalleddatafixedlocation,
-fortheprocessingofothermaterials(e.g.leatherorotherheavymaterialssuchastentorsailfabrics)
-forcommercialorindustrialuse.
Sewingmachinecomponents
1 Threadtake-uplever
2 Bobbinthreadguide
3 Threadtensiondial
4 Needlewidthdial
5 Stitchlengthdial
6 Patternselectordial
7 Sewingtable
8 Needleplate
9 Presserfoot
10 Automaticneedlethreader
11 Threadcutting
12 Reversesewinglever
13 Bobbinwinderstopper
14 Bobbinwinderspindle
15 Spoolpin
16 Upperthreadguide
17 Handle
18 Two-steppresserfootlifter
19 Mainplugsocket
20 Powerswitch
21 Handwheel
22 Holeforsecondspoolpin
Accessories
a All-purpose presser foot(already installed)
b Invisiblezipperfoot
c Zipperfoot
d Buttonsewingfoot
e Buttonholefoot
f Blindstitchfoot
g Needlethreader
h Bobbins(4x)(1xalreadyinstalled)
i Feltcushion
jOilbottle
k Needlebox:3xsingleneedles(90/#14)(1x alreadyinstalled),1xsingleneedle(75/#11),
1xjeansneedle(100)
L-screwdriver
m.Screwdrivers(large&small)
n Bobbins(1xblue, 1xpink, 1xyellow)
○ Stitchripper/brush
p Embroideryanddarningplate
q Edge/quiltguide
r Secondaryspoolpin
s Spoolpincap(large&small)
t Dustcover
u Footpedal/powerplug
Technicaldata
| Ratedvoltage | | 230Volt/50Hz |
| Powerrating | -Machine | 70Watt |
| -Sewinglight | 15Watt |
| -Total | 85Watt |
| Dimensions | -Whenhandleisfoldeddown | A p p r o3x8 2( x 2 x H8 x M ) β 2 m m |
| Cablelength | -Powercable | Approx.m1.8 |
| -Footcontrolcable | Approx.1.4m |
| Weight | -Machine | Approx.5.kg |
| Material | | Aluminium/plastic |
| Operating components | -MainspowerswitchON/OFF | Supplied |
| -Footforedwingspeed | Supplied |
| Display components | -Sewinglight | Supplied |
| Loopersystem | | Oscillatinghook |
| Needlesystem | | 130/705H |
| Interference-free | | Inacc.withEUDirective |
| TÜVapproved | | Yes |
| Productguarantees | | 3years |
| Protectionc lass | | II □ |
Important safety instructions
When using an electrical appliance, the basics safety instruction should always be followed. Read all Operating Instructions before using this sewing machine.
DANGER -Toreducetheriskofelectricshock:
- Thesewingmachines should never be left unattended when plugged in.
- Always removethe plug from the socket immediately after use as well as before cleaning and other maintenance.
- Alwaysunplugthesewingmachinebeforereplacingthebulb. Replacethebulbwithoneof thesametypeandratedat15watts(220-240V).
WARNING -Toreducetheriskofburns,fire,electricshock,orinjurytopersons:
- Donotallowthesewingmachinetobeusedasatoy. Closeattentionisnecessarywhenthe sewingmachineisusednearchildren.
- Use the swing machine only forthosethings described in the Operating Instructions.
- Donotusethesewingmachineifithasadamagedelectriccableorplug, ifitisnotworking properly or if water has penetrated into its interior. In these cases return the appliance to the nearest authorized dealer or service centre for examination.
- Never operatethe appliance with any ventilation openings blocked. Keep the ventilation opening of these sewing machine and footped alfree from any accumulation of flint, dust, and loose cloth.
- There is a risk of injury because of the upwards and downward movements of the needle when sewing. Always work with care and watch the area of work.
- Alwaysusetheproperstitchplate. Thewrongplatecancausetheneedletobreak.
- Donotusebentneedles.
- Donotpullonthefabricwhilesewing. It may deflect the needle causing it to break.
- Alwaysswitch thesewing machine off when making any adjustments in the needle area, such as threading or changing the needle, threading the bobbin, or changing the presser foot etc.
- Always unplug these sewing machine from the electrical outlet before removing the cover, lubricating them machine or when undertaking any others servicing work described in the Operating Instructions.
- Neverdroporinsertanyobjectintoanyopening.
- Donotuseoutdoors.
- Donotoperatewhereaerosolsprayproductsoroxygenarebeingused.
- Todisconnect, turnthemainswitchtotheoff("O") position, thenremovetheplugfromthesocket.
15.Donotunplugbypullingonthecable.Tounplug,grasptheplug,notthecord.
- Thesoundlevelundernormaloperatingconditionsis75dB(A).
- Pleaseturnoffthemachineorunplugifthemachineisnotoperatingproperly.
- Neverplaceanythingonthefootpedal.
- If the supply cord that is fixed to the foot pedal is damaged, it must be replaced by the manufacturer or its service agent or similar qualified person in order to avoid a hazard.
- This appliance can be used by children aged from 8 years and above and persons with reduced physical, sensory or mental capabilities or lack of experience and knowledge if they have been supervisory or instruction concerning use of the appliance in asafeway and understand the hazards involved. Children shall not play with the appliance.
- Cleaning and user maintenances shall not be made by children without supervision.
- Keep the Operating Instructions in suitable placenearthemachine, and hand the Instructionsoverify you give them machineto third party.
SAVETHESEINSTRUCTIONS
Thissewingmachineisintendedforhouseholduseonly.
Connectingmachinetopowersource


natural_image
Line drawing of a foot wearing a seatbelt with a cable inserted, showing a hand holding the seatbelt (no text or symbols)
Important:
Unplugpowercablewhenmachineis notinuse.
Important:
Consultaqualifiedelectricianifindoubt aboutconnectingthemachinetothe powersource.Unplugpowercableifyou arenotusingthepowersupply. Thesewingmachinemustbeusedwith theELECTRONICfootpedal(t)KD-2902/FC-2902D(220-240V).
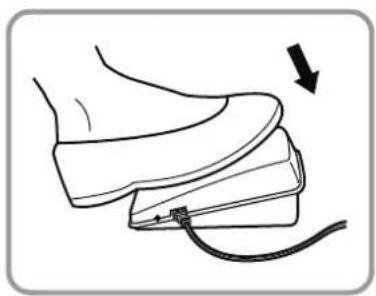
Connectthemachinetoapowersources illustratedintheadjacentdrawing.
Illumination
Themachineisstartedandthelight switchedonbypassingthemainswitch (20)inposition "I".
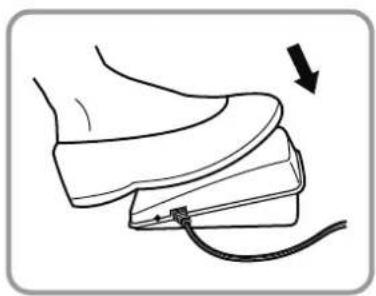
Theoperatingspeedofthemachineis regulatedwiththepedal(u).
Changingthebulb

Disconnectthemachinefromthepower supplybyremovingtheplugfromthemains socket!
- Loosenscrew(A)asillustrated.
- Removethecover(B).
- Unscrewthebulb(C) and fitanewone.
- Replacethecoverandtightenscrew.
Shouldtherebeanyproblem,askyour localdealerwhowillbeabletoadvise you.
Installingthesnap-insewingtable

If you want to sew on the arm bed, pull out the snap-in sewing table (7) in the direction of the arrow.
Theinsideofthesnap-insewingtable(7) canbeutilisedasanaccessorybox.
Insideofthesnap-incompartmentthe includedaccessorieswillbefound.
Insertingtheneedle

Important:
Turnpowerswitch(20)tooff("O").
Changetheneedlesregularly,especiallyat thefirstsignsofproblemswhensewing.
Inserttheneedleasintheillustration.
A. Loosentheneedleclampscrew and tightenagainafterinsertingthenew needle.
B. The flatsideoftheshaftshouldbe towardstheback.
C/D. Inserttheneedleuptothestopatthe endoftheshaft.
Onlyusefully-functionalneedles:
Problemscanoccurwiththeuseof:
-Bentneedles
-Bluntneedles
-Damagedpoints

natural_image
Illustration of a hand holding a pen or tool with a ruler, showing a measurement scale (no text or symbols present)

natural_image
Line drawing of a sewing machine needle with a curved arrow indicating rotation (no text or symbols)
Whensewingthickfabrics, the passage of fabrics under the presser foot can be improved by raising the two-steppresser footlifter (18) further (arrow).


Important:
Turnthemainswitch(20)tooff("O") whencarryingoutalltheoperations!
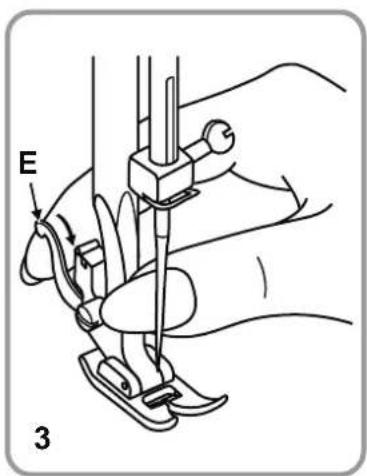
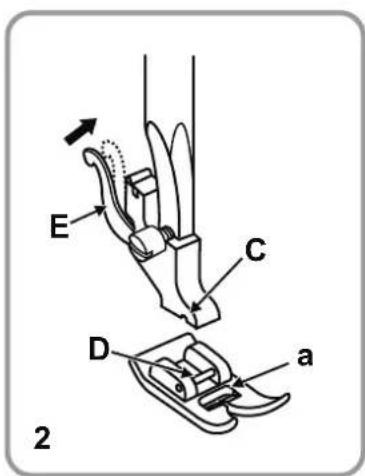
Raisethepressorbar(A)byliftingthe two-steppresserfootlifter(18)Attach the presserfootholder(B)asillustrated.
Lowerthepresserfootbar(B)untilthe groove(C)isdirectlyabovethepin(D). Lowerthepresserfootbar(A)asfarasit willgo. The presserfoot(a)willengage automatically.
Raisethepressorfoot.
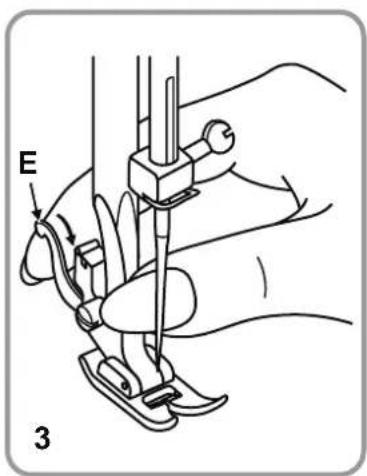
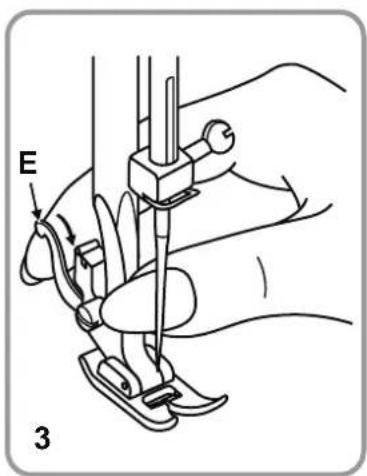
Pressthelever(E)gentlytowardsthe
frontandthepresserfootdisengages.
4. Insertingtheedge/quiltguide(q).
Asshownintheillustrationcarefully inserttheedge/quiltguide(q)e.g.For hems,pleats,etc.
Windingthelowerthread


Placethespool(n)onthespoolpin(15) andholditinplacewithaspoolpincap(s).
-Smallspoolpincapforthinthreads
-Largespoolpincapforthickthreads
Pullthethreadfromthespoolintothe threadguide, anduptothebobbin(2).
Pullthethreadfromtheinsidethrougha holeoftheemptybobbin(h).Placethe spoolonthespoolholder(14)andthen pushtotherightintothefillingposition.
Holdtheendofthethread.Pressthepedal(u).Releasethepedal(u)afterafewturns. Releasethethreadandcutascloseas possibletothespool.Pressthepedal(u) again.
Oncethespoolisfull, itrotatesmoreslowly. Releasethepedal(u).Replacethebobbin (h)intosewingpositionandremoveit.
Note:
If the bobbin winderspindle(14) is in the winding position, thesewing process is automatically interrupted. Tosew, push the bobbin winderspindle(14) to the left (sewing position).
Insertingthebobbin

natural_image
Illustration of a sewing machine needle being adjusted with a hand (no text or symbols)

natural_image
Diagram of two mechanical components: a wheel and a spool, with no visible text or symbols.

natural_image
Simple line drawing of a mechanical component with an arrow indicating motion (no text or symbols)
natural_image
Simple line drawing of a mechanical component with an arrow indicating direction (no text or symbols)

natural_image
Technical line drawing of a mechanical device with a hand operating the center (no text or symbols)

Important:
Turnpowerswitch(20)tooff("O").
Wheninsertingorremovingthebobbin(h), theneedlemustbefullyraised.
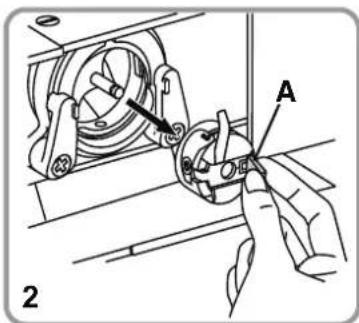
- Openthehingedcover.
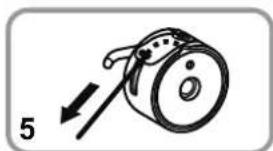
- Pullthebobbincasetab(A) and removethebobbincase. Hold the bobbincasewithonehand.
-
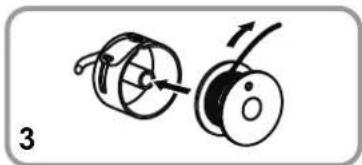
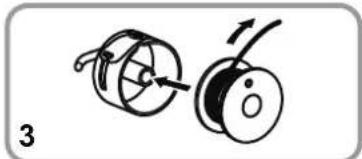
Insertthebobbin(3)sothatthethread runsinaclockwisedirection(arrow).
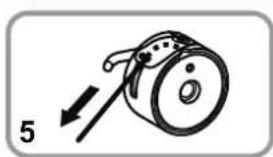
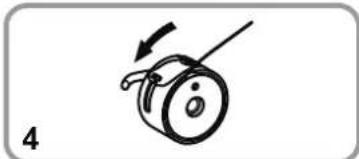
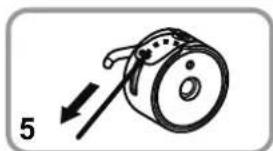
4/5.Pullthethreadintotheslitandunder thetensionspring.
-
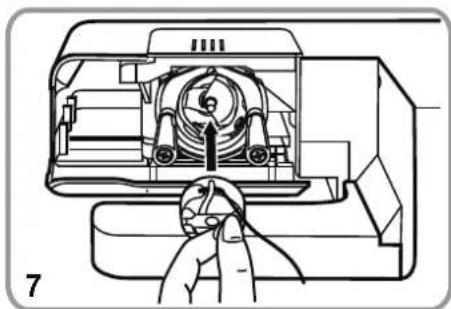
Holdthebobbincasebetween the indexfingerandthumbonthebobbin casetab(A).
-
Insertitintotheshuttlerace.
Note:
Themethodofbringingupthelower threadisexplainedonpage90.
Threadingtheupperthread



natural_image
Diagram of a mechanical component with arrows indicating motion or force direction (no text or symbols)

Important:
Setthemainswitch(20)to("O").
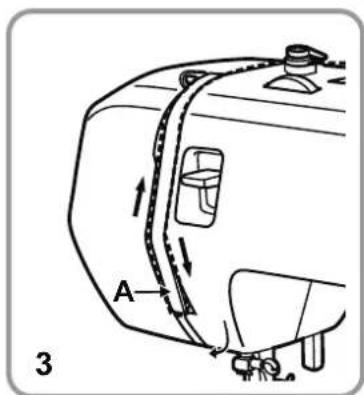
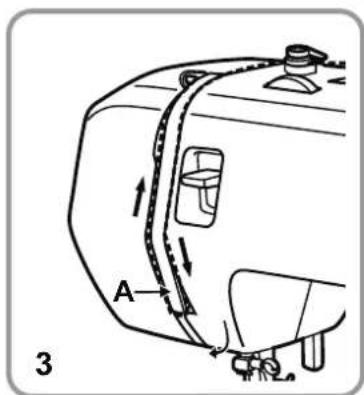
Raisethepressorfootbarbyliftingthe two-steppresserfootlifter(18)andlift thethreadlever(1)byturningthehand wheel(21)anti-clockwise.Followthe arrowsandnumbersonthesewing machinewhenthreading.
- Placethespool(n)onthespoolpin(15) andholditinplacewithaspoolpincap (s).
-Smallspoolpincapforthinthreads
-Largespoolpincapforthickthreads
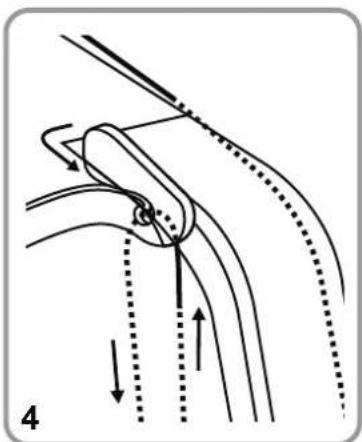
- Guidetheupperthreadthroughthe upperthreadguide(16)andbobbin threadguide(2)fromrighttoleft,then moveitforwardintotherightslotand guideitdownwards.
- Guideittotheleftundertheguidelug(A) and then upwards again.
- Guidethethreadfromrighttoleft throughethreadlever(1)andthen downwards.
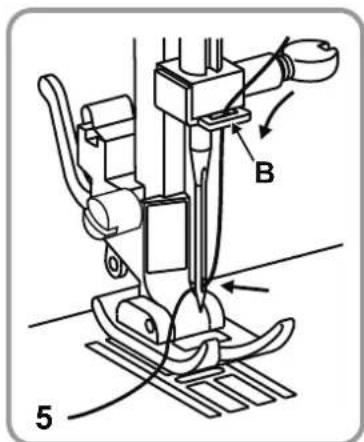
- Guidethethreadfirstbehindthelarge, metalthreadguide(B)andthenthrough theeyeoftheneedle.Alwaysthreadthe needlefromthefront.
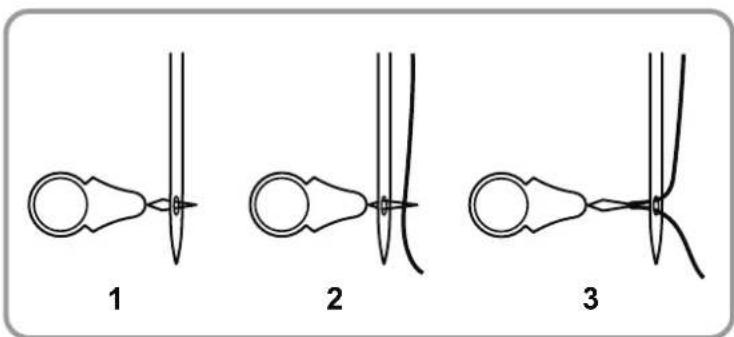
Needlethreader
Youcanusetheneedlethreader(g)asa threadingaid.
- Inserttheneedlethreader(g) through theeyeoftheneedlefrombacktofront.
- Guidetheupperthreadthroughthewire loopoftheneedlethreader.
- Pulltheneedlethreader(g)togetherwith thethreadbackthroughtheeyeofthe needle.
Automaticneedlethreader

Attention:
Turnpowerswitchto"O"before threadingtheneedle.
Important:
Raisetheneedletoitshighestposition byturningthehandwheeltowardyou untilthemark(A)matchedwiththeline (B)onthemachine.
- Lowerthepresserfoot.
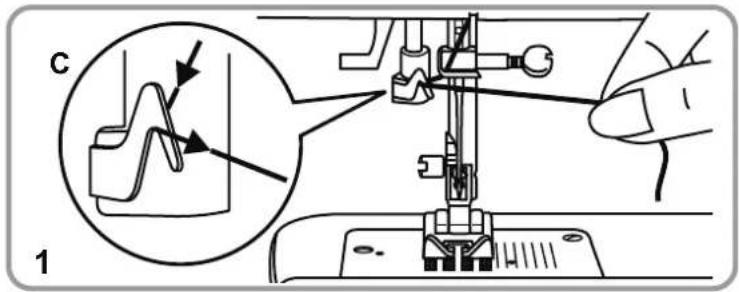
Passthethreadaroundthethreadguide (C).

2.Presstheleverdownasfarasitgoes.
Theneedlethreaderturnsautomatically tothethreadingpositionandthetiny hookpinpassesthroughtheneedleeye (D).

- Takethethreadinfrontoftheneedle and makesureitisunderthehookpin(E).
Thenholdthethreadslightlyupwardsso thatithangsonthehook.

- Holdthethreadlooselyandreleasethe leverslowly.
Thehookwillturnandpassthethread throughtheneedleeyeformingaloop.
Pullthethreadthroughtheneedleeye.
Threadtension

Upperthread tension(A)
Basicupperthreadtensionsetting:"AUTO" Toincreasethetension,turnthedialtothe nexthighernumber.Toreducethetension, turnthedialtothenextlowernumber.
- Normalthread tension
- Upperthreadtensiontooloose
- Upperthreadtensiontootight
Note:
Theupperthreadtensionmustbesetat 2-3whensewingthelightweightfabrics, likesilkandjerseyetc.
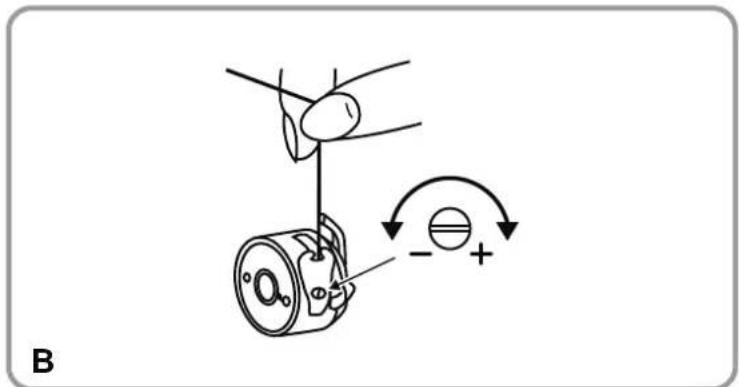
Lowerthread tension(B)
Note:
Thebobbintensionisadjustedcorrectly duringmanufacturing,thereforeno changesarenecessary.
Totestthebobbinthreadtension,thefull bobbinisplacedinthebobbincase.The bobbincaseandgripperarethen suspendedbytheendofthethread.Ifthe tensioniscorrect,thethreadwillunwindby about5to10cm.whengentlyswungand willthenremainsuspended.Ifthefull bobbincaseunwinds,thetensionistoo slack.Ifthetensionistootight,ithardly unwindsordoesnotunwindatall.Toadjust, usethesmallscrewdriver(m).
Bringingupthelowerthread

natural_image
Line drawing of a sewing machine being adjusted for the number of threads (no text or symbols present)
Holdtheendoftheupperthreadwiththe lefthand. Turnthehandwheel(21)inthe anticlockwisedirectionuntiltheneedleis againraised(acompleterevolution).
Pullontheupperthreadobringthelower threadupthroughthestitchplatehole.Lay boththreadstothebackunderthepresser foot.
Sewing/Usefulapplications

natural_image
Line drawing of a sewing machine needle stitching fabric, showing needle insertion and cutting path (no text or symbols)


Sewing(A)
Oncethesewingmachineiscorrectly threadedandadjusted,lowerthepresser footbeforesewingbyloweringthetwo-stagepresserfootlifter(18).Pressthe controlpedal(u)tostartsewing.
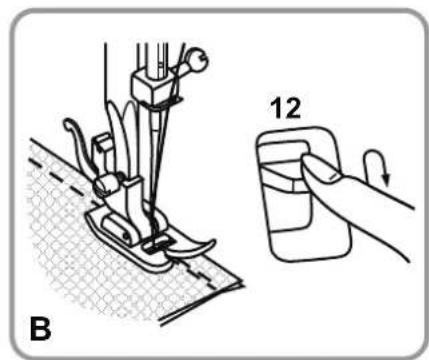
Stitching(B)
Attheendofseam, pressdownthereverse sewinglever(12). Sewafewreverse stitches. Releasetheleverandthemachine will begintosewforwardsagain
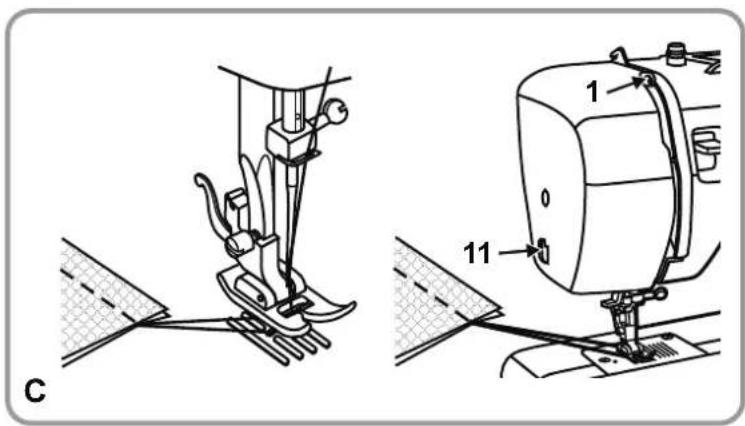
Releasingthematerial(C)
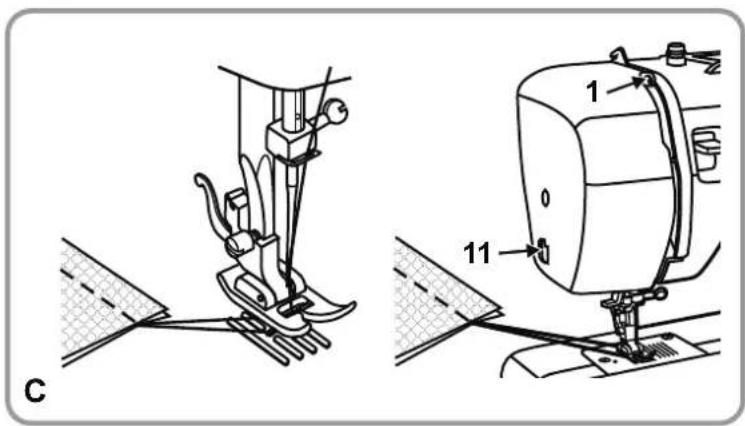
Turnthehandwheel(21)anticlockwiseto putthethreadlever(1)intoithighest position.Liftthepresserfootandpullthe materialbackinordertoreleaseit.
Cuttingthethread(C)
Holdthethreadsbehindthepresserfoot withbothhands;guidethemtothethread cutter(11)andmoveyourhandsdown.
Matchingtheneedle,fabricandthread
NEEDLE, FABRIC, THREADSELECTIONGUIDE
| NEEDLESIZE | FABRICSTHREAD | |
| 9-11(65-75) | Lightweightfabrics:thincottons,voile,serge,silk,muslin,Qiana,interlocks,cottonknits,jerseys,crepes,wovenpolyester,shirt&blousefabrics. | Light-dutythreadincotton,nylonorpolyester. |
| 12(80) | Mediumweightfabrics::cotton,satin,heavy muslin,sailcloth,doubleknits,lightwoollens. | Mostthreadssoldaremedium sizeandsuitableforthese fabricsandneedlesizes.Use polyesterthreadsonsynthetic materialsandcottononnatural wovenfabricsforbestresults.Alwaysusethesamethreadon topandbottom. |
| 14(90) | Mediumweightfabrics:cottonduck,woollens, heavierknits,terrycloth,denims. |
| 16(100) | Heavyweightfabrics:canvas,woollens,canvas andquiltedfabrics,denims,upholsterymaterial (lightandmedium). |
| Jeans(100) | Heavyweightfabrics:denims,jeans,canvas,thick material. |
| 18(110) | Heavywoollens,overcoatfabrics,upholstery fabrics,someleathersandvinyls. | Heavydutythread,carpet thread(setthepresserfootto highpressure-highnumbers.) |
IMPORTANT: Matchneedlesizetothreadsizeandweightof.fabric
PleaseNote:
-Ingeneral, finethreads and needles are used for sewing fine fabrics, and thicker threads are used for sewing heavy fabrics.
-Alwaysstestthreadandneedlesizeonasmallpieceoffabricwhichwillbeusedforactualsewing.
-Usethesamethreadforneedleandbobbin.
-Usethestabilizermaterialforfineorstretchyfabrics, and select the correct presser foot.
-Theupperthreadtensionmustbesetat2-3whensewingthelightweightfabrics,likesilkandjersey etc.
Howtochooseyourstitch


For, strafigeststitchelector dial(6)untilrequiredletter"A"coincides withthemark.Youcanadjusttheneedle positionfromlefttocentralbyturningthe stitchwidthdial.
For, zigthestitchselector dial(6)untiltherequiredletter"B"coincides withthemark.Adjustthestitchlengthand stitchwidthaccordingtothefabricbeing used.
Toobtainanyoftheother stitchesshown intheupperrow ,turnthestitchselector dialuntiltherequiredletter/stitchcoincides withthemarkAdjustthestitchlengthand thestitchwidthhasrequired.Inorderto achieveanoptimalresultforthedecorative stitchesG-Kofthefirstrow,thestitch lengthshouldbesetbetween"0.3"anda maximumof"0.5".
Toobtainanyofthe stitchesonthe secondrow ,turnthestitchlengthdial(5) to"S1".Toobtainanyofthe stitcheson thethirdrow ,turnthestitchlengthdial(5) to"S2",selectthestitchdesiredwiththe stitchselectordial(6)andturnthestitch selectordial(6)untiltherequiredletter coincideswiththemark.Setthestitch lengthhasrequired.
Straightstitchingandneedleposition
Stitchlengthdial Stitchwidthdial thestitchselectordial(6)to"A" (straightstitch).
Generally speaking, the thicker the fabric, thread and needle, the longer the stitch should be.
Selecttheneedlepositionfromlefttoright bychangingthestitchwidthdial(4)from"0" to"5".


Zigzagstitching
Stitchwidthdial

Stitchlengthdial
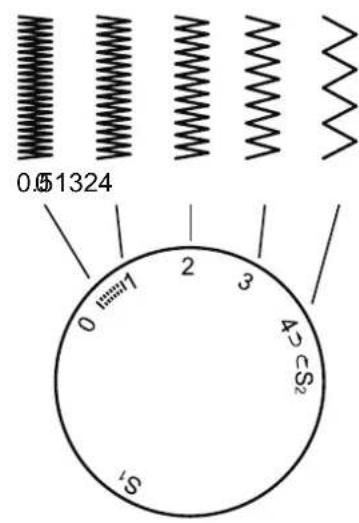
Turnthestitchselectordial(6)to"B".
Thefunctionofstitchwidthdial(4)
Themaximumstitchwidthforzigzag stitchingis"5";however,thestitchwidth canbereducedonanytypeofstitch. The widthincreasesasyouturnthestitchwidth dial(4)from"0"to"5".
Thefunctionofstitchlengthdial(5) whilezigzaging
Thedensityofzigzagstitchesincreasesas thesettingofthestitchlengthdial approaches"0".Foragoodzigzagstitch,a stitchwidthof2.5orlessisused.
Satinstitch
Whenthestitchlengthissetbetween"0"-1",thestitchesareveryclosetogether producingthe"satinstitch"whichisused formakingbuttonholesanddecorative stitches.
Finefabric
Whensewingveryfinefabric,placeapiece offleeceunderthefabric.
Zipperfoot

natural_image
Technical line drawing of a mechanical device with two views (top and side), no text or symbols present.
A

natural_image
Technical line drawing of a sewing machine needle stitching fabric, showing base and stitching details (no text or symbols)
| Stitch | Stitch width | Stitch length |
| A | 2.5 | 1~4 |
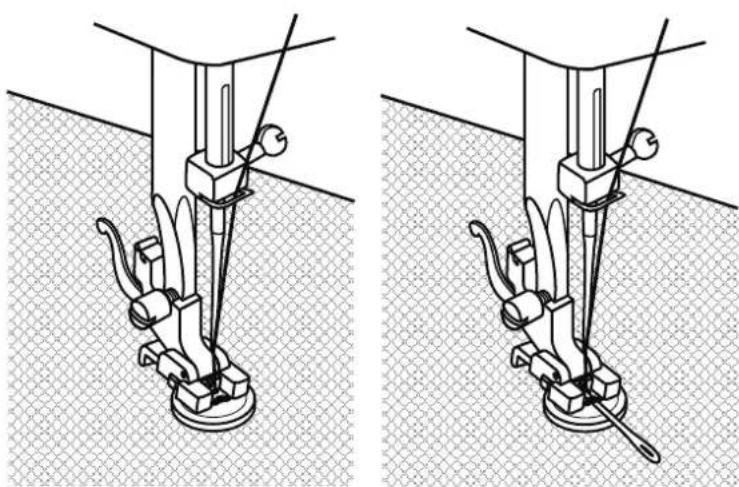
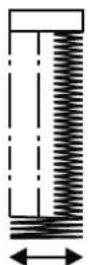
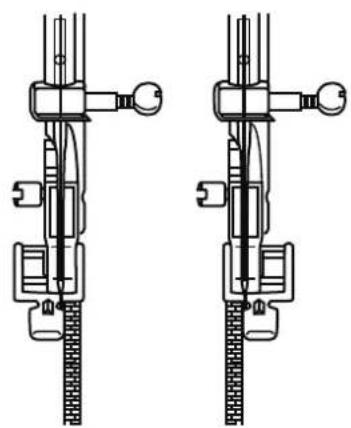
Thezipfootcanbeinsertedrightorleft, dependingonwhichsideofthefootyouare goingtosew.(A)
Tosewpastthezippull,lowertheneedle intothefabric,raisethepressorfootand pushthezippullbehindthepresserfoot.
Lowerthefootandcontinuetosew.
Itisalsopossibletosewinalengthofcord, intoabiasstriptoforma"welt".
According to thickness off fabricated set stitch length control. (B)

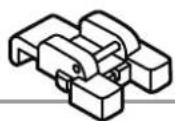
TheInvisibleZipperFootprovidesan invisibleclosingonskirts,dressesanda varietyofgarmentsandaccessories.
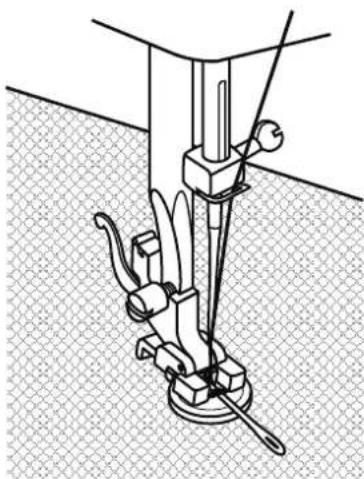
Attachtheinvisiblezipperfoottothe machine,withtheneedlelinedupwith centermark.Placeopenzipperface-down onrightsideoffabricasshown.Pinin placewithcoilonseamline(5/8"in)and topstop3/4" belowrawedgeofgarment. Withright-handgrooveoffootovercoil, stitch zipperuntilthefoothitstheslider (removepinsasyoucometothem.)Backtack.

Toattachtheotherhalfofthezipper,pin tapeface-downwithcoilonseamline(5/8" in)andtopstop3/4" belowrawedge of garment,asbefore.Makesurethatthe zipperisnottwistedatthebottom.Usethe left-handgrooveoffoot,makingsurethat thecentermarkingisstilllinedupwiththe needleandstitch,asbefore.
Closezipper.Slidezipperfoottotheleftso thatneedleisintheouternotch.Pinthe seamtogetherbelowzipperopening.Fold endofzipperoutofthewayandlowerthe needlebyhandslightlyaboveandtothe leftofthelaststitch.
Stitchseamforabout2",asshown.Pull threadthroughtoonesideandtie.Change toregularpresserfootandcompletethe seam.
Atzipperend,stitchabout1"ofeachzipper tapetoseamallowanceonly.
Sewingbasics

| StitchStitch | width | Stitchlength |
| D | 1 | ~ |
Forhems,curtains,trousers,skirts,etc.
.Λ..Λ. Blindstitchforeelasticfabrics.
- Foldthefabricasillustratedwiththeleft sideuppermost.
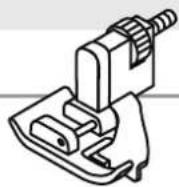
- Placethereversedfabricunderthe blindstitchpresserfoot(f).Turnthe handwheel(21)forwardsbyhanduntil theneedleisfullytotheleft.Itshould justpiercethefoldofthefabric.lfit doesnot,adjustthestitchwidth accordingly.
3/4. Adjust the guide (3) by turning the dial (4) so that the guide just rests against the fold.
Sewslowlyandguidethefabriccarefullyso thatitspositiondoesnotchangeinrelation totheguide.


natural_image
Technical line drawing of a mechanical assembly with no visible text or symbols
natural_image
Technical line drawing of a mechanical clamp or clamping device mounted on a base, with no visible text or symbols.
| StitchStitch | widthStitchlength |
| B | 0 | ~ |
Installtheembroideryanddarningplate(p).
Positiontheworkunderthefoot.Placethe buttononthemarkedposition,lowerthe presserfoot,adjuststitchwidthto"0"and firstsewafewsecuringstitchesintheleft hole.Adjustthestitchwidth(usually between3and4).Sewsomecheck stitcheswiththehandwheel(21)untilthe needlegoescleanyintotherighthole of thebutton(varysthestitchwidthdepending onthebutton)andsewonthebutton. Adjustthestitchwidthto"0"andsewafew securingstitches.
Ifashankisrequired,placeadarning needleontopofthebuttonandsew.For buttonswith4holes,sewthroughthefront twoholesfirst,pushtheworkforwardand thensewthroughthebacktwoholesas described.
2
5

natural_image
Isometric line drawing of a rectangular electronic component with internal compartments (no text or symbols)

natural_image
Technical diagram of a cylindrical mechanical device with internal components and directional arrows indicating flow or movement (no text or symbols present)

| StitchStitchwidthStitchlength |
| 11.0 | 5 | 0 |
Preparation:
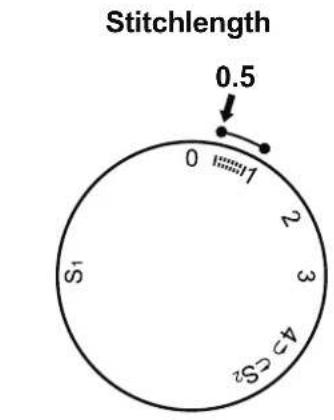
Removethepressorfootandattachthebuttonhole foot(e).Adjustthestitchlengthdial(5)tobetween "0.5"- "1". Thedensityofthestitchdependson thicknessofthefabric.
Note: Alwaystestsewabuttonhole.
Topreparethefabric:
Measurethediameterefthebuttonandadd0.3cm (1/8")forthebartacks.Ifyouhaveaverythick button,addmoretothediametermeasurement. Markthepositionandlengthofthebuttonholeon thefabric.Raisetheneedletoitshighestposition.
Positionthefabricsothattheneedleisonthemark thatisfurthestfromyou.
Pushthebuttonholefoot(e)towardsyouasfarasit willgo.Lowerthefoot.
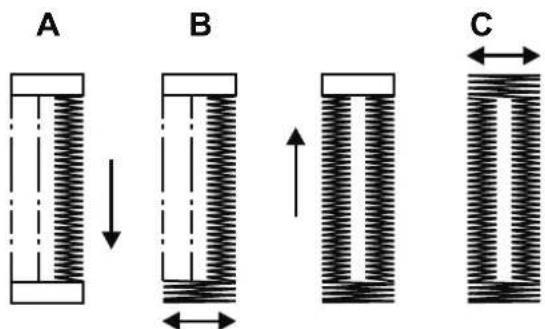
A. Turnthestitchselectordial(6)to"".Sew: moderatespeeduntilyoureachtheendmark. Raisetheneedletoitshighestposition.
B. Turnthestitchselectordial(6)to""andsew 5-6bartackstitches.Raisetheneedletoits D highestposition.
C. Turnthestitchselectordial(6)to""andsew theleftsideofthebuttonholetothemarkatthe endwhichisfurtherfromyou.Raisetheneedle toitshighestposition.
D. Turnthestitchselectordial(6)to""andsewa fewbartackstitches.Raisetheneedletoits highestposition.
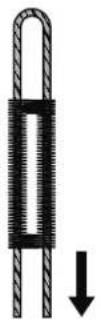
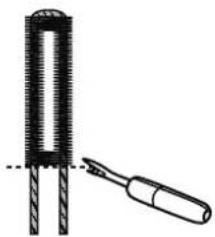
Liftthefoot.Removethefabricfromunderthefoot andseparatethethreads.Drawtheupperthread throughthefabrictotheearandknottheupperand lowerthreads.Cutthecentreofthebuttonholewith thestitchripper(o),beingcarefulnottocutthe stitchesoneitherside.
Note:
-Slightlyreduceupperthreadtension(3)to producebetterresults.
-Itisrequiredthatyouuse thestabilizermaterial suchasyarnorfleeceforfine,stretchyorknitted fabrics.Thezigzagstitchmustsewovertheyarn (E).
-Pleaseuseneedle9-11(65-75)forthefollowing fabric: Lightweightfabrics:thincottons,voile,serge,silk, muslin,Qiana,interlocks,cottonknits,jerseys, crepes,wovenpolyester,shirt&blousefabrics.

natural_image
Diagram showing a hexagonal grid pattern on the left and a vertical wall with diagonal hatching (no text or symbols)
A

natural_image
Pure geometric pattern with a vertical line and triangular hatching (no text or symbols)
B
natural_image
Technical line drawing of a sewing machine needle stitching fabric (no text or symbols)
C
| StitchStitch | widthStitchlength | |
| E,F3~5S | 1,S2 | |
Note:
Usenewneedlesorballpointneedles.
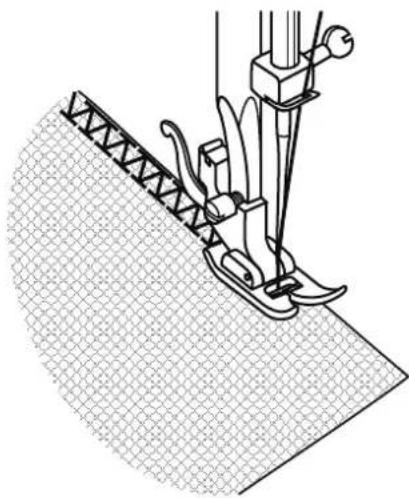
Seams, sewing and neatening visible hems.
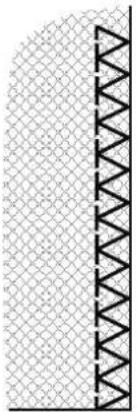
Overlockstitch(A)
Forfineknits,jerseys,neckedges,borders.
Standardoverlockstitch(B)
Forfineknits,jerseys,neckedges,borders.
Doubleoverlockstitch(C)
Forfineknits,handknits,seams.
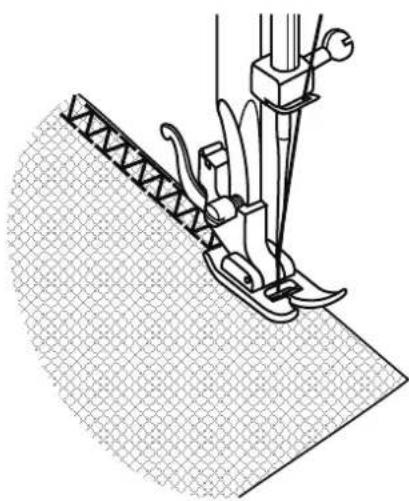
Alloverlockstitchesaresuitableforsewing andneateningedgesandvisibleseamsin oneoperation.
Whenneatening,theneedleshouldjustgo
overtheedgeofthefabric.
3-stepzig-zag

natural_image
Diagram showing a square with a central oval and dotted pattern, alongside a vertical line with diagonal lines (no text or symbols)
1
2
| StitchStitch | widthStitchlength |
| C | 3 | ~ |
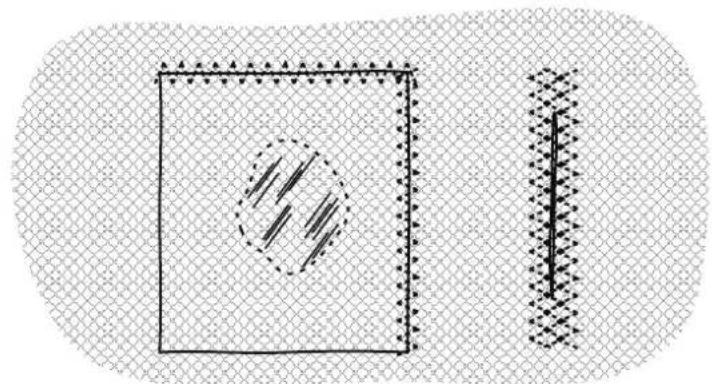
Sewingonlaceandelastic, darning, mending, reinforcingedges.
- Placepatchinposition.
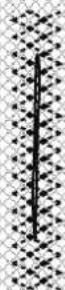
- When mending tears, it is advisable to use apiece of backing fabricas reinforcement. First sew over the centre and then just over lapon both sides. Depending on the type off fabric and damage, sew between 3 and 5 rows.

| StitchStitch | widthStitchlength |
| A | 2 | . |
Triplestraightstitch:(A)
Forhardwearingseams.
Themachinesewstwostitchesforwards andonestitchbackwards. Thisgivestriple reinforcement.
| StitchStitch | widthStitchlength | |
| B3~5 | S1,S2 | |
Triplezig-zag:(B)
Forhardwearingseams, hemsand decorativeseams.
Triplezig-zagissuitableforfirmfabricslike
denim,corduroy,etc.
Patchwork


natural_image
Technical line drawing of a sewing machine needle stitching fabric strips on a mesh mat (no text or symbols)
| StitchStitch | widthStichlength |
| F3~5S1 | | |
Tojointwopiecesoffabricwhileleavinga spacebetweentheiredges.
- Foldovertheedgesofthetwopiecesof fabricforthehemandtacktheedgesto athinpieceofpaperleavingasmall spacebetweenthem.
- Stitchalongtheedge, pulling both threadsslightlywhenbeginningtosew.
- Usethickerthannormalthreadsfor sewing.
- Aftersewing, removethetacking and the paper. Finish by tying knotson the reverseside at the beginning and the end of these seams.
Monogrammingandembroideringwithembroideryhoop\*
*Theembroideryhoopisnotsuppliedwith themachine.


| StitchStitch | widthStitchlength |
| B | 1 | ~ |
Attachtheembroideryanddarningplate
- Removethepressorfootandthepresser footholder.
- Attachtheembroideryanddarningplate (p).
- Lowerthetwo-steppresserfootlifter(18) beforestartingtosew.
- Adjustthestitchwidthaccordingtothe sizeofletteringordesign.
- Drawthedesiredletteringordesignon therearsideofthefabric.
- Stretchthefabricbetween the embroideryhoopasfirmlyaspossible.
- Placethefabricundertheneedle. Lower the two-steppresserfootlifter(18).
- Turnthehandwheel(21)towardsyouto bringupthelowerthreadthroughthe fabric.Sewafewsecuringstitchesatthe startingpoint.
- Hold the hoop with thumb and forefingers of both hands.
- Coordinate these sewingspeed and the movement of hoop.
Applique


natural_image
Medical illustration showing surgical instruments manipulating a patient's abdomen (no text or labels)

natural_image
Simple line drawing of a duck with patterned body and beak (no text or symbols)
| StitchStitch | widthStitchlength |
| B3~50.5~1 | |
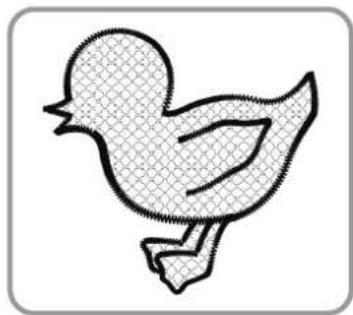
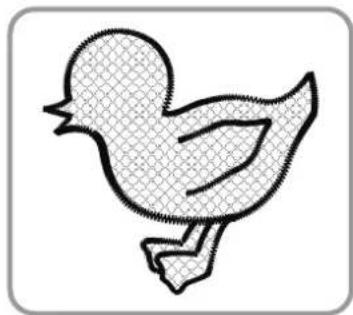
- Cutouttheappliquedesignandtackitto thefabric.
2.Sewslowlyaroundtheedgeofthe design.
- Trimexcessmaterialoutsidethe stitching. Makesurenottocutany stitches.
- Removethetackingthread.
- Tietopandbottomthreadunderthe appliquetoavoidunravelling.
Scallopstitching


natural_image
Line drawing of a sewing machine needle stitching fabric (no text or symbols)
1

natural_image
Diagram of a sewing machine needle stitching fabric (no text or symbols)
2
| StitchStitch | widthStichlength |
| 1 | 3 | ~ |
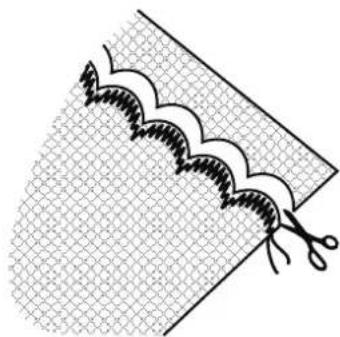
Youcanproduceadecorativeedgewiththe scallopstitch
- Sewthescallopstitchalongtheedgeof thematerial.
- If desired, trimaroundthescallop with scissorstocreateascallopededge. Be careful nottocutthethread.
Important:
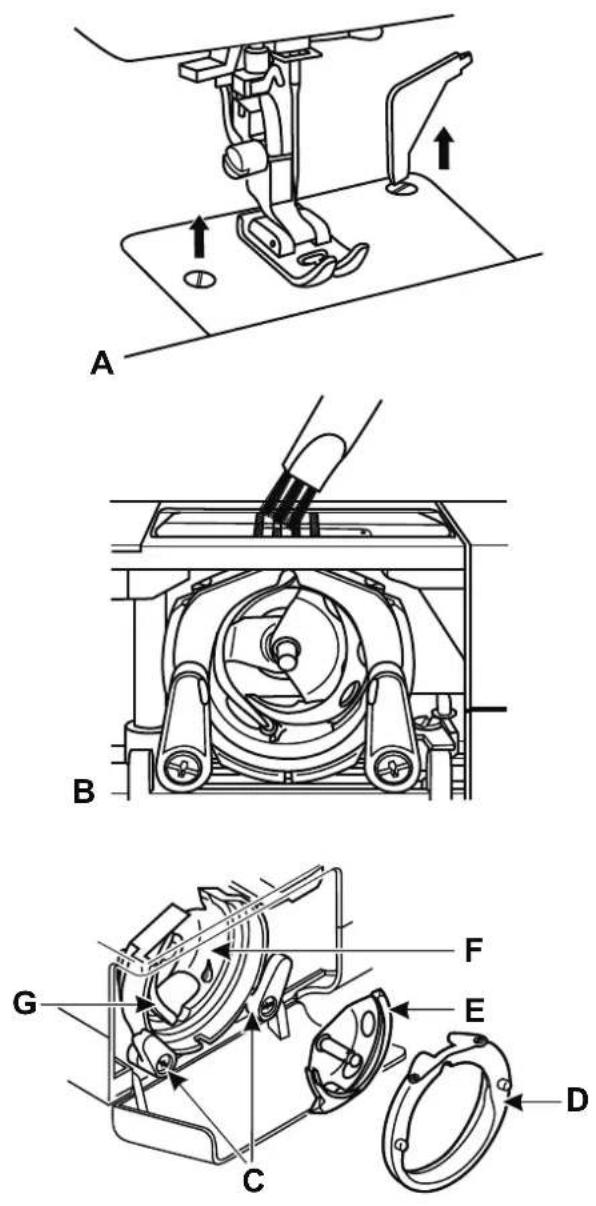
Disconnect themachine from the electricity supply by removing the plug from them mains socket. When cleaning them machine, it must always be disconnected from the electricity supply.
Removingthestitchplate(A):
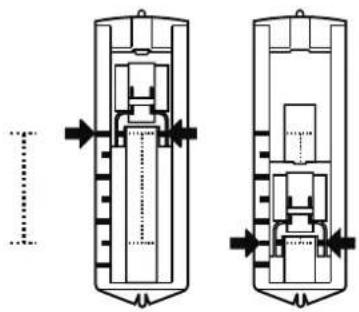
Turnthehandwheel(21)untiltheneedleisfully raised.Openthehingedfrontcoverandremovethe stitchplatescrewswiththeL-screwdriver(I).
Cleaningthefeeddog(B):
Removethebobbincaseandusethebrush(o) suppliedtocleanthewholearea.
Cleaningandlubricatingthecatch(C-G):
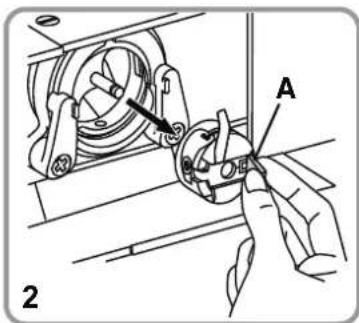
Removethebobbincase.Snapthetwocatch retainingarms(C)outwards.Removetheshuttle racecover(D)andthecatch(E)andcleanwitha softcloth.Lubricateatthepointsindicated(F)(1-2 drops)usingsewingmachineoil.Turnthe handwheeluntiltheshuttlerace(G)isintheleft position.Replacethecatch(E).Replacetheshuttle racecoverandsnapbackthetwocatchretaining arms.Insertthebobbincaseandbobbinand replacethestitchplate.
Important:
Fabricfluffandthreadsmustberemoved regularly.
Storage

natural_image
Line drawing of a sewing machine with a downward arrow indicating compression or lifting (no text or symbols)
Alwaysremovethepowerplugfromthesocket whennotusingthesewingmachine.Usethedust cover(t)provided.Storethesewingmachineina drylocationwhichchildrencannotaccess.Ifthe sewingmachineisnotusedforanextendedperiod, itshouldbeprotectedfromexcessivedust,dirtor moisture.
Troubleshootingguide
ProblemCauseCorrection
| Upperthread breaks | 1. Themachineisnotthreaded correctly.2. Thethreadtensionistootight.3. Thethreadistoothickfortheneedle.4. Theneedleisnotinsertedcorrectly.5. Thethreadhasbecomewound aroundthebobbinwinderspindle(14).6. Theneedleisdamaged. | 1. Rethreadthemachine.2. Reducethethreadtension(3).(lowemumber)3. Usealargerneedle.4. Removeandreinserttheneedle.(flatside towardstheback)5. Removethebobbin(h)andunwindthe thread.6. Replacetheneedle. |
| Lowerthread breaks | 1. Thebobbincaseisnotinserted correctly.2. Thebobbincaseisthreadedwrongly. | 1. Removeandreinsertthebobbincaseandpull onthethread.Thethreadshouldpulleasily.2. Checkbothbobbin(h)andbobbincase. |
| Skipped stitches | 1. Theneedleisnotinsertedcorrectly.2. Theneedleisdamaged.3. Thewrongsizeneedlehasbeen used.4. Thewrongpresserfootisinstalled. | 1. Removeandreinsertneedle.(flatside towardstheback)2. Replacetheneedle.3. Chooseaneedlesizetosuitthethreadand fabric.4. Usethecorrectpresserfoot. |
| Needlebreaks | 1. Theneedleisdamaged.2. Theneedleisnotcorrectlyinserted.3. Fabrictoothick/needlesizewrong.4. Thewrongpresserfootisattached. | 1. Replacetheneedle.2. Inserttheneedlecorrectly(flatsidetowards theback)3. Chooseaneedlesizetosuitthethreadand fabric.4. Usethecorrectpresserfoot. |
| Loosestitches | 1. Themachineisnotcorrectly threaded.2. Thebobbincaseisnotcorrectly threaded.3. Needle/fabric/threadcombinationis wrong.4. Threadtensionwrong. | 1. Threadthemachinecorrectly.2. Threadthebobbincaseasillustrated.3. Theneedlesizemustsuitthefabricand thread.4. Correctthethreadtension. |
| Seamsgather orpucker | 1. Theneedleistoothickforthefabric.2. Thestitchlengthiswronglyadjusted.3. Fabricpuckers.3. Useabackingforfineorstretchyfabrics. | 1. Useafinerneedle.2. Checkthethreadtension. |
| Unevenstitches, unevenfeed | 1. Thethreadistooweak.2. Thebobbincaseiswronglythreaded3. Fabrichasbeenpulledwhensewing. | 1. Usestrongerthread.2. Rethreadthebobbincaseandinsertcorrectly.3. Donotpullonthefabric.Itmustbe automaticallymovedbythemachine. |
| Themachineis noisy | 1. Themachinemustbelubricated.2. Flufforoilhavecollectedonthehook orneedlebar.3. Poorqualityoilhasbeenused.4. Theneedleisdamaged. | 1. Lubricateasdescribed.2. Cleanthehookandfeeddogasdescribed.3. Onlyusegoodqualitysewingmachineoil.4. Replacetheneedle. |
| Themachine jams | Threadiscaughtinthehook. | Removetheupperthreadandbobbincase, turnthehandwheel(21)backwardsand forwardsbyhandremovethethread remains.Lubricateasdescribed. |
Disposal

-Disposeofdeviceswithdangerousdefectsimmediatelyandensurethattheycanno longerbeused.
-Donotdisposeofthesewingmachineinnormaldomesticwaste.
-ThisproductissubjecttoEUDirective2012/19/EU.
-Disposeofthesewingmachineataregisteredwastedisposalfirmorthroughyourlocal authoritywastedisposalfacility.
- Observetheregulationscurrentlyinforce.Incaseofdoubt,consultyourwastedisposal facility.
-Pleasedisposeofallpackagingmaterialsinanenvironmentallyfriendlymanner.
Keep these sewing machine's transport packaging. It maybe useful for storing the machine, but is particularly useful if you want to send these sewing machine away for repair. Most instances of damage occur when the machines are being transported.
Guarantee
Thereisathreeyearguaranteeonthissewingmachinestartingfromthepurchasedate. The device was inspectedcarefullyandconscientiouslybeforedelivery.Pleasekeepyourreceiptasproofof purchase.Incaseofaguaranteecomplaint,pleasecallyourservicecentre.Thisistheonlywayto ensurefreeshipmentofyourgoods.
Theguaranteescopeonlycoversmaterialormanufacturingdefects;itdoesnotcoverwearingpartsordamagetofragilepartse.g.switches.Theproductisonlyintendedforprivateandnotcommercialuse. Intheeventofmisuse,improperhandling,theuseofforceoranykindofinterferencewhichwasnotbeenperformedbyourserviceoffice,theguaranteewillapse.Thisguaranteedoesnotlimityourstatutoryrights.
Servicenumber
TheseOperatingInstructionscannotcoverallpossibleapplications.
Formoreinformationorincaseofproblemsnotcoveredornotcoveredinsufficientdetailinthese
OperatingInstructions, pleasecontacttheservicenumber0080055500666(free)
PleasekeeptheseOperatingInstructionsinasafeplaceandpassontoanyfutureusers.
Service-Address:
CROWNServiceCenter
teknihallElektronikGmbH
Breitefeld15
DE-64839Münster
GERMANY
IAN300024
sewingguide-service-gb@teknihall.com
Manufacturer
Pleasebeawarethatthefollowingaddressisnotaserviceaddress.Pleasefirstcontacttheservice officestatedabove.
CrownTechnicsGmbH
Turmstraße4
DE-78467Konstanz
GERMANY
GB Servicenumberforcomplaints:
IE 0080055500666()free
NI
VersiondesinformationsStandvandeinformatie
StandderInformationen: · LastInformationUpdate
03/2018Ident.-No.:032018
021VGK0301(E)(FR/NL/DE/GB)
www.sewingguide.de