KH 4300 - Sewing machine SILVERCREST - Free user manual and instructions
Find the device manual for free KH 4300 SILVERCREST in PDF.
| Product type | Overlock sewing machine |
| Brand | SILVERCREST |
| Model | KH 4300 |
| Usage | Domestic, portable |
| Number of threads | 4 or 3 |
| Number of needles | 2 or 1 |
| Maximum sewing speed | 1100 stitches/min |
| Stitch width | 6 mm with 4 threads, 6 mm or 4 mm with 3 threads |
| Stitch length | 1 - 5 mm |
| Needle type | HA x 1 No. 11-14 or 130/705 H No. 75-90 |
| Power supply | 230 V ~, 50 Hz |
| Power consumption | 105 W (motor 90 W, lighting 15 W) |
| Protection class | II |
| Lighting | Bulb 15 W, socket E14 |
| Noise level | 78 dB(A) |
| Differential feed | Yes, adjustable (positions N, G, S) |
| Free arm (free arm sewing) | Yes |
| Cutting width | Adjustable |
| Pedal | Electronic, type KD-2902 |
| Package contents | Machine, foot pedal, oil, waste container, accessory box, needles, spare upper blade, bobbin caps, bobbin holders, tools (Allen key, screwdriver), protective cover, tweezers, brush |
| Safety | Safety micro switch on front cover |
| Warranty | 3 years |
Frequently Asked Questions - KH 4300 SILVERCREST
User questions about KH 4300 SILVERCREST
0 question about this device. Answer the ones you know or ask your own.
Ask a new question about this device
Download the instructions for your Sewing machine in PDF format for free! Find your manual KH 4300 - SILVERCREST and take your electronic device back in hand. On this page are published all the documents necessary for the use of your device. KH 4300 by SILVERCREST.
USER MANUAL KH 4300 SILVERCREST
Overlock Sewing Machine
IE Operating instructions
CONTENT
PAGE
Intended Usage 3
Safety instructions 3
Technical Data 4
Items supplied 4
Description of the appliance 5
Preparation 5
Adjusting the thread tree 5
Bobbin supports 5
Bobbin caps 6
Connecting the foot pedal 6
Controlling the sewing speed. 6
Safety switch 6
Fitting the waste container 6
Handwheel 6
Front flap 6
Opening the free arm 7
7
Threading yarns into the needle 8
Trial run. 9
Setting the thread tension 10
Adjusting thread tension on the needle threads 11
Adjusting thread tension on the looper threads. 11
Overview of the machine adjustments. 12
Changing threads (binding together) 13
Setting the stitch length 13
Setting the cutting width 14
Exchanging needles 14
Replacing bulbs 15
Exchanging the upper blade 15
| Close and broad sewing with three threads | 16 |
| Sewing freehanded | 16 |
| Adjusting the sewing foot | 16 |
| Hemstitch and edging | 17 |
| Sewing hemstitch | 17 |
| Sewing narrow edging | 17 |
| Differential feed motion | 18 |
| Manner of operation | 18 |
| Setting the differential feed motion | 18 |
| Uneven material edges and smoothness | 19 |
| Avoid ruffles by stretching | 19 |
| Troubleshooting | 20 |
| Cleaning and care | 21 |
| Storage | 21 |
| Disposal | 21 |
| Warranty and Service | 22 |
| Importer | 22 |
Read the operating instructions carefully before using the appliance for the first time and preserve this booklet for later reference. Pass the manual on to whomsoever might acquire the appliance at a later date.
Intended Usage
This overlock sewing machine is intended ...
- for use as a portable machine,
- for the trimming of material edges (sewing) of typical household textiles, and ...
- only for domestic household use.
This overlock sewing machine is not intended ...
- to be installed at a permanent location,
- for the processing of other materials (e.g. leather, canvas, sailcloth and other heavy materials),
- for commercial or industrial use.
Safety instructions
Like any other electrical device, a sewing machine can cause serious, even life-threatening injuries.
To avoid these, and to work safely:
- Always disconnect the power supply when leaving the machine unattended. This will prevent the risk of accidents if the machine is switched on accidentally.
- First pull the power plug before changing the bulb or performing maintenance work on the machine. This will prevent possibly life-threatening electric shocks.
- Do not pull the plug out of the wall socket by the lead. When pulling out the plug, always hold the plug, not the lead.
-
Only use the sewing machine in dry rooms.
-
Arrange for defective power plugs and/or cables to be replaced at once by qualified technicians or our Customer Service Department.
- This appliance is not intended for use by individuals (including children) with restricted physical, physio-logical or intellectual abilities or deficiencies in experience and/or knowledge unless they are supervised by a person responsible for their safety or receive from this person instruction in how the appliance is to be used.
Children should be supervised to ensure that they do not play with the appliance. - Never use the machine when the ventilation apertures are blocked. Keep the ventilation apertures of the machine and the foot switch free from fluff, dust and waste material.
- Should the cable connected to the foot pedal become damaged, to avoid potential risks it must be replaced by the manufacturer, his customers services or a similarly qualified person.
Warning about injuries and material damages:
- Keep your work space tidy. An untidy workplace can lead to accidents.
- Provide adequate lighting when working!
- Do not wear loose clothing or jewellery, as these can be caught in moving parts. You should also wear a hair net if you have long hair.
- Avoid adopting an unusual posture. Remain steady and in a well-balanced position at all times.
- If accidents occur as a result of handling the machine with insufficient care, or failure to follow the safety instructions in this manual, then the manufacturer cannot accept liability.
- Never cover the ventilation slots! Risk of overheating!
Technical Data
| Number of threads | 4 or 3 |
| Number of needles | 2 or 1 |
| Sewing speed | 1100 Revs/min |
| Stitch width | 6 mm with 4 threads |
| 6 mm or 4 mm with 3 threads |
| Stitch length | 1 - 5 mm |
| Needles | HA x 1 Nr. 11-14 or 130/705 Nr. 75-90 |
| Power consumption : | Motor: 90 W |
| Bulb: 15 W | |
| Total: 105 W |
| Rated voltage: | 230 V ~, 50Hz |
| Protection class: | II ☑ |
| Bulb power: | 15 W |
| Bulb voltage: | 230 V / ~50 Hz |
| Bulb thread: | E14 thread |
The sound intensity level under normal operating conditions amounts to 78dB(A).
Foot pedal
Use only the foot pedal originally supplied with this sewing machine:
- ELECTRONIC FDM Speed Controller
- Type KD-2902
Items supplied
Overlock Sewing Machine
Oil
Waste container
Accessory box
Operating instructions
| Replacement (upper blade) | |
| 2 Needles Nr. 11 4 Needles Nr. 14 (2 in the machine, pre-installed) | |
| 4 Bobbin caps | |
| 4 Spool pin (preinstalled) | |
| Allen key | |
| Flat-headed screw- driver | |
| Covering hood | |
| Pincers | |
| Brush |
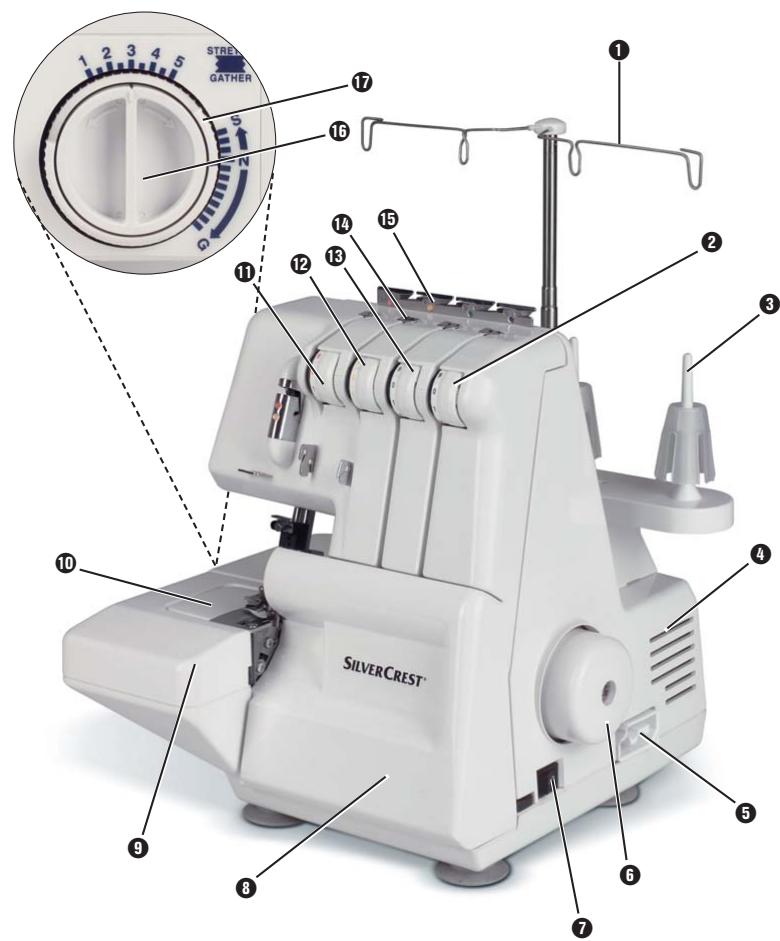
Description of the appliance
1 Thread tree
2 Thread tension selector (lower looper)
Spool support
4 Cold air intake
5 Connection Footpedal/Power supply
Handwheel
7 Power switch (On/Off switch)
6 Front flap
9 Arm support
10 Free arm
1 Thread tension selector (left needle)
12 Thread tension selector (right needle)
Thread tension selector (upper looper)
14 Thread guide
Thread guide plate
16 Adjustment wheel for stitch length
17 Adjustment wheel for differential feed motion
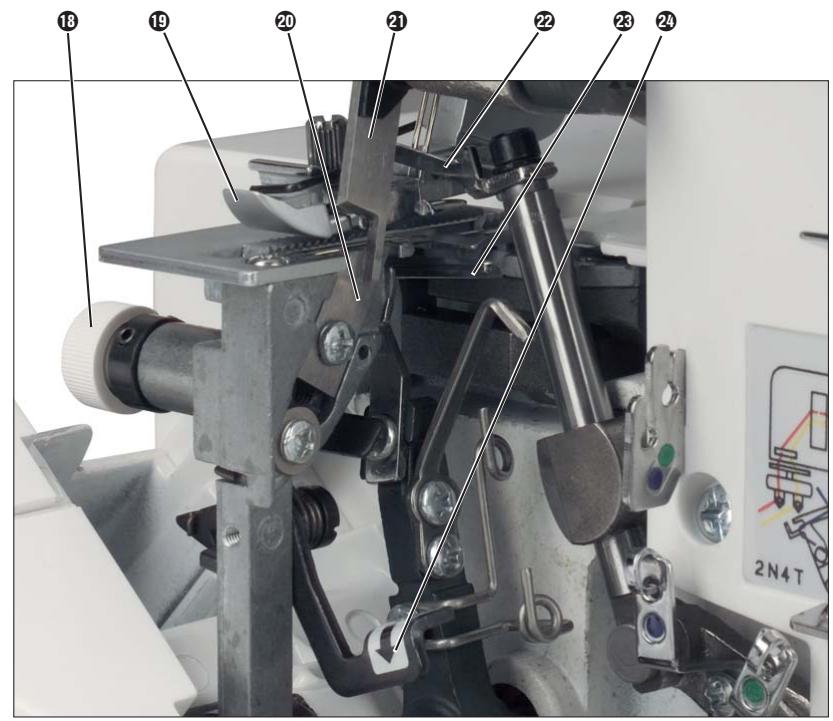
18 Adjustment wheel for cutting width
Sewing foot
20 Lower blade
Upper blade
Upper looper
Lower looper
24 Release lever PUSH
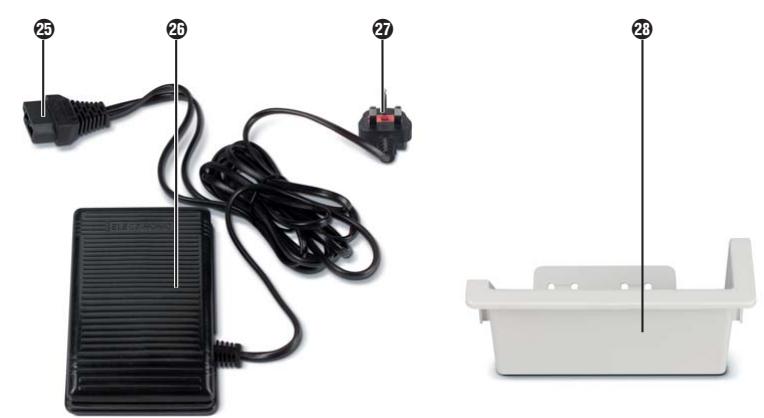
25 Connection plug
26 Foot pedal
Power plug
28 Waste container
Preparation
Place the overlock sewing machine on a stable and level surface. Ensure there is sufficient illumination at your workplace.
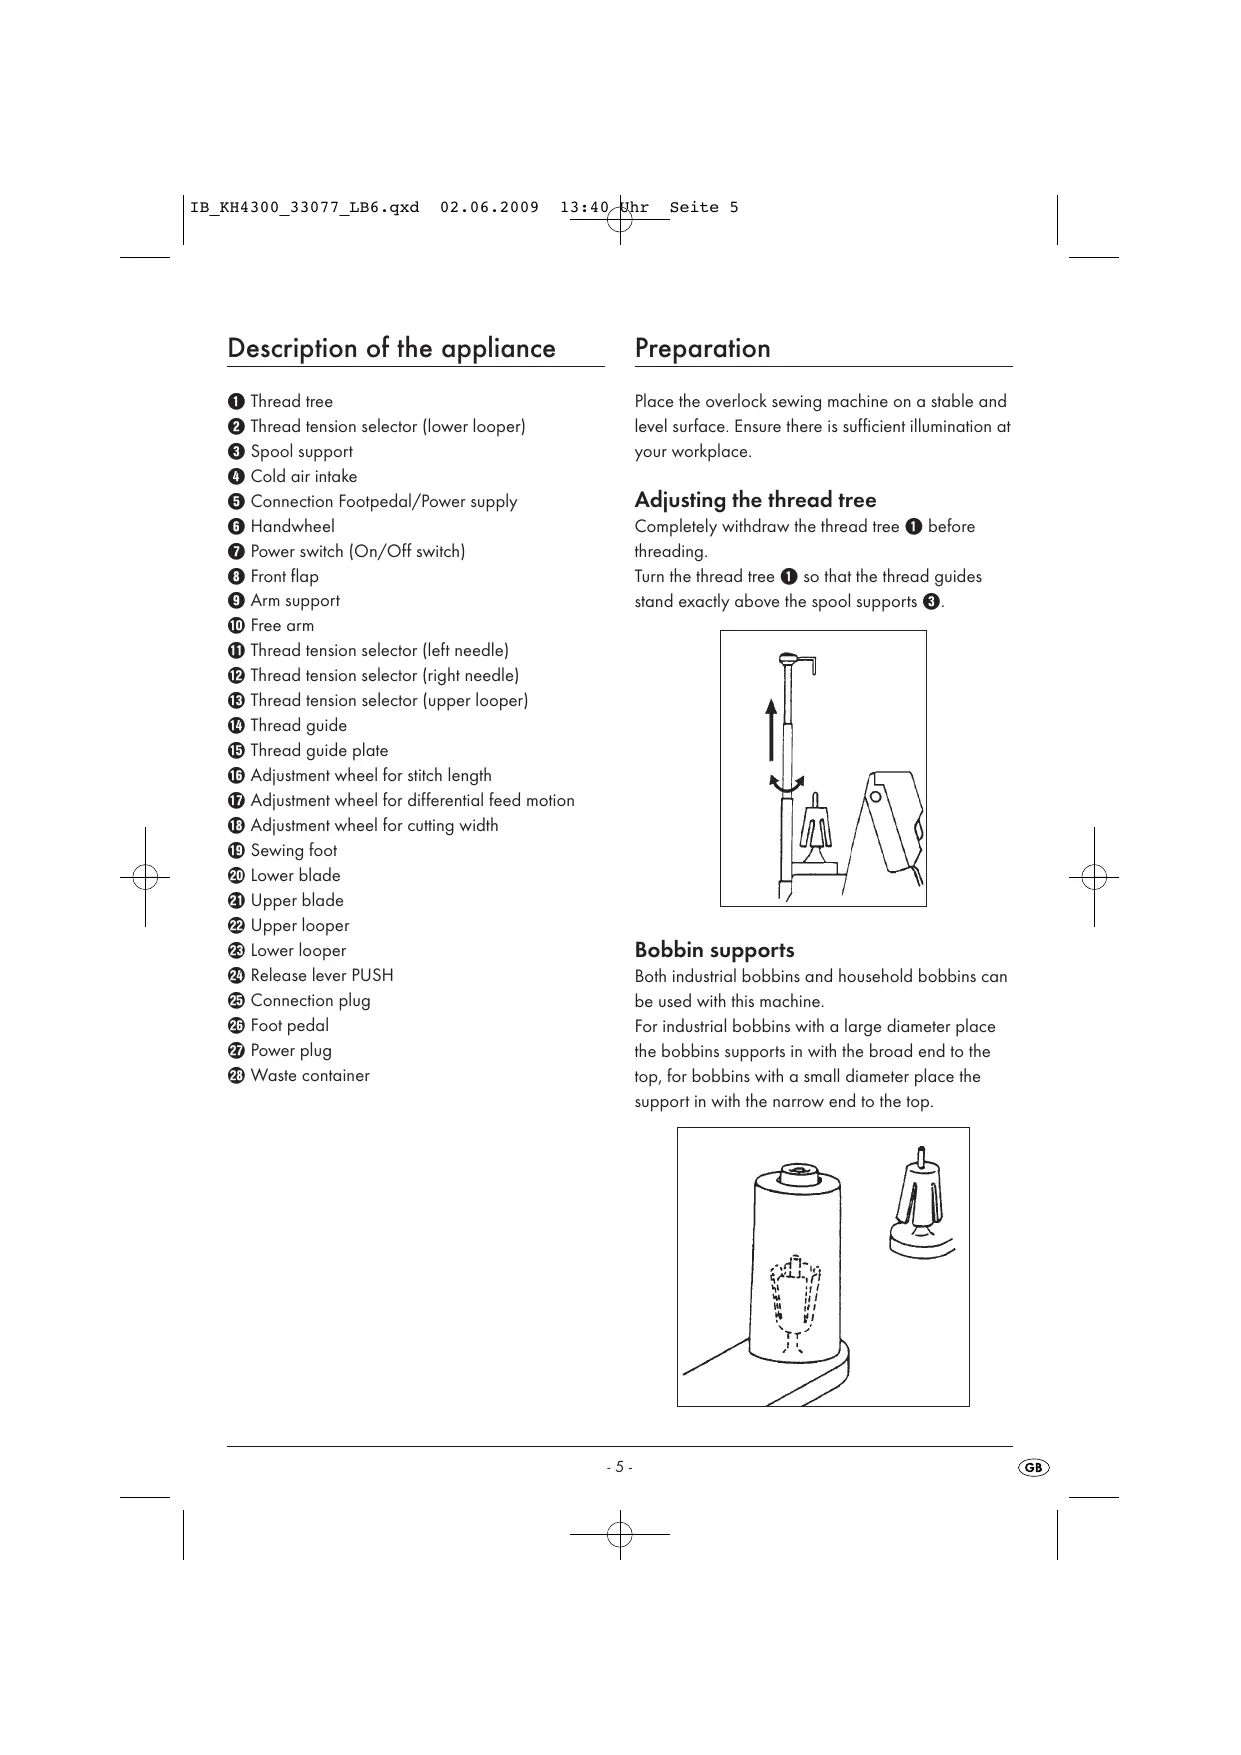
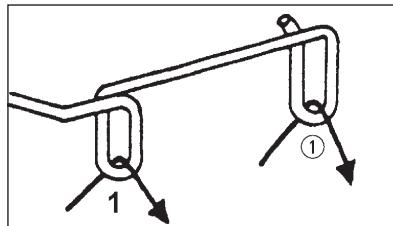
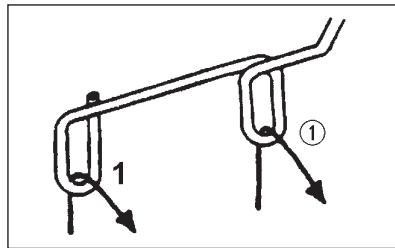
Adjusting the thread tree
Completely withdraw the thread tree 1 before threading.
Turn the thread tree ① so that the thread guides stand exactly above the spool supports ③.

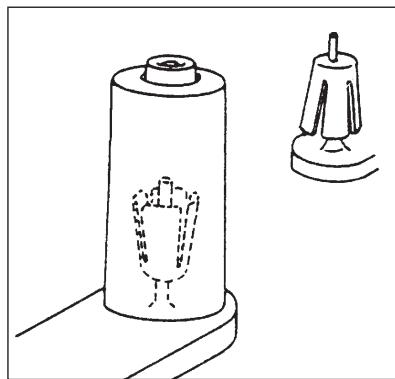
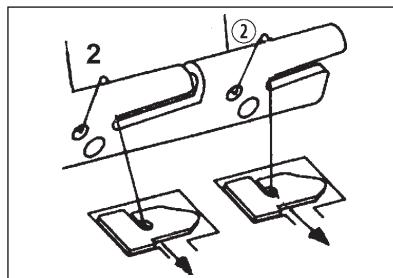
Bobbin supports
Both industrial bobbins and household bobbins can be used with this machine.
For industrial bobbins with a large diameter place the bobbins supports in with the broad end to the top, for bobbins with a small diameter place the support in with the narrow end to the top.
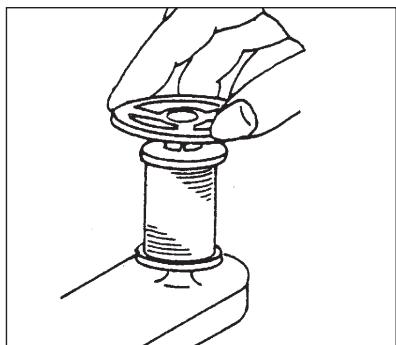
Bobbin caps
If using non-industrial thread bobbins, remove the bobbin supports and place the bobbin caps on the thread bobbins.
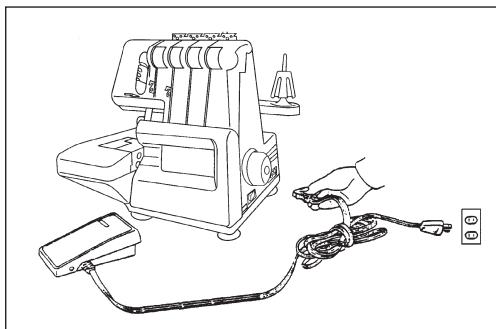
Connecting the foot pedal
Insert the plug of the footpedal 25 into the connection for the footpedal 5 and the power plug 27 into a mains power socket.
To switch the machine on, press the power switch ①.

Attention!
During absences from the machine or when doing maintenance work, always remove the plug 2 from the mains power socket. Injury hazard!
Controlling the sewing speed
The sewing speed is controlled by means of the footpedal 26. The sewing speed is changed by applying more or less pressure to the footpedal 26.
Safety switch
This machine is fitted with a micro safety switch. You cannot start the machine if the front flap ⑧ is open. Close the front flap ⑧ before you start to sew.
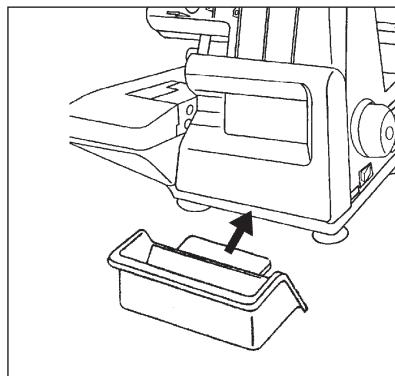
Fitting the waste container
The waste container ② collects remnants during sewing, so that your workplace stays tidy. Place the waste container ② between the machine and the table.
Handwheel

Note:
Always turn the handwheel 6 towards yourself, that is, in the same direction as with a domestic sewing machine.
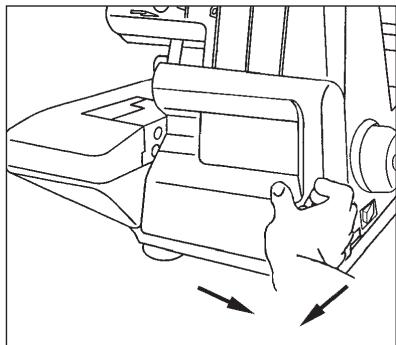
Front flap
To open the front flap ⑧, slide it as far as possible to the right and, at the same time, draw it towards yourself.
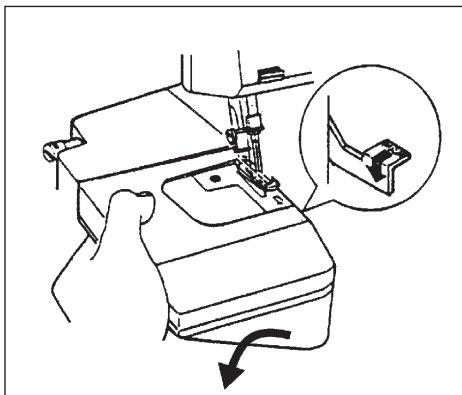
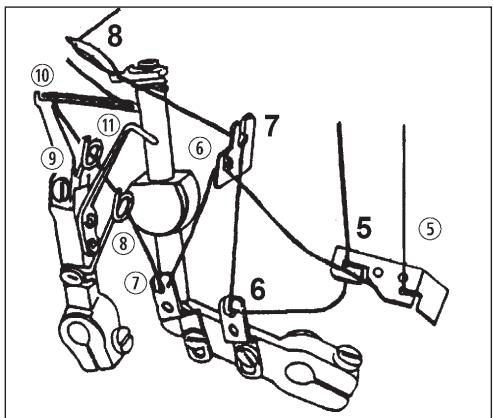
Opening the free arm
For threading the yarns the free arm 10 must be opened.
- Pull the arm support 9 off to the side.
- Open the front flap 8
- Press the release lever "PUSH" 24 and, at the same time, pull the free arm 10 downwards.
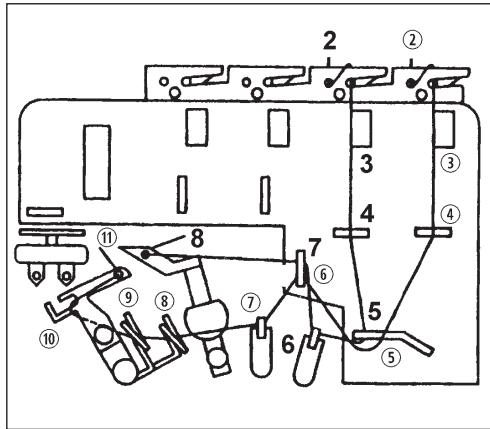
Threading yarns into the looper
Attention!
Before starting to thread yarns, ALWAYS place the power switch ① at OFF and remove the plug ②. This will prevent an unintentional starting of the appliance. If you do not, you run a risk of serious injury!
Correct threading is important, so that the stitches are not irregular and that the yarn does not break. On the inner side of the front flap 3 there is a guide to threading. Additionally, the thread guides are marked in various colours.
In the accessory box you will find pincers, the use of which helps make threading easier.
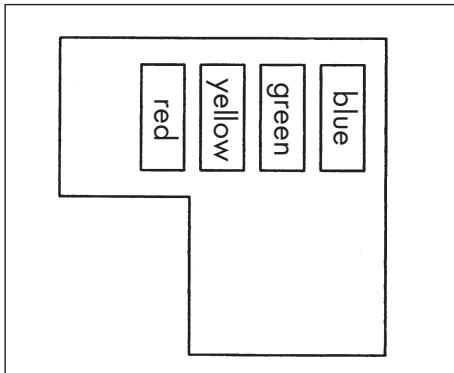
Threading takes place in this sequence:
- First step: Upper looper (green)
- Second step: Lower looper (blue)
- Third step: Right needle (yellow)
- Fourth step: Left needle (red)
For simplification, the individual steps are numbered on the illustrations (1 ①, 2 ②, 3 ③, 4 ④, ...).
- Open the front flap 8 and free arm 10.
- Turn the handwheel 6 to yourself until the looper 22 is in the most favourable position for threading.
- Thread the upper and lower looper yarns as shown.
Thread tree 1 (on the right)
Thread guide 14 and thread guide plate 15 (on the right)
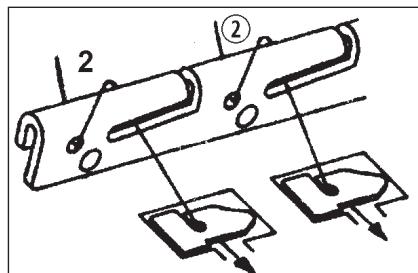
① Note:
The yarn must lie correctly between the two discs of the thread tension selector 2/13.
Thread tension selector 2 13
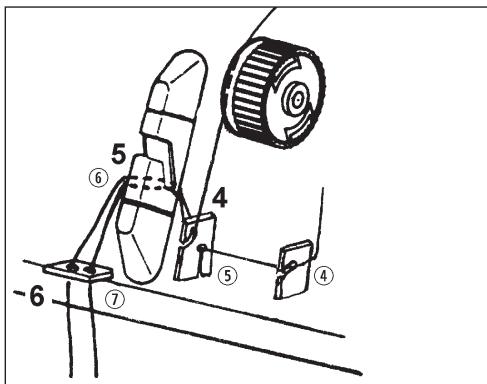
- Pull the end of the thread about 10cm(4^ ) out from the looper eyelet.
- Lift the sewing foot 19 and slide the thread under it; then lower the sewing foot 19 back down. The lever for lifting and lowering the sewing foot 19 is located at the rear of the machine, above the sewing lever rod system.

Position the lever to lift the sewing foot 19
Thread routing behind the front flap 8
Thread routing on from the thread guide plate 1
Threading yarns into the needle
For simplification, the individual steps are numbered on the illustrations (1 ①, 2 ②, 3 ③, 4 ④, ...).
- Turn the handwheel 6 to yourself until the needles stand fully at the top.
- Thread the left and right yarns as shown.
Thread tree ① (on the left)
Thread guide 14 and thread guide plate 15 (on the left)
① Note:
The yarn must lie correctly between the two discs of the thread tension selector.
Thread tension selector 1 12

Thread routing on from the thread guide plate 8
further thread routing
- Guide the yarn, as shown, from front to back through the eyes of the needles.
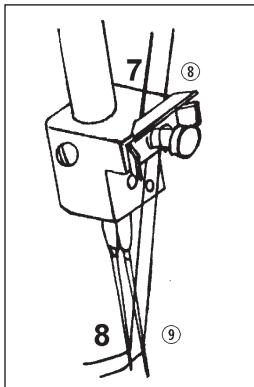
- Pull the end of the thread about 10cm(4^ ) out from the eyes of the needles. Lift the sewing foot 16 and slide the thread under it; then lower the sewing foot 16 back down. The lever for lifting and lowering the sewing foot 16 is located at the rear of the machine, above the sewing lever rod system.
Position the lever to lift the sewing foot 19
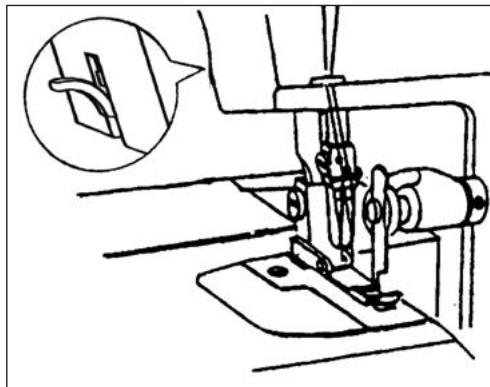
Trial run
When yarn has been threaded for the first time, or after a yarn breakage it must be rethreaded, proceed as follows:
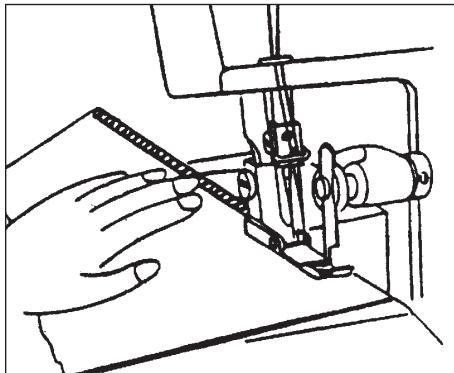
Lift the sewing foot 19.
Hold the ends of the threads between the fingertips of your left hand, slowly turn the handwheel ⑥ two or three times towards yourself and then check the threads once again.
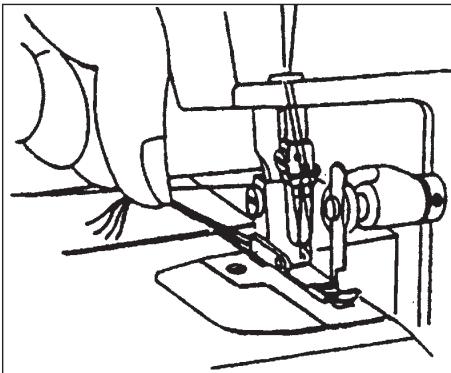
Lay the material for a trial run under the sewing foot 19 and slowly start to sew.
The material will be automatically fed through.
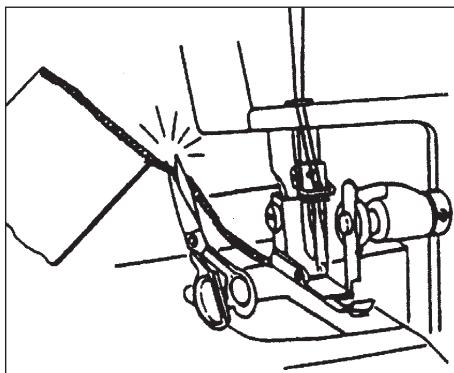
When the task is complete, continue sewing until an approximately 5cm (2") long length of threads has formed at the end of the material.
Cut through the threads with scissors.
Setting the thread tension
The thread tension required is variable, being dependent itself on the type and thickness of the thread and fabric.
Check the seams and then adjust the appropriate thread tension on the machine.
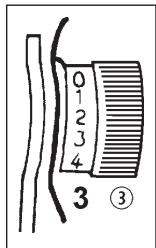
Tensioning the thread
When you turn the tensioning device to a lower number, the tension reduces.
When you turn the tensioning device to a higher number, the tension increases. The wheels of the tensioning device have the following colours:
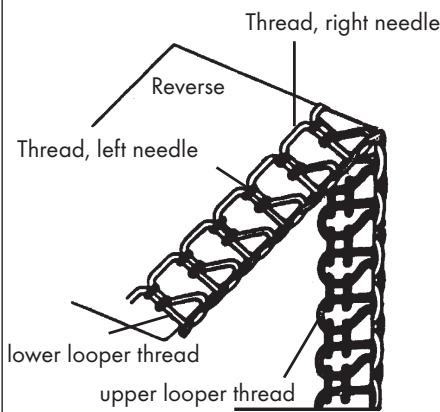
Correct thread tension:
Adjusting thread tension on the needle threads
The tread tension on the left needle is too loose.
Adjust tension on the left thread.
The tread tension on the right needle is too loose.
Adjust tension on the right thread.
Adjusting thread tension on the looper threads
The lower looper thread is firm and/or the upper looper thread is loose.
Loosen the tension of the lower looper thread and/or tighten the upper looper thread.
The upper looper thread is firm and/or the lower looper thread is loose.
Loosen the tension of the upper looper thread and/or tighten the lower looper thread.
Overview of the machine adjustments
The most appropriate thread tension adjustment for one type of material is not necessarily the ideal adjustment for a different material.
The thread tensions required are dictated by the pliability and thickness of the material as well as the type and thickness of the thread.
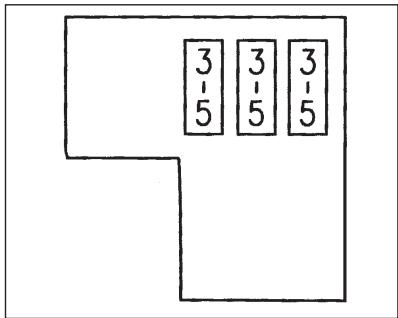
When necessary, adjust thread tensions as per this table:
| Fabric | Thread | Needles | Stitch length | Thread tension adjustment |
| Light: · Georgette · Muslin · Batiste · Dress fabric · Crepe de Chine · Silk | · Cotton · Polyester Nr. 80 - 100 | HA x 1 Nr. 11 130 / 705H Nr. 80 | 2.0 - 3.5 mm · Standard 2.5 mm | 2/4 2/4 2/4 |
| Medium weight: · Cotton · Poplin · Waterproofed cotton · Corduroy | · Cotton · Polyester Nr. 60 - 100 | HA x 1 Nr. 11 - 14 130 / 705H Nr. 80 - 90 | 2.0 - 3.5 mm · Standard 2.5 mm | 3/5 3/5 3/5 3/5 |
| Heavy: · Denim · Tweed · Velour | · Cotton · Polyester Nr. 50 - 80 | HA x 1 Nr. 14 130 / 705H Nr. 90 | 2.5 - 4.0 mm · Standard 3 mm | 5/7 5/7 3/5 3/5 |
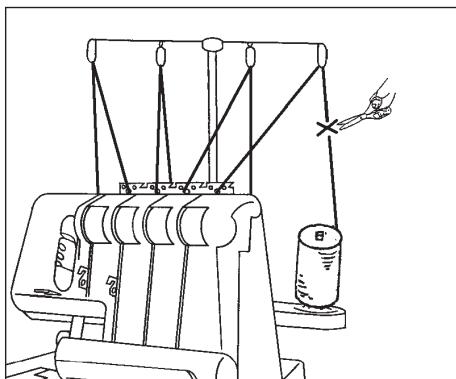
Changing threads (binding together)
With the following procedure, changing threads is quite simple:
- Cut the yarn above the spindle and knot the ends of the new and the old thread together.
- Place the thread tension selector 2/1/12/13 at "0" and lift the sewing foot 19.
- Pull on the other end of the yarn until the knot passes under the sewing foot 19.
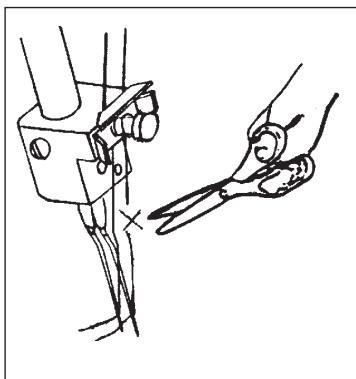
- For threading it in the needle, pull on the other end until the knot is in the eye of the needle and then cut the yarn to the left and right of the knot. Then carry out the rethreading.
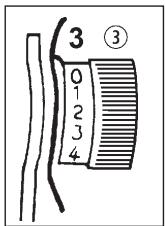
Setting the stitch length
The stitch length can be adjusted in nine steps, from 1.0 to 5.0mm . Almost all overlock work is carried out with a stitch length of 2.5 - 3.5mm Turn on the inner adjustment wheel for stitch length to adjust the stitch length:
| Stitch | Stitch length |
| Normal seams | 2.0 - 5.0 mm Standard: 3.0 mm |
| Narrow edgings | 1.0 - 2.0 mm |
| Hemstitching | 1.0 - 2.0 mm |
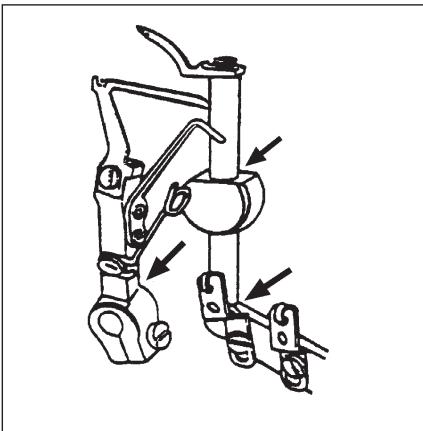
Setting the cutting width
The appropriate cutting width is, from material to material, variable. Each time test the seams and adjust the cutting width as follows:
- Turn the handwheel 6 towards yourself until the needles are in the lowest position.
- Open the front flap 8
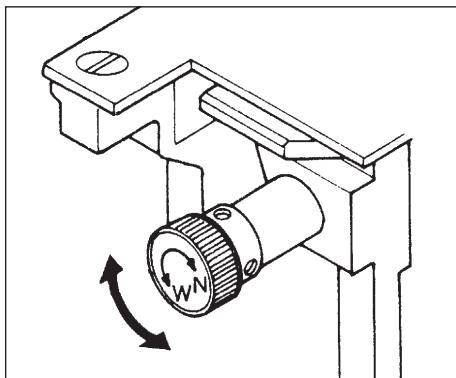
- Press the lever PUSH 24. The free arm 10 lowers itself and the adjustment wheel for the cutting width 18 can be seen.
- Turn the deutment wheel for the cutting width 10 With this you move the lower blade 20. Continue turning it until the looper threads are lying at the edge of the material. When you turn in the direction W (wide), the cutting width is broader. When you turn in the direction N (narrow), the cutting width is narrower.
Examples:
Select a narrower cutting width if the material edges ruffle during sewing. For this, turn the adjustment wheel for cutting width 18 to the right (N).
Select a larger cutting width if the yarn is being sewed beyond the material edge. For this, turn the adjustment wheel for cutting width 13 to the left (W).
Exchanging needles
Attention!
Before exchanging the needles, remove the power plug. This prevents an unintended starting of the machine. If you do not, you run a risk of serious injury!
- Turn the handwheel 6 towards yourself until the needles are in the highest position.
- Open the front flap 8 and lower the sewing foot 19.
-
Loosen the setscrew against the needle with the Allen key from the accessories box and then remove the needle:
-
upper left setscrew for the left needle
- lower right setscrew for the right needle.
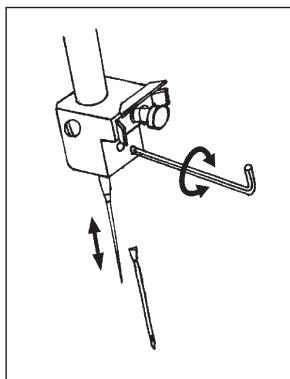
- Insert the new needle, with the flat side to the rear, into the needle mounting. Ensure that the needle is inserted as far as is possible. Secure the needle by retightening its setscrew.
When the needles have been correctly fitted, the left needle stands a little higher than the right needle. If the needles have not been correctly inserted, stitches will occasionally be left out when sewing.
This machine is equipped with needles of the type H.Ax1 (Needle system 130H) (for household machines).
Replacing bulbs
Risk of electric shock
When changing bulbs, ALWAYS remove the plug 27 from the mains power socket!
- Remove the small round cover with a needle or something similar.
- Unscrew the screw completely.
- Remove the lamp cover.
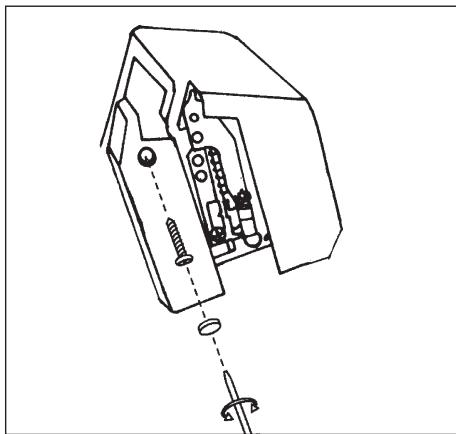
- Exchange the bulb. Use a bulb of the type E14, 15 W.
- Reassemble all of the parts in reverse order.
Exchanging the upper blade
Attention!
Before changing the blade 21, ALWAYS remove the plug 27 from the mains power socket. This prevents an unintended starting of the machine. If you do not, you run a risk of serious injury!
① Note:
The lower blade 20 is manufactured from a special material and normally does not need to be exchanged. Should it at some time become nonetheless damaged, please make contact with our Customer Services.
To exchange the upper blade 2 when it has become blunt:
- Open the front flap 8 and turn the handwheel 6 towards yourself until the needles are in the lowest position.
- Using the screwdriver, loosen the screw on the upper blade holder and remove the upper blade ②
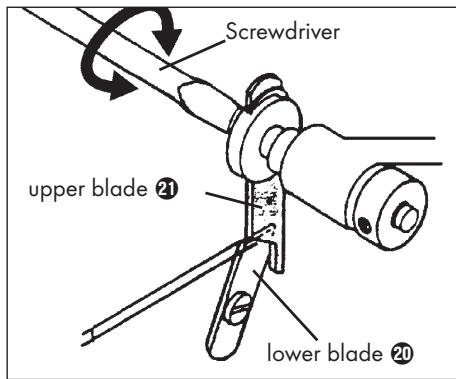
- Insert a new upper blade 21 and lightly tighten the screw on the blade holder.
- Adjust the upper blade 2 to that its cutting edge surmounts the cutting edge of the lower blade 20 by about 0.5 - 1.0mm
- Now firmly tighten the setscrew in the holder for the upper blade 21 and close the front flap 8.
Close and broad sewing with three threads
When sewing with this machine you can adjust from four to three threads.
Remove either the left or the right needle (see section "Exchanging needles") and the appropriate thread. The machine is now ready for sewing with three threads.
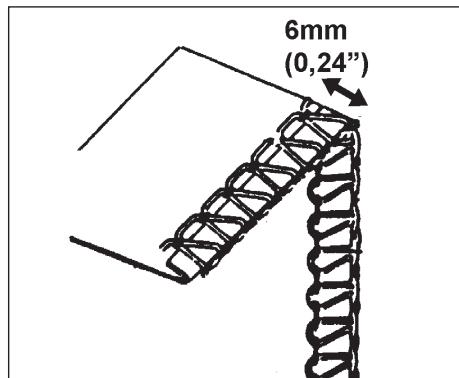
With exclusive use of the right needle, the stitching length amounts to 4mm (0.16^ )
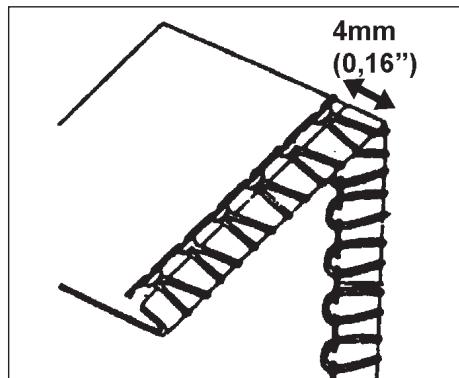
With exclusive use of the left needle, the stitching length amounts to 6mm (0.24^ )
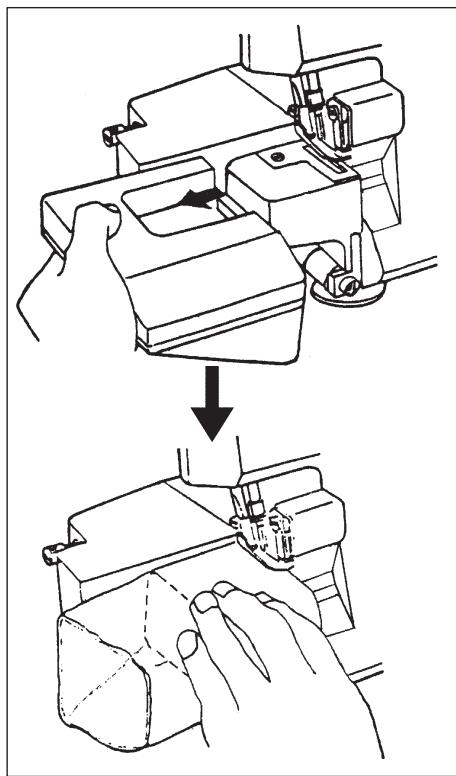
Sewing freehanded
Freehand operation is excellently suited for the sewing of trouser legs, sleeves and cuffs etc.
Remove the arm support 9, as shown in the illustration, to change from flatbed to free arm operation.
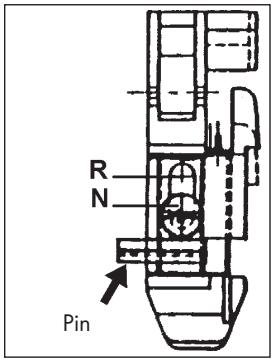
Adjusting the sewing foot
The special sewing foot is adjusted to the position N on the countersunk screw at the front of the sewing foot for normal sewing operations. Should you wish to sew a hemstitch, simply loosen the large screw lightly and slide the small pin, which protudes from the foot to the left, all the way in. Now the letter R stands on the screw.
Hemstitch and edging
For these two tasks proceed as follows:
- In the section "Adjusting the sewing foot" reread the instructions for adjusting the sewing foot 19.
- Turn the handwheel to yourself until the needles stand fully at the top.
- Open the front flap 8 and remove the left needle (see section "Exchanging needles").
- Adjust the stitching length to 1.0 - 2.0mm . Ensure that the adjustment wheel for the differential feed motion 17 is placed at "N".
- Adjust the stitching width as described in the section "Setting the cutting width".
- If a yarn is not threaded, now rethread a new yarn.
- Lay your material under the sewing foot 19 and start to sew.
① Note:
Before you begin to sew on your actual workpiece, always check the adjustments for stitching length and thread tension on a material remnant.
① Note:
Always remember to return the adjustment for the sewing foot 19 from this special to normal operation (sewing tasks) after the sewing of hems.
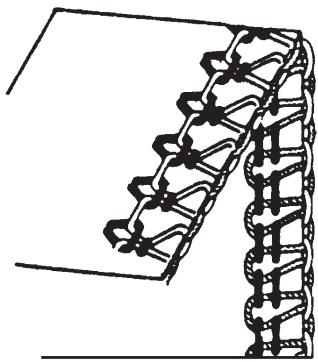
Sewing hemstitch
With the sewing of hemstitches the loops of the upper looper thread should be pulled back to the underside of the material. This is achieved by adjustment of the thread tension, as described in the section "Setting the thread tension".
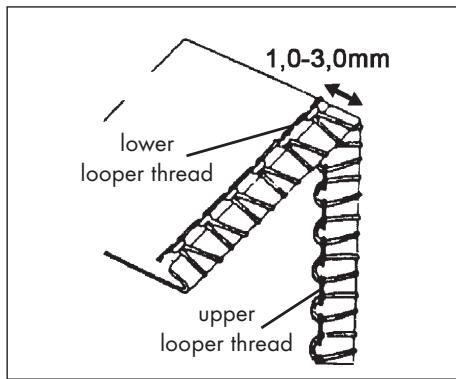
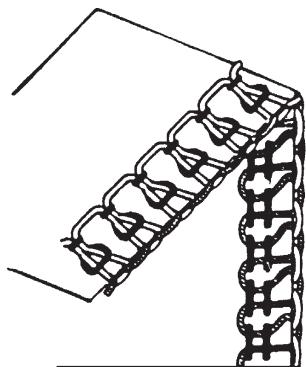
Sewing narrow edging
If you wish to sew very thin or light materials, select a suitable thread tension, as described in the section "Setting the thread tension".
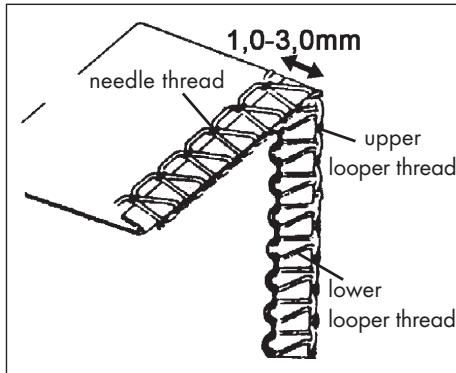
Important: If necessary, adjust the stitching length and cutting width.
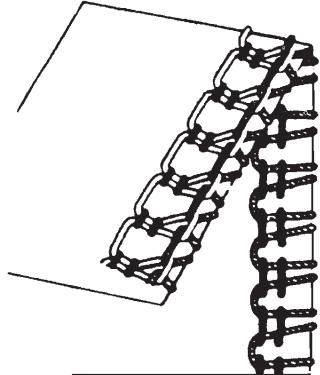
Hem stitching

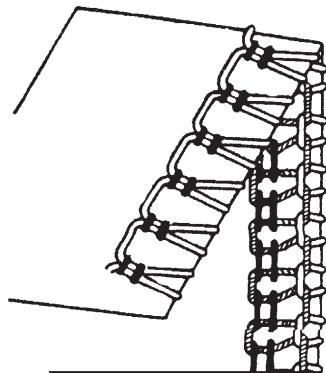
Edging
Differential feed motion
With the differential feed motion uneven seams are avoided in knitted materials, as well as the slippage of textile positions. Additionally, the seams cause no wrinkles in very light materials.
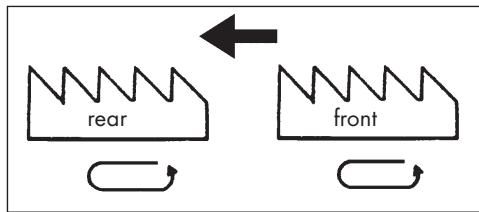
Manner of operation
The machine has two sets of toothed rack feeders, one to the front and one to the rear. Both sets move independant of each other. Through the differential feed motion both toothed rack sets can move themselves at various speeds.
The toothed transport racks move themselves in an elliptical motion and thus transport the material:
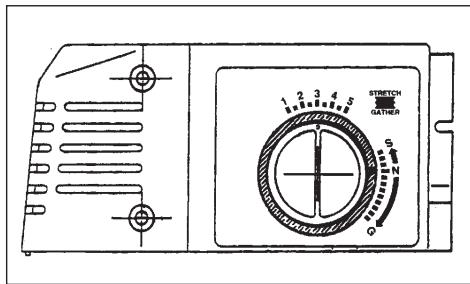
Setting the differential feed motion
The differential feed motion is adjusted to the desired direction simply by turning the adjustment wheel for the differential feed motion 17.
"N" = "Neutral Position", the toothed rack feeders move the material forward evenly.
"G" = "Gather Position", the front toothed rack feeders push the material forward faster than the rear ones. Thereby, elasticated material is not extended.
"S" = "Stretch Position", the rear toothed rack feeders push the material forward faster than the front ones. Thereby, the front toothed rack feeders hold the material tautly.
The differential feed motion can also be adjusted during sewing.
Uneven material edges and smoothness
To obtain precise flat edges when sewing elasticated materials, the front toothed rack feeders must push forward faster than the rear ones, so that the material is not stretched. For smoothness the front toothed rack feeders must also work faster than the rear ones. With a larger stitching length the material stays easily smooth. Place the differential feed motion at "G".

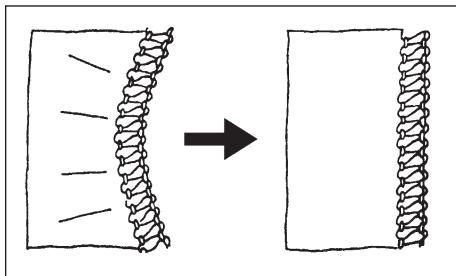
Avoid ruffles by stretching
To avoid seams casting wrinkles in very light materials or fine nylons, the rear toothed rack feeders must work faster than the front ones. Thereby the front toothed rack feeders hold the material taut so that it does not ruffle. Place the differential feed motion at "S".
Troubleshooting
| Problem | Cause | Solution |
| Needles break | • Needles are bent, blunt or damaged at the points. | • Fit new needles. |
| • Needles are not correctly inserted. | • Insert the needles into the retainers correctly. | |
| • You have pulled the material too heftily. | • Carefully guide the material with both hands. | |
| Thread breaks | • Yarn has not been correctly threaded. | • Thread the yarn correctly. |
| • Thread tension is too high. | • Reduce the thread tension. | |
| • Needles are not correctly inserted. | • Insert the needles into the retainers correctly. | |
| Stitches are omitted | • Needles are bent, blunt or damaged at the points. | • Fit new needles. |
| • Needles are not correctly inserted. | • Insert the needles into the retainers correctly. | |
| • Yarn has not been correctly threaded. | • Check the course of the individual threads. | |
| • Incorrect needles are fitted. | • Use the correct needles (HA x 1 or 130/705H) | |
| Stitches are irregular | • Thread tension is not correct. | • Correct the thread tension. |
| • Thread is trapped. | • Check the course of the individual threads. | |
| Seams cause wrinkles | • Thread tension is too high. | • Adjust the thread tension. |
| • Yarn has not been correctly threaded. | • Thread the yarn correctly. | |
| • Thread is blocked. | • Check the course of the individual threads. | |
| • Differential feed motion not adjusted. | • Place the differential feed motion at "S". | |
| Material is not cut off cleanly | • Upper blade ➂ is blunt or incorrectly inserted. | • Change the blade ➁ or insert it correctly. |
| Material edges ruffle themselves | • Too much material in a stitch. | • Alter the seam width. |
Cleaning and care
Attention:
ALWAYS remove the plug ⑦ from the mains power socket before cleaning or lubricating the machine. Otherwise there is the risk of you receiving an electric shock!
To ensure that your machine works faultlessly at all times, it must occasionally be cleaned with a brush. This machine requires very little lubrication, as the main components are manufactured from a special material.
Only occasionally lubricate the designated positions:
Storage
Attention:
ALWAYS remove the plug 2 from the mains power
socket before storing the machine.
This prevents an unintended starting of the machine.
When the machine is not in use, always cover it with the hood. This will protect the machine from dust. Store the machine at a clean and dry location.
Disposal

Do not dispose of the appliance in your normal domestic waste. This product is subject to the provisions of European Directive 2002/96/EC.
Dispose of the appliance through an approved disposal centre or at your community waste facility. Observe the currently applicable regulations. In case of doubt, please contact your waste disposal centre.

Dispose of all packaging materials in an environmentally friendly manner.
Warranty and Service
This appliance comes with a 3 year warranty Purchase date. This appliance has been manufactured with care and meticulously examined before delivery. Please retain your receipt as proof of purchase. In the case of a warranty claim, please make contact by telephone with our service department. Only in this way can a post-free despatch for your goods be assured.
The warranty covers only claims for material and manufacturing defects, not for wearing parts or for damage to fragile components, e.g. buttons or batteries. This product is for private use only and is not intended for commercial applications.
In the event of misuse and improper handling, use of force and interference not carried out by our authorized service branch, the warranty will become void. Your statutory rights are not restricted in any way by this warranty.
GB DES Ltd
Units 14-15
Bilston Industrial Estate
Oxford Street
Bilston
WV147EG
Tel.: 0870/787-6177
Fax: 0870/787-6168
e-mail: support.uk@kompernass.com
IE Kompernass Service Ireland
Tel: 1850930412 (0,082 EUR/Min.)
Standard call rates apply. Mobile operators may vary.
e-mail: support.ie@kompernass.com
Importer
KOMPERNASS GMBH
BURGSTRASSE 21
44867 BOCHUM, GERMANY
www.kompernass.com