Smaragd 91527 - Bike rack Pro-User - Free user manual and instructions
Find the device manual for free Smaragd 91527 Pro-User in PDF.
| Brand | Pro-User |
| Model | Smaragd 91527 |
| Product type | Towbar bike rack |
| Capacity | 2 bicycles |
| Net weight | 13 kg |
| Maximum load on bike rack | 60 kg |
| Recommended total weight (rack + bicycles) | Do not exceed permissible towbar load (generally 75 kg) |
| Lighting power supply | 7 or 13 pin towbar socket |
| Main material | Aluminium |
| Main functions | Bicycle transport, signal lighting, tilt mechanism for boot access, anti-theft locking |
| Assembly | Partially pre-assembled, manual step-by-step assembly |
| Vehicle attachment | Quick coupling with key lock |
| Bicycle installation | Wheel gutters with tie-down straps, adjustable frame supports |
| Maintenance and cleaning | Regularly check tightening and lighting; clean with a soft cloth |
| Safety | Key lock for quick coupling and frame supports; observe maximum load |
| Spare parts | Available (e.g. access wheel gutter ref. 91549, 3-bike extension ref. 91531) |
| General information | 56-page instruction manual included; compatibility with standard towbar |
Frequently Asked Questions - Smaragd 91527 Pro-User
User questions about Smaragd 91527 Pro-User
0 question about this device. Answer the ones you know or ask your own.
Ask a new question about this device
Download the instructions for your Bike rack in PDF format for free! Find your manual Smaragd 91527 - Pro-User and take your electronic device back in hand. On this page are published all the documents necessary for the use of your device. Smaragd 91527 by Pro-User.
USER MANUAL Smaragd 91527 Pro-User
UK: Assembly instruction and safety regulations
natural_image
Black-and-white photo of a bicycle being lifted by an open trunk into a parked car, with trees and a fence in the background (no visible text or symbols)Pro User
Europese typegoedkeur/Europäische Zulassung/European permission/Certification Européenne e4*79/488*87/354*0069*02
INHOUDSOPGAVE/ INHALTSVERZEI CHNIS/TABLE OF CONTENTS/ TABLE DES MATIÈRES
| E | n | g | l | i | s | h | ||||||||
| -Mounting | the | bike | carrier | 30 | ||||||||||
| -Mounting of the bike carrier onto the towbar | 34 | |||||||||||||
| -License | plate | holder | and | Lighting | 36 | |||||||||
| -Tilting | mechanism | 3 | 7 | |||||||||||
| -Mounting of the bikes on the bike carrier | 38 | |||||||||||||
| - | l | m | p | o | r | t | a | n | t | i | n | f | ||
| - | A | c | c | e | s | s | o | r | y | |||||
| - | P | a | r | t | s | l | i | s | t | |||||
| -Explosion | drawing | 4 | 2 | |||||||||||
natural_image
Mechanical device with lever and adjustment knob (no visible text or symbols)
natural_image
Exterior view of a metallic mechanical device with four clamps and mounting points (no text or symbols visible)

De montage:
natural_image
Close-up of a metallic mechanical clamp bracket with bolts and mounting base (no visible text or symbols)natural_image
Exterior view of a metallic cylindrical device with black clamps and a handle, mounted on a stand (no visible text or symbols)Stap 2
Onderdelen:

natural_image
Mechanical device with metallic frame and black clamps, no visible text or symbols
natural_image
White table tennis paddle with two black clips attached, no text or symbols visible
De montage:

natural_image
Close-up of mechanical components including a metallic cylindrical part and a metal bracket (no visible text or symbols)natural_image
Mechanical device with metallic frame and adjustable arms, no visible text or symbolsStap 3
Onderdelen:

De montage:
natural_image
Exterior view of a modern building with balconies and decorative wall art (no visible text or symbols)
natural_image
Close-up of a hand holding a small object inside a black plastic panel (no visible text or symbols)natural_image
Close-up of a mechanical assembly with metallic components and mounting brackets (no visible text or symbols)natural_image
Front view of a silver SRARAGD vehicle with multiple camera clips and headlights (no visible text or symbols on the vehicle body)MONTAGE VAN DE FIETSDRAGER OP DE TREKHAAK
natural_image
Close-up of a mechanical switch mechanism with directional arrows and a lock, no visible text or symbols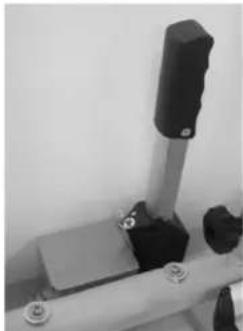
natural_image
Mechanical assembly with a vertical cylindrical component mounted on a metal rod, no visible text or symbolsnatural_image
Close-up of a hand operating a cylindrical mechanical device with adjustment knobs and a black knob (no visible text or symbols)natural_image
Close-up of a mechanical device with arrows indicating direction, no visible text or symbolsnatural_image
Close-up of a mechanical device with a black arrow pointing to a small component (no visible text or symbols)natural_image
Close-up of a black mechanical device with directional arrows and lock symbols, no readable text or labels present.
natural_image
Close-up of a black remote control panel with grid patterns and a 'Pro User' label (no readable text beyond label)DE VERLICHTING
natural_image
Black-and-white photo of a white car with a mounted anti-tank vehicle labeled 'SMARAGD' on a paved surface, no visible text or symbols on the vehicle itself.KANTELMECHANISME
natural_image
Black-and-white photo of a damaged car trunk with open trunk, next to a metal clamp on a paved path (no visible text or symbols)natural_image
Close-up of a mechanical device with black and white components, no visible text or symbols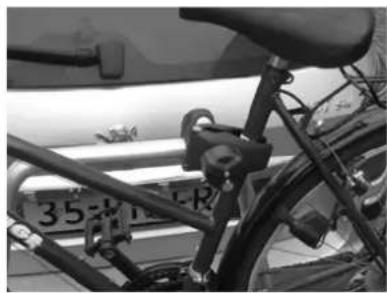
natural_image
Close-up of a bicycle's front wheel and side seat, showing no visible text or symbols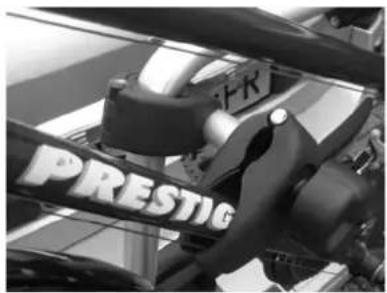
natural_image
Close-up of a mechanical assembly with visible 'PRESTIG' branding (no readable text beyond label)natural_image
Close-up of a mechanical lever with a knob and handle (no visible text or symbols)natural_image
Close-up of a curved metal pipe with attached black-and-white striped strap, mounted on a concrete structure (no visible text or symbols)natural_image
Black and white striped fabric with a metallic object at the bottom (no text or symbols visible)
natural_image
Technical line drawing of a mechanical assembly with no visible text or symbols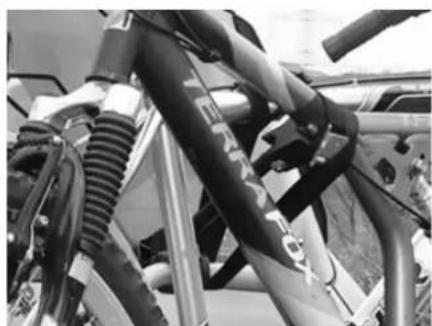
natural_image
Close-up of bicycle suspension system components (no visible text or symbols)BELANGRIJKE INFORMATIE
natural_image
Close-up of a mechanical lever mechanism with a knob and control panel (no visible text or symbols)natural_image
Black-and-white photo of bicycles parked on a paved pavement next to a parked car (no visible text or symbols)natural_image
Close-up of a mechanical component with a metallic tool interacting with a cylindrical body (no visible text or symbols)natural_image
Two black-and-white photos: one showing a metal rod with attached clips, the other showing a metal rack with multiple wheels and a vehicle parked nearby (no visible text or symbols)text_image
Technical diagram of a mechanical device with numbered components for identification and assembly reference.natural_image
Mechanical device with lever and adjustment knob (no visible text or symbols)
natural_image
Mechanical assembly with four metallic cylindrical components and black clamps, no visible text or symbols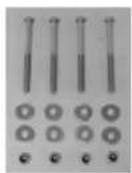
Die Montage:
natural_image
Close-up of a metallic mechanical clamp or bracket with mounting bolts, mounted on a white base (no visible text or symbols)natural_image
Mechanical device with metallic frame and black clamps, no visible text or symbolsStep 2
Bauteile:
natural_image
Mechanical device with metallic frame and attached clamps, no visible text or symbols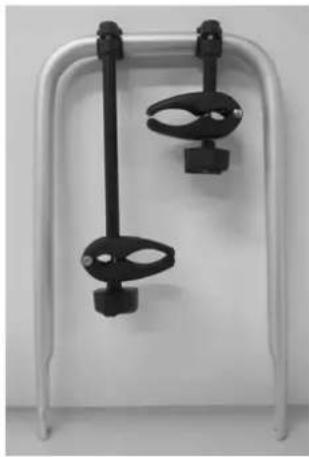
natural_image
White metal frame with two black clamps hanging from each other (no text or symbols visible)
Die Montage:
natural_image
Close-up of a mechanical device with metallic components and a cylindrical shaft (no visible text or symbols)natural_image
Mechanical device with metallic frame and black clamps, no visible text or symbolsStep 3
Bauteile:

Die Montage:
natural_image
Exterior view of a modern building with balconies and decorative windows (no signage)
natural_image
Close-up of a hand holding a small object inside a black plastic panel (no visible text or symbols)natural_image
Mechanical device with metallic frame and adjustable arms (no visible text or symbols)
text_image
SMARAGD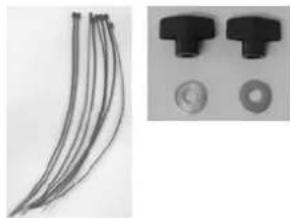
natural_image
Close-up of two black plastic components with circular end caps, alongside a bundle of thin wire connectors (no text or symbols visible)Die Montage:
natural_image
Close-up of a mechanical assembly with metallic components and mounting brackets (no visible text or symbols)natural_image
Exterior view of a modern office building (no signage)natural_image
Close-up of a mechanical switch mechanism with directional arrows and a lock, no visible text or symbols
natural_image
Close-up of a mechanical device with a black cylindrical component and metallic base (no visible text or symbols)natural_image
Close-up of a hand holding a metallic tool or device with a small black component, no visible text or symbols.natural_image
Close-up of a mechanical device with a black lever and lock mechanism, no visible text or symbolsnatural_image
Close-up of a white electronic device with a metallic knob and a black arrow pointing to it (no visible text or symbols)natural_image
Close-up of a black mechanical device with directional arrows and lock symbols, no readable text or labels present.
natural_image
Close-up of a black rectangular device with grid patterns and a labeled 'Pro User' tag (no readable text beyond label)DIE BELEUCHTUNG
natural_image
Rear view of a white car with a mounted anti-tank vehicle labeled 'SMARAGD' on a paved surface (no additional text or symbols visible)ABKLAPPMECHANISMUS
natural_image
Black-and-white photo of a car trunk with open lid and attached electrical device on cobblestone pavement (no visible text or symbols)natural_image
Close-up of a mechanical device with black and white components, no visible text or symbols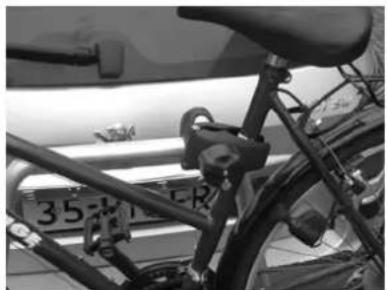
natural_image
Close-up of a bicycle's front wheel and side seat, showing no visible text or symbols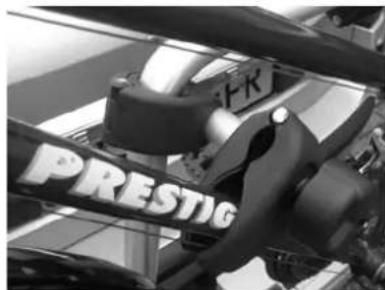
text_image
FR PRESTIGnatural_image
Close-up of a mechanical component with a knob and lever mechanism (no visible text or symbols)natural_image
Close-up of a curved metallic object with a patterned strap, mounted on a cylindrical base (no visible text or symbols)natural_image
Black and white striped fabric with a small metallic object on top (no text or symbols visible)
natural_image
Technical line drawing of a mechanical assembly with no visible text or symbols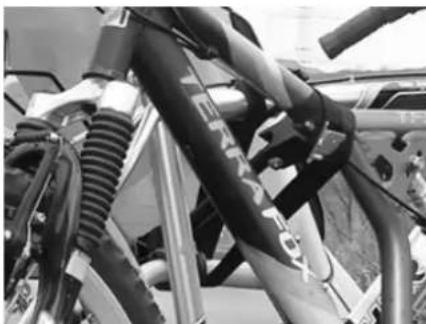
natural_image
Close-up of mechanical hoses and connectors in a workshop setting (no visible text or symbols)WICHTIGE INFORMATIONEN
natural_image
Close-up of a mechanical lever mechanism with a spherical head and control panel (no visible text or symbols)natural_image
Black-and-white photo of a bicycle parked on a paved pavement next to a car, no visible text or symbols.natural_image
Close-up of a mechanical component with a metallic tool interacting with a curved metallic body (no visible text or symbols)natural_image
Mechanical assembly with a long cylindrical component and multiple clamps (no visible text or symbols)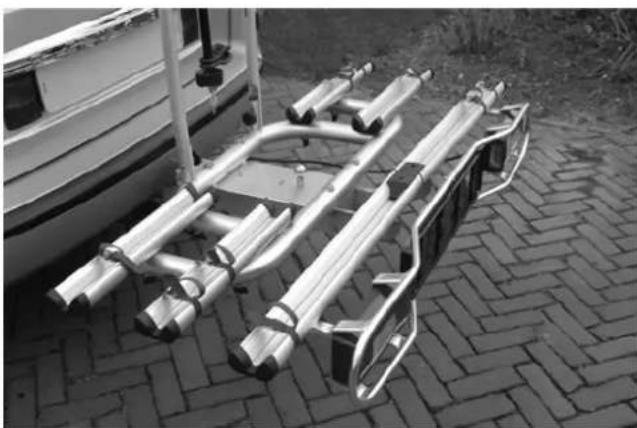
natural_image
Exterior view of a metal vehicle chassis mounted on a paved ground, with a small boat visible in the background (no text or symbols)text_image
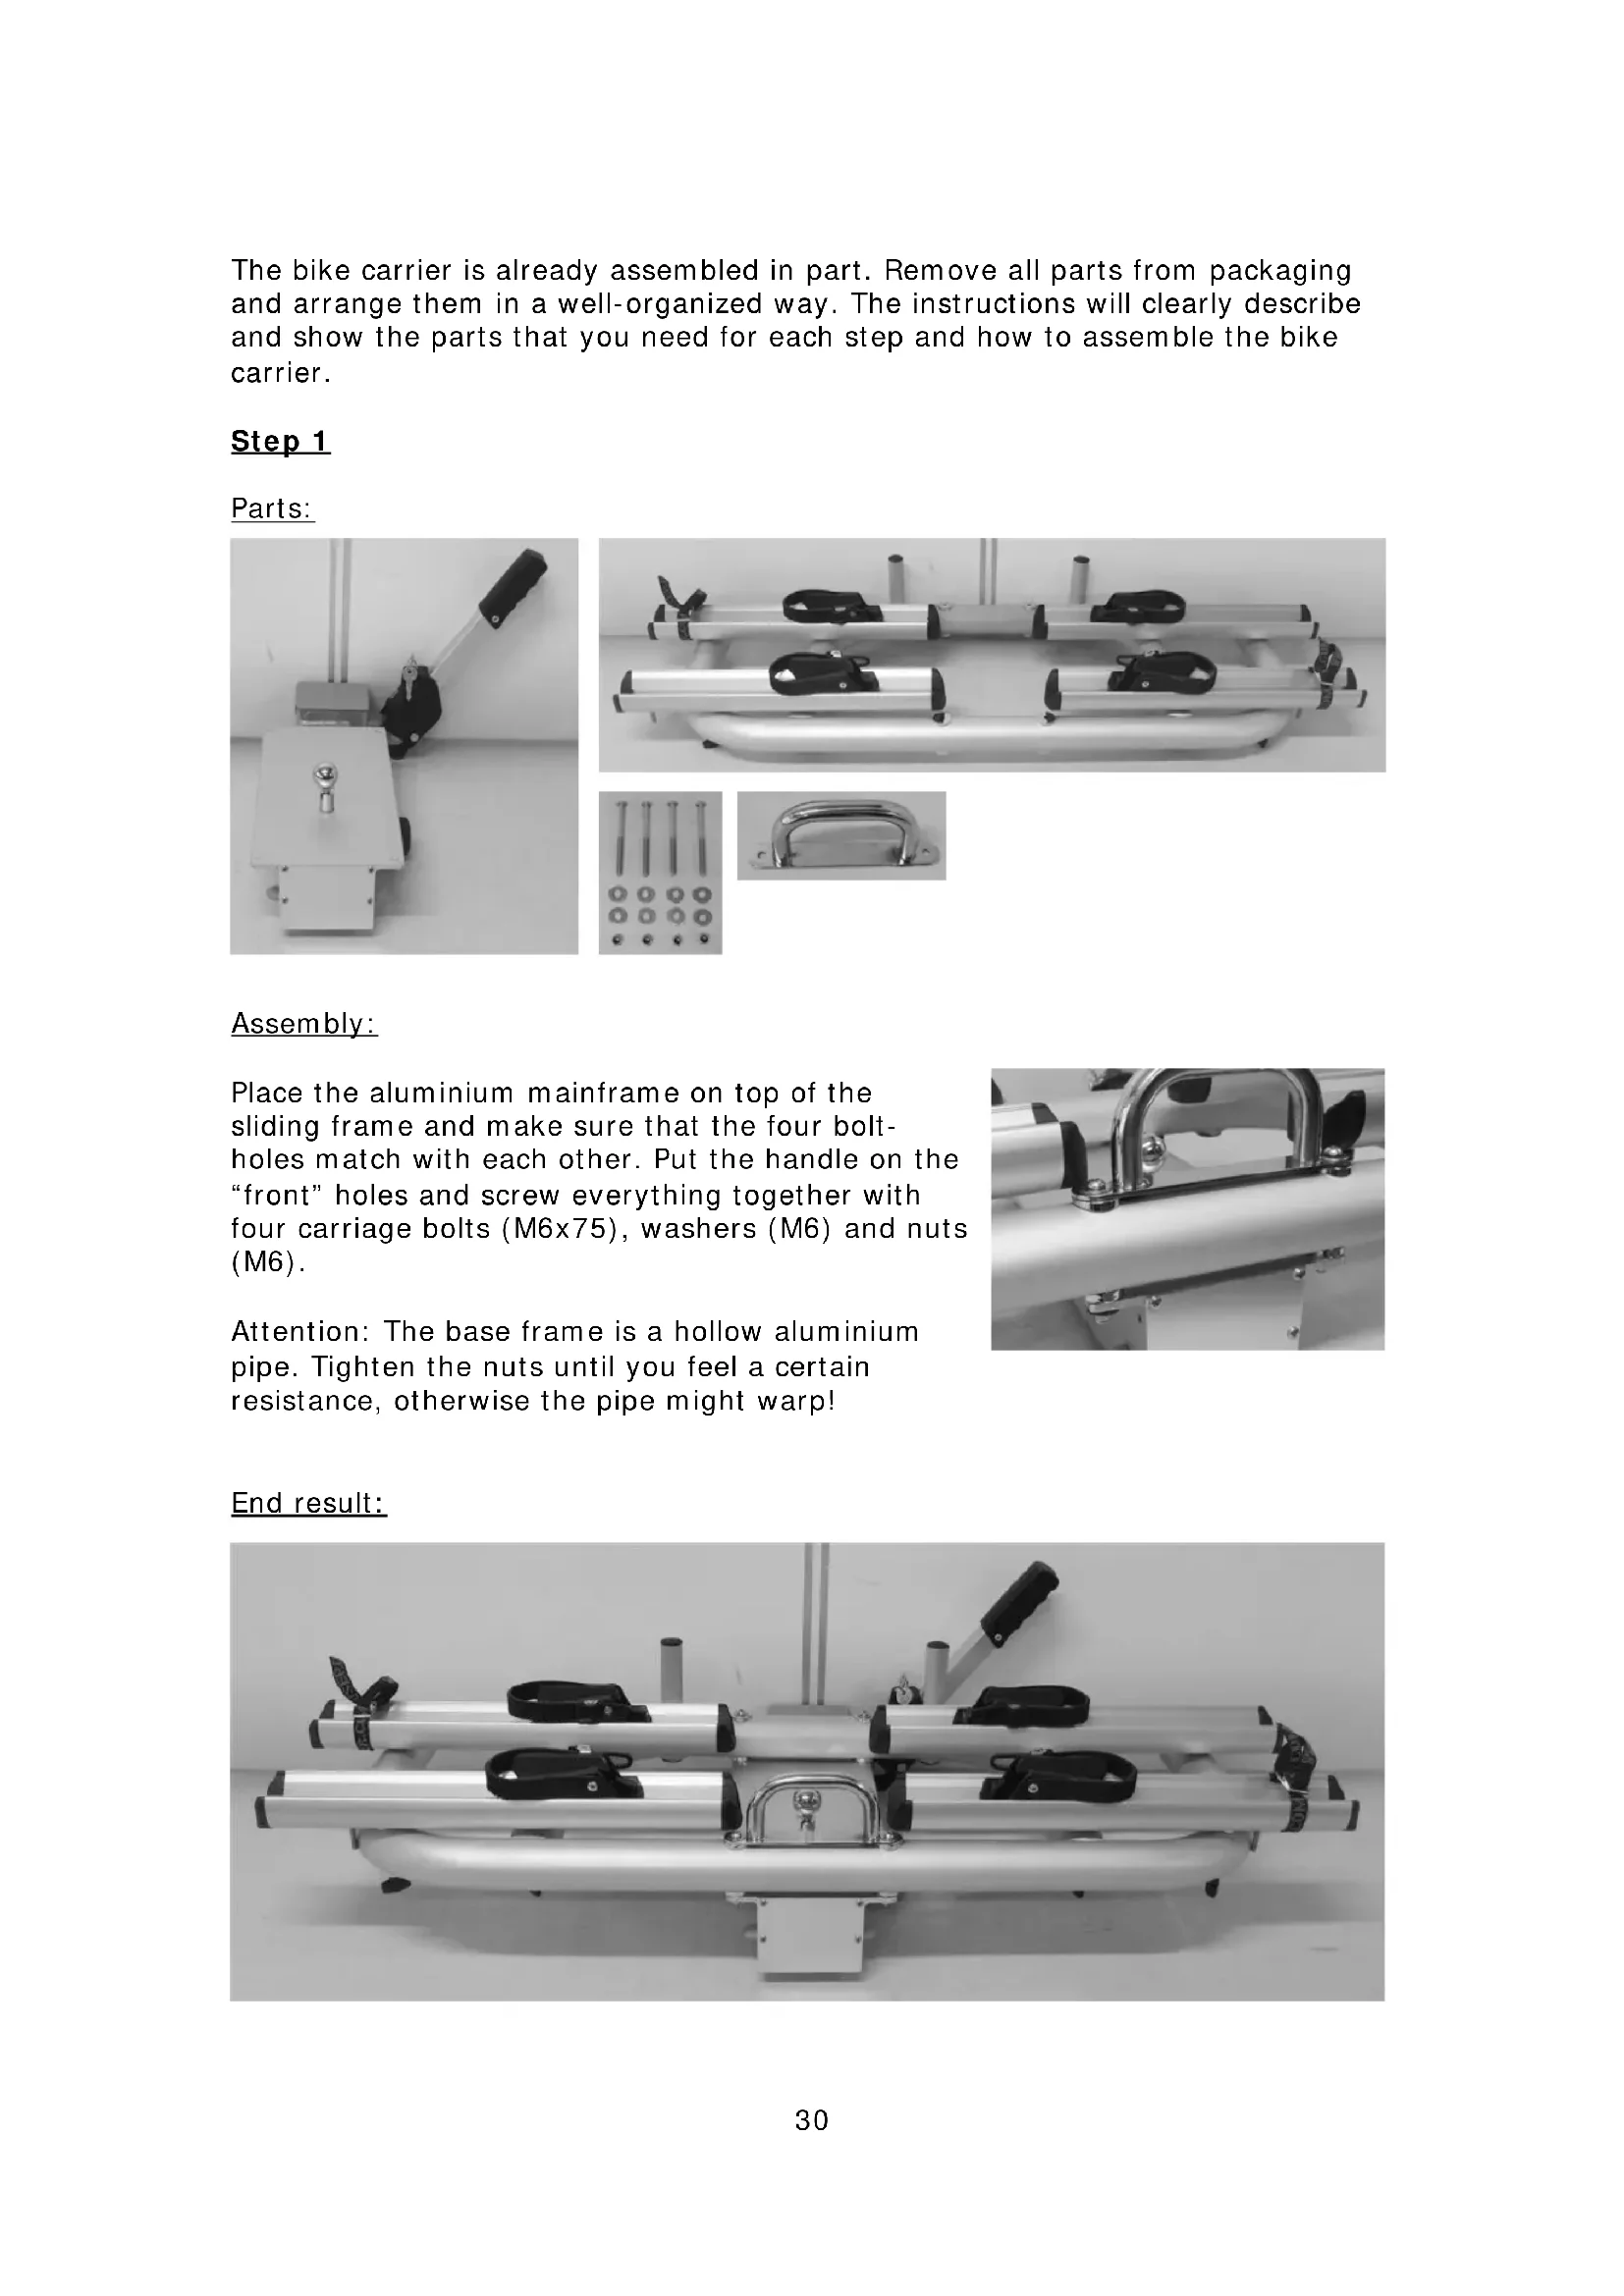
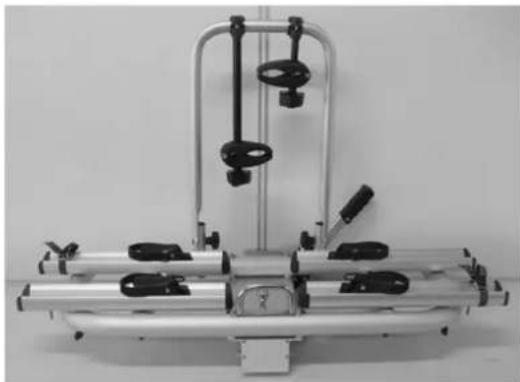
Technical diagram of a mechanical device with numbered components for identification and assembly reference.The bike carrier is already assembled in part. Remove all parts from packaging and arrange them in a well-organized way. The instructions will clearly describe and show the parts that you need for each step and how to assemble the bike carrier.
Step 1
Parts:
natural_image
Technical images of mechanical components including a lever, four clamps, and a handle (no visible text or symbols)Assembly:
Place the aluminium mainframe on top of the sliding frame and make sure that the four bolt-holes match with each other. Put the handle on the "front" holes and screw everything together with four carriage bolts (M6x75), washers (M6) and nuts (M6).
Attention: The base frame is a hollow aluminium pipe. Tighten the nuts until you feel a certain resistance, otherwise the pipe might warp!
natural_image
Close-up of a metallic mechanical clamp or bracket with bolts and metal components (no visible text or symbols)End result:

natural_image
Mechanical device with metallic frame and black clamps, no visible text or symbolsStep 2
Parts:

natural_image
Mechanical device with metallic frame and attached clamps, no visible text or symbols
natural_image
White metal frame with two black clamps hanging from each other (no text or symbols visible)
Assembly:

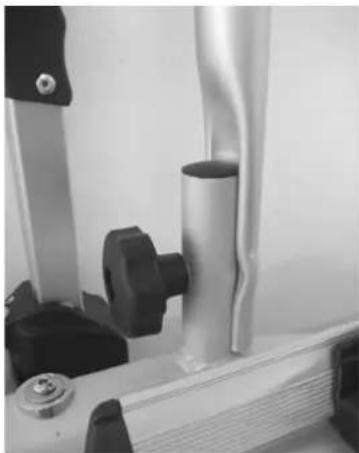
natural_image
Close-up of a mechanical device with metallic components and a cylindrical shaft (no visible text or symbols)Slide the Aluminium U-frame on the U-frame holders of the base frame. Secure this U-frame with the carriage bolts (M8x60), washers (M8) and plastic knobs (M8) supplied with the carrier.
End result:
natural_image
Mechanical device with metallic frame and adjustable arms, no visible text or symbolsStep 3
Parts:
Assembly:
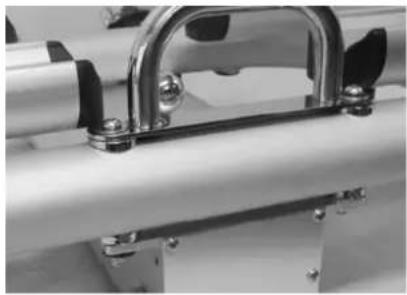
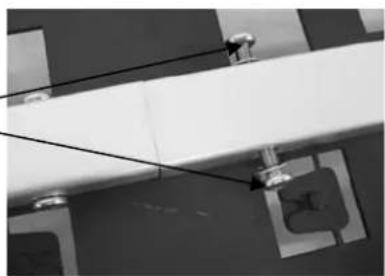
The lamps are already mounted on aluminium lamp holder. Slide the left and right part of the aluminium lamp holder including the license plate holder at the same time together.
text_image
SMARAGDFix the two aluminium lampholderparts by using the two supplied screws (M5x10) and washers(M5).
natural_image
Exterior view of a modern building with balconies and decorative windows (no visible text or symbols)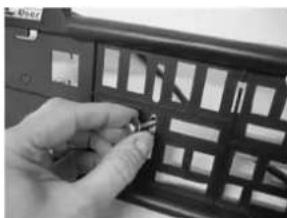
natural_image
Close-up of a hand holding a black plastic panel with grid patterns (no visible text or symbols)Finally fix the license plate holder on the aluminium lamp holder-tube by using the bolts (M5x25), washers (M5) and nuts (M5).
End result:

text_image
SMARAGDStep 4
Parts:
natural_image
Mechanical device with metallic frame and mounting bracket (no visible text or symbols)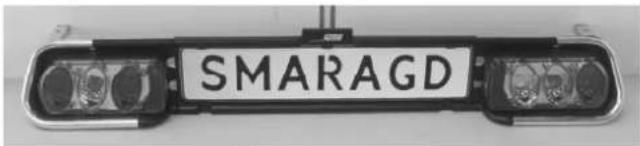
text_image
SMARAGD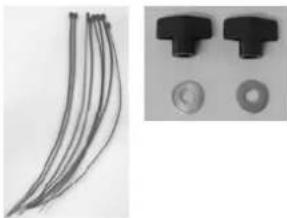
natural_image
Close-up of two black plastic components with circular features, one showing a bundle of curved wires (no text or symbols visible)Assembly:
The lights and number plate are mounted in a separate frame (light holder); this frame can be mounted to the carrier.
Insert the carriage bolts (on the bottom side of the front wheel holders) in the pre-drilled holes in the 'arms' of the light holder and tighten them with the washers (M6) and nuts (M6).
Make sure that the light holder is mounted in the middle of the carrier.
natural_image
Close-up of a mechanical assembly with metallic components and black clamps (no visible text or symbols)With the cable ties supplied with the carrier, the light cable can be fastened neatly at the bottom of the carrier.
End result:
natural_image
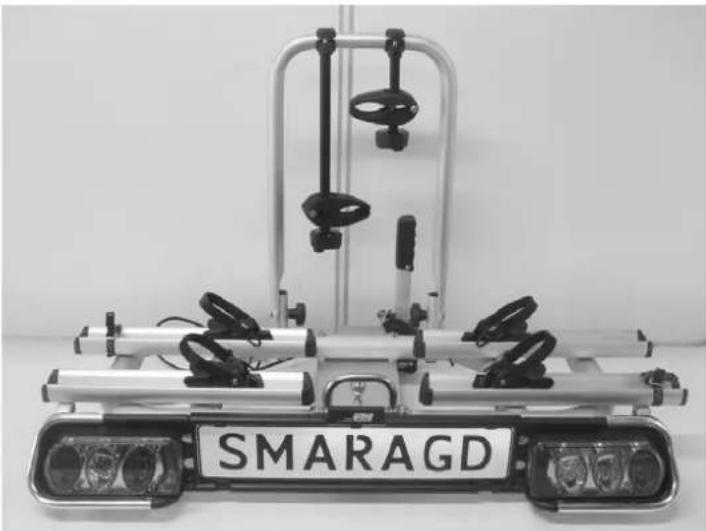
Exterior view of a modern vehicle-mounted vehicle with two front-mounted sensors and a metal frame (no visible text or symbols)MOUNTING OF THE BIKE CARRIER ON CAR
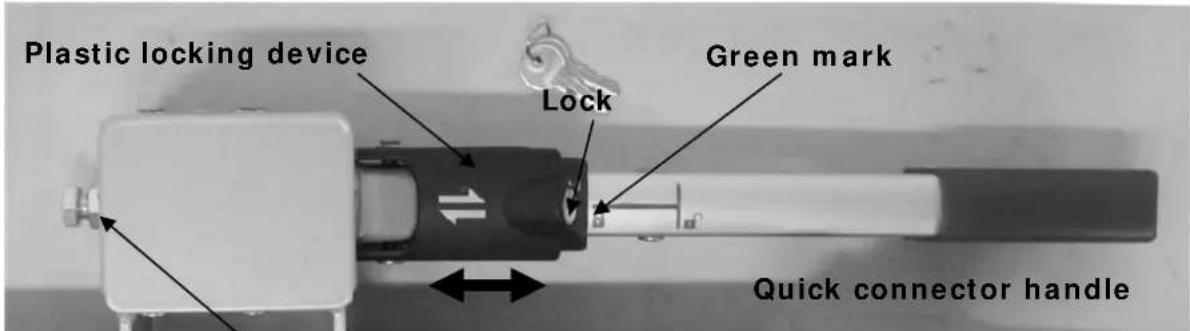
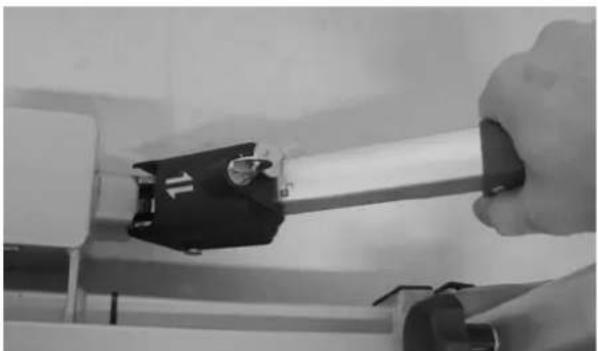
The first step is to become familiar with the quick connector.
text_image
Plastic locking device Lock Green mark Quick connector handleQuick connector adjustment screw
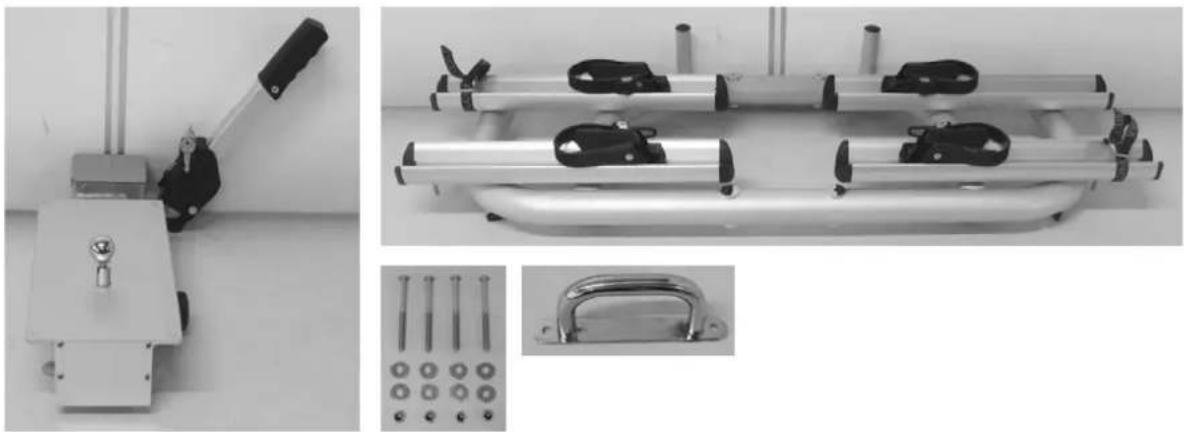
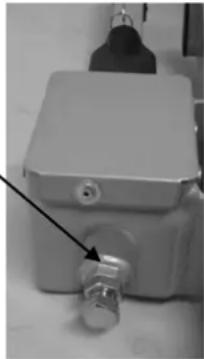
The quick connector consists of a case mounted to the bike carrier and a lever. Using the lever, you can close and open the quick connector. Using the sliding locking devise to lock the handle of the quick connector and finally lock the complete quick connector with the key (mandatory during use!).
When mounting the bike carrier to the car, it is best that the car is parked straight, the engine is turned off and the parking brake is activated. Make sure that the tow ball is undamaged, clean and not greasy!
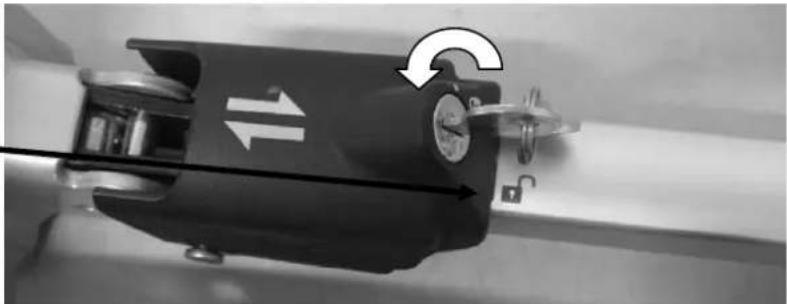
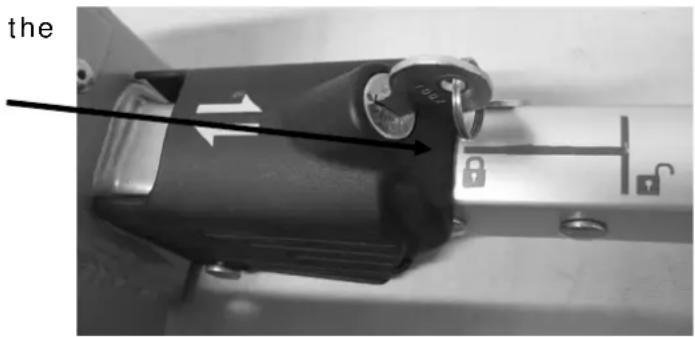
Open the lock of the plastic locking device with use of the supplied key. Turn the
key one quarter (key stands now vertical). Slide the plastic locking device to the right (only open red lock is visible on the handle).
natural_image
Close-up of a mechanical device with directional arrows and a dial indicator (no readable text or symbols)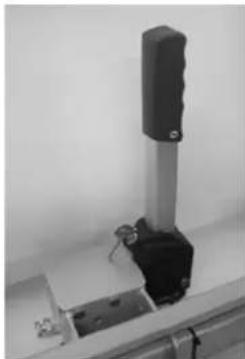
natural_image
Close-up of a mechanical testing setup with a vertical cylindrical component and metal base (no visible text or symbols)Release the quick connector by moving the handle in the vertical position.
Position the bike carrier on the tow-bal from the top. Press the handle of the quick connector downwards (approx. 35-40kg) until it stops (handle will stay stable in the horizontal position).
natural_image
Close-up of a hand holding a metallic tool with a black component, no visible text or symbolsSlide the plastic locking devise to the left until the green mark on the handle is 100% visible.
text_image
theNow test if the carrier is attached steady enough on the tow ball (and not easy to
twist). If not, you have to adjust the quick connector. Detach first the carrier by sliding the plastic locking device to the right and pull the handle up. Adjust the adjustment bolt (First release the locking nut, than adjust the bolt and finally lock it again with the locking nut). Test again if the carrier is stable enough on the tow bal (and not easy to twist). Repeat this until the carrier is completely stable. Caution: Always make sure that the locking nut of the adjustment bolt is tightened again!
natural_image
Close-up of a metallic industrial control box with a valve and connector (no visible text or symbols)When the bike carrier is not easy to turn anymore, the quick connector can be locked. Slide the plastic locking devise to the left until the green mark on the handle is 100% visible. Lock the quick connector with the key and take the key out (the red mark is on the position of the lock symbol). Keep it carefully on a safe place. The bike carrier is now also protected against theft.
natural_image
Close-up of a black mechanical device with directional arrows and a lock mechanism, mounted on a metal surface (no visible text or symbols)
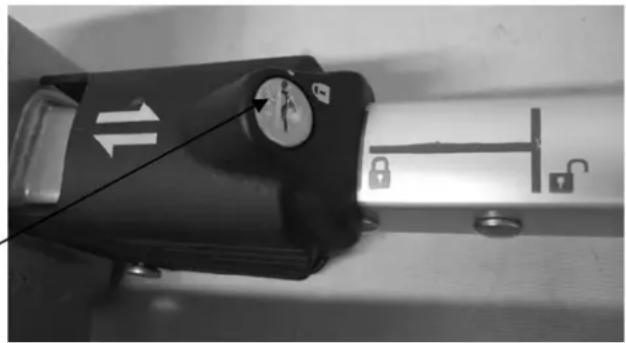
Always check if the quick connector is well secured! The green mark on the handle must be completely visible and the red dot on the lock must be at the same position as the lock symbol on the locking device.
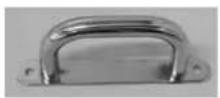
THE LICENSEPLATEHOLDER
The fastening clips to secure the number plate are incorporated in the back of the number plate holder and can easily be pressed out. Subsequently, use two clips to secure the number plate (at the bottom).

natural_image
Close-up of a black remote control panel with grid patterns and a 'Pro User' label (no readable text beyond label)LIGHTING
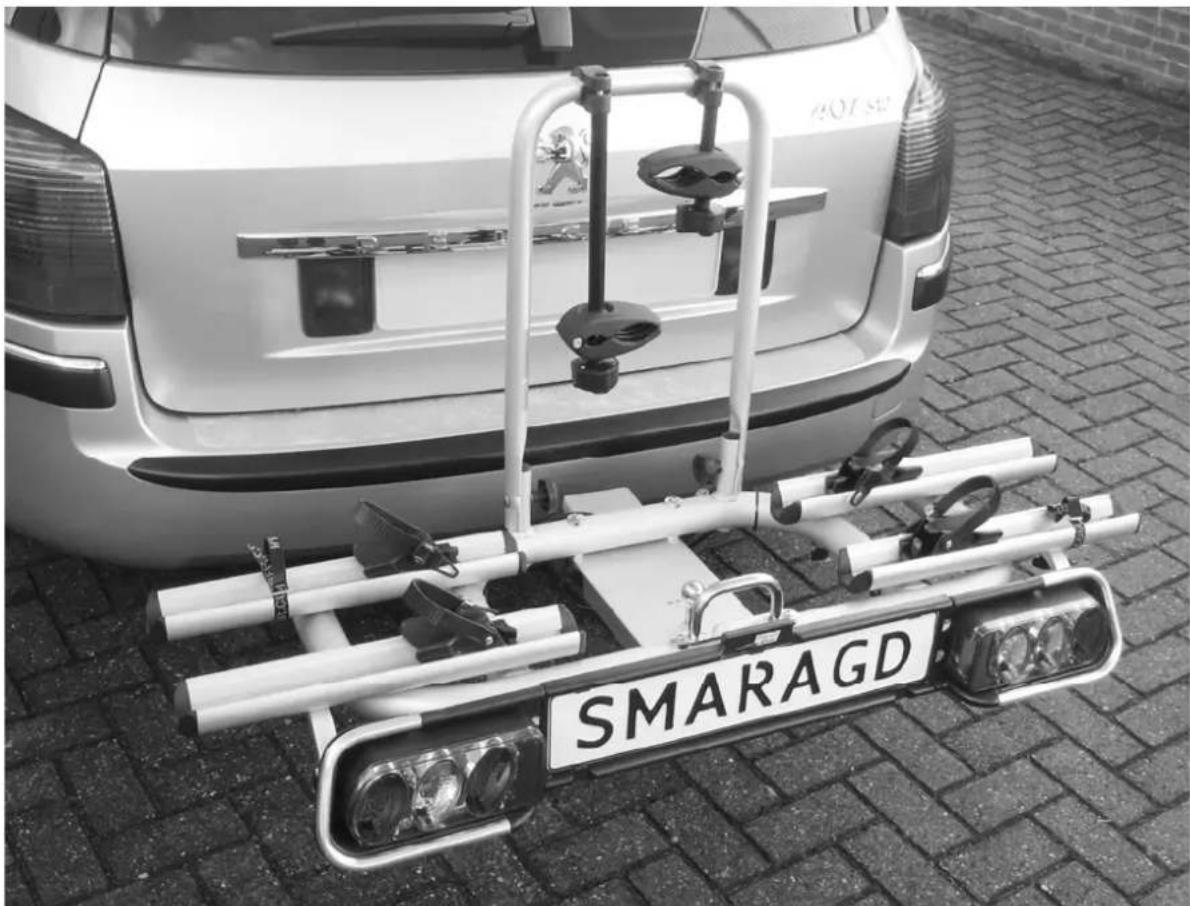
This bike carrier is equipped with a lighting system. This system can be connected to the towbar power socket of your car. Seeing that there are different kinds of sockets that require different kinds of plugs, this carrier comes with the usual 7-pin plug and the 13-pin plug (Jaegers). As a result, the carrier can be used with any towbar!
However, the rear fog light and reversing light only works with the 13-pin plug.
natural_image
Rear view of a white car with a mounted anti-tank vehicle labeled 'SMARAGD' on a paved surface (no additional text or symbols visible)TILTING MECHANISM
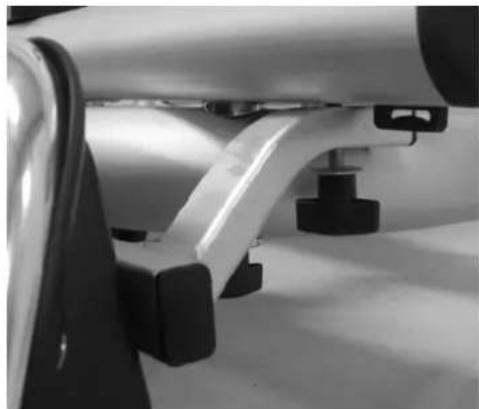
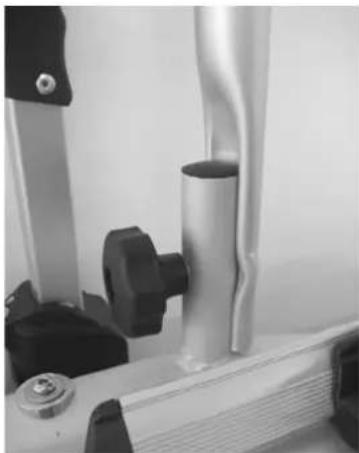
For easy access to your boot, even if the bikes are mounted on the carrier, you may use the tilting mechanism.
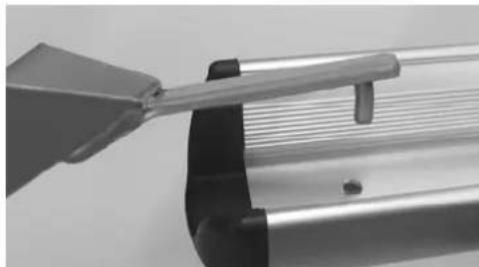
First you must release the locking. Start with loosening the rotary knob on the right side. Loosen it until you cannot loosen it any further.
Subsequently, you pull up the locking pin in the middle of the carrier and rotate it by a quarter turn (so that it stays released).
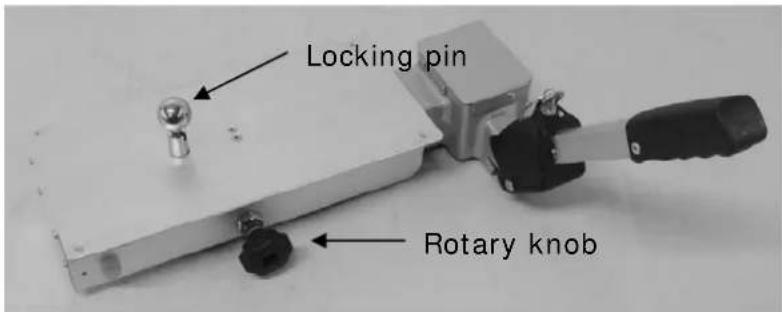
text_image
Locking pin Rotary knobWith one hand, keep a firm grip on the U-frame or the bikes, so that the carrier can not fall down in an uncontrolled movement. Pull the carrier carefully towards you (towards you!). Attention: Do NOT use the light holder to do this!
Now you can carefully tilt the carrier.
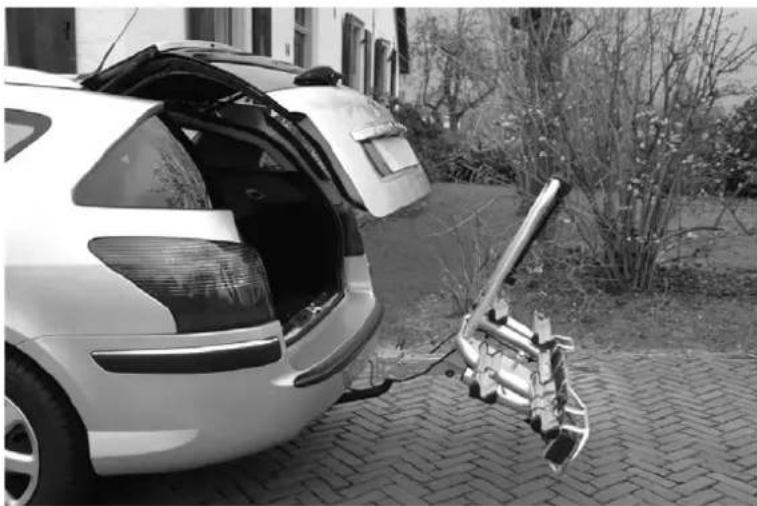
natural_image
Black-and-white photo of a car trunk with open doors and a metal device attached to the side, parked on a paved path near a building (no visible text or symbols)To return the carrier you must raise it first and then slide it back into the guide until it cannot go any further. Secure the locking pin and firmly tighten the rotary knob.

Attention: The carrier may never be used without both locking pins secured! Make sure that both locking pins are secured before you start driving!
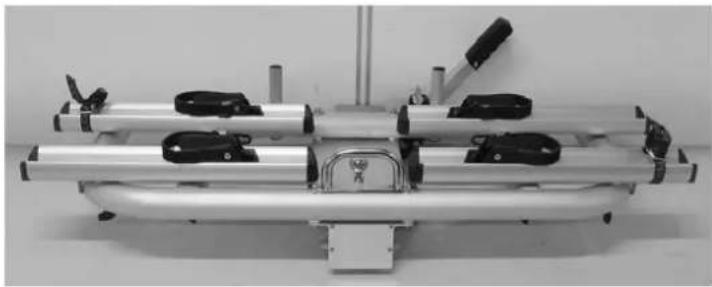
MOUNTING OF THE BIKES ON THE BIKE CARRIER
The first bike has to be placed in the rear wheel holder (the one which is the nearest to the car) and secured with the short frame holder on the U-tube. The ftameholders are flexible to place on the U-tube, and are also flexible to place on your bike. Try the first time which position in your situation works best (and most stable affirmative is). It is important to place the frame holder as high as possible, giving maximum stability.
natural_image
Close-up of mechanical components with no visible text or symbols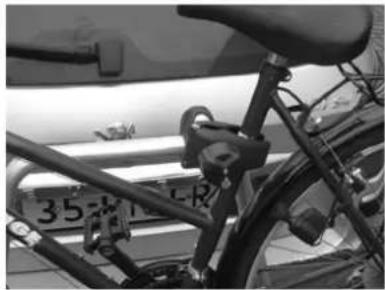
natural_image
Close-up of a bicycle frame with visible latches and a license plate (no readable text or symbols)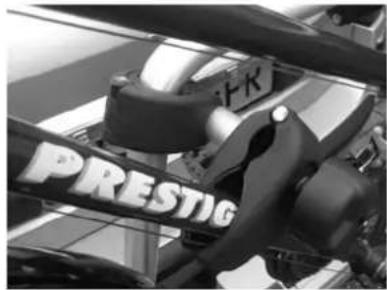
natural_image
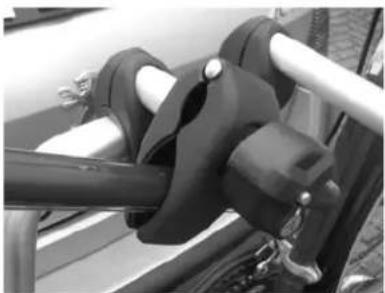
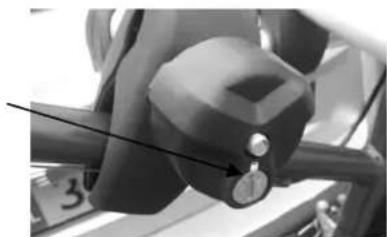
Close-up of a mechanical assembly with visible brand name 'PRESTIG' on the side (no additional text or symbols)You clamp the frame of the bike with the frame holder and turn the lockable
button tight. Always lock the frame clamp with the key (the "lock" sign on the button and the red sign on the metal plate indicate if the frame holder is locked or unlocked).
natural_image
Close-up of a mechanical component with a knob and arrow indicator (no visible text or symbols)You place the second bike in opposite direction in the second wheel holder and you secure it with the long frame holder.
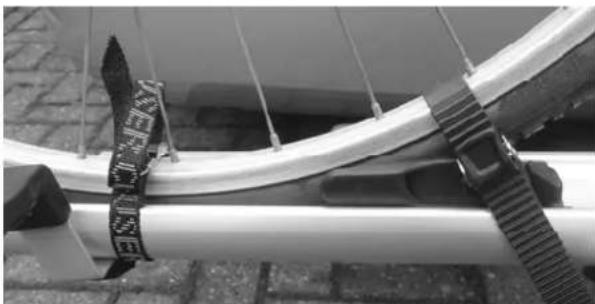
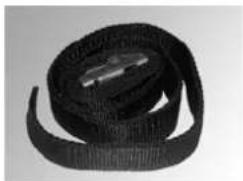
The wheels stand in the stable aluminium wheel holders and have to be blocked with the black "stoppers" while driving. Move the stoppers to the tyres (release the plastic button to slide the stopper). Finally you have to secure the wheels with the included straps. Please pay attention that the front wheel is attached using double straps!
natural_image
Close-up of a curved metallic pipe with attached black-and-white striped strap, mounted on a concrete ledge (no text or symbols visible)Now secure the bikes using the long safety belt. Run the safety belt through the bike frame and around the U frame and tighten firmly.
natural_image
Black and white striped fabric with a metallic object at the bottom (no text or symbols visible)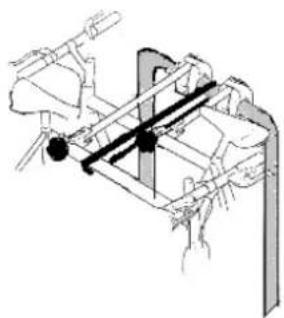
natural_image
Technical line drawing of a mechanical assembly with no visible text or symbols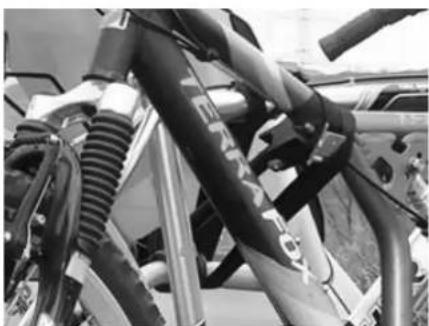
natural_image
Close-up of a motorcycle's front suspension system with visible hoses and brackets (no text or symbols)IMPORTANT INFORMATION
The carrier is suitable for the transport of two bikes at most. Please check the maximum permissible ball load. You can find it on the identification plate of the tow bar of your car (for most cars this is 75 kg). The total weight of the carrier with the bikes cannot exceed the maximum permissible ball load of the tow bar.
The maximum permissible load for the carrier itself may be 60kg. The net weight of the carrier is 13kg.
Each time after having mounted the carrier on the tow ball, it will "settle" during the first kilometres that you drive. Therefore, check if the carrier is still firmly secured after the first few kilometres and if necessary, tighten the locking bolt.
Take the carrier of the tow bar if not used.
Check the correct operation of the lighting at regularly.
Make sure that no parts of the bike can get lost during driving (pump, basket, saddlebags, etc.). Always remove these before driving!
Driving with a bike carrier affects the performance of your car. Adjust your speed accordingly. Try to avoid sudden braking and steering movements.
Please remember when driving in reverse that the car is longer than usual!
In addition, pay attention to the regulatory requirements applicable to the transport of goods at the back of your vehicle.
natural_image
Close-up of a mechanical lever mechanism with a spherical head and control panel (no visible text or symbols)ACCESSORIES (not included)
Ride-on ramp
natural_image
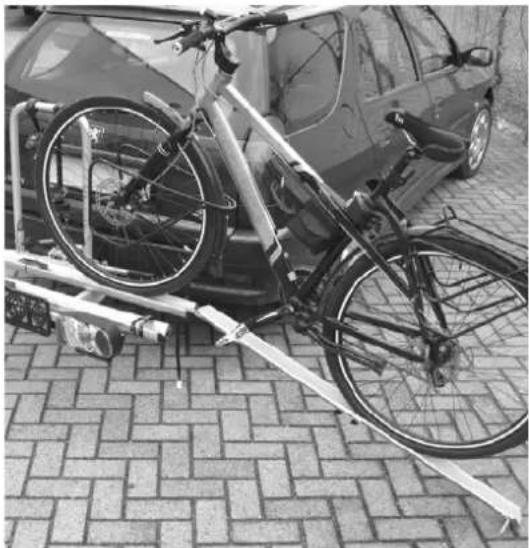
Black-and-white photo of a bicycle parked on a paved pavement next to a car, no visible text or symbols.With the optional ride-on ramp (Article 91549), you can really simply drive your bicycle on the bike carrier without lifting. To do this install the ride-on ramp onto the wheelholder using the pin and the special hole. As shown in the picture.
natural_image
Close-up of a mechanical component with a tool interacting with a metallic bracket (no visible text or symbols)Extension to three bikes
With the add-on accessory (article 91531), the Smaragd bike carrier can be extended for the transport of three bikes. Ask your Pro-User dealer for more information about the possibilities.

natural_image
Two black-and-white photos showing a metal rail vehicle with attached clips and a mounted rack-mounted frame on a paved ground (no text or symbols visible)Attention: With the add-on accessory, the weight of the bike carrier (excluding bikes) will increase to 15 kg!
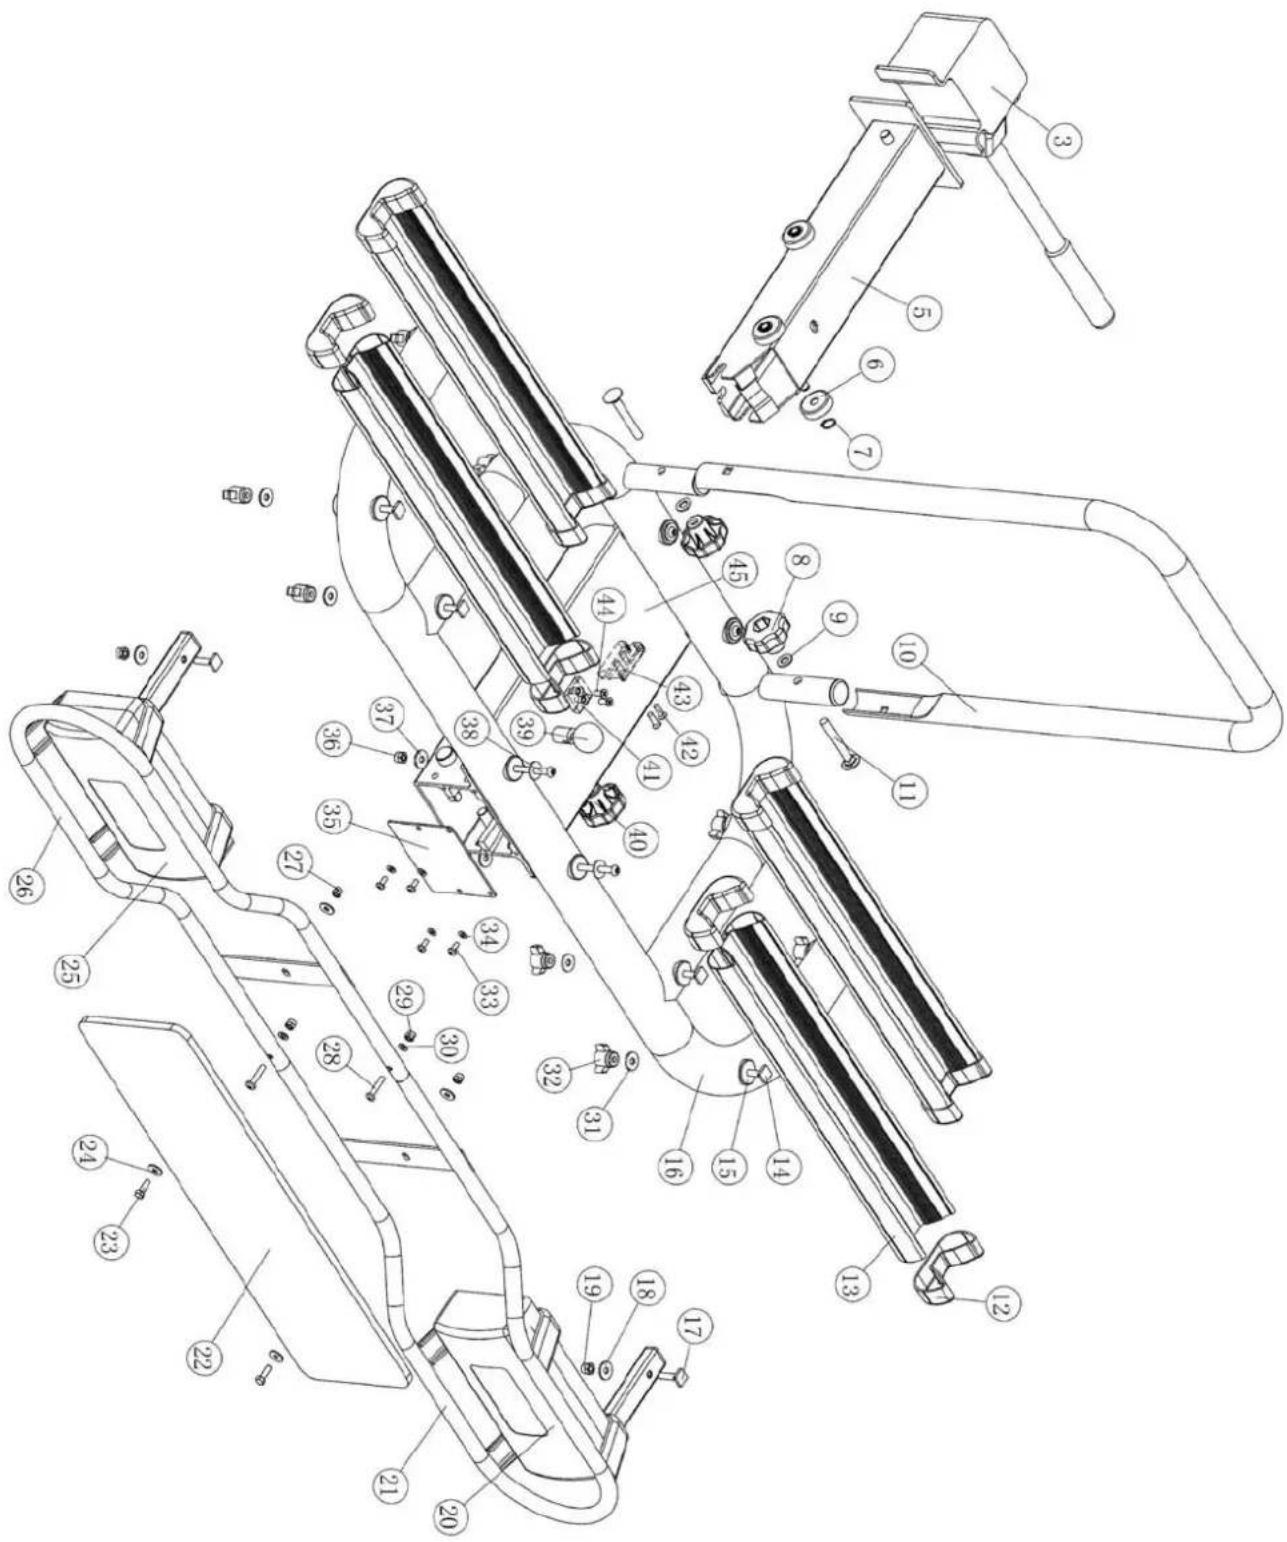
Partlist
| Posnr. | Description | Number | Size |
| 3 Quick connect coupling 1 | |||
| 5 Inner base frame 1 | |||
| 6 Plastic guider 4 | |||
| 7 Spring washer 4 | |||
| 8 Plastic knob 2 | M8 | ||
| 9 Washer 2 M8 | |||
| 10 U-Frame 1 | |||
| 11 Nut 2 M8x60 | |||
| 12 End cap wheel holder 8 | |||
| 13 Aluminum wheel holder | 4 | ||
| 14 Lock bolt (4-size head) | 8 M6x70 | ||
| 15 Plastic washer (chrome look) | 8 | ||
| 16 Aluminum base frame | 1 | ||
| 17 Lock bolt (4-size head) | 2 M6x25 | ||
| 18 Washer | 2 | M6 | |
| 19 Self locking nut | 2 M6 | ||
| 20 Right rear light unit | 1 | ||
| 21 Lamp holder rights | 1 | ||
| 22 License plate holder | 1 | ||
| 23 Hex head screw | 2 | M5x10 | |
| 24 Washer | 4 | M5 | |
| 25 Left rear light unit | 1 | ||
| 26 Lamp holder left | 1 | ||
| 27 Self locking nut | 2 M5 | ||
| 28 Hex head screw | 2 | M5x25 | |
| 29 Self locking nut | 2 M5 | ||
| 30 Washer | 4 | M5 | |
| 31 Washer | 8 | M6 | |
| 32 Plastic knob | 8 | M6 | |
| 33 Small bolt | 4 | M5x10 | |
| 34 Washer | 4 | M5 | |
| 35 Aluminum cover | 1 | ||
| 36 Self locking nut | 4 M6 | ||
| 37 Washer | 4 | M6 | |
| 38 Lock bolt | 4 | M6x65 | |
| 39 Security knob | 1 | ||
| 40 Plastic knob | 1 | ||
| 41 End stop | 1 | ||
| 42 Small bolt | 4 | M6x10 | |
| 43 Plastic end stop | 2 | ||
| 44 Small bolt | 2 | M6x5 | |
| 45 Aluminum base part (sleigh) | 1 | ||
Exploded drawing
text_image
Technical diagram of a mechanical device with numbered components for identification and assembly reference.natural_image
Close-up of a metallic mechanical clamp or bracket with mounting bolts, mounted on a white base (no visible text or symbols)natural_image
Exterior view of a metallic mechanical device with multiple lever arms and mounting base (no visible text or symbols)Etape 2
Eléments:

natural_image
Mechanical device with metallic frame and black clamps, no visible text or symbols
natural_image
White table tennis paddle with two black clips attached, no text or symbols visible
L'assemblage :
natural_image
Close-up of mechanical components including a metallic cylindrical part and a black-and-white tool holder (no visible text or symbols)natural_image
Mechanical device with metallic frame and adjustable arms, no visible text or symbolsEtape 3
Eléments:

L'assemblage:
natural_image
Mechanical device with metal frame and adjustable arms, no visible text or symbols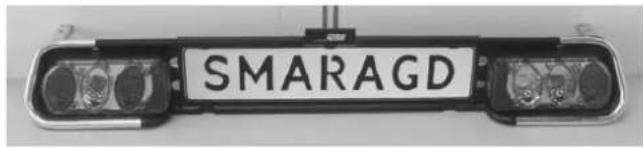
text_image
SMARAGD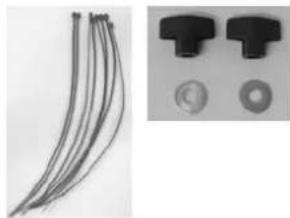
natural_image
Close-up of multiple black cable connectors and two circular components (no text or symbols visible)L'assemblage:
natural_image
Close-up of a metallic cylindrical mechanical component with attached clamps and mounting brackets (no visible text or symbols)natural_image
Exterior view of a modern office building (no signage)MONTAGE DU PORTE VELOS SUR L'ATTACHE-REMORQUE
natural_image
Close-up of a mechanical device with directional arrows and a lock mechanism (no text or symbols visible)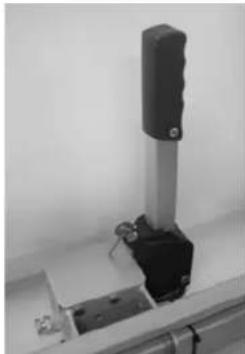
natural_image
Close-up of a mechanical clamp or lever assembly with metallic components and a black handle (no visible text or symbols)natural_image
Close-up of a hand holding a metal tool with a black component, no visible text or symbolsnatural_image
Close-up of a mechanical component with directional arrows indicating movement or force, no visible text or symbolsnatural_image
Close-up of a metallic mechanical device with a black arrow pointing to a small component (no visible text or symbols)natural_image
Close-up of a black mechanical device with directional arrows and lock symbols, no readable text or labels present.
natural_image
Close-up of a black rectangular device with grid patterns and a labeled 'Pro User' tag (no readable text beyond label)L'ECLAI RAGE
natural_image
Rear view of a white car with a mounted anti-tank vehicle labeled 'SMARAGD' on a paved surface (no additional text or symbols visible)MECANISME A BASCULE
natural_image
Black-and-white photo of a damaged sedan trunk with open trunk, next to a metal robotic arm mounted on a paved path (no visible text or symbols)natural_image
Close-up of a mechanical device with black and white components, no visible text or symbols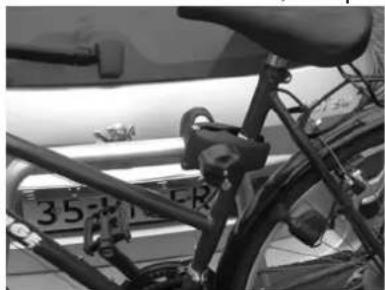
natural_image
Close-up of a bicycle frame with visible latches and license plate number 35 (no text or symbols on the frame itself)
text_image
FR PRESTIGnatural_image
Close-up of a mechanical lever mechanism with a knob and handle (no visible text or symbols)natural_image
Close-up of a curved metal pipe with attached black-and-white striped band, no visible text or symbolsnatural_image
Black and white striped fabric with a small metallic object on top (no text or symbols visible)
natural_image
Technical line drawing of a mechanical assembly with no visible text or symbols
natural_image
Close-up of a bicycle's front suspension system with black hoses and metal frame (no visible text or symbols)INFORMATIONS IMPORTANTES
natural_image
Black-and-white photo of a bicycle parked on a paved pavement next to a car (no visible text or symbols)natural_image
Close-up of a mechanical component with a tool interacting with a metallic rod (no visible text or symbols)natural_image
Mechanical assembly with a long cylindrical component and multiple clamps (no visible text or symbols)
natural_image
Black-and-white photo of a metal vehicle chassis mounted on a paved path, next to a small boat (no visible text or symbols)text_image
Technical diagram of a mechanical device with numbered components for identification and assembly reference.www.pro-user.com
2010