CD9180 - Cd player/recorder Soundmaster - Free user manual and instructions
Find the device manual for free CD9180 Soundmaster in PDF.
User questions about CD9180 Soundmaster
0 question about this device. Answer the ones you know or ask your own.
Ask a new question about this device
Download the instructions for your Cd player/recorder in PDF format for free! Find your manual CD9180 - Soundmaster and take your electronic device back in hand. On this page are published all the documents necessary for the use of your device. CD9180 by Soundmaster.
USER MANUAL CD9180 Soundmaster
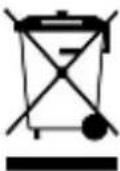
Do not dispose of this product with the normal household waste at the end of its life cycle. Return it to a collection point for the recycling of electrical and electronic devices. This is indicated by the symbol on the product, user manual or packaging.
The materials are reusable according to their markings. By reusing, recycling or other forms of utilization of old devices you make an important contribution to the protection of our environment.
Please contact your local authorities for details about collection points.

WARNING
Risk of electric shock Do not open!

Caution: To reduce the risk of electric shock, do not remove the cover (or back). There are no user serviceable parts inside. Refer servicing to qualified service personnel.
This symbol indicates the presence of dangerous voltage inside the enclosure, sufficient enough to cause electric shock.

This symbol indicates the presence of important operating and maintenance instructions for the device.
Safety, Environmental and Setup Instructions
- Use the device in dry indoor environments only.
- Protect the device from humidity.
- Do not open the device. RISK OF ELECTRIC SHOCK! Refer opening and servicing to qualified personnel.
- Connect this device to a properly installed and earthed wall outlet only. Make sure the mains voltage corresponds with the specifications on the rating plate.
Make sure the mains cable stays dry during operation. Do not pinch or damage the mains cable in any way. - A damaged mains cable or plug must immediately be replaced by an authorized service center.
In case of lightning, immediately disconnect the device from the mains supply. - Children should be supervised by parents when using the device.
- Clean the device with a dry cloth only.
Do NOT use CLEANING AGENTS or ABRASIVE CLOTHS!
- Do not expose the device to direct sunlight or other heat sources.
Install the device at a location with sufficient ventilation in order to prevent heat accumulation. - Do not cover the ventilation openings!
- Install the device at a safe and vibration-free location.
Install the device as far away as possible from computers and microwave units; otherwise radio reception may be disturbed. - Do not open or repair the enclosure. It is not safe to do so and will void your warranty. Repairs only by authorized service/ customer center.
- Only use mercury and cadmium-free batteries.
Used batteries are hazardous waste and NOT to be disposed of with the household waste!! Return the batteries to your dealer or to collection points in your community. - Keep batteries away from children. Children might swallow batteries.
Contact a physician immediately if a battery was swallowed.
- Check your batteries regularly to avoid battery leakage.
- Batteries shall not be exposed to excessive heat such as sunshine, fire or the like.
- CAUTION: Danger of explosion if battery is incorrectly replaced
Replace only with the same or equivalent type
Used batteries are hazardous waste and NOT to be disposed of with the household waste! As a consumer you are legally obligated to return all batteries for environmentally responsible recycling - no matter whether or not the batteries contain harmful substances!).
Return batteries free of charge to public collection points in your community or to shops selling batteries of the respective kind
Only return fully discharged batteries.
*) marked Cd = cadmium, Hg = mercury, Pb = lead
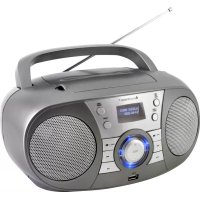
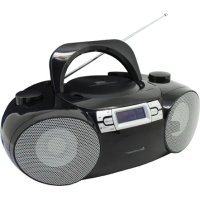
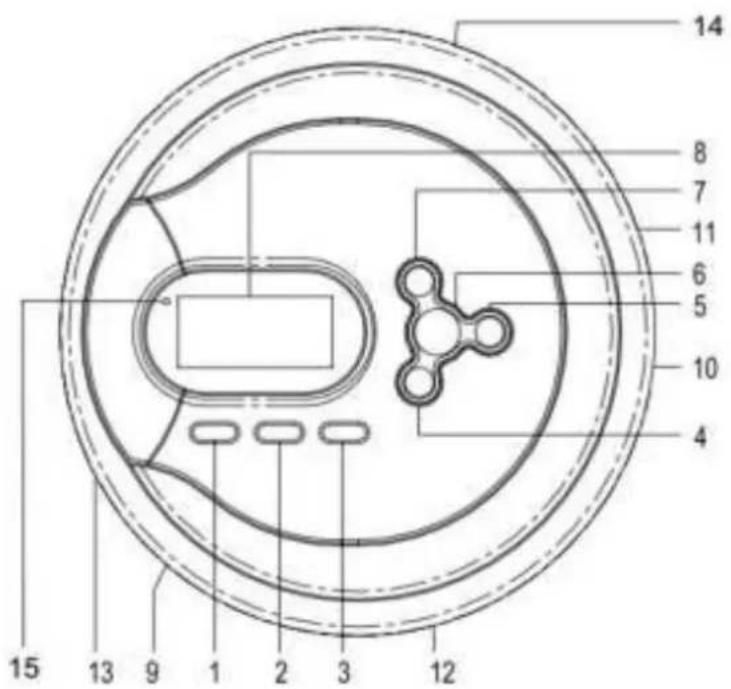
LOCATION OF CONTROLS
- Dir UP / ASP button
- EQ button
- MODE / PROG button
- SKIP / SEARCH DN button
- STOP button
- PLAY/PAUSE button
- SKIP / SEARCH UP button
-
LCD display
-
Battery compartment
- Open knob
- Volume knob
- Phone jack
- DC jack
- Recharge switch
- Recharge Indicator
PREPARATION BEFORE USING
Battery Installation
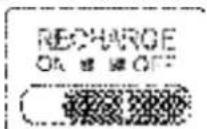
ATTENTION !!!
On operation with standard/conventional batteries, be sure that the charging switch „RECHARGE“ (14) is on „OFF“ position, otherwise the
batteries may become hot and may explode.
- Open Battery Compartment cover.
- Insert 2 batteries (UM-3, "AA", LR6 or equivalent) in the correct polarity as indicated. (Heavy duty batteries are recommended).
- Close the cover properly.
*In order to operate the player on batteries, the optional AC/DC adaptor must be disconnected from the DC 4.5V Jack.
AC-DC Adaptor
*Before connection, make sure the AC voltage of the adaptor correspond to your local AC outlet voltage.
- Plug the DC output of the adaptor to the DC 4.5V jack.
- Connect the adaptor (4.5V/600mA with polarity ( C1 - C2) ) to a power outlet.
This unit can fully recharge the specified rechargeable battery, in approximately 15 hours. The rechargeable batteries (NOT supplied) should be recharged before they are used for the first time because they are low in power or if they have not been used for a long period (over 60 days).
- Open the battery compartment cover and insert two of the recommended rechargeable batteries, matching polarity. (1.2V 650mA). (Both batteries must be of rechargeable nickel-cadmium type, otherwise the batteries may explode or leak.)
- Plug in the AC adaptor and set the Recharge switch to ON position to start charging. (Use only the AC adaptor supplied with the set for charging.)
- After 15 hours. Please unplug the AC adaptor and switch the Recharge switch to the off position.
(Do not charge continuously for 24 hours or more. Doing so can cause the performance of the rechargeable battery to deteriorate.)
Note : • You may play DISCS whilst charging the batteries.
- If the operating time decreases drastically even when the rechargeable nickel-cadmium batteries are properly recharge, purchase a new set of rechargeable nickel-cadmium batteries.
- When charging for the first time or after a long time, playing time may be reduced. In this case, charge and discharge the batteries several times.
DISC PLAYING
Sound Effects
During playback you can choose between the following Sound Effects:" BBS, Pop, Jazz, Rock, and Classic", by pressing EQ BUTTON repeatedly. To turn off the effects, press the EQ BUTTON repeatedly until the "Sound Effects" indicator disappears.
Getting Start
- Insert the headphone/earphone plug to PHONE JACK.
- Press the OPEN KNOB, and then the door opens, put a disc into the CD compartment with label side upward.
- Push the disc gently around the centre area until it clicks so that the disc fits into the pivot. (To remove the disc: pick up the disc, holding the edge, while pressing the pivot gently.)
- Close the door and press the PLAY/PAUSE BUTTON once.
- The Display will show the total number of tracks/files/directions of the disc, and then it begins to play the first track/file.
General Operation
PLAY/PAUSE BUTTON Press once to start playback in the original order. Press again to stop the disc play temporarily.
STOP BUTTON Press once to stop playback. Press again to turn off power.
SKIP/SEARCH BUTTONS Press once to skip to next track or back to previous track . Press continuously to search forward or backward
DIRUP/ASP BUTTON ASPON/OFF(ForCD).
Directory UP (For MP3 Disc).
Resume function
This player is equipped with a resume function, means CD-disc will automatic start at position, where CD-disc was stopped by last use. ATTENTION, this function works only, when no other CD-disc was insert in meantime into the player. If you wish to start with track 1, press FR button frequently until track 1 shown into display.
Automatic Turn Off (Auto Power Off)
If the player is in STOP mode for approximately 30 seconds, it will turn off automatically.
Various Playing Modes
MODE BUTTON — There are 3 kinds of function: (FOR CD):
A. Repeat Play
During Play Mode
- Press the MODE BUTTON once to play current track repeatedly.
The repeat indicator will appear in the display.
During Play Mode
- Press the MODE BUTTON twice to play the entire disc repeatedly.
The repeat indicator ALL will appear in the display.
NOTE = To cancel REPEAT PLAY simply press the MODE BUTTON until the repeat Indicator disappears.
B. Intro Scan,
During Play Mode
- Press the MODE BUTTON three times.
- The INT indicator will appear in the display.
- Press the PLAY BUTTON to play the first 10 seconds of each track on the disc.
NOTE - To cancel INTRO SCAN, simply press the MODE BUTTON until the INT indicator disappears.
C. Random Play
During Play Mode
- Press the MODE BUTTON four times.
The SHUF indicator will appear in the display. - Press the PLAY BUTTON, all the tracks on the disc will be played in random sequence.
After all the tracks have been played, the system will stop automatically.
NOTE - To cancel RANDOM PLAY, simply press the MODE BUTTON until the SHUF indicator disappears.
MODE BUTTON — There are 3 kinds of function: ( FOR MP3 DISC ) :
A. Repeat Play
During Play Mode
- Press the MODE BUTTON once to play current track repeatedly.
The repeat indicator > 1 will appear in the display.
During Play Mode
- Press the MODE BUTTON twice to play the ENTIRE DISC repeatedly.
- The repeat indicator will appear in the display.
During Play Mode
- Press the MODE BUTTON three times to play the current DIRECTORY repeatedly.
The repeat indicator will appear in the display.
NOTE - To cancel REPEAT PLAY, simply press the MODE button until the repeat indicator disappears.
B. Intro Scan
During Play Mode
- Press the MODE BUTTON four times.
- The INT indicator will appear in the display.
- Press the PLAY BUTTON to play the first 10 seconds of each track on the disc.
NOTE - To cancel INTRO SCAN, simply press the MODE BUTTON until the INT indicator disappears.
C. Random Play
During Play Mode
- Press the MODE BUTTON five times.
The SHUF indicator will appear in the display. - Press the PLAY BUTTON, all the files on a disc to be played in a random sequence and after all files are played, system will stop automatically.
NOTE - To cancel RANDOM PLAY, simply press the MODE BUTTON until the SHUF indicator disappears.
Program Play ( FOR CD )
- In stop mode, press the PROG BUTTON to make program memory.
- "..." will be displayed, "00" means track number to memory and "01" means program number.
- Press or button to select the desired track.
- Press the PROG BUTTON to enter the track into memory, the program numbers which will be increment one step.
※ The program no. "01" has become "02" on the display.
- Repeat step 3 and 4 until memory is full. (64 tracks)
- Press OK BUTTON to start the program play.
- To stop the program play, press the STOP BUTTON.
- For program play in step " 7 ", press the PROG BUTTON, then the oai BUTTON.
- To check the program memory, in program play mode, press the BUTFONS.
- To erase the program memory, open the door or turn off the power.
Program Play ( FOR MP3 )
- In stop mode, press the PROG BUTTON to make program memory.
- "PGM 000 01" will be displayed, "000" means file number, "01" means program number.
- Press the DIR UP/ASP BUTTON to select the desired directory, the display will become
"PGM 000 01 01", "01" means directory number.
- Press the or BUTTONS to select the desired file.
- Press the PROG BUTTON to enter the directory and file into memory. The program number which will be increment one step.
※ The program no. "01" has become "02" on the display.
- Repeat step 3 and 5 until memory is full. (64 files).
CD9180 / English manual
- Press BUTTON to start the program play.
- To stop the program play, press the STOP BUTTON.
- For program play in step " 8 ", press the PROG BUTTON & oB button.
- To check the program memory, in program play mode, press the BUTFONS.
- To erase the program memory, open the door or turn off the power.
If you do not need to select directory but only select files, the above step 3 can be skipped.
Digital Anti-Shock Operation
The DIGITAL ANTI-SHOCK PROTECTION function uses semiconductor memory to prevent the unit from skipping when the unit is subjected to shocks and vibration during play.
When the PLAY/PAUSE BUTTON is pressed and the power turns on, the "ASP" appears and the Digital Anti-Shock Protection function turns on automatically.
LOW BATTERY ALERT
When the low battery indicator appears on the display, please prepare to replace the new batteries.
Switch off the volume restriction
To protect your hearing, after switching on the device, only reduced volume is available. You can switch off this "Volume restriction".
2 Press again the EQ ^ button to switch off the volume restriction.
3 Switch off the "Volume restriction" with EQ<.
Note: The volume restriction is reactivated after switching off or changing the disk.
SPECIFICATIONS
Output Power :&≥slant 80dB(32) &100 20000Hz Freq. Response
Power Source 2× UM-3"AA" LR6 size batteries ( batteries not included ) 4.5v(600mA) AC-DC adaptor
Dimensions 141mm(W)× 140mm(D)× 26mm(H)
** For improvement purposes, specification and design are subject to change without notice. **
PROTECTION DE L'ENVIRONNEMENT
Dimensions : 141mm(P) × 140mm(L) × 26mm(h)
MAP OMHOOG/ASP TOETS
ASP AAN/UIT (Voor CD). Map OMHOOG (Voor MP3 CDs).