
Adagio ES 180 - Coffee machine ROWENTA - Free user manual and instructions
Find the device manual for free Adagio ES 180 ROWENTA in PDF.

| Product type | Espresso coffee machine with 15 bar pump |
| Dimensions (H x W x D) | 300 x 275 x 250 mm |
| Power supply | 220-240 V, 50 Hz |
| Power | 1060 W |
| Water tank capacity | 0.8 L |
| Pump pressure | 15 bars |
| Main functions | Espresso extraction for 1 or 2 cups, steam function for cappuccino, water dosage selector |
| Filter holder | With coffee grounds ejection system and progressive tamping, removable |
| Steam nozzle | Adjustable for frothing milk |
| Safety | Overheating protection device, filter holder lock |
| Maintenance and cleaning | Regular cleaning of the filter holder, tank, and drip tray |
| Descaling | Recommended with white vinegar, frequency according to water hardness and usage |
| Warranty | 1 year for domestic use |
Frequently Asked Questions - Adagio ES 180 ROWENTA
User questions about Adagio ES 180 ROWENTA
0 question about this device. Answer the ones you know or ask your own.
Ask a new question about this device
Download the instructions for your Coffee machine in PDF format for free! Find your manual Adagio ES 180 - ROWENTA and take your electronic device back in hand. On this page are published all the documents necessary for the use of your device. Adagio ES 180 by ROWENTA.
USER MANUAL Adagio ES 180 ROWENTA
086380AL AN FR IT ES FOR NE SU 18/09/02 19:39 Page 1

ES-180
Gebrauchsanweisung
Instructions
for Use
mode d'empl
Gebruke
Gebirksaanwijzing.
Instigation
per l'uso
Modo
de empeo.
Instrument
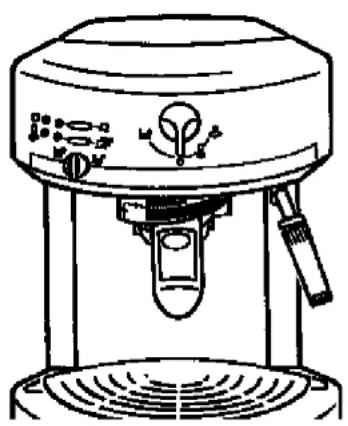
General description.
Fig.1
A.Water tank lid.
B. Removable water tank
C. Control panel
D. Rotating steam nozzle
E. Capucino accessory
E. Measuring spoon
G. Location of filter-holder
H. Filter-holder with used grounds ejection
and gradual compression of grounds
Power cable
1. Drip tray grid
Drip tray grid:
R. Brdlt tray
Fig. 2.
C. Control panel
C1. Control selector
a) "Coffee extraction" position
b)T-position(machine off)
c) "Steam heating"position
d. "Stearn"position
C3-1-sunkey
C3.2-cup key
C4Automatic
C5. Start-up indicator light
C6.Rice in water tamper
Fig.3
Fig.3.
H. Filter-holder with used ground sjection H1 Filtrate
H1. Fine.
H2. Button for ejecting used grounds and releasing filter-holder
Français
Thank you for placing your confidence in Rowenta products and for your loyalty. You have just purchased the very latest espresso innovation.
Your coffee machine contains a filter-holder with two exclusive systems :
- one for ejecting the used grounds,
and the other for gradually compressing the coffee when the filter-holder is being placed in position.
It is also removable, which enables it to be cleaned frequently and thus kept in perfect working order. For safety purposes the filter-holder is fitted with a locking device so that it will remain in position as the pressure rises.
1. TECHNICAL SPECIFICATIONS.
Electromagnetic pump :15 bars.
- Filter-holder with used grounds ejection.
1 or 2 cups.
- Steam function.
- Removable tank (capacity: 0.8 l).
Power:1060W.
Voltage:220-240 V - 50 Hz.
Safety devices for overheating
Dimensions :H.300 mm.W.275 mm.D.250 mm
IMPORTANT!
Voltage : this appliance is designed to operate on 220-240 V AC mains only.
Type of use : this appliance is designed for DOMESTIC USE ONLY.
2. SAFETY INSTRUCTIONS
Before initial use, follow the instructions in paragraph 5."USING FOR THE FIRST TIME".
- Check that the operating voltage for the appliance (220-240 V) is compatible with your mains supply. Any
connection error may cause irreversible damage not covered by the guarantee.
The appliance MUST be connected to an outlet with earth connection. If you use an extension, ensure that
it is the double-pole type with a 10 A earth wire and in perfect condition.
- Warning! During operation, the appliance is under pressure. It should therefore be monitored at all times when in use.
Carefully follow the instructions given in the leaflet when the "Steam"function is on to avoid any jets.
- Do not use or place the appliance on a hot surface (e.g.a cooker ring or hotplate) nor immediately next to
a flame so as not to damage the machine casing.
- When using a domestic electrical appliance, some of the product parts (steam, steam nozzle and filterholder) may be subjected to high temperatures likely to cause burns. Use the insulated handle on the filterholder and warn other users.
- Keep the appliance out of the reach of children.
- Do not start the machine up without water.
- Do not pull the cable to disconnect.
- Do not immerse the appliance in water.
- Do not heat any inflammable liquid with steam.
- Disconnect the appliance (by removing the plug) :
- before removing the tank for filling, emptying or cleaning purposes.
To descale, we recommend pure spirit vinegar (do NOT use wine vinegar).
- This appliance can only be repaired with special tools. If the power cable is damaged or if there is any other problem, contact your normal dealer or an approved repairer (see attached list).
3. PRACTICAL ADVICE
Remember to release the filter-holder by pressing lightly on the "EJECT" button before removing from the appliance (fig. 9).
To obtain a strongly flavoured espresso, we recommend using special freshly ground espresso coffee appropriate to the delicate operation of preparing this type of coffee. Also use only small cups with a capacity of less than 50 ml.
- Keep the ground coffee in a refrigerator; in this way it will retain its flavour longer.
- Do not fill the filter-holder to the brim, but use the measuring spoon (1 spoon for one cup, 2 spoons for 2 cups). Remove any excess coffee from the holder rim.
- If the appliance is not going to be used for more than 5 days, empty the water tank and rinse through.
Before removing the water tank for filling or emptying, always make sure that the appliance is disconnected
IMPORTANT!
Before initial use, after prolonged periods when not in use and after descending, the appliance should be cleaned as described in the paragraph "USING FOR THE FIRST TIME".
4. USING FOR THE FIRST TIME.
Rinse through before using for the first time.
- Fill the water tank.
- Insert the filter-holder (without coffee) into the appliance; turn from left to right until it rests against the stop (fig. 4).
- Place a container with a capacity of more than 1/2 litre under the filter-holder. Turn selector C1 to the "□" (coffee extraction) position (fig. 5).
- Select a weak espresso by turning the water dosage selector to the left (fig. 6).
- Press the 2-cup selector C3 "eng.7).
- Next, slop the machine ("0" position).
- Remove the tank, empty, rinse carefully and replace in the machine (fig.8).
5. PREPARED THE ESPRESSO.
IMPORTANT!
IF the espo is being used for the first time, the appliance should be cleaned as described in paragraph 5. "USING FOR THE FIRST TIME".
Before removing the removable tank. Please turn selector C1 to position "0".
A. PREPARATION
- Fill the tank with cold water.
- Switch on.
- If required, release the filter-holder by pressing lightly on the "E.JECT" button and turning holder to the left. Using the measuring spoon, place the ground coffee in the filter-holder:
- for one cup :one measure (level spoonful),
for two cune two measures (level enonfule)
The two start-up and water temperature lights will come on (fig. 13).
The cup selection lights will flash.
- Select the amount of coffee you wish for each cup by turning the water dosage selector (C4) to the right for a strong espresso and to the left for a weaker one (fig. 6).
- Press the 1-cup ^* (C2) or 2-cup key" (C3) according to the desired number of cups (fig. 7). The light for C2 or C3 will remain on while the espresso is being extracted.
- When the water has reached the correct temperature, the water temperature light will go out.
The espresso will flow into the cup(s) after a few moments and then stop automatically.
C. MANUAL CORRECTIONS TO OBTAIN THE DESIRED AMOUNT.
1 - THE AMOUNT OBTAINED IS INSUFFICIENT
To increase the amount of coffein in your cup(s) Immediately after the drip cycle stops and while the indicator light of key C2 or C3 is flashing-pass on the key selected once again (1 or 2 cups) until you have the amount desired.
2 - THE AMOUNT OBTAINED IS TOO MUCH:
To prevent overflow, it is possible to stop the drip cycle during operation by pressing on key C2 or C3 (the key just selected).
- Remove the cups.
D-CLEANING THE FILTER HOLDER.
- Release the filter-holder by lightly pressing the "EJECT" button while turning the holder to the left and withdraw it from the machine. Throw away the used coffee grounds by using the ejection system and pressing fully on the "EJECT" button on the handle (fig. 3). Wash the filter-holder in running water, activating the "EJECT" button to remove any coffee residue (also see para 8, B, F for more thorough cleaning).
To make a fresh espresso, turn the C1 selector to the "D" (coffee extraction) (fig. 5) and 1 seul mot repeat the above process.
COMMENTS
It is normal for a slight noise to be heard from water or steam circulating each time the C1 control returns to "0" and "1" (steam heating). This is due to a special device removing pressure from all circuits.
The automatic water dosage selector does not permit correcting the amount of coffee during the drip cycle.
6. PREPARED THE STEAM.
The steam is used to froth up the milk (e.g. for cappuccinos and hot chocolate) and to heat the water (for tea and other hot drinks).
- Turn the C1 selector to the "B" position (steam heating) (fig. 14). To obtain more steam, the temperature setting should be higher than for coffee.
The two power on and water temperature lights will come on.
- Place the liquid which is to be heated into a container. For better results, we recommend that the liquid to be reheated or frothed up should be poured into a container will a small mouth (small jug, for example).
- Dip the steam nozzle in the liquid
- When the water has reached the correct temperature, the water temperature light will go out. You can then turn selector C1 to the A (steam position) (fig. 15).
To obtain a good froth on the milk, agitate with circular movements and move up and down (fig.16).
The pump will operate intermittently. This is normal
- During the process, it is normal for the water temperature light to go on and off.
- When the liquid is hot and/or frothy, stop the machine (°position).
IMPORTANT!
Once the steam has stopped, immediately clean the nozzle carefully with a damp sponge so that the residue "does not stick" and then produce a little more steam in the open air to rinse out the inside.
7. CLEANING AND MAINTENANCE
A. The machine.
- Before cleaning disconnect the machine each time and allow it to cool down.
- Clean the outside of the machine periodically with a damp sponge. Regularly wash the tank, drip tray and grid and wipe dry.
Regularly wash the inside of the tank. - Do not use cleaning products with an alcohol or solvent base.
After unplugging the appliance, clean the hot water grid and seal regularly, using a damp sponge (fig. 17).
B. The filter-holder.
The appliance you have just purchased is fitted with an ejection filter-holder, which can be removed to enable you to keep it in perfect working order. We recommend that it be cleaned after each use.
Removal and refitings should be undertaken when the machine is cold.
1.1.1.1.1.1.1.2.1.3.1.4.1.5.1.6.1.7.1.8.1.9.10.11.12.13.14.15.16.17.18.19.
a) removing the filter-holder.
- Take out the filter-holder from the espresso.
- Throw away the used grounds by pressing the ejection button.
- Rinse in clear water.
- Take the bottom of the filter-holder between your thumb and index finger, then pull downwards (fig. 18).
b) Cleaning and rinsing the filter-holder.
The filter-holder may now be cleaned with a "dish-washing" detergent and a scourer, after which it should be rinsed with clear water.
For better results, the ejection button should be pressed several times during rinsing.
We recommend shaking the filter-holder vigorously to rid it of all water.
c) Refitting the filter-holder
Begin by inserting the bottom of the filter-holder in notch A provided for this purpose, then push until the "click" is heard which locks it into position (fig.19).
8. DESCALING
- Remember to descale your espresso machine regularly.
- How frequently this is carried out obviously depends on the number of espressos made and also on the hardness of the water used.
To make this clearer, the summary table below gives the frequency for descending :
| DESCALING FREQUENCY | |||
| Average weekly Soft number water water of coffees (<19th) | Hard Very hard water water (19-30th) (>30th) | ||
| Less than 7 | Once Every a year | Every 8 months | 6 months |
| 7-20 | Every 4 months | Every 3 months | Every 2 months |
| More than 20 | Every 3 months | Every 2 months | Every month |
-
Repairs to the coffee machine due to failure to descale will not be covered under the guarantee.
-
Empty the tank and replace on the machine.
- Pour 1/2 litre of pure spirit alcohol (do NOT use wine vinegar) into the tank.
- Connect the machine and turn selector C1 to the "position (espresso extraction) (fig. 5).
The two start-up and water temperature lights will come on (fig. 13).
The cup selection lights will flash. - Select the weak espresso by tuming the water dosage selector to the left (C4).
Press the 2-cups key "B3) - Run a glass of alcohol vinegar through the system.
- Disconnect the unit during operation while leaving selector C1 in the position
- Wait 10 minutes, connect the unit and press the "2-cup" (C3) key once again until the alcohol vinegar has dripped out completely.
B. Rinsing.
IMPORTANT
- After descending, rinse through 2-3 times with clear water (without coffee), as described in paragraph "Before using for the first time".
The appliance has now been descaled and is ready to be used once again.
9. GUARANTEE.
Your machine is guaranteed for one year, but any incorrect connection, handling or use other than described herein will render the guarantee null and void.
The machine has been designed solely for domestic use, all other types of use rendering the guarantee null and void. Repairs arising from scaling shall not be covered under the guarantee.
If you have any after-sales or spares problems, consult your dealer or an approved service station.
- PROBLEM SOLVING
| Problem | Possible cause | Solutions |
| Filter-holder will not move. | You have forgotten to release the filter-holder. | Lightly press the EJECT button while turning the filter-holder to the left (fig. 9). |
| Used coffee grounds are not dry after the water has passed through. | You have not tightened the filter-holder correctly. | Tighten the filter-holder more securely. |
| Espresso flows too slowly. | You have tightened the filter-holder too much. | Reduce the tightening torque. |
| The ground coffee is too fine, too olly or powdery. | Choose a slightly coarser grind. | |
| The filter-holder is dirty. | Clean the filter-holder according to the instructions in paragraph 7.B. | |
| The grid through which the water passes is clogged. | When the machine has cooled down, clean the grid with a damp | |
| Problem | Possible causes | Solutions |
| Used coffee grounds in cup. | The filter-holder is clogged. | Clean the filter-holder with hot water. Activate the “EJECT” button to remove any coffee residue.Shake to rid of water. Also see paragraph 7. B. |
| The coffee is too finely ground. | Use a slightly coarser grind. | |
| Espresso is not frothy. | The coffee is too old. | Use freshly ground coffee. |
| The coffee is not suitable for the espresso. | Use a more finely ground coffee. | |
| Too little coffee in the filter-holder. | Add more coffee. | |
| Water tank leaks when carried. | The valve at the bottom of the tank is dirty or faulty. | Wash the water tank and activate the valve at the bottom of the tank with your finger. |
| Water is sprayed in the detachable removable tank housing. | You removed the detachable tank before turning the control selector to its OFF position (0). | Before removing the detachable tank, please turn selector C1 to position “0”. |
| Water flows out under the machine. | Internal leak. | Do not use the machine. Contact an approved service centre. |
| Cracking sounds are heard in the filter-holder. | Normal:filter holder safety blocking. | |
| The pump is unusually loud. | No water in the tank. | Stop the unit (“0” position) fill the tank and re-start. |
| Cups are filled unequally. | The filter-holder is clogged. | Refer to paragraph 7, for filter-holder care. |
| Espresso is leaking from the sides of the filter-holder. | The filter-holder is not in the correct position. | Place the holder in position and lock it (turn from left to right until it stops) (fig. 4). |
| The rim of the filter-holder is clogged with coffee grounds. | Remove the excess coffee (fig. 10). | |
| Espresso has a bad taste (vinegar). | After descending, rinsing has not been carried out correctly. | Rinse out the appliance according to the instructions. Make sure you use spirit vinegar and not wine vinegar. |
| Machine is not working. | The machine has heated abnormally releasing the safety device. | Wait for 30 minutes : the machine will then be ready to function. If after 30 minutes it still does not work, contact an approved service centre. |
| The pump has failed through lack of water. | Fill the water tank and prime the pump (see paragraph 4. “Using | |
| Problem | Possible cause | Solutions |
| Steam nozzle will not froth up the milk. | The nozzle is blocked or furred up. | Descale the nozzle according to the paragraph on 'DESCALING'or use a needle to unblock (fig.21). |
| The milk is too hot. | Use cool milk. | |
| The container is an unsuitable shape. | Use a small jug. | |
| You are using skimmed milk. | Use full-cream or semi-skimmed milk preferably. |
If it is not possible to establish the cause of the failure, contact an approved repairer.
Never take the machine apart!
Françals
A. Descalcification.
1.PRODUKTINFORMATION.
4. INNAN ANVANDNING.
according to enclosed conditions.
1 année de garantie
Date of purchase Stamp of your dealer