EWS2020 - Weather Station HAMA - Free user manual and instructions
Find the device manual for free EWS2020 HAMA in PDF.
User questions about EWS2020 HAMA
0 question about this device. Answer the ones you know or ask your own.
Ask a new question about this device
Download the instructions for your Weather Station in PDF format for free! Find your manual EWS2020 - HAMA and take your electronic device back in hand. On this page are published all the documents necessary for the use of your device. EWS2020 by HAMA.
USER MANUAL EWS2020 HAMA
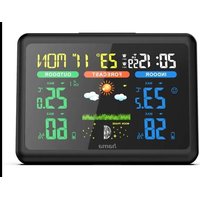
Electronic Weather Station
hama®
Hama GmbH & Co KG
D-86651 Monheim/Germany
www.hama.com
All listed brands are trademarks of the corresponding companies. Errors and omissions excepted, and subject to technical changes. Our general terms of delivery and payment are applied.
text_image
27.34 2.61 955 1545 1000092651/05.09
00092651
PRODUKTMERKMALE: HAUPTGERÄT
A. Infrarotsensor
LUFTDRUCKWERT ABLESEN
GB Operating Instruction
Triest TRI Italien ITA
Coimbra COI Portugal PRT
Faro FAR Portugal PRT
Leiria LEI Portugal PRT
Lissabon LIS Portugal PRT
Porto POR Portugal PRT
Danzig GDZ Polen POL
Krakau KKW Polen POL
Posen-Poznan POZ Polen POL
Stettin SZC Polen
This weather station measures the environment of its surrounding area and receives weather data transmitting from up to five outdoor thermometers for temperature. The data is continuously updated to bring you the latest weather information displayed on the LCD of the receiving unit. Its wireless 433MHz can transmit data over a distance of 75 meters (250 feet) in open space.
FEATURES: MAIN UNIT
A. IR motion sensor
It is a motion sensing device to activate the backlight or snooze function, provided that an object (e.g. human hand) gets within an 3 inches distance in front of the sensor.
B. Air pressure trend arrows
Indicate the trend of air pressure changes
C. Low battery indicator
Shown to indicate the battery in the main unit is low and all displayed information in LCD is no longer reliable. The user needs to change the batteries at once
D. Weather forecast window
Show weather forecast in animation with snowfall
indicator and storm warning indicator
E. Indoor indicator
Indicates the indoor temperature and humidity are
displayed
F. Indoor maximum/minimum indicator
Indicates the maximum/minimum indoor temperature and humidity are displayed
G. Outdoor remote sensor indicator
Indicates the current outdoor remote sensor signal received. It can display up to 5 different remote sensors which is placed in 5 different places and within 75 meter distance from the main unit.
H. Auto scroll indicator
The animated rolling arrow icon is shown to indicate the auto scroll of 5 different remote channel.
I. Outdoor maximum/minimum indicator Indicates the maximum/minimum outdoor temperature is displayed
J. Remote sensor battery low indicator
Appears when the batteries of the remote sensor are running dry and the temperature measured by this sensor is no longer reliable. The user must change the batteries at once.
K. Barometric history indicator
Indicates the recorded air pressure reading in the past 24 hours
L. Barometric pressure window
Displays the barometric pressure reading in mb hpa or inHg.
M.Barometric pressure chart
Shows the barometric pressure trend chart for the past 24 hours
N. Moon phase
The animated running moon phase will pause for 5 seconds in place of current moon phase.
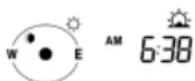
0. Sun position and Moon position
Sun rises from the east (E) and goes down in the west (W) everyday. This weather station can calculate the different sunrise, sunset, moonrise and moonset time according to the input city and diagrams the sun and moon position in a day at 3 hour interval.
P. Sunrise and Sunset time
Shows the exact sunrise time of a pre-set city in a specific day. Press [ CITY ] button once to toggle to see the sunset time.
Q. City name
Abbreviation of a city name in Europe. The user must set to his own located city before start to use this weather station to have the correct sunrise, sunset time & moon phase.
R. Clock window
Display current time, current time and weekday, calendar or alarm time
S. Radio reception signal
Indicates the condition of DCF77 radio controlled time reception
T. A larm on icon
Appears when alarm is activated
DESCRIPTION OF BUTTONS
Sculpture has 7 major function buttons on the edge
1. [MEMORY]
Toggle to view the Max/Min reading of the indoor temperature/humidity & remote temperature. Press & hold 2 seconds to clear indoor temperature/humidity memories or remote temperature records.
2. [CHANNEL]
Select among channel 1, 2, 3, 4, 5 or to enter auto scroll mode. Press and hold 2 seconds to activate or deactivate the sensor searching mode.
3. [HISTORY]
Press to view the past 24-hour barometric readings. Press and hold 2 seconds to enter the altitude adjustment mode.
4. [4]
Press once to increase the date to view the MOON PHASE status, Sunrise and Sunset time of a specific day in Day-Month-Year (or Month-Day-Year depends on the date format setting). Press once to increase the setting in CLOCK, CALENDAR or ALARM setting mode Press & hold 2 seconds to manually activate or deactivate the radio controlled function.
5. [▼]
Press to decrease the date to view the MOON PHASE status, Sunrise and Sunset time of a specific day in Day-Month-Year (or Month-Day-Year depends on the date format setting). Press once to decrease the setting in CLOCK, CALENDAR or ALARM setting mode. Press once to arm or disarm the daily alarm under alarm display mode.
6. [CITY]
Press once to toggle between the sunrise and sunset time of a pre-set city in a specific day. Press and hold 2 seconds to enter city setting mode, use [▲and []]▼select the abbreviation country name and then city name according to the list in the appendix, press [CITY] to confi rm. Use [▲and []]▼select the DST (Daylight Saving Time) "ON" or "OFF", press [CITY] to confirm.
7. [CLOCK]
Toggle amongst display for Clock-Sec (HR-MIN-Sec), Clock-day (HR-MIN-Weekday), Calendar (Date-Month-Year), alarm time and repeat...
AND 3 BUTTONS ON THE REAR SIDE
1. [°C/°F]
Toggle the temperature unit °C <- -> °F
2. [UNIT]
Press to toggle the pressure unit. (hPa/mb -> inHg)
3. [MODE]
Press & hold 2 seconds to enter backlight color setting mode.
SLIDE SWITCH [BACKLIGHT] ON THE REAR SIDE TO SELECT THE BACKLIGHT MODE
| Power Supply | |||
| Slide switch position | Battery Only | Battery & Adapter | Adapter only |
| Auto Wave hand in front of the IR sensor to activate backlight for 5 seconds | |||
| OFF Disable the backlight function | |||
| ON Wave hand in front of the IR sensor to activate backlight for 5 seconds | Backlight always on | ||
GETTING STARTED
This Weather Station was designed for easy set up. For best operation, the following steps are required to be done in the proper sequence.
-
Insert batteries for main unit before doing so for the sensor units.
-
Receiving unit cannot be set manually until the wireless remote sensor unit registration procedure has been completed.
-
Position the remote unit and main unit within effective transmission range, which, in usual circumstances, is 250 feet.
Although the remote unit is weather resistant, it should be placed away from direct sunlight, rain or snow.
BATTERY INSTALLATION FOR MAIN UNIT
-
Turn the metal nut anti-clockwise on the bottom of the unit to open and release the battery compartment:
-
Insert 4 AA size 1.5 V alkaline battery as indicate by the polarity;
-
Push the battery compartment back, turn the metal nut clockwise to lock;
NOTE: Replace the batteries when the low battery indicator appears on the top-right corner of the LCD.
WIRELESS REMOTE SENSOR REGISTRATION PROCEDURE
-
Insert x4 AA batteries first to the main unit, the outdoor temperature display shows “--”. – While the wave icon will keep blinking for 2 minutes indicate unit is in sensor searching mode.
-
In a second step, insert the x2 AAA batteries for the sensor unit. The LED on the front panel will start flashing at a rate of one time per around 2 seconds indicates channel-1 is in use.
-
While the LED in the sensor unit is flashing, press once the [CH] key will change the sensor channel setting to 2. Keep toggle on [CH] key can change channel setting up to 5. The LED is blinking at a frequency to indicate the channel setting, i.e. continuous blinks 2 times indicate channel-2 is selected.
NOTE: If user does not press any key for 10 seconds, it will exit the channel setting mode and transmit the RF signal. The main unit will register the temperature reading.
(If the transmitter has the LCD display, the °C/°F key will toggle the temperature unit on the LCD.)
REMOTE CHANNEL AUTO-SCROLLING
This device is equipped with an auto-scroll function. While the auto-scroll function is set, the unit will automatically cycle to display temperature of each remote sensor for 6 seconds.
-
To retrieve manually the specific sensor temperature reading, press CHANNEL key until desired channel number is displayed.
-
To enable auto-scroll function, use CHANNEL button to select channel 1, 2, ... until auto scroll icon appears on the left hand corner of the 3rd line display.
DCF 77 RADIO CONTROLLED CLOCK
The radio-controlled time is calculated by the Cesium Atomic clock of Braunschweig (offi cial clock of Germany). Then the time is coded and transmitted from Mainfl ingen - near Frankfurt - via a signal on DCF-77 (77.5 kHz). The transmitting range of the signal is 1500 km, which means that most of Western and Central Europe is covered by this signal. Within this range the received time is completely accurate. However, there are many environment factors may affect the RCC reception, i.e. nearby computer monitors or other electronic devices, put on any metal surface, surrounded by any fall buildings and so on. The user had better to place the atomic clock near the window and face the transmitter in Mainfl ingen near Frankfurt, Germany. And then check the RCC strength indicator in the clock display to see if there has any wave above the reception tower. There have 3 wave icons fl ash to indicate 4 levels of RCC signal status:

Very weak Weak Medium Strong
If there has no wave above the reception tower that means the signal is very weak and the clock can not be set by the RCC signal, please try to rotate the unit or other windows to seek for a better RCC reception location. Besides, the RCC signal is the strongest at night, the user can manually set the clock to local time and leave it overnight to receive the RCC signal.
If nothing else works, take the clock outdoors after dark at night, remove and re-install the batteries and leave it overnight to force it to look for the radio controlled time signal. If the clock works outdoors but not indoors, you probably have a local interference problem inside your house or building.
Once the time signal is received, the wave icon will stay on the LCD, and time and calendar will automatically be updated.
Note:
During 10 minutes of time signal reception, all manual settings will be suspended. If setting is desired, press once [▲key to deactivate the reception. You can also press and hold the same key for 3 seconds to manually activate the reception in normal mode. The clock will work as a normal quartz clock if it can't receive the RCC signal.
SET THE CLOCK, CALENDAR & LANGUAGE
- In clock time display mode, press & hold [CLOCK] button for 2 seconds to enter clock setting mode. Flashing 24 hours will appear.
- Press [▲] or [▼] button to switch between 24 hours and 12 hours format, and then press [CLOCK] button to confirm.
- The hour digits will flash. Use the [▲] button to increase by one hour or [▼button to decrease by one hour to your desired hours. Holding down either button will change the increment unit rapidly. Press [CLOCK] button to confirm.
- The minute digits will flash. Use the [▲] button or [▼] button to set your desired minutes. Holding down either button will change the increment unit rapidly. Press [CLOCK] button to confirm.
NOTE: Every change of minute digit will automatically reset the seconds to zero.
- The year digit will flash and Yr icon appears. Press [▲] or [ ]▼button to set your desired year. Press | CLOCK | button to confirm.
NOTE: Year range is from 2000 to 2099.
-
D and M icons will flash. Press [▲] or [▼] to select D M (Date Month) or M D (Month Date) format. Press [CLOCK] button to confirm.
-
Month digits will flash. Press [▲] or [▼] button to set your desired month. Press [CLOCK] button to confirm. Do the same to set Date.
NOTE: The moon phase and the weekday will be automatically calculated and displayed for the date set above.
- E digit will flash. Press [▲] or [▼] button to switch 5 languages display of weekday (English/German/French/Spanish/
Italian. See table 1). Press [ CLOCK ] button to confirm and exit setting mode
T able 1
NOTE: If no key press during setting mode for 10 seconds, it will automatically keep the setting and exit to normal display.
TO SET DAILY ALARM
- In clock time display mode, press [CLOCK] button triple time to switch to display alarm for ever.
In clock time display mode, press once [ CLOCK ] button to switch HR:MIN sec => HR:MIN week => DAY MON year => ALARM time (HR:MIN sec).
If user don't press [ CLOCK ] button it will always display alarm time.
-
Press and hold [ CLOCK ] button for 2 seconds to enter alarm setting mode.
-
The hour digits will flash, use [▲] button to increase by one hour or [▼] button to decrease by one hour to your desired hours. Holding down the button will change the increment unit rapidly. Press [CLOCK] button to confirm.
-
The minute digits will flash. Use [▲] button to increase by one minute or [▼] button to decrease by one minute to your desired minutes. Holding down the button will change the increment unit rapidly. Press [CLOCK] button to confirm and finish the setting.
-
When alarm is beeping, wave hand in front of the IR sensor to snooze for 5 minutes. Press [CLOCK] [▲] or [CITY] button to stop the alarm for a day.
MOON PHASE
Our weather station is equipped with 8 moon phases display (i.e. from new moon to waning crescent) on the screen.

text_image
Full Moon Waning Bibious Waning Bibious Waning Crescent Waning Crescent First Quarter Last Quarter New Moon- The animated rolling moon phase will pause 5 seconds in the place of the current moon phase calculated by the current calendar date.
- The user also can press [▲] button or [▼] button go through the calendar to check the moon phase for a specific date other than the current date.
SUN POSITION, MOON POSITION, SUNRISE and SUNSET TIME
The weather station will automatically calculate the sun position, moon position, sunrise and sunset time based on the input city location and the set data.
WEATHER FORECAST
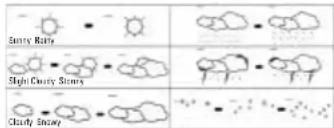
text_image
Sunny Rays Slight Cloudy Sunny Cloudy SnowyOur weather station is capable of detecting local barometric pressure changes, and based on the data collected, can predict the weather for the next 12 to 24 hours.
NOTE:
- The accuracy of a general pressure-based weather forecast is about 70 to 75%, and therefore, we cannot be held responsible for any inconveniences so caused by an inaccurate one.
- The weather forecast is meant for the next 12 to 24 hours. It may not necessarily reflect the current situation.
- The 'Sunny' forecast covering night hours indicates clear weather.
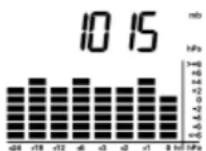
HOW TO CHECK THE BAROMETRIC PRESSURE
The current and historical barometric pressure is shown on the atmospheric pressure window.
For monitoring the Sea Level barometric pressure reading at certain altitude, the user needs to select the local altitude I-100 to 2500 meter or -330 to 8200 footl for the altitude setting. Our weather station requires entry of elevation in meter and in foot separately. To determine your location elevation, please either contact your local library. TV/radio weather forecaster, or via Internet at http://www.worldatlas.com/atatlas/infopage/elvation.htm. 1. To enter the altitude compensation setting mode, press and hold | HISTORY | button for 2 seconds to switch from Barometric Pressure to Altitude adjust mode for 10 seconds and the meter icon fl ashes.
-
During Altitude adjust mode, press [UNIT] button to toggle between meter and foot unit. Then press [HISTORY] button to confirm.
-
Last altitude reading will flash, press [UNIT] button to increase the value by 10. Hold down the button to have fast stepping. Press [HISTORY] button once to confirm and exit setting.
The atmospheric pressure can be displayed in mb/hPa, inHg. Press [UNIT] to select the pressure unit.
Our weather station is equipped with barometer reading for 24hr history. If you want to check the pressure history for a particular hour during the past 24 hours, press [HISTORY] button, each press on the button will go back by an hour.
NOTE: If the weather station was just installed with batteries and past data was not yet measured, it will display "---".
The recorded barometric changes for the past 24 hours are displayed in a bar chart below the barometric pressure window.
SET BACKLIGHT COLOR
Make sure the backlight switch is not on "OFF" position, press & hold [MODE] for 2 seconds to enter the backlight color setting and the barometric chart displays a "C" pattern to prompt the user to set the color, the alternate backlight indicates the backlight is set to auto mode and its color is changed according to the weather condition (see more details in 'BACKLIGHT COLOR CHANGE ACCORDING TO FORECAST WEATHER CONDITION'), press [UNIT] button to select f x backlight color in the sequence, 'AMBER' -> 'BLUE' -> 'PURPLE' and then cycle back to 'auto mode'. Press [MODE] button to confirm the setting or auto exit after 10 second.
BACKLIGHT COLOR CHANGE ACCORDING TO FORECAST WEATHER CONDITION
While the backlight is set to auto mode, the color of the backlight will change according to the forecast weather condition to acknowledge the user for the forecast weather.
Sunny : amber color
Slight Cloudy & Cloudy : purple color
Rainy & Stormy (or Snowing): blue color
SPECIFICATIONS
Main Unit
Displayed temperature range: -10^ to +60.0^ (14°F to 140.0°F)
Proposed operating range: 0°C to +50.0°C (32.0°F - 122.0°F)
Temperature resolution : 0.1°C (0.2°F)
Remote Temperature measurement
Indoor relative humidity measurement
ranging from 25 % RH to 95 % RH
Temperature compensation range: -10^ to +60.0^ (14°F to 140.0°F)
Batteries: Use 4 pieces
UM-3 AA size 1.5 V
alkaline battery
CAUTION:
Under severe environment with radio frequency interference, the unit may not establish or maintain communication link under this condition. It will return to normal state when interference stops.
DISCLAIMER
The information provided in this document has been reviewed and is deemed to be correct.
However, neither the device manufacturer nor their affiliates shall accept liability in the event of any
inaccuracies, errors or omissions that may appear in this manual. In no way shall the device manufacturer nor their affiliates be held liable for any direct, indirect, particular, accessory or immaterial damage resulting from the use of this product or suffered as a result of any defects/omissions in this document, and this even after being warned of the possibility of such damage.
The device manufacturer and its affiliates reserve the right to make improvements or changes to this document and to the products and services described by it at any time and without prior warning nor any obligation of any kind on their part.
EUROPE CITY ABBREVIATION LIST
City City Country Country
| code | code | ||
| Berlin | BER | Germany | DEU |
| Dusseldorf | DUS | Germany | DEU |
| Dresden | DRE | Germany | DEU |
| Frankfurt | FRA | Germany | DEU |
| Flensburg | FLE | Germany | DEU |
| Freiburg | FRE | Germany | DEU |
| Hannover | HAN | Germany | DEU |
| Bremen | BRM | Germany | DEU |
| Hamburg | HAM | Germany | DEU |
| Rostock | HRO | Germany | DEU |
| Stralsund | HST | Germany | DEU |
| Koblonz | KDB | Germany | DEU |
| Kiel | KIE | Germany | DEU |
| Kassel | KAS | Germany | DEU |
| Leipzig | LEZ | Germany | DEU |
| Muenchen | MUE | Germany | DEU |
| Magdeburg | MAG | Germany | DEU |
| Nurnberg | NUR | Germany | DEU |
| Regensburg | REG | Germany | DEU |
| Stuttgart | STU | Germany | DEU |
| Saarbruechen | SAA | Germany | DEU |
| Schwerin | SCH | Germany | DEU |
| Alborg | ALB | Denmark | DNK |
| Arhus | ARH | Denmark | DNK |
| Copenhagen | CPH | Denmark | DNK |
| Odense | ODE | Denmark | DNK |
| Alicante | ALI | Spain | ESP |
| Andorra | AND | Spain | ESP |
| Badajoz | BAD | Spain | ESP |
| Barcelona | BAR Spain | ESP | |
| Bilbao | BIL | Spain | ESP |
| Cadix | CAD Spain | ESP | |
| Cordoba | COR | Spain | ESP |
| Ibiza | IBZ | Spain | ESP |
| La Coruna | LCO | Spain | ESP |
| Leon | LEO | Spain | ESP |
| Las Palmas | LPA | Spain | ESP |
| Madrid | MAD | Spain | ESP |
| Malaga | MAL | Spain | ESP |
| Salamanca | SAL | Spain | ESP |
| Sevilla | SEV | Spain | ESP |
| Valencia | VAL | Spain | ESP |
| Zaragoza ZAR Spain | ESP | ||
| Besancon | BES France | FRA | |
| Biarritz | BIA France | FRA | |
| Bordeaux | BOR France | FRA | |
| Brest | BRE France | FRA | |
| Cherbourg | CHE France | FRA | |
| Clermont Ferrand | CMF | France | FRA |
| Lyon | LYO | France | FRA |
| Marseille | MAR | France | FRA |
| Monaco | MCO | France | FRA |
| Metz | MET | France | FRA |
| Nantes | NAN | France | FRA |
| Nice | NIC France | FRA | |
| Orleans | ORL | France | FRA |
| Paris | PAR | France | FRA |
| Parpignan | PER | France | FRA |
| Lille | LIL | France | FRA |
| Rouen | ROU France | FRA | |
| Strasbourg | STR | France | FRA |
| Toulouse | TOU | France | FRA |
| Helsinki | HEL | Finland FIN | |
| Aberdeen | ABD | UK | GBR |
| Belfast | BEL | UK | GBR |
| Birmingham | BIR | UK | GBR |
| Bristol BRI | UK | GBR | |
| Edinburgh | EDH | UK | GBR |
| Kingston | KIN UK | GBR | |
| Liverpool | LVP UK | GBR | |
| London | LON | UK | GBR |
| Manchester | MAN | UK | GBR |
| Newcastle upon Tyne | NUT UK | GBR | |
| Plymouth PLY | UK | GBR | |
⑤ Mode d'emploi
Budapest BUD Hungary HUN
Zapreb ZAG Croatia HRV
Ancona ANC Italy ITA
Bari BAI Italy ITÀ
Bologna BOL Italy ITA
Cagliari CAG Italy ITA
Catania CAT Italy ITA
Firenze FIR Italy ITA
Foggia FOG Italy ITA
Genova GEN Italy
Lecce LEC Italy ITA
Messina MES Italy ITA
Milano MIL Italy ITA
Napoli NAP Italy ITA
Palermo PAL Italy ITA
Parma PAM Italy
Perrero PRO Italy
Roma ROM Italy ITA
Torino TOR Italy ITA
Trieste TRI Italy
Venezia VEN Italy ITA
Verona VER Italy ITA
Ventimiglia VTG Italy ITA
Dublin DUB Ireland IRL
Luxembourg LUX Luxembourg LUX
Bergen BGN Norway NOR
Oslo DSL Norway NOR
Stavanger STA Norway NOR
Amsterdam AMS Netherlands NLD
Arnhem ARN Netherlands NLD
Eindhoven EIN Netherlands NLD
Enschede ENS Netherlands NLD
Groningen GRO Netherlands NLD
Den Haag HAA Netherlands NLD
Rotterdam ROT Netherlands NLD
Evora AVO Portugal PRT
Coimbra COI Portugal PRT
Faro FAR Portugal PRT
Leiria LEI Portugal PRT
Lisbon LIS Portugal PRT
Porto POR Portugal PRT
Gdansk GDZ Poland POL
Krakow KKW Poland POL
Poznan POZ Poland POL
Szczecin SZC Poland POL
Warsaw WAW Poland POL
Krasnodar KRA Russia RUS
Moscow MOS Russia RUS
Novosibirsk NOV Russia RUS
Samara SAM Russia RUS
St. Petersburg PET Russia RUS
Ufa UFA Russia RUS
Vladivostok VLA Russia RUS
Yekaterinburg YEK Russia RUS
Gothenburg GDT Sweden SWE
Malmo MLO Sweden SWE
Stockholm STO Sweden SWE
Bratislava BRV Slovakia SLO
Ljubljana LJU Slovenia SLO
Berlgrade BEO Serbia and SCG
Mo n t e
Graz GRZ Austria AUT
Innsbruck INN Austria AUT
Linz LNZ Austria AUT
Brugge BRG Belgium BEL
Bruxelles BRU Belgium BEL
Charlerai CHA Belgium BEL
Liege LIE Belgium BEL
Basel BAS Switzerland CHE
Bern BRN Switzerland CHE
Chur CHR Switzerland CHE
Geneva GNV Switzerland CHE
Locarno LOC Switzerland CHE
Lucerne LUC Switzerland CHE
St Moritz MOR Switzerland CHE
St Gallen SGL Switzerland CHE
Sion SIO Switzerland CHE
Zurich ZUR Switzerland CHE
Prague PRG Czech Republic CZE
Hong Kong HKG China CHN
Registration and Safety Certification/General
Information
This device bears the CE symbol as specified by the provisions of Directive R & TTE (1999/5/EC).
Hama GmbH & Co. KG hereby declares that this device
is in compliance with the basic requirements and other
relevant guidelines and regulations of the 1999/5/EC
guideline. You will find the declaration of compliance and
declaration of conformity in the Internet at
http://www.hama.com
FONCTIONS DE LA STATION METEOROLOGIQUE
text_image
r o B D F G H K M N R S 28.0-27.0 38.0 0.8 0.05 8.18.0S A C F I J L O P Q T WEATHER STATION
natural_image
Line drawing of a steam iron with internal compartments and ventilation slots (no text or symbols)CARACTERISTIQUES : UNITE PRINCIPALE
Coimbra COI Portugal PRT
Faro FAR Portugal PRT
Leiria LEI Portugal PRT
Porto POR Portugal PRT
Danzig GDZ Polen POL
Krakau KKW Polen POL
Posen-Poznan POZ Polen POL
Stettin SZC Polen POL
| Storm | Rain |
| Storm | |
| Narge |
prevederile Directivei R & TTE (1999/5/EC).