Pico IR - Hi-fi system REVO - Free user manual and instructions
Find the device manual for free Pico IR REVO in PDF.
| Product Type | Portable internet radio hi-fi system |
| Brand | REVO |
| Model | Pico IR |
| Dimensions (estimated) | Approximately 200 x 130 x 80 mm |
| Weight (estimated) | Approximately 500 g |
| Power Supply | 5V DC power adapter and internal rechargeable battery (12 h battery life) |
| Main Functions | Internet radio (thousands of stations), FM radio, network audio player (PC/Mac), MPort input for iPod/MP3, presets (12), remote control, LCD screen |
| Connectivity | Wi-Fi b/g, Ethernet RJ45 |
| Connectors | 3.5 mm headphone jack, stereo RCA output, USB port for updates, DC jack |
| Care and Cleaning | Clean with a soft dry cloth; do not use abrasive products |
| Safety | Do not expose to water; do not open the case; use only the supplied adapter |
| Spare Parts and Repairability | Replacement power adapter available at www.revo.co.uk |
| Warranty | 1 year (registration required) |
Frequently Asked Questions - Pico IR REVO
User questions about Pico IR REVO
0 question about this device. Answer the ones you know or ask your own.
Ask a new question about this device
Download the instructions for your Hi-fi system in PDF format for free! Find your manual Pico IR - REVO and take your electronic device back in hand. On this page are published all the documents necessary for the use of your device. Pico IR by REVO.
USER MANUAL Pico IR REVO
Warranty + Warranty Registration 3
■ Before Getting Started 3
Wi-Fi Internet Connection 3
Registering Your Radio 3
■ Controls and Connections 4
■ Remote Control 4
■ Powering Pico 4
■ Remote Control Operation 4
■ Getting Started 5
Pico's Control Method 5
Pico's Menus Explained 5
■ Internet Radio Mode 6
Connecting To Broadband Network 6
Using Internet Radio Features 7
Choosing A Station 7
Choosing A Podcast 7
My Favourites 8
My Added Stations 8
Help 8
■ Internet Radio Portal 8
Access Additional Features 8
Registering Your Radio 8
■ Music Player Mode 9
Windows PC Set-UP 9
Apple Mac Set-Up 10
■ FM Mode 11
■ MPort Mode 11
System Setup 12
Info 12
■ Troubleshooting 12
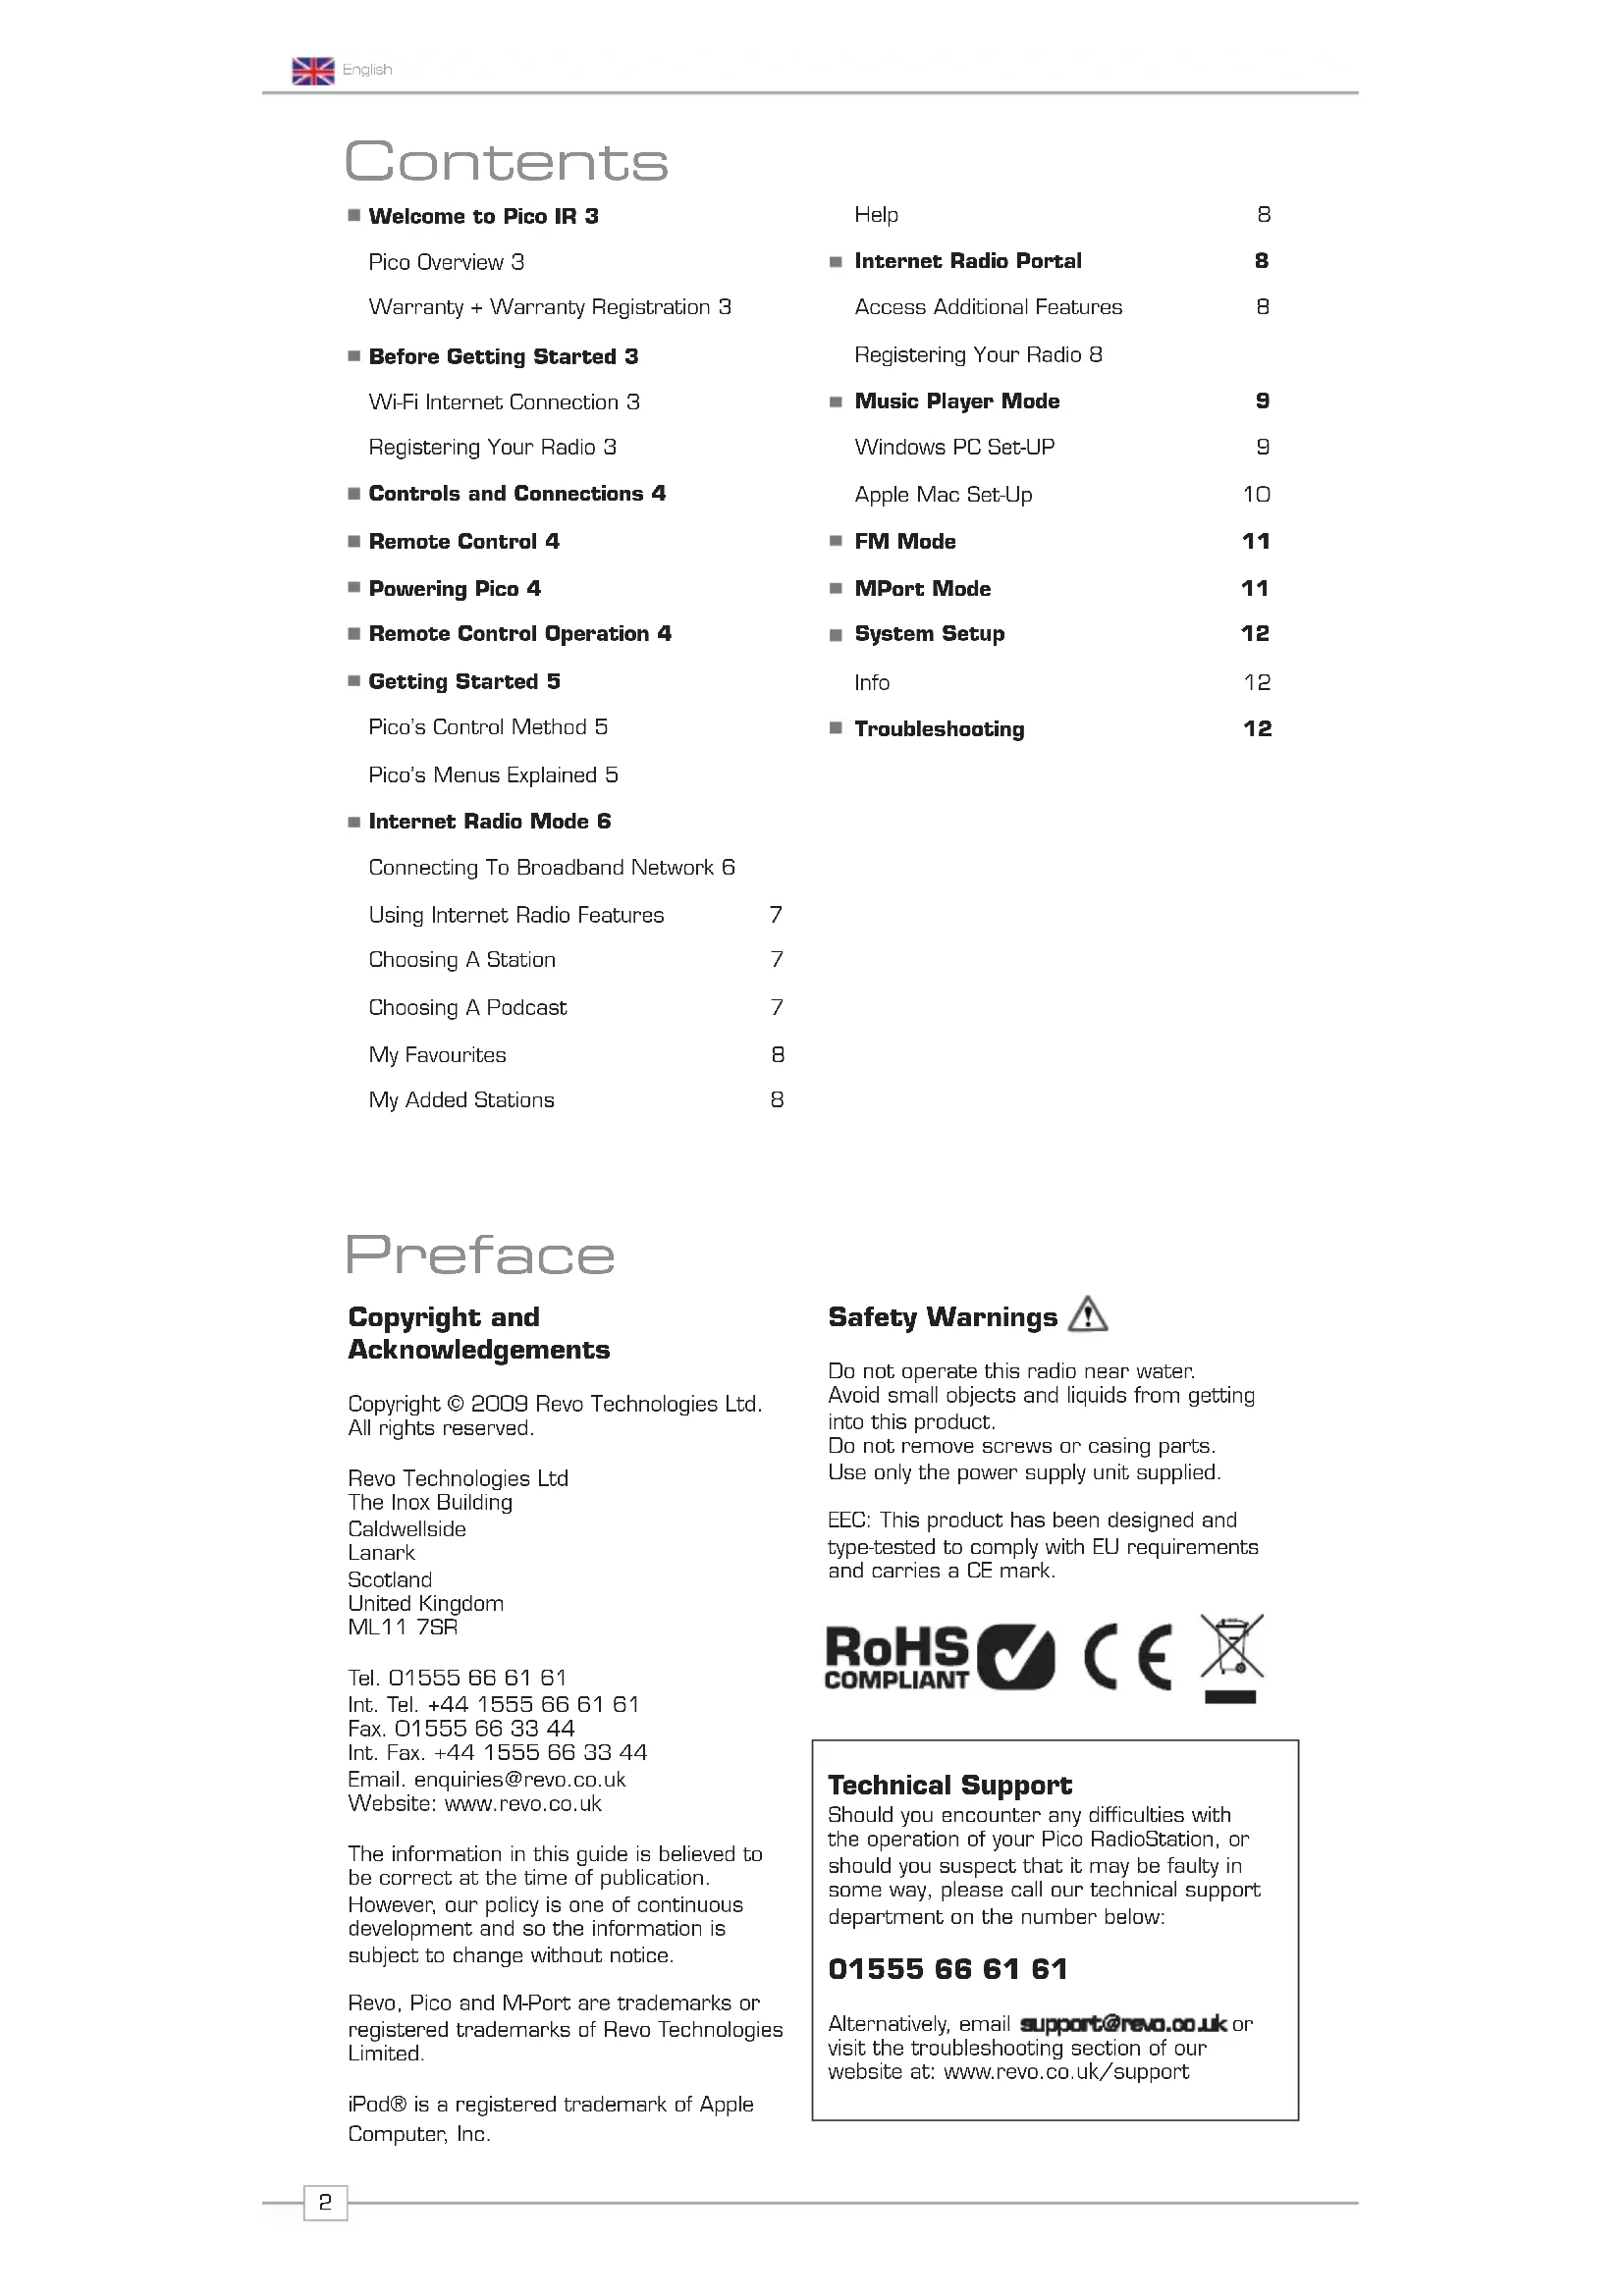
Preface
Copyright and Acknowledgements
Copyright © 2009 Revo Technologies Ltd. All rights reserved.
Revo Technologies Ltd
The Inox Building
Caldwellside
Lanark
Scotland
United Kingdom
ML11 7SR
Tel. 01555 66 61 61
Int. Tel. +44 1555 66 61 61
Fax. 01555 66 33 44
Int. Fax. +44 1555 66 33 44
Email. enquiries@revo.co.uk
Website: www.revo.co.uk
The information in this guide is believed to be correct at the time of publication. However, our policy is one of continuous development and so the information is subject to change without notice.
Revo, Pico and M-Port are trademarks or registered trademarks of Revo Technologies Limited.
iPod® is a registered trademark of Apple Computer, Inc.
Safety Warnings

Do not operate this radio near water. Avoid small objects and liquids from getting into this product.
Do not remove screws or casing parts.
Use only the power supply unit supplied.
EEC: This product has been designed and type-tested to comply with EU requirements and carries a CE mark.
RoHS COMPLIANT


Technical Support
Should you encounter any difficulties with the operation of your Pico RadioStation, or should you suspect that it may be faulty in some way, please call our technical support department on the number below:
01555 66 61 61
Alternatively, email support@revo.co.uk or visit the troubleshooting section of our website at: www.revo.co.uk/support
Welcome to Pico IR
Thank you for buying our Pico IR internet radio, we feel sure that it will provide you with years of enjoyment and reliable service.
This guide has been designed to quickly get you up-and-running and listening to your radio, offer guidance on the more complex features of this product and provide information on safety, warranty and registration.
Pico IR Overview
Key Benefits
Access to thousands of radio stations Search by genre or country Access 'Listen Again' services Station list updates automatically No subscription charges
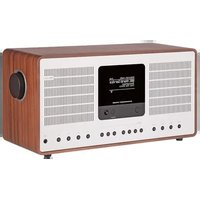
Pico IR is the go-anywhere internet radio, acting as a portal to thousands of radio stations from around the world.
Pico IR provides high quality digital audio in a splashproof casing, with the convenience of internal battery power.
Pico also provides coverage of traditional FM radio and the added benefit of doubling as an iPod ^® speaker system.
Throw-in the ability to stream music from your PC or Mac, and Pico IR becomes the ultimate go-any where digital radio.
Warranty
Revo Technologies Ltd warrants to the purchaser that this product will be free from parts and manufacturing defects in the course of normal use for a period of one year from the date of purchase.
This warranty does not apply in cases of accidental damage, where the case has been removed, wear and tear, negligence, modification or inappropriate use.
Should you encounter problems with this product, please contact your supplier or alternatively see page 2 of this guide for technical support contact details.
Warranty Registration
It is a warranty condition that you register your purchase by either completing the warranty card enclosed with your radio or alternatively registering online at www.revo.co.uk/register
Before Getting Started
IMPORTANT
To ensure that your Pico IR is running the latest software release (and therefore has access to the latest software
features), we advise you to perform a software update. Please see page 12 of this operating guide for full details.
Network Connection
In order to use the internet radio functions of your Pico IR you will require either a wireless (Wi-Fi) or wired LAN broadband internet connection.
For setup instructions please see page 6.
NB. If your wireless network is configured to use Wired Equivalent Privacy (WEP), or Wi-Fi Protected Access (WPA or WPA2) data encryption, you need to know the WEP or WPA code (Web Key) in order to allow Pico to connect to your wireless network.
Registering Your Radio and Accessing Additional Services
Some of Pico IR's more advanced internet radio features can only be accessed by visiting the Frontier Internet Radio Portal (www.wifiradio-frontier.com).
These features include the ability to create a "Favourites" list and add unlisted radio stations and podcasts. See page 8 for instructions on how to register your radio.
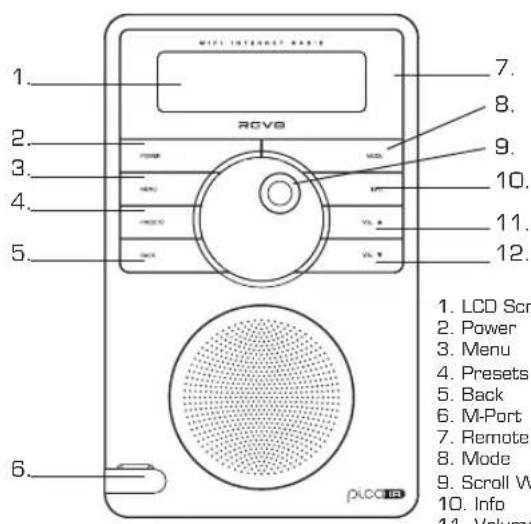
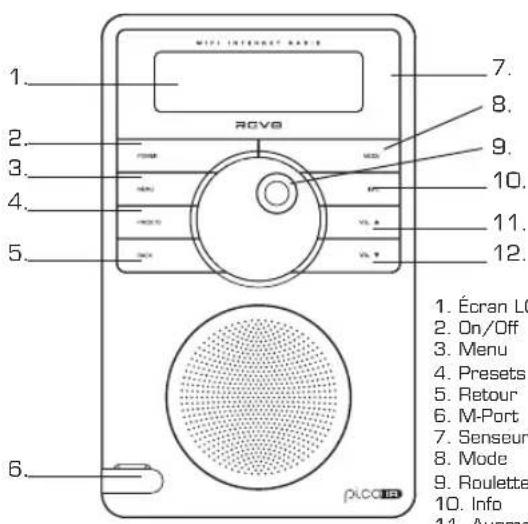
Controls and Connectors
text_image
1. LCD Scr 2. Power 3. Menu 4. Presets 5. Back 6. M-Port 7. Remote 8. Mode 9. Scroll W 10. Info 11. Volume 12. PCDC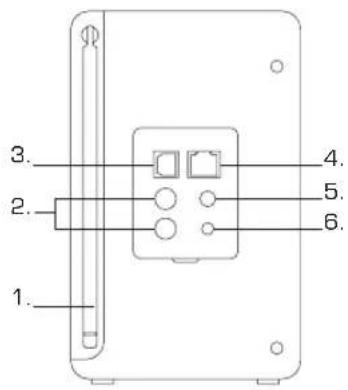
text_image
1. 2. 3. 4. 5. 6.- LCD Screen
- Power
- Menu
- Presets
- Back
- M-Port
- Remote Control Sensor
- Mode
- Scroll Wheel
- Info
- Volume Up
- Volume Down
- Telescopic Antenna
- Stereo RCA
- USB Update Port
- Wired LAN
- 3.5 Headphone Connector
- DC Power Socket
Remote Control
- Mode
- Back
- Menu
- Info
- Media Player
- 12 Presets
- Down
- Volume Down
- Volume Up
- Select
- Standby
- Up

text_image
plco IR 1. 2. 3. 4. 5. 6. Media Player II Pause ▶ Play ◀ Skip Back Skip Forward REV0 WIFI INTERNET RADIOPowering Pico IR
Your Pico IR radio is powered from the mains using the power adaptor supplied, or from its own internal rechargeable battery pack.
To power from the mains, insert the power adaptor plug into the DC power socket on the rear of Pico IR. When Pico IR is connected to mains power, its internal battery pack will commence charging. On a full charge, Pico IR's internal battery pack has a 12 hour life.
Only use the power adaptor supplied. Replacements are available from www.revo.co.uk
Getting Started
Pico IR is a sophisticated digital radio device, with several modes of operation and many advanced features.
In order for you to get the most out of Pico's functions, it is important that you learn how to use the cursor based control system, and also understand how Pico's menus work.
Pico's Control Method
Pico's control method is based around a central scroll wheel (with push to select function).
SCROLL WHEEL
Rotate clockwise and anti-clockwise to scroll through menu options.
PUSH TO SELECT:
Press the scroll wheel to select the current menu option. In FM mode, pressing the scroll wheel will initiate an FM scan.
BACK:
Press to return to the previously selected menu entry. Repeatedly pressing will return you to the top level of the Mode menu (for the mode you are in).
MENU:
Press to enter (or return to) the Mode menu for the mode of operation you are currently in. Pressing for a second time will return you to the 'playing' screen.
MODE:
Sequentially cycles through each of the modes of operation.
Using these keys, you will be able to perform most functions and navigate through Picos various menus.
Pico's Menus Explained
Pico has three types of menu as follows:
Main Menu
This is Pico's principle (top level) menu, and allows you to enter different operating modes, setup the radio, and view information such as software version and your radio's ID number.
Mode Menus
The Mode menus are so called because they show the functions available within the context of each of the operating modes Internet Radio mode, FM mode etc.).
Pressing the MENU button at any time will take you to the Mode menu of the operating mode your radio is currently in. Each Mode menu includes a listing for Main Menu – selecting this option will return you to the top level Main Menu (as described above).
Main Menu
The Main menu provides access to the following modes and sub-menus:
Internet Radio
Music Player
FM
M-Port
System Setup
Info
To select an option from the menu, simply use the scroll wheel to move through the menu options, then press to select.
Internet Radio Mode
Connecting to your broadband network
In order to access Pico IR's internet radio features, first it must be connected to your broadband connection.
- Firstly, select 'Internet Radio' by pressing the MODE key until 'Internet Radio Mode' appears on the display, or alternatively select from Pico's main menu.
- Pico will now ask you to select a 'Wlan region'. To do so, simply rotate the scroll wheel to cycle through the list of available options, then push to make your selection.
- Pico will ask you to choose the network you'd like to use. If there is more than one available, all will be listed.
If you are using a wired LAN connection choose 'Wired' option from the network list. To make your selection rotate the scroll wheel to cycle through the list of available options, then push to select.
If the Wi-Fi network you have chosen doesn't require a password, Pico will automatically connect.
If your chosen network has security enabled, you will be asked to input the relevant key or password. Remember, the password will be case-sensitive.
Use the scroll wheel to move through the banks of characters and push the wheel to select your chosen character. When the password has been entered, move the flashing cursor to the symbol at the end of the line and push to enter the code. Pico will now connect to the network.
■ Pico will remember the security key or password, you will not be required to enter it again, even after Pico has been used on another network in a different location.
■ Pico can also remember keys and passwords for multiple Wi-Fi networks.
If at some time you would like to connect to another Wi-Fi network, you can do so by selecting 'Wizard' from the 'Internet Setup' option on the main menu, and entering the required key/password.
■ Advanced users can edit their Wi-Fi settings by accessing the 'System Setup' option from the Main menu.
)Most of Europe USA
[Rescan] [Wired]
My Home Network
Connected
Key: 0123456789(4)C
Please wait Connecting...
Internet setup Time setup
Using Internet Radio Features
The internet radio mode allows you to choose from a number of services, including listening to live radio or Podcasts. There are five options on the internet radio menu as follows:
My Favourites: Used to navigate to your favourite stations. This list is compiled using your PC/Mac via the internet radio portal. See page 8 for details.
Stations: Find stations by location, genre, most popular, new station or by alphabetical search.
Podcast: Find Podcasts or 'Listen-Again' services by location, genre or search.
My Added Stations: Shows stations which you have personally added to Pico IR's list through the vTuner internet radio portal. See page 8 for details.
Help: Find your Access Code here, see page 8.
Choosing A Station
To select a station select 'Internet Radio' by pressing the MODE key until 'Internet Radio Mode' appears on the display, or alternatively select from Pico's main menu.
■ Using the scroll wheel, scroll to the 'Stations' option and press to select.
■ You now have the option of selecting a station by location (country), genre, alphabetical search, most popular stations or new stations. Using the scroll wheel, scroll through the options and press to choose your search criteria.
- Choosing location will give you an alphabetical list of continents/regions and then a list of countries. Use the scroll wheel to scroll through the list and push to select your chosen country. You will then be given the option of choosing a genre, to further refine your search.
■ After selecting your search criteria, you will be presented with a list of stations that meet your requirements. Simply select a station from the list to begin listening.
Choosing A Podcast
- Podcasts (also referred to as 'Listen Again') are selected in the same way as a regular station.
- Select 'Podcast' from the 'Internet Radio' menu, you can search for a station by location, genre or a combination of both.
The main difference is that when you have selected a station, you will then be presented with a list of 'shows' or Podcasts available from that station.
■ Select your choice using the scroll wheel before pushing to select your choice.
Internet Radio Mode
My Favourites >Stations
Location >Genre
Location >Genre
Finland >France
BBC Radio 1
BBC 1Xtra
BBC Radio 1 Playing
Podcast My Added Stations
Podcast My Added Stations
BBC 6 Music BBC Radio 7
My Favourites
It is possible to compile a list (or lists) of your favourite stations, allowing quick and easy access to a number of varied stations. To do this you must first register your radio and then choose your favourites by visiting the Frontier Internet Radio Portal - see 'Internet Radio Portal' section below for details.
■ When in 'Internet Radio Mode', choose 'Station List' from the options, then select 'My Favourites'.
If you have set up a 'My Favourites' list via the Frontier Portal, your list will appear on Pico IR's screen.
My Added Stations
If you have added any of your own stations to Pico's already huge station list (via the Frontier Portal - see section below), they will be listed here. The 'My Added Stations' option can be found under 'Station List' in 'Internet Radio Mode'.
Help
The 'Help' option is where you can find the Access Code that you require to register your radio on the Frontier Portal (see below for full instructions). A helpful FAQ audio track can also be found under this heading.

text_image
>My Favourite Stations >Station List Main Menu >Get Access Code FAQInternet Radio Portal
Access Additional Features
Some of Pico IR's more advanced internet radio features can only be accessed by visiting the Frontier Internet Radio Portal.
In order to access these features you must first register your radio.
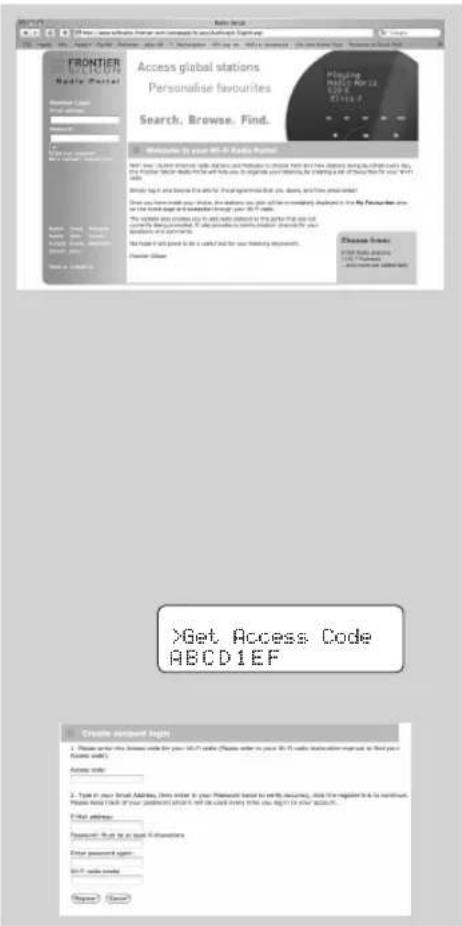
Registering Your Radio
■ Firstly, open your web browser on your PC or Mac and go to the Frontier Portal at http://www.wifiradio-frontier.com
- Click on the Register link, (located on the left hand panel) to begin the registration process.
You will now be asked for an Access Code.
To find your Access Code enter 'Internet Radio Mode', select 'Station List' from the options, then select 'Help'. From the 'Help' menu now select "Get Access Code".
■ Now fill-in the rest of the from to complete the registration process. You will now be able to login and take advantage of the various additional features and services offered by the Frontier Internet Radio Portal.
text_image
FRONTIER Radio Portal Access global stations Personalise favourites Search, Browse, Find. Welcome to your Web in Radio Portal Get access global stations with Access and Printers to access home and how access is during the week's day, and/or use of radio station or printers to access your website, by adding out of those who have your own user. Show log on and above the site for the programme that you are, and how yourself? Have you have your website, then address you will be more easily displayed as a new Facebook store or the base page of a website or http://www.abc.com/ The website also contains you to read web content in the website that can not currently be published. It also provides a web content for your questions and comments. Choose links: 2018 Facebook Online http://www.abc.com/ <|vision_start|> user at www.abc.com >Get Access Code ABCD1EF Create account rights: 1. Please select this website for your 56-79 radio. Please select in your 56-79 radio information map as if next your footer code? Access info: 2. Type in your Small Address, there select in your Facebook store to verify accounts, click the register link to continue. Please keep link of your passwords (which will be used) when you begin to find your account. Other accounts: Password: What is any other characteristics. Other password signs: 56-79 radio Request CancelMusic Player Mode
Music Player Operation
■ Pico IR's media player functionality allows you to play audio files (AIFF, AU, MP3, RM, WAV and WMA) and playlists (M3U) stored on a networked PC or Apple Mac. The media player functions have been tested and certified to operate with Windows 2000, Windows XP, Windows Vista and Mac OSX 10.2 - 10.4.9.
Windows PC Set-Up
There are two Music Player modes available. Each of them requires different settings, and either one can be used to playback music from a media server.
Shared Folders (CIFS)
In order to set up the device to playback music stored on shared network drives, user name, password and domain settings must be configured to work with the PC share settings. This is only required if the user has set a password on his/her shared folders.
PC: Domain/Workgroup configuration
The Domain configuration item can be found on a Windows XP machine as follows:
-
From the start menu, select Control Panel > System then select the Computer Name tab.
-
The Domain or Workgroup that this Computer is a member of is displayed in this tab.
-
If the PC is not a member of any Domain or Workgroup then one must be joined. To do this click on the change button on the computer name tab and enter the name of the domain (default on Windows XP is MSHOME).
-
A reboot of the PC may be prompted if the Domain or Workgroup has been changed.
PC: Setting up a new user account (Windows XP)
Pico IR may require you to set-up a user account on each PC that you wish to browse. By default most PCs have at least one user account associated with it. The user name and password (optional) needs to be the same on each PC as the Internet Radio only stores one user name and one password. For windows XP this can be set up as follows:
-
From the start menu, select Control Panel -> User accounts
-
From this screen left click the 'Add ...', and enter the new user name and the Domain/Workgroup setting noted above. Select the type of user (limited) and then select 'create account'.
-
Select the user just created, select 'Create Password ...' and enter a password for this user.
- Note the User Name and Password.
Note for Windows VISTA : Users have to turn on the Guest account via manage user accounts in the control panel in VISTA, then add access to either 'Everyone' or 'Guest' on the shared drive. They could create a new account for the internet radio, with a password, if they are concerned about security. The Guest account has no password by default, so the Wi-Fi radio will connect to it from its factory default settings.
PC: Configuring A Shared Drive
From the Start menu select My Computer and navigate to the directory you wish to share. Right click on the directory and select Sharing and Security. Configure the shared drive as read only, and ensure that the User Name created above has read access to the share.
Wi-Fi Radio: Storing The Username And Password
Before the radio can stream music from a PC, you need to ensure you have shared folder available on the PC, and set up the radio so that it knows the username and password (if one has been set) for the shared folder on the PC. This can be set up using the PC settings menu.
Shared Media (UPnP)
Media sharing uses Windows Media Player (WMP) 11 and above as media server. This mode does not require any setting in the radio, but the PC needs to be configured to allow the radio access to the media. You will only have to do it once, following the next steps.
- The PC must be connected to network (wired or wireless) that will be used to share media with the radio.
- Ensure that the radio is powered on and connected to the same network as the PC.
- In WMP, add to the media library the audio files and folders you want to share with your internet radio (in Library > Add to library).
- In the WMP main window, click on Library, then Media sharing.
The Internet radio is presented as an "Unknown Device". Make sure that the device has access to the shared media by selecting it and clicking
The PC is now ready to stream the music to the radio.
Music Player Mode
Apple Mac Set-Up
Set-Up for OSX 10.2.1 --> 10.4.9
Setup Windows File Sharing on the MAC:
From the 'Dock', click 'System Preferences'. From the 'System Preferences' window (under the 'Internet & Network' section) click 'Sharing'.
From the 'Sharing' window, do the following:
Under the 'Services' section, enable 'Personal File Sharing' and 'Windows Sharing'. Also, click 'Start' for each of these services. Under Windows file sharing you will also need to 'enable' the account you wish to share from (This needs your administrator password).
Under the 'Firewall' section, keep firewall off.
Under the 'Internet' section, keep 'Internet Sharing' off.
Setup an Account:
From the 'System Preferences' window, under the 'System' section, click 'Accounts'. Select an account and remember its 'Short Name' and password. This information will be used by Pico IR when connecting to your Mac.
Directory Setup:
From the 'Dock', click 'Finder'. From the 'Finder' window, click 'Applications > Utilities'. Holding Ctrl click on 'Directory Access' then select 'Get Info' and ensure that read / write enabled. Next double click on 'Directory Access' and enable the following:

AppleTalk LDAPv3

SLP SMB/CIFS
Also, for the 'SMB/CIFS' item, click 'Configure' and select an appropriate workgroup.
To allow your Pico IR you need to add your login details, by following the path Main Menu -> System Setup -> Internet Setup -> PC Settings. You should input your short username and administrator password here. Ensure that your Mac is successfully connected to the wireless network. Note, you may need to wait for few minutes for the changes to take effect.
You should now be able to access the audio files on your Mac by selecting Browse -> Shared Folders on Pico, then selecting the workgroup chosen in the step above. On selecting your Mac scroll through the available folders until you find the one which contains your music files.
Apple Mac Set-Up
Set-Up for OSX Leopard 10.5.1-->
Setup Windows File Sharing on the MAC:
From the 'Dock', click 'System Preferences'. From the 'System Preferences' window (under the 'Internet & Network' section) click 'Sharing'.
From the 'Sharing' window, do the following:
Under the 'Services' section, enable 'File Sharing' click 'Start' for this service. Then under the shared folders click the "+" and select the folder which contains your music files. Then Select the music folder from the shared folders area, in the users area make sure "Everyone" is set to read and write. Finally click on "Options" and make sure "Share files and folders using AFP" is checked and "Share files and folders using SMB" (This will require your admin password to activate) lastly make sure your account is also checked as active.
Ensure that your Mac is successfully connected to the wireless network. Note, you may need to wait for few minutes for the changes to take effect. You should now be able to access the audio files on your Mac by selecting 'Browse > Shared Folders' on Pico, then selecting your Mac from the list of devices. On selecting your Mac, you should see your folder that you selected above.
FM Mode
FM Operation
■ Extend the telescopic antenna found on the rear of Pico IR.
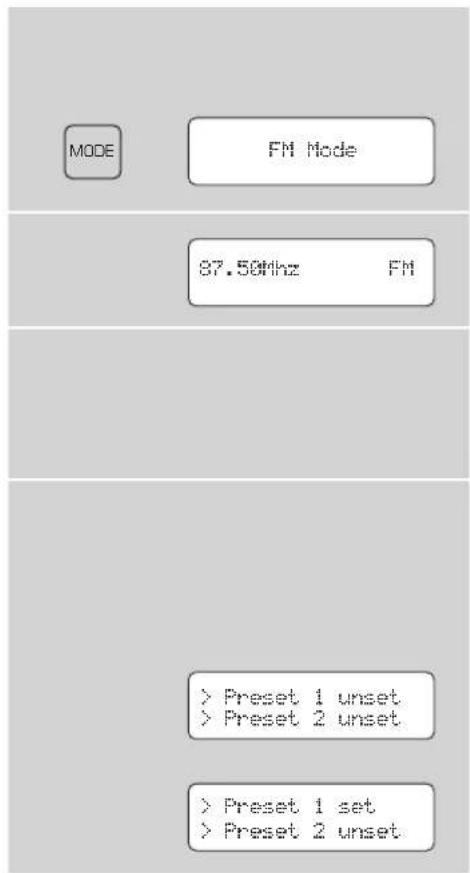
■ Enter FM Mode by pressing the MODE key and switching between Internet Radio Mode and FM Mode. Alternatively, FM Mode can be accessed via the Main Menu.
If this is the first time Pico IR has been in FM mode, it will start at the beginning of the FM frequency range. Otherwise, the last FM station you were listening to will be selected.
■ To scan through the FM frequency range turn the scroll wheel.
■ To 'SEEK' the next active station, press the scroll wheel.
Favourite Station Presets
■ Pico allows you to store 12 favourite station presets, either via the PRESET button on Pico itself, or on the optional Pico remote control.
■ To save the station you are currently listening to as a preset, simply press the PRESET button then use the scroll wheel to find an unused location. Now press the scroll wheel to store.
To listen to a stored station press the PRESET button then use the scroll wheel to locate your desired preset, then press to select.
text_image
MODE FM Mode 87.50MHz FM >Preset 1 unset >Preset 2 unset >Preset 1 set >Preset 2 unsetMPort Mode
Using MPort
■ Revo's MPort connector allows for quick and easy connection of an iPod®, similar MP3 player or sound source.
■ Using the connection lead supplied, Pico IR is transformed into a high quality digital audio speaker system.
■ Connect one end of the supplied audio lead to the headphone (or auxiliary out) socket of your source device, then connect the other end to the MPort on the front of Pico IR.
Now press the MODE key and cycle through the options until 'MPort Mode' is displayed.
■ Pico IR's LCD screen will now display the word 'MPort' on its screen.
■ You should adjust the output volume level on both the source device and on Pico itself to gain optimal volume levels and sound performance.
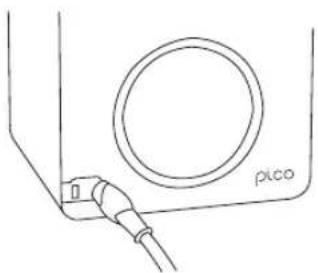
natural_image
Line drawing of a device with a circular component labeled 'pico' and a cable inserted (no text or symbols beyond label)MPort Mode
M-Port
System Setup
Internet Setup
■ Advanced users can find and edit their Wi-Fi settings in this section, these include MAC address, DHCP status, PC Settings, SSID, IP Settings etc.
Factory Reset
In the unlikely event that Pico IR should 'crash', 'freeze' or start behaving in a strange way, it is possible to perform a full software reset. This operation will completely reset Pico's memory, clearing all WEP/WPA codes and user settings. This will effectively return Pico IR to its default factory settings.
Software Update
It is possible to remotely update Pico IR's software via your Wi-Fi internet connection, to ensure that you have all the latest features, or to fix known bugs in the software. To check whether there are any updates available, simply go to the 'System Setup' option on the 'Main Menu' and select 'Software Update'. Pico IR will search to see if a software update is necessary, then report back. If an update is available and necessary, Pico IR will start the download process and install its new software automatically.
Info
Software Version and Radio ID
■ You may be asked for one or both of these pieces of information when dealing with a technical support issue.
- Both can be found under the 'Info' heading, located in the 'Main Menu'.
SW version ir.dabe-nmi.rvo.ve
Radio ID 0013E0A11D25
Troubleshooting
Wi-Fi Internet Radio
If you are experiencing any problems with your Pico IR's please read the following 'troubleshooting' guide. Alternatively you can visit the support section of the Revo website (www.revo.co.uk) or call our technical support staff on 01555 66 61 61.
If you have trouble connecting Pico IR to your wireless network, these steps may help to resolve the problem:
-
Confirm that a Wi-Fi connected PC can access the Internet (i.e. can browse the web) using the same network.
-
Check that a DHCP server is available, or that you have configured a static IP address on the radio.
-
Check that your network's firewall is not blocking any outgoing ports.
As a minimum, Pico IR needs access to UDP and TCP ports 80, 554, 1755, 5000 and 7070.
-
Check your access point does not restrict connections to particular MAC addresses. You can view the radio's MAC address under the 'Internet Setup' section, accessed via the 'System Setup' option on Pico's main menu.
-
If you have an encrypted network, check that you have entered the correct key or pass phrase into the radio. Remember that text-format keys are case sensitive. If, when attempting to connect to an encrypted network, your radio displays: 'Wireless error' followed by a 5-digit number, then please ensure that you enter the correct pass phrase for the network. If the problem persists, then you may need to consult your network configuration.
If Pico IR can connect to the network successfully, but is unable to play particular stations, it may be due to one of the following causes:
-
The station is not broadcasting at this time of the day (remember it may be located in a different time zone).
-
The station has reached the maximum allowed number of simultaneous listeners.
-
The station is not broadcasting anymore.
-
The link on the radio is out of date.
-
The Internet connection between the server (often located in a different country) and you is slow.
REVO®
picoIR
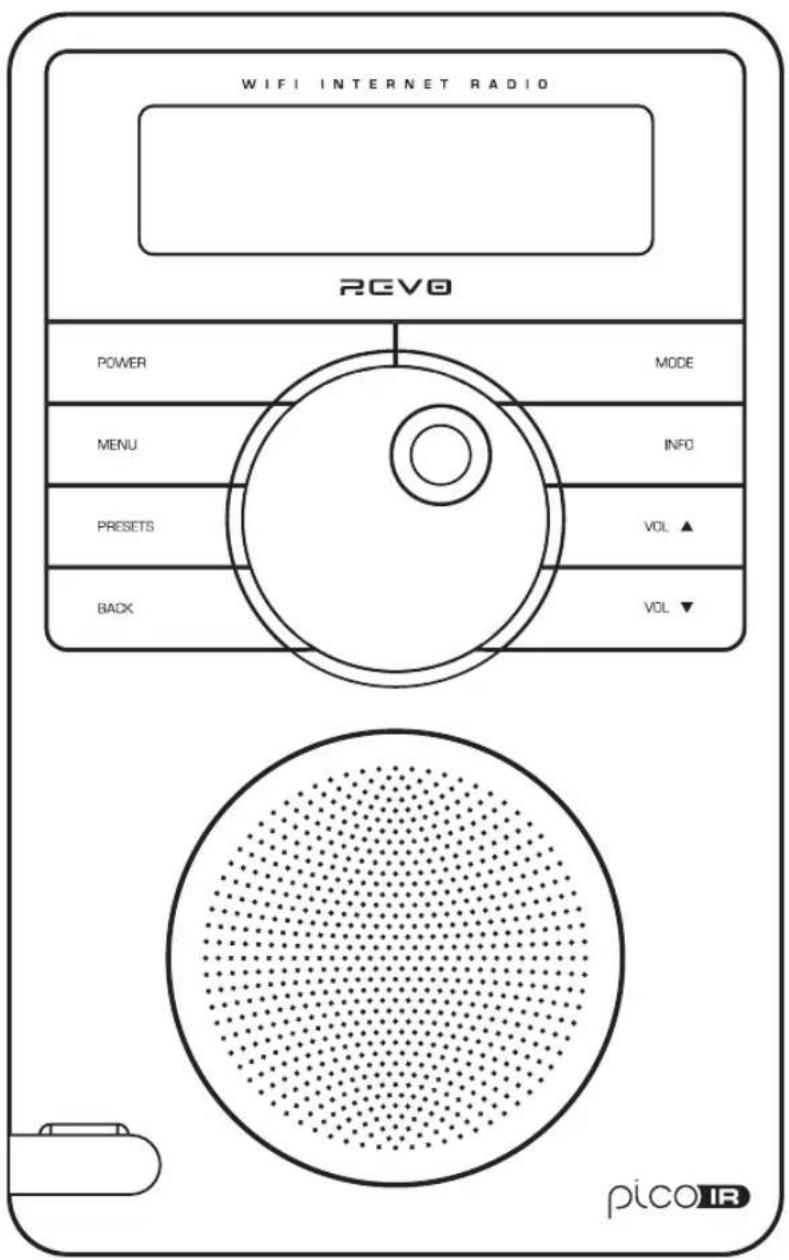
text_image
WIFI INTERNET RADIO REVO POWER MODE MENU INFO PRESETS VOL ▲ BACK VOL ▼ picoIRCopyright © 2009 Revo Technologies Ltd.
Revo Technologies Ltd
The Inox Building
Caldwellside
Lanark
Scotland
United Kingdom
ML11 7SR
Tel. 01555 66 61 61
Int. Tel. +44 1555 66 61 61
Fax. 01555 66 33 44
Int. Fax. +44 1555 66 33 44
Email. enquiries@revo.co.uk
Website: www.revo.co.uk
Controls and Connectors
text_image
MIFI INTERNET RACE RCVB 1. 2. 3. 4. 5. 6. 7. 8. 9. 10. 11. 12. 1. Écran LO 2. On/Off 3. Menu 4. Presets 5. Retour 6. M-Port 7. Senseur 8. Mode 9. Roulette 10. Info 11. Ausma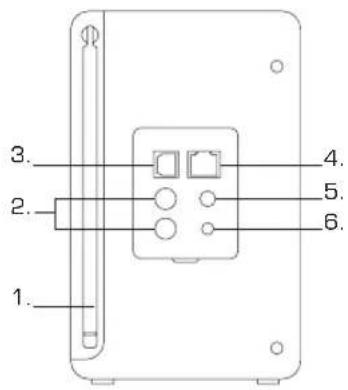
text_image
1. 2. 3. 4. 5. 6.Please wait Connecting...
Internet setup Time setup
Podcast My Added Stations
Podcast My Added Stations
BBC 6 Music BBC Radio 7
Mes préférés
text_image
FRONTIER NETWORK Radio Portal Access global stations Personalise favourites. Search, Browse, Find. Welcome to your Wi-Fi Radio Portal Next year, October 2018, the following radio stations are available to access. First and last stations being installed every day, in the United States. The data is available to the following: for a single file of the www.fr-fi radio station. Describe log it and broadcast this site for the programming that you listen, and then press saved. Once you have made your access, the readers will be immediately displayed in the My Personalize area on its own home page and download through your Wi-Fi radio. This website also includes you to add radio station to the other that you need to use any other platform. It also provides a service, information, and your questions and comments. Not used it will prove to be useful but for your listening app? Powder Store Choose from: STIR Data Available 1.0.1 Probability and 1.0.1.1.1.1.1.1.1.1.1.1.1.1.1.1.1.1.1.1.1.1.1.1.1.1.1.1.1.1.1.1.1.1.1.1.1.1.1.1.1.1.1.1.1.1.1.1.1.1.1.1.Mode lecteur
text_image
MODE FM Mode 87.50kHz FM >Preset 1 unset >Preset 2 unset >Preset 1 set >Preset 2 unsetMPort Mode
Utiliser MPort
Revo Technologies Ltd
The Inox Building
Caldwellside
Lanark
Scotland
United Kingdom
ML11 7SR
Tel. 01555 66 61 61
Int. Tel. +44 1555 66 61 61
Fax. 01555 66 33 44
Int. Fax. +44 1555 66 33 44
Email. enquiries@revo.co.uk
Website: www.revo.co.uk
m = 311
[Non-Text]
[Non-Text]
6

text_image
PLCO IR MODE TACH BOOST VOL 1 2 3 4 5 6 7 8 9 10 11 12 REV0 WIFI INTERNET RADIOMedia Player
|| Pause
Play

Skip Back Skip Forward
Pico IR einschalten
Please wait Connecting...
Internet setup Time setup
Podcast My Added Stations
Podcast My Added Stations
BBC 6 Music BBC Radio 7
Meine Favoriten
text_image
FRONTIER NETWORK Radio Portal Access global stations Personalise favourites. Search, Browse, Find. Welcome to your Wi-Fi Radio Portal View the website (www.roadlines.com) and includes a list of relevant information for the following: the website is also available in the website's main page. The website is also available in the website's main page. The website is also available in the website's main page. The website is also available in the website's main page. The website is also available in the website's main page. The website is also available in the website's main page. The website is also available in the website's main page. The website is also available in the website's main page. The website is also available in the website's main page. The website is also Available Choose from: >Get Access Code ABCD1EF Create account login Please enter the network code for your Wi-Fi radio (Please enter to your Wi-Fi radio instruction manual to find your Windows audio). Access code: 2. Type in your Email Address, then enter in your Password Email to verify accuracy, click the register link to continue. Please enter a link of your passwords on this will be used every time you begin to your account... F-Map address: Password: Must be at least 6 characters. Enter password again: Wi-Fi radio model Choose / CancelMusic Player Modus
Music Player Operation
text_image
MODE FM Mode 87.50kHz FM >Preset 1 unset >Preset 2 unset >Preset 1 set >Preset 2 unsetMPort Modus
MPort benutzen
Revo Technologies Ltd
The Inox Building
Caldwellside
Lanark
Scotland
United Kingdom
ML11 7SR
Tel. 01555 66 61 61
Int. Tel. +44 1555 66 61 61
Fax. 01555 66 33 44
Int. Fax. +44 1555 66 33 44
Email. enquiries@revo.co.uk
Sito Web: www.revo.co.uk
Media Player
II Pausa
▶ Play

Skip Indietro
Skip Avanti
Alimentare Pico IR
Please wait Connecting...
Internet setup Time setup
text_image
Internet Radio Mode My Favourites >Stations Location >Genre Location >Genre Finland >France BBC Radio 1 >BBC 1Xtra BBC Radio 1 Playing >Podcast My Added Stations >Podcast My Added Stations >BBC 6 Music BBC Radio 7Preferiti
text_image
FRONTIER MICROPHONE Radio Portal Access global stations Personalise favourites. Search, Browse, Find. Welcome to your Wi-Fi Radio Portal Next year, please visit the radio station and includes to access. Next and next database being used for your own data in the local radio station platform and help you to navigate your following for a listing of radio from your website sites. Simply log it and forward this site for the programming that you always, and then press about! Once you have made your access, we always use this site to be immediately displayed in the My Personalize area or on its home page at download through your website sites. This website is available to us all radio stations to the right that you will currently be provided. It also provides a very much shared for your questions and comments. Not based it will prove to be a useful bit for your listening app? Powder Global Choose from: STIR Data Available 1231-70000000000000000000000000000000000000000000000000000000000000000000000000000000000000000 >Get Access Code ABCD1EF Create account login 1. Please enter the network code for your 5G+ radio (Please refer to your 5G+ radio instruction manual to find your website login). Access code: 2. Type in your Email Address, then enter in your Personalized Email to verify accuracy, click the register to be to continue. Please keep each of your passwords within it will be used every time you begin to your account... F-mail: www.psd.com Password: Must be at least 6 characters Enter password again: 5G+ radio model Choose / CancelRadio Wi-Fi: Memorizzare Username e Password
Media Condivisi (UPnP)
Copyright © 2009 Revo Technologies Ltd. All rights reserved.
Revo Technologies Ltd
The Inox Building
Caldwellside
Lanark
Scotland
United Kingdom
ML11 7SR
Tel. 01555 66 61 61
Int. Tel. +44 1555 66 61 61
Fax. 01555 66 33 44
Int. Fax. +44 1555 66 33 44
Email. enquiries@revo.co.uk
Website: www.revo.co.uk
website: www.revo.co.uk/support
Media Player
|| Pause
▶ Play

Skip Back Skip Forward
Please wait Connecting...
Internet setup Time setup
Podcast My Added Stations
Podcast My Added Stations
BBC & Music BBC Radio 7
Mine favoritter
text_image
Frontier RICHMON Radio Portal Access global stations Personalise favourites. Search. Browse. Find. Welcome to your Wi-Fi Radio Portal New user: 100% (200% of users) or 50% (100% of users). You can access the website for your website. Browse it up to 30 minutes. You can access the website for your website. Browse it up to 30 minutes. You can access the website for your website. Browse it up to 30 minutes. You can access the website for your website. Browse it up to 30 minutes. You can access the website for your website. Browse it up to 30 minutes. You can access the website for your website. Browse it up to 30 minutes. You can access the website for your website. Choose from: USB Audio Address USB Wireless Downloaded and updated data >Get Access Code ABCD1EF Create account login Please order this network code for your Wi-Fi radio (Please order to your Wi-Fi radio button manual to find your Windows code) Choose code: Type in your Email Address, then order in your Password based on verify instructions, click the register that is continuous. Please need to check if your password should not be used every time you log on the user account. Email address: Password: Must be at least 0.0000000000000000000000000000000000000000000000000000000000000000000000000000000 Enter password again: Wi-Fi radio model Choose / CancelMusikkavspilling-modus
Fellesarkiver/shared folders (CIFS)
Fellesmedia/Shared Media (UPnP)
'Configure' and select an appropriate workgroup.
If you have trouble connecting Pico IR to your wireless network, these steps may help to resolve the problem:
Radio is our Religion
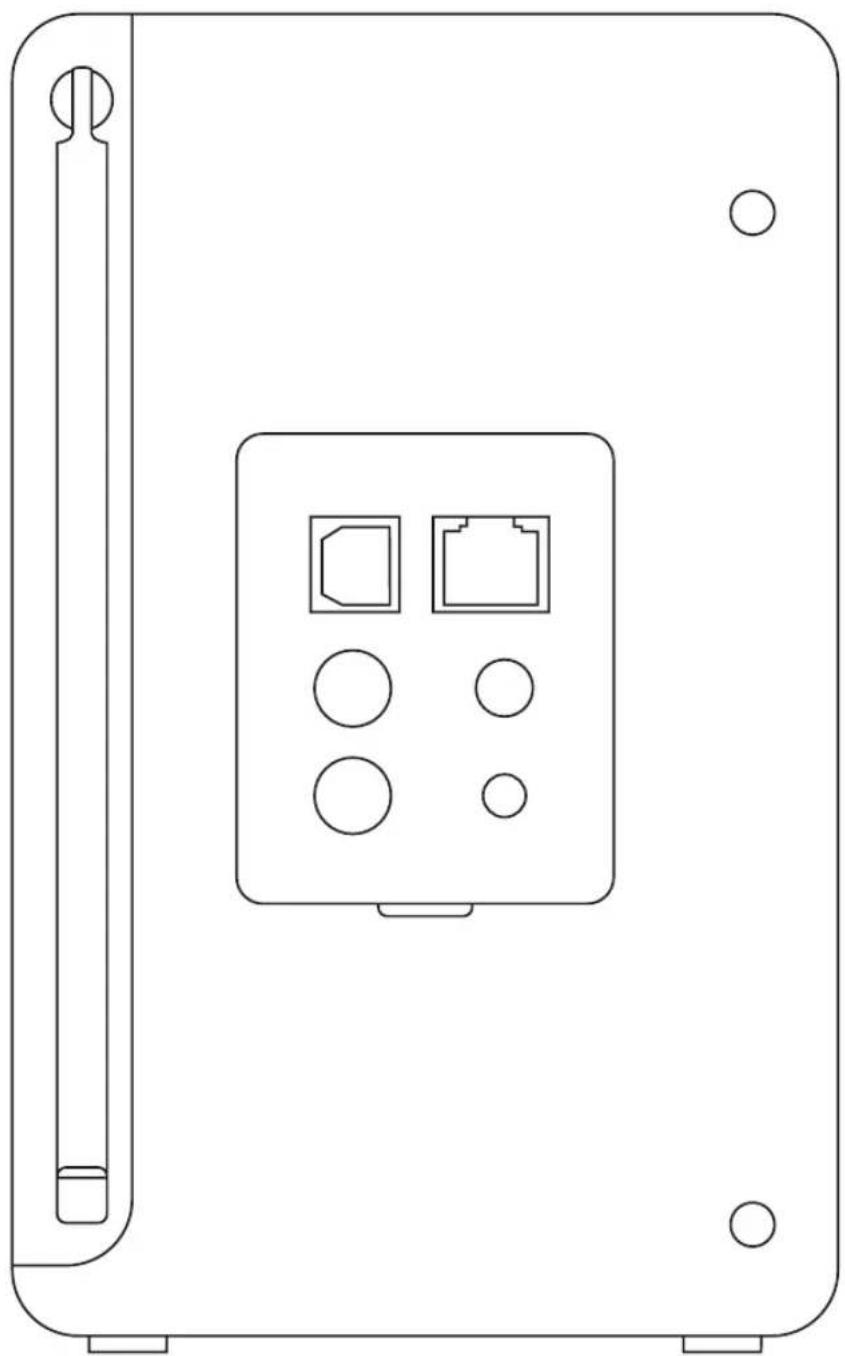
natural_image
Line drawing of a device rear panel with ports and indicators (no text or symbols)Revo Technologies Ltd The Inox Building Caldwellside Lanark Scotland United Kingdom ML11 7SR
Telephone Support 01555 666 161