R110 - Hi-fi system SCANSONIC - Free user manual and instructions
Find the device manual for free R110 SCANSONIC in PDF.
| Product Type | Hi-Fi System |
| Brand | Scansonic |
| Model | R110 |
| Power Supply | Mains via included power cable |
| Network Connectivity | Built-in Wi-Fi, Ethernet (RJ45) |
| Audio Inputs | Digital Coaxial, Digital Optical, Analog AUX (RCA) |
| Audio Output | Subwoofer (SubOut, RCA mono) |
| Tuner | FM, DAB, Internet Radio (via Frontier Silicon portal) |
| Supported Audio Formats | MP3, AAC, WMA, FLAC (via UPnP) |
| Functions | Equalizer, balance, alarm (dual alarm), auto sleep, presets |
| Included Accessories | Remote control, FM/DAB antenna, Wi-Fi antenna, power cable |
| Display | Backlit display with station information and clock |
| Maintenance | Wipe with a soft dry cloth; do not use solvents or cleaning agents |
| Safety | Do not expose to humidity, do not block ventilation openings, unplug during thunderstorms |
| Repairability | Repairs exclusively by qualified personnel |
| General Information | RoHS and WEEE compliant; energy class not specified |
Frequently Asked Questions - R110 SCANSONIC
User questions about R110 SCANSONIC
0 question about this device. Answer the ones you know or ask your own.
Ask a new question about this device
Download the instructions for your Hi-fi system in PDF format for free! Find your manual R110 - SCANSONIC and take your electronic device back in hand. On this page are published all the documents necessary for the use of your device. R110 by SCANSONIC.
USER MANUAL R110 SCANSONIC
natural_image
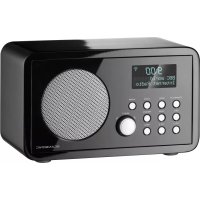
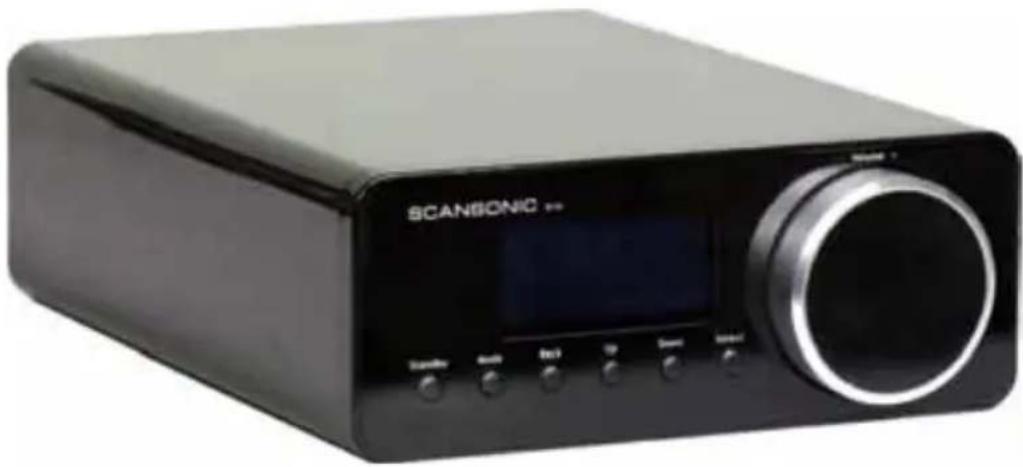
Black Scangsonic 350 electronic device with control buttons and a digital display (no visible text or symbols on body)UK User Manual
1 Contents
2 Important safety instructions
3 Owner's manual
4 Remote control
5 Front panel
5 Rear panel
6 Connecting the R110
7 Getting started/setup
8 Network
9 Internet radio
10 FM radio
11 DAB radio
12 External source
12 Sub out
13 Other settings
14 Internet radio portal
15 Music Player Mode
16 Alarm and Sleep
Important safety instructions
CAUTION, read this first
READ, FOLLOW, HEED, AND KEEP ALL INSTRUCTIONS AND WARNINGS.
DO NOT OPERATE NEAR ANY HEAT SOURCE
DO NOT BLOCK ANY VENTILATION OPENINGS ON THIS APPARATUS.
FOR PROPER OPERATION, THIS UNIT REQUIRES MINIMUM 4" (100mm) OF WELL VENTILATED SPACE AROUND HEATSINKS AND OTHER AIR FLOW PROVISIONS IN THE CABINET.
DO NOT USE THIS APPARATUS NEAR SPLASHING, FALLING, SPRAYING, OR STANDING LIQUIDS.
CLEAN ONLY WITH LINT-FREE DAMP CLOTH AND DO NOT USE CLEANING AGENTS.
ONLY CONNECT POWER CORD TO A POLARIZED, SAFETY GROUNDED OUTLET WIRED TO CURRENT ELECTRICAL CODES AND COMPATIBLE WITH VOLTAGE, POWER, AND FREQUENCY REQUIREMENTS STATED ON THE REAR PANEL OF THE APPARATUS.
PROTECT THE POWER CORD FROM DAMAGE DUE TO BEING WALKED ON, PINCHED, OR STRAINED.
UNPLUG THE APPARATUS DURING LIGHTNING STORMS OR WHEN UNUSED FOR LONG PERIODS OF TIME.
ONLY USE ATTACHMENTS AND ACCESSORIES SPECIFIED BY THE MANUFACTURER FOR SAFE OPERATION AND TO AVOID INJURY.
WARNING: TO REDUCE THE RISK OF ELECTRIC SHOCK OR FIRE. DO NOT EXPOSE THIS UNIT TO RAIN OR MOISTURE.
SERVICE MUST BE PERFORMED BY QUALIFIED PERSONNEL.

text_image
CAUTION RISK OF ELECTRIC SHOCK DO NOT OPEN
The lightning flash with arrowhead symbol within an equilateral triangle, is intended to alert the user to the presence of uninsulated "dangerous voltage" within the product's enclosure that may be of sufficient magnitude to constitute a risk of electric shock to persons.
The exclamation point within an equilateral triangle is intended to alert the user to the presence of important operating and maintenance (servicing) instructions in the literature accompanying the product
Owner's manual
Introduction
Thank you for choosing R110. We hope our product will bring you many years of enjoyment.
Please read this manual fully before unpacking and installing the product.
Carton contents
During production and packing we have carefully checked and inspected this receiver.
After unpacking please check for any damage from transport. We recommend that you keep the original carton box and packing material for any future shipping.
In the carton box you will find:
1 Remote control
1 FM/DAB antenna
1 Wi-Fi antenna
1 Mains cable
R110 installation
The receiver requires connection to the mains power supply, so for your safety it is important that you read this manual carefully.
First switch off all equipment when connecting your R110.
R110 positioning
Place the amplifier on a solid and plane surface. Avoid placement on carpets and other soft surfaces.
Secure that there is plenty of ventilation around the amplifier, minimum 4" (100mm) free space behind and above the amplifier.
Do not cover the ventilation holes on the backside of the amplifier.
Care and cleaning
We don't recommend use of any solvents or cleaners on R110 lacquered cabinets. The cabinet surface usually only requires dusting or cleaning with a soft cloth (do not use water).
Disconnect the unit from the mains supply if taken out of use for a longer period.
Environmental information
The R110 complies with international directives on the Restriction of Hazardous Substances (RoHS) in electrical and electronic equipment and the disposal of Waste Electrical and Electronic Equipment (WEEE) - the crossed bin symbol indicates compliance and that the products must be appropriately recycled or processed in accordance with these directives.
CAUTION, read this first
READ, FOLLOW, HEED, AND KEEP ALL INSTRUCTIONS AND WARNINGS.
DO NOT OPERATE NEAR ANY HEAT SOURCE DO NOT BLOCK ANY VENTILATION OPENINGS ON THIS APPARATUS.
DO NOT USE THIS APPARATUS NEAR SPLASHING, FALLING, SPRAYING, OR STANDING LIQUIDS.
CLEAN ONLY WITH LINT-FREE DAMP CLOTH AND DO NOT USE CLEANING AGENTS.
ONLY CONNECT POWER CORD TO A POLARIZED, SAFETY GROUNDED OUTLET WIRED TO CURRENT ELECTRICAL CODES AND COMPATIBLE WITH VOLTAGE, POWER, AND FREQUENCY REQUIREMENTS STATED ON THE REAR PANEL OF THE APPARATUS.
PROTECT THE POWER CORD FROM DAMAGE DUE TO BEING WALKED ON, PINCHED, OR STRAINED.
UNPLUG THE APPARATUS DURING LIGHTNING STORMS OR WHEN UNUSED FOR LONG PERIODS OF TIME.
ONLY USE ATTACHMENTS AND ACCESSORIES SPECIFIED BY THE MANUFACTURER FORSAFE OPERATION AND TO AVOID INJURY.
WARNING: TO REDUCE THE RISK OF ELECTRIC SHOCK OR FIRE.
DO NOT EXPOSE THIS UNIT TO RAIN OR MOISTURE.
SERVICE MUST BE PERFORMED BY QUALIFIED PERSONNEL.

text_image
CAUTION RISK OF ELECTRIC SHOCK DO NOT OPEN
The lightning flash with arrowhead symbol within an equilateral triangle, is intended to alert the user to the presence of uninsulated "dangerous voltage" within the product's enclosure that may be of sufficient magnitude to constitute a risk of electric shock to persons.

The exclamation point within an equilateral triangle is intended to alert the user to the presence of important operating and maintenance (servicing) instructions in the literature accompanying the product
Remote control
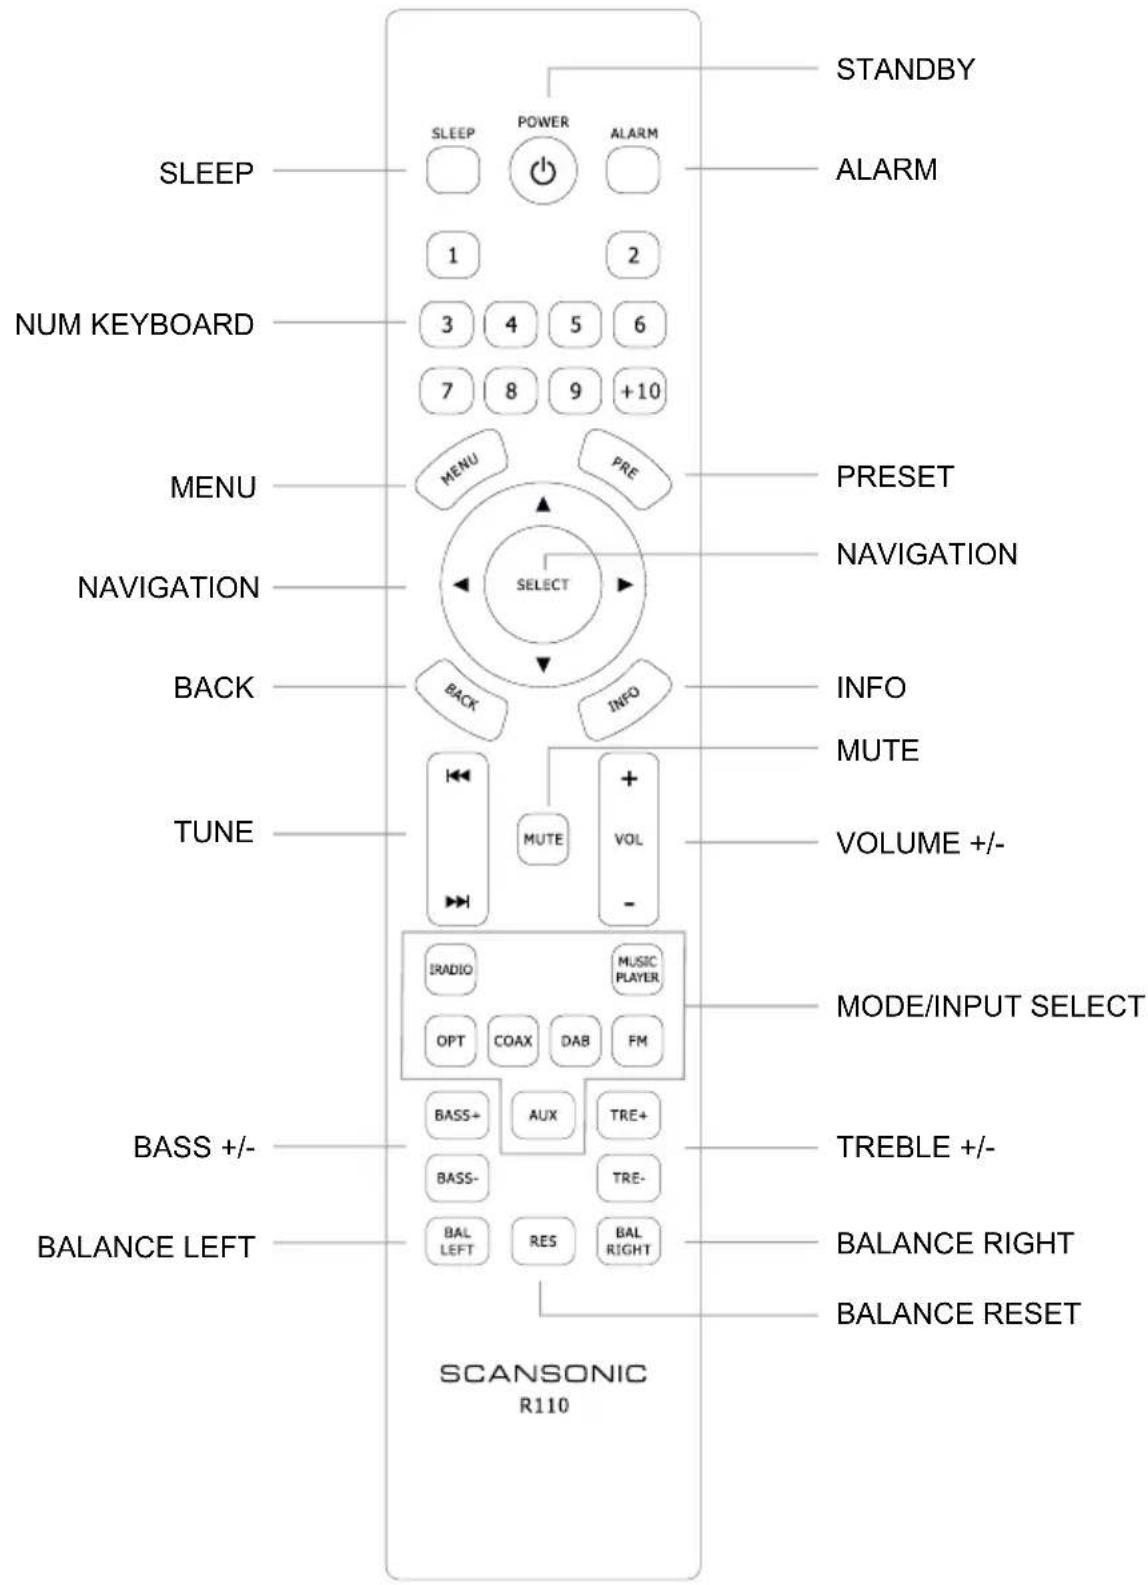
text_image
STANDBY SLEEP POWER ALARM 1 2 NUM KEYBOARD 3 4 5 6 7 8 9 +10 MENU PRE PRESENT NAVIGATION SELECT INFO MUTE TUNE MUTE VOLUME +/-- IRADIO MUSIC PLAYER OPT COAX DAB FM MODE/INPUT SELECT BASS+ AUX TRE+ BASS- TRE- BAL LEFT RES BAL RIGHT BALANCE LEFT BALANCE RIGHT BALANCE RESET SCANSONIC R110Front panel
text_image
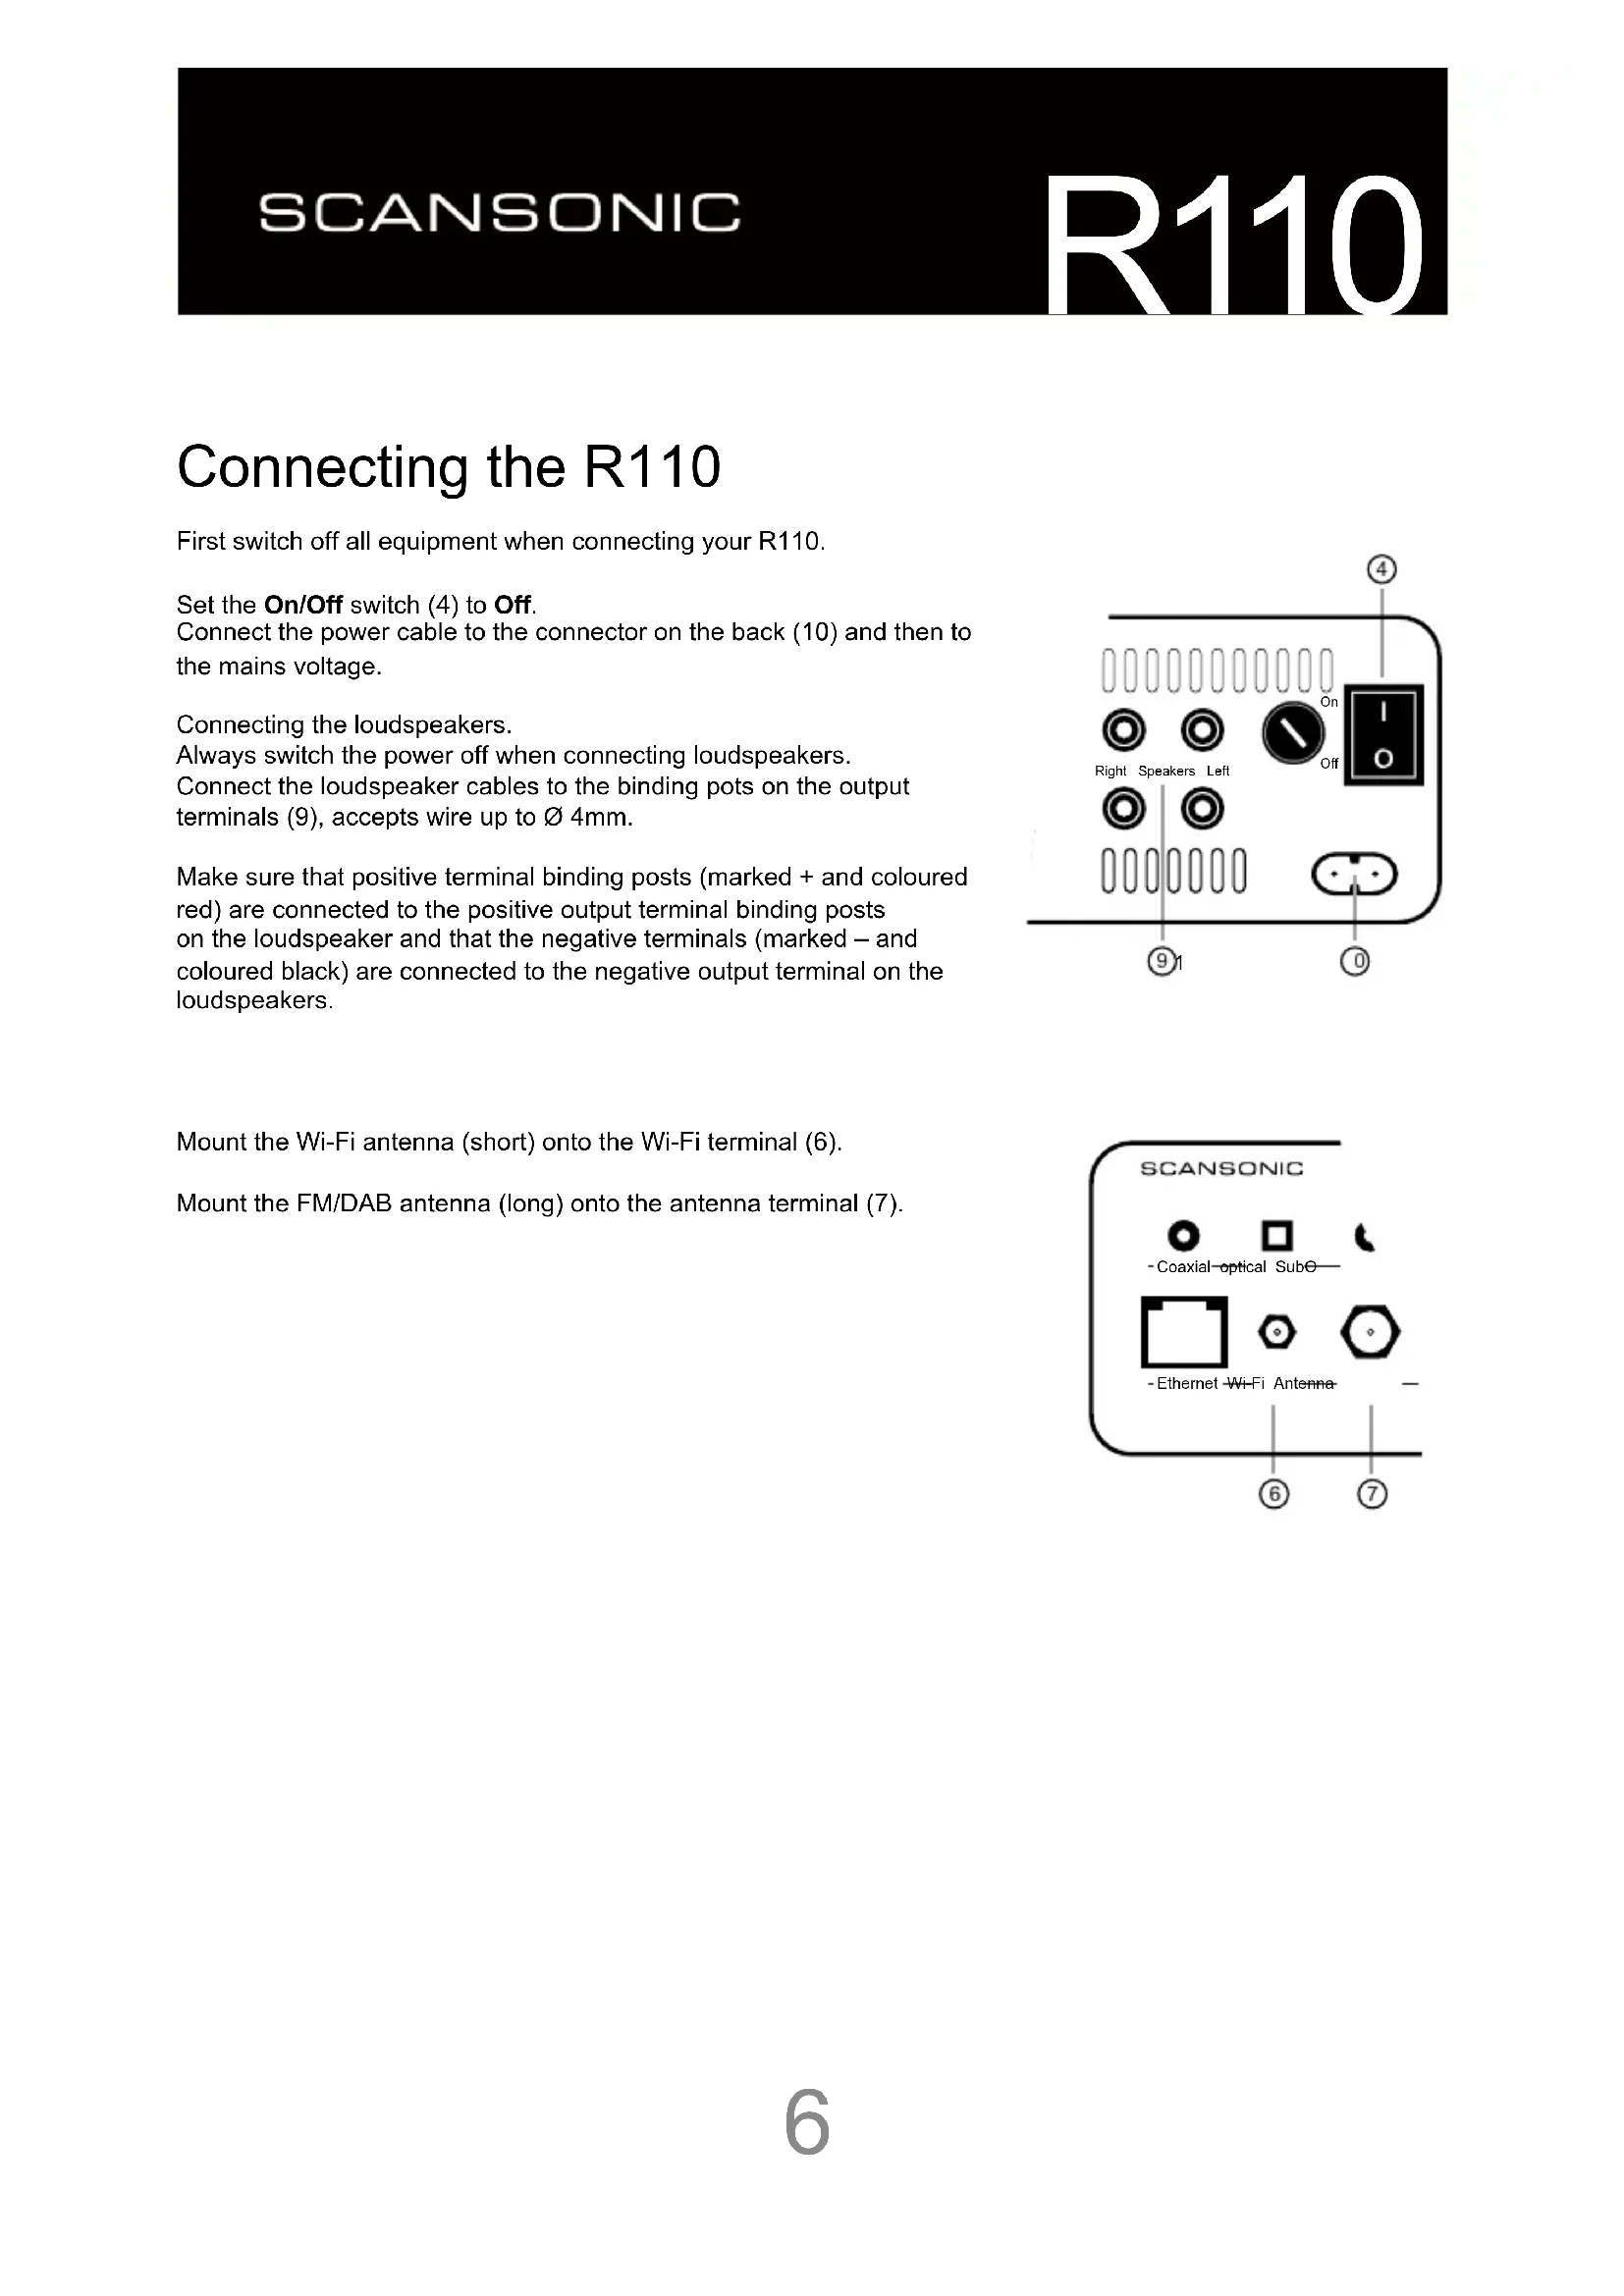
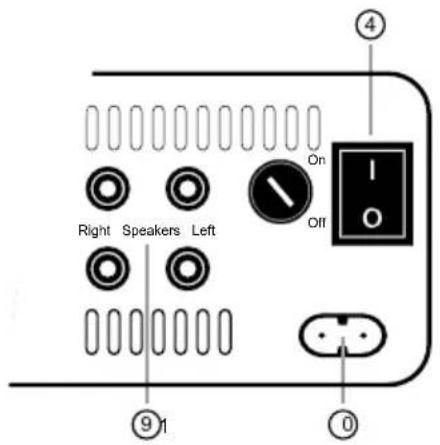
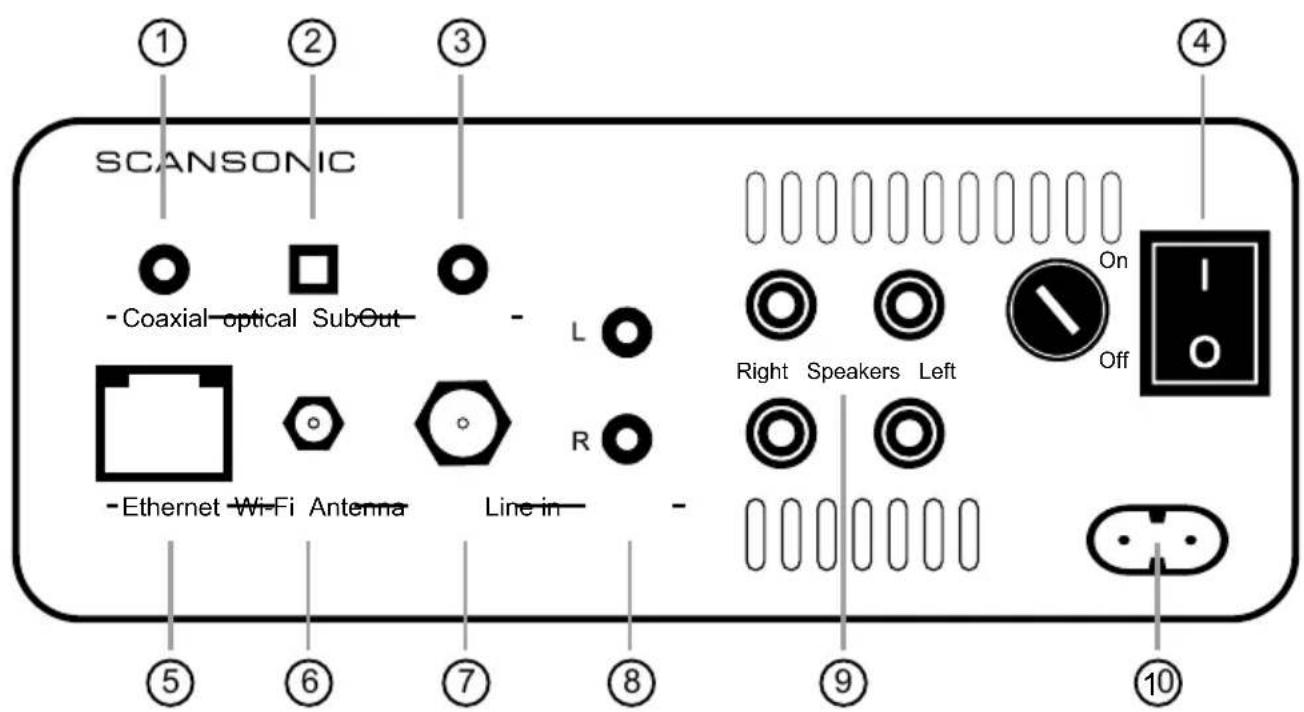
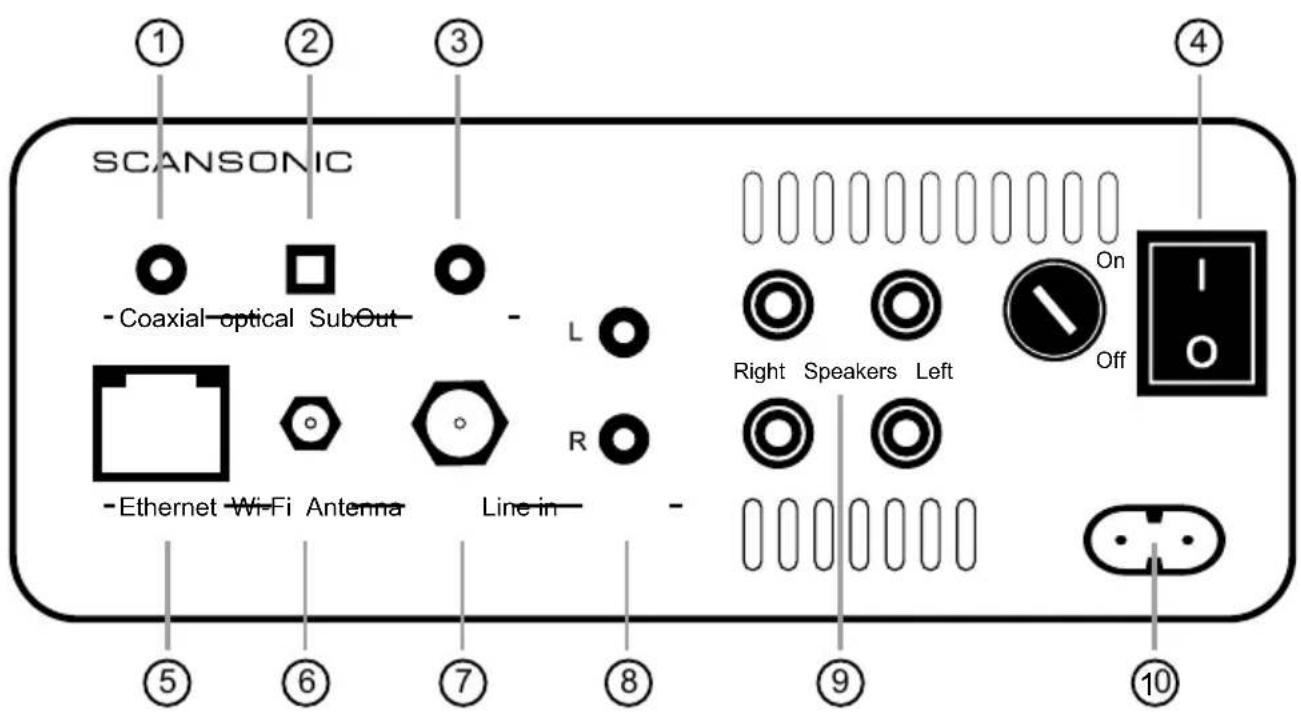
SCANSONIC - Coaxial - optical SubOut - L R - Ethernet - Wi-Fi Antenna Line in - ⑤ ⑥ ⑦ ⑧ ⑨ ⑩ On Off Right Speakers LeftConnecting the R110
First switch off all equipment when connecting your R110.
Set the On/Off switch (4) to Off.
Connect the power cable to the connector on the back (10) and then to the mains voltage.
Connecting the loudspeakers.
Always switch the power off when connecting loudspeakers.
Connect the loudspeaker cables to the binding pots on the output terminals (9), accepts wire up to ∅ 4mm.
Make sure that positive terminal binding posts (marked + and coloured red) are connected to the positive output terminal binding posts on the loudspeaker and that the negative terminals (marked – and coloured black) are connected to the negative output terminal on the loudspeakers.
text_image
Right Speakers Left On Off ④ ⑨ 1 ①Mount the Wi-Fi antenna (short) onto the Wi-Fi terminal (6).
Mount the FM/DAB antenna (long) onto the antenna terminal (7).

text_image
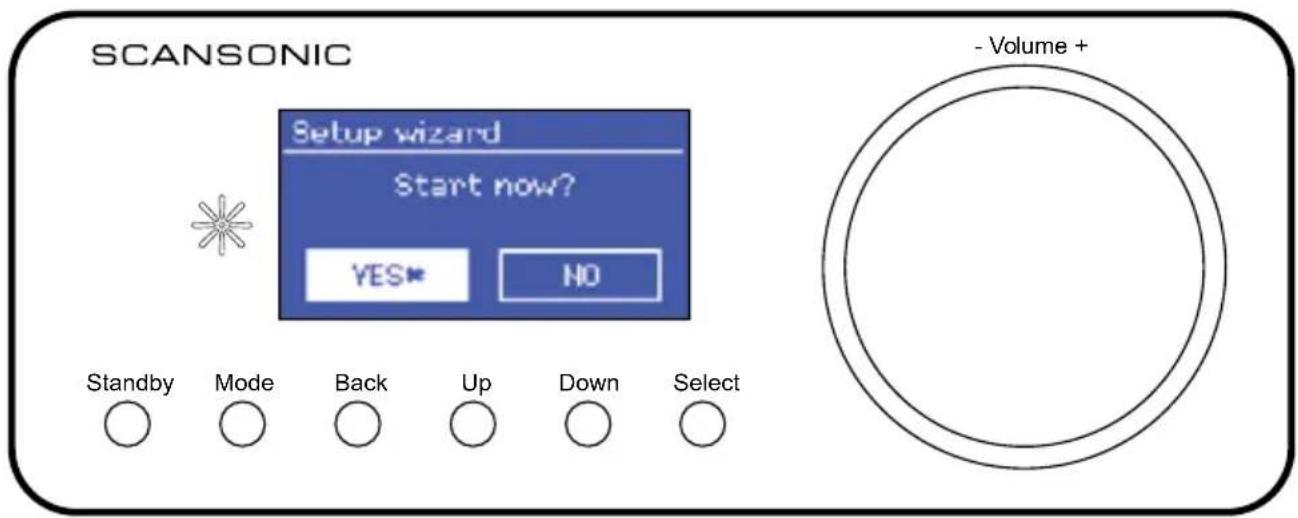
SCANSONIC - Coaxial-optical Subo- - Ethernet Wi-Fi Antenna - ⑥ ⑦Getting started/setup
Setup wizard
When Scansonic R110 is started for the first time, it runs through a setup wizard to configure settings for date/time and network.
Note: If you want to use wired network, you can bypass the wizard.

text_image
Setup wizard Start now? YES* NOSelect YES to start the setup wizard.
Note: If power is removed while the wizard is in progress, the wizard will run again next time the unit is started.
12/24 hour display
To change between 12 and 24 hour display.
Time/Date
The time and date can be updated manually or automatically. With auto-update, the time and date are automatically synchronize with external clocks.
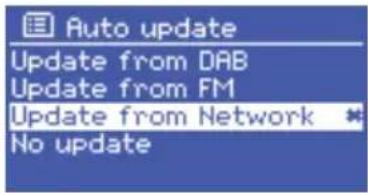
text_image
Auto update Update from DAB Update from FM Update from Network * No updateAuto-update
DAB uses time signals from DAB stations.
FM uses time signals from FM radio broadcasts.
Network uses time signal from Frontier Silicon Internet radio portal.
- Select Update from DAB, FM, Network or No update.
- Set your timezone
- If your country uses daylight saving,
Manual set
If you set No update, the wizard now prompts you to set time and date manually.
The date and time are displayed as dd-mm-yyyy and hh:mm AM/PM with the active value flashing.
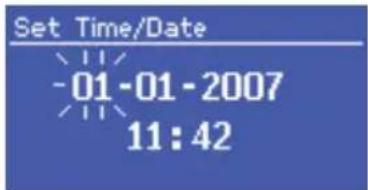
text_image
Set Time/Date -01-01-2007 11:42Adjust each value with the Select.
Network
Network wizard
Select Region.
Use Up/Down or navigation buttons on the remote control to highlight desired wireless network from the list or wired, if you want to use wired ethernet (RJ45 cable), press Select to enter selection.
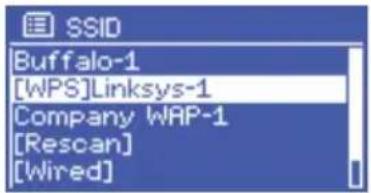
text_image
SSID Buffalo-1 [WPS]Linksys-1 Company WAP-1 [Rescan] [Wired]Enter the network key (password).
Use Up/Down or navigation buttons on the remote control to select the characters.
Press Select to enter the highlighted character.

text_image
Key: P0s5k 0123456789., ab cdefghijklmnopg rstuvwxyzABCDEF GHIJKLMNOPQRSTUVWXYZ BKSP OK CANCELHighlight OK and press Select to save password.
The unit will not try to connect to the network.
If connecting fails, it will return to the previous screen.

text_image
Network settings Please wait Processing... \The network is now connected.

text_image
Connected ConnectedPress Select to exit wizard.

text_image
Setup wizard Setup wizard completed Press 'SELECT' to exitThe unit remembers the last four networks it has connected to, and automatically tries to connect to whichever it can find.
For users experienced with networks settings, there are also other options for viewing and manually altering network settings from Menu > System > Settings > Network.
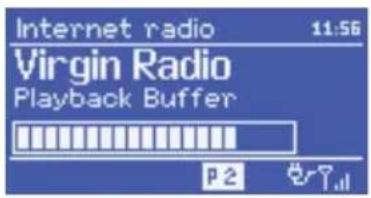
Internet radio
Network wizard
The unit can play thousands of radio stations and podcasts from around the world though a broadband internet connection.
When you select internet radio mode, the unit contacts the Frontier Silicon internet radio portal to get a list of stations, organised into region, country and different categories.
To enter internet radio mode, press Mode until the display shows Internet Radio, or press IRADIO on the remote control.
Use Up/Down or navigation buttons on the remote control to highlight desired wireless network from the list or wired, if you want to use wired ethernet (RJ45 cable), press Select to enter selection.
Last listened
Use this option to select a recently used station.
Select MENU > Last listened.
Station list
Use this option to browse internet broadcasts.
Select MENU > Station list.
Select on of the following options:
My Favourites Favorites added via the Internet radio portal
Local Local stations
Stations Browse all stations
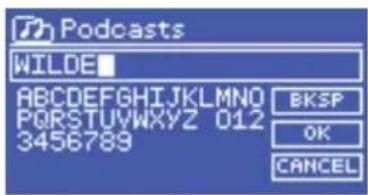
Podcasts Browse podcasts
My Added Manually added stations via the Internet radio
Stations portal.
When Stations is selected you can browse using these options:
Location Geographical location
Genre Rock, Pop, News etc.
Search Enter station name
Popular Popular stations
New Newly added stations
Genre
Once you have select a genre, the list can be display as follows:
All stations
Highlighted Stations
By country
Search
Enter the station name and select OK.
text_image
Internet radio 11:56 Virgin Radio Playback Buffer P2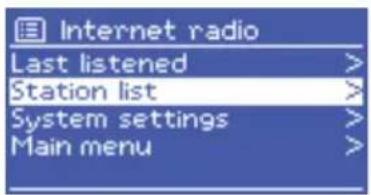
text_image
Internet radio Last listened > Station list > System settings > Main menu >
text_image
Stations Location > Genre > Search Popular > New >
text_image
Genre Alternative > Ambient > Big Band > Bluegrass > Blues >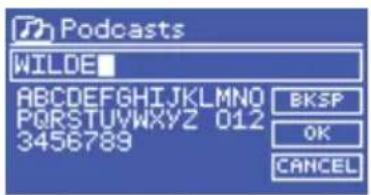
text_image
Podcasts WILDE ABCDEFGHIJKLMNOP PQRSTUWXYZ 012 3456789 BKSP OK CANCELFM radio
FM radio mode receives analogue radio from the FM band.
To enter FM mode, press Mode until the display shows FM radio or press FM on the remote control.

text_image
FM Alice 97.3 Best Music in the WorldSelecting stations
To find a station, press Select. The frequency display to count as the unit scans the FM band. Alternatively, you can scan up or down by pressing the Up or Down button or press and hold the I>> or <<I on the remote control.
Presets
To store a station as a preset, press and hold Preset until the display shows the Save to preset screen. Select one of the 10 presets and press Select to save.
To select a preset, press Preset briefly, then select one of the listed presets.
Scan settings
By default, FM scans stops at any Available station. This may result in a poor signal to noise ratio (hiss) from weak stations.
To change the scan settings to stop only at stations with good signal strength, select Menu > Scan setting and change option to Yes.
Audio settings
By default, all stereo stations are reproduced in stereo. For weak stations this may result in a poor signal to noise ratio (hiss).
To play weak stations in mono, select Menu > Audio setting and change option to Yes.
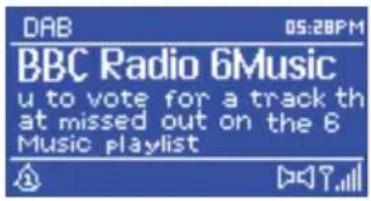
DAB radio
DAB radio mode receives digital radio from the DAB band and shows information about the station, the program and music.
To enter DAB mode, press Mode until the display shows DAB radio or press DAB on the remote control.
text_image
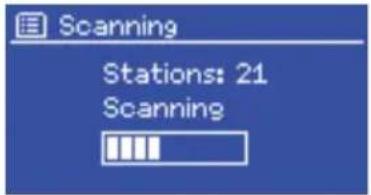
DAB 05:28PM BBC Radio 6Music u to vote for a track th at missed out on the 6 Music playlistScan for DAB stations
First time the DAB mode is selected, it automatically scans for DAB stations.
Use Up/Down to select a station from the list and press Select.
text_image
Scanning Stations: 21 ScanningTo make a new station scan: Menu > Scan and press Select.
Selecting stations
Use MENU > Station to show station and press Select to choose a station. You can also use I>> or <<I to step to the next DAB station.
Manual tune
Used to scan manually.
Prune invalid
Removes unavailable stations.
DRC
Some DAB broadcasts uses DRC.
DRC is a dynamic range compression.
It increases the quieter parts and decreases the louder parts of the audio signal.
Use MENU > DRC and select DRC high, DRC low or DRC off.
Station order
Used to select sorting order for DAB stations.
Use MENU > Station order and select Alphanumeric, Ensemble or Valid.
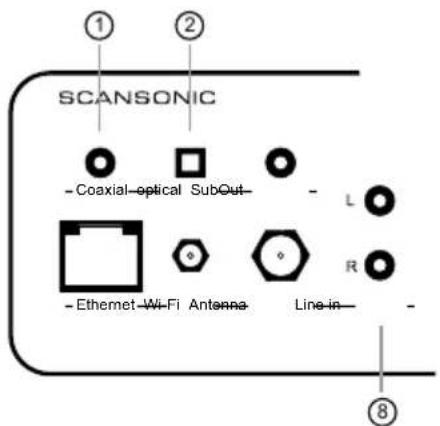
External source
The R110 can playback signal from different external sources, such as MP3 player, DVD, TV etc.
Always turn the volume down and switch off all devices, before connecting external sources.
Coaxial (digital)
Connect the coaxial cable from the external source to the coaxial connector (1) on the back.
Press Mode several times until the display shows Coax in, or press COAX on the remote control.
Optical (digital)
Connect the optical cable from the external source to the optical connector (2) on the back.
Press Mode several times until the display shows Opt in, or press OPT on the remote control.
AUX (analogue)
Connect the RCAI cable (red and white) from the external source to the line in connectors (L and R) (8) on the back.
Press Mode several times until the display shows AUX in, or press AUX on the remote control.
text_image
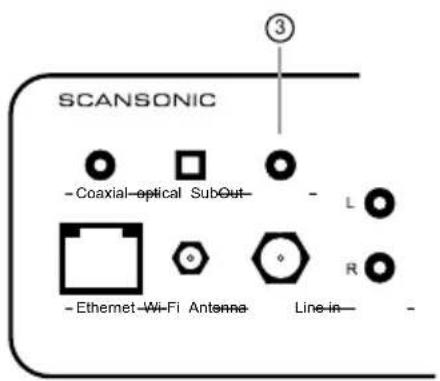
① ② SCANSONIC - Coaxial-optical SubOut - L - Ethernet-Wi-Fi Antenna Line-in - ⑧Sub out
The R110 can provide signal to an active subwoofer.
Always turn the volume down and switch off all devices, before connecting a subwoofer.
Sub out
Connect the RCA mono cable from the subwoofer to the SubOut connector (3) on the back.
text_image
SCANSONIC - Coaxial-optical SubOut- - L - Ethernet Wi-Fi Antenna Line-in- -Other settings
Equaliser
You can use the equaliser to change the bass, treble and loudness.
Menu > System settings > Equaliser
Choose between presets: Normals, Flat, Jazz, Rock etc., or select My EQ profile setup, to make your own settings.
Bass
You can change the bass setting from the remote using BASS +/BASS -.
Treble
You can change the bass setting from the remote using TREBLE +/TREBEL -
Balance
You can change the balance between the left and the right speaker from the remote control using BAL LEFT and BAL RIGHT.
To reset the balance press RES.
Language
You can change the display language.
MENU > System settings > Language
Factory reset
You can change all settings back to the factory defaults.
MENU > System settings > Factory reset select Yes.
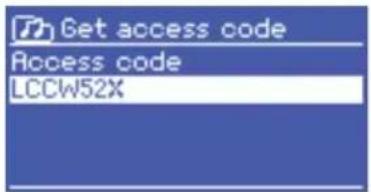
Internet radio portal
Registration
The Frontier Silicon Internet radio portal website allows you to organise your favorites lists, manually add stations and also listen to internet radio on a computer.
To register your Scansonic with the portal, first get your radios unique access code:
Switch to Internet radio mode.
MENU > Station list > Help > Get access code
text_image
Get access code Access code LCCW52XWrite down the code
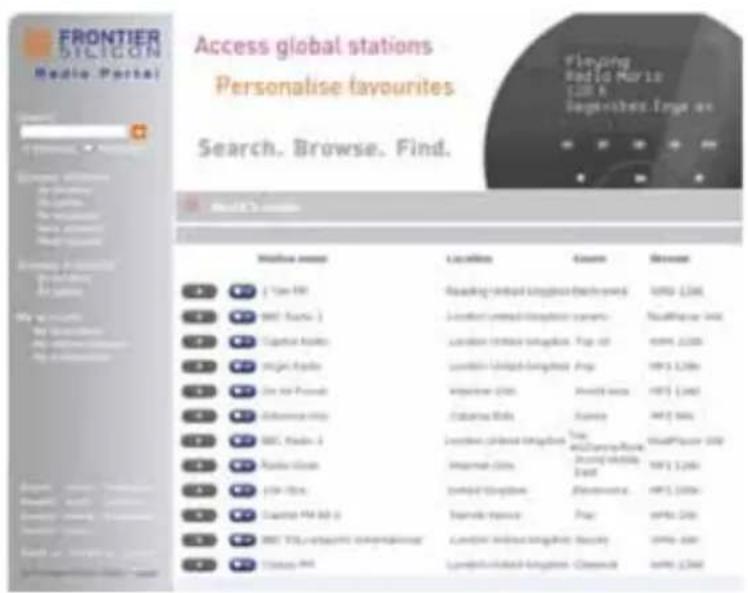
Visit the portal website: www.wifiradio-frontier.com
If this is your first visit to the portal, register for a new account, entering the following information:
- access code
- your e-mail address
- password
• radio model (Scansonic R110)
text_image
FRONTIER SYLICON Media Portal Access global stations Personalise favourites Search, Browse, Find. Playing Red 10 Paris LUIK & logrettes.Engie en Model's Search Online search engine Reading: http://www.telgust.com/ (http://1236) Local search engine system Local search engine Page-45 Local search engine Page Local search engine Page Local search engine Page Local search engine Page Local search engine Page Local search engine Page Local search engine Page Local search engine Page Local search engine Page Local search engine Page Local search engine Page Local search engine Page Local search engine Page Local search engine Page Local search engine Page Local search engine Page Local search engine Page Local search engine Page Local search engine Page Local search engine Page Local search engine Package Local search engine Package Local search engine Package Local search engine Package Local search engine Package Local search engine Package Local search engine Package Local search engine Package Local search engine Package Local search engine Package Local search engine Package Local search engine Package Local search engine Package Local search engine Package Local search engine Package Local search engine Package Local search engine Package Local search engine Package Local search engine Package Local search engine Package Local search enginePackage Local search engine Package Local search engine Package Local search engine Package Local search engine Package Local search engine Package Local search engine Package Local search engine Package Local search engine Package Local search engine Package Local search engine Package Local search engine Package Local search engine Package Local search engine Package Local search engine Package Local search engine Package Local search engine Package Local search engine Package Local search engine Package Local search engine Package Local search engine package Local search engine package Local search engine package Local search engine package Local search engine package Local search engine package Local search engine package Local search engine package Local search engine package Local search engine package Local search engine package Local search engine package Local search engine package Local search engine package Local search engine package Local search engine package Local search engine package Local search engine package Local search engine package Local search engine package Local search engine Package Local search engine Package Local search engine Package Local search engine Package Local search engine Package Local search engine Package Local search engine Package Local search engine Package Local search engine Package Local search engine Package Local search engine Package Local search engine Package Local search engine Package Local search engine Package Local search engine Package Local search engine Package Local search engine Package Local search engine Package Local search engine Package Local search engine PurchaseIf you already have an account and wish to add an additional radio, log in to your account and select: My preferences > Add another Wi-Fi radio.
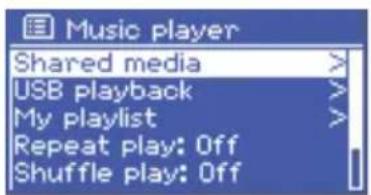
Music Player Mode
Music player mode plays audio files such as MP-3, ACC, WMA or FLAC from a computer on the local network.
To enter FM mode, press Mode until the display shows Music player or press MUSIC PLAYER on the remote control.

text_image
Music Player 05:28PM Flirt Artist: CameoShared media (from UPnP media server).
Press MENU > Shared media.
If you have set up shared media (such as Windows Media Player) on your network, you should see a list of the computers containing shared media.
text_image
Music player Shared media > USB playback > My playlist > Repeat play: Off Shuffle play: OffSelect a computer from the list to browse and select a track.
Once a track has been selected, you can skip to the next or previous track, using I>> and <<I on the remote control.
Note: There are several option to share media through UPnP, such as Windows Media Player and some Home Nas servers.
iTunes does not currently work as a UPnP media server.
Alarm and Sleep
The radios alarm lets you wake up to your desired radio station – or a buzz.
Setting the alarm
Press ALARM on the remote control.
Choose Alarm 1 or Alarm 2 and press SELECT.
Set the following parameters:
- Enable: Off, Daily, Once, Weekends or Weekdays
- Time: HH:MM
• Mode: Buzzer, Internet radio, DAB, FM - Preset: Last listened or 1-10
• Volume: 0 - max.
To save the new settings, scroll down and select Save.
The alarm icon is now showing the display.
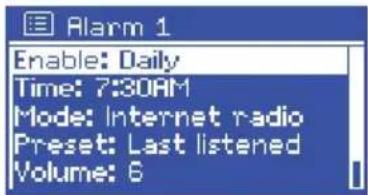
text_image
Alarm 1 Enable: Daily Time: 7:30AM Mode: Internet radio Preset: Last listened Volume: 6To stop alarm press ALARM or POWER/STANDBY.
Sleep
The sleep function sets the unit in standby when the selected time is elapsed.
To set the sleep timer, press SLEEP on the remote control.
Press SLEEP several time to choose from Sleep OFF, 15 MINS, 30 MINS, 45 MINS or 60 MINS.
natural_image
Black Scaniaoic electronic device with control panel and display screen (no visible text or symbols on body)text_image
SCANSONIC - Coaxial - optical SubOut - L R - Ethernet - Wi-Fi Antenna Line in - ⑤ ⑥ ⑦ ⑧ ⑨ ⑩ On Off Right Speakers LeftR110 anschließen
text_image
Setup wizard Start now? YES* NOtext_image
Auto update Update from DAB Update from FM Update from Network * No updatetext_image
SSID Buffalo-1 [WPS]Linksys-1 Company WAP-1 [Rescan] [Wired]
text_image
Key: P0s5k 0123456789., ab cdefghijklmnopg rstuvwxyzABCDEF GHIJKLMNOPQRSTUVWXYZ BKSP OK CANCEL
text_image
Network settings Please wait Processing... \
text_image
Connected Connected
text_image
Setup wizard Setup wizard completed Press 'SELECT' to exittext_image
Internet radio Last listened > Station list > System settings > Main menu >text_image
Stations Location > Genre > Search Popular > New >
text_image
Genre Alternative > Ambient > Big Band > Bluegrass > Blues >Genre
text_image
FM Alice 97.3 Best Music in the WorldSender auswählen
text_image
DAB 05:28PM BBC Radio 6Music u to vote for a track th at missed out on the 6 Music playlistDAB-Sendersuche
text_image
Scanning Stations: 21 Scanningtext_image
FRONTIER SYLICON Media Portal Access global stations Personalise favourites Search. Browse. Find. Playing Red 10 Paris LUIK & logrettes Froyes as Home's Search Online search [ Tour AR] [ BBC: Sources ] [ Capital Asia] [ Major Asia] [ In the Ponds] [ Alliance Help] [ BBC: Sources ] [ Polar Group] [ LOP-Box] [ Capital FM Box 6] [ BBC: Sources ] [ Latin America International] [ Country FM ] Reading - Linked Integration (which only) London - Linked Integration System London - Linked Integration Page - all London - Linked Integration Page My name My name My name My name My name My name My name My name My name My name My name My name My name My name My name My name My name My name My name My name My name My name My name My name My name My name My name My name My name My name My name My name My name My name Online search Local search Search Browse Reading - Linked Integration (which only) London - Linked Integration System London - Linked Integration Page - all London - Linked Integration Page My name My name My name My name My name My name My name My name My name My name My name My name My name My name My name My name My name My name My name My name My name My name My name My Name Reading - Linked Integration (which only) London - Linked Integration System London - Linked Integration Page - all London - Linked Integration Page My name My name My name My name My name My name My name My name My name My name My name My name My name My name My name My name My name My name My name My name My name My name My name Reading - Linked Integration (which only) London - Linked Integration System London - Linked Integration Page - all London - Linked Integration Page My name My name My name My name My name My name My name My name My name My name Reading - Linked Integration (which only) London - Linked Integration System London - Linked Integration Page - all London - Linked Integration Page - All Playing Red 10 Paris LUIK & logrettes Froyes as Playing Red 10 Paris LUIK & logrettes Froyes as Playing Red 10 Paris LUIK & logrettes Froyes astext_image
Music player Shared media > USB playback > My playlist > Repeat play: Off Shuffle play: Offtext_image
Alarm 1 Enable: Daily Time: 7:30AM Mode: Internet radio Preset: Last listened Volume: 6natural_image
Black Scaniaoic electronic device with control panel and display screen (no visible text or symbols on body)DK Brugervejledning
Indhold
BESKYT STR∅MKABLET MOD SKADE SOM F∅LGE AF AT BLIVE TRÅDT PÅ, KLEMT ELLER BELASTET.
TAG STIKKET UD UNDER TORDENVEJR ELLER HVIS ENHEDEN IKKE BRUGES I LÄNGERE TID.
BRUG KUN UDSTYR OG TILBEH∅R GODKENDT AF PRODUCENTEN, FOR SIKKER ANVENDELSE OG FOR AT UNDGÅ SKADER.
ADVARSEL: FOR AT REDUCERE RISIKOEN FOR ELEKTRISK ST∅D ELLER BRAND.
UDSÆT IKKE DENNE ENHED FOR REGN ELLER FUGT.
REPARATION SKAL UDF∅RES AF KVALIFICERET PERSONALE.

text_image
FORSIGTIG RISIKO FOR ELEKTRISK STÖD MÅ IKKE ÅBNES
BESKYT STR∅MKABLET MOD SKADE SOM F∅LGE AF AT BLIVE TRÅDT PÅ, KLEMT ELLER BELASTET.
TAG STIKKET UD UNDER TORDENVEJR ELLER HVIS ENHEDEN IKKE BRUGES I LÄNGERE TID.
ANVEND KUN TILSLUTNINGER OG TILBEH∅R, DER ER ANGIVET AF PRODUCENTEN. DERVED OPNÅS SIKKER BETJENING, OG SKADER UNDGÅS.
ADVARSEL: FOR AT REDUCERE RISIKOEN FOR ELEKTRISK ST∅D ELLER BRAND. UDSÆT IKKE DENNE ENHED FOR REGN ELLER FUGT.
REPARATION SKAL UDF∅RES AF KVALIFICERET PERSONALE.

text_image
FORSIGTIG RISIKO FOR ELEKTRISK STÖD MÅ IKKE ÅBNES
text_image
SCANSONIC Setup wizard Start now? YES* NO - Volume + Standby Mode Back Up Down Select Volume +Bagpanel
text_image
SCANSONIC - Coaxial-optical SubOut - L R Ethernet Wi-Fi Antenna Line in - 5 6 7 8 9 10 On Off Right Speakers LeftTilslutning af R110
text_image
Setup wizard Start now? YES* NOtext_image
Auto update Update from DAB Update from FM Update from Network * No updateAuto-opdatering
text_image
SSID Buffalo-1 [WPS]Linksys-1 Company WAP-1 [Rescan] [Wired]
text_image
Key: P0s5k 0123456789., ab cdefghijklmnopg rstuvwxyzABCDEF GHIJKLMNOPQRSTUVWXYZ BKSP OK CANCEL
text_image
Network settings Please wait Processing... \
text_image
Connected Connected
text_image
Setup wizard Setup wizard completed Press 'SELECT' to exittext_image
Internet radio Last listened > Station list > System settings > Main menu >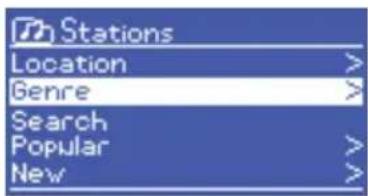
text_image
Stations Location > Genre > Search Popular > New >
text_image
Genre Alternative > Ambient > Big Band > Bluegrass > Blues >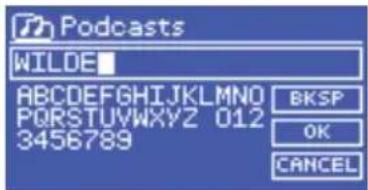
text_image
Podcasts WILDE ABCDEFGHIJKLMNOP 012 PQRSTUWXYZ 012 3456789 BKSP OK CANCELGenre
Markerede Stationer (Highlighted Stations)
After land (By country)
Søg
text_image
FM Alice 97.3 Best Music in the WorldValg af kanaler
text_image
DAB 05:20PM BBC Radio 6Music u to vote for a track th at missed out on the 6 Music playlisttext_image
Scanning Stations: 21 Scanningtext_image
SCANSONIC - Coaxial-optical SubOut- - L - Ethernet Wi-Fi Antenna Line-in -Andre indstillinger
Equalizer
text_image
FRONTIER SYLICON Media Portal Access global stations Personalise favourites Search. Browse. Find. Playing Red 10 Paris LUIK & logrettes. Entry as Home's Search Online search [Van Nu] [UK: Suisse :] [Capitol Asia] [Ingeg Europe] [Jia ie Ponsol] [Albemar http] [UK: India -4] [Panor China] [USP-USA] [Coastal FM SD 6] [UK: USA's international integrated] [Turkey FM] Reading Linked Integration Exchange London Linked Integration System London Linked Integration Page London Linked Integration Page My name London Linked Integration System London Linked Integration Page London Linked Integration Page London Linked Integration Page London Linked Integration Page London Linked Integration Page London Linked Integration Page London Linked Integration Page London Linked Integration Page London Linked Integration Page London Linked Integration Page London Linked Integration Page London Linked Integration Page London Linked Integration Page London Linked Integration Page London Linked Integration Page London Linked Integration Page London Linked Integration Page London Linked Integration Page London Linked Integration Page London Linked Integration Page London Linked Integration Package London Linked Integration Package London Linked Integration Package London Linked Integration Package London Linked Integration Package London Linked Integration Package London Linked Integration Package London Linked Integration Package London Linked Integration Package London Linked Integration Package London Linked Integration Package London Linked Integration Package London Linked Integration Package London Linked Integration Package London Linked Integration Package London Linked Integration Package London Linked Integration Package London Linked Integration Package London Linked Integration Package London Linked Integration Package London Linked Integration Page London Linked Integration Page London Linked Integration Page London Linked Integration Page London Linked Integration Page London Linked Integration Page London Linked Integration Page London Linked Integration Page London Linked Integration Page London Linked Integration Page London Linked Integration Page London Linked Integration Page London Linked Integration Page London Linked Integration Page London Linked Integration Page London Linked Integration Page London Linked Integration Page London Linked Integration Page London Linked Integration Page London Linked Integration Papertext_image
Music player Shared media > USB playback > My playlist > Repeat play: Off Shuffle play: Offtext_image
Alarm 1 Enable: Daily Time: 7:30AM Mode: Internet radio Preset: Last listened Volume: 6natural_image
Black Scaniaoic electronic device with control panel and display screen (no visible text or symbols on body)text_image
SCANSONIC - Coaxial - optical SubOut - L R - Ethernet - Wi-Fi Antenna Line in - ⑤ ⑥ ⑦ ⑧ ⑨ ⑩ On Off Right Speakers LeftBranchement du R110
text_image
Setup wizard Start now? YES* NOtext_image
Auto update Update from DAB Update from FM Update from Network * No updatetext_image
SSID Buffalo-1 [WPS]Linksys-1 Company WAP-1 [Rescan] [Wired]
text_image
Key: P0s5k 0123456789., ab cdefghijklmnopg rstuvwxyzABCDEF GHIJKLMNOPQRSTUVWXYZ BKSP OK CANCEL
text_image
Network settings Please wait Processing...\
text_image
Connected Connected
text_image
Setup wizard Setup wizard completed Press 'SELECT' to exittext_image
Internet radio Last listened > Station list > System settings > Main menu >
text_image
Stations Location > Genre > Search Popular > New >text_image
FM Alice 97.3 Best Music in the Worldtext_image
DAB 05:20PM BBC Radio 6Music u to vote for a track th at missed out on the 6 Music playlisttext_image
Scanning Stations: 21 Scanningtext_image
Music player Shared media > USB playback > My playlist > Repeat play: Off Shuffle play: Offtext_image
Alarm 1 Enable: Daily Time: 7:30AM Mode: Internet radio Preset: Last listened Volume: 6natural_image
Black Scaniaoic electronic device with control panel and display screen (no visible text or symbols on body)text_image
SCANSONIC - Coaxial - optical SubOut - L R - Ethernet - Wi-Fi Antenna Line in - ⑤ ⑥ ⑦ ⑧ ⑨ ⑩ On Off Right Speakers Lefttext_image
Setup wizard Start now? YES* NOtext_image
Auto update Update from DAB Update from FM Update from Network * No updatetext_image
SSID Buffalo-1 [WPS]Linksys-1 Company WAP-1 [Rescan] [Wired]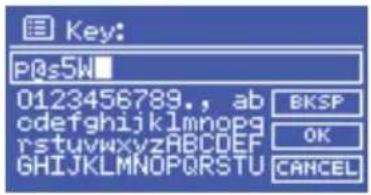
text_image
Key: P0s5k 0123456789., ab cdefghijklmnopg rstuvwxyzABCDEF GHIJKLMNOPQRSTUVWXYZ BKSP OK CANCEL
text_image
Network settings Please wait Processing...\
text_image
Connected Connected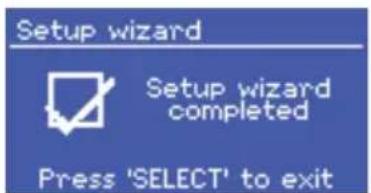
text_image
Setup wizard Setup wizard completed Press 'SELECT' to exittext_image
Internet radio Last listened > Station list > System settings > Main menu >text_image
Stations Location > Genre >Genere
text_image
FM Alice 97.3 Best Music in the Worldtext_image
DAB 05:28PM BBC Radio 6Music u to vote for a track th at missed out on the 6 Music playlisttext_image
Scanning Stations: 21 Scanningtext_image
SCANSONIC - Coaxial-optical SubOut- - L - Ethernet Wi-Fi Antenna Line-in -Altre impostazioni
Equalizzatore
text_image
FRONTIER SICICON Radio Portal Access global stations Personalise favourites Search, Browse, Find. Playing Radio Maris (128 N logarites.tags on Search & Options Studel assay Locations Gaze Minesy C: 2 Tax Air Reading vintage Congress (Electrology) 4996-1,000 C: 3007, Auto-2 Location modernization system 561887-2000 C: 3007 Capital Health London community board - Tax-45 4996-1,000 C: 3007 Power Books Location community board - Play 4997-1,000 C: 3007 For-45 Person Improvement Shop Stand-up 4997-1,000 C: 3007 Alpharet-45 C: 3007 Alpharet-2 Location modernization system 4997-1,000 C: 3007 Famine-3 Amusement City Aldom Regional Board 4997-1,000 C: 3007 Fire Bars Limited Complexes Exhibition 4997-1,000 C: 3007 Lander Park Bus Newer Society Play 4996-2,000 C: 3007 MSA social media engagement London community board - Security 4996-1,000 C: 3007 Clustal Pro London community board - Service 4996-1,000text_image
Music player Shared media > USB playback > My playlist > Repeat play: Off Shuffle play: Offtext_image
Alarm 1 Enable: Daily Time: 7:30AM Mode: Internet radio Preset: Last listened Volume: 6natural_image
Black Scangsonic TV studio electronic device with control buttons and a digital display (no visible text or symbols on main body)Coaxial optical SubOut
Right Speakers Left
Off
Ethernet Wi-Fi Antenna Line in
Conectar el R110
text_image
Setup wizard Start now? YES* NOtext_image
Auto update Update from DAB Update from FM Update from Network * No updateActualizar-auto
text_image
SSID Buffalo-1 [WPS]Linksys-1 Company WAP-1 [Rescan] [Wired]text_image
Network settings Please wait Processing...\text_image
Connected Connectedtext_image
Setup wizard Setup wizard completed Press 'SELECT' to exittext_image
Internet radio Last listened > Station list > System settings > Main menu >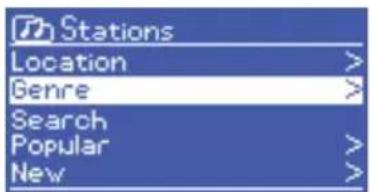
text_image
Stations Location > Genre > Search Popular > New >
text_image
Genre Alternative > Ambient > Big Band > Bluegrass > Blues >
text_image
Podcasts WILDE ABCDEFGHIJKLMNOP PQRSTUWXYZ 012 3456789 BKSP OK CANCELRadio FM
text_image
FM Alice 97.3 Best Music in the Worldtext_image
DAB 05:20PM BBC Radio 6Music u to vote for a track th at missed out on the 6 Music playlistBuscar emisoras DAB
text_image
Scanning Stations: 21 ScanningUse MENU > DRC y seleccione CRD alto (DRC high), CRD bajo (DRC low) o CRD desactivado (DRC off).
text_image
SCANSONIC - Coaxial-optical SubOut- - L - Ethernet Wi-Fi Antenna Line-in -Otros ajustes
Ecualizador
text_image
FRONTIER SYLICON Media Portal Access global stations Personalise favourites Search. Browse. Find. Playing Red 10 Paris LUIK & logrettes Froyes as Home's Search Online search [ Tour AR] [ BBC: Sources ] [ Capital Asia] [ Major Asia] [ In the Ponds] [ Alliance Help] [ BBC: Sources ] [ Polar Group] [ LOP-Box] [ Capital FM Box 6] [ BBC: Sources ] [ Latin America International] [ Country FM ] Reading - Linked Integration (which only) London - Linked Integration System London - Linked Integration Page - all London - Linked Integration Page My name My name My name My name My name My name My name My name My name My name My name My name My name My name My name My name My name My name My name My name My name My name My name My name My name My name My name My name My name My name My name My name My name My name Online search Local search Search Browse Reading - Linked Integration (which only) London - Linked Integration System London - Linked Integration Page - all London - Linked Integration Page My name My name My name My name My name My name My name My name My name My name My name My name My name My name My name My name My name My name My name My name My name My name My name My Name Reading - Linked Integration (which only) London - Linked Integration System London - Linked Integration Page - all London - Linked Integration Page My name My name My name My name My name My name My name My name My name My name My name My name My name My name My name My name My name My name My name My name My name My name Reading - Linked Integration (which only) London - Linked Integration System London - Linked Integration Page - all London - Linked Integration Page Reading - Linked Integration (which only) London - Linked Integration System London - Linked Integration Page - all Reading - Linked Integration (which only) Playing Red 10 Paris LUIK & logrettes Froyes as Playing Red 10 Paris LUIK & logrettes Froyes as Playing Red 10 Paris LUIK & logrettes Froyes as Playing Red 10 Paris LUIK & logrettes Froyes as Playing Red 10 Paris LUIK & logrettes Froyes as Playing Red 10 Paris LUIK & logrettes Froyes astext_image
Music player Shared media > USB playback > My playlist > Repeat play: Off Shuffle play: Offtext_image
Alarm 1 Enable: Daily Time: 7:30AM Mode: Internet radio Preset: Last listened Volume: 6natural_image
Black electronic device labeled 'SCANSONIC' with control buttons and a circular dial (no visible text beyond branding)S Bruksanvisning
Innehåll
text_image
SCANSONIC Setup wizard Start now? YES* NO - Volume + Standby Mode Back Up Down Select Volume +Bakre panel
text_image
SCANSONIC - Coaxial - optical SubOut - L R - Ethernet - Wi-Fi Antenna Line in - ⑤ ⑥ ⑦ ⑧ ⑨ ⑩ On Off Right Speakers LeftAnsluta R110
text_image
Setup wizard Start now? YES* NOtext_image
Auto update Update from DAB Update from FM Update from Network * No updatetext_image
SSID Buffalo-1 [WPS]Linksys-1 Company WAP-1 [Rescan] [Wired]text_image
Network settings Please wait Processing...\text_image
Connected Connectedtext_image
Setup wizard Setup wizard completed Press 'SELECT' to exitGenre Rock, pop, nyheter etc.
text_image
Internet radio Last listened > Station list > System settings > Main menu >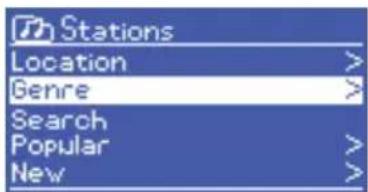
text_image
Stations Location > Genre > Search Popular > New >
text_image
Genre Alternative > Ambient > Big Band > Bluegrass > Blues >