SlimBox - Media player STOREX - Free user manual and instructions
Find the device manual for free SlimBox STOREX in PDF.
| Product type | Media gateway / media player |
| Brand | Storex |
| Model | SlimBox |
| Video connectivity | Composite (AV) and HDMI |
| Audio connectivity | Optical and coaxial |
| Network connectivity | Ethernet LAN and WiFi (via optional USB key) |
| USB ports | 2 USB Host ports (front and rear) |
| Card reader | SD/MMC |
| Supported video formats | AVI, RMVB, TS, VOB, MKV, MOV |
| Supported audio formats | MP3, WMA, AAC, WAV, OGG |
| Supported photo formats | BMP, JPEG, TIF, GIF, PNG |
| Power supply | Input: 100-240 V ~ 50/60 Hz 0.6 A; Output: 12 V ⎓ 2 A |
| Approximate dimensions | 20 × 15 × 5 cm (estimate) |
| Approximate weight | 500 g (estimate) |
| Remote control | Yes, infrared with dedicated keys |
| Main functions | Playback of videos, music, photos from USB/card/network; HD output; file browsing; web services |
| Maintenance and cleaning | Disconnect before cleaning; use a soft, dry cloth; do not open the device |
| Safety | Do not expose to moisture; do not cover the device while operating; use only the supplied adapter |
| Spare parts and repairability | Power adapter, remote control, AV cables, optional WiFi key; repair by qualified personnel only |
| Warranty | 1 year for the device, 3 months for accessories |
| General information | CE certified, RoHS compliant; manufactured in France in an ISO 9001:2000 certified company |
Frequently Asked Questions - SlimBox STOREX
User questions about SlimBox STOREX
0 question about this device. Answer the ones you know or ask your own.
Ask a new question about this device
Download the instructions for your Media player in PDF format for free! Find your manual SlimBox - STOREX and take your electronic device back in hand. On this page are published all the documents necessary for the use of your device. SlimBox by STOREX.
USER MANUAL SlimBox STOREX
CONDITIONS DE GARANTIE
This device was designed and built in order to guarantee your safety. The safety mechanisms implemented in the product will protect you if you observe the following installation, use and troubleshooting procedures:
- Please carefully read and follow the following instructions before handling and installing your device,
- Keep these instructions for further reference.
GÉNÉRAL INFORMATION
- Don't shake the reader as this may damage the product,
- Only use components and accessories (power supply...) recommended by the manufacturer,
- Don't move the device while it is working.
SAFETY
- In order to avoid fires or electrical shocks, don't place the device near objects continuing liquid,
- If a heavy object or some liquid were to fall on the device, unplug it immediately and have it checked by a qualified party before using it again.
- While functioning, the box's surface produces heat; consequently, place the product on a flat and hard surface and avoid covering it or placing anything over it.
PRODUCT'S POWER SUPPLY
- If you don't plan to use the product for an extended period of time or if a storm occurs, unplug the device from the wall socket by handling the plug itself, not by pulling on the cable,
- The power adaptor provided is specific to the product. Using another adaptor could damage the product or cause accidents.
PLACING THE PRODUCT
- Place the device away from high attraction equipment such as microwaves, speakers...
- Place your product in a sufficiently ventilated place and on a flat and hard surface in order to disperse the heat produced by the device.
CLEANING
- Never open the product to clean it or the guarantee will be void,
- Unplug the product from the wall socket before cleaning it,
Clean the product's surface as well as the remote control with a soft and dry cloth. Never use rough materials, scourer powder or solvents such as alcohol or spirits.
TROUBLESHOOTING
- All troubleshooting should be dealt with by qualified parties. This can be necessary in several cases, such as: damaged plug or power cable, liquid spill on the product, introduction of small objects into the product, exposure to rain or dampness, functioning fault, accidental drop...
IMPORTANT POINT
Warning: This product allows the display of a still video image or a screen image on your television screen for an undetermined period of time. Displaying a still video image or a screen image on your television screen during an extended period of time can cause damage to your television screen. Plasma screen televisions and projector screens are particularly sensitive.
SAFETY - ENVIRONMENT

Your STOREX product has been laboratory tested; it complies to European guidelines corresponding to the CE labelling in force at the time of its launch.

Your STOREX product's components are traceable; this demonstrates the product's compliance to environmental guidelines (RoHS) in force at the time of its launch.
Once the product has reached the end of its lifespan, don't throw it in a dustbin. Return it to the retailer or bring it to a rubbish heap, to ensure the product is properly disposed of via a waste electrical and electronic equipment (WEEE) channel.

Your STOREX product has been prepared, tested and packaged in a French company, ISO9001 : 2000 certified by an annual audit performed by a qualified person from Bureau Véritas Certification.
PACKAGE'S CONTENTS
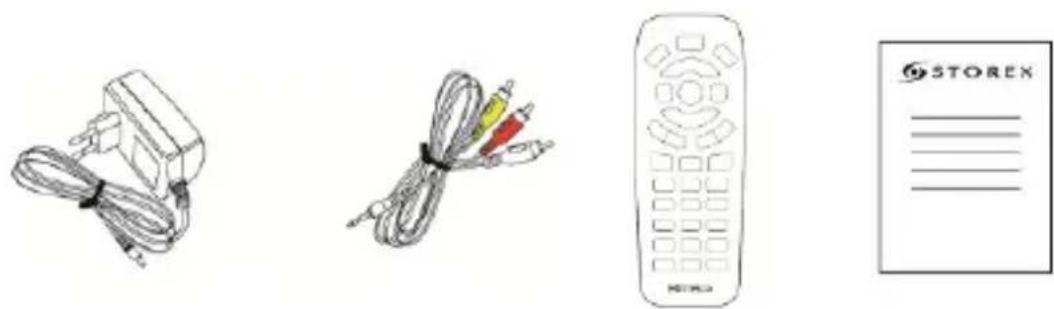
PLEASE NOTE: Keep the original packaging, should you need to return your product for repair or maintenance.
TABLE OF CONTENTS
INTRODUCTION 28
OPERATION 28
MAIN FEATURES 28
PRODUCT DETAILS 29
FRONT PANEL 29
REAR PANEL 29
SIDE 29
REMOTE CONTROL DETAILS 30
CONNECTING THE "SLIMBOX" GATEWAY TO THE TV. 32
CONNECTING A PERIPHERAL TO YOUR "SLIMBOX" 33
READING A FILE 34
READING FROM A MEMORY CARD 35
SHORTCUT BAR 36
"SLIMBOX" SETTINGS 37
Wireless network (WIFI) 38
TERMS OF GUARANTEE 41
STOREX WEBSITE 42
GUARANTEE REGISTRATION 42
INTRODUCTION
Your "SlimBox" is a multimedia gateway allowing you to watch photos and videos in high definition, or listen to music.
OPERATION
- Once connected to the TV, you can watch multimedia files from your USB peripheral or SD/MMC memory card in high definition on your "SlimBox".
- Connected to the network, the "SlimBox" gateway will allow you to view your multimedia content in high definition.
MAIN FEATURES
- USB Host connexions (x2) and SD/MMC card reader.
- Video connexions: Composite and HDMI
- Audio connexions: Optical and Coaxial
- Power supply INPUT : ~100V - 240V
50-60Hz 0.6A
OUTPUT:12.0V
= 2000mA
- Supported formats - Video : Avi, Rmvb, Ts, Vob, Mkv, Mov
- Audio: MP3, WMA, AAC, WAV, OGG
- Photo : BMP, JPEG, TIF, GIF and PNG
PRODUCT DETAILS
FRONT PANEL

1. INFRA-RED RECEIVER
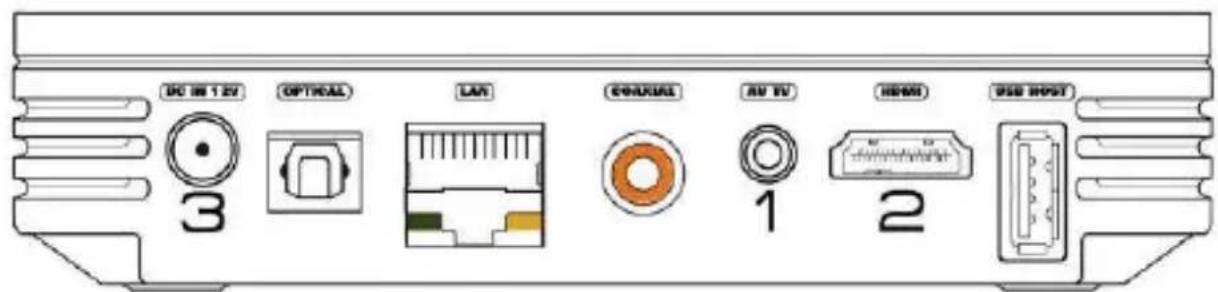
REAR PANEL
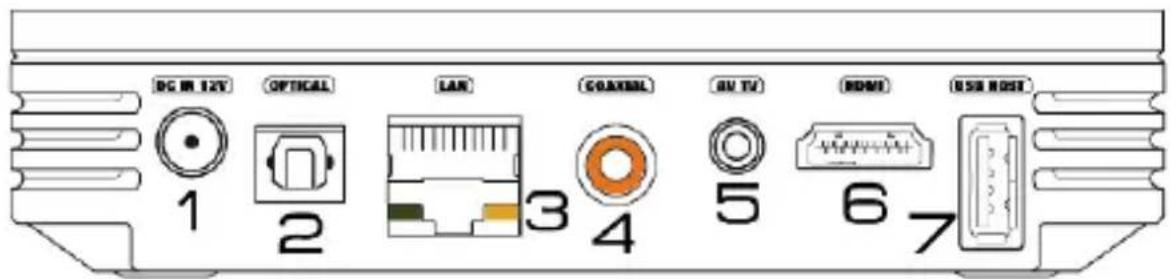
- DC IN 12V: To connect the power adaptor.
- OPTICAL: To connect an optical cable (from your SlimBox to your audio amplifier).
- LAN: To connect an Ethernet cable (from your SlimBox to your router).
- COAXIAL: To connect a coaxial cable (from your SlimBox to your audio amplifier).
- AV TV: To connect your SlimBox to your TV using the provided AV cable.
- HDMI: To connect a HDMI cable (from your SlimBox to your TV).
- USB HOST: To connect a USB peripheral (USB stick, external hard drive or WiFi USB stick).
SIDE
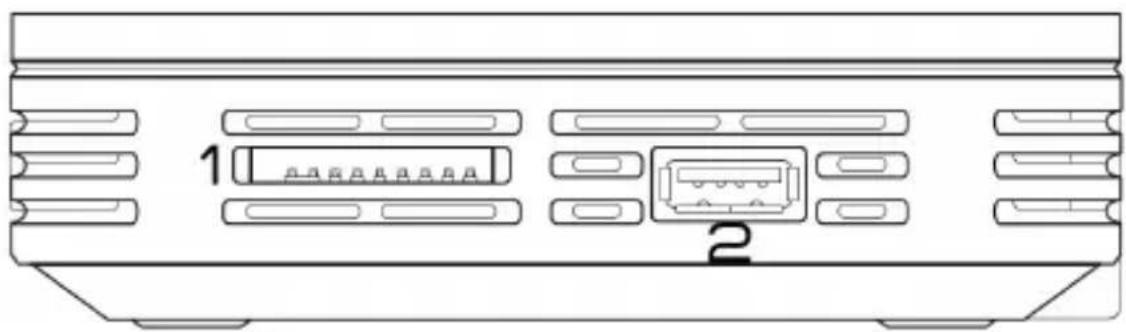
- SD/MMC: To connect an SD or MMC memory card
- USB HOST: To connect a USB peripheral (USB stick, external hard drive or WiFi USB stick).
REMOTE CONTROL DETAILS

REAL REMOTE CONTROL

KEYPAD NUMBERING
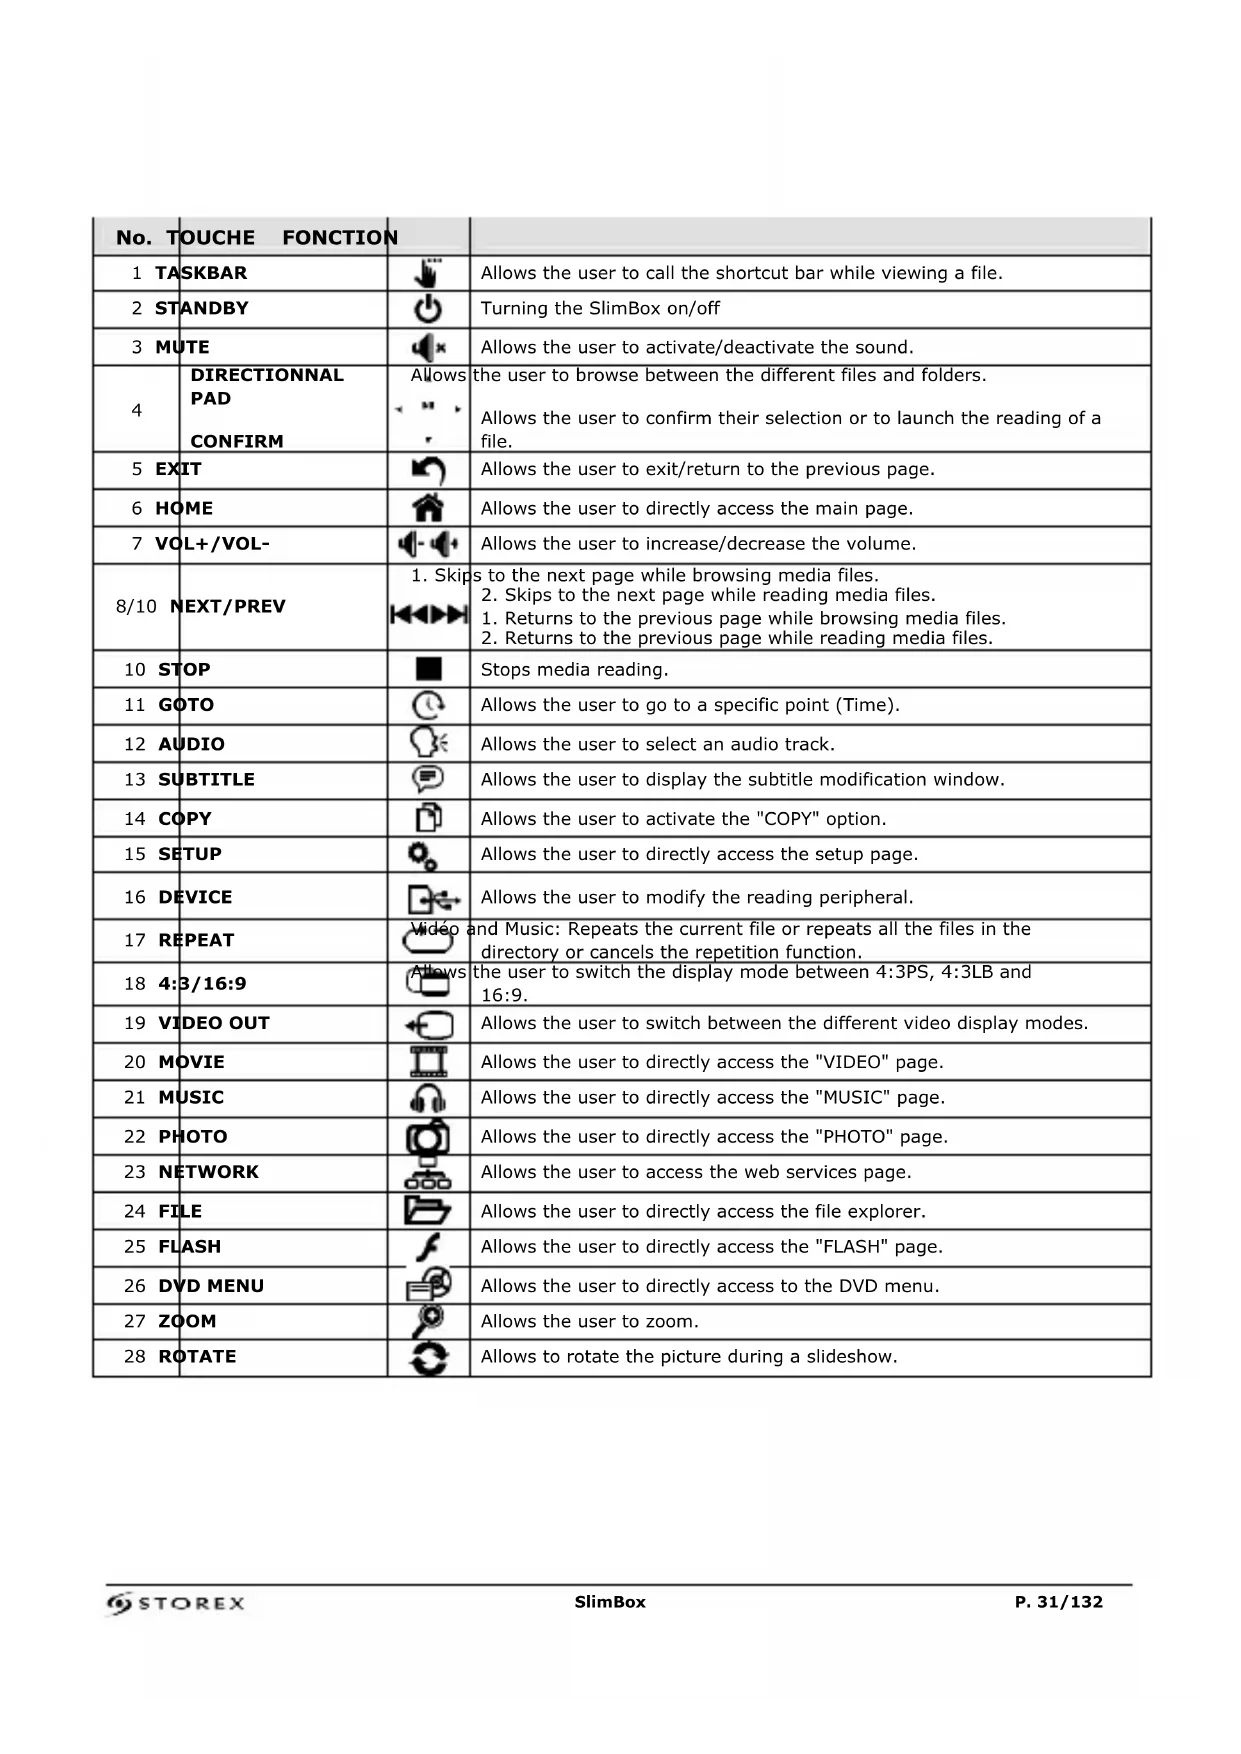
| No. TOUCHE FONCTION | ||
| 1 TASKBAR | Allows the user to call the shortcut bar while viewing a file. | |
| 2 STANDBY | Turning the SlimBox on/off | |
| 3 MUTE | Allows the user to activate/deactivate the sound. | |
| 4 DIRECTIONAL PAD CONFIRM | Allows the user to browse between the different files and folders. Allows the user to confirm their selection or to launch the reading of a file. | Allows the user to confirm their selection or to launch the reading of a file. |
| 5 EXIT | Allows the user to exit/return to the previous page. | |
| 6 HOME | Allows the user to directly access the main page. | |
| 7 VOL+/VOL- | Allows the user to increase/decrease the volume. | |
| 8/10 NEXT/PREV | 1. Skips to the next page while browsing media files. 2. Skips to the next page while reading media files. 1. Returns to the previous page while browsing media files. 2. Returns to the previous page while reading media files. | |
| 10 STOP | Stops media reading. | |
| 11 GOTO | Allows the user to go to a specific point (Time). | |
| 12 AUDIO | Allows the user to select an audio track. | |
| 13 SUBTITLE | Allows the user to display the subtitle modification window. | |
| 14 COPY | Allows the user to activate the "COPY" option. | |
| 15 SETUP | Allows the user to directly access the setup page. | |
| 16 DEVICE | Allows the user to modify the reading peripheral. | |
| 17 REPEAT | Video and Music: Repeats the current file or repeats all the files in the directory or cancels the repetition function. | |
| 18 4:3/16:9 | Allows the user to switch the display mode between 4:3PS, 4:3LB and 16:9. | |
| 19 VIDEO OUT | Allows the user to switch between the different video display modes. | |
| 20 MOVIE | Allows the user to directly access the "VIDEO" page. | |
| 21 MUSIC | Allows the user to directly access the "MUSIC" page. | |
| 22 PHOTO | Allows the user to directly access the "PHOTO" page. | |
| 23 NETWORK | Allows the user to access the web services page. | |
| 24 FILE | Allows the user to directly access the file explorer. | |
| 25 FLASH | Allows the user to directly access the "FLASH" page. | |
| 26 DVD MENU | Allows the user to directly access to the DVD menu. | |
| 27 ZOOM | Allows the user to zoom. | |
| 28 ROTATE | Allows to rotate the picture during a slideshow. | |
CONNECTING THE "SLIMBOX" GATEWAY TO THE TV
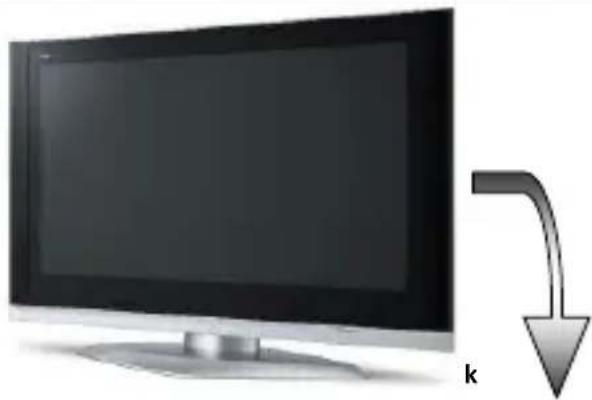
TV rear view
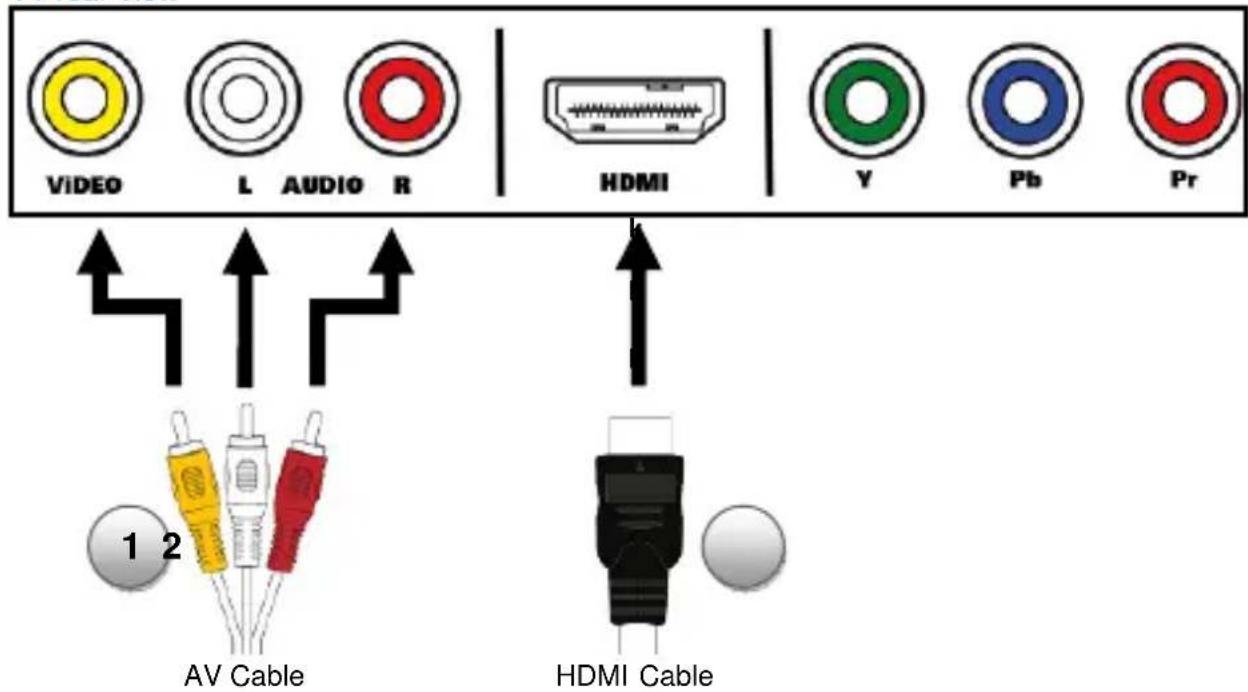
- Connect one end of your AV cable behind the product and the other end to the TV (see diagram above), normally a diagram will guide you (AV1, AV2, EXT1, EXT2...) once connected to the TV.
- Connect one end of your HDMI cable behind the product and the other end to the TV (see diagram above), normally a diagram will guide you (AV1, AV2, EXT1, EXT2...) once connected to the TV.
- Connect the power adaptor to the "SlimBox" and switch the commuter (under the product) to ON.
- Press the "Standby" key on your remote control.
- The homepage menu appears after a few seconds.
CONNECTING A PERIPHERAL TO YOUR "SLIMBOX"
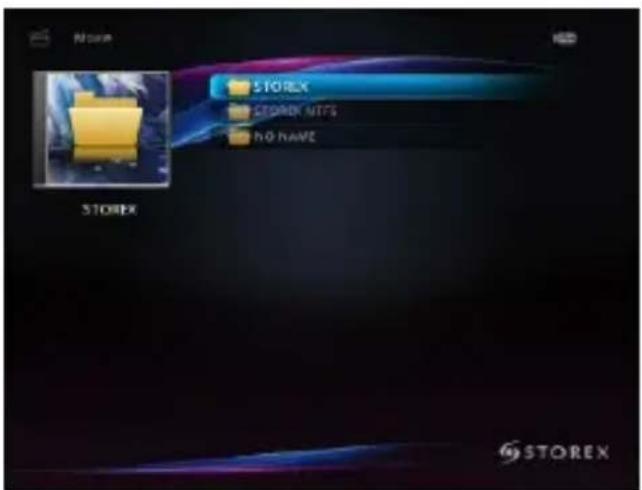
The "SlimBox" gateway is equipped with "USB Host" ports allowing the user to connect a USB stick or a USB hard drive directly to the "SlimBox", to browse it and read the multimedia content stored in it.
- Select one of the icons according to the type of file you wish to view (Video, Audio, Photo or Text).
- Select your storage peripheral and press "ENTER", select the file you wish to view and press "ENTER".
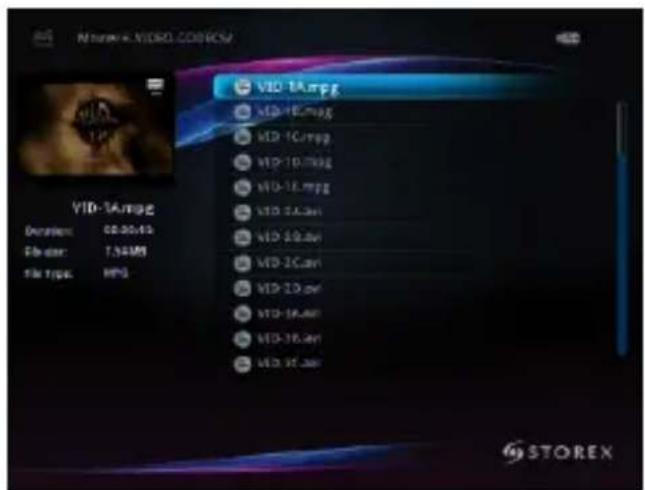
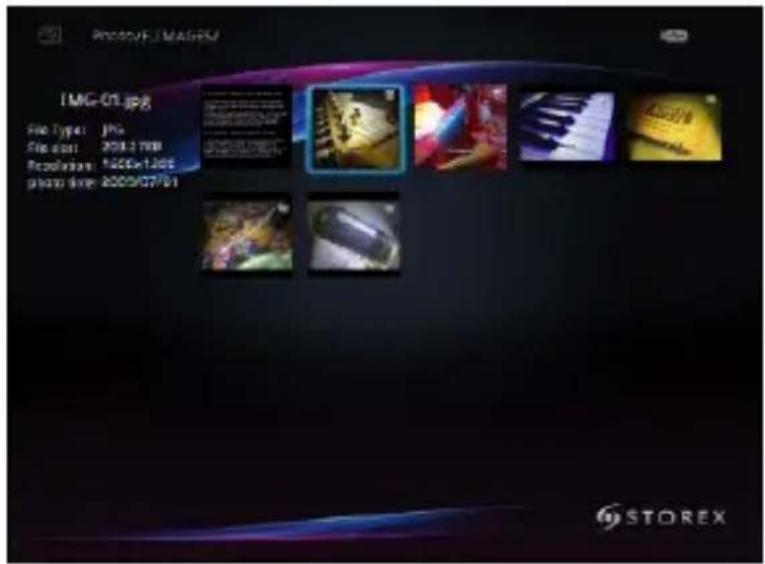
READING A FILE
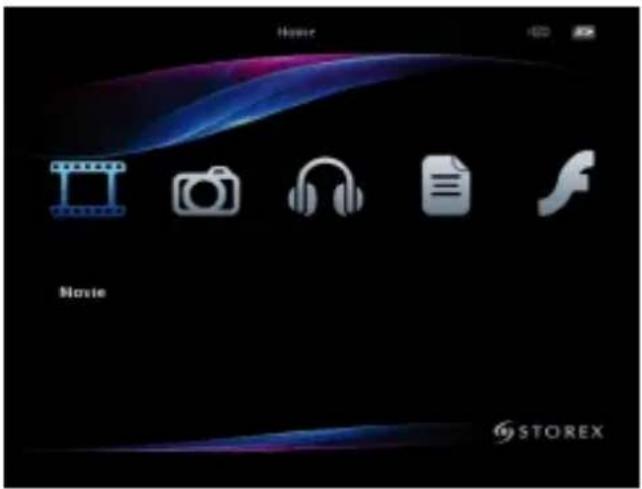
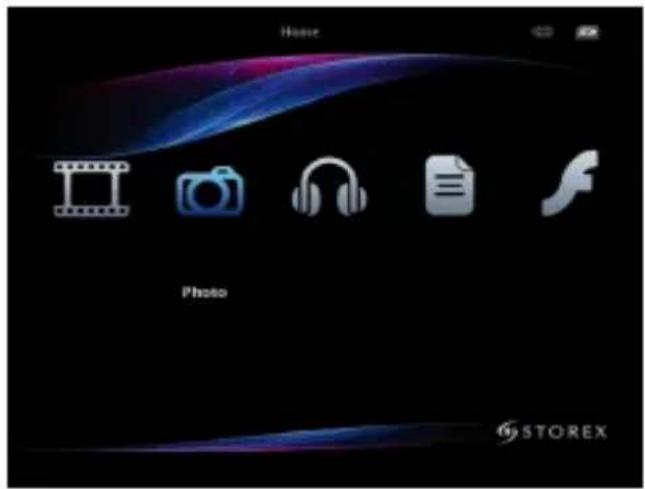
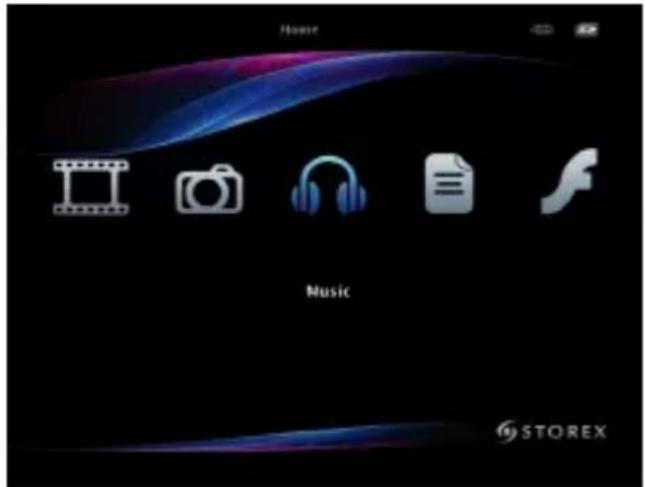
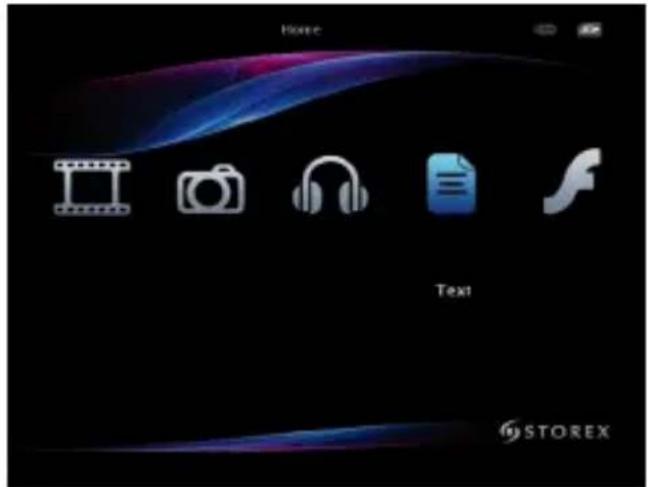
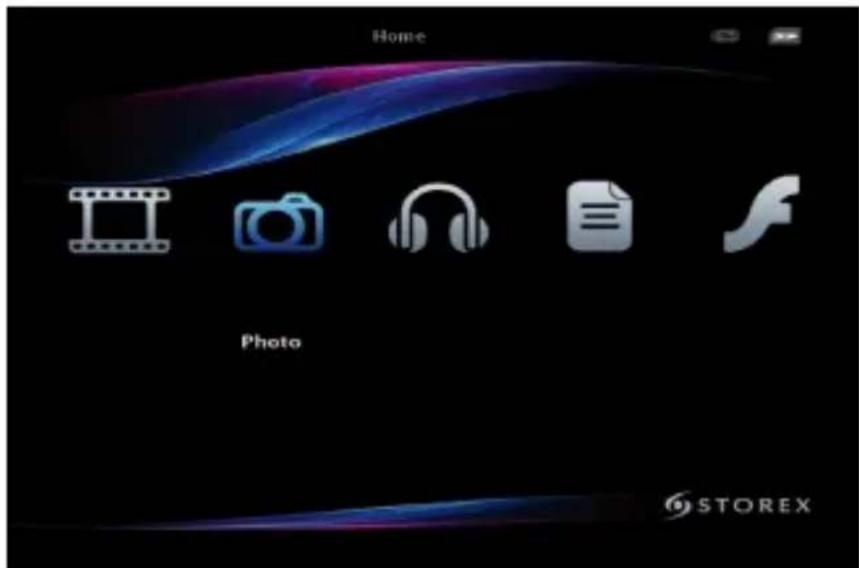
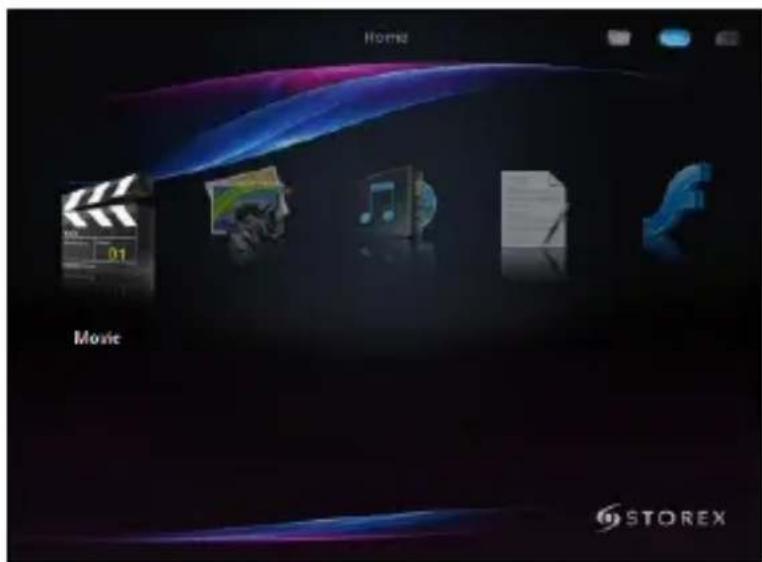
The homepage (HOME) displays 8 main icons. Select one of the modes (Video, Music, Photo, Text, Flash or Network) by using the directional arrows on the remote control and press "ENTER". To use the remote control, please refer to the remote control details.
HOMEPAGE
- Select the directories and files with the directional pad and confirm the selection by pressing "ENTER".

- Press the " key to show the following shortcut bar:

You will be shown the following shortcuts in respective order:
- Previous 2. Pause
- Rotation 4. Zoom
- Background music 6. Photo display
- Next
READING FROM A MEMORY CARD
- Insert the memory card in the designated place (refer to "product details").
- Press the "D" key to change your reading peripheral. Each time you press the key the reading peripheral will change and be displayed in blue.

- Select the directories and files with the directional pad and confirm the selection by pressing "ENTER".

SHORTCUT BAR
The shortcut bar is only accessible during the reading of a multimedia file.
- Press the "key to display the shortcut bar.
1.VIDEO
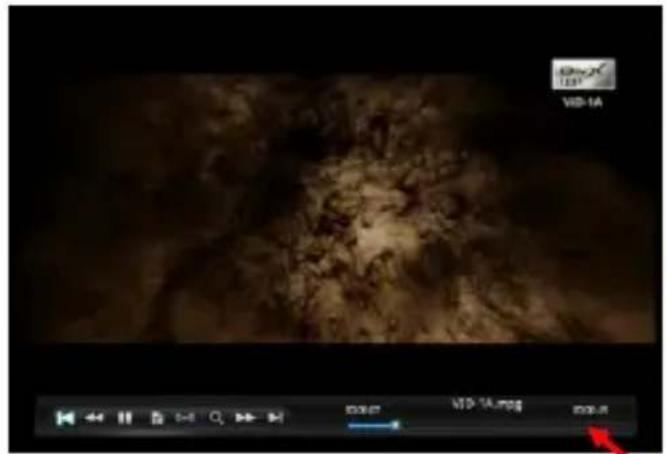
- Previous
- Rewind
- Play/Pause
- Subtitles (allows the user to display or change the subtitle display).
- Audio (allows the user to change the audio track).
- Zoom
- Fast Forward
- Next

2. MUSIC
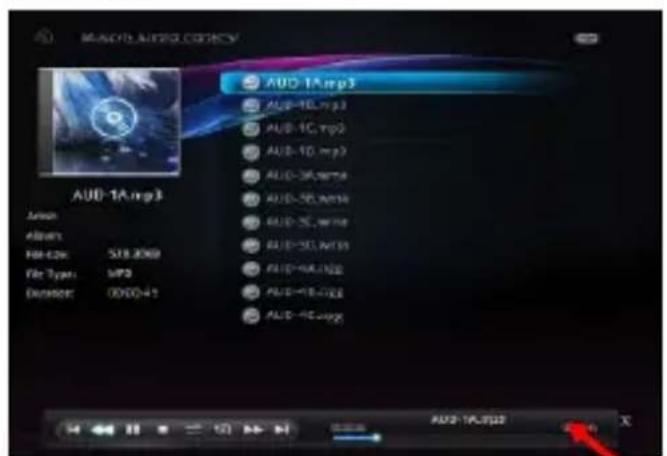
- Previous
- Rewind
- Play/Pause
- Stop
- Sequential or random play
- Repeat all, repeat directory or repeat one.
- Fast Forward
- Next

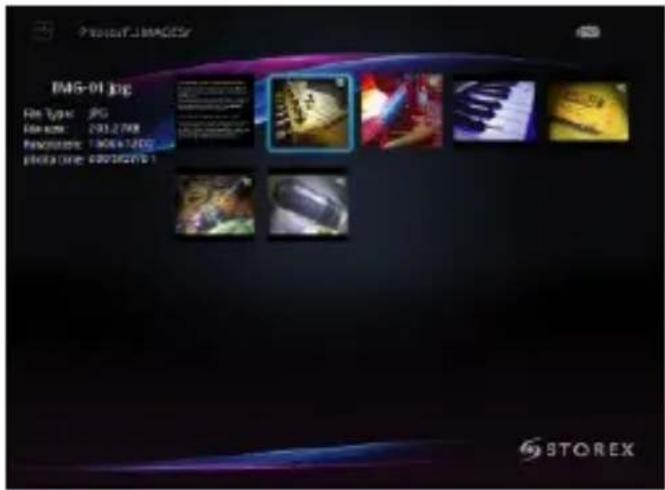
3. PHOTO
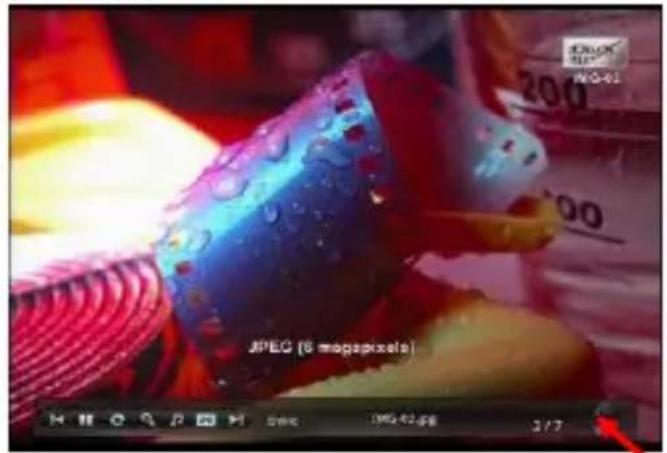
- Previous
- Play/Pause
- Rotation
- Zoom
- Activate/Deactivate background music
- Photo display type on screen
- Next

- Move around using the directional pad and confirm by pressing "ENTER".
- Press the " " key to hide the shortcut bar.
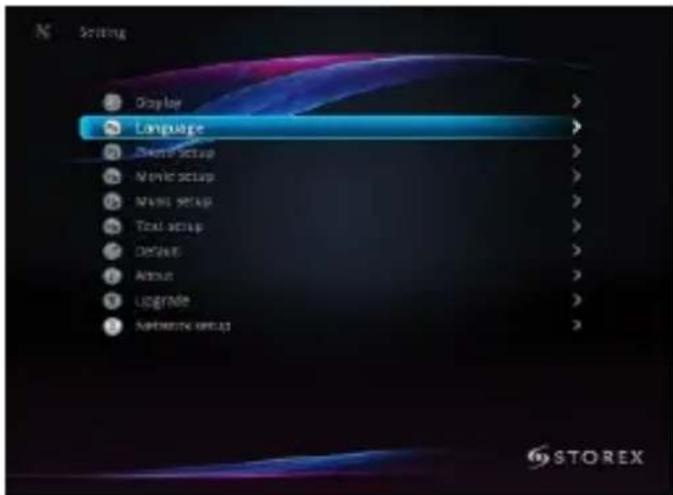
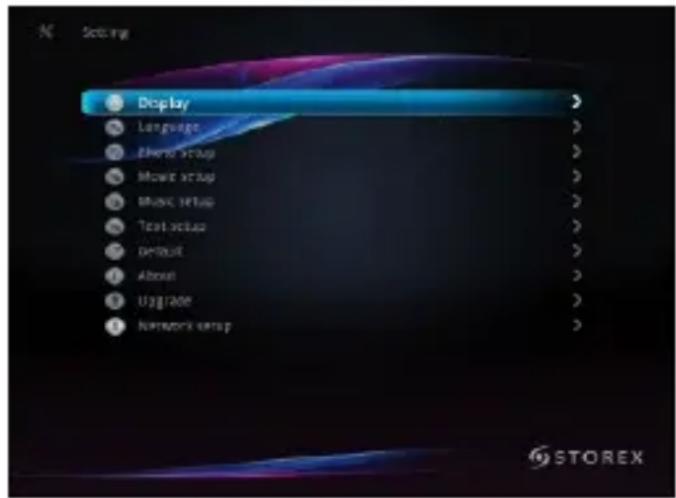
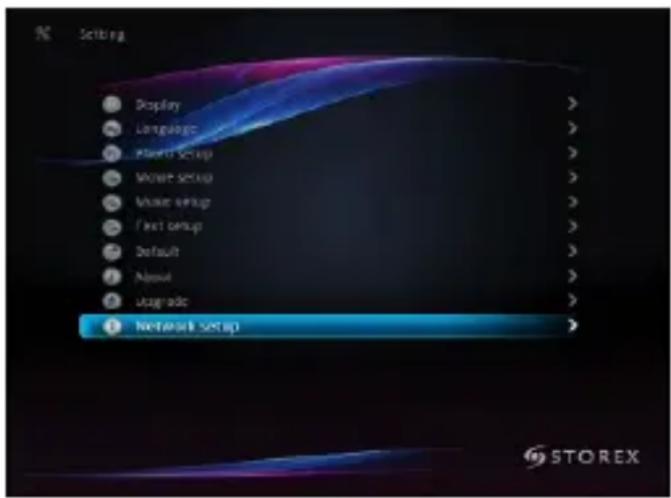
"SLIMBOX" SETTINGS
On this page you can perform several adjustments, including the language and the display resolution.
- Press the "SETUP" key on the remote control to enter the settings menu.
- Use the directional keypad to select the settings and press "ENTER".
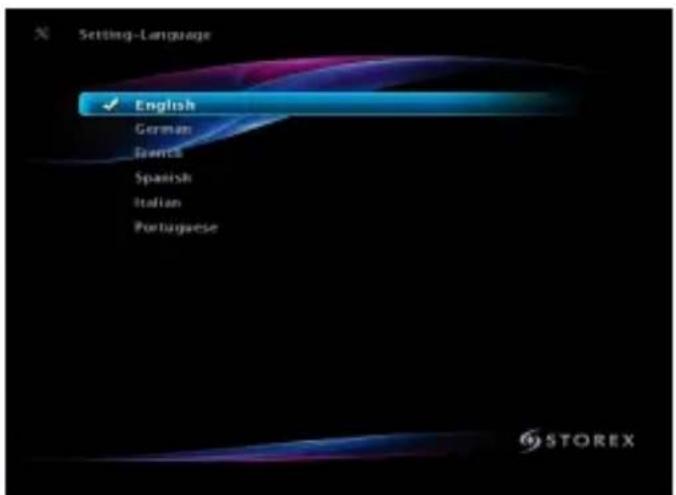
On this page you can choose the language.
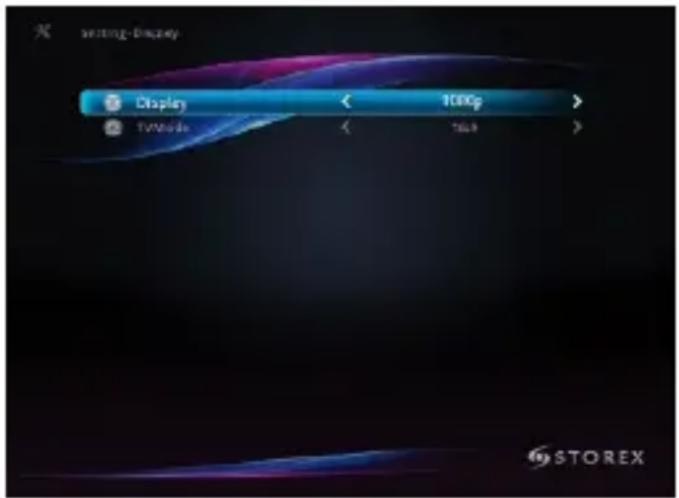
On this page you can modify the "SlimBox" display resolution.
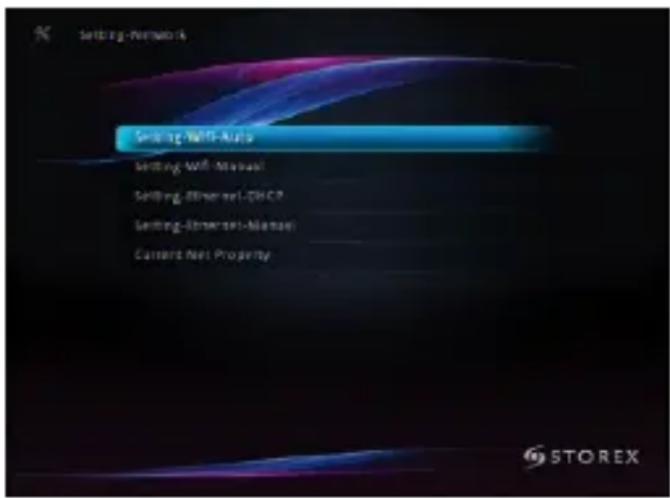
Wireless network (WIFI)
- The WIFI is optional for the "SlimBox", please contact your retailer or refer to the http://www.e-storex.com website to purchase a compatible WiFi key.
- Connect the USB WiFi key (optional) to one of the USB HOST ports.
Note : The WiFi wireless network is only available if the USB WiFi key is connected to the unit and your WiFi router is turned on and operational.
- Press the "Network" key, select "Network" and "Auto wireless setup" by pressing "ENTER".
- The list of available SSID names on your network is displayed.
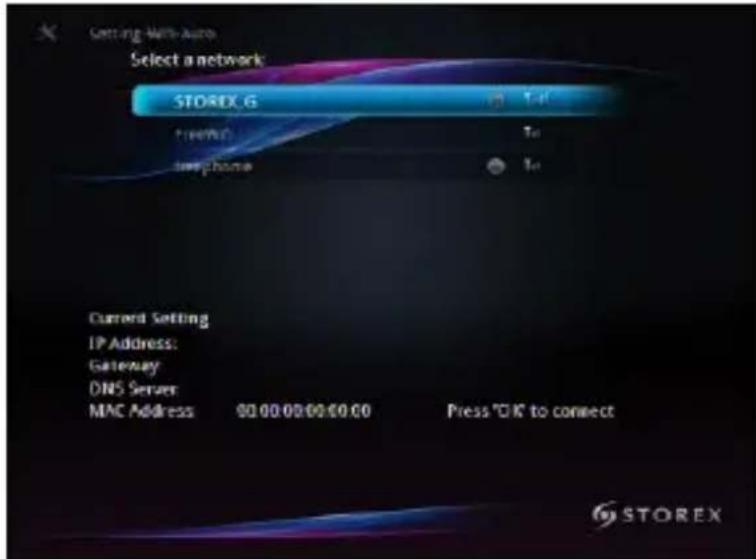
- Select your WiFi network and press "ENTER"
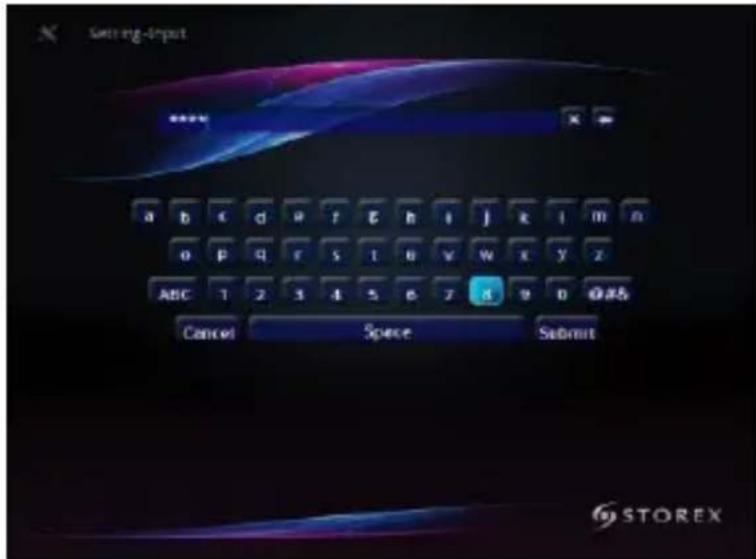
- Enter your key according to safety settings (WEP in this example) with the virtual digital number pad. Press "ENTER" to confirm.
- Once you have entered your key, select "CONFIRM" and press "ENTER".
- You will find the IP address, the subnet mask and the default DNS server if your connexion is successfully established.
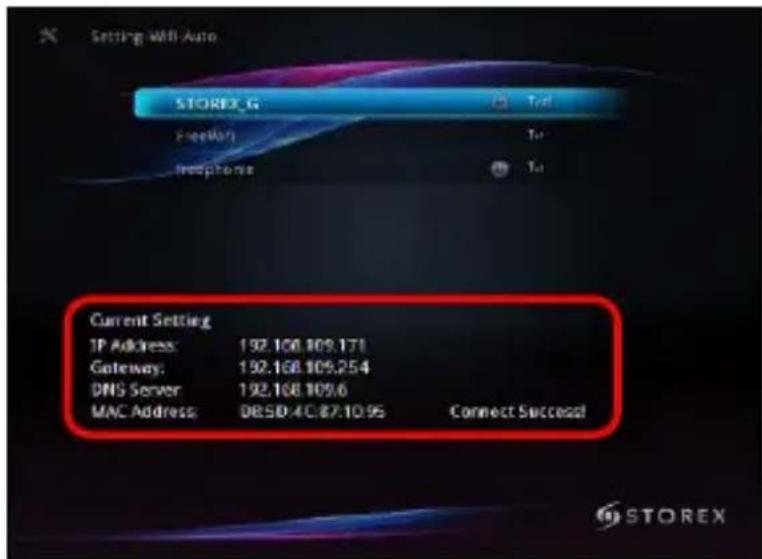
- Press " " to go back to the homepage.
NOTE
We recommend setting up the network after properly connecting the USB WiFi stick to the SlimBox.
Please ensure that the antivirus or firewall aren't blocking this unit's access to the network. You may experience a temporary cut and a freeze of the AV content via the WiFi network due to the network speed, the input capacity or AV files including HD files.
TERMS OF GUARANTEE
STOREX's available guarantee is valid for 1 year for the "SlimBox" gateway and 3 months for its accessories (remote control, AV cables, power supply...).
STOREX guarantees your product against any manufacturing or assembling faults. This guarantee applies to the first hand purchase of a "SlimB ox" by the end user and is not transferrable if the device is resold. The guarantee doesn't cover incompatibilities found by the end user apart from recommendations specified on the packaging, nor incompatibilities generated by other equipment or software installed on the computer to which the "Slim Box" is connected.
A proof of purchase must be presented to our services for the guarantee to be applied by STOREX.
The guarantee doesn't cover failures or faults induced by non-compliance to this manual's instructions, negligence, transformation of "SlimBox", bad installation or handling, repairs or modifications not authorized by STOREX, inappropriate tests, accidents or external factors such as (not exhaustive) excessive heat or dampness, power failures or bad installation/uninstalling of "SlimBox".
The only contractual obligation endorsed by STOREX pertains to the repair and replacement of a defective product. In no case can STOREX be held responsible for loss of data or its consequences induced by an operational fault or a product failure. In any case, STOREX won't be bound to any financial responsibility for any amount exceeding the value of the product purchased by the end user.
The present guarantee is so defined and can't be modified, decreased or increased without STOREX's written consent. Furthermore, STOREX can't be held responsible for any technical advice or service provided pertaining to the "SlimBox" gateway.
For any request not covered by this guarantee, please contact STOREX's support service or log on to the www.e-storex.com website to order any accessory.
You aren't assigned by law to the present guarantee. The guarantee covers your "SlimBox" and is governed by French law.
Note:
STOREX™ reserves the right to modify the user manual without prior notice according to the product's evolutions. You can find the manual's latest version on our website: http://www storex.eu
STOREX WEBSITE
You will find a SUPPORT section associated with each STOREX product on STOREX's website. Log on to http://www storingex.eu.
Select "Multimedia Gateway" and "SlimBox". You will be able to download the latest complete version of the manual, software updates, and refer to the frequently asked questions section. Before contacting our technical support team or our after-sales service, please check the "Forum" section first, available in our website's "Support" tab, as your issues and their solutions could already be listed.
GUARANTEE REGISTRATION
In order to facilitate the management of your issue should you contact our support team, we invite you to register your "Slim Box" guarantee on our website at the following address:
http://garantie storex.eu
Should you experience a product failure, please contact your retailer in order to repair your guaranteed "SlimBox", or send your request via email to the following address:
support@storex.eu
or by telephone at the following number:
France: 0155858200 (Cost of a local call to Paris)
Espagne: 911871608(
Monday to Thursday from 09h30 a.m. till 07h30 p.m.
Friday from 9h30 a.m. till 06h30 p.m.
For further details, please refer to the user manual's complete version (available on our website): http://www storex.eu
SUPPORT
STORwebEX
Remote handling
Using the STORwebEX platform allows the Hotline technicians to connect remotely to the customer's computer, in order to resolve installation issues pertaining to a STOREX product.
GUIA D'INSTALLACION RAPIDA
SUMBOX

DETAILHES DO PRODUTO
PAINEL FRONTAL

1. RECEPTOR INFRA-VERMELHOS
PAINEL POSTERIOR

Sexta a partir das 9h30 a.m. as 06h30 p.m.
Is part of the product range manufactured by
All mentioned brand names are patented by their respective owners.