MH26MF - Electric oven FAGOR - Free user manual and instructions
Find the device manual for free MH26MF FAGOR in PDF.

| Product type | Electric oven |
| Brand | Fagor |
| Model | MH26MF |
| Dimensions (W x D x H) | 478 x 398 x 325 mm |
| Weight | 7.9 kg |
| Voltage / Frequency | 220-240 V ~ 50 Hz |
| Power consumption | 1500 W |
| Number of cooking modes | 5 (fan + top and bottom heating elements, fan + top heating element, top and bottom heating elements, top heating element + rotisserie, all functions) |
| Timer | Yes, with automatic shut-off and beep |
| Glass door | Yes, do not wet when hot |
| Included accessories | Drip tray, grid, handle for grid, rotisserie |
| Cleaning | Unplug and let cool, use a soft cloth with mild detergent, do not immerse |
| Safety | Automatic shut-off after cooking, hot surface (beware of burns), do not leave unattended |
| Repairability | Contact exclusively a Technical Assistance Service approved by the manufacturer |
| General information | Compliant with European Directives on Electromagnetic Compatibility and Low Voltage |
Frequently Asked Questions - MH26MF FAGOR
User questions about MH26MF FAGOR
0 question about this device. Answer the ones you know or ask your own.
Ask a new question about this device
Download the instructions for your Electric oven in PDF format for free! Find your manual MH26MF - FAGOR and take your electronic device back in hand. On this page are published all the documents necessary for the use of your device. MH26MF by FAGOR.
USER MANUAL MH26MF FAGOR
La lubricant se incipient in Ohio, the most four less operating client plans in property rights.
natural_image
3D rendering of a microwave oven with control panel and door (no visible text or symbols)MINI HORNO / MINI FORNO / MINI OVEN / MINI-FOUR / MINI-BACKOFEN /
MINI SÜTÖ / MINI TROUBA / MINI RÜRA / МИНИПЕЧЬ / مصفر : ف / LABEA
MOD.: MH-26MF
N.I.F. F-20.020.517 - B° San Andrés, n° 18 • Acartacio 49 - 20503 MONDRAGON/Gurp(zooel) ESPAÑA

FAGOR

ES
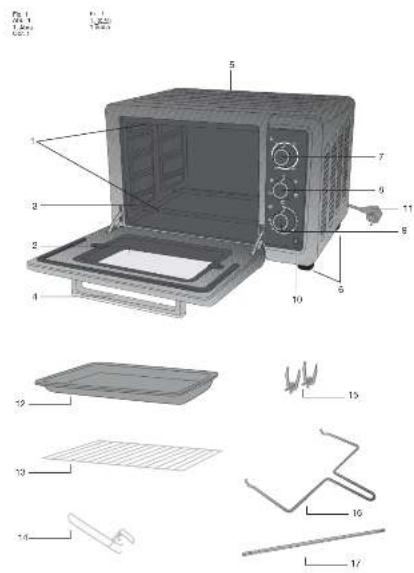
1. DESCRIPCIÓN
- Elements
- Glass
- Support slots
- Door handle
- Outer casing
- Legs
- Temperature selector dial
- Grill mode selector dial
- Timer dial.
- Indicator light
- Cable and plug
- Tray
- Grill rack
- Grill rack handle
2. TECHNICAL CHARACTERISTICS
Voltage/ Frequency 220-240 V \~ 50 Hz
Power (W) 1500
Dimensions (mm) 478 X 398 X 325
Weight (kg) 7,9
This product complies with the European Directives on Electromagnetic Compatibility and Low Voltage.
3. SAFETY WARNINGS AND PRECAUTIONS
- Check that the voltage of the domestic power supply is the same as that indicated on the appliance.
- Always use the tray handle in order to insert and remove the tray. Direct contact with the tray could cause serious burns.
- Do not apply water or dampen the glass of the oven when it is hot. This could cause the glass to break.
- When you unplug the appliance, pull on the plug and not on the cable; otherwise, the internal wiring could become damaged.
-
Do not operate the appliance near a gas ring or other heat source or electric fan, etc. This will ensure that the correct temperature is maintained.
-
This appliance is not designed for use by people (including children) with reduced physical, sensory or mental abilities, or those with lack of experience or knowledge, unless they are supervised or instructed on the use of the appliance by a person responsible for their safety.
- Do not get the cable wet or handle the unit with wet hands.
- Unplug the cable after using the appliance or when you are not going to use it. Do the same if the appliance is going to be left unattended. Any malfunction when the appliance is connected to the power supply could cause a fire.
- When you are cooking dishes with oil that may splash, such as roast chicken, you are advised to use two sheets of aluminium foil in the tray in order to reduce the splashing from the oil. Put one in the tray. The oil will then drip into a gap between the sheets of aluminium foil.
- Supervise children to make sure that they do not play with it. They should not use the oven if there is no adult present.
- In the event of a fault and/or a malfunction of the appliance, switch it off and do not try to repair it. If the appliance needs repairing, only contact a Technical Support Service authorised by the manufacturer.
- If the oven is too near to a wall, it could burn or become rusty. Make sure that the appliance is well away from curtains.
- Do not place anything between the bottom of the oven and the surface on which it is resting. This could cause a fire.
- Do not place anything on top of the oven when it is in use; the heat could cause objects to become misshapen or to break, etc.
- No bottles or tins of food can be put directly into the oven; this could damage the appliance or harm individuals.
- Caution: Avoid burning yourself during
or after its use. The metal parts and the glass panel can reach very high temperatures. Do not touch these parts when you open or close the door.
- An AC plug in perfect condition must be used. Insert the plug fully into the socket; otherwise, it may not operate properly. Do not connect several plugs to the same socket.
- If the power cable is damaged, the manufacturer must replace it (its service agent or a similarly qualified technician) to prevent any danger.
4. OPERATING THE APPLIANCE
Before using your oven for the first time, heat up the oven whilst empty.
To turn the oven on, you must adjust the three dials. Firstly, you must select the temperature you require with the first dial, the temperature selector (7). Before selecting the temperature, you must take into account the type of food you are going to cook.
Then select the grill knob (8) position. If you turn the knob to the first position, this will switch on the fan and upper and lower elements. If you turn the knob to the second position, this will switch on the fan and upper element only. If you turn the knob to the third position, only the upper and lower elements will switch on. If you turn the knob to the fourth position, the upper element and chicken rotisserie will come on. To use this function, first insert the roasting spit (17) in the slots inside the oven between the second and third tray positions. If you turn the knob to the fifth position, this will switch on the fan, the upper and lower elements and the chicken rotisserie functions.
Finally, you must select the cooking time you require, using the timer dial (9). The minutes 10, 20, 30, etc are shown around the dial, with minutes 2, 4, 6, etc indicated by dots.
Once you have activated or adjusted the three dials on the oven, the timer (9) will
begin to count down. It will count down the time until the selected time has passed. The oven will then turn off automatically and you will hear a beep to indicate that the cooking cycle has finished.
Even if you have selected the specific temperature, grill mode and cooking time, you can change them during cooking just by turning the corresponding dial (7), (8) or (9) to the left. You can also turn the oven off by turning the last dial, i.e. the timer dial (9) fully to the left.
You must adjust the three dials in order for the oven to operate properly. If you activate one or two, the oven will not heat up. For example, if you activate the timer, the indicator light will activate, but the oven will not heat up.
CAUTION: If the oven is dirty, your dish may take longer to cook.
N.B.: The appliance may emit smoke and a burning smell when it is used for the first time, but this will not be due to any fault.
| Type of Food | Temperature (°C) | Rack Time | Support | |
| Bread | 180 | Third | 9-13 | |
| Cake | 180 | Second | 25-3 | |
| Fish | 250 | Second | 10 | |
| Chicken/Duck | 220-250 | Second | 30-45 | |
| Pancake | 160 | Top | 7-10 | |
| Beef | 250 | Second | 8-15 | |
| Egg/Peanut | 125-150 | Second | 6-10 | |
| Hot Dog | 200 | Second | 6-10 | |
| Hamburger | 240 | Second | 10-14 | |
- Tray: This can be used for dishes such as hamburgers, grilled dishes, roast chicken, sponges and roasts.
- Grill rack: Roast potatoes... Dry food in general.
- Tray + grill rack: For food with a lot of fat or oil. For example, fish.
CAUTION: Be careful when taking out puddings or other hot liquids.
TRAY GROOVES (3)
The tray can be positioned at four different levels, depending on what you want to cook. For example, if you want to brown a dish of macaroni, place the dish at the top, using the highest slot. To roast a chicken, use the lowest position.
5. CLEANING
- Unplug the appliance and leave it to cool down before beginning to clean it.
- Clean the inner and outer surface of the tray, grill rack and the handle with a cotton cloth (or sponge), using a neutral cleaner.
- Rinse with water. Do not use a brush with hard bristles, as this may scratch the inner surface of the oven, the protective surface of the tray, the grill rack or the handle.
- Wipe the outside of the appliance with a damp cloth.
- Do not immerse the appliance in water or put it under the tap.
- Do not use toxic or abrasive cleaners such as petrol, polishing powder or solvent.
WARNING
If the power cable is damaged, the manufacturer must replace it (its service agent or a similarly qualified technician) to prevent any danger.
SAFETY WARNINGS

This symbol indicates that the appliance must not be disposed of in domestic waste containers.
Caution: The accessible surface can reach very high temperatures when the appliance is in use.
6. INFORMATION FOR THE CORRECT DISPOSAL OF ELECTRICAL AND ELECTRONIC APPLIANCES
At the end of its working life, the product must not be disposed of as urban waste. It must be taken to a special local authority differentiated waste collection centre or to a
dealer providing this service. Disposing of a household appliance separately avoids possible negative consequences for the environment and health deriving from inappropriate disposal and enables the constituent materials to be recovered to obtain significant savings in energy and resources.
To remind you that you must collaborate with a selective collection scheme, the symbol shown appears on the product warning you not to dispose of it in traditional refuse containers.
For further information, contact your local authority or the shop where you bought the product.
FR
1. DESCRIPTION
رَة physics earners: rigid
السب العمل السيد