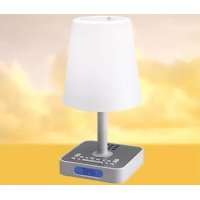
CL500 - Alarm Clock AudioSonic - Free user manual and instructions
Find the device manual for free CL500 AudioSonic in PDF.


| Product type | Clock radio with bedside lamp |
| Brand | AudioSonic |
| Model | CL500 |
| Mains power | 230 V ~ 50 Hz |
| Backup battery | CR2032 (not supplied) |
| Bulb type | Standard or opaque E27 |
| Max bulb wattage | 60 W |
| FM radio | Yes, with integrated wire antenna |
| Built-in nature sounds | Forest, stream, ocean |
| Memory stations | 10 |
| Audio input | 3.5 mm line-in |
| Bedside lamp | Adjustable brightness (L01 to L20) |
| Alarm | Dual with choice of radio, buzzer or nature sounds |
| Snooze function | Yes, about 9 minutes |
| Sleep timer | 10 to 90 minutes |
| Display | Digital with time, frequency, etc. |
| Time format | 12h/24h |
| Volume | Adjustable from V00 to V20 |
| Maintenance | Soft damp cloth, no chemicals |
| Safety | Detailed instructions in the manual |
| Spare parts | E27 bulb, CR2032 battery |
| Manual | 113 pages, downloadable PDF |
Frequently Asked Questions - CL500 AudioSonic
User questions about CL500 AudioSonic
0 question about this device. Answer the ones you know or ask your own.
Ask a new question about this device
Download the instructions for your Alarm Clock in PDF format for free! Find your manual CL500 - AudioSonic and take your electronic device back in hand. On this page are published all the documents necessary for the use of your device. CL500 by AudioSonic.
USER MANUAL CL500 AudioSonic
LIGHT'N'WAKE ALARM RADIO WITH WELLNESS SOUND S INSTRUCTION MANUAL
SAFETY INSTRUCTIONS

The triangular symbol with the lightning Bolt warns the user to the presence of dangerous non-isolated voltage on the inside of this device which may cause an electric shock.
WARNING
DANGER OF A HAZARDOUS ELECTRIC SHOCK. DO NOT OPEN
WARNING: TO REDUCE THE RISK OF AN ELECTRIC SHOCK, DO NOT REMOVE THE FRONT OR BACK COVER. INSIDE THE UNIT, THERE ARE NO PARTS THAT CAN BE REPAIRED OR ADJUSTED BY THE USER. PLEASE REFER TO QUALIFIED TECHNICIANS.

The triangular symbol with the exclamation highlights important points of which the user should refer to the manual regarding maintenance and repair.
FURTHER INFORMATION

Beware of small pieces and batteries, do not swallow them. It may be hazardous to your health and lead into suffocation. Please, Make sure to keep small devices and batteries out of the reach of children.

Important advice regarding hearing protection Caution:
You care for your hearing, and so do we. Therefore, use caution while using this appliance.
Our recommendation: Avoid high volumes.
Children should be supervised while using headphones; make sure that the appliance is not set to high volume
Caution!
High volumes may cause irreparable damage to children's ears.

NEVER let allow anyone, especially children, to put objects into the holes, slots or openings on this devise. This may lead into death due to electric shock. The device must only be opened by a qualified assistant.

Only use the appliance for its intended purpose.
This device may only be used in housings and business premises.

Please keep this instruction manual for further reference
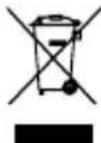
Instructions on environment protection
Do not dispose of this product in the usual household garbage at the end of its life cycle; hand it over at a collection point for the recycling of electrical and electronic appliances. The symbol on the product, the instructions for use or the packing will inform about the methods for disposal.
The materials are recyclable as mentioned in its marking. By recycling, material recycling or other forms of re-utilization of old appliances, you are making an important contribution to protect our environment.
Please inquire at the community administration for the authorized disposal location.

Do not obstruct the ventilation of the device. Make sure, that no curtains, newspapers, furniture or any other type of object are blocking the ventilation system of the apparatus. The ventilation system must be clear of objects at all times! Overheating may lead into serious damage of the device and reduce its performance and lifespan.
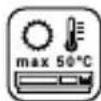
Heat and warmth
Do not expose the appliance to direct sunlight. Make sure that the appliance is not subject to direct heat sources such as heaters or open fire. Make sure that the ventilation slots of the appliance are not covered.
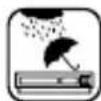
Moisture and cleaning
This appliance is not waterproof! Do not immerse player in water. Do not allow player to come in contact with water. If water gets inside the player it may cause serious damage. Do not use cleaning agents that contain alcohol, ammoniac, benzene or abrasives as these could damage the player. For cleaning, use a soft, moistened cloth.

Professional recycling
Batteries and packaging should not be disposed of in the trash. Batteries must be handed over to a collection centre for used batteries. Separating disposable packaging materials is ecologically friendly.
SAFETY INSTRUCTIONS
-
READ INSTRUCTIONS - All the safety and operating instructions should be read before the unit is operated.
-
RETAIN INSTRUCTIONS - The safety and operating instruction should be retained for future reference.
-
HEED WARNINGS - All warnings on the unit and in the operating instructions should be adhered to.
-
FOLLOW INSTRUCTIONS - All operating instructions should be followed.
-
WATER AND MOISTURE - The unit should not be used near water, for example, near a bathtub, washbowl, kitchen sink, laundry tub, swimming pool or in a wet basement.
-
VENTILATION - Openings in the device serve its proper ventilation, are necessary for the operation and prevent overheating. The unit should be situated so that its location or position does not interfere with its proper ventilation. Do not place on bed, sofa, rug or similar surface that may block the ventilation openings, in a built-in installation, such as a bookcase or cabinet that may impede the flow of air through the ventilation openings.
-
HEAT - The unit should be situated away from heat sources such as radiators, stoves, or other appliances (including amplifiers) that produce heat.
-
POWER SOURCE - The unit should be connected to power supply only of the type described in the operating instructions or as marked on the unit.
-
POWER CORD PROTECTION - Power supply cords should be routed so that they are not likely to be walked on or pinched by items placed upon or against them.
-
NON-USE - During longer periods of non-use please disconnect from mains power supply and antenna.
-
OBJECT and LIQUID ENTRY - Care should be taken so that objects do not fall and liquids are not spilled into the enclosure through openings.
-
DAMAGE REQUIRING SERVICE - The unit should be serviced by qualified service personnel when:
a. The power-supply cord or plug has been damaged.
b. Objects have fallen into, or liquid has been spilled into the unit enclosure.
c. The unit has been exposed to rain or moisture.
d. The unit does not appear to operate normally. Only use the units and controls as described in this manual;
e. The unit has been dropped, or the enclosure damaged.
f. The unit displays serious changes in its performance.
-
SERVICING - The user should not attempt to service the unit beyond that described in the user operating instructions. All other servicing should be referred to qualified service personnel.
-
CLEANING - Disconnect from mains power supply before cleaning. Do not use liquid or spray cleaners, only use a damp cloth. Follow the care and maintenance instructions in this manual.
-
LIGHTNING - During lightning and longer periods of non-use please disconnect from mains power supply and antenna.
- SAFETY CHECK - After servicing the unit ask the customer service for a safety check.
- OVERLOAD - To avoid fire and electric shock do not overload wall outlets and convenience receptacles.
- ELECTROSTATIC DISCHARGE- Disconnect from mains power supply and remove batteries if the unit malfunctions. Reconnect after a short time.
Setting a safe volume level
- If you continually listen to loud music, your hearing gradually adapts to it and gives you the impression that the volume is lower.
What seems normal to you can actually be damaging. - To protect yourself from this, set the volume to a low level.
- Increase the volume slowly, until you can hear clearly and without problems.
- Damage to your hearing can be extensive and cannot be reversed.
If you notice a hearing problem, please consult a doctor.
Installation
Avoid installing the player in areas of:
- direct sunlight or heating radiators or closed automobiles:
- high temperature or high humidity:
- excessive dust:
- excessive vibration, as the internal parts may be seriously damaged.
Stacking:
Place the unit in an upright position. Do not place the unit on or under amplifiers or other equipment, which may heat up.
Mains Power Supply:
Heed the following instructions to avoid malfunction, fire, injury and electric shock:
- Check if the mains voltage as shown on the type plate (under the set) corresponds to your local mains voltage. This unit is designed for AC 230V~50Hz.
- Connect the mains lead to the AC mains socket and the wall outlet.
- To disconnect from wall outlet only pull the plug and not the cable.
- Hold the plug tight, when connecting to or disconnecting from wall outlet.
- Do not touch the power cord with wet hands.
- Protect the power cord from heat generating devices.
- Please turn off the unit and contact an authorized customer service if it has been dropped or is damaged otherwise.
Battery Safety Precautions:
- Keep batteries away from children and pets.
- Insert the batteries observing the polarity (+/-). Failure to properly align the battery polarity can cause personal injury and/or property damage.
- Remove exhausted batteries from the device. Remove the batteries when the device will not be used for extended periods of time to prevent damage due to rusted or corroded batteries.
- Never throw batteries into the fire. Do not expose batteries to fire or other heat sources.
- Battery disposal: exhausted batteries must be properly disposed of and recycled in compliance with all applicable laws. For detailed information contact your local municipality's waste authority.
- Follow the battery manufacturer's safety, usage and disposal instructions.
LOCATION OF CONTROLS
Top View (Lamp Shade Removed)
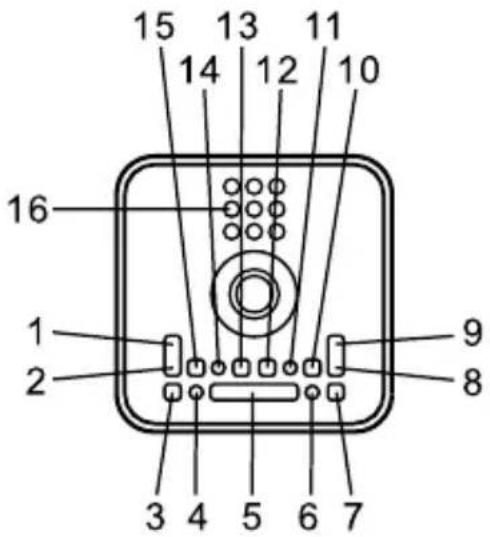
1 light + Bedside lamp brighter
2 light - Bedside lamp darker
3 on/off Bedside lamp on/off
4 mem + Access station memory
5 snooze/sleep Access and set sleep timer, display remaining sleep time; snooze function after alarm activation
6 sound selector Cycle through nature sounds forest, brook and ocean
7 al. off Turn radio and nature sounds on/off; turn alarm off
8 vol - Decrease volume
9 vol + Increase volume
10 function Function selector FM and nature sounds
11 al. 2 set Set alarm 2
12 tune + Radio: Tune into radio station up in frequency band; select station memory Set alarm: Set time, alarm mode, volume and brightness of bedside lamp
13 tune - Radio: Tune into radio station down in frequency band; select station memory Set alarm: Set time, alarm mode, volume and brightness of bedside lamp
14 al. 1 set Set alarm 1
15 clk. set mem Set current time Radio: Set station memory
16 Speaker
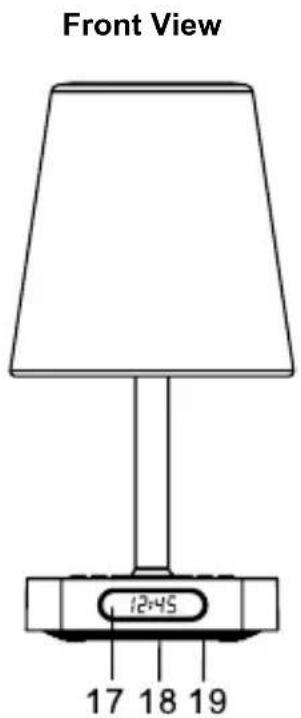
17 Display
18 Type label (bottom)
19 Battery compartment (bottom)
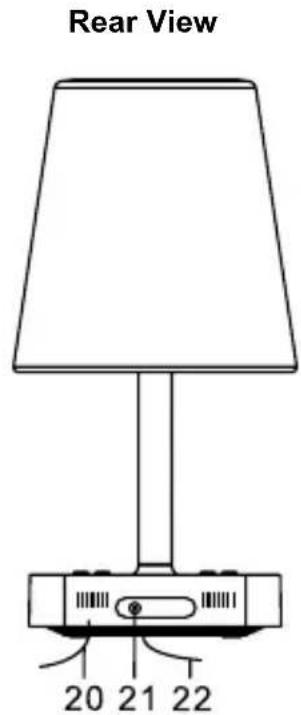
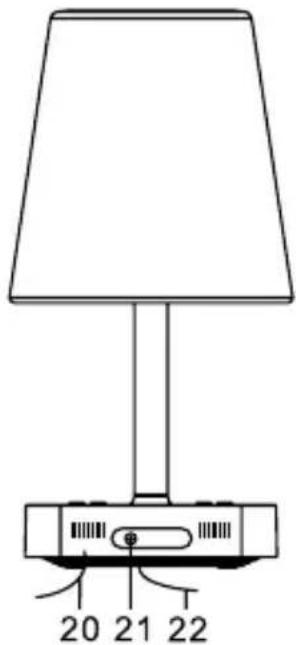
20 Mains power cable
21 line in jack
22 FM wire antenna
Assembly Instructions
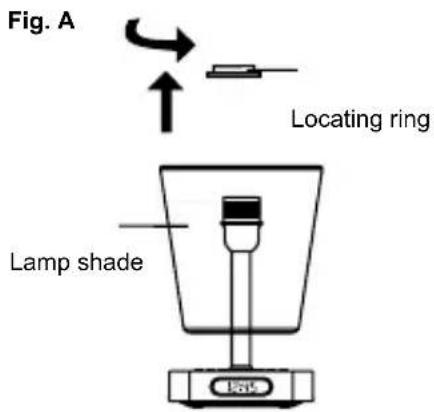
Unpack the unit and place it on a flat surface.
Please follow these instructions to assemble your bedside lamp with built-in radio and nature sounds:
- Turn the locating ring counter-clockwise to unlock the light bulb holder as shown in Figure A.
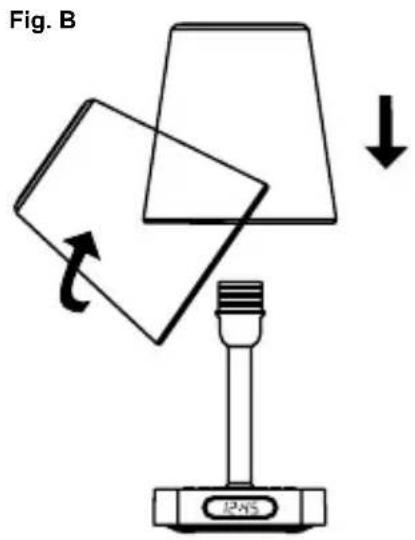
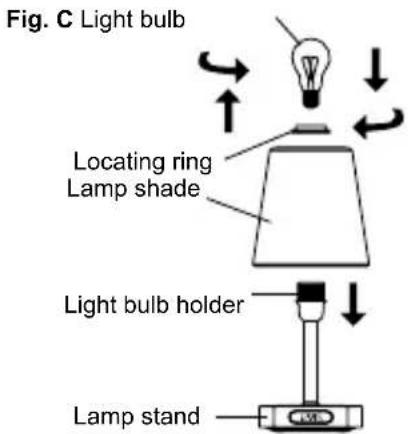
- Remove the lamp shade as shown in Figure B.
- Turn the lamp shade around and place it on top of the light bulb holder as shown in Figure C. Replace the locating ring by turning it clockwise.
- Before installing or exchanging a light bulb press n/off to turn the light off. Disconnect from mains power supply. Do not pull the cord; always take hold of the plug.
- Gently turn the light bulb counter-clockwise and remove it from the light bulb holder. WARNING: Do not attempt to replace the light bulb immediately after it has burnt out. Please let it cool down. Turn off the light and ensure that the unit is disconnected from mains power supply.
- Insert only E27 type A max. 60W standard/ frosted regular light bulbs (as supplied). WARNING: Please hold the light bulb carefully to reduce the risk of breaking.
- Connect the unit again to mains power supply.
- Press on/off to turn the light on.
CONNECTIONS
Antenna Connection
The clock radio comes with an FM wire antenna at the rear, please extend for best reception.
Mains Power Supply
Before plugging the power cord into the AC outlet, check to make sure all of the assembly instructions have been followed. Now carefully plug the power cord into the wall outlet.
Press al. off button on top of the unit to turn it on.
Power Source
The unit is powered by 230V 50Hz mains power supply. The CR2032 button cell (not supplied) is used for clock back-up only. Please remove the battery during long periods of non-use to avoid battery leakage.
To avoid damages not covered by the warranty only connect the unit to above power supply.
Insert/Change Back-Up Battery
Insert the back-up battery in the battery compartment at the bottom of the unit; you need a Phillips screwdriver to open the battery compartment. Please observe the polarity.
Change the back-up battery once a year.
Your settings (alarm, station memory, etc.) are retained during power failure or when disconnecting from mains power supply to replace the light bulb; the unit automatically switches to back-up battery.
NOTE: Please dispose of exhausted batteries environmentally responsible.
line in Jack
Connect your portable MP3 player or other audio devices via 3.5mm jack audio cable (not supplied) to play back via your clock radio.
BASIC OPERATION
Turn Bedside Lamp On/Off
Press on/off to turn the bedside lamp on, the display shows and the brightness setting as L01 to L20. Press light + or light - to adjust the brightness.
Turn Clock Radio On/Off
Turn the radio off with the al. off button, when not in use. Press the al. off button to turn the radio on.
Select the mode with the function selector, toggle between fm and the nature sounds forest, brook and ocean.
Press vol + or vol - to adjust the volume between v 00 and v 20.
After use, please turn the unit off. To save energy, please turn the unit off when not in use for a longer period of time.
In standby mode the current time is displayed.
The unit is designed for continuous operation; it is either in ON mode or in standby mode.
Set Current Time
When first connecting the unit 00:00 is displayed. Current time and timers can only be adjusted in standby mode.
Press and hold clk. set mem to access the setting mode for the current time; at first 12Hr is displayed.
Press tune + or tune - to toggle between 12-hour or 24-hour formats, the display shows 24Hr or 12Hr. Confirm your setting with clk. set mem.
If selecting 12-hour format AM or PM is displayed in front of the current time.
Now the hours flash on the display. Press tune + or tune - to set the hours. Press and hold the button for fast setting or tap it briefly to increase or decrease the setting by one hour. Press clk. set mem to confirm.
Now the minutes flash on the display. Press tune + or tune - to set the minutes. Press and hold the button for fast setting or tap it briefly to increase or decrease the setting by one minute. Press tune + or tune - to confirm.
The current time is set.
Nature Sounds
This clock radio comes with three built-in nature sounds, which can be accessed in ON mode with the function button and can then be selected with the sound selector between forest, brook and ocean. The setting is shown on the display.
Radio
Press al. off to turn the radio on. In case nature sounds were selected, press the function selector, until fm and the frequency (e.g. 106.0MHz) is displayed.
Press vol + or vol - to adjust the volume between v 00 and v 20.
Press tune + or tune - to tune into your favorite station. Short press for manual scan one IF up or down. One step in FM band equals 0.05MHz. Press and hold to activate auto scan. When tuning into the next station, scanning stops and the radio station is played. The frequency is displayed next to the frequency band fm.
Press al. off to turn the radio off.
The radio comes with an FM wire antenna; please unwind for best reception
Set and Access Station Memory
Press al. off to turn the radio on as usual. Press tune + or tune - to tune into your favorite station and adjust the volume. Now press and hold clk. set mem, until the display shows M and a flashing number, which stands for the memory location. Press tune + or tune - to select the station memory and press clk. set mem to confirm.
Save further stations to the memory following above steps; altogether 10 station memories are available.
Press mem + to access and cycle upwards through the station memory.
Set Alarm
Press al. 1 set once to display the alarm setting. Now press and hold al. 1 set for a few seconds, until the hours are flashing. Set the alarm hours with tune + or tune -
Press and hold the button for fast setting or tap it briefly to increase or decrease the setting by one hour. Press al. 1 set to confirm.
Now the minutes flash on the display. Press tune + or tune - to set the minutes.
Press and hold the button for fast setting or tap it briefly to increase or decrease the setting by one minute. Press al. 1 set to confirm.
Now the first alarm is set and you have to set the alarm mode. Either radio, buzzer or nature flashes on the display and you select the mode with tune + or tune -
If you want to wake up to radio, you will have to set the station. If you want to wake up to nature sounds, you will have to select the appropriate sound. For the buzzer no further settings are necessary.
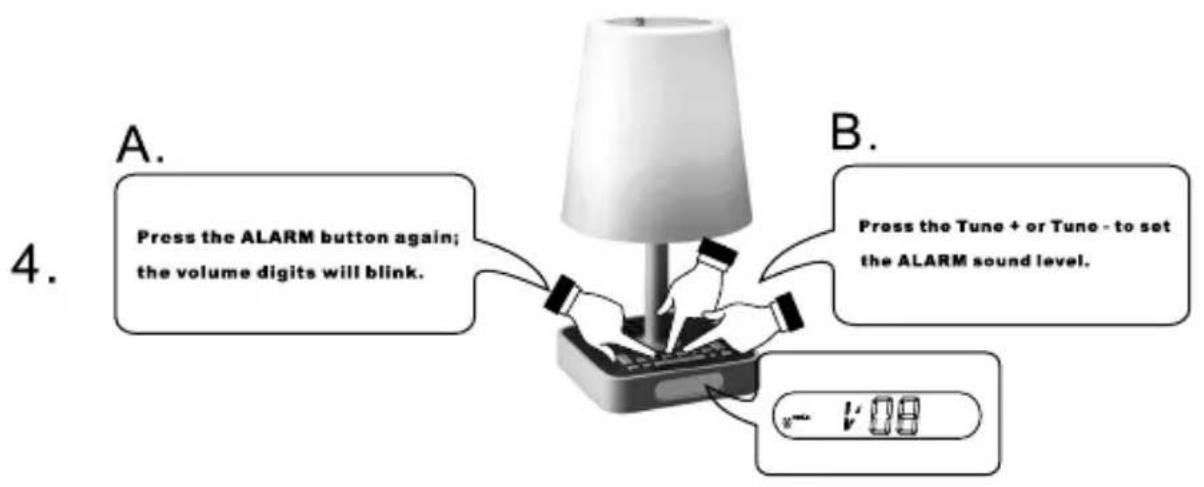
After setting the alarm mode you have to adjust the volume. Press al. 1 set again, v and a number (the volume level) flash on the display. Press tune + or tune - to adjust the desired alarm volume and confirm with al. 1 set.
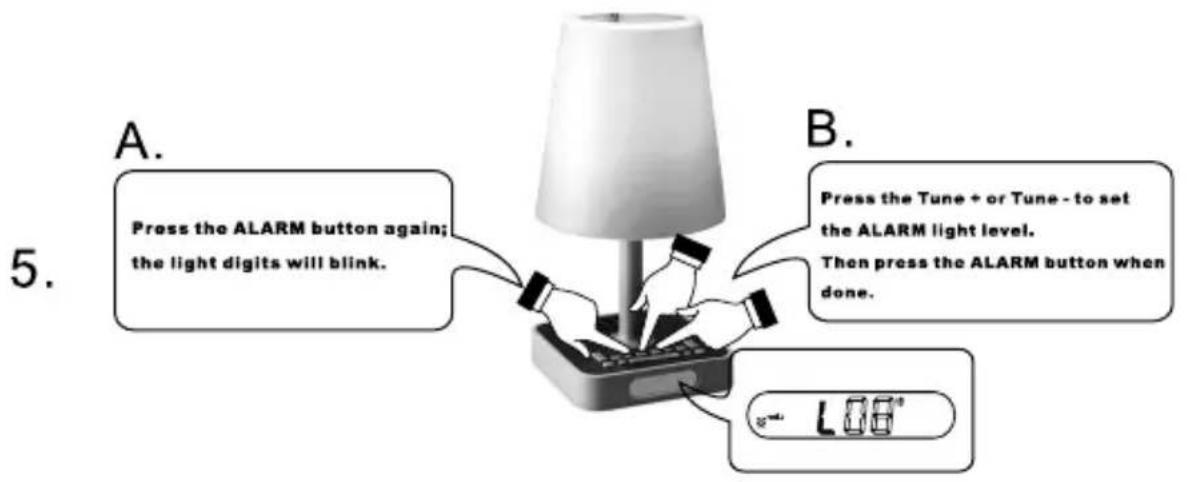
Now only the brightness setting for the bedside lamp is to be set. L and a number (the brightness level) flash on the display. Adjust the brightness with tune + or tune - and confirm with al. 1 set.
All settings for the first alarm are made and is displayed.
Set the second alarm as described above, but select and confirm your settings with button al. 2 set.
Wake to Radio/Nature Sounds/Buzzer
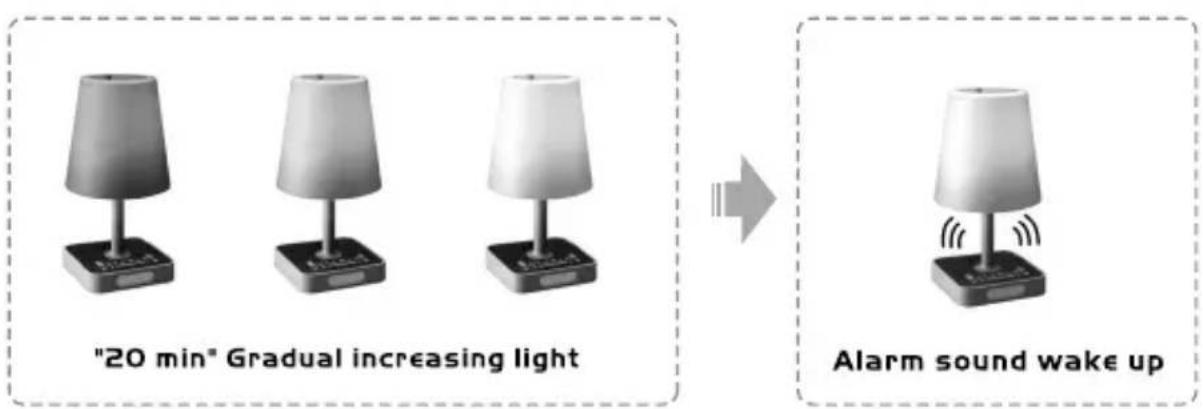
At the preset time the unit will wake you with the buzzer, your favorite radio station or nature sounds and with the light of your bedside lamp.
Press al. off to disable alarm 1 or 2 (depending on your setting) for today, disappear from the display; you will be woken again the next day at the same time with the same settings.
Snoopze Function
If you want to snooze for a few more minutes press snooze/sleep when the alarm sounds. Approx. 9 minutes later the alarm will go off again.
The snooze function can be repeated for approx. 1 hour before the function is automatically cancelled.
Sleep to Radio/Nature Sounds
Select between natural sounds and radio and adjust the volume level. For details refer to chapters Radio and Nature Sounds.
Press snooze/sleep to access the sleep timer; the display shows 90. Repeatedly press snooze/sleep to adjust the sleep time to 80, 70, 60, 50, 40, 30, 20 and 10 minutes, the corresponding time is displayed.
The radio turns off after the preset time.
Briefly press snooze/sleep if you want to check how much time is left until the radio turns off automatically.
To disable the sleep timer ahead of time, press and hold snooze/sleep, until the time display turns off.
Troubleshooting
If a fault occurs, first check the points listed below before taking the unit for repair. If you are unable to solve a problem by following these tips, consult your dealer or authorized service center.
WARNING: Never open the device. Always refer service or maintenance to authorized customer service personnel.
| noituloSnosaeRmelborP | ||
| No Sound Volume | me is set too low. Mains power supply is not connected. | Adjust the volume. Connect the power cord to the wall outlet. |
| Key malfunction. | Electrostatic charge. | Turn the unit off and then back on. Alternatively, turn off the unit, disconnect the AC power cord and the back-up battery and then re-connect it. |
| Poor reception. | Weak signal. Interference from other electric appliances (TV, VCR, Computer, etc.). | Adjust the antenna. Keep distance to other electrical appliances. |
English
1.
Setting Alarm Time
A.
Press the ALARM button once. While the display is showing the alarm time and you hold the ALARM button for 3 seconds and the hours will blink.
B.
Press the Tune + or Tune - to set ALARM hour.
A.
Press the ALARM button again;
the minute digits will blink.
B.
Press the Tune + or Tune - to set the ALARM minutes.
2.
A.
Press the ALARM botton and you can change the sound mode (Buzzer,radio,nature) for the alarm.
1200
B.
Press the Tune + or Tune - to choose different sound mode.
3.

GB-14
WARNING
- No flame sources, such as lighted candles, should be placed on the apparatus.
- Do not place the product in closed bookcases or racks without proper ventilation.
- The mains plug is used as the disconnect device, the disconnect device shall remain readily operable.
- The ventilation should not be impeded by covering the ventilation openings with items, such as newspapers, table-cloths, curtains, etc.
- It shall not be exposed to dripping or splashing and that no objects filled with liquids, such as vases, shall be placed on the apparatus.
- The unit should not be exposed to direct sunlight, very high or low temperature, moisture, vibrations or placed in dusty environment.
- Do not use abrasive, benzene, thinner or other solvents to clean the surface of the unit. To clean, wipe it will mild non-abrasive detergent solution and clean soft cloth.
- Never attempt to insert wires, pins or other such objects into the vents or opening of the unit.
Do not dispose of the device with the household waste. This product must be disposed of according to EU directive 2002/96/EC-WEEE (Waste Electrical and Electronic equipment). Return the device to a collection point. Observe the applicable regulations. Contact your municipality, if in doubt.
CAUTION
- Danger of explosion if battery is incorrectly replaced.
- Replace only with the same or equivalent type of battery.
- Batteries shall not be exposed to excessive heat such as sunshine, fire or the like.
- Attention should be drawn to the environmental aspects of battery disposal.
DUTCH
LIGHT'N'WAKE ALARMRADIO MET WELLNESS-GELUIDEN
GEBRUIKSAANWIJZING
VEILIGHEIDSINSTRUCTIES

17 Display
18 Type label (onderkant)
19 Batterijcompartment (onderkant)
Overzicht allerstände
20 Stroomsnoor
21 line in-aansluiting
22 FM wire antenna
- establisher alarma 2
Establisher alarma 2
- Sintonizar +
- establisher alarma 1
Establisher alarma 1
Defi nir as horas actuais
Defi nir as horas actuais
INFORMACJE DODATKOWE

- LIGHT'N'WAKE ALARM RADIO WITH WELLNESS SOUND S INSTRUCTION MANUAL
- WARNING
- FURTHER INFORMATION
- Important advice regarding hearing protection Caution:
- Caution!
- Instructions on environment protection
- Heat and warmth
- Moisture and cleaning
- Professional recycling
- SAFETY INSTRUCTIONS
- Setting a safe volume level
- Installation
- Stacking:
- Mains Power Supply:
- Battery Safety Precautions:
- LOCATION OF CONTROLS
- Top View (Lamp Shade Removed)
- Assembly Instructions
- CONNECTIONS
- Antenna Connection
- Mains Power Supply
- Power Source
- Insert/Change Back-Up Battery
- line in Jack
- BASIC OPERATION
- Turn Bedside Lamp On/Off
- Turn Clock Radio On/Off
- Set Current Time
- Nature Sounds
- Radio
- Set and Access Station Memory
- Set Alarm
- Wake to Radio/Nature Sounds/Buzzer
- Snoopze Function
- Sleep to Radio/Nature Sounds
- Troubleshooting
- English
- 1.
- Setting Alarm Time
- A.
- B.
- 2.
- 3.
- CAUTION
- DUTCH
- LIGHT'N'WAKE ALARMRADIO MET WELLNESS-GELUIDEN
- GEBRUIKSAANWIJZING
- VEILIGHEIDSINSTRUCTIES
- Defi nir as horas actuais
- INFORMACJE DODATKOWE
Brand : AudioSonic
Model : CL500
Category : Alarm Clock