
VSX922S - AV receiver PIONEER - Free user manual and instructions
Find the device manual for free VSX922S PIONEER in PDF.
| Product type | Audio-video receiver |
| Brand | PIONEER |
| Model | VSX-922S |
| Number of channels | 7.2 (7 channels + 2 subwoofers) |
| Speaker impedance | 6 to 16 Ω |
| Connectivity | HDMI (4 inputs, 1 output with ARC), USB, Ethernet, Bluetooth (via adapter), FM/AM |
| Supported audio formats | Dolby TrueHD, DTS-HD Master Audio, etc. |
| Acoustic calibration | MCACC (Setup microphone included) |
| Tuner | FM/AM with presets |
| Network functions | Internet radio, control via AVNavigator |
| Dimensions (W x H x D) | 435 x 168 x 360 mm |
| Weight | 10.5 kg |
| Power supply | 220-230 V, 50/60 Hz |
| Power consumption | 400 W (max), 5 W (standby) |
| Maintenance and cleaning | Clean with a soft, dry cloth. Do not use solvents. |
| Safety | Leave 40 cm above, 10 cm at the rear, and 20 cm on the sides for ventilation. Do not block openings. |
| Included accessories | Remote control, setup microphone, FM antenna, AM antenna, CD-ROM (AVNavigator) |
| Warranty | 2 years (subject to legal conditions) |
Frequently Asked Questions - VSX922S PIONEER
User questions about VSX922S PIONEER
0 question about this device. Answer the ones you know or ask your own.
Ask a new question about this device
Download the instructions for your AV receiver in PDF format for free! Find your manual VSX922S - PIONEER and take your electronic device back in hand. On this page are published all the documents necessary for the use of your device. VSX922S by PIONEER.
USER MANUAL VSX922S PIONEER
KpaTkoepyKOBOCTBONoIb3OBaTeIa
Thank you for buying this Pioneer product. This Quick Start Guide includes instructions for basic connections and operations to allow simple use of the receiver. For detailed descriptions of the receiver, see the "Operating Instructions" provided on the included CD-ROM (CD).
AAA size IEC R03 dry cell batteries x2
Pies a anode seche AAA IEC R03 x 2
AAA/IEC/R03 Trockenbattenen x2
Pile a secco AAA TEC RO3 x2
AAGIECRO3 drogeelbattenx2
PIAS SECAS AAA,IEC RO5X2
Cyxne 6atapeyn pa3mepa AAA IEC R03,2 wT.
Pod cable
Cable iPod
Pcc-Kabel
Cavo per iPod
PQK-Kacel
Cable de iPod
Ka6enb iPod
Warranty card
Carte de garantie
Garantiekarte
aneta de garantia
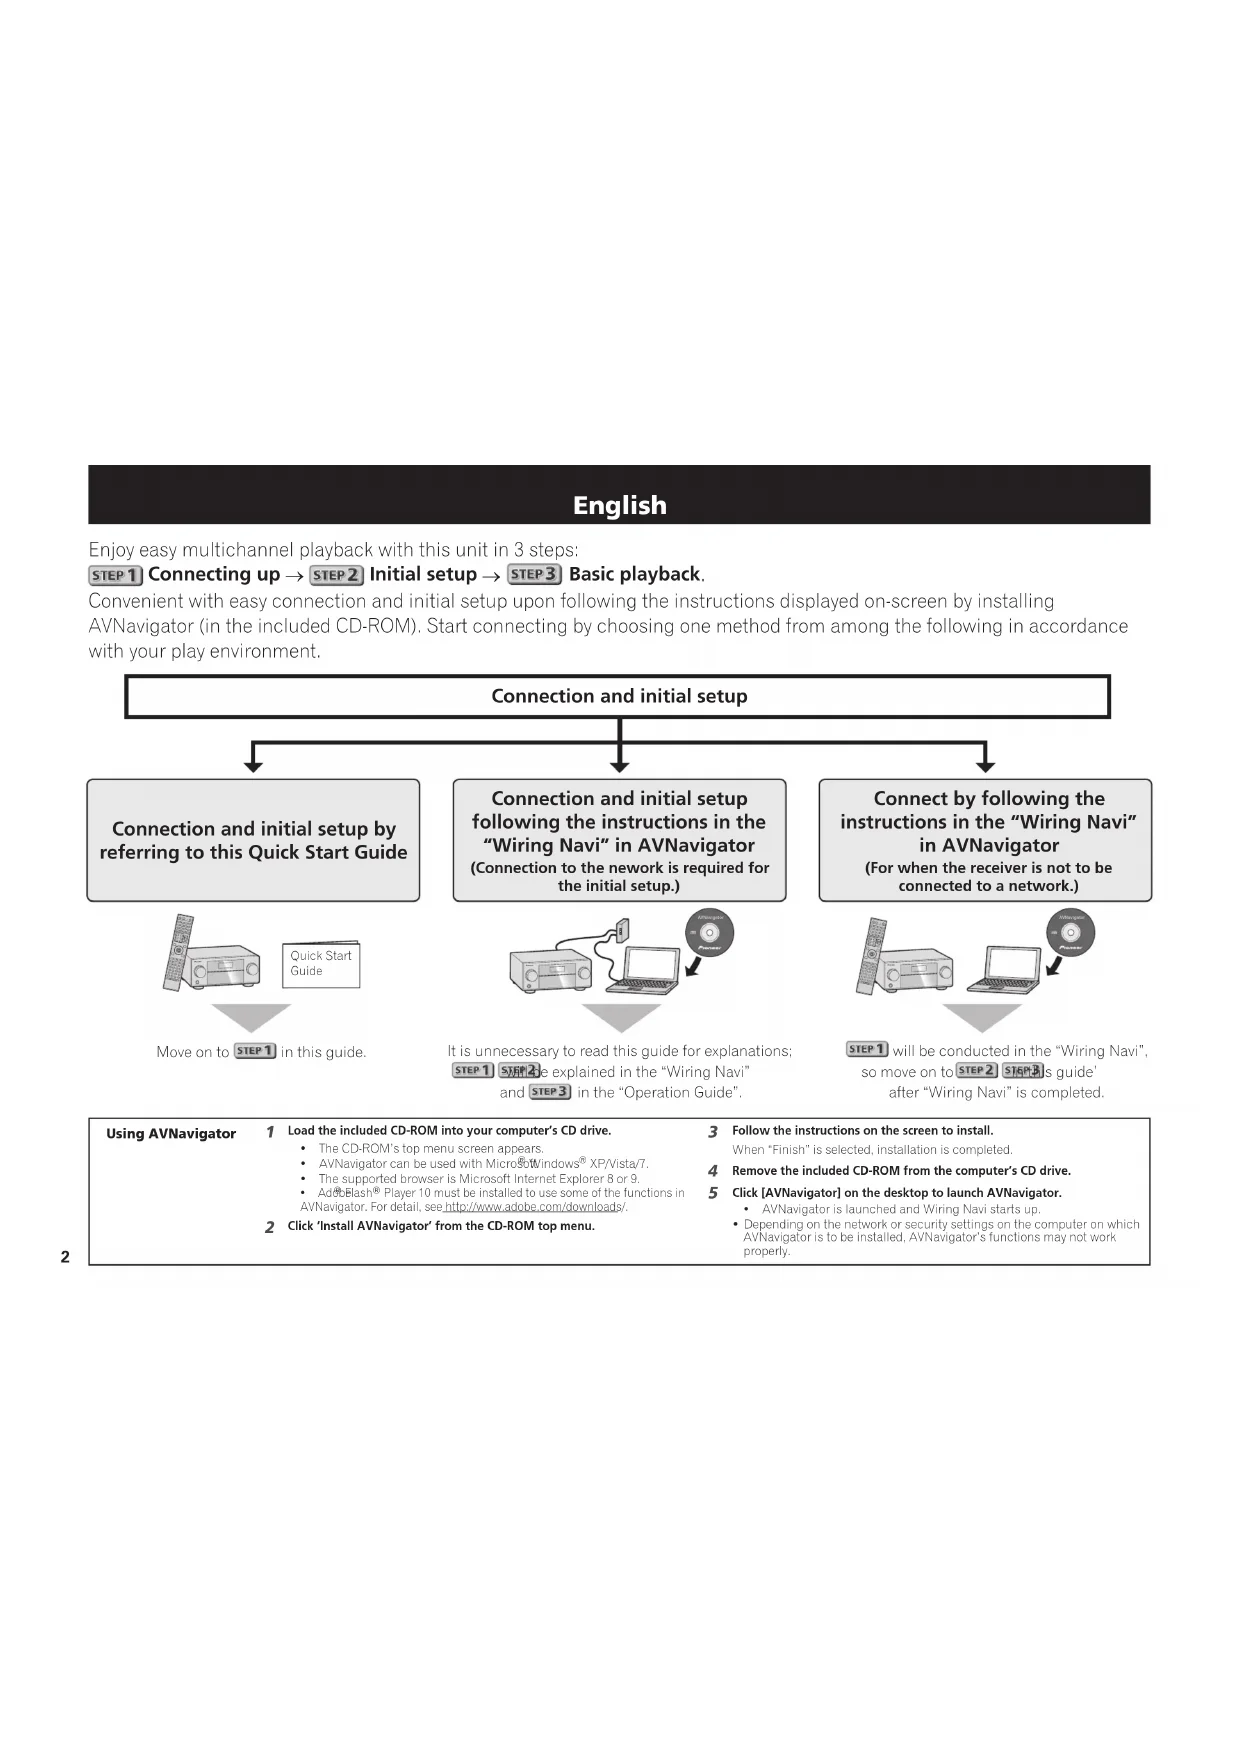
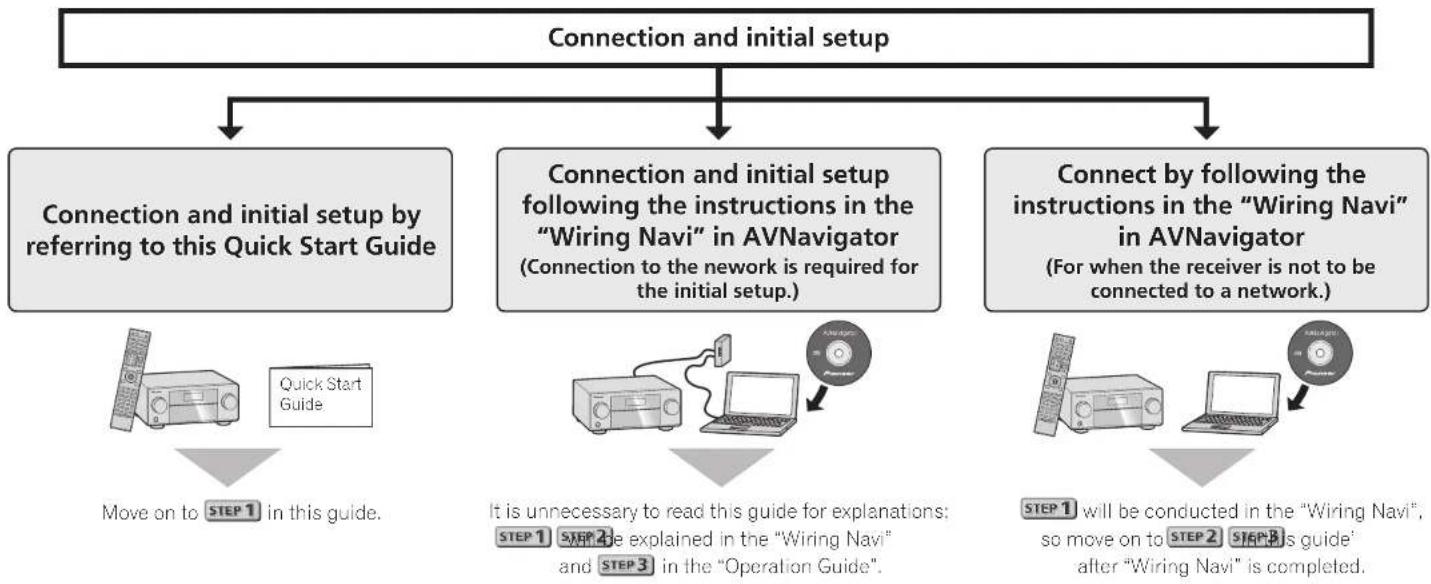
Enjoy easy multichannel playback with this unit in 3 steps:
STEP1 Connecting up STEP2 Initial setup STEP3 Basic playback.
Convenient with easy connection and initial setup upon following the instructions displayed on-screen by installing
AVNavigator (in the included CD-ROM). Start connecting by choosing one method from among the following in accordance with your play environment.
Using AVNavigator
1 Load the included CD-ROM into your computer's CD drive.
The CD-ROM's top menu screen appears:
AvNavigator can be used with Micro800WindowsXPVista/
The supported browser is Microsoft Internet Explorer 8 or 9.
- Acoblas Player 10 must be installed to use some of the functions in
AVNavigator.Fordeta,seehttp://www.adose.com/downloads/.
2 Click 'Install AVNavigator' from the CD-ROM top menu.
3 Follow the instructions on the screen to install.
When "Finish" is selected, installation is completed.
4 Remove the included CD-ROM from the computer's CD drive.
5 Click [AVNavigator] on the desktop to launch AVNavigator.
AVNavigator is launched and Wiring Navi starts up.
Depending on the network or security settings on the computer on which AvNavigator is to be installed. AvNavigator's functions may not work properly.
STEP1 Connecting up
Important
- Illustration shows the VSX-1122, however connections for the VSX-922 are the same except where noted.
Connecting the speakers
The receiver will work with just two stereo speakers (the front speakers in the diagram) but using at least five speakers is recommended, and a complete setup is best for surround sound.
To achieve the comfortable surround sound, install your speakers as shown below.
7.2 channel surround system:
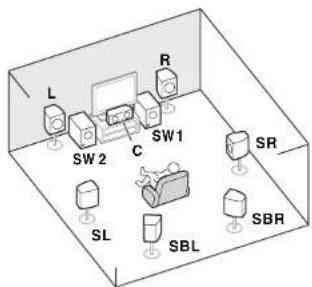
L-Front Left
C-Center
R-FrontRight
SL-Surround Left
SR-Surround Right
SBL-Surround back Left
SBR-Surround back Right
SW-Subwoofer
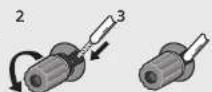
Connecting the speaker cables
Make sure you connect the speaker on the right to the right (R) terminal and the speaker on the left to the left (L) terminal. Also make sure the positive and negative (+/-) terminals on the receiver match the on the speakers.
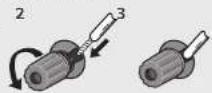
1 Twist exposed wire strands together.
2 Loosen terminal and insert exposed wire.
3 Tighten terminal.

CAUTION
- Before making or changing connections, switch off the power and disconnect the power cord from the AC outlet.
These speaker terminals carry HAZARDOUS LIVE voltage. To prevent the risk of electric shock when connecting or disconnecting the speaker cables, disconnect the power cord before touching any uninsulated parts.
After installing the speakers, connect them as shown below.
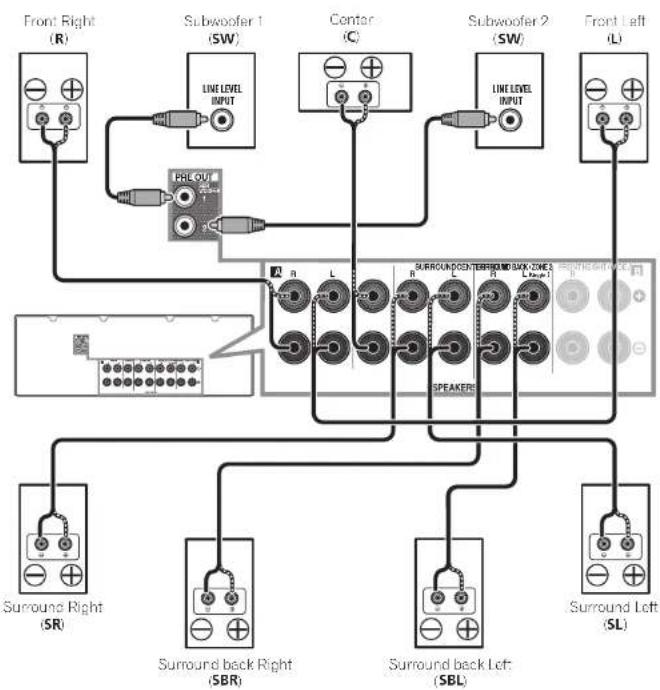
Note
- If you have two subwoofer, the second subwoofer can be connected to the SUBWOOFER 2 terminal. Connecting two subwoofer increases the bass sound to achieve more powerful sound reproduction. In this case, the same sound is output from the two subwoofer.
This unit supports speakers with a nominal impedance 16Ω.
Connecting a TV and playback components
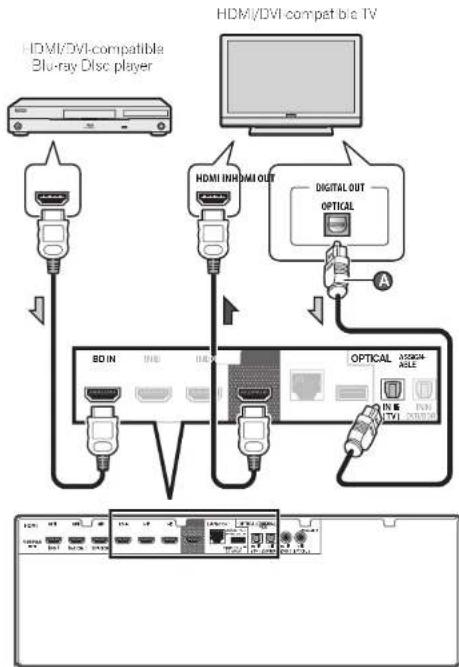
If the TV does not support the HDMI Audio Return Channel function, optical digital cable (A) connection is required to listen to the TV sound over the receiver.
- if the TV supports the HDMI Audio Return Channel function, the sound of the TV is input to the receiver via the HDMI terminal, so there is no need to connect an optical digital cable. In this case, set ARC at HDMI Setup to ON
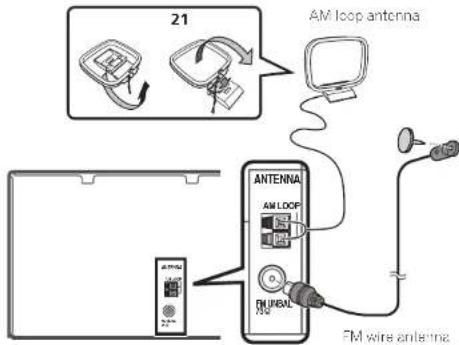
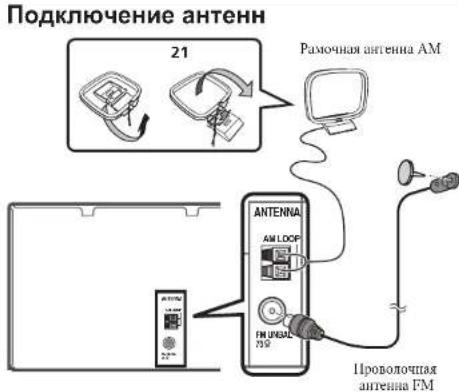
Connecting antennas
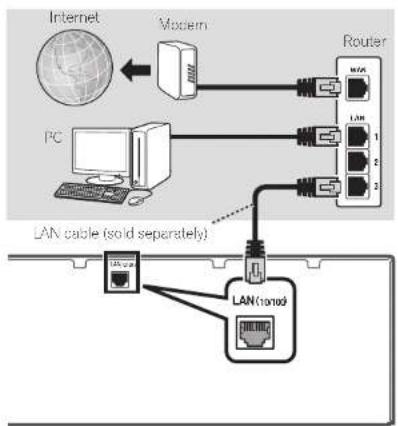
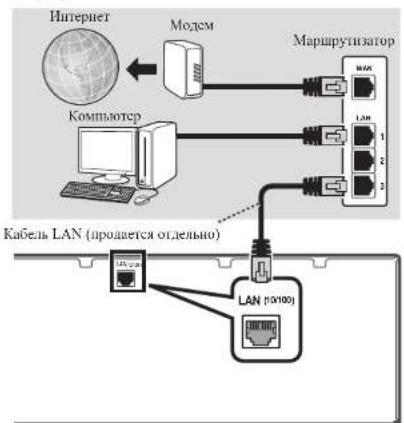
Connecting to the network through LAN interface

Note
Refer to the operating instructions in the included CD-ROM if you wish to connect a TV or playback component in a method other than an HDMI connection. Refer to the operating instructions in the included CD-ROM for other device connections.

CAUTION
- Handle the power cord by the plug part. Do not pull out the plug by tugging the cord, and never touch the power cord when your hands are wet, as this could cause a short circuit or electric shock. Do not place the unit, a piece of furniture, or other object on the power cord or pinch the cord in any other way. Never make a knot in the cord or lie it with other cables. The power cords should be routed so that they are not likely to be stepped on. A damaged power cord can cause a fire or give you an electric shock. Check the power cord once in a while. If you find it damaged, ask your nearest Pioneer authorized independent service company for a replacement.
VENTILATION CAUTION
When installing this unit, make sure to leave space around the unit for ventilation to improve heat radiation (at least 40 cm at top, 10 cm at rear, and 20 cm at each side).
WARNING
Slots and openings in the cabinet are provided for ventilation to ensure reliable operation of the product, and to protect it from overhealing. To prevent fire hazard, the openings should never be blocked or covered with items (such as newspapers, table cloths, curtains) or by operating the equipment on thick carpet or a bed.
D3-4-2-1-7bA1En
STEP2 Initial Setup
Before you start
1 Put the batteries in the remote control.
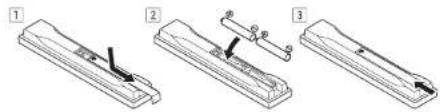
The batteries included with the unit are to check initial operations; they may not ast over a long period. We recommend using alkaline batteries that have a longer life.
2 Switch on the receiver and your TV.
3 Switch the TV input so that it connects to the receiver.
4 Turn the subwoofer on and turn up the volume.
WARNING
- Do not use or store batteries in direct sunlight or other excessively hot place, such as inside a car or near a heater. This can cause batteries to leak, overheat, explode or catch fire. It can also reduce the life or performance of batteries.
CAUTION - When disposing of used batteries, please comply with governmental regulations or environmental public institution's rules that apply in your country/area.
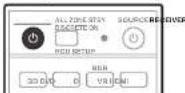
Canceling the demo display
The display on the front panel shows various information (demo displays) when the receiver is not operating. You can turn off the demo display.
② "Canceling the demo display"
The demo mode is canceled automatically when the Auto MCACC setup is performed (see below).
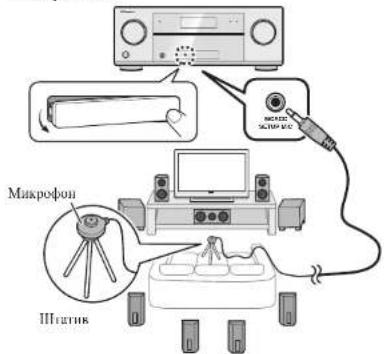
Automatically setting up for surround sound (MCACC)
The Aulo Multi-Channel Acoustic Calibration (MCACC) setup uses the supplied setup microphone to measure and analyze the test tone that is outputled by the speakers. This setup enables automatic high precision measuring and sellings; utilizing it will create an optimum user listening environment.
Important
- Measure in a quiet environment.
If you have a tripod, use it to place the microphone so that it's about ear level at your normal listening position. Otherwise, place the microphone at ear level using a table or a chair. - Accurate measurements may not be possible if there are obstacles between the speakers and the listening position (microphone).
When measuring, step away from the listening position, and operate using the remote control from the external side of all the speakers.
1 Connect the supplied setup microphone.
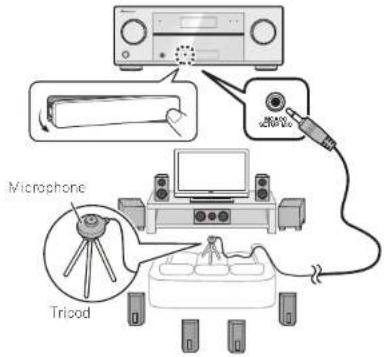
The Full Auto MCACC screen appears on your TV.

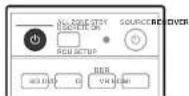
2 Press RECEIVER on the remote control, then press the ENTER button.
Automatic measuring will start.
Measuring will take about 3 to 12 minutes.
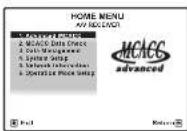
3 Follow the instructions on-screen.
- Automatic selling is complete when the Home Menu screen appears.

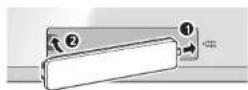
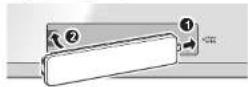
4 Make sure the setup microphone is disconnected.
- Attach the front cover as shown in the following illustration.
Canceling the Auto Power Down
If no operation is performed for a certain amount of time with no audio or video signal being input, the receiver's power turns off automatically. The automatic power-off timer is set to 30 minutes under factory settings, and the timing can be changed or the power-off function switched off altogether.
Auto Power Down
STEP3 Basic playback
Multichannel playback
1 Switch on the playback component.
E.g.) Turn the Blur-ray Disc player connected to the HDMI BD IN terminal on.
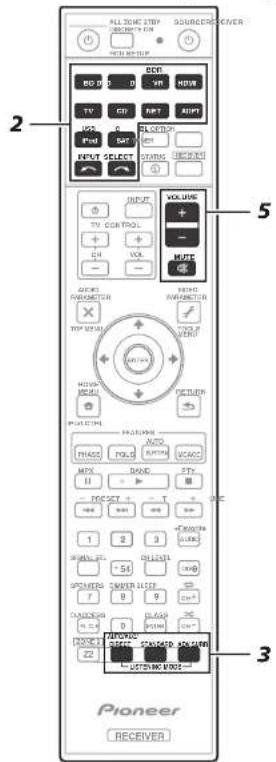
2 Switch the input of the receiver.
E.g.) Press BD to select the BD input.
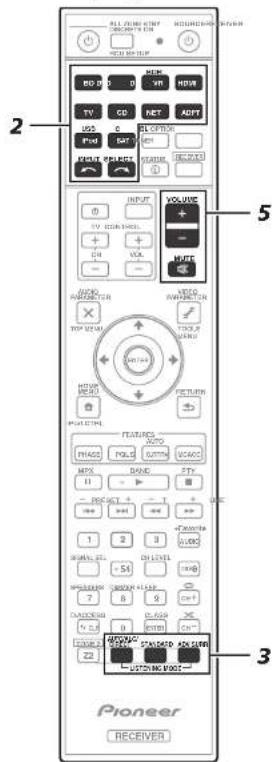
3 Press AUTO/ALC/DIRECT to select 'AUTO SURROUND'.
Also press STANDARD or ADV SURR for multichannel playback. Select your preferred listening mode.
4 Start the playback component's playback.
L.g.) Start playback of the Bu-ray Disc player.
5 Use VOLUME + / - to adjust the volume level.
Sound can be switched off by pressing MUTE button.
Note
- Switch to one of the underlined devices to use the remote control to operate that device. To operate the receiver, first press RECEIVER, then press the appropriate button to operate.
The receiver's remote control can be used to operate not only the receiver but also a variety of other devices, including an iPod/USB device, a Bluetooth Disc player, a TV, etc.
Ex.: Playing a Blu-ray Disc player

- It will take about 1 minute to be able to use the NETWORK (internal radio and such), iPod/USB, or ADAPTER PORT from the time the power is turned on.
Listening to the radio
1 Press TUNER to select the tuner.
If necessary, press BAND to change the band (FM or AM).
2 Press TUNE + / - to tune to a station.
- Press and hold TUNE +/- for about a second. The receiver will start searching for the next station.
- If you're listening to an FM station out the reception is weak, press MPX to select FM MONO and set the receiver to the mono reception mode.
Saving station presets
If you often listen to a particular radio station, it's convenient to have the receiver store the frequency for easy recall whenever you want to listen to that station.
1 Press TOOLS while receiving a signal from the station you want to store.
The preset number is blinking.
2 Press PRESET + / - to select the station preset you want, then press ENTER.
The preset number stop blinking and the receiver stores the station.
Listening to station presets
You will need to have some preset stores to do this.
- Press PRESET +/- to select the station preset you want.
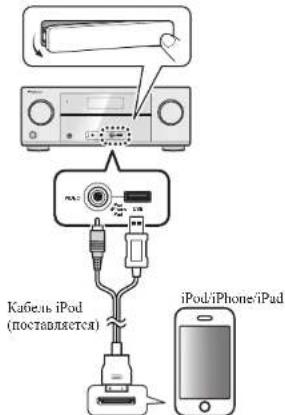
Playing an iPod
1 Connect your iPod.
An Pod/iPhone/iPad can be connected to the receiver.
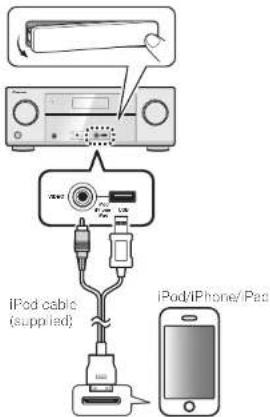
2 Press iPod USB to select the iPod/USB input.
When the display shows the names of folders and files, you're ready to play music from the iPod.
3 Use / to select a category, then press ENTER to browse that category.
To return to the previous level any time, press RETURN
4 Use / to browse the selected category (e.g., albums).
- Use / to move to previous/next levels.
5 Continue browsing until you arrive at what you want to play, then press to start playback.
Listening to Internet radio stations
Important
-
When using a broadband Internet connection, a contract with an Internet service provider is required. For more details, contact your nearest Internet service provider.
To listen to Internet radio stations, you must have high-speed broadband Internet access. With a 56 K or ISDN modem, you may not enjoy the full benefits of Internet radio. -
Access to content provided by third parties requires a high speed internet connection and may also require account registration and a paid subscription. Third party content services may be changed, suspended, interrupted, or discontinued at any time without notice, and Pioneer disclaims any liability in connection with its occurrences. Pioneer does not represent or warrant that content services will continue to be provided or available for a particular period of time, and any such warranty, express or implied, is disclaimed.
Press NET repeatedly to select the INTERNET RADIO input.
It may take several seconds for this receiver to access the network.
2 Use / to select the Internet radio station to play back, and then press ENTER.
To enjoy the many functions of the unit to the fullest extent

Install the AVNavigator from the included CD-ROM into your computer, and use the "Interactive Manual".

Load the CD-ROM into your computer and download the PDF manual from the menu screen to read.
Functions
Playing a USB device
Bluetooth ADAPTER for Wireless Enjoyment of Music
Playback with NETWORK feature
Setting the Audio options
Setting the Video options
Using the MULTI-ZONE controls
FAQ
Glossary
Features index
© 2012 PIONLER CORPORATION.
All rights reserved.
Français
SBL-Surround amere Gauche
SBR Surround amcre Droile
SW - Caisson de grave
1 RaccordezVoteiPod.
© 2012 PIONLER CORPORATION.
© 2012 PIONLER CORPORATION.
© 2012 PIONLER CORPORATION.
Tutt i diniti riservat.
Nederlandds
© 2012 PIONLER CORPORATION.
© 2012 PIONLER CORPORATION.
SR-1IpaBbI pROMKOBOPHTCBIO6cMHO 8BHHAH
SBL-3aHHHcBbI rpoMkoROOBpHTCB 0bLcMHOO3ByyAHH
SBR-3aHHHIIpIrpOMKIOBOPOBcIb 06bCMHO 3ByuHHH
SW-HH3K0AactOTHHrPOMKOROBOPHTCJIb
PoiKIOUOHeNKeKabeNeI rpoMkoROrOpBOnTeNeI
ByBteBHIMIEHBI HIOIOIOIOHTeIpHHBn rPMOKOROBOPHTETK INPANOMOy R)TePMHATy H IeHHN MPOMKOROBOPHTETK INKHOYMOU L)TePMHATy. TaKae YOBeHIECt B TOM, YTOIOIOIOHJIeHHbHI OIPHHaTEbHI(+/-) TePMHAIHa PAeCHBepe COIBIAHOT C TcPMHAIHAM H APOPMKOROBOPHTCTX.
1 CkpyTne oroneHHbIe KINbI npOBoa.
2 OcbO6OHTe TepMHHn H BCTaBbTe oroneHHbI npBOd.
3 3akpyntte TepmHaI.

PNEyNPEKDEHNE
IpeBbHHeHHem HmHMeHHem NOKIOHnH,OTKIOHTHE THTAHNE H OTOeHHHeKabeBHITAHNOrpOeTKH NepeMHHO TOKA.
HnHHHe TepmHaBt IpOMKOrOBOpHTeIe
coeepaHOTANOHCEJN K3HN
HnPAHcHHe.Bo H6ckAaHne PnKa
OCTPPOoka pHn POJIIOCHUHN Hn
OTCoEHTHEHnKABeEN rPoMkOROnOPHTeIe,
HEpeI HPrKOHOBcEHem KIObHM
HC301HPoBAHHM qACTM,OTCCDHHTC
Kab6eITHnTAAHn
TocyeyctahOHKnIpOMKOrOBOpHTeHnIOKIOOHTeHXKNOKaHaHO HNKe.
pcpedm pmpn pnpk000003
HIXKOTOTOHMI LCHPTAHMI IrpomKOROBOPHTIEI rPOMKOROPOBTIEI
HnKoAotOHnTH PtonKOrOBOpOTnEe
R. repensianae acmii R. pexkowrobojcevii

(SBR)
PnmuueHne
IipHnTHHHINbX INHKOACTOTNIg rPOMKOBOPHTCNC, BTOPOINIKHOACTOTNIg rPOMKOROBOPHTCN MIOKIOIOIOIOIOITK T KPMNTHMISUBWOOFER 2. IIOIOIOIOIOIOIg rPOMKOROBOPHTNE yCHNIE GACOHOB3HNNHIE, KBOIOIOIOIOIOIg MOHNOHO HOHPOHO HBNHO HBNHO HBNHO HBNHO HBNHO HBNHO HBNHO HBNHO HBNHO HBNHO HBNHO HBNHO HBNHO HBNHO HBNHO HBNHO HBNHO HBNHO HBNHO HBNHO HBNHO HBNHO HBNHO HBNHO HBNHO HBNHO HBNHO HBNHO HBNHO HBNHO HBNHO HBNHO HBNHO HBNOOH
Aannn Hnnnapn Hooepnnaeepnepnepnepnepnepnepnepnepnepnepnepnepnepnepnepnepnepnepnepnepnepnepnepnepnepnepnepnepnepnepnepnepnepnepnepnepnepnepnepnepnepnepnepnepnepnepnepnepnepnep
IopKnHouHe TeneBn3opa N KOMNHOHTOB BOCPON3BeDeHn
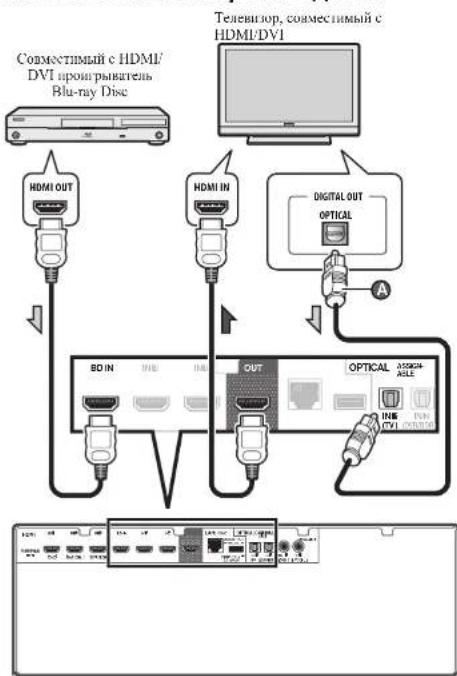
EeHnTeCNBnOpe NoepKBAeT FyHHIO KATana B03pata ayHOCHNtna HDMI, TpoCyTe BAIOHHTN. NOKTHIOc Hpe3 OHTCNKII INPOBOKABe (),TO6M MoKHO bIOPOCYNHARb 3RyAueNCNBOOPa cpe3 pceHREp
KEN THEBISOP NOEPOBMAET FYNKINHO KANATA BOSAPATA ayIOHCHNHL HA HIDMI, BYAHMNE TEIPOA IOPA HOCTNYAHTA HApceHHEPepe3 TEPMHNAH IDMI, HOITOMY HE HEO6XIOHMOTN NOKIOHATOHIOHNK EIKHPOAOKAHO. B. TAKOMC yUAACTYBOHARC HDMSETUP ON 一 HDMSETP
IopKnIOUeHne K cTeN Upe3 INTEPcEIC LAN

PpmeuHne
EChnHyKHOIOHKHOHTBTeIEB3OPH KMOHOENT BOCPOHBOCCHINAPYTHOOB4OM, aHCHepe3HOIKHOCHNHDMI,TOCMPTHEHCTpyKHHHOOKHIHTAUNHA HOCTAAEMOMCD-ROM.
1. 历江鄂氏渊氏甲四胺THYCTPOHTBEMOTPHTHECNETPYKIIIN NOOKNPNATAHNAHNOCTAANTMEMCD-ROM
PNEyIPEXJEHNE
DcKHTC KAc6Tb HHTAHH 3a BnHKy. BbHHMaB BHTKY H3 pOe3KTH, INKoRdTA H TINHTE cAam KAc6Tb, INKoRdTA IIOrTaBHnAEiTe,7o Ka6Te HnTAAHnBnBAAkMHpyKaMn, TAK KKT OTO MeOKET CTATN PpHNNHOI KOPOKOT AAMKHNHn HOPaKeHHn AEKeIPHeCKHM TOKOM. HeOnyckaiTe yCTAHOBKn HA Ka6BeIb HHTAHnAM CMOI AIIHAPRT, UpeMeTOr M6eEHn HnHApTyHX IpcIMToB hcr OeAeMChn HIO6BaMn APyHMn CHOCoMMn. HeOnyckaiTe O6pAoBBHn HA Ka6BeIe YHONH HnH eO ChTyBBAHnC DpyTMN Ka6eMH. Ka6EIH HHTAHN HcEyET IpOkIaBbBt B TAKHX MEcTA, Tc EBo3MOKHOCT BACTYHTB HnHX bOCT MAIOBcPtoHNI. IObpckJCHBIH KAc6BeIb HHTAHN MoKcTc tAtb PpHNNHOI BO3OPaHN HnH NopaKeHHn AEKeIPueCeKM ToKOM. IepHoTIeCKN IPOBcPte KAc6BeIb HHTAHN. EeiH ObpHuKHTcero NOBpckJCHNC, O6pAHIcB B 6IJIaJIaJIeCpBNCHIh ICHrT, yNoTHOocmHnn KOMMANH Pienccr, no NOBOy cro 3AmHn
STEP2 NepBoHaayanbHna HacTpoJa Ka
Ipeed hauanom pa60tbi
1 YctaHOBNTe 6aTapeKn B nylbT dY.
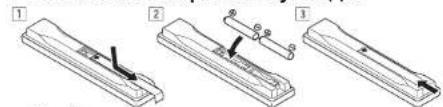
katapekh, noctanenme c anannn annapatom, npnanae nnaa.
Tn nponeckn npboananh xynnn ytnpaaen Hx moekt
nxnattn hnoIIO. Pcokmniocn Hnncbmoabtt MtoHnue
6atapckn, KOTOPAC bOAnadao npdoKHTCnHm epokom cykb
2BknHHTpepeCBepnncnoIb3yeMbI TeeBn3Op.
3 NepeKIOUaTe BXoT TEeBn3Opa Do Tex nOp, noka OH He NOkIOHouNTc K pecHBepy.
BKnOHTe H3K0aTObHbI rPOMKOrOBOpTeHb IIOHMnTE yPOBeHrPOMKoCTN.
PNEyIPEXJEHNE
HeHnIbIyHTN XpAHITBcBATAPCN B MCTax,NOIePRTYTHX
PIMOMY PAACHHO CoHHIXYJyCH, HxpyrN PDCJIbHO
KAKPHKMeCTAX,HANHPMep, BYHYP MAnHHHbIK HIN BOHIE
OBOPERAEIA. 30o MoKet BBAHTPiOTKeAHIne, NpeIpeh,
paBbHIN HOBOPAHBEaPeek. 30o Taakce MoKet PnREChk
ymenmHIPO cPoka CcyKbN O paoTtBa na paOte batapeek.
I PENEJYNPEKJEHNE
PpOHHIOHTHe yTHHHTHNO HHOHOB30AHHX 6Htpeck B COOTCTBHH C cHETCYBOHM H CHPaHE PEOHO TOCy,APCCHBBHIM HOCTHOBBHMM HUPBOHMM,BBEJHbHHM 00eBHbHHMM HHCITYAMN OOKpyKooJIcpe.1B
OTmeHa peKIMMa demOHcTpaCn
Korda pccBep He paoTb. HnHcIe KpeCHei HaeHHI OTOpKaactc TaPCHINH HINPOMaHH (pcKHM cMOHCTPAHH). Pekm demOHcTpaHH MOKHO OTKIOHHT. ②OOnMeHa pcHcMA deOMcmpaauo
PekHM DEMOHCTPAHNN ABOTOMAHueckN OTMeHHeTcH Hn 3aynckc ABOTOMAHueckoi NaTePOHN MCACC (cm. Hnke).
ABTomatuecka hactpoKa 06bemHoro 3ByuHa (MCACC)
HAcpoKa Auto Multi-Channel Acoustie Calibration (MCACC) c HOMOIO NOCTABMOTMO MHKOPOHOA HAcPOHOH NMCPEHT H ANATHHPYc TCCOBMC TOIHINHC HTHTA. BHBODHMBC IPOMKONOBOPHTJMM. DHHAH HAcPOKAIOHOBOBET ABOTMAHTHECKN C BMCOKOITOHOCTBO BMBIOHNB NMECPHNIH HAcPOKH. CC HNOI3OBAHNC IOBOBACT CO3DAIb OHTHMAJIbHYC CPQyPNCYNBMNAH DnIOI3OBATCA.
Baxhoe npedynpexdeHne
BbnoimrHmepnna co6nodar Tnnny.
EcnH y Bac cctb HtTaTH, HcnoB3yHcre cro yctaTobKn MHKpOHa np6nHHTeTbNO na yponne yxa n a6bYHOM MecTe CHaHrAe. B npOHINOM Cyeae paMecTe HmKpOHa h yPOBE yxa H cTHe HnH CYte.
HAnHHIe IepnTCTBnM MeKdy IpOMKOrOBOPHTBnHH MeCtOM CUYH (MHKPOHOOM) MOKeI HpeIRCTBOHRbTOHOMY BEMePeHHIO.
BoBPEMBAHMEPEHHCHIeyET HAXOJIHTBCHBE MECTeA CNYUCAH NYPABNBT BY NTbTA 3a pncdAmn 30mH paonnoKoCINH BCCPROMOROBOPHTCN.
1 NoKNoHTe noCTaBnEmbMnKpOphn HAcTPOKn.
Ha TeneBnOpe OTo6paKaTaCg Okpan Full Auto MCACC

2 HaxMNTe RECEIVER ha nyIbTe Dy, 3aTEM haxMNTe KhoNky ENTER.
3anyckaeTcAANTOMaHueckoe Hmepenne.
Hmepnne nainmet npnmeo or 3 no 12 mnyr.
3 Cnedynte HNCTpykunM,OTobpaXaEMbIM Ha 3kpane.
- Automatneuchka nahtpojka 3ahepiHaetc npn otObpaKeHHN KpHa Home Menu.
4 Y6eIntecb, TTO MkPpOoH nactpoKn OTOcEINHe.
Iprprrnre nepeemrno kpiymk ra nokaranto ra enerytoen pheynie.
OTMeHa ABTomatNueckoe OTKJIIOUeHne NITAHIN
HnB TceHHe OpeTeeHmro pOmeKytKa BpeMeHHIe npnoHbHnHcN bIObe OoepaH, cOTcyTBmBxOHNx ayHNO HnHnBuCCOHHTOB, HHTAHNC pcpehCBAOTBMTHCCKyBCT OKtIOCHNO. TaHmcp ABOTOMATHCCKORO OTKIOCHINBB MOCHTIOTpykck C aBOta YcTANONETII 30MHIT, NO BpMa Ia Taimpe MOHO MeHTb HnBOOE OTOEHTb FyHKIOOTKIOCHENH HINTAH. 念 AemuaueeeKoe OHKAnaeuue HnnH
STEP3
OchOBhble onepaunBocnpon3BeDeHn
MhorokaHaJIbHoe BOCPon3BeDeHne
1 BkHouHTe KOMHOHeT BOCpOn3BeDeHnA.
Haan.) BHKHHeI HPOHPbBateiB BLu-Tay Disc, HIOKIOHMHH K TEPMHYH HDMI BD IN.
2 PepeKIOHTe BXoHapeCHepe.
Haap.) HaKmte BD n Bb6peHte BXo1BD.
3 HaxmaraUTO/ALC/DIRECT, Bb6epnte (AUTO SURROUND).
TAKKIAHAKHTSTANDARD HIN ADV SURR.13 MHOROKAHALIBHO BOCIPPOH3BcHHN.Bb6pcHtC HNYKHIN peHHN IPOCUYHHAHNN
3anyctnTe Bocpon3BeDeHne Ha KOMnoHeHTe BOCpon3BeDEHHN.
Harp.) 3aynyTHTRE noocpoHHBeTeHnI na pnoHpMaTeN EblurY Disie.
5 C nOmoosbVOLUME +/oTpepynpyTe ypoBeHrpoMkoTH.
3ByaHHe MOKHO GKOIOHTb, HOKAB KHOIky MUTE.
Приимейчиме
IpeKHHTcB HA OHH HIOHepKHybX yCtpoHCT,ITo68 MoHO bHO HcNOBbATyHb DY IaY npABINH TcM yCtpoHCTbOM.Ⅱa YnpABINH pCCHBpOM CHaHa IaKaMHTc RECEIVER, 3ATE MAnKMTe COOTNETyTOI KIOK, IyipANHEN
Hpypeepbopa mo HcnoBtBnnypabtnnn Hte Tko pechepom, HO TaKae pRDMyTnx yctpoCTK kipodycpoIcBO USB, npOHTPBareblu-rayDisc,TeE3B0P,Ap.

C MCMNTA BKNIOCHIN HINATNA TPC6yctc CnC PNHMCPHO I MHTY, IOKA MOKHO 6yHET IHCIOBIOHB NETWORK (HHTHEPRAHOTAHHHI TOMO HO6hoe), iPod/USB HADAPTER PORT.
PpocnyuBaHne paDnOpepa
1 HaxmTe TUNER nBb6opa THepe.
IIHr HO60HOHHOHT HXKMTB BAND IINCPCKIOCHIHA IIH3OHSA (FM IIM AM).
2 Haxab TUNE +/-, hactpoTecb ha paHIOCTaHIO.
- Haxmertte H yzepkainnre haoakotf TUN +f- nprhmeco cekyU. Pechebn Hnehtn noHC cnEyohn pahokctaanH.
-ПИн плOMN npHmE npOyHnMaEmo pAIOOraHnHnFM HAKMHT MPX Hb6ePcHf PM MNO,TOb6y TaHOAHOBt peHNCpB pKoIIMMOTooHcckToPOnpMA.
CoxpaHHeI npEpyCTaHOBJIeHHbIX paAnocTaHm
EeHH BHaacto ciuyBaTe KAKyO-HH6o OInpcIcHHyO
PAHIOCTAHIOHO, O9eY, yIOHbO, eCNi OHa Byer CoXpanHeBA
HANNN PecnepBaHApA HIOHcHoUyOe 6BcTporo BB3OBaB
HIOBOHOMeMT CbeLbNpOcDyHBHn.
1 HaxmTe TOOLS BO BpemnpeMa CnHana c paHocTaHcH, KOtOpHy HxHHO COXpaHb. MHRact HOMC pIcIyCTAHOBKH.
2 Haxmair PRESET + / - BBb6epTe HxhHbH HOMep npeDyctaHOBKn dIpaNocTaHcHn, 3aTeM HaxmIte ENTER.
HemepypeCTAHORKKHEPCTAETMHATBnpeCHHBaTHOMHHaEPaTHOCTAHIIHO.
PpocnyuBbAHne npedyctaHOBJeHHbIX paHIOCTaHm
TTO TPOcOyTe, TIOBn HmNcHb NkOToPae HpeyctAHOBHeHHBe paHooTaHH.
Haxmam PRESET + / - BbIbepuTe HxHy npdyctaHOBneHHyO paIOCTaHIO.
Bocnpom3BeDHeH iPod
1 Npoknoute iPod.
K pccnBepy moKHO nKIOHouArb iPod/iPhone/iPad.
2 Haxab iPod USB, Bb6epnte BXoD iPod/USB.
PIOIe OTOBpAeHHH HJIcHJIeE HJIaBHAn HJIaHOK HJAIIOB MOHO 6yEToNOCPOHNIHTbMy2A3ky oI pOd.
3 C nOmoUbIO ↑/BbIepeNte KaterOpHIO, 3aTEM HAXMITE ENTER dI npOnctlbAHH 3TOI KATEROpH.
JIIBB03BPATAHINPcBAUUYIINYPOBCHBIAIO6MOmCHTBPECMHIXKMQMITERETURN
4 C nOMOuBIO ↑/↓ДЯnpONHcTBiBAHnBBb6paHHo KaterOpu (HaNP., anb6ombl).
JIINPepemepenHnI npIytnnnIcpeynOytnnnIyponE HnIeYtRCH
5IpoJoxKaIte npOIncTbIBaHne DoTexnop, noka He 6yDET BbIpaH MaTePmAn, KOtOpBn HEOxOIMO BOCpnONBecTn,3aTe HAKMnTe ▷nA 3anycka BocpnONBecHnA.
PpocnyuBaanHe NHTepHETpaNoctaHm
PIONEERCORPORATION,2012.
Bcc npaba 3aunnncnna.
http://www.pioneer.co.uk
http://www.pioneer.fr
http://www.pioneer.de
http://www.pioneer.it
http://www.pioneer.nl - http://www.pioneer.be
http://www.pioneer.es
http://www.pioneer-rus.ru
http://www.pioneer.eu
© 2012 PIONEER CORPORATION.
All rights reserved.
© 2012 PIONEER CORPORATION
PIONEER ELECTRONICS (USA) INC.
P.O. BOX 1540, Long Beach, California 90801-1540, U.S.A. TEL: (800) 421-1404
PIONEER ELECTRONICS OF CANADA, INC.
340 Ferrier Street, Unit 2, Markham, Ontario L3R 225, Canada TEL: 1-877-283-5901, 905-479-4411
PIONEER EUROPE NV
Haven 1087, Keetberglaan 1, B-9120 Melsele, Belgium TEL: 03/570.05.11
PIONEER ELECTRONICS ASIACENTRE PTE. LTD.
253 Alexandra Road, 04-01, Singapore 159936 TEL: 65-6472-7555
PIONEER ELECTRONICS AUSTRALIA PTY. LTD
5 Arco Lane, Heatherton, Victoria, 3202, Australia. TEL: (03) 9586-6300
PIONEER ELECTRONICS DE MEXICO S.A, DE C.V.
Blvd.Manuel Avilla Camacho 138 10 piso Col.Lomas de Chapultepec, Mexico, D.F. 11000 TEL: 55-9178-4270
K002_B4_Ru
Printed in China Imprimé en Chine
<5707-00000-661-0S>

- Using AVNavigator
- STEP1 Connecting up
- Important
- Connecting the speakers
- Connecting the speaker cables
- CAUTION
- Note
- Connecting a TV and playback components
- Connecting antennas
- Connecting to the network through LAN interface
- VENTILATION CAUTION
- WARNING
- STEP2 Initial Setup
- Before you start
- Canceling the demo display
- Automatically setting up for surround sound (MCACC)
- Canceling the Auto Power Down
- STEP3 Basic playback
- Multichannel playback
- Listening to the radio
- Saving station presets
- Listening to station presets
- Playing an iPod
- Connect your iPod.
- Listening to Internet radio stations
- To enjoy the many functions of the unit to the fullest extent
- Functions
- FAQ
- Glossary
- Features index
- Français
- RaccordezVoteiPod.
- Nederlandds
- PoiKIOUOHeNKeKabeNeI rpoMkoROrOpBOnTeNeI
- PNEyNPEKDEHNE
- PnmuueHne
- IopKnHouHe TeneBn3opa N KOMNHOHTOB BOCPON3BeDeHn
- IopKnIOUeHne K cTeN Upe3 INTEPcEIC LAN
- PpmeuHne
- PNEyIPEXJEHNE
- STEP2 NepBoHaayanbHna HacTpoJa Ka
- Ipeed hauanom pa60tbi
- YctaHOBNTe 6aTapeKn B nylbT dY.
- 2BknHHTpepeCBepnncnoIb3yeMbI TeeBn3Op.
- NepeKIOUaTe BXoT TEeBn3Opa Do Tex nOp, noka OH He NOkIOHouNTc K pecHBepy.
- BKnOHTe H3K0aTObHbI rPOMKOrOBOpTeHb IIOHMnTE yPOBeHrPOMKoCTN.
- I PENEJYNPEKJEHNE
- OTmeHa peKIMMa demOHcTpaCn
- ABTomatuecka hactpoKa 06bemHoro 3ByuHa (MCACC)
- Baxhoe npedynpexdeHne
- NoKNoHTe noCTaBnEmbMnKpOphn HAcTPOKn.
- HaxMNTe RECEIVER ha nyIbTe Dy, 3aTEM haxMNTe KhoNky ENTER.
- Cnedynte HNCTpykunM,OTobpaXaEMbIM Ha 3kpane.
- Y6eIntecb, TTO MkPpOoH nactpoKn OTOcEINHe.
- OTMeHa ABTomatNueckoe OTKJIIOUeHne NITAHIN
- OchOBhble onepaunBocnpon3BeDeHn
- Приимейчиме
- PpocnyuBaHne paDnOpepa
- CoxpaHHeI npEpyCTaHOBJIeHHbIX paAnocTaHm
- PpocnyuBbAHne npedyctaHOBJeHHbIX paHIOCTaHm
- Bocnpom3BeDHeH iPod
- Npoknoute iPod.
- PpocnyuBaanHe NHTepHETpaNoctaHm
Brand : PIONEER
Model : VSX922S
Category : AV receiver