
RTI 100 M - Thermostat AEG - Free user manual and instructions
Find the device manual for free RTI 100 M AEG in PDF.
| Brand | AEG |
| Model | RTI 100 M |
| Product type | Mechanical two-position room thermostat |
| Power supply | 1/N/PE ~ 50 Hz 230 V |
| Switching capacity | 16 A |
| Temperature range | Approx. 5 °C to 35 °C (continuous adjustment) |
| Central setpoint temperature | Approx. 20 °C |
| Main function | Automatic control of heat storage fan heaters |
| Frost protection | Maintains approx. 10 °C during prolonged absence |
| Sensor | External, integrated |
| Installation type | Built into heat storage unit (WSP 2010 to WSP 7010) |
| Supplied accessories | Thermostat, heating collar, selector, switch, capacitor, screws, manual, stickers |
| Standards | Complies with VDE 0100 |
| Installation | By qualified installer |
| Recommended mounting position | In the rightmost storage unit in case of multiple units |
| Number of pages in manual | 28 pages |
| Available languages | EN, FR, DE, NL |
Frequently Asked Questions - RTI 100 M AEG
User questions about RTI 100 M AEG
0 question about this device. Answer the ones you know or ask your own.
Ask a new question about this device
Download the instructions for your Thermostat in PDF format for free! Find your manual RTI 100 M - AEG and take your electronic device back in hand. On this page are published all the documents necessary for the use of your device. RTI 100 M by AEG.
USER MANUAL RTI 100 M AEG
Integrated Room Temperature Regulator
for Electric Storage Heaters
WSP 2010 to WSP 7010
Operating and Installation Instructions
RTi 100 M
Français
1. Operating instructions For the user
1.1 Functional principle 10
2. Installation instructions For the fitter
2.1 Technical data 11
2.2 Packing unit 11
2.3 Installation 12
2.4 Function test 14
2.5 Transfer 14
3.Environment and recycling 15
Sommaire
1. Operating Instructions
RTi 100 M
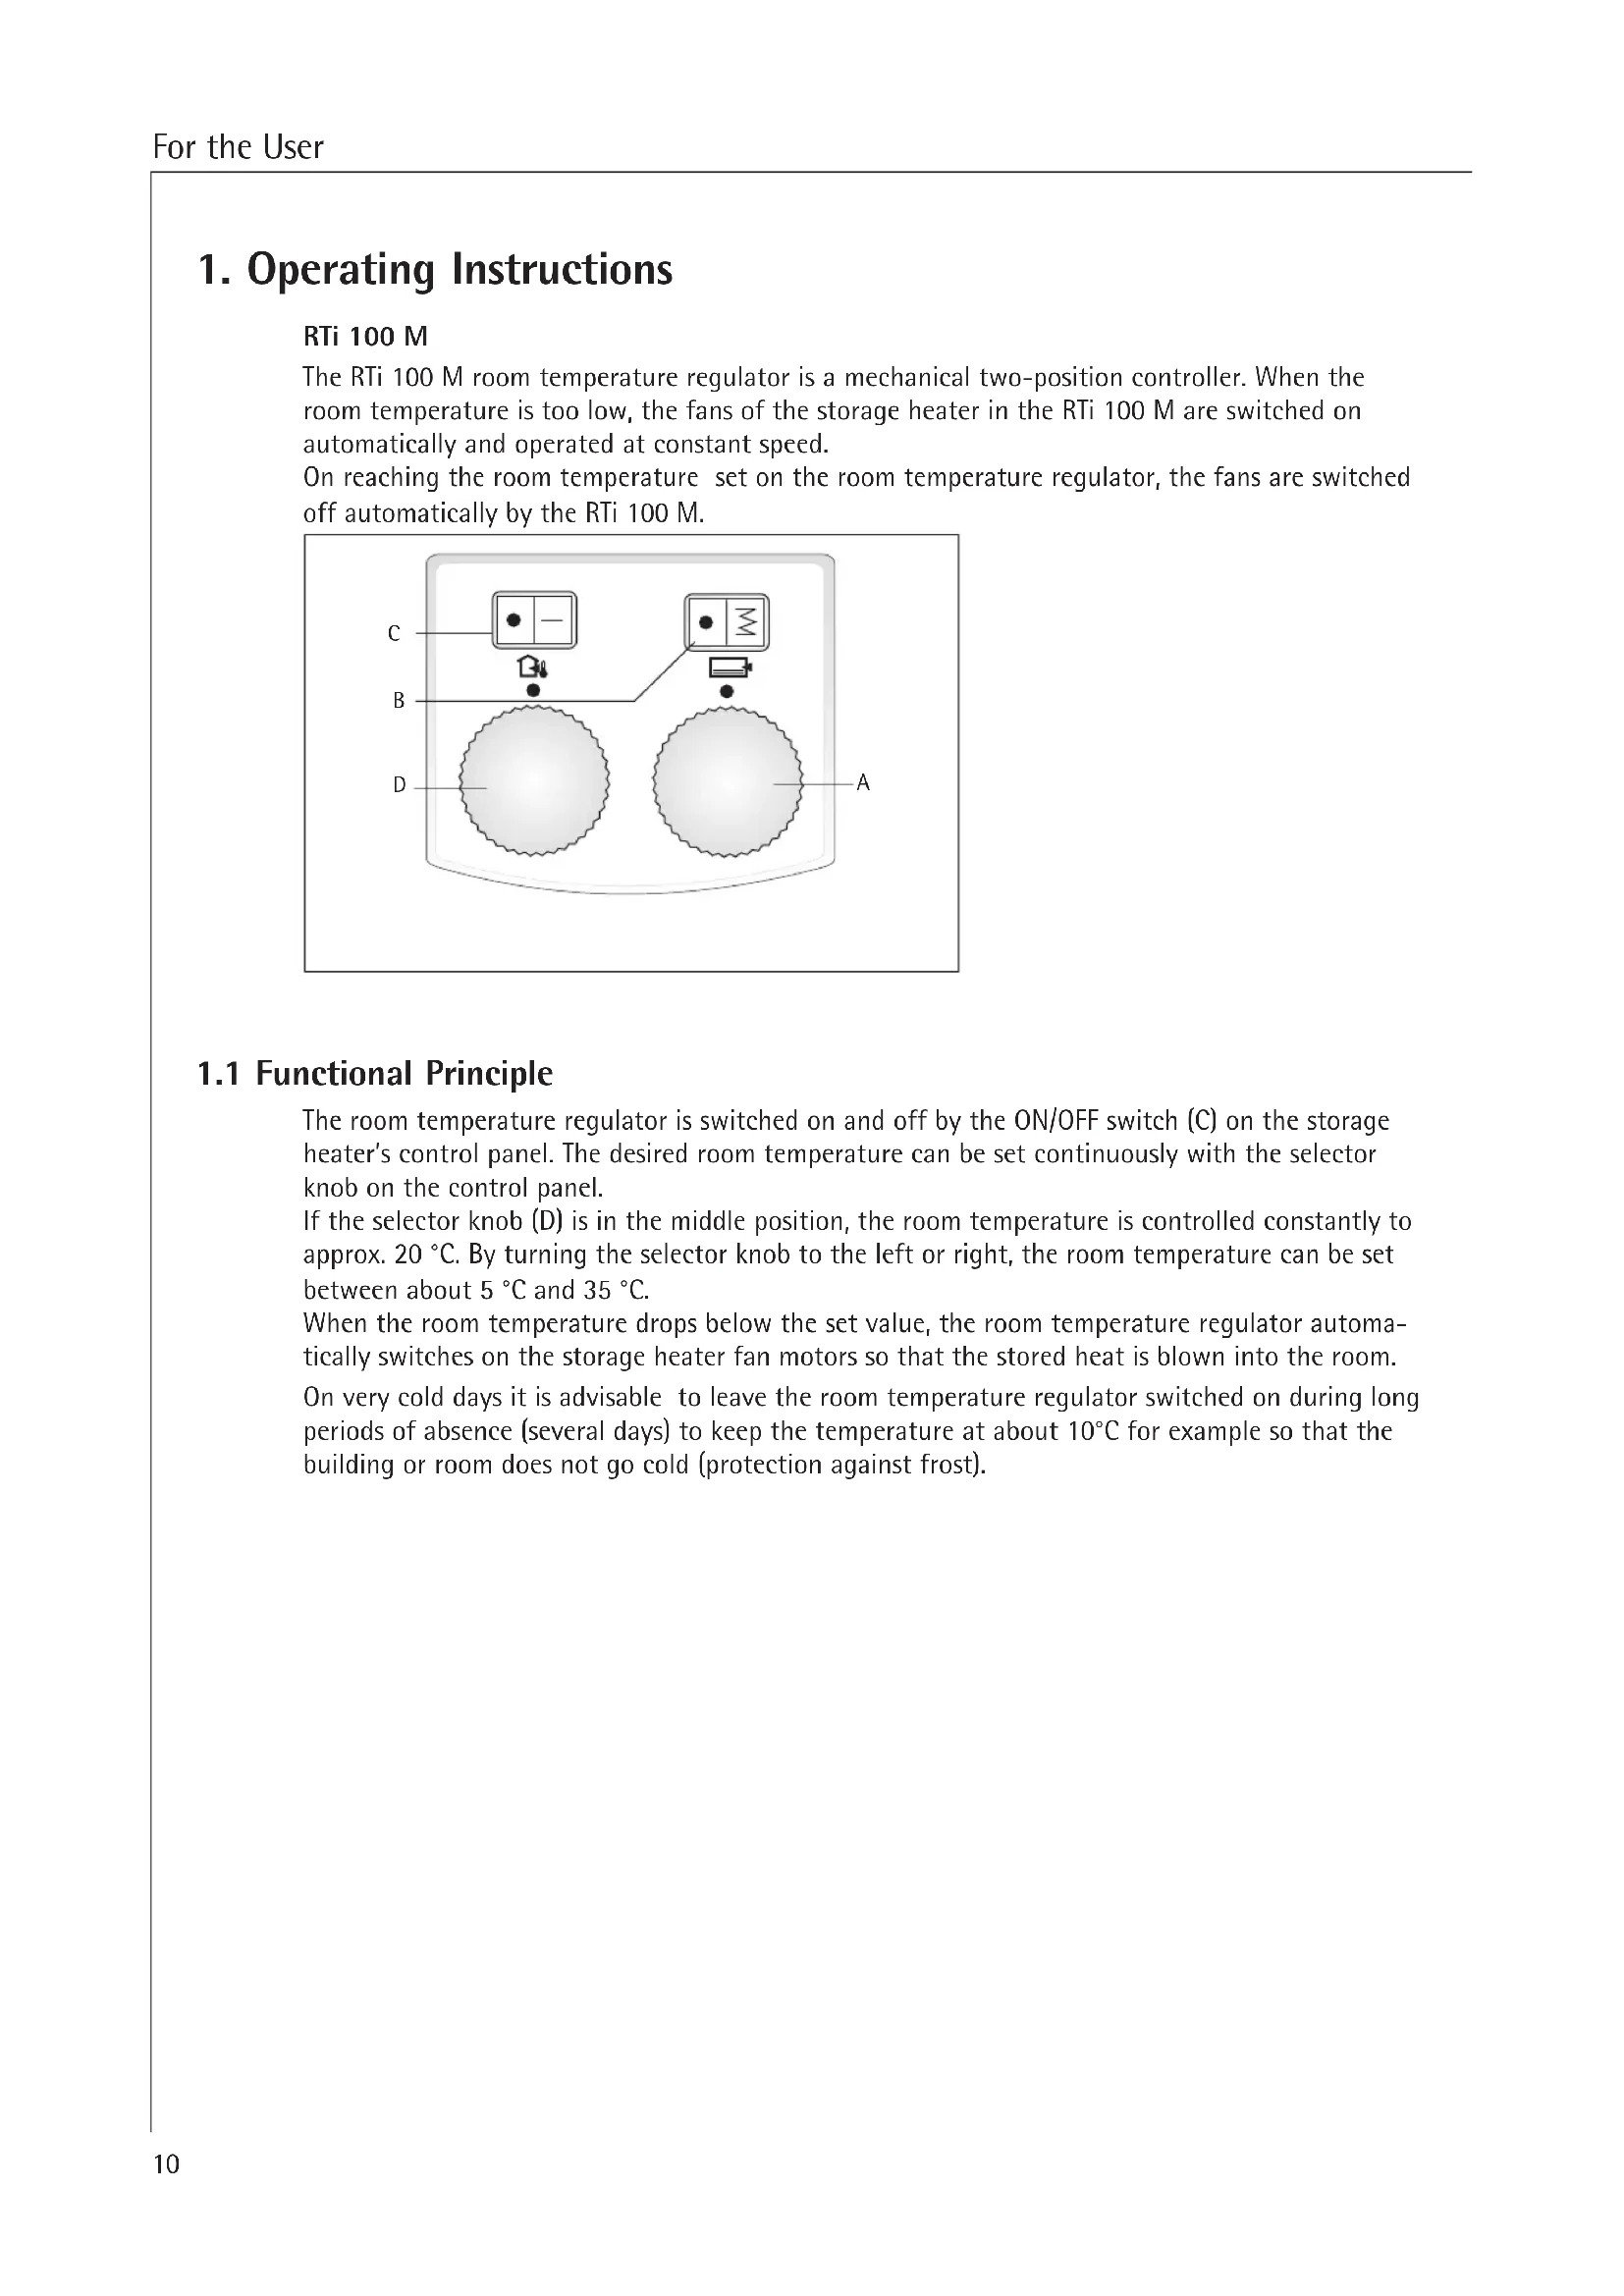
The RTi 100 M room temperature regulator is a mechanical two-position controller. When the room temperature is too low, the fans of the storage heater in the RTi 100 M are switched on automatically and operated at constant speed.
On reaching the room temperature set on the room temperature regulator, the fans are switched off automatically by the RTi 100 M.
1.1 Functional Principle
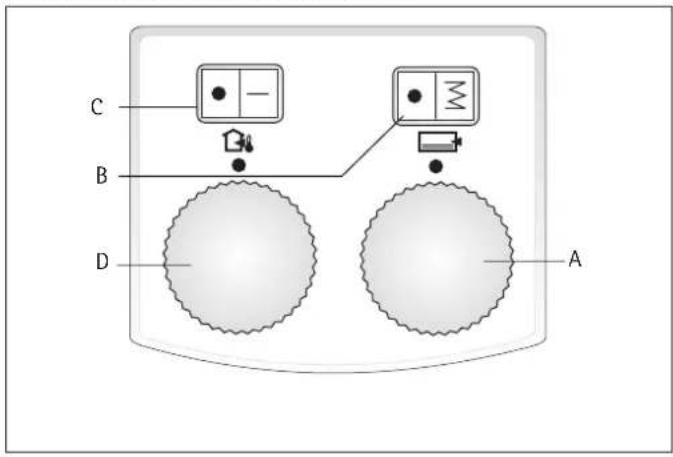
The room temperature regulator is switched on and off by the ON/OFF switch (C) on the storage heater's control panel. The desired room temperature can be set continuously with the selector knob on the control panel.
If the selector knob (D) is in the middle position, the room temperature is controlled constantly to approx. 20^ . By turning the selector knob to the left or right, the room temperature can be set between about 5^ and 35^ .
When the room temperature drops below the set value, the room temperature regulator automatically switches on the storage heater fan motors so that the stored heat is blown into the room.
On very cold days it is advisable to leave the room temperature regulator switched on during long periods of absence (several days) to keep the temperature at about 10^ for example so that the building or room does not go cold (protection against frost).
2. Installation Instructions

The room temperature regulator must be fitted by an authorised specialist under consideration of the these operation and installation instructions and the operating and installation instructions of the storage heater.
All electrical connection and installation work must be performed in accordance with the VDE regulations 0100, the regulations of the electricity supply company responsible and the pertinent national and regional regulations.
2.1 Technical Data
| Model | RTi 100 M |
| Rated voltage | 1/N/PE ~ 50 Hz 230 V |
| Connection rating | 16 A |
2.2 Packing Unit
1 room temperature regulator with outside sensor, heating band 2-3 W as thermal feedback (already pre-installed on the mounting plate)
1 temperature selector knob
1 ON/OFF switch with 2 wires
1 radio interference suppressor 0.2 F 47 ohms
3 screws
1 operating and installation instructions
1 circuit diagram label
1 control panel label
2.3 Installation

Disconnect the storage heater from the power supply before starting installation work.
When connecting the storage heater to an automatic charging control unit, there may be voltage at the terminals A1/Z1 and A2/Z2 even when the fuses are removed.
When installing several storage heaters in a row make sure that the room temperature regulator is installed in the outside right unit. This guarantees that the room temperature can be measured properly.
2.3.1 Order of Installation
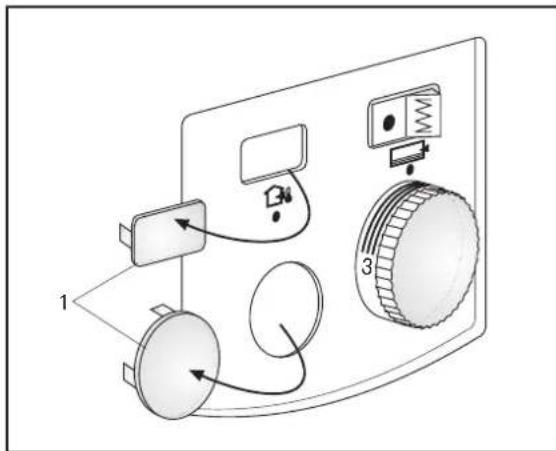
- Remove air outlet and inlet grille, front wall and right side wall as described in the storage heater operation and installation instructions.
- Press the dummy caps (1) for switch and temperature selector knob out of the control panel at the top and bottom left from the switching area side using a suitable tool.
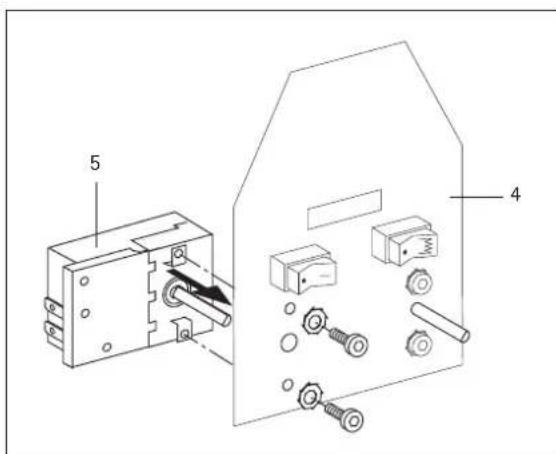
- Installation of the ON/OFF switch:
Push the enclosed black wires (short and long) with the flat connectors onto the switch (2) through the holder (3) and snap the holder onto the metal bracket (4). - Press the On/Off switch (2) with the symbol "I" into the right of the holder.
- Mount the temperature regulator (5) with the 2 screws and toothed washers on the bracket (4).
-
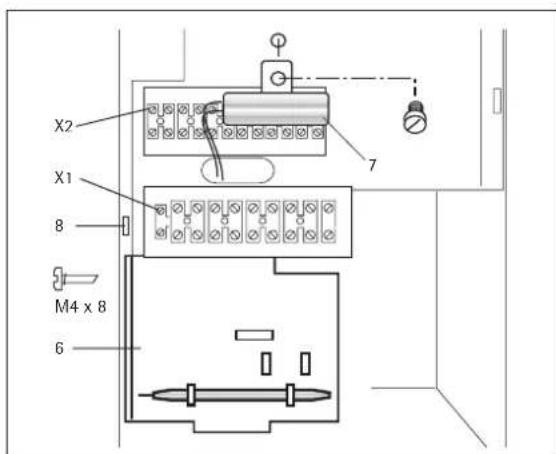
Attach the preassembled unit consisting of sensor bulb, heating strip, spacer frame and support plate (6) to the upper sheet-metal bracket of the control panel (support plate of terminal strips X1 and X2). To do so, engage the lower sheet-metal bracket behind the locking tab of the upper sheet-metal bracket (8). The two brackets are joined together by means of a screw (M4x8).
-
Wire the room temperature regulator according to the circuit diagram (see circuit diagram, page 6)
-
Short black wire of switch 2 (S2) to room temperature regulator 5 (N6)
- Long black wire of switch 2 (S2) to (L) terminal strip X1
- Black wire (long) from heating resistor 6 (E9) to room temperature regulator 5 (N6)
- Blue wire from heating resistor 6 (E9) to (N) terminal strip X2
-
Black wire from regulator 5 (N6) to X2 LE (from above)
-
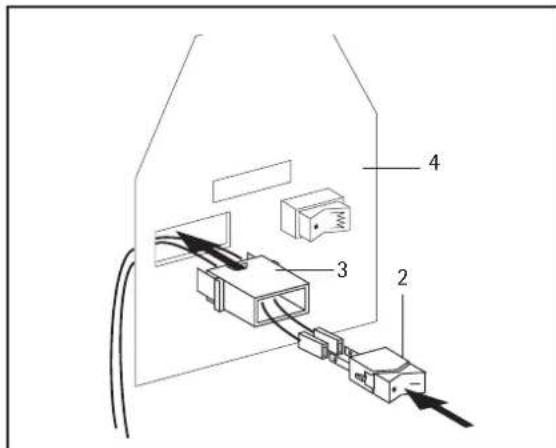
Screw the radio interference suppressor (7) to the top part of the angle plate (above terminal strip X2) with the screw provided
-
Wiring of the radio interference suppressor:
-
Blue wire to X1 L top (double assignment)
- Black wire to X2 L top (double assignment)
- Fix the cables in the existing cable strap in the switching area behind the angle plate.
All switching wires must be fixed in the switching area in such a way that they neither come into contact with the right side wall nor can be touched through the ventilation slots. They must not be near to the cable opening either.
- Stick the valid circuit diagram over the circuit diagram on the right side wall, mark installation and stick the control panel label to the outside of the right side wall.
- Mount the right side wall. Fix the fastening screw with toothed washer (protective earth connection!)

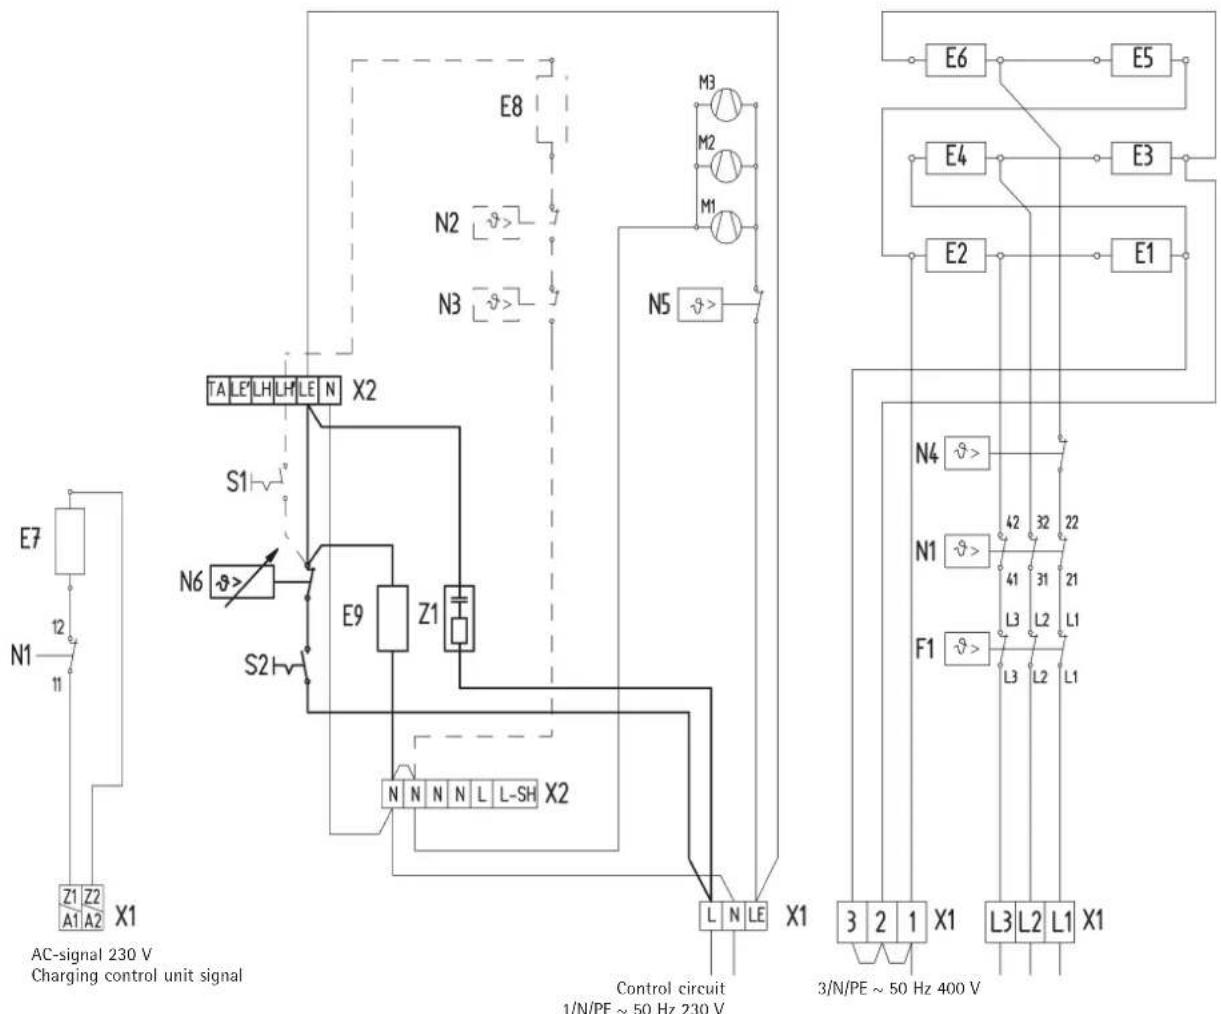
2.3.2 Circuit Diagram Labelling
X1 mains terminal
X2 terminal
Circuit diagram WSP 2010 - 7010 with RTi 100 M
E1 - E6: Heating element (storage heater)
E7: Heating resistor
F1: Safety temperature limiter
M1-M3:Fan
N1: Temperature limiter - charging
N5: Temperature limiter - fan drawer
N4: Temperature limiter - charging
X1: Mains terminal
X2: Terminal
Integr. room temperature regulator
E9: Heating resistor
N6: Temperature regulator - discharging
S2: Rocker switch - discharging
Z1: Radio interference suppressor
Supplementary heater
E8: Supplementary heating element
N2: Temperature regulator - supplementary heater
N3: Temperature regulator - supplementary heater
S1: ON/OFF switch - supplementary heater
2.4 Function Test
Move the ON/OFF switch to position 1
Now turn the temperature selector knob until the fan in the storage heater unit switches on.
If the fan does not switch on, the operating and fault indicators on the charging and discharge control unit must be observed.
2.5 Transfer
These operating and installation instructions are part of the unit and must be kept in a safe place by the user. In the case of a change of ownership they must be handed over to the new owner. The specialist must be given access to the operating and installation instructions for any repair work.
3. Environment and recycling
Please help us to protect the environment by disposing of the packaging in accordance with the national regulations for waste processing.
Guarantee
For guarantee please refer to the respective terms and conditions of supply for your country.
The installation, electrical connection and first operation of this appliance should be carried out by a qualified installer.
The company does not accept liability for failure of any goods supplied which are not installed in accordance with the manufacturer's instructions.


- RTi 100 M
- Operating instructions For the user
- Installation instructions For the fitter
- Sommaire
- Operating Instructions
- Functional Principle
- Installation Instructions
- Technical Data
- Packing Unit
- Installation
- Order of Installation
- Circuit Diagram Labelling
- Circuit diagram WSP 2010 - 7010 with RTi 100 M
- Function Test
- Transfer
- Environment and recycling
- Guarantee
Brand : AEG
Model : RTI 100 M
Category : Thermostat