
EM 50-2 - Thermostat AEG - Free user manual and instructions
Find the device manual for free EM 50-2 AEG in PDF.


| Product Type | Electronic Controller for Ice and Snow Melting |
| Brand | AEG |
| Model | EM 50-2 |
| Zones | 1 or 2 independent zones |
| Sensor Inputs | 2 (sensor 1 and sensor 2) |
| Supported Sensors | Ground sensor (EF 50-25 H), Gutter sensor (F50-10 RH), Outdoor sensor (ATF 5) |
| Display | Backlit graphic display |
| Control | Encoder button (turn and press) |
| Temperature Scale | Celsius or Fahrenheit (selectable) |
| Set Temperature Range | -20°C to +50°C (-4°F to 122°F) |
| Off Temperature Limit | -20°C to OFF (no limit per zone) |
| Afterrun Time | 0 to 18 hours, adjustable per zone |
| Moisture Detection | Yes, with sensitivity adjustment (MIN, LOW, NORM, HIGH, MAX) |
| Moisture Control | Can be switched off |
| Application Modes | Electric 1-Zone, Electric 2-Zone, Electric 2-Step (Y/Δ) |
| Calibration | Temperature offset calibration for each zone and outdoor sensor |
| Factory Reset | Yes, with password code 1202 |
| Language Selection | Multiple languages (e.g., English, German, etc.) |
| Alarm Indication | Red LED flash for sensor/heater faults |
| Software Version | Displayed in info menu |
| Power Supply | Not specified in manual |
| Dimensions | Not specified in manual |
| Weight | Not specified in manual |
Frequently Asked Questions - EM 50-2 AEG
User questions about EM 50-2 AEG
0 question about this device. Answer the ones you know or ask your own.
Ask a new question about this device
Download the instructions for your Thermostat in PDF format for free! Find your manual EM 50-2 - AEG and take your electronic device back in hand. On this page are published all the documents necessary for the use of your device. EM 50-2 by AEG.
USER MANUAL EM 50-2 AEG
EM 50-2
Deutsch
Inhalt
EM 50-2
English
Contents
Glossary ......Page 6
Introduction Page 6
Startup Page 6
Operation Page 7
Main menu Page 7
Display texts ......Page 7
Application info ......Page 7
Settings Page 7
Offset calibration....Page 8
Factory settings ......Page 9
Troubleshooting Page 9
Illustrations ......Page 10
Glossary
Zone 1, 2: Independent heating zones in which ice and snow can be melted.
Encoder button: Button which can be turned or pressed to easily configure the settings.
EF 50-25 H: Ground sensor for detecting moisture and temperature.
F50-10 RH: Gutter sensor for detecting moisture.
ATF 5: Outdoor sensor for detecting temperature.
Afterrun: The heat provided by the system, for a specified length of time, after the moisture/temperature signal has been eliminated by a heating cycle.
Introduction
Type EM 50-2 is an electronic controller for fully automatic, economical ice and snow melting on outdoor areas and in gutters. EM 50-2 detects both temperature and moisture and the heating system will only be activated if a possibility of snow or ice is indicated by both parameters.
An easily operated encoder button and backlit graphic display ensure quick and easy configuration and simple indication of temperature, status, etc.
EM 50-2 is suitable for controlling electric heating cables in 1 or 2 zones.
Startup
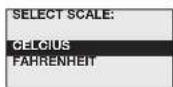
When EM 50-2 is switched on for the first time, Celsius or Fahrenheit must be selected. Turn the encoder button until the required temperature scale is highlighted. Then OK the selection by pressing the encoder button.
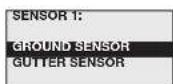
SENSOR 1 is shown on the display, allowing the type of sensor connected for input 1 to be selected: GROUND SENSOR
GUTTER SENSOR + outdoor sensor
Then OK the selection by pressing the encoder button.
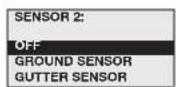
SENSOR 2 is then shown on the display, allowing the type of sensor connected for input 2 to be selected. If none sensor is connected for input 2, OFF must be selected.
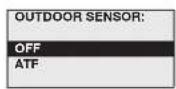
Select if outdoor sensor ATF 5 is connected terminals 31-32.
If none sensor is connected, OFF must be selected. Press encoder button for OK.
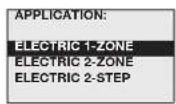
Select the application type by turning the encoder button and pressing OK.
ELECTRIC 1-ZONE : 1 zone electric heating control/simple waterbased.
ELECTRIC 2-ZONE : 2 zones individual electrical heating control/simple waterbased.
ELECTRIC 2-STEP : Advanced 2-stage electric heating control (Y/Δ) for 1 zone. Reduces power to 1/3 during the afterrun time. This applies only to heating mats with 400 V. connection.
Select the appropriate option and press OK. The system is now set up, and will begin operating fully automatically, in accordance with the pre-configured standard program, see FACTORY SETTINGS. Alternative settings can also be made, see SETTINGS.
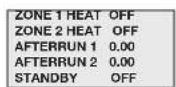
Status and afterheat data for zones 1 and 2 are now shown on the display.
Operation
EM 50-2 is equipped with an easily operated encoder button (turn and press) and a display which describes the current situation. The display is backlit and is illuminated by pressing the encoder button (OK). The illumination is automatically switched off after 30 seconds. Press the encoder button and the main menu will be shown on the display.
Turn the button to scroll through the options. Not all the options are shown on the display at once, but they can be accessed by turning the encoder button.
Press OK to select a highlighted option.
Main menu
| ZONE 1 OFF |
| ZONE 2 OFF |
| SENSOR 1 ##.°C |
| SENSOR 2 ##.°C |
| MOIST 1 NO |
| MOIST 2 NO |
| OUT. TEMP ##.°C |
| ALARM NO |
| SHOW INFO |
| SETUP |
| RESTART |
| EXIT |
Display texts
| ZONE 1 OFF | Heating zone 1 active (ON) or inactive (OFF) |
| ZONE 2 OFF | Heating zone 2 active (ON) or inactive (OFF) |
| SENSOR 1 ##.#°C | Sensor 1 (heated sensor) core temperature.Applies only when GROUND SENSOR sensor is connected. NOTE: Not ambient temperature! |
| SENSOR 2 ##.#°C | Sensor 2 (heated sensor) core temperature.Applies only when GROUND SENSOR sensor is connected. NOTE: Not ambient temperature! |
| MOIST 1 NO | Sensor 1 moisture status. YES / NO / Blank.Blank will be shown if temperature is above Set Temp or the system is in Afterrun mode. |
| MOIST 2 NO | Sensor 2 moisture status. YES / NO / Blank.Blank will be shown if temperature is above Set Temp or the system is in Afterrun mode. |
| OUT TEMP ##.#°C | Ambient outdoor temperature. Applies only when ETF sensor is connected. |
| ALARM NO | Fault message, fault type will be displayed. Red LED on front of unit will flash. |
Application info
| SHOW INFO | |
| APP: E. 1-ZONE | Application type: electric heating |
| SW VERSION 1.10 | Software version |
| SENSOR 1 GRND | Sensor type, sensor 1 |
| SENSOR 2 OFF | Sensor type, sensor 2 |
| SENSOR ATF OFF | ATF 5 sensor connected |
| EXIT | Return to main menu |
Settings
Please note that incorrect sensor setup may lead to poor or lacking ice and snow melting.
Press OK and a submenu will be shown on the display.
Select the parameter to be set and press OK.
SETUP
FORCE HEAT OFF Manual start of forced heat. Press OK and select ON to start Forced heat. EM 50-2 controller will heat in the pre-programmed after run time, see AFTERRUN 1 and 2.
SELECT SCALE C Whether temperature is to be displayed in Celsius (C) or Fahrenheit (F) can be selected here. Select the required scale and press OK. Press OK to return to the SETUP menu.
SET TEMP 1 3.0C Set temperature for Zone 1: The temperature at which the ice and snow melting system will become active can be set here. The temperature setting can be adjusted from +50 / -20°C (122 / -4°F). Set the required temperature and press OK.
SET TEMP 2 3.0C Set temperature for Zone 2: The temperature at which the ice and snow melting system will become active can be set here. The temperature setting can be adjusted from +50 / -20°C (122 / -4°F). Set the required temperature and press OK.
OFF TEMP 1 OFF he lowest operating temperature for Zone 1 can be set here. Below this tempera ture, the system will enter standby mode. The adjustment range goes down to -20^ / OFF (-3.9°F/OFF). OFF = no limit. To change the minimum cut-off tempera-ture, press OK, turn the encoder button to the desired value and confirm with OK.
OFF TEMP 2 OFF The lowest operating temperature for Zone 2 can be set here. The adjustment range goes down to -20^ / OFF (-3.9°F/OFF). OFF = no limit. To change the minimum cut-off temperature, press OK, turn the encoder button to the desired value and confirm with OK.
AFTERRUN 1 2:00 Afterrun time Zone 1 : An afterheat duration of between 0 and 18 hours can be set here. The system will continue to provide heat for the specified time after the moisture/temperature signal has been eliminated by a heating cycle. Use the encoder button to set the required after-run time and press OK.
AFTERRUN 2 2:00 Afterrun time Zone 2 : An afterheat duration of between 0 and 18 hours can be set here. Use the encoder button to set the required afterrun time and press OK.
OFFSET T1 0.0C Zone 1 temperature can be calibrated here. With EF 50-25 H sensor, the temperature shown on the EM 50-2 display is always the core temperature of the sensor. For calibration, please see page 13.
OFFSET T2 0.0C
Zone 2 temperature can be calibrated here. With EF 50-25 H sensor, the temperature shown on the EM 50-2 display is always the core temperature of the sensor. For calibration, please see page 13.
OFFSET OUT. 0.0C
Outdoor temperature can be calibrated here. The temperature, recorded by the ATF outdoor sensor, can be adjusted so that the exact temperature is displayed on EM 50-2. Measure the temperature beside the sensor using a thermometer. Adjust the necessary offset using the encoder button. Press OK.
SENSORHEAT AUTO
In auto mode, sensor heating is switched off during periods when snow melting is active. In special options or extreme cold weather the sensor heat can be selected on continuously. Select ON and press OK.
MOIST CTRL ON
The moist control on sensor can be switched off here. The termostat will only control snow and ice melting after the set temperature, see SET TEMP. Select OFF for switching off the moist control and press OK.

Note that energy consumption/costs will rise with lacking moisture control.
SENSITIVITY NORM
Sensor sensitivity can be adjusted in 5 steps: MIN - LOW - NORM - HIGH - MAX. To change sensitivity, press OK, turn the encoder button to the desired setting and confirm with OK.
LANGUAGE ENGLISH
Menu language is selectable here. Select your preferred language and press OK
FACTORY RESET
All EM 50-2 factory settings can be restored here. Selecting this option deletes all customised settings.
FACTORY RESET
Whether setup failure in startup menu, or new hardware connection has been done, The primare setup must be changed in STARTUP menu. Select PASSWORD and turn the encoder button to the factory code (1202) The controller will then return to the startup menu, see STARTUP.
Select this option and press OK to return to the main menu.
Restart
When changing the settings or require a new process start, the EM 50-2 can be restarted in this menu.
RESTART
Restart operation. Keeping your current settings. The EM 50-2 will go to the initial status display.
Offset calibration
If it is necessary to calibrate the temperature measured by the GROUND SENSOR sensor, please follow the steps below:
- Disconnect the sensor from terminals 11 and 12 (sensor heating) of the EM 50-2.
- Wait a few hours until the sensor has acquired the same temperature as the ground.
- Measure the real ground/sensor temperature and compare it with
the temperature shown on the EM 50-2 display.
- Program the offset for the sensor concerned to match the difference between the two temperatures (displayed/real). Adjust the necessary offset using the encoder button. Press OK.
- Reconnect the sensor to terminals 11 and 12 of the EM 50-2.
NOTE: With EF 50-25 H sensor, the temperature shown on the EM 50-2 display is always the core temperature of the sensor.
Factory settings
| Setup Factory settings Own settings | |
| Application | Electric |
| Zone 1 | GROUND SENSOR |
| Zone 2 | OFF |
| Select scale | Celsius |
| Afterrun time Zone 1 | 2.00 hours |
| Afterrun time Zone 2 | 2.00 hours |
| Temp. offset Zone 1 | 0.0^/0.0^ |
| Temp. offset Zone 2 | 0.0^/0.0^ |
| Temp. offset ATF | 0.0^/0.0^ |
| Temperature setpoint Zones 1+2 | 3.0^/37.4^ |
| OFF temperature Zones 1+2 | OFF |
| Sensor heating Zones 1+2 | AUTO |
| Moisture control Zones 1+2 | ON |
| Sensitivity Zones 1+2 | NORM |
Troubleshooting
By errors in the snow melting system, it is recommendable to check the setup of the EM 50-2. Activate the menu by pressing the adjustment knob, press SHOW INFO and readout the programmed application. By errors in the setup, activate REINSTALL with factory code 1202.
Check that all connections are placed correctly, and that cables are fastened in the clamps.
Ice/snow does not melt
- Does the display show heat ON in zone 1 / 2?
YES:
o Wait 1-2 hours.
- Check under the snow, if the snow is beginning to melt the system is OK.
- Check heating cables for defects, bad connections, incorrect connections.
o It is too cold for snow melting (power/m2) or undersized heating cables/ water heating system.
NO:
o The temperature is higher than SET TEMP. Adjust SET TEMP to higher temperature.
The snow around the ground sensor is melting/drifting snow has exposed the sensor.
AFTERRUN time must be increased. Alternatively, FORCED HEAT can be activated.
o Igloo effect around the sensor. The ground sensor has melted an insulated hollow under the snow. Activate FORCED HEAT or, alternatively, set MOIST SENSOR to OFF.
o The temperature is lower than the OFF TEMP setting.
Depending on dimensioning, the system has a lower temperature limit, at which the system can melt the snow. Try melting the
snow with FORCE HEAT, before OFF TEMP is changed.
The heat does not shut off after ice/snow melting
o Afterrun time is too long – reduce AFTERRUN time and activate RESTART in the menu.
o Moisture detection in the GROUND SENSOR/GUTTER SENSOR is turned off – set MOIST CTRL to ON in the menu.
If the ALARM button flashes red, one of the following errors has occurred. This can be displayed under the menu: ALARM.
"TEMP SENSOR 1" - Temperature sensor in ground or roof sensor 1 defective.
"TEMP SENSOR 2" - Temperature sensor in ground or roof sensor 1 defective.
"OUTDOOR SENSOR" - Outdoor sensor defective.
"SENSOR HEATER" - Short circuit of heating element in ground or roof sensor.
Urzhumskaya street 4,
building 2
129343 Moscow
Tel. 0495 7753889
Fax 0495 7753887
Switzerland
STIEBEL ELTRON AG
Netzibodenstr. 23 c
4133 Pratteln
Tel. 061 81693-33
Fax 061 81693-44
Irrtum und technische Änderungen vorbehalten! | Subject to errors and technical changes! | Sous réserve d'erreurs et de modifications techniques! | Onder voorbehoud van vergissingen en technische wijzigingen! | Salvo error o modificación técnica! | Rätt till misstag och tekniska ändringar förbehålls! | Excepto erro ou alteração técnica | Zastrzeżone zmiany techniczne i ewentualne błędy | Omyły a technické změny jsou vyhrazeny! | A muszaki változtatások és tévedések jogát fenntartjuk! | Отсутствие ошибок не гарантируется. Возможны технические изменения. | Chyby a technické zmeny sú vyhradené! 1118

- EM 50-2
- Deutsch
- Inhalt
- English
- Contents
- Glossary
- Introduction
- Startup
- Operation
- Settings
- SETUP
- OFFSET T2 0.0C
- OFFSET OUT. 0.0C
- SENSORHEAT AUTO
- MOIST CTRL ON
- SENSITIVITY NORM
- LANGUAGE ENGLISH
- FACTORY RESET
- Restart
- Offset calibration
- Troubleshooting
- Ice/snow does not melt
- YES:
- NO:
- The heat does not shut off after ice/snow melting
- Switzerland
Brand : AEG
Model : EM 50-2
Category : Thermostat