
AC5521CH - Air-conditioner TRISTAR - Free user manual and instructions
Find the device manual for free AC5521CH TRISTAR in PDF.

| Product type | Mobile air conditioner |
| Brand | TriStar |
| Model | AC5521CH |
| Power supply | 220-240 V ~ 50 Hz |
| Main functions | Cool, Dehumidifier, Fan |
| Fan speeds | High, Medium, Low |
| Temperature range (cool mode) | 18 °C to 30 °C (64 °F to 86 °F) |
| Timer | Programmable from 30 min to 24 h |
| Sleep mode | Yes (auto-off after approx 7 h) |
| Swing function | Yes (horizontal oscillation) |
| Filter | Washable (cleaning recommended every 2 weeks) |
| Water tank | With overflow indicator (FL) |
| Manual drain | Yes (via drain cap) |
| Exhaust hose length | 60 to 170 cm (adapter included) |
| Remote control | Yes (with batteries) |
| Display | LED (ambient or set temperature) |
| Error code E2 | Abnormal ambient temperature sensor |
| Error code E3 | Abnormal coiled tube sensor |
| Error code FL | Water overflow alarm |
| DF code | Active anti-freeze/defrost mode |
| Maintenance | Wipe with a soft damp cloth; do not use chemicals |
| Warranty | 24 months (conditions on service.tristar.eu) |
| Weight (approx.) | Not specified |
Frequently Asked Questions - AC5521CH TRISTAR
User questions about AC5521CH TRISTAR
0 question about this device. Answer the ones you know or ask your own.
Ask a new question about this device
Download the instructions for your Air-conditioner in PDF format for free! Find your manual AC5521CH - TRISTAR and take your electronic device back in hand. On this page are published all the documents necessary for the use of your device. AC5521CH by TRISTAR.
USER MANUAL AC5521CH TRISTAR
- This air-conditioner is suitable for indoor use only rather than for other occasions.
- Rated operating range: this unit shall be connected to 220-240V/50Hz power output end.
- The air-conditioner shall be installed in accordance with the wiring rules of local grid to ensure proper grounding. Should you have any question about electrical installation, follow the User's Manual or have the installation done by professional electrician whenever necessary.
- Please put this unit in a flat and dry place and keep it at least 50cm away from surrounding objects or walls.
- Once the air-conditioner is installed, ensure that the plug wire is in good condition and inserted firmly into the power socket and always ensure that the power cord is arranged in order to prevent the personnel from stumbling over it or the plug from being pulled out.
- Do not insert any object into the air inlet/outlet of the air-conditioner. Be sure to keep the air inlet/outlet of the air-conditioner unblocked.
- Where there is the need to install a drain pipe, ensure that the connection of the drain pipe is in good condition without flexure.
- When adjusting the horizontal/vertical louver at the air outlet, turn it slightly by hand to avoid damage of the louver.
-
Keep the unit in an upright position when moving it.
-
Keep this unit away from gasoline, flammable gases, oven or other heat sources.
- Do not dismantle, inspect or modify the unit without authorization as this may result in fault of the unit, and even bodily injury & property damage; to avoid dangers, if the unit is faulty, be sure to have it repaired by the manufacturer or professionals.
- Do not install and operate this air-conditioner in a bathroom or other wet environments.
- Do not allow the children to play with this machine. Closely supervise the children or disabled people when this unit is in use.
- Do not turn off this unit by removing the plug.
- Do not place such objects as cups on the unit to prevent water or other liquids from spilling into the air-conditioner.
- Do not use pest control aerosol or other flammable substances near the air-conditioner.
- Do not wipe or wash the unit with chemical solvents such as gasoline and alcohols, etc. Before cleaning the air-conditioner, be sure to turn off the power supply and wipe it with soft semi-wet cloth; if the machine is indeed very dirty, wipe it with neutral cleaner.
Recommended operation environment: temperature: 17C^ - 35C^ relative humidity: 20 - 85% RH - The appliance shall be installed in accordance with national wiring regulations.
- The appliance can be used by children aged from 8 years and above and persons with reduced physical,
sensory or mental capabilities or lack of experience and knowledge if they have been given supervision or instruction concerning use of the appliance in a safe way and understand the hazards involved. Children shall not play with the appliance. Cleaning and user maintenance shall not be made by children unless they are older than 8 and supervised.
- Keep the appliance and its cord out of reach of children less than 8 years.
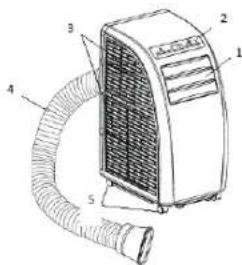
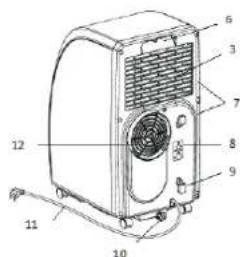
PARTS
- Guide strip
- Control panel
- Inlet grid
- Exhaust pipe
- Corner wheel
- Handle
- Strainer
- For installation of power line plug
- Buckle of power line
- Drainage outlet
- Power line with plug
- Exhaust outlet
CONTROL PANEL
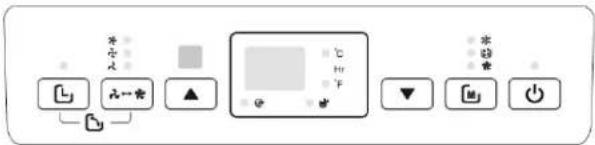

(Power): press this button to turn on or off the air conditioner.

Mode): press this button to select cool, dehumidify or fan mode.
and in the timer on or timer off is set, pressing up or down can adjust on/off time; in running state of cool or heat mode or timer state, pressing up or down can adjust the set temperature; and pressing up and down simultaneously can realize conversion between ^ C and ^ F , and ^ C is displayed in default.
= a (Speed): press this button to select the speed level in fan and cool mode: high, mid and low. In fan mode press this button for 5s to run the internal dry function, press this button for another 5s to cancel.

(Timer): press this button to enter timer setting state.
Display: displays the set temperature in the cool mode, and displays the room temperature in fan and dehumidify modes.
EN
REMOTE CONTROL
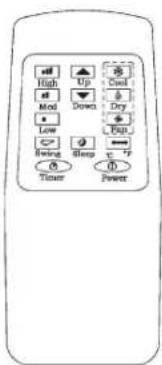
| ① | power press this button to turn on/off the air conditioner. |
| ② | timer press this button to set timer. |
| ③ | swing press this button, and the horizontal guide vane rotates automatically. |
| ④ | temperature conversion button temperature is converted from °C to °F. |
| ⑤ | cool press this button to select cool mode. |
| ⑥ | dehumidify press this button to select dehumidify mode. |
| ⑦ | fan press this button to select fan mode. |
| ⑧ | up press up to set temperature or adjust timer. |
| ⑨ | down press down to set temperature or adjust timer. |
| ⑩ | high press this button to select high speed. |
| ⑪ | mid press this button to select mid speed. |
| ⑫ | low press this button to select low speed. |
| ⑬ | sleep press this button to set sleep mode. at the moment the speed of upper and lower fans is fixed at low speed, in sleep mode temperature and speed cannot be changed. press this button again to cancel. |
INSTALLATION
Install in a flat and dry place, and 50cm must be left around the air conditioner to enable smooth circulation of air. (Figure 1.)
Assembly method of exhaust pipe
- Connect exhaust pipe assembly with round joint. (Figure 2.)
Fix the round end of the connected exhaust pipe assembly at air outlet of the air conditioner. (Figure 3.)
- Connect the oblate joint of the connected exhaust pipe assembly with seal plate of window. Install the seal plate on the nearest window. Make sure there are no obstacles at a distance of 50cm around the window to guarantee unimpeded air exhaust.
The exhaust pipe is 60cm~170cm long (including adapter). We recommend using the minimum length so as to save energy for you
- The length of exhaust pipe is especially designed in accordance with the specification of the air conditioner. Please do not use other exhaust pipes of different lengths or materials, in such way failure may be caused.
Installation of window seal plate (Figure 4.)
Design of window sealplate complies with most standard horizontal or vertical windows.
- Wall mounted (Figure 5.)
Bow alignment (Figure 6.)
Incorrect bending (Figure 7.)
OPERATION
Timer setting
- Timer off: When the air conditioner is running, press the timer button, the timer LED lamp is on, and the display will blink. Use the UP and DOWN buttons to adjust time from 0.5h to 24h. When the set time expires, the air conditioner turns off automatically.
- Timer on: When the air conditioner is in standby mode, press the timer button, the timer LED lamp is on, and the display will blink. Use the UP and DOWN buttons to adjust time from 0.5h to 24h.
- During this setting procedure, the operating modes after start can be selected, if the cool mode is selected, the set temperature can be adjusted simultaneously. After the set time expires, the air conditioner starts automatically and runs in the selected operating mode.
Change of the set time
You can press TIMER once in the running process of the timer, the remaining time will be displayed. Press the UP and DOWN buttons to increase/decrease the time. If you press the TIMER button again during blinking, the set time will be cancelled, namely timer quits.
COOL mode
!!Attention: if the air conditioner is restarted immediately after shutdown in the COOL mode, it will take 3 minutes before the cooling process will start.!!!
- Press the MODE button to select the COOL mode.
- Press the UP or DOWN button to set the desired temperature in a range of 18 30^ (64-86°F).
- Press the SPEED button to select the desired fan speed.
After selecting COOL mode, press the SLEEP button on the remote control to enter the SLEEP mode. The speed level will turn automatically in the lowest mode and the air conditioner will turn off automatically in approximate 7h. - Press the SWING button to activate the swing function.
DEHUMIDIFY mode
-
Make sure the exhaust pipe is not installed.
-
Press the MODE button to select the DEHUMIDIFY mode.
- Temperature and speed are not adjustable.
- Press the SWING button to activate the swing function.
FAN mode
- Press the MODE button to select the FAN mode.
- Press the SPEED button to select the desired fan speed. In this mode press SPEED for "5 seconds" to run the internal dry function, i.e. both upper and lower fans work simultaneously. Press SPEED for another "5s" to cancel the internal dry function. Make sure the exhaust pipe is not installed during this mode.
- During the fan mode the temperature is not adjustable.
- Press the SWING button to activate the swing function.
Cautions:
- When water full indication light comes on, the air conditioner will stop work, you should drain the water like described further in the manual. After drainage the air conditioner will start automatically.
- If your room faces the sun directly, please close the curtains.
DRAINAGE OPERATION (FIGURE 8.)
- When water full indication light comes on, the air conditioner will stop work, you should drain the water.
- Place the air conditioner on a place where you can drain the water directly (such as toilet or sewer).
- Unscrew the nut and pull out the plug. Install the plug and nut before use.

STAR Instruction manual
MAINTENANCE (FIGURE 9.)
Before cleaning please turn off the air conditioner and pull out the plug.
- Clean surface of the air conditioner with duster or semi-wet soft cloth.
Do not use chemical reagents, such as benzene, alcohol and gasoline
- If strainers are blocked by dust, air circulation will be impeded this will have influence on the efficiency of the air conditioner.
- If the air conditioner is used regularly the strainers needs to be cleaned once per two weeks.
- Pull out trainers in the direction as shown.
- Put strainers into warm water with neutral detergent (about 40^ ) and clean up.
- Let the trainers dry in shade place.
Install strainers back in the original position
POSTSEASON STORAGE
When the air conditioner is out of season or not used for long time, corresponding maintenance measures should be taken.
- Drain the water as described in the drainage section
- Wind up, and fasten power line at the back of the unit.
- Remove exhaust pipe.
- Set the air conditioner into a plastic bag and put it in a dry place.
Take out of cells of remote control and keep properly.
DETECTION CODES
Intelligent detection functions
Detection codes Meaning
E2 Abnormal sense of room temperature sensor
E3 Abnormal sense of coil pipe sensor
FL The air conditioner is in water full alarm state
DF The air conditioner is in anti-freezing or defrosting state
GUARANTEE
- This product is guaranteed for 24 months granted. Your warranty is valid if the product is used in accordance to the instructions and for the purpose for which it was created. In addition, the original purchase (invoice, sales slip or receipt) is to be submitted with the date of purchase, the name of the retailer and the item number of the product.
- For the detailed warranty conditions, please refer to our service
website: www.service.tristar.eu
Air conditioner

ENVIRONMENT
This appliance should not be put into the domestic garbage at the end of its durability, but must be offered at a central point for the recycling of electric and electronic domestic appliances. This symbol on the appliance, instruction manual and packaging puts your attention to this important issue. The materials used in this appliance can be recycled. By recycling of used domestic appliances you contribute an important push to the protection of our environment. Ask your local authorities for information regarding the point of recollection.
SUPPORT
You can find all available information and spare parts at service.tristar.eu!
BELANGRIJKVEILIGHEIDSMAATREGELEN
Quality shouldn't be a luxury!

service.tristar.eu
Tristar Europe B.V. | Jules Verneweg 87 | 5015 BH Tilburg | The Netherlands