
TCH7590ER - Heating DELONGHI - Free user manual and instructions
Find the device manual for free TCH7590ER DELONGHI in PDF.
| Brand | DeLonghi |
| Model | TCH7590ER |
| Product type | Oscillating fan heater |
| Power supply voltage | 220-240 V ~ 50 Hz |
| Operating modes | Heating, Ventilation, Anti-freeze (7°C) |
| Power levels (heating mode) | MIN, MAX, AUTO |
| Oscillation | Yes, vertical (left-right) |
| Remote control | Yes, with AAA batteries |
| Timer | Programmable delayed start and stop |
| Temperature display | Switches between °C and °F (hold + 5s) |
| Minimum room area | 4 m² |
| Anti-tip device | Yes, automatic shutdown if tipped over |
| Overheat protection | Yes, automatic shutdown with audible signal |
| Dust filter | Removable, clean by vacuuming |
| Compliance | Directive 2004/108/EC (electromagnetic compatibility) |
Frequently Asked Questions - TCH7590ER DELONGHI
User questions about TCH7590ER DELONGHI
0 question about this device. Answer the ones you know or ask your own.
Ask a new question about this device
Download the instructions for your Heating in PDF format for free! Find your manual TCH7590ER - DELONGHI and take your electronic device back in hand. On this page are published all the documents necessary for the use of your device. TCH7590ER by DELONGHI.
USER MANUAL TCH7590ER DELONGHI
KEPAMNUECKN TEPMOBEHTNJIATOP
TERMOVENTILATOR KERÁMIA ELLENÁLLÁSSAL
TEPLOVZDUŠNÍ KERAMICKÁ VENTILÁTOR
TERMOWENTYLATOR CERAMICZNY
KERAMIKKVIFTEOVN
KERAMISK VÄRMEFLÄKT
KERAMISK VARMLUFTBLAESER
KERAAMINENTUULETINLÄMMITIN
Instructions
Mode d'emploi
Bedienungsanleitung
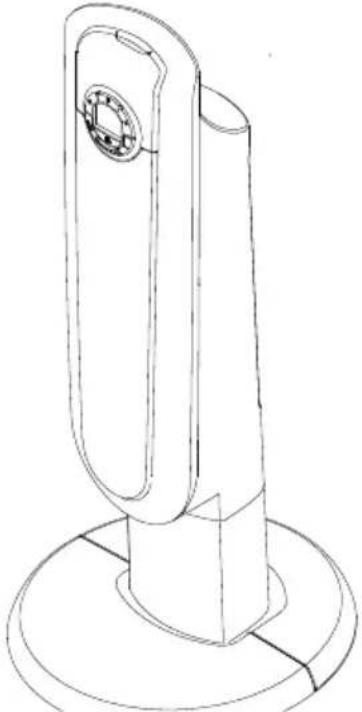
F Timer button
G Remote control receiver
H Indicator light
Tip over device
JGrille
K Filter
LON/OFF switch
ELECTRICAL CONNECTIONS
- Before plugging into the mains, make sure the voltage of your mains supply corresponds to the V value indicated on the appliance and that the socket and power line are appropriate for the load required.
- THIS APPLIANCE COMPLIES WITH DIRECTIVE 2004/108/EEC ON RADIO INTERFERENCE SUPPRESSION.
INSTALLATION
The appliance can be used on any horizontal surface. Do not use the same socket for more than one appliance.
ASSEMBLING THE APPLIANCE
- Fit the base of the appliance to the body by inserting the pins in their housings (see figure 1).
- Turn the appliance upside down and fix the base to the body of the appliance with the screws provided (see figure 2).
- Pass the power cable through the opening in the base (see figure 3).
OPERATION AND USE
- Make sure the appliance is off before plugging into the mains.
- To turn the appliance on, the ON/OFF switch (L) at the back of the appliance must be in the I position. The appliance emits a beep. The light (H) also comes on and remains lit while power to the appliance is on.
- The appliance is in stand-by mode and "--" is displayed.
- Press the button (A) to turn the appliance on. It will start heating with the current settings.
- Press the MODE button (E) to select one of the following modes:
Heating (念) Fan (念) Freeze protection (念)
5.1 Heating
In this mode, the required temperature can be set by pressing buttons + and - (B) and selecting one of the power levels, MIN, MAX or AUTO, by pressing button D ( ).
MIN power level: The appliance operates at minimum power, reducing noise levels and energy consumption to a minimum.
MAX power level: The appliance operates at maximum power to heat the room rapidly.
AUTO power level: The appliance determines the power automatically according to room conditions.
5.2 Fan (x)
In this mode, only the fan is active and the appliance does not heat the room. Press the power selector button (D) (---) to select the required fan speed, MIN or MAX.
5.3 Freeze protection (×)
In this mode, the appliance keeps the room at a temperature of 7^ to avoid freezing.
- If you want the appliance to distribute the air flow over a wider area, press the swing button (C)
The appliance will swing from right to left.
To stop the appliance in the desired position, simply press button (C) again.
- To turn the appliance off, press button A and place the switch (L) on the back in the 0 position.
NOTE: The display can show the temperature in both ^ F and ^ C . To select, press and hold the + key for at least 5 seconds, then release.
TIMER FUNCTION
This function can be activated in any operating mode.
Delayed start: With the appliance in stand-by, press the timer button (F) (C).
The symbol is displayed together with the hours left before the appliance comes on.
Change the hours using the + and - buttons (B), then wait a few seconds for the programme to be memorised.
The "--" stand-by and symbols are displayed.
When the programmed time has elapsed, the appliance will come on with the previous settings.
Delayed stop: with the appliance on, press the timer button (F) (L).
The symbol is displayed together with the hours left before the appliance goes off.
Change the hours using the + and - buttons (B), then wait a few seconds for the programme to be memorised.
The current settings and 已 symbol are displayed.
At the end of the set time the appliance switches off automatically.
To go back to operating without the timer, press the timer button (F) twice.
The timer symbol () disappears from the display.
USING THE REMOTE CONTROL.
The remote control must be used with care.
- The remote control functions are the same as those on the control panel.
See the section "Operation and use" for a description.
INSERTING OR REPLACING THE BATTERIES
- Remove the cover on the rear of the remote control;
- Insert two R03 "AAA" 1.5V batteries in the correct position (see instructions inside the battery compartment);
- Replace the cover. If the remote control unit is replaced or disposed of, the batteries must be removed and disposed of in accordance with current legislation as they are harmful to the environment.
MAINTENANCE
- Before performing maintenance on the heater, always unplug from the mains socket.
- During the season when the appliance is in use, clean the air intake and outlet grilles regularly using a vacuum cleaner.
- Never use abrasive powders or solvents to clean the appliance.
- Remove the rear grille by pulling it outwards (fig. 4).
Remove the dust filter which retains impurities in the air drawn in from the room, blow on it lightly then replace in the appliance.
TROUBLESHOOTING
In case "PF" is displayed and a warning sound is emitted, there is a fault on the temperature sensor. If the problem persists, call the service centre.
If the appliance goes off unexpectedly:
- Make sure power to the appliance is on.
- Make sure the appliance is in a vertical position on a flat surface as otherwise the tip over safety device may have tripped.
- Check the temperature set and the timer.
The appliance may have gone off because the temperature set has been reached or the time set on the timer has elapsed.
IMPORTANT SAFEGUARDS
-
Do not use this heater near showers, bathtubs, sinks, swimming pools, etc.
-
Always use the heater in an upright position.
-
Do not use the heater to dry laundry. Never obstruct the intake and outlet grilles (danger of overheating). The appliance is not intended for use by persons (including children) with reduced physical, sensory or mental capabilities, or lack of experience and knowledge, unless they have been given supervision or instruction concerning use of the appliance by a person responsible for their safety.
Children should be supervised to ensure that they do not play with the appliance.
-
The heater must be positioned at least 50~cm from furniture or other objects.
-
Do not use the appliance near walls, furniture, curtains, etc.
-
The use of extension leads is not recommended. However if they cannot be avoided, follow the instructions as lead and never exceed the power limit marked on the extension.
-
If the power cable is damaged, it must be replaced by the manufacturer, an authorised service centre or a qualified electrician in order to eliminate all risk.
-
The appliance must not be placed immediately under a fixed power socket.
-
Do not use the appliance in rooms with a floor area of less than 4m^2
The heater is fitted with a safety device which switches it off in the event of accidental overheating (e.g. obstruction of air intake and outlet grilles, motor turning slowly or not at all).
To reset, unplug the appliance from the mains socket for a few minutes, remove the cause of overheating then plug in again.
A tip over safety device turns the appliance off if it falls over or is positioned inappropriately in such a way as to jeopardise safety.

IMPORTANT: To avoid overheating, never under any circumstances cover the appliance during operation as this would lead to a dangerous rise in temperature.
WARNING: to avoid the safety system resetting accidentally, this appliance must not be powered through an external on/off device such as a timer, or connected to a circuit which is turned off and on regularly by the energy supplier.
Important information for correct disposal of the product in accordance with EC Directive 2002/96/EC.
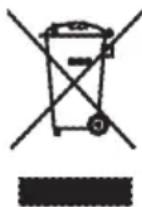
At the end of its working life, the product must not be disposed of as urban waste. It must be taken to a special local authority differentiated waste collection centre or to a dealer providing this service. Disposing of a household appliance separately avoids possible negative consequences for the environment and health deriving from inappropriate disposal and enables the constituent materials to be recovered to obtain significant savings in energy and resources. As a reminder of the need to dispose of household appliances separately, the product is marked with a crossed-out wheeled dustbin.
DESCRIPTION DE L'APPAREL
INTRODUCTION OU REMPLACEMENT DES PILES
BESCHLIVING VAN HET APPARAAT
5.3 Anti-gelo (一)
MEPbI IPEdoctoPOXHOCTN
- He noIb3yItecB 3Tm HArpeBaTeJIbHbIM npnbopOM B HENOCpeIcTBeHHoN 6JIN3OCTM OT dywa, BaHHbl, pyKOMOHNka, 6acceHa N T.D.
- IcnoJb3yIte np6Op ToJIbKO B BepTKaJIbHOM NOJOXeHN.
- He nCloNoJIb3yIte npnbop IJRA cyuKn 6eJIb, He 3aKpbBaIte peWetKn noJaun BBIXOJa BO3dUxa (BO3MOKeH nepeRpeB npnbopa).
- He pa3pewaTe noJb3ObaTbcra np6opom JIOdAm (B TOM YHcJIe N DeTAM) C NOHNXeHHbIM yPOBHeM BOCnPnAITnI INCnXoOfN3UeCKNX BO3MOxHOCTe IIN C HeDOCTaTOUYbIM ONbITOM N 3HaHnAIM, 3a NCKJIouHeHem CnyaEB, KOrJa 3a HmN BHMaTeNbHO CJIeIaT, IN OHN OByeHbI OTBeuAIOUIm 3a IN X Be3ONaCHOCTb YeJIOBEKOM. CJIeIte 3a DeTbMI, Y6eIInTECb B TOM, UTO np6Op He CJyXHT IM INrpyuKOi.
-Пибopy Heьзя HaxOДиТьСя Ha paCCTOЯHn 6Лnxke 50 cm ot MebeIиIи npdeMToB. - He заугпорюм стейн, Meблььо, Заразсamy T.Д.
- He pekomeHnyetcnoIb3OBAtbcyDJIHHHTeJIeM.
EcnnoB30BaHne ydHHTeJIaTHOBHTc HEO6XoIMbIM, BHMaTeJbHO CJeDyIe IHCTpyKcIaM, PnJaRaEmbIM K ydHHTeJIIO, He npeBbIaJppeJbHO MOuHOctn, yka3aHHoHa ydHHTeJIe.
- EcJn shHyp nHTaHnra NOBpeXdEh, OH dOJIxH e6bITb 3aMeHeH npOn3BODnteIeM nJIne erO cepBnCHoTexHnueckoCnyK60n nn, B JIO6OM Cnyae, KBaINΦnUpOBaHHbIM CNEuJaNCTOM, YTO N03BOJNT N36ExKaTb JIO6O rPnCKa.
- Pnp6op He doJxeh HaxoINTbcr HEnocpeDCTBENHO IOI pO3eTKO 3JeKTPoNTaHn.
-He nCIOJIb3yIte np6Op B IOMeUeHn C IIIOuaJbHO MeHbIe 4 M 2.
YcTpoIcTbO abapHnHO 6JOKnOBKn OTKJIIOHT TepMOBENTJrTOp B CJIyae erO cJIyuaHOro nepepeBa (HaNPmEp, B CJIyae, ecJN 3aKpbITbPeWETKN IODaHN N BbIXOda BO3dYxa, MeIeHHoro BpaUeHnMOTopa INI erO OCTaHOBKn).
ДяВОЗбHOBJIeHЯ pa6Otbl Heo6xOДИМо Ha HeCKOЛьКо MmHyT n3BJIeчb BnIky I3 pO3eTKI OJIeKTPoPNTaHЯ, yCTpaHHTb npuHIny nepeIpeBa, n 3aTeM BHOBb BCTaBNTb BnIky Bpo3eTKY.
YcTpoNCTBO 3aunTbI npn ONpOKnDbBaHnn npepbIbAeT pa6Otu npnbopa, ecIn OH ONpOKnHyT ININ, B JIO6OM Cnyuae, HENpaBnIbHO yCTaHOBJIeH N 3TO HApywaET erO 6e3OnacHOCTb.

OBPATNE BHIMAHNE: IJRA TOrO, UTO6bI N36eXaTb NepeRpeBa, HN B KOeM Cnyae He HaKpbIbAaTe np6Op BO BpeMa pa60TbI, TaK KaK 3TO MOKeT Bbl3BaTb ONaCHOE NOBbIWeHne TemnepaTypbl.
BHIMAHNE:ДЯТOrO,ЧTO6ыИЗБЕкАТьОпаСHOCTeи,CВЯ3AHbIX CO CЛУЧАнHBIM CбpoCOM 3auntHOу YCTPOIcTBA,ДaHHbI INpN6Op He MoXeT 6bITb 3aNTaH Yepe3 BHeUHHeeYCTPOIcTBO BKJIQUeHn/BBIKJIQUeHn,TaKOrO KaK TaMep,HN NOДКЛIOчEHb I K CETN,KOTOPa peRyJЯрHo OTKJIQUaETcN bKJIQUaETcN NOCTaBUnKOM 3JIeKTPO3HeprN.
A KESZULEK LEIRASA
TIDSINNSTILLINGSFUNKSJON
Man kan aktivereijke funksjonden fra hvilket som helst funksjonsmodus.
Forsinket tenning: Med apparatet i stand-by trykker man pa tidsinnstilleren (F) ()
- ELECTRICAL CONNECTIONS
- INSTALLATION
- ASSEMBLING THE APPLIANCE
- OPERATION AND USE
- TIMER FUNCTION
- USING THE REMOTE CONTROL.
- INSERTING OR REPLACING THE BATTERIES
- MAINTENANCE
- TROUBLESHOOTING
- IMPORTANT SAFEGUARDS
- DESCRIPTION DE L'APPAREL
- INTRODUCTION OU REMPLACEMENT DES PILES
- BESCHLIVING VAN HET APPARAAT
- Anti-gelo (一)
- MEPbI IPEdoctoPOXHOCTN
- A KESZULEK LEIRASA
- TIDSINNSTILLINGSFUNKSJON
Brand : DELONGHI
Model : TCH7590ER
Category : Heating