
Gigaset E1 MA - Cordless phone SIEMENS - Free user manual and instructions
Find the device manual for free Gigaset E1 MA SIEMENS in PDF.
| Brand | Siemens |
| Model | Gigaset E1 MA |
| Product Type | DECT Cordless Phone |
| Power Supply | Power adapter with power cord |
| Batteries | 2 x NiMH 700 mAh (rechargeable) |
| Standby Time | Up to 100 hours |
| Talk Time | Up to 15 hours |
| Charging Time | Approximately 5 hours |
| Display | Large character and symbol display |
| Phonebook | 30 entries (name and number) |
| Direct Call Keys | 4 keys (I to IV) for emergency or frequently dialed numbers |
| Hands-free | Yes, activation/deactivation via dedicated key |
| Number Announcement | Yes (if subscribed with operator) |
| Profiles | Visual, hearing, motor impairment |
| Adjustable Volume | Ringtone (5 levels), earpiece (5 levels), hands-free (5 levels) |
| Ringtones | 10 melodies (melodies 1-3 classic) |
| Belt Clip | Included |
| Headset Jack | 2.5 mm mini-jack |
| Registration | Automatic on E150 base, manual possible on GAP base |
| Display Languages | Multilingual (default English) |
| Maintenance | Slightly damp cloth (no solvent) |
| Safety | Use only approved power adapter and batteries |
| Warranty | 24 months (France, Belgium), 12 months (Switzerland) |
| Accessories | Batteries, headset (not supplied), belt clip |
| Repairability | Service center, parts available online (my-siemens.com) |
Frequently Asked Questions - Gigaset E1 MA SIEMENS
User questions about Gigaset E1 MA SIEMENS
0 question about this device. Answer the ones you know or ask your own.
Ask a new question about this device
Download the instructions for your Cordless phone in PDF format for free! Find your manual Gigaset E1 MA - SIEMENS and take your electronic device back in hand. On this page are published all the documents necessary for the use of your device. Gigaset E1 MA by SIEMENS.
USER MANUAL Gigaset E1 MA SIEMENS
Gigaset Communications GmbH is the legal successor to Siemens Home and Office Communication Devices GmbH & Co. KG (SHC), which in turn continued the Gigaset business of Siemens AG. Any statements made by Siemens AG or SHC that are found in the user guides should therefore be understood as statements of Gigaset Communications GmbH.
We hope you enjoy your Gigaset.
Gigaset Communications GmbH is a trademark
licensee of Siemens AG
Gigaset Communications GmbH 2008
All rights reserved.
Subject to availability. Rights of modifications reserved.
www.gigaset.com
CSVázeni zákaznici,
spolecnost Gigaset Communications GmbH je pravnim nastupcem spelecnosti Siemens Home and Office Communication Devices GmbH & Co. KG (SHC), ktera dale preraja segment Produkt Gigaset spelecnosti Siemens AG. Jakekoli prohlasei spelecnosti Siemens AG nebo SHC, ktere naleznete v uživatskych pifruckach, je tbrepa povazovat za prohlasei spelecnosti Gigaset Communications GmbH. Doufame, ze jste s produity Gigaset spokojeni.
SKVázeny zákazník,
Spolocnost' Gigaset Communications GmbH je pravnym nastupcom spolocnosti Siemens Home and Office Communication Devices GmbH & Co. KG (SHC), ktorá zasaPokračovala v cinnosti diviszie Gigaset spolocnosti Siemens AG. Z toto dovodu je potrebné vsetky vyhlásenia spolocnosti Siemens AG alebo SHC, ktoré sa nachadzaju v použivatel'skych priručkach, chapat'ako vyhlásenia spolocnosti Gigaset Communications GmbH. Veríme,Že budete so zariadenim Gigaset spokojni.
ROStimate client,
Gigaset Communications GmbH este succesorul legal al
companiei Siemens Home and Office Communication
Devices GmbH & Co.KG (SHC),care,la randul sau,a
continuat activitatea companiei Gigaset a Siemens AG.
Orice affirmatii efectuate de Siemens AG sau SHC si incluse
in ghidurile deutilizare vor fi,prin urmare,considerate a
apartine Gigaset Communications GmbH.
Speram ca produsele Gigaset sfe la inaltimea dorintelor dvs.
SRPoStovani potrošaču,
Gigaset Communications GmbH je pravni naslednik kompanije Siemens Home and Office Communication Devices GmbH & Co. KG (SHC), kroz koju je nastavljeno poslovanje kompanije Gigaset kao dela Siemens AG. Stoga sve izjave od strane Siemens AG ili SHC koje se mogu naci u korisnickim uputstvima treba tuma Ci tia kao izjave kompanije Gigaset Communications GmbH. Nadamo se da cete uzivati u koriscenju svog Gigaset uredaja.
BG Ybaxaemnnotpebnenn
Gigaset Communications GmbH e npabonpneMnkbT Ha Siemens Home and Office Communication Devices GmbH & Co. KG (SHC), Kojto ha cboi peoipbKn 6n3heca Ha nopaedeneHTo Siemens AG. Tao npuHa BCaKBN nloKeHn, HapbaeHn OT Siemens AG nsh SHC, KOnto ce hAmnPaB pkoBOOCTBATA 3a notpe6ntela, cneBa da ce pa3bnpat kato n3noKeHn Ha Gigaset Communications GmbH. HanaBame ce da non3BaTe C ydoBONCTBne BaaHg Gigaset
Gigaset Communications GmbH is a trademark
licensee of Siemens AG
Gigaset Communications GmbH 2008
All rights reserved.
Subject to availability. Rights of modifications reserved.
www.gigaset.com
SIEMENS
Be inspired
Gigaset
E1
DECT

Kundenservice (Customer Care)
www.my-siemens.com/contact
Service-CenterBelgien 078152221
"We, Siemens AG, declare, that the above mentioned product is manufactured according to our Full Quality Assurance System certified by CETECOM ICT Services GmbH with ANNEX V of the R&TTE-Directive 99/5/EC. The presumption of conformity with the essential requirements regarding Council Directive 99/5/EC is ensured"
Senior Approvals Manager
Anhang
The Declaration of Conformity (DoC) has been signed. In case of need a copy of the original DoC can be made available via the company hotline.
0682
Technische Daten
Empfohlene Akkus
Nickel-Metall-Hybrid (NiMH):
Sanyo Twicell 700
Sanyo Twicell 650
Panasonic 700 mAh
GP700mAh
YDT AAA SUPER 700
VARTA PhonePower AAA 700 mAh
Customer Care (Service) 36
D
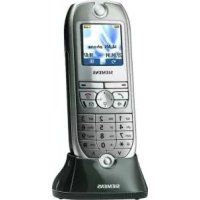
Illustration of a handset that is registered to a base with SMS functionality.
Contents
Brief overview 2
Safety precautions 5
Special features of the Gigaset E 1 6
Preparing to use your phone 7
Inserting the batteries 7
Placing the handset into the base station and charging the batteries 8
Manual registration 9
Attaching the belt clip 10
Activating/deactivating the handset 11
Operating the telephone, menu overview 12
Control keys on the handset 12
Function keys 13
Making calls 14
Making external calls and ending a call 14
Answering a call 14
Handsfree 15
Making internal calls 16
Using the directory, direct dial keys and other lists 17
Directory 17
Direct dial keys 20
Last number redial list 21
Calls list 22
Handset settings 23
Changing language 23
Setting the date and the time 24
Set the display font size, large 24
Activate or deactivate automatic auto answer 25
Contents
Adjusting the loudspeaker volume 25
Changing the ringer tone 27
Activating/deactivating advisory tones 29
Setting profiles 31
Phone number statement 32
Restoring the handset to factory settings 33
Appendix 35
Care 35
Contact with liquid 35
Service (Customer Care) 35
Specifications 37
Character set chart 38
Warranty Certificate Ireland 39
Accessories 41
Index. 42
Safety precautions
Use only the power unit supplied, as indicated on the underside of the base station.

Fit only the recommended rechargeable batteries (page 37) of the same type! Use no other types of batteries or non-rechargeable batteries, as they could damage health and cause personal injury.
Ensure correct polarity when fitting rechargeable batteries, and use the battery type according to these instructions (you will see polarity symbols in the handset's battery compartments).

The operation of medical appliances may be affected. Be aware of the technical conditions within the particular environment (e.g. doctor's practice).

The handset may cause an intrusive 'hum' in hearing aids.

Do not install the base in bathrooms or shower rooms (page 35). The handset and base are not watertight.

Do not use the phone in environments subject to explosion hazard (e.g. auto paint shops).

If you give your Gigaset to someone else, make sure you also give them the operating manual.

Dispose of the batteries and phone in accordance with environmental regulations.
| i | Not all of the functions described in these instructions are available in all countries. |
Special features of the Gigaset E 1
Large keys
Large display of text and symbols on screen
Additional function Jumbo Font (large print)
Direct dial keys
Handsfree
Phone number statement (only for CLIP activation) for - Incoming calls - Calls list
Profiles for special requirements
- Seeing
- Hearing
- Entering
Control keys for volume control
Extended setting options for
- V o l u m e,
- T o n e m e l o d y
- Key clicks
- K e y t o n e s
Connection for microphone set (microphone set not included in scope of delivery)
Preparing to use your phone
The pack contains: one Gigaset E 1 handset, one charger, a power supply unit with power cord, one belt clip for the handset, two batteries, one set of operating instructions.
Removing protective film
The screen is protected by a plastic film. Please remove the protective film!
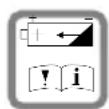
Inserting the batteries
Insert the batteries the right way round - see illustration left.
Place the cover on the battery compartment about 3mm down from the latch and push it up until it clicks into position.
To open the battery cover, press on the chequered area and slide down.
| Use only the rechargeable batteries recommended by Siemens on page 37! Never use conventional batteries (non-rechargeable) or other battery types as this may cause significant damage to health and property. For example, the jacket of the battery could be destroyed (hazardous). The phone could also malfunction or be damaged. |
Placing the handset into the base station and charging the batteries
When you place the handset into the E 150 base, the handset will register automatically to the base. Do the following:
- Place the handset with the screen facing up in the base station.
- Wait till the handset has registered automatically to the base. The automatic registration takes around one minute. While this is happening, Registration Procedure flashes in the screen. After registration, the idle screen is displayed.
- Now leave the handset in the charger for the batteries to charge - the batteries are supplied uncharged. Battery charging is indicated in the top right of the screen by the battery icon flashing.
Should automatic registration be interrupted, register the handset manually as described starting on page 9.
| For the initial charge we recommend a continuous, uninterrupted charging period of five hours, whatever battery display is indicated. After a while the charge capacity of the batteries will decrease for technical reasons. |
The battery charging status is correctly displayed only after uninterrupted charging/discharging. You should therefore avoid removing the batteries unnecessarily and ending the charging process prematurely.
| i | ◆The battery charging status is only displayed - during charging - when the batteries are empty ◆If the batteries are almost empty, you will hear the battery warning tone (if activated, page 30). In idle status, the icon also flashes on screen and Battery warn. Please load is displayed. ◆Once initial charging is complete, you can replace your handset in the charger after each call. This ensures that the batteries are charged in a way that maximises their life. ◆The batteries heat up during charging. This is normal and not dangerous. |
Manual registration
If automatic registration is interrupted, or if you want to use your E 1 handset on another GAP base, you must register the handset manually. Your Gigaset E 1 can only be registered on one base.
You must initiate handset registration on the handset and on the base.
1. On the handset
Preparing to use your phone

Select the menu item and confirm.

Enter the system PIN of the base (0000) and confirm.
2. On the base
Please refer to the operating instructions for the base to find out how to initiate handset registration on the base.
Attaching the belt clip
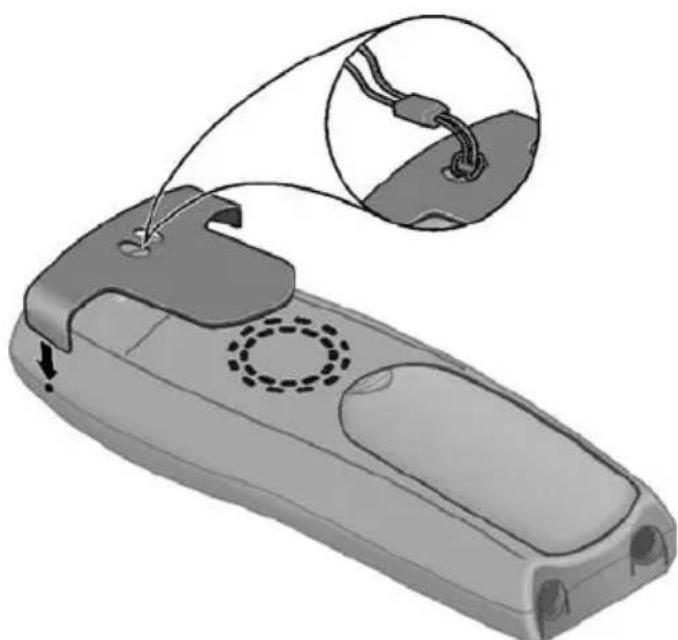
Push the belt clip onto the back of the handset until the lugs click into the recesses on either side of the handset. You can also attach a strap to carry the handset in your hand or around your neck.
Activating/deactivating the handset
To activate the handset press the end call key. You will hear a confirmation tone (rising tone sequence). The handset activates automatically when placed in the charging shell.
To deactivate the handset, press the end call key in idle status and hold (confirmation tone).
Operating the telephone, menu overview
Control keys on the handset
The control keys have different functions, depending on the particular operating situation of the handset.
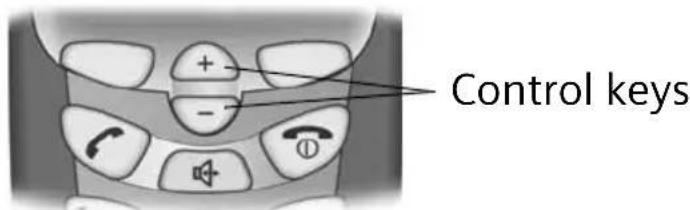
Different functions of the control key.
| + | - | |
| In idle status and when the telephone is ringing | Increase the volume of the ringer | Decrease the volume of the ringer |
| When making calls | Increase the earpiece volume. | Decrease the earpiece volume. |
| In lists and menus | Scroll up. Scroll down. | |
| In an input field | Move the cursor to the left. | Move the cursor to the right. |
| In handsfree mode | Increase the handsfree volume. | Decrease the handsfree volume. |
Function keys
The function keys are the right and left keys just below the screen. Their function changes depending on the particular operating situation. The current function is displayed in the screen directly above the key to which it relates. If you can scroll in a list, the icon also appears in the screen .
Example
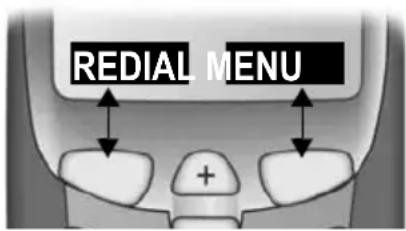
Function keys
The various display symbols have the following meanings:
| Screen icon | Meaning when pressed |
| Accept | Answer a call. |
| Silence | Deactivate ringer on handset. |
| REDIAL | Automatic radial key: Open the list of the last 10 numbers you dialled. |
| OK | Confirm menu function or confirm an input and store. |
| MENU | Activates the main menu when in standby. Open a status-dependent menu while making a call. |
| ▲ | Move the keys ↑ upwards or downwards. |
| ESC | Go back one menu level, or cancel the operation. |
| Delete | Delete input from right to left one character at a time. |
Making calls
Making external calls and ending a call
External calls are calls using the public telephone network.


Making an external call: Enter the phone number and press the talk key. The number is dialled.
Or:
You can also first press the talk key (you hear a dial tone) and then enter the phone number.

Ending the call: Press the end call key. You can use the end call key to cancel dialling.
Inserting a dialling pause
You can insert a dialling pause between the prefix and the actual telephone number. Press and hold the hash key . Now enter the telephone number.
Answering a call
Your telephone rings, the call is displayed on the screen and the key flashes on the handset.
Press (or l ), to take the call.
If the handset is in the charger and the Auto Answer function is activated (page 25), then you just need to lift the handset out of the charger to take the call.
Handsfree
You can make calls without having to hold the handset. Other persons can also participate in the call.
You should inform your caller that you intend to use the handsfree function before you activate it.
Activating/deactivating handsfree
To activate: press handsfree key.
To deactivate: press talk key.
As soon as you terminate the handsfree mode you switch to 'earpiece mode' and continue the call on the handset.
Adjusting the volume while in handsfree mode

Decrease or increase the volume.
Making internal calls
Internal calls are free calls between handsets that are registered with the same base. To make an internal call, one of the direct dial keys must be programmed for an internal call (see page 20).
Making an internal call

While in idle status, press any direct dial key programmed for internal calls.
Call all?
Confirm.
Call all
Yes
Internal Connected
The internal call was answered by another user.

If no one answers, the handset goes into idle status.
Answering an internal call
IntenavConnected


If an internal call is answered, the screens of all other registered handsets show Internal busy.
Using the directory, direct dial keys and other lists
Directory
The directory makes dialling easier for you. You call up the directory via the menu.
You can save up to 30 phone numbers in the directory.
Refer to the Character Set Chart (page 38) to see how to enter text correctly.
Storing a telephone number in the directory
MENU
Press the function key to open the main menu.
Directory OK
Confirm. The directory is opened.
MENU
Press the function key to open the directory menu.
New Entry OK
Confirm.

OK
Enter phone number and confirm.

OK
Enter the name and confirm.
The entry is stored.

Long press (back to idle status).
Dial with the directory
MENU
Press the function key to open the main menu.
Directory
OK
Confirm. The directory is opened.
either ...
Scroll to the entry:

Select entry.

Press the key. The number is dialled.
or ...
Enter the first letter:

Enter the first letter of the name you require.

Select entry.

Press the key. The number is dialled.
Edit, copy, and delete an entry in the directory, and delete list
MENU
Press the function key to open the main menu.
Directory OK
Confirm. The directory is opened.

MENU
Scroll to the required entry and press the function key.
either ...
Edit an entry in the directory:
Edit Entry

Select the menu item and confirm.

Change the number and confirm.

Edit the name and confirm.
The entry is stored
or ...
Copy and modify an entry in the directory

Select...
Copy and Modify

and confirm.
or ...
Delete a single entry:
Delete Entry
Select the menu item and confirm. The entry is deleted.

or ...
Delete the entire directory:
Delete List
Select the menu item and confirm.


Press the function key to confirm the prompt.
... then

Long press (back to idle status).
Direct dial keys
Using the 4 direct dial keys you can save especially important phone numbers, e.g., emergency numbers. You dial the saved number by pressing the corresponding direct dial key.
Refer to the Character Set Chart (page 38) to see how to enter text correctly.
Save/change direct dial keys
You can assign the direct dial keys external phone numbers or the internal call function (see page 16).
MENU
Press the function key to open the main menu.
-Settirthe menu item and confirm. OK
- Direct Dial. Keys
Select the menu item and confirm.
OK
- I:
Select the direct dial key (I to IV).
MENU
Press the function key to open the menu.
either ...
Store an external phone
Edit Entry
OK
Confirm.

OK
Enter phone number and confirm.

OK
Enter the name and confirm. The entry is stored.
or ...
Program an internal call

Activate Internal Call

Select the menu item and confirm. The entry is stored

Long press (back to idle status).
If your phone is connected to a PABX you may have to enter the access code (outside line code) as the first digit of your entry (refer to the operating instructions of your PABX).
Last number radial list
The last 10 phone numbers you dialled are in the last number radial list. Numbers dialled multiple times only appear once. If you have saved names for these numbers in the directory, then these names will be displayed. You can use the last number radial list to radial the telephone numbers.
Dialling telephone numbers from the last number redial list

Open the last number radial list.

Scroll to the required entry and press the talk key. The phone number is dialled.
Editing, deleting, or copying phone number to the directory

Open the last number radial list.


Scroll to the required entry and press the function key.
Using the directory, direct dial keys and other lists
either ...
Use Number

Change a number:
Confirm.
or ...
Copy phone number to the directory:
Copy to Directory

Select...

and confirm.

Confirm the number.


Enter the name and confirm.
The entry is stored.
or ...
Delete a single telephone number:

DeleteEntry

Select the menu item and confirm.

If there still entries on the list, press the key and hold (back to idle status).
or ...
Delete the entire last number redial list:

Delete List

Select the menu item and confirm.
Calls list
New calls are signaled using the mail symbol in the screen. Press the function key to open the list.
Handset settings
Your handset is pre-set for you when delivered. You can change these settings individually.
Changing language
You can view the texts in different languages.
MENUPress the function key to open the menu.

Settings
Select the menu item and confirm.
OK
- Selanguagemenu item and confirm. The current language is checked (the default setting is English).


Select a language and confirm.

Long press (back to idle status).
If you set the wrong language in error, press MENU 4ghi 3 def.
Now select the correct language with - and press OK to confirm your choice.
Setting the date and the time
Date and time settings are essential if you want to know exactly when calls were received.
MENU
Press the function key to open the menu.
OK
-Settling menu item and confirm.
-Date/Time menu item and confirm.
OK
Enter the date:

OK
Enter day/month/year and confirm.
Example: For 20.05.2003 enter
2abc 0+ 0+ 5jde 0+ 3def
Enter the time:

OK
Enter hours/minutes and confirm.
Example: For 9.35, enter 0 + 9^wxyz 3^def 5_id .
Set the display font size, large
You can change the digits on the screen to large print. (Default settings: deactivated).
MENU
Press the function key to open the menu.
Set settings menu item and confirm.
OK

Confirm to deactivate or activate the function ( = On)

Long press (back to idle status).
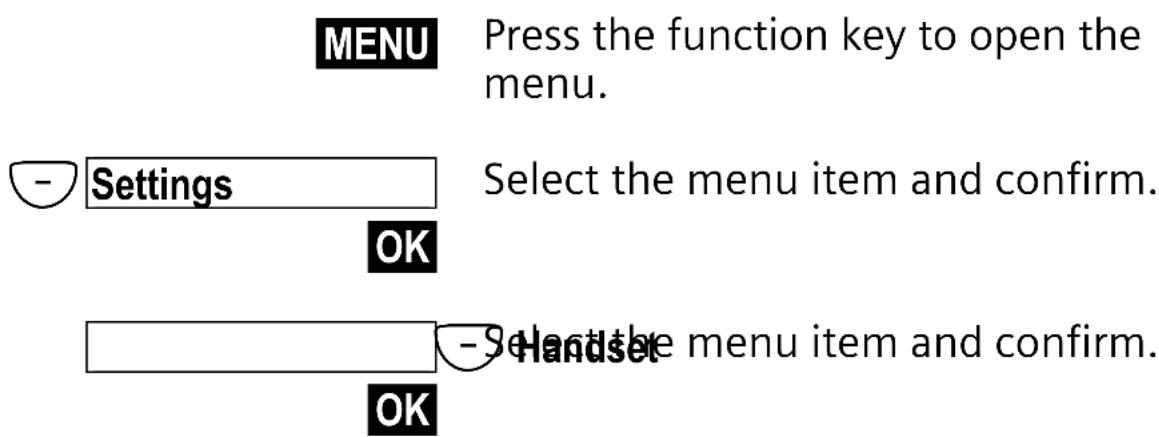
Activate or deactivate automatic auto answer
You use this function when you want to be able to take your handset out of the charging shell. You must then no longer press the talk key or the handsfree key (factory settings: On).
MENUPress the function key to open the menu.
-Settlingse menu item and confirm. OK
-Handseme menu item and confirm. OK
Auto Answer
Confirm to deactivate or activate the function ( = On)


Long press (back to idle status).
Adjusting the loudspeaker volume
You can set the earpiece volume, the headphone volume of the microphone set, and the volume for handsfree talking is on five levels (1-5) - you can even do this while an call is in progress.
Setting in idle status
MENU
Press the function key to open the menu.
- SeAediteh menu item and confirm.
OK
either ...
Set the earpiece volume:
Handset Volume OK
Confirm. You will hear a tone in the currently volume.

OK
Select the earpiece volume and confirm.
or ...
Set the handsfree volume:

Select...
Handsfree Volume
OK
and confirm.

OK
Select the handsfree volume and confirm.
or ...
Set the headphone volume:

Select...
Headset Volume
OK
and confirm.

OK
Select headphone volume and confirm.

Long press (back to idle status).
Adjustments during a call


Changing the earpiece volume.

Confirm if you want to keep the setting.
You are only adjusting the volume for the operating mode that you are currently using (volume of the handset, handsfree volume, or volume of the headphones for the microphone set).
If you do not confirm the change in volume, the current one, then the setting is only applicable for the current call.
Changing the ringer tone
You can assign internal and external calls with differing ringers. A range of options is available:
- Five volume levels (1-5; e.g. volume level 2 = ) and switch off ringer (display screen ).
Ten melodies (1-10; melodies 1-3 are the 'classic ringer tones'). Melody 1 is the best ringer to listen to.
Changing the ringer melody

Press the function key to open the menu.


Ringer Melody
Select the menu item and confirm.

either ...
External Calls OK
or ...

Internal Calls
OK
... then
Melody 1

Confirm melody, e.g., Melody 1 ( = On)

Long press (back to idle status).
Changing the volume of the ringer

Press the function key to open the menu.

Audio
OK
Select the menu item and confirm.

Select...
Ringer Volume

and confirm.


Select volume and confirm. You will hear the ringer in the currently volume.

Long press (back to idle status).
| i | ◆You can also change the volume of the ringer directly while it is ringing by pressing the + or - key. If you want to save the setting, confirm with OK. ◆Volume 0 means: ringer switched off.. ◆If the ringer is intrusive, press the key *P. The ringer is deactivated. You can take the call so long as it is displayed on the screen. |
Activating/deactivating advisory tones
Your handset uses 'advisory tones' to tell you about different activities and statuses. The following advisory tones can be activated and deactivated individually (the default setting is On). On).
Key click/tone: Every key press is confirmed
Acknowledge tones:
- Confirmation tone (rising tone sequence): at the end of an input or setting, when the handset is placed in the base and when a new entry arrives in the calls list
- Error tone (a descending tone sequence): with incorrect inputs
- End tone menu: when scrolling at the end of a menu
Battery warning tone: Repeated beep that displays that the batteries need to be charged.
MENU
Press the function key to open the menu.
-Select the menu item and confirm. OK

Advisory Tones
; Select the menu item and confirm.
either ...
Activate/cancel key click:
Key
Tones OK
Select the condition (Off, Beep, On) and confirm ( = on)
or ...
Activate/cancel battery warning tone:

Battery Warning
OK
Select condition (Off, On, While Call) and confirm, e.g. On (ticked ).
or ...
Activate/cancel confirmation tones:

Confirm. Tones
OK
Select the menu item and confirm () = On).
... then

Long press (back to idle status).
Setting profiles
Selecting one or multiple profiles can use several settings at the same time (factory default: all off).
| Profile Settings | |
| Visual Jumbo numbers | large print |
| Phone number statement, handset | |
| Phone number statement, answering machine | |
| Key tone | |
| Pin input tone | |
| Acoustic Ringer tones | with max. volume |
| Ringer tones with optimised frequency | |
| Maximum earpiece volume | |
| Maximum handsfree volume | |
| Maximum volume headset | |
| Motoric Screen is lignted longer during entries | |
| Extended time period for entries in the directory | |
MENU
Press the function key to open the menu.

Settings


Select the menu item and confirm.

Profiles


Select the menu item and confirm.
Visual

Confirm to select or deselect the profile ( = selected)
- Select acoustic confirm to select or deselect the profile (√ = selected). OK
Motoric Select and confirm to select or deselect the profile ( = selected). OK
Long press (back to idle status).
Phone number statement
You can have the number of a caller spoken (prerequisite: the phone number is transferred).
MENUPress the function key to open the menu.
-
Settings Select the menu item and confirm. OK
-
Caller ID Announced Confirm to deactivate or activate the function (V = On). OK
Hold down (back to idle status).
The phone number statement applies both to incoming calls as well as for calls in the calls list (see page 22).
Restoring the handset to factory settings
You can reset individual settings and changes you have made. This will reset the settings to their original factory settings. Entries in the directory, the calls list, the direct dial keys, and the handset's registration on the base will be retained. Press to cancel the reset.
MENUPress the function key to open the menu.
-Settling menu item and confirm. OK
-Handseme menu item and confirm. OK
- Handset reset Select the menu item and confirm. OK
- Select... Reset to defaults?
Yes and confirm.
Hold down (back to idle status).
Factory settings of the handset
| Earpiece volume 1 page 25 | ||
| Handsfree volume 3 page 25 | ||
| Headphone volume 3 page 25 | ||
| Ringer volume 5 page 27 | ||
| Ringer melody 1 page 27 | ||
| Auto answer Activated page 25 | ||
| Battery tone/Key click/Confirmation tone Activated page 29 | ||
| Display language English page 23 | ||
| Last number radial list Empty page 21 | ||
Appendix
Care
Wipe the base and handset with a damp cloth (use no solvent) or an antistatic cloth. Never use a dry cloth. This can cause static.
Contact with liquid
If the handset should come into contact with liquid, on no account switch the device on. Remove all batteries immediately.
Allow the liquid to drain out of the device, and then pat all parts of the device dry.
Keep the handset with the batteries removed in a warm, dry place for at least 72 hours. In many cases, you will then be able to use it again.
Service (Customer Care)
Our online support on the Internet:
www.my-siemens.com/customercare
If you need any repair work, or have a guarantee claim to submit, our
Service Center Ireland 18 50 77 72 77
will give you quick and reliable assistance. Keep your till receipt handy.
Appendix
You will find more service numbers in the section entitled "Service" at the end of this booklet.
Replacement or repair services are not offered in countries where our product is not sold by authorised dealers.
Country-specific features have been taken into account.
The E1 handset is licensed throughout the EU and in Switzerland.
The CE mark certifies conformity of the device with the essential requirements of the R&TTE directive.
Excerpt from the original declaration:
"We, Siemens AG, declare, that the above mentioned product is manufactured according to our Full Quality Assurance System certified by CETECOM ICT Services GmbH with ANNEX V of the R&TTE-Directive 99/5/EC. The presumption of conformity with the essential requirements regarding Council Directive 99/5/EC is ensured"
Senior Approvals Manager
The Declaration of Conformity (DoC) has been signed. In case of need, a copy of the original DoC can be made available via the company hotline.
(0682)
Recommended batteries
Nickel-metal-hydride (NiMH):
Sanyo Twicell 700
Sanyo Twicell 650
Panasonic 700 mAh
GP700mAh
YDT AAA SUPER 700
VARTA PhonePower AAA 700 mAh
Handset operating times/charging times
| Capacity (mAh) | Standby time (hours) | Calling time (hours) | Charging time (hours) |
| 700 up to 100 | up to 15 approx. | 5 |
These operating and charging times apply only when using the recommended batteries.
Standard characters
Press the relevant key repeatedly or hold it down
| 1x 2x 3x 4x 5x 6x 7x 8x 9x 10x 11x 12x 13x 14x | |
| 1 | Space 1 € £ $ ¥ Ⓞ |
| 2abc | b c 2 ā a à â âãç |
| 3def | d e f 3 é é è é |
| 4ghi | g h i 4 i i i i i |
| 5jkl | j k l 5 |
| 6mno | m n o 6 ö ñ ñ ñ ñ ñ ñ |
| 7pqs | p q r s 7 β |
| 8tuv | t u v 8 ü ë ë ë |
| 9wxyz | w x y z 9 y y æ ø Å |
| 0+ | . , ? ! 0 + - : i i " " ; _ |
| *P | Abc abc * / () < = > % |
| abc 123 | |
| #R | # @ \ & § |
Creating and editing text
You can create and edit text in a number of ways:
Move the cursor to the left and right with the +- .
Characters (to the left of the cursor) are deleted with Delete.
Characters are added to the left of the cursor.
To switch from upper case (first letter upper case, all other letters lower case) to lower case, press _ before you key in the letter. Pressing _ again switches from lower case letters to digits. Press again to return to upper case letters.
The first letter of the name of directory entries is automatically capitalised, followed by lower case letters.
Order of directory entries
- Space (shown here as )
- Digits (0-9)
- Letters (alphabetical)
- Other characters
To work around the alphabetical order of the entries in the directory, insert a space before the name. This entry then goes to the first position (example: "Carla"). You can also number the entries with digits (e.g. "1Jane", "2Mary", "3John").
Warranty Certificate Ireland
Without prejudice to any claim the user (customer) may have in relation to the dealer or retailer, the customer shall be granted a manufacturer's Guarantee under the conditions set out below:
In the case of new devices and their components exhibiting defects resulting from manufacturing and/or material faults within 24 months of purchase, Siemens shall, at its own option and free of charge, either replace the device with another device reflecting the current state of the art, or repair the said device. In respect of parts subject to wear and tear (including but not limited to, batteries, keypads, casing), this warranty shall be valid for six months from the date of purchase.
This Guarantee shall be invalid if the device defect is attributable to improper care or use and/or failure to comply with information contained in the user manuals. In particular claims under the Guarantee cannot be made if:
- The device is opened (this is classed as third party intervention)
- Repairs or other work is done by persons not authorised by Siemens.
- Components on the printed circuit board are manipulated
- The software is manipulated
Appendix
- Defects or damage caused by dropping, breaking, lightning or ingress of moisture. This also applies if defects or damage was caused by mechanical, chemical, radio interference or thermal factors (e.g.: microwave, sauna etc.)
Devices fitted with accessories not authorised by Siemens
This Guarantee shall not apply to or extend to services performed by the authorised dealer or the customer themselves (e.g. installation, configuration, software downloads). User manuals and any software supplied on a separate data medium shall be excluded from the Guarantee.
The purchase receipt, together with the date of purchase, shall be required as evidence for invoking the Guarantee. Claims under the Guarantee must be submitted within two months of the Guarantee default becoming evident.
Ownership of devices or components replaced by and returned to Siemens shall vest in Siemens.
This Guarantee shall apply to new devices purchased in the European Union. For Products sold in the Republic of Ireland the Guarantee is issued by Siemens Ireland Limited, Ballymoss Road, Sandyford Industrial Estate, Dublin 18 - The Republic of Ireland.
Any other claims resulting out of or in connection with the device shall be excluded from this Guarantee. Nothing in this Guarantee shall attempt to limit or exclude a Customers Statutory Rights, nor the manufacturer's liability for death or personal injury resulting from its negligence.
The duration of the Guarantee shall not be extended by services rendered under the terms of the Guarantee.
Insofar as no Guarantee default exists, Siemens reserves the right to charge the customer for replacement or repair.
The above provisions do not imply a change in the burden of proof to the detriment of the customer.
To make a claim under this Guarantee, please contact the Siemens helpdesk on 1850 777 277. This number is also to be found in the accompanying user guide.
Accessories
Earpiece and microphone set
You can connect a commercially available earpiece and microphone set via the universal 2.5 mm interface. For example, an earpiece and microphone set M110 from Plantronics.
All accessories and batteries are available from your mobile phone retailer. Or you can order direct online from the my-siemens Online Shop: www.my-siemens.com.
The Online Shop also has the latest product information.
Index
A
Accessories 41
Acknowledgement tones 29
Advisory tones. 29
Answering a call 14
Auto answer 25
B
Batteries
Charging . .8 Display. 8 Inserting. 5,7 Recommended 37
Battery tone 30
Belt clip. 10
C
Calling
External 14
Internal 16
Care of the telephone. 35
Change display language 23
Character set chart. 38
Charge indicator (batteries). 8
Confirmation tone 11, 29
Customer Care (Service) 35
Customer service 35
D Date setting. 24
Deactivating (handset) 11
Dialling pause 14
Direct dial keys. 2, 20
Directory Copy and edit an entry . 18
Delete an entry 18
Display and edit an entry . . . 18
Storing a number 17
Displayfont. 24
E Earpiece mode. 2, 15
Earpiece volume 25
End call 14
Error tone 29
F Factory settings of the handset. 33
Handset Activate/deactivate 11 Operating and charging times 37
Phone number statement . . 32
Preparing to use. 7
Restore factory settings. 33
Setting 23
Handset at a glance. 2
Handset charging times. 37
Handset operating time 37
Handsfree Activate/deactivate 15
Volume 15,25
Hearing aids 5
Internal dialling 16
J Jumbo numbers 24
K Key click. 29
L Language, see Changing display language
Last number redial 13,21
Loudspeaker volume 25
Handset 25
M
Mains adapter 5
Making calls
Answering a call. 14
External 14
Internal. 16
Medical appliances. 5
Melody 27
Menu
End tone 29
Guidance through the menu 12
Message key 2
0
Online Shop. 41
P
Pack contents. 7
Phone number statement . . . 32
R
Ringer
Set volume 27
Setting a melody 27
S
Safety precautions 5
Service 35
Service making handset ready for service. 7
Set time by 24
Setting profiles. 31
Signal tone, see Advisory tones
Specifications. 37
Speed dial list. 20
Standard characters (Chart) 38
T
Telephone number
Pick from directory 21
Store (directory). 17
Tone
Battery tone 30
Confirmation 29
Error tone 29
V
Volume
Earpiece volume 25
Handsfree 15,25
Loudspeaker (handset) 25
Ringer (handset) 27
W
Warning tone, see Advisory
tones 29
Warranty 39
Writing digits 2,38
SIEMENS
Be inspired
Gigaset
E1
DECT

Service clients (Customer Care)
www.my-siemens.com/customercare
centre de services France 01 56 38 42 00
www.my-siemens.com/contact
"We, Siemens AG, declare, that the above mentioned product is manufactured according to our Full Quality Assurance System certified by CETECOM ICT Services GmbH with ANNEX V of the
R&TTE-Directive 99/5/EC. The presumption of conformity with the essential requirements regarding Council Directive 99/5/EC is ensured"
Senior Approvals Manager
Customer Care (Service) 38
D
Témoin de charge (batteries) . . 8
(Alla conspicna: Off).
MENU
"We, Siemens AG, declare, that the above mentioned product is manufactured according to our Full Quality Assurance System certified by CETECOM ICT Services GmbH with ANNEX V of the R&TTE-Directive 99/5/EC. The presumption of conformity with the essential requirements regarding Council Directive 99/05/EC is ensured."
Senior Approvals Manager
The Declaration of Conformity (DoC) has been signed. In case of need a copy of the original DoC can be made available via the company hotline.
0682

- CSVázeni zákaznici,
- SKVázeny zákazník,
- ROStimate client,
- SRPoStovani potrošaču,
- BG Ybaxaemnnotpebnenn
- SIEMENS
- Gigaset
- E1
- Kundenservice (Customer Care)
- Anhang
- Technische Daten
- Empfohlene Akkus
- Nickel-Metall-Hybrid (NiMH):
- D
- Contents
- Brief overview 2
- Safety precautions 5
- Special features of the Gigaset E 1 6
- Preparing to use your phone 7
- Operating the telephone, menu overview 12
- Making calls 14
- Using the directory, direct dial keys and other lists 17
- Handset settings 23
- Safety precautions
- Special features of the Gigaset E 1
- Preparing to use your phone
- Removing protective film
- Inserting the batteries
- Placing the handset into the base station and charging the batteries
- Manual registration
- On the handset
- On the base
- Attaching the belt clip
- Activating/deactivating the handset
- Operating the telephone, menu overview
- Control keys on the handset
- Function keys
- Example
- Making calls
- Making external calls and ending a call
- Or:
- Inserting a dialling pause
- Answering a call
- Handsfree
- Activating/deactivating handsfree
- Adjusting the volume while in handsfree mode
- Making internal calls
- Making an internal call
- Answering an internal call
- Using the directory, direct dial keys and other lists
- Directory
- Storing a telephone number in the directory
- MENU
- Directory OK
- New Entry OK
- OK
- Dial with the directory
- either ...
- or ...
- Edit, copy, and delete an entry in the directory, and delete list
- Edit Entry
- Copy and Modify
- Delete Entry
- Delete List
- Direct dial keys
- Save/change direct dial keys
- -Settirthe menu item and confirm. OK
- Store an external phone
- Program an internal call
- Last number radial list
- Dialling telephone numbers from the last number redial list
- Editing, deleting, or copying phone number to the directory
- Calls list
- Handset settings
- Changing language
- Settings
- Setting the date and the time
- Set the display font size, large
- Activate or deactivate automatic auto answer
- Auto Answer
- Adjusting the loudspeaker volume
- Setting in idle status
- Handset Volume OK
- Handsfree Volume
- Headset Volume
- Adjustments during a call
- Changing the ringer tone
- Changing the ringer melody
- Changing the volume of the ringer
- Activating/deactivating advisory tones
- Advisory Tones
- Key
- Tones OK
- Battery Warning
- Confirm. Tones
- Setting profiles
- Visual
- Phone number statement
- Restoring the handset to factory settings
- Appendix
- Care
- Contact with liquid
- Service (Customer Care)
- You will find more service numbers in the section entitled "Service" at the end of this booklet.
- Excerpt from the original declaration:
- Recommended batteries
- Nickel-metal-hydride (NiMH):
- Handset operating times/charging times
- Standard characters
- Creating and editing text
- Order of directory entries
- Warranty Certificate Ireland
- Accessories
- Earpiece and microphone set
- Index
- A
- M
- 0
- P
- R
- S
- T
- V
- W
- Service clients (Customer Care)
Brand : SIEMENS
Model : Gigaset E1 MA
Category : Cordless phone