
GIGASET M270 T - Cordless phone SIEMENS - Free user manual and instructions
Find the device manual for free GIGASET M270 T SIEMENS in PDF.
| Product type | Digital terrestrial TV adapter (DVB-T) |
| Brand | Siemens (Gigaset) |
| Model | Gigaset M270 T |
| Dimensions | Approx 250 x 140 x 32 mm |
| Weight | Approx 1.0 kg |
| Power supply | 230 V AC / 50 Hz converted to 12 V DC, power consumption < 10 W |
| Connectors | 2 SCART sockets (TV and VCR), 1 analog audio output R/L (RCA), 1 digital audio output S/PDIF, 1 coaxial antenna input, 1 coaxial antenna output (loop-through) |
| Supported video formats | 4:3, 4:3 letterbox, 16:9, 4:3 CCO/Pan Scan, 4:3 letterbox 14:9 |
| Main functions | DVB-T reception, teletext, electronic program guide (EPG), timer, radio mode, TV and radio channel lists, favorites, automatic and manual search |
| Remote control | Infrared, with AAA batteries supplied |
| Display | On-screen OSD menu, information banner |
| Compatibility | MPEG-2, DVB-T |
| Maintenance and cleaning | Unplug before cleaning, use a soft dry cloth |
| Safety | Protect from humidity and heat sources, do not open, use only supplied accessories |
| Spare parts and repairability | Remote control, batteries, power adapter, SCART cable; repair by authorized technician |
| Warranty | 24 months (consumables: 6 months) |
| Ambient temperature | 5 °C to 40 °C |
| Approval | CE (compliant with LV 2006/95/EC and EMC 2004/108/EC) |
Frequently Asked Questions - GIGASET M270 T SIEMENS
User questions about GIGASET M270 T SIEMENS
0 question about this device. Answer the ones you know or ask your own.
Ask a new question about this device
Download the instructions for your Cordless phone in PDF format for free! Find your manual GIGASET M270 T - SIEMENS and take your electronic device back in hand. On this page are published all the documents necessary for the use of your device. GIGASET M270 T by SIEMENS.
USER MANUAL GIGASET M270 T SIEMENS
Gigaset Communications GmbH is the legal successor to Siemens Home and Office Communication Devices GmbH & Co. KG (SHC), which in turn continued the Gigaset business of Siemens AG. Any statements made by Siemens AG or SHC that are found in the user guides should therefore be understood as statements of Gigaset Communications GmbH.
We hope you enjoy your Gigaset.
Gigaset Communications GmbH is a trademark
licensee of Siemens AG
© Gigaset Communications GmbH 2008
All rights reserved.
Subject to availability. Rights of modifications reserved.
A31008-N1080-R101-1-9W19

natural_image
Exterior view of a Siemens M270 T air conditioner unit on a wooden table with a vase and white orchid, set against a plain wall (no text or symbols visible on the device itself)Gigaset M270 T
Issued by
Siemens Home and Office Communication Devices GmbH & Co. KG
Schlavenhorst 66
D-46395 Bocholt
© Siemens Home and Office Communication Devices GmbH & Co. KG 2007
All rights reserved. Subject to availability.
Rights of modification reserved.
Inhaltsverzeichnis
Kundenservice (Customer Care) 21
Garantie-Urkunde 22
Index 23
Zu Ihrer Sicherheit
natural_image
Pure electrical circuit lines without any symbolsnatural_image
Line drawing of a bus with smoke clouds (no text or symbols)16:9-Format:
Kundenservice (Customer Care)
Service clients (Customer Care) 20
Certificat de garantie 21
Index 23
Sécurité
natural_image
Pure electrical circuit lines without any symbolsnatural_image
Line drawing of a bus with smoke clouds (no text or symbols)Format 16:9 :
natural_image
Line drawing of a bus with smoke clouds (no text or symbols)
natural_image
Front view line drawing of a bus with windows and wheels, no text or symbols present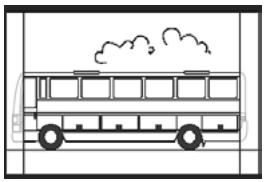
natural_image
Line drawing of a bus with smoke clouds above the side (no text or symbols)Service clients (Customer Care)
activer/désactiver ..... 14
V
Vidéo....16
Voyant Alimentation (LED)....4
Contents
Safety 2
Safety Precautions 2
Information on Installation Location and Operation 2
The set-top box Gigaset M 270 T ....3
Control elements and functional components 4
Remote control 5
Starting up the set-top box 6
Inserting the battery into the remote control 6
Connecting the devices 6
Operation 8
Switching on the set-top box 8
Applying the OSD menu 8
Initial installation 8
Channel search 9
TV operation 10
Adjusting the antenna 10
Choosing a channel 10
Controlling the volume 11
Selecting options 11
Electronic programme guide (EPG) 12
Timer 13
Radio operation 14
Settings 14
Selecting settings 14
Miscellaneous settings 15
Specifying the display duration of the information banner 15
Specifying screen formats 15
Setting the video output format 16
Restoring factory defaults 16
Managing the favourites list 17
System information & software update 18
Appendix 19
Troubleshooting 19
Technical data 20
Authorisation 20
Index 21
Safety
This device is used exclusively for receiving, recording and replaying DVB signals.
Please read the following information carefully to ensure safe usage.
Safety Precautions
Only use the cables supplied or authorised accessories, as indicated in this manual, for connecting the device.
◆ Do not connect the device during a storm to avoid the risk of electric shock.
If you are using an external antenna, this must be installed professionally and protected from lightening.
◆ Protect the device from moisture, aggressive liquids and vapours in order to avoid the danger of fire and electric shock. Do not use the device in damp places (e.g. bathrooms) or in explosive areas.
◆ The device and remote control may only be repaired by authorised service staff. Never open the device.
◆ Keep these instructions in a safe place and make sure the device is accompanied by these instructions and the supplied accessories when you give it to others to use.

All electrical and electronic products should be disposed of separately from the municipal waste stream via designated collection facilities appointed by the government or the local authorities.
This crossed-out wheeled bin symbol on the product means the product is covered by the European Directive 2002/96/EC.
The correct disposal and separate collection of your old appliance will help prevent potential negative consequences for the environment and human health. It is a precondition for reuse and recycling of used electrical and electronic equipment.
For more detailed information about disposal of your old appliance, please contact your local council refuse centre or the original supplier of the product.
Information on Installation Location and Operation
◆ Install the device on a level, non-slip surface. Do not place the device on a heat-sensitive surface. Protect particularly sensitive surfaces.
◆ Place the device away from heat sources and avoid direct sunlight.
Do not place objects on the device. Ensure that the air openings for air circulation are not blocked.
◆ Before cleaning the device disconnect it from the power supply. Use a soft, dry cloth to clean the device and remote control.
The set-top box Gigaset M 270 T
Your new digital set-top box opens up the whole world of top quality television for you!
Study these Operating Instructions to make perfect use of your set-top box's extensive functions and options.
All features at one glance:
◆ separate channel lists for TV and radio
◆ automatic as well as manual channel scan
◆ quick channel scan
◆ direct frequency input option
◆ easy-to-operate electronic programme guide (EPG)
◆ OSD menu/on-screen display (OSD)
◆ content-related help functions
◆ easy to use graphical user interface
◆ volume control for analogue sound output
◆ very short change-over intervals
◆ teletext support via TV
◆ support of 4:3, 4:3 letterbox and 16:9 video formats
◆ compatible to MPEG-2 digital and DVB
Scope of delivery
Check whether the package's contents are complete and without damage. The scope of delivery includes:
◆ 1 set-top box
◆ 1 operating instructions
◆ 1 remote control and 2 type AAA (R6) 1.5 V batteries for the remote control
◆ 1 SCART cable
◆ 1 pluggable power supply
Control elements and functional components
Front side
A IR Sensor: Receives the infrared signals from the remote control.
B Power LED: Indicates the operating status of the digital receiver.
Flashing green: The device is starting.
Green: The device is on.
Flashing orange: Each operation with the remote control is confirmed.
Red: The device is in standby mode.
Off: The device is disconnected from the mains or is not operational.
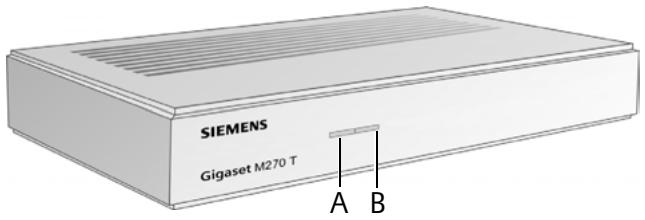
Rear side
A TV: AV Scart connector, optimised for connection of a TV
B VCR: AV Scart connector, for example for video recorder or DVD device
C S/PDIF: Audio output digital (visual)
D Audio Out R: Right stereo channel analogue (Cinch, red)
E Audio Out L: Left stereo channel analogue (Cinch, white)
F In: Coaxial antenna socket for plugging in the antenna connector
G Out: Coaxial antenna connector for transmitting analogue signals to the television or to another device (loop through)
H 12 V DC: Socket for connecting the supplied plug-type AC adapter
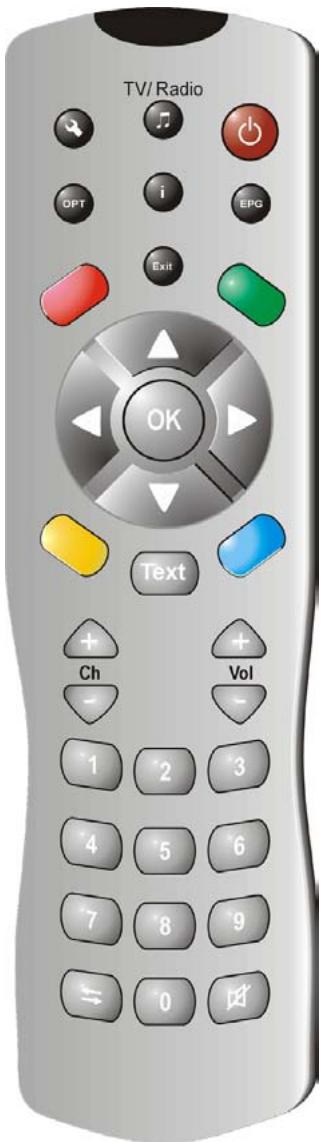
Switch on/off device
Tunisia Toggle between TV and radio modes
☐ Display the OSD (On-Screen Display) menu
i Show the info box; Display help on menu
OPT Display options menu (e.g. sound track selection)
© EPG Open EPG (Electronic Programme Guide)
Exit Cancel a process; Quit a menu
OK Confirm selection TV
OSD: Navigation and selection of menu items EPG: Select any day of the week (right/left); previous/next programme (up/down)
Colour buttons
EPG: red: not assigned green: to select audio outputs (mono, stereo) blue: informs on the time yellow: displays the options menu Videotext navigation (if activated)
Text Open/close teletext
Volume: Increase/decrease volume
+ Channels: Next/preceding channel
Numeric keypad: Enter text and digits; Select channel
Channel list: backward/forward between the last two channels selected
Toggle between channel list and favourites list
Mutes the sound; press again to turn sound back on
Starting up the set-top box
Note: In this user guide, sequences of symbols are used to show you which steps you must carry out. For example:
Search for Channels > Automatic Search is the same as:
- Press ⏻ to run the OSD.
- Highlight the menu's item Search for Channels using the arrow buttons 📄.
- Press OK to confirm your selection.
- Highlight the menu's item Automatic Search using the arrow buttons 📄.
- Press OK to confirm your selection.
Inserting the battery into the remote control
→ Insert the batteries as shown on the bottom of the battery compartment. Observe the polarity!
Connecting the devices
Caution: Prior to connecting a unit, verify that it is switched off. First establish all other connections, then plug the power supply connector into the mains socket. This helps to avoid possible damage.
Antenna port
→ Connect the set-top box's antenna socket with your room antenna or the antenna system of your home using a coaxial cable, which is not included in the scope of delivery.
Connecting to a TV Set
Use the SCART cable to establish the connection between set-top box and TV set.
- Plug the SCART cable into the set-top box's socket.
- The other end of the SCART cable is connected to the Video In connection of your TV set or video recorder.
Note: If you intend to receive analogue channels in addition to the digital ones, you need to have the analogue signal of these channels fed through. Therefore, connect the set-top box's socket with the antenna input of your TV set using a coaxial cable.
Caution: Do by no means use the decoder input some TV sets dispose of. For further information refer to the Operating Instructions of your TV set.

Connecting to a stereo set
- Connect a cinch cable (3.5 mm jack to 2x cinch) to the analogue audio output.
- Connect the cinch plugs (right=red, left=white) with the sound input of your stereo system.

natural_image
Pure electrical circuit lines without any symbolsConnecting the power supply cord
Caution: Only connect the device to a 230 V \~ 50 Hz power outlet installed according to regulations, being accordingly fused.
Only switch the device on after the connections with the antenna and the SCART cable have been established.
Connect set-top box and mains socket with the pluggable power supply.
- First plug the power supply cord into the power supply socket of the set-top box.
- Connect the pluggable power supply to a power outlet.
Operation
Switching on the set-top box
As soon as you have connected the set-top box's pluggable power supply to a power outlet, the set-top box switches on, the LED on the front housing lighting up in green.
Note: If the LED is showing red light, switch the device on by pressing ⏻ of the remote control.
- Switch on all devices connected to the set-top box.
- Activate that AV channel or input of your TV set to which you have connected the set-top box.
Note: For further information refer to the Operating Instructions of your TV set.
Applying the OSD menu
Via the OSD menu you are enabled to carry out settings on the device using your RC unit.
Note: Also observe the information and help messages displayed on the screen.
This is how you use the on-screen display functionality:

OSD navigation and selection of menu items. The selected menu item is framed with colour.

Confirm your selection. The selected menu item is now activated or executed.

Hide the OSD or exit an activated menu.

The remote control's red, green, yellow and blue keys are assigned different functionalities, dependent on the currently selected menu.
If a button of the OSD shows red, green, yellow or blue colour, the respective function is triggered by pressing the button of the same colour on the remote control.
Notes are displayed on the lower screen edge of the OSD, on which buttons to use for specifying the settings of the currently activated menu.
Initial installation
You are presented with the initial installation menu. This menu is displayed only at first start of the device or when you have returned to factory settings to support you in installing your set-top box.
- Specify your preferred Menu Language and confirm your selection.
-
Specify your preferred Country, Screen Format and TV Output Format. Go to the Apply bar and confirm your selection.
-
Specify your preferred frequencies and channels. Go to Start Scan and confirm your selection.
The device then initiates an automatic channel search.
- Follow the instructions as displayed on the screen until initial installation is completed, the device then changes to TV operation.
Channel search
For a start we recommend to have an automatic search done as this scan mode normally detects all channels available. The expert scan mode enables the specific search for an individual channel. This in particular makes sense if you only want to include one individual channel into your channel list and you know the information on the channel and frequency.
In the course of scanning already detected channels are added to a list, two displays informing you on signal strength and quality.
Note: You may cancel scanning at any time by pressing ⒷExit.
Automatic channel search
Search for Channels > Automatic Search
Note: If feasible at all, leave the scanning values unchanged, as the defaulted values generally guarantee the detection of all channels.
- Choose those channels to be searched for (recommended: All).
Note: We generally advise you to search for all channels and to not alter the defaulted values.
- Select Start Scan and confirm your selection.
Following the scanning procedure a dialog informs you on the completion of the search.
-
Specify whether the found channels should add to the current channel list or replace the former list or whether you want the newly detected channels to be discarded. Confirm your selection.
-
Pressing Exit once makes you quit the scan menu and return to the overview. The repeated activation hides the OSD.
Note: If no channels were found at all check the antenna cable for correct connection.
Expert scan mode
Search for Channels > Manual Search
- Implement all required settings.
The numerical buttons enable for input of the frequency. In addition, you can preselect the channels to be searched for by activating the Channels to search for function (e.g. for all channels Free to air).
- Then select Start Scan and and confirm your selection.
TV operation
Following the scanning procedure a dialog informs you on the completion of the search.
- Specify whether the found channels should add to the current channel list or replace the former list or whether you want the newly detected channels to be discarded.
- Pressing Exit once makes you quit the scan menu and return to the overview. The repeated activation hides the OSD.
TV operation
Adjusting the antenna
On principle, an antenna being stationed nearby a window will effect the most optimal reception. Find the ideal position for your antenna:
Technical Information > Channel Information
You are displayed the current channel's channel information.
- Try out different positions of your antenna, until the display for Signal Quality shows its maximum value (100%) or some value similarly high.
Note: Please mind that depending on your type of antenna the antenna's orientation may be of importance as well. If this is the case, swing your antenna around to see whether this influences the quality of the signal. Refer to your antenna's operating instructions to find out if your device owns omnidirectional qualities.
-
Afterwards, use the channel buttons ⬤ to switch to diverse channels. Further adjust your antenna's position, if appropriate.
-
Feeling content with the reception quality set, press Exit to hide the channel information and complete the process.
Choosing a channel
General operation

switches to the following/previous channel memory

Direct input of a channel's memory number to immediately jump to a certain channel

Complete input of channel numbers with less than 4 figures. Example: Skip to channel 45 pressing 4 5 OK.
An info banner pops up at the lower edge of the screen whenever you change the channel.
Making use of the list and zapping buttons
An alternative to activating a channel is offered by the channel or favourites list. Establishing a favourites list may make it easier to remember the single memory numbers, as there you are free to define the channel memories as desired.

In certain channel: The channel list is run and the current channel is highlighted with colour.

In channel list: Toggle between the entire channel list and the favourites list.
In certain channel: Switch from the current to the previous channel and vice versa.
Calling up information on channels
Every time you switch to another channel an info banner will pop up for a short period of time at the lower edge of the screen. The information banner displays:
◆ the selected channel memory number and the channel name.
◆ the time on the left edge of the information banner. The display bar on the right next to the time graphically indicates the programme time that has already elapsed.
◆ the current and the next programme including its broadcasting time.
After several seconds, the information banner is automatically hidden again. It is up to you to define for how long the info banner will be shown, see page 15.

Display the info banner (without having to change channels).
While the information banner is displayed: Display extended information banner for supply of further details with regard to the current programme.
Repeatedly pressing: Toggling between the current and subsequent programme information.

Close the info banner.
Controlling the volume
In addition to the volume control of your TV or stereo set, you can also adjust the volume via the set-top box's volume control.

increases/decreases the volume. You are displayed the set volume by means of a graphical bar.

Entirely switch off the sound. Pressing again resets the volume to its previous loudness level.
Selecting options
Some channels occasionally provide several camera perspectives, sound tracks and/or teletexts. If one or several of these options are available for a channel, the option icon appears in the right-hand corner of the info banner when that channel is selected.
TV operation
You then know that you can select from various views, sounds or teletexts or any combination of these options.
- Call up the desired channel.
- OPT call the selection menu.
- Choose the desired option (perspective, sound track or teletext) and confirm your selection. The selected option is enabled.
Note: You may find that both a view and an audio track can be selected. In this case you have to press OPT repeatedly to be taken to the sound selection menu.
Electronic programme guide (EPG)
The electronic programme guide (EPG) offers you an overview of all programmes to be broadcasted in the next week on the current channel.
Note:
Not all channels offer an extensive EPG.
Many broadcasting services broadcast the current day programme but do not offer detailed descriptions.
There are also TV stations that do not broadcast any EPG information.
Due to the progressive technical development, more and more broadcasting services ill extend this offer in the future.

Open the programme preview.

Change the current channel.

Right or left: Select any day of the week.
Up and down: Previous or next programme. Scrolling far enough down the current programme preview list automatically takes you to the preview of the coming day.

The colour buttons are assigned certain times of the day:
Red button: morning (starting at 6:00 am)
Green button: afternoon (starting at 12:00 am)
Yellow button: evening (starting at 6:00 pm)
Note: The blue button serves to effect programming via timer, see page 13.

A further screen presents you with a summary of the programme's contents. In case of lengthy text information use the up and down arrow buttons for scrolling.

Quits the programme preview.
Timer
Setting a timer allows you to switch your set-top box on or off at a specified time to watch a programme that is of special interest to you, for example. The device then automatically switches on in the standby mode.
If the device is already switched on, the device automatically switches to the selected programme.
Adding programmes to the timer list
The timer function is included in the timer list via the EPG.
- Press EPG.
- Highlight the desired programme.
- Press ◇ and confirm.
The window is closed and the selected programme is stored in the timer list.
Note: "Timer programmes" are marked by a small alarm clock icon being displayed besides the title of the respective programme.
Editing the timer list
Timer
Deleting programmes
- In the timer list select the desired programme.
- Press the respective colour button and confirm the deleting:
red: deletes the selected programme
yellow: all programmes are deleted.
Timer editing
- In the timer list select a programme and confirm your selection.
- Alter the settings for date, time (starting and end time) and cycle (interesting for series and regularly recurring programmes): Repeatedly select one setting and modify it using the numerical buttons.
- Then highlight OK besides Apply and confirm your settings.
Switching off current timer functions
When watching a timer programme only few buttons can be activated, i.e. volume controls, OPT and 🔍. During this time the OSD is also not available.
For switching off the current timer functions:
→ Press ⏻ on your remote control and press the button again.
Radio operation
The antenna connection of your set-top box enables for reception of radio programmes. These were stored in a separate list when implementing channel search. When in radio mode all buttons of the remote control maintain the same functionalities as with TV operation. Proceed as follows to switch over to radio operation:
→ Press Ⓜ to activate the radio mode.
→ Press Ⓜ again to return to TV operation.
Note: Currently not all broadcast areas transmit radio programmes.
Settings
Selecting settings
The menu leaves you with the opportunity of defining numerous different language settings.

Box Settings > Language Settings
→ Do your settings as desired using the arrow buttons.
Menu Language:
Set the language of the OSD. A wide range of languages is available for you to choose from, e.g. English, French, Spanish.
Audio Language:
Select a reproduction language for the programmes.
Audio Language #2:
Select an optional reproduction language for the programmes.
Note: In case your favoured programme is not broadcast in the language set in Audio Language, the Audio Language #2 is used automatically.
Subtitle Language:
Select a language for the captions.
Proceeding in selecting a first and a second subtitle language follows the same principles as with the first and second audio language.
Subtitles Automatic:
Set this option to On if you want to automatically show broadcast subtitles in the selected subtitle language (default: Off).
→ Press Ⓑit to exit the menu.
The Miscellaneous Settings dialog allows for settings regarding time and audio output formats. Selection of audio language and subtitling is only supported if the programme is broadcasted in more than one language.
The set-top box time can be updated either automatically or manually.

> Box Settings > Miscellaneous Settings
-
Select the time change type from winter time to summer time or vice versa
-
choosing the Automatic setting from the Time Zone Adjustment option, making the set-top box take its time information from the currently chosen channel, or
-
setting the Time Zone Adjustment option to Manual, selecting On or Off for Summertime / DST as appropriate, then specifying the difference to the Greenwich Mean Time (GMT) via the Time Zone (GMT) function. For Central Europe this difference amounts to one hour ahead (+01:00).
-
Specify the desired audio output format (of special interest in case you have connected a stereo system to the set-top box).
- Press Exit to exit the menu.
Specifying the display duration of the information banner
You can set the time after which the info banner, see page 11, is to disappear from the screen again.

> Box Settings > Menu Settings > Info Banner Duration
-
Select the desired time of delay for the Info Banner Duration after which the info banner is to be deactivated automatically:
-
Permanent: No automatic hiding of the info banner.
-
None prevents the info banner from being displayed at each channel change.
-
Press Exit to exit the menu.
Specifying screen formats
Due to the screen format varying e.g. in case of cinema films or general series you can select the appropriate screen format for the current programme in the settings menu.
The following formats are available for selection:

natural_image
Line drawing of a bus with smoke clouds (no text or symbols)16:9 format:
Presents films on a 16:9 TV in full size.

natural_image
Line drawing of a bus with smoke clouds (no text or symbols)
natural_image
Front view line drawing of a bus with windows and wheels, no text or symbols present
natural_image
Line drawing of a bus with smoke clouds above it (no text or symbols)4:3 format wide screen (letterbox):
Zooms out of 16:9 format films to scale down to 4:3 format TVs by adding a black bar above and below the picture on the screen.
4:3 format CCO/Pan Scan (enlarged):
Presents films in the 16:9 format in a screen-filling manner. With regard to 4:3 TVs, the left and right picture border is cut off.
4:3 (Letterbox 14:9)
Zooms out of 16:9 format films to scale down to 4:3 format TVs by adding a black bar above and below the picture on the screen.
Additionally the left and right border is slightly cut off
> Box Settings > Video Settings > Screen Format
- Select the screen format.
- Press Exit to exit the menu.
Setting the video output format
The Settings menu enables for specifying a.o. the video output settings. Please note:
◆ The formats RGB, Video and S-Video are provided for the "TV video output".
◆ The "VCR video output" (video recorder output) only disposes of the Video and S-Video settings.
◆ Having selected RGB for the TV output, only the Video option will be made available for the VCR output.
Note: If you are not aware of the format your TV set supports, simply check which setting brings about the best picture representation.
> Box Settings > Video Settings > TV Output Format / VCR Output Format
- Select the video format with the optimal image reproduction. VCR Output Format enables for setting the screen format of a video recorder if connected.
- Press Exit to exit the menu.
Restoring factory defaults
You can reset the device to default settings. In doing so, the individually composed favourites list is deleted.
> Box Settings > Restore Factory Settings
→ In the dialog box displayed set the option to Yes using the arrow buttons and confirm the restoration of factory settings.
The device reboots, switches off, and shortly afterwards switches on again.
Managing the favourites list
Following channel scan the detected channels are stored to a general channel list. The storing sequence of these channels in the list is fixed.
Note: If the set country disposes of channels with preset slots, these are stored to predefined channel memories. These diverse slots may not follow a continuous sequence. This sorting method is called Logic Channel Numbering (LCN). All further channels are added following the last LCN channel found.
Defining channels as favourites
Applying the favourites list function you can sort your favourite channels according to your own preferences and activate these via the remote control accordingly.
Note: You may include the LCN channels (if appropriate) in the favourites list and store them at any slot within this list, thus preventing the favourites list from showing breaks. It is not possible to ensure a continuous sequence of the LCN channels in the "All channels list".
Sort TV channels (represented by a list icon on the left edge of the screen)
The Sort TV channels menu is displayed. The list comprises all found channels, your favourites being indicated by an asterisk (*).
Note: In case of a rather long channel list you may wish to apply the filter function to achieve a more structured overview, see page 18.
-
Select the channel you want to mark as a favourite and confirm your selection.
-
Repeat the step described above to add further channels to the favourites list.
-
Press Exit to close the window.
-
You will be prompted whether to store the changes made. Confirm this.
Editing channel list
Possibly the channel list may appear too complex to you or contain channels that you are not interested in watching. Via the main menu, you edit the channel list.
> Sort TV channels
-
Press to toggle between channel and favourites list.
-
Carry out the desired settings.
-
Press Exit to close the window.
-
You will be prompted whether to store the changes made. Confirm this.
Shifting channels
You can adapt the order of channels in the favourites list.
- Press to switch to the favourites list.
- Highlight the channel intended for shifting and confirm your selection. The channel name is inserted.
- Move the chosen channel to its new position as desired by means of the arrow buttons and confirm to store the channel at the desired place.
- Press Exit and confirm the subsequent prompt.
Filtering channels
By means of this function, you can display the channel list according to desired criteria.
Note: A filter is always temporary, thus not being stored. As soon as you close the Sort TV channels screen, the current filter settings are discarded again.
- Press 🔧 to call up the filter function.
- Select the channels to be displayed.
- Determine the sorting type (according to number or alphabetical order) via Sorting and confirm your selection.
Note: Observe the respective information on the lower part of the window. They help you to carry out the correct settings.
Deleting channels
You are not allowed to delete channels from the general channel list. If you have deleted channels from the favourites list, they still remain stored in the channel list.
- Highlight the channel you wish to delete.
- Press ☐ if you want to delete the selected channel only. Pressing ☐ initiates deletion of all favourites.
- Quit the channel list by pressing Exit and confirm your changes.
System information & software update
The system information is of special interest in case support is needed. Additionally you may as well search manually for a new set-top box software update.
> Technical Information > System Information
- A dialog box is displayed. Select Update Software and confirm to start searching for a new software update.
- Press Exit to exit the menu.
Appendix
Troubleshooting
All electronic devices may have faults. However, these faults need not be defects in every case. Instead, they are often caused by bad leads or plug-and-socket joints or by connections being incorrectly established.
Prior to seeking expert help, please check the following points:
| Problem | Possible cause | Remedies |
| Device does not start | No mains voltage (no LED display) | Check connector cable and pluggable power supply |
| No picture, no sound | No mains voltage | Check connector cable and pluggable power supply |
| No channel list or incorrect channel list | Carry out automatic channel scan | |
| Lost connection | Check connection | |
| No picture or bad picture | SCART plug not completely connected | Check SCART connection |
| Inadequate positioning of the antenna | Re-adjust the antenna, (see p. 10) | |
| Antenna too small | Make use of a larger antenna | |
| Channel is broadcast by means of other parameters | Implement automatic channel scan (see p. 9) | |
| Sound available, no picture | Channel is broadcasted by means of other parameters | Implement automatic channel scan (see p. 9) |
| SCART plug not completely connected | Check SCART connection | |
| Device is in radio mode | Switch to TV mode pressing ⏻ | |
| No reception of channels that could be received before | Channel is no longer broadcasted | Not any |
| Remote control without reaction | Obstacle between remote control and set-top box | Eliminate obstacle |
| Faulty data stream, the device locks | Disconnect pluggable power supply, re-establish connection after 10 seconds | |
| Batteries used up | Exchange old batteries of the remote control for new ones | |
| Several channels are not received from time to time | These channels are not broadcasted 24 hours a day and sometimes are not available. This is not a fault. | |
| Device cannot be operated | Obstacle between remote control and set-top box | Eliminate obstacle |
| Bad picture quality | Incorrect TV SCART output signal | Select different video output format (see p. 16) |
You will find additional solutions and FAQs (Frequently Asked Questions) on the Internet at http://www.siemens.com/qigaset.
Technical data
| Model: | Gigaset M 270 T |
| TV: | 1 DVB-T tuner |
| RF: | INPUT: 1 socket (IEC)OUTPUT (loop through): 1 socket (IEC) |
| SCART: | 2 Euro AV sockets:TV (OUT): CVBS, RGB, YCVCR (OUT): CVBS, RGB, YC |
| Cinch: | 1 ANALOG OUT (AUDIO R/L) |
| SPDIF (visual): | 1 Audio digital (Dolby Digital, AC3, PCM stereo) |
| LED Display | Power on/off/standby, RCU activity |
| Device configuration: | Via TV menu |
| Supply voltage: | 230 V AC / 50 Hz to 12 V DC |
| Power consumption: | less than 10 Watt |
| Permissible ambient temperature: | 5 °C to 40 °C |
| Dimensions: | approx. 250 x 140 x 32 mm |
| Weight: | approx. 1.0 kg |
Authorisation
The CE mark certifies conformity of the device with the relevant harmonised standards of the LV Directive 2006/95/EC and EMC Directive 2004/108/EC.
A copy of the declaration of conformity is available at this Internet address: http://www.siemens.com/giqasetdocs.
CE
Index
A
Antenna adjust..... 10 connect..... 6
Antenna socket 4
Audio language.... 14 second.... 14
Audio output.... 4 format.... 15
Authorisation 20
Automatic channel search ..... 9
Automatic subtitles ..... 14
C
Channel define as favourite ..... 17 delete from channel list ..... 18 favourites..... 17 filter..... 18 information ..... 10 order in the favourites list..... 18 toggling..... 10
Channel list....9, 10, 11, 17 edit....17 sort....17
Channel search automatic....9 in expert mode....9
Cinch cable 7
Connect antenna....6 power supply....7 stereo set....7 TV set....6
Connectors 4
D
Display options 11
E
Electronic programme guide see EPG EPG .... 12 button on remote control .... 5 colour buttons .... 5, 8
Expert scan mode 9
F
Factory default settings, restore .... 16 Favourites .... 17 Favourites list.... 11 manage .... 17 order of channels.... 18
Features....3 Front side....4
H
Help on menu 5
|
Information banner .... 11 set disappear time .... 15 Information on operation.... 2 Initial installation menu .... 8
Installation location ..... 2 IR Sensor ..... 4
L
Language settings 14
M
Menu display .... 5 exit.... 5 handling.... 8 help.... 5
Menu button .... 5 Menu language .... 14 Miscellaneous settings .... 15
Index
O
On / Off button 5
Options menu display 5
OSD menu see Menu
P
Power 12 V DC....4
Power LED 4
Power supply connect .... 7
Programme delete from timer list .... 13 edit in timer list .... 13 summary of contents.... 12
Programme guide, electronic..... 12
Programme preview .... 12 exit .... 12
R
Radio mode.... 5
Radio programme 14
Rear side 4
Remote control 5
RGB 16
S
Safety precautions.... 2
SCART cable 6
Scope of delivery.... 3
Screen format 15
14:9.... 16
16:9.... 15
4:3 enlarged.... 16
4:3 wide screen 16
Set-top box radio mode....14 switch on....8 switch on/off via timer....13 switch to standby mode....13
Signal quality .... 10 Software update .... 18 Sound, mute .... 5 SPDIF .... 4
Standby mode automatically switch on .... 13 indication .... 4
Stereo set connect .... 7
Subtitle language....14 S-Video....16 Switch on....8 System information....18
T
Technical data ..... 20 Time zone adjustment ..... 15 Timer ..... 13 switch on/off ..... 13 Timer list ..... 13 Troubleshooting ..... 19 TV scart ..... 4 TV set connect ..... 6
V
Video....16
Video output format....16
Video scart....4
Volume control....11
Innehåll
Säkerhet 2
Säkerhetsåtgärder 2
Kundservice (Customer Care) 21
natural_image
Pure electrical circuit lines without any symbolsAnsluta elkabeln
natural_image
Line drawing of a bus with exhaust smoke (no text or symbols)16:9-format:
natural_image
Line drawing of a bus with smoke clouds (no text or symbols)
natural_image
Front view line drawing of a bus with windows and wheels, no text or symbols present
natural_image
Line drawing of a bus with smoke clouds above it (no text or symbols)4:3-format bredbild (letterbox):
Kundservice (Customer Care)

- Inhaltsverzeichnis
- Index 23
- Zu Ihrer Sicherheit
- Kundenservice (Customer Care)
- Sécurité
- Service clients (Customer Care)
- V
- Contents
- Safety 2
- The set-top box Gigaset M 270 T ....3
- Starting up the set-top box 6
- Operation 8
- TV operation 10
- Settings 14
- Appendix 19
- Index 21
- Safety
- Safety Precautions
- Information on Installation Location and Operation
- The set-top box Gigaset M 270 T
- All features at one glance:
- Scope of delivery
- Control elements and functional components
- Front side
- Rear side
- Starting up the set-top box
- Inserting the battery into the remote control
- Connecting the devices
- Antenna port
- Connecting to a TV Set
- Connecting to a stereo set
- Connecting the power supply cord
- Operation
- Switching on the set-top box
- Applying the OSD menu
- Initial installation
- Channel search
- Automatic channel search
- Expert scan mode
- TV operation
- Adjusting the antenna
- Choosing a channel
- General operation
- Making use of the list and zapping buttons
- Calling up information on channels
- Controlling the volume
- Selecting options
- Electronic programme guide (EPG)
- Note:
- Timer
- Adding programmes to the timer list
- Editing the timer list
- Deleting programmes
- Timer editing
- Switching off current timer functions
- Radio operation
- Settings
- Selecting settings
- Menu Language:
- Audio Language:
- Audio Language #2:
- Subtitle Language:
- Subtitles Automatic:
- > Box Settings > Miscellaneous Settings
- Specifying the display duration of the information banner
- > Box Settings > Menu Settings > Info Banner Duration
- Specifying screen formats
- > Box Settings > Video Settings > Screen Format
- Setting the video output format
- > Box Settings > Video Settings > TV Output Format / VCR Output Format
- Restoring factory defaults
- > Box Settings > Restore Factory Settings
- Managing the favourites list
- Defining channels as favourites
- Editing channel list
- > Sort TV channels
- Shifting channels
- Filtering channels
- Deleting channels
- System information & software update
- > Technical Information > System Information
- Appendix
- Troubleshooting
- Authorisation
- Index
- A
- C
- D
- E
- F
- H
- |
- L
- M
- O
- P
- R
- S
- T
- Innehåll
- Säkerhet 2
- Ansluta elkabeln
- Kundservice (Customer Care)
Brand : SIEMENS
Model : GIGASET M270 T
Category : Cordless phone