HR2028 - Blender PHILIPS - Free user manual and instructions
Find the device manual for free HR2028 PHILIPS in PDF.
| Product type | Blender |
| Brand | Philips |
| Model | HR2028 |
| Blender capacity | 1.5 L (liquids), 1 L (hot or foaming liquids) |
| Speeds | 2 speeds + Pulse function |
| Dry mill (small) | For grinding dry ingredients: seeds, rice, dried shrimp, tea |
| Liquid-tight mill (large) | For chopping wet ingredients: chili paste, cooked rice |
| Filter | For fresh fruit juice, cocktails, soymilk (accessory included) |
| Safety stop | Integrated safety lock: appliance only works if jar is properly installed |
| Jar material | Measuring glass, plastic for jars |
| Blades | Stainless steel, very sharp |
| Maximum ingredient temperature | 80 °C |
| Maximum operating time | Blender: 3 minutes; Mill: 30 seconds |
| Noise level | Lc = 86 dB(A) |
| Cleaning | Removable parts dishwasher safe (except motor unit) |
| Motor unit | Do not immerse, clean with damp cloth |
| Included accessories | Measuring cup, lid, filter, dry mill, liquid-tight mill, sealing rings |
| Cord length | Adjustable by winding under base |
| Compliance | EMC standards (electromagnetic fields) |
| Warranty | International Philips warranty (see leaflet) |
Frequently Asked Questions - HR2028 PHILIPS
User questions about HR2028 PHILIPS
0 question about this device. Answer the ones you know or ask your own.
Ask a new question about this device
Download the instructions for your Blender in PDF format for free! Find your manual HR2028 - PHILIPS and take your electronic device back in hand. On this page are published all the documents necessary for the use of your device. HR2028 by PHILIPS.
USER MANUAL HR2028 PHILIPS
Congratulations on your purchase and welcome to Philips! To fully benefit from the support that Philips offers, register your product at www.philips.com/welcome.
General description (Fig. 1)
A Measuring cup
B Lid of blender jar
C Blender jar
D Level indication
E Sealing ring
F Blade unit
G Motor unit
H Control panel
- Speed buttons (1 and 2)
- Pulse/off button
Filter
Dry mill beaker
K Wet mill beaker
L Mill sealing ring
M Mill blade unit
Important
Read this user manual carefully before you use the appliance and save it for future reference.
General
Danger
- Never immerse the motor unit in water or any other liquid, nor rinse it under the tap. Use only a moist cloth to clean the motor unit.
Warning
- Check if the voltage indicated on the appliance corresponds to the local mains voltage before you connect the appliance.
- If the mains cord is damaged, you must have it replaced by Philips, a service centre authorised by Philips or similarly qualified persons in order to avoid a hazard.
- Do not use the appliance if the plug, the mains cord or other parts are damaged.
- Never use the blender jar, the dry mill beaker or the wet mill beaker to switch the appliance on and off.
- Never let the appliance run unattended.
- This appliance is not intended for use by persons (including children) with reduced physical, sensory or metal capabilities, or lack of experience and knowledge, unless they have been given supervision or instruction concerning use of the appliance by a person responsible for their safety.
- Children should be supervised to ensure that they do not play with the appliance.
- Do not touch the blades, especially when the appliance is plugged in. The blades are very sharp.
- If the blades get stuck, unplug the appliance before you remove the ingredients that block the blades.
- Make sure the blade unit is securely fastened to the blender jar or mill beaker before you assemble the blender jar or mill beaker onto the motor unit.
Caution
- Always unplug the blender before you assemble, disassemble or make adjustments to the blender jar, the dry mill or the wet mill and before you start to clean the blender.
- Never use any accessories or parts from other manufacturers or that Philips does not specifically recommend. If you use such accessories or parts, your guarantee becomes invalid.
- Do not exceed the maximum level indicated on the blender jar and the mill beakers.
- Noise level: Lc = 86 dB( A) .
Blender
Warning
-
Never reach into the blender jar with your fingers or an object while the appliance is running.
-
Make sure the blade unit is securely fastened to the blender jar before you assemble the blender jar onto the motor unit.
Caution
- Never fill the blender jar with ingredients hotter than 80^ C .
- To prevent spillage, do not put more than 1.5 litres of liquid in the blender jar, especially when you process at a high speed. Do not put more than 1 litre in the blender jar when you process hot liquids or ingredients that tend to foam.
- If food sticks to the wall of the blender jar, switch off the appliance and unplug it. Then use a spatula to remove the food from the wall.
- Always make sure the lid is properly assembled on the jar and the measuring cup is inserted properly in the lid before you switch on the appliance.
- Never forget to place the sealing ring on the blade unit before you connect the blade unit to the blender jar, otherwise leakage will occur.
- Do not let the appliance run for more than 3 minutes at a time.
- Always let the appliance cool down to room temperature between processing cycles.
Dry mill and wet mill
Warning
- Do not use the dry mill to grind very hard ingredients such as nutmeg, Chinese rock sugar and ice cubes.
- Do not use the wet mill to mix liquids or to crush ice cubes. Use the blender jar to process these ingredients.
- Do not touch the cutting edges of the mill blade unit when you clean it. They are very sharp and you could easily cut your fingers on them.
Caution
- Never use the dry mill or wet mill for more than 30 seconds without interruption.
Let the dry mill or wet mill cool down to room temperature between processing cycles. - Let hot ingredients cool down before you process them in the dry or wet mill (max. temperature 80^ ).
- Never forget to place the sealing ring in the blade unit before you assemble the mill jar, otherwise leakage occurs.
- Always process cloves, star anise and aniseed together with other ingredients. If processed separately, these ingredients may attack the plastic materials of the appliance.
- The mill breakers may become discoloured when you use them to process ingredients such as cloves, anise and cinnamon.
- The dry mill and wet mill are not suitable for chopping raw meat. Use the blender instead.
- Do not use the dry mill or wet mill to process liquids such as fruit juice.
- Do not process dry ingredients such as coffee beans and dried beans in the wet mill.
Filter
Caution
- Never use the filter to process ingredients hotter than 80^
- Never overload the filter. Do not put more than 75g dried soy beans or 160g fruit in the filter at the same time.
- Always make sure the lid is assembled properly and the measuring cup is inserted properly in the lid before you switch on the appliance.
- Cut fruit into smaller pieces before you put it in the filter.
- Soak dried ingredients, such as soy beans, before you put them in the filter.
Built-in safety lock
This feature ensures that you can only switch on the appliance if you have properly assembled the blender jar, the dry mill beaker or the wet mill beaker on the motor unit. If the blender jar or mill beaker is correctly assembled, the built-in safety lock will be unlocked.
Electromagnetic fields (EMF)
This Philips appliance complies with all standards regarding electromagnetic fields (EMF). If handled properly and according to the instructions in this user manual, the appliance is safe to use based on scientific evidence available today.
Before first use
Thoroughly clean the parts that come into contact with food before you use the appliance for the first time (see chapter 'Cleaning').
Using the appliance
You can adjust the length of the cord by winding part of it round the reel in the base. Pass the cord through the slot in the base.
Blender
The blender is intended for fine pureeing, chopping and blending. With the blender you can prepare soups, sauces and milk shakes. You can also use it to process vegetables, fruit, meat, pancake batter etc.
Preparing the blender for use
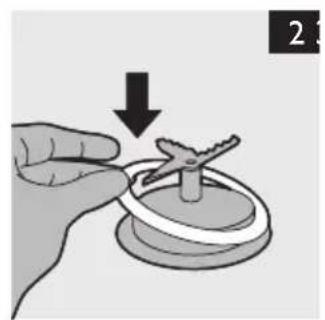
1 Assemble the sealing ring on the blender blade unit (Fig. 2).
2 Put the blade unit in the bottom of the blender jar (1). Screw the blade unit anticlockwise (2) until it is fixed properly. (Fig. 3)
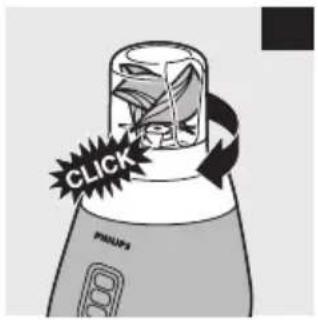
3 Put the blender jar with the blade unit attached on the motor unit and fix it by turning it clockwise ('click'). (Fig. 4)
The blender jar can be mounted in two positions: with the handle on the right side or on the left side.
Put the mains plug in the wall socket.
Using the blender
Put the ingredients in the blender jar.
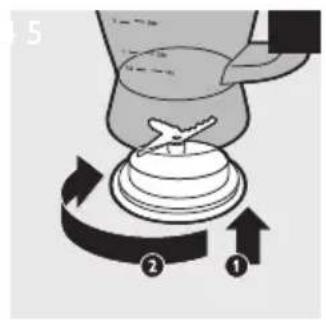
Put the lid on the jar and turn it until it is firmly fixed ('click').
3 Insert the measuring cup into the opening in the lid. (Fig. 5)
4 Press speed button 1 or 2 to switch on the blender.
After processing, press the pulse/off button to switch off the blender. If you want to process ingredients very briefly, use the pulse/off button instead of the speed buttons.
Do not let the appliance run for more than 3 minutes at a time. Let it cool down to room temperature between processing cycles.
Tips
- If you want to crush ice cubes, put not more than 6 ice cubes (of approx. 25 × 35 × 25 ~mm ) in the blender jar and press the pulse button a few times.
- Cut meat or other solid ingredients into smaller pieces before you put them in the blender jar.
- Do not process a large quantity of solid ingredients at the same time. To get good results, we advise you to process these ingredients in a series of small batches.
- To make tomato juice, cut the tomatoes in four and drop the pieces through the opening in the lid onto the rotating blades.
Disassembling the blender
1 Remove the mains plug from the wall socket.
2 Remove the lid with the measuring cup from the blender jar.
3 Turn the blender jar with the blade unit attached anticlockwise to remove it from the motor unit.
4 Clean all removable parts immediately after use (see chapter 'Cleaning').
Filter
With the filter you can make delicious fresh fruit juices, cocktails or soy milk. The filter prevents pips and skins from ending up in your drink.
Never overload the filter. Do not put more than 75g of soy beans (unsoaked weight) or 160g of fruit in the filter at the same time.
Preparing the filter for use
1 Mount the blender jar with the blade unit attached on the motor unit. Turn the blender jar clockwise to fix it ('click') (Fig. 4).
The blender jar can be mounted in two positions: with the handle on the right side or on the left side.
Put the filter in the blender jar (Fig. 6).
Make sure that the grooves of the filter fit exactly onto the ribs inside the blender jar.
3 Put the mains plug in the wall socket.
Using the filter
1 Place the lid on the blender jar.
2 Put the ingredients in the filter. (Fig. 7)
Do not exceed the MAX indication on the sieve mesh.
Pour water or another liquid (milk, juice, etc.) into the blender jar.
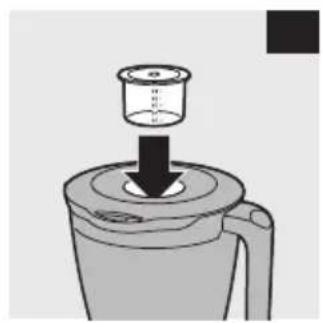
4 Insert the measuring cup into the hole in the lid.
5 Let the appliance run for approx. 40 seconds.
6 Switch off the appliance and remove the blender jar with the blade unit attached from the motor unit.
Do not remove the lid. Leave the measuring cup and the filter in the jar.
ENGLISH10
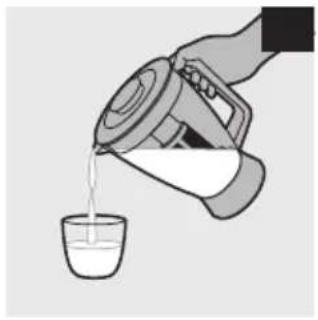
Pour out the drink through the pouring lip of the blender jar. (Fig. 8)
Tip: For optimal results, put the jar with the remaining ingredients back onto the appliance and let it run for a few more seconds.
Note: When you process a large quantity, we advise you not to put all the ingredients in the filter at the same time. Start to process a small quantity and let the appliance run for a few seconds. Then switch off the appliance and add another small quantity. Repeat this procedure until you have processed all the ingredients. Always keep the lid on the blender jar during processing.
8 Clean all removable parts immediately after use (see chapter 'Cleaning').
Mill
This blender is supplied with two mills:
- The dry mill (the smaller one) is intended for grinding dry ingredients, such as dried beans, dried rice, dried shrimps or dry tea leaves.
- The wet mill (the larger one) is intended for chopping moist ingredients, such as chili paste and soaked rice.
Using the mill
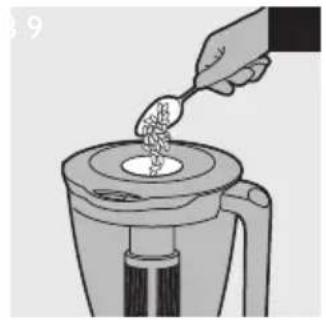
Put the ingredients in the mill beaker (Fig. 9).
You can process wet and dry ingredients.
Do not fill the mill beaker beyond the MAX indication.
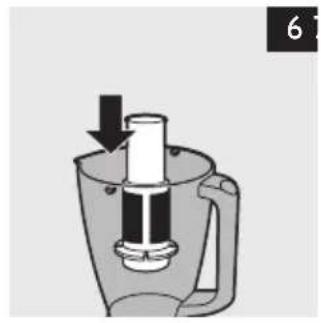
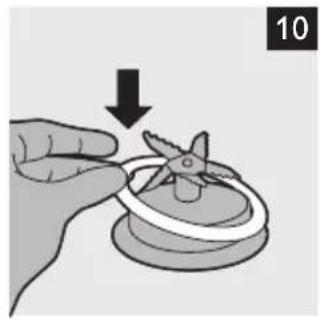
2 Assemble the sealing ring on the blender blade unit (dry mill) or assemble the sealing ring on the wet mill blade unit (wet mill) (Fig. 10).
3 Put the dry mill blade unit on the dry mill beaker (1) or put the wet mill blade unit on the wet mill beaker (1) and screw the blade unit anticlockwise (2) until it is fixed properly (Fig. 11).
4 Turn the assembled mill upside down and screw it clockwise onto the motor unit ('click') (Fig. 12).
Put the mains plug in the wall socket.
6 Press and hold the PULSE button and let the appliance run until the ingredients are fine enough. This takes approx. 10-30 seconds.
Disassembling the mill
Unplug the appliance.
Screw the mill anticlockwise off the motor unit.
3 Turn the mill upside down and screw the blade unit clockwise off the mill beaker.
4 Clean all removable parts immediately after use (see chapter 'Cleaning').
Cleaning
Always unplug the appliance before you clean it.
Never immerse the motor unit in water, nor rinse it under the tap. Do not clean the motor unit in the dishwasher.
Never use scouring pads, abrasive cleaning agents or aggressive liquids such as petrol or acetone to clean the appliance.
Tip: Cleaning the appliance and its parts is easiest immediately after use.
1 Make sure the appliance is unplugged.
2 Disassemble all removable parts.
Do not forget to remove the blender sealing ring.
Do not touch the blades. The blades are very sharp.
3 Clean the motor unit with a moist cloth.
4 Clean the removable parts in hot water with some washing-up liquid.
Note: All parts except the motor unit can be cleaned in the dishwasher.
Storage
Note: Make sure the blender is clean and dry when you store it.
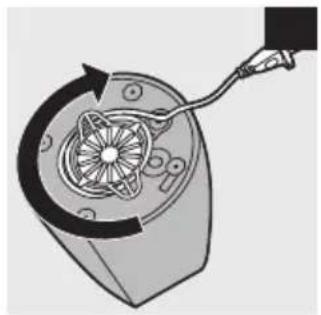
1 To store the mains cord, wind it round the reel in the base of the motor unit (Fig. 13).
Screw the blade unit anticlockwise onto the bottom of the blender jar.
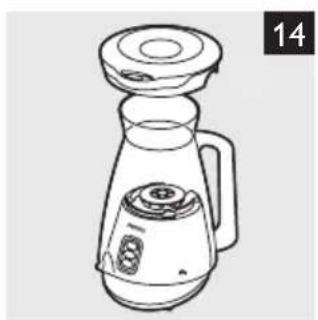
3 Turn the blender jar upside down.
Put the blender jar on the motor unit.
Note: Make sure the handle of the blender jar is at the back of the motor unit.
5 Place the lid on top of the blender jar (Fig. 14).
Environment
- Do not throw away the appliance with the normal household waste at the end of its life, but hand it in at an official collection point for recycling. By doing this, you help to preserve the environment (Fig. 15).
Guarantee and service
If you need information or if you have a problem, please visit the Philips website at www.philips.com or contact the Philips Customer Care Centre in your country (you find its phone number in the worldwide guarantee leaflet). If there is no Customer Care Centre in your country, go to your local Philips dealer or contact the Service Department of Philips Domestic Appliances and Personal Care BV.
Recipes
Garam massala
Note: This recipe can be prepared with the dry mill.
Ingredients
- 10g cloves
- 10g cinnamon (cut into 1cm pieces)
- 5g cardamom
- 10g black pepper
1 Put all ingredients in the dry mill.
2 Use the PULSE setting to process the ingredients for 30 seconds.
Five spices powder
Note: This recipe can be prepared with the dry mill.
Ingredients
- 2g aniseed
- 2g star anise
- 2g (Chinese) cassia
- 2g (Chinese) liquorice
1 Put all ingredients in the dry mill.
2 Use the PULSE setting to process the ingredients for 30 seconds.
Thai mosaman curry paste
Note: This recipe can be prepared with the wet mill.
Ingredients
- 20g shallots
- 15g garlic
- 7g galangal (cut into approx. 1cm thick slices)
- 9g lemon grass
- 2pcs cloves
- 1tbsp coriander seeds
- 1tbsp cumin seeds
- 3pcs dried chillies
- 5pcs peppercorns
- 1tbsp shrimp paste
- 1tbsp salt
1 Put all ingredients in the wet mill.
2 Use the PULSE setting to process the ingredients for 30 seconds.
Chili paste
Note: This recipe can be prepared with the wet mill.
Ingredients
- 6g dried chili, deseeded
- 20g fresh chili, deseeded
- 30g shallots
- 1pc garlic
- 1tbsp water
1 Put all ingredients in the wet mill.
2 Use the PULSE setting to process the ingredients for 30 seconds.
Soy milk
Note: This recipe can only be prepared with the filter (HR2027/HR2024 only). You can order the filter for the HR2021 and HR2020 as an extra accessory from your Philips dealer.
Always let the appliance cool down to room temperature between processing cycles.
Ingredients
- 75g dried soy beans
- 640ml water
1 Soak the soy beans for 4 hours before you process them. Then let them drain.
2 Put the soaked soy beans in the filter and pour the water into the blender jar. Blend for 30 seconds.
Pour the soy milk into a pan and bring to the boil. Then add some sugar and let the soy milk simmer until all sugar has dissolved.
4 Serve hot or cold.
Nourishing vegetable soup from Budapest
Ingredients
- 120g kohlabi
- 180g potatoes
- 180g celery
- 60g carrots
- 100g smoked pork
- 0.55ltr water
- 100g lentils (canned)
- 125g crème fraîche
- 10g parsley
- salt, freshly ground pepper, 1 stock cube, 1 bay leaf
1 Precut the ingredients into pieces of 2 × 2 × 2 ~cm .
2 Put the kohlrabi, potatoes, celery, carrots and 0.42ltr water in the blender jar in this order. Then blend for 30 seconds.
3 Put the blended ingredients in a pan and bring them to boil. Add the rest of the water (0.13ltr), crème fraîche, lentils, meat, herbs, stock cube and seasonings.
4 Let the soup simmer for 30 minutes. Stir the soup regularly.
Introduction
HNNNHN HNNN HNNN HNNN HNNN HNNN HNNN HNNN HNNN HNNN HNNN HNNN HNNN HNNN HNNN HNNN HNNN HNNN HNNN HNNN HNNN HNNN HNNN HNNN HNNN HNNN HNNN HNNN HNNN HNNN HNNN HNNN HNNN HNNN HNNN
m
1 2x2x2u.
2 kohlabi (nunuun) uonuun uon 0.42 aunuunuunu unuuuuuuuuuuuuuuuuuuuuuuuuuuuuuuuuuuuuuuuuuuuuuuuuuuuuuuuuuuuuuuuuuuuuuuuuuuuuuuuuuuuuuuuuuuuuuuuuuuuuuuuuuuuuuuuuuuuuuuuuuuuuuuuuuuuuuuuuuuuuuuuuuuuuuuuuuuuuuuuuuu
3 1
4
Giomi thieu
Chuc mung ban dā mua duoc san pham Philips moi va chao mung ban den voi Philips! De co duoc lqi ich day du tu su ho tro do Philips cung cap, hyd dang ky san pham tai www.philips.com/welcome.
Mô tâ chung (Hinh 1)
A Coc dinh luong
B Nap sinh may xay
C Binh may xay
D Chiao muc
E Vong dem
F Bô luòi CAT
G Bô phân mô-tô
H Panen dieu khien
-Cac nut toc d0 (1 va 2)
- Nut Xung/tat
Bô loc
Cocnghién khô
K Cac nghién uot
L Vong dem nay nghien
M Bô luòi cat may nghiēn
Luru y
Luru y: Dam bao may xay sach va kho truck hia bao quan.
1 De bao quan day dan dien, cuon day quanh cuon trong chan de cua bo phan mo-to (Hinh 13).
2 Vǎn bó luoī cát nguoc chieu kim dong hó vàoDaycua sinh may xay.
3 Lön ngroc binh may xay.
4 Lap binh may xay vao bo phan mo-to.
Lru y: Dam bao tay cam cua sinh may xay o phia sau cua bo phan bo phan mo-to.
| L###y##j#j###la#d###.c###o###g###y##d###l###do###log###, ###j#j###j#j |
| ###j#j#j#j#j#j#j#j#j#j#j#j#j#j#j#j#j#j#j#j#j#j#j#j#j#j#j#j#j#j#j#j#j#j#j#j#j#j#j#j#j#j#j#j#j#j#j#j#j#j#j# P###u##dlly##j#j#j#j#j#j#j#j#j#j#j#j#j#j#j#j#j#j#j#j#j#j#j#j#j#j#j#j#j#j#j#j#j#j#j#j#j#j#j#j#j#j#j#j#j#j#j#j#j#j |
| blizl |
| glj jyj l yj yj yj yj yj yj yj yj yj yj yj yj yj yj yj yj yj yj yj yj yj yj yj yj yj yj yj yj yj yj yj yj yj yj yj yj yj yj yj yj yj yj yj yj yj yj yj yj yj yj y |
| . . . . . . . . . . . . . . . . . . . . . . . . . . . . . . . . . . . . . . . . . . . . . . . . . . . . . . . . . . . . . . . . . . . . . . . . . . . . . . . . . . . . . . . . . . . . . . . . . . . . .. . . . . . . . . . . . . . . . . . . . . . . . . . . . . . . . . . . . . . . . . . . . . . . . . . . . . . . . . . . . . . . . . . . . . . . . . . . . . . . . . . . . . . . . . . . . . . . . . . . .. ... |
| . . . . . . . . . . . . . . . . . . . . . . . . . . . . . . . . . . . . . . . . . . . . . . . . . . . . . . . . . . . . . . . . . . . . . . . . . . . . . . . . . . . . . . . . . . . . . . . .. . . . . . . . . . . . . . . . . . . . . . . . . . . . . . . . . . . . . . . . . . . . . . . . . . . . . . . . . . . . . . . . . . . . . . . . . . . . . . . . . . . . . . . . . . . . . . . . . . . . . . . . . . . . . . . . . . . . . . . . . . . . . . . . . . . . . . . . . . . . . . . . . . . . . . . . . . . . . . . . . . . . . . . . . . . . . .. . . .. . .. . .. . .. . .. . .. . .. . .. . .. . .. . .. . .. . .. . .. . .. . .. . .. . .. . .. . . . . . . . . . . . . . . . . . . . . . . . . . . . . . . . . . . . . . . . . . . . . . . . . . . . . . . . . . . . . . . . . . . . . . . . . . . . . . . . . . . . . . . . . . . . . . . . . . . . . . 1 . 1 . 1 . 1 . 1 . 1 . 1 . 1 . 1 . 1 . 1 . 1 . 1 . 1 . 1 . 1 . 1 . 1 . 1 . 1 . 1 . 1 . 1 . 1 . 1 . 1 |
Jalali ngao
aBjll aiball plssuul yagll oia jao:abso
stgColl
gjgjgjoo jolg 7
gjgjgjzjjgdjg
[{\rho }{1} = \frac{2}{\rho }{p}{1}]
pg ≥ - 1.
cfoafo
aBbI aIboll oIgSall J
.
logall yls
ab d28g. (baa HR2027/HR2024 jball) aall plsiol go x! aagll oia jaox Ss x: abdo
d: jolll Philips ojg! ejo goo jolos HR2020 ,HR2021 jbll
a
stgfall
有 a_1^x = 70^w
会社
.
. 1
Jg j 1
a_2 = 23
13jIgI liSLw a0a
uugno aiaaill jasll
stgoll
ωωj5ρ≥1r
ab| | b_2 : P| > 1| .
,
j p_1 7
j0jipjpoj1
clojil:00
()0 1
S APQ = S AOB + S_ OBC
,12
aIgJie aeg,ag ayu yfo, jlb gabo Jalil,
Prrr jiej yegb jlligall gbaaiyog
bssll jiey yag jy. bksll ceg g cloj .g jg jg g sblg g aill
auii r. iao
1g 11111111111111111111111
lg( 1 + g( 1 - g) ) = lgl_1 + lg( 1 - g^2)
.1buiy aaii yooa r. aol jay aii
#
21wlo pIj
aill aiball plsiuol agll oia sao:abxlo
cligFall
p9p>1. - (pa)pa>ab8ebaa)aa>1. - Jpa>0 - gai jlai 1
.
. aulr. dal algcal (PULSE) aill lue
Jgssss
aill aiball plsiuily agll oia jaoi: abxlo
cligFall
guiyjuyiyj
a+gaiy pi r
( x,y,0) l_2 ,y = r
()wgggglr
.
.ult r. dal agll (PULSE) 1
suii lll joljgall 100
.4bll aiball plsiuwl yagll oia jao:abdo
clipFall
S APQ = S AQP + S_ PQR
p1 · p2 ÷ 10
(p)aaxy afoe bga (daebao)jlaiggs
a0 ≤ a1 ≤ a2 ≤ a3
· = r
a
jgafduaedao
四四四
jolc0e
yio 0gfo aao
alol
aBbI aiaaball 15
. ault r. dal clgall (PULSE) 1
.
.
1a a 1
a ball d a yb
1
acllll 150s c l aegg jgagall g no ball
acllll aol lal gag b n aiaaball eeg no aiaaaa aagg aiaaball
"abill" jol yjil) 1pplxwXl 1dll alll 1g j
#
aaii jie jie 1e ciyjie Jia ie laui
. gIbXl allwe jgigall aag abu y. gaiioll cni Iqabiu x g clll gjgall adog syao
jlll jll l 10 10 10 10 10 10 10 10 10 10 10 10
.3julp1ssxwI 2e:llj jai jai jai jai jai jai jai jai jai jai jai jai jai
.1
.
ac JcLj bslll ceg jol
gagall aag c bslll sclg y
gagall aag g no galsll gilll aalbalsll ceg aao egg co sul:abdo
.125u) bcll clog Jc lbcil 0
#
aay aai abai jai 1009 1000 0000 0000 0000 0000
(10 J) aI I c bI aI g e xI i pI pl l s no nclw.ogg ad
all
Jc Philips aIy jyj yj yj yj yj yj yj yj yj yj yj yj yj yj yj yj yj yj yj yj yj yj yj yj yj yj yj yj yj yj yj yj yj yj yj yj yj yj yj yj yj yj yj yj yj yj yj yj yj yj yj
10 p1j17. g1 (eill jgll) lgall Jg no p1j Vo no jst 2 .dall aew ne dil ; clas ydiwix
plssiislllaaalj
("aai) aiiil aclll bclc alj g balsll clog ygall aag jle caii tll aag laIbalsll ceg 1 (ε J)
(1) bslll ceg aiaall
.
dlaal plsi
. bslil ceg lc boll
(VJ)
.aaall aJUgagall (MAX) 111jwgo Jss
.
.
.
gall g no aolal ldo balsll ceg p jgljgl
.
(1) 150) bslll clog g aagall wall
aeg aegg jgl gaaiaagllgagallgeagllgaii jlgss
aaiy i y aag aalag c gag g aay daaai clgall no ayss cia s uic : absl
jclsll s. ayao aol p jgl l aag gli ggl jao jglggl e g o aos
. jaiill slit balsl ceg lc bell gog lc lail yra . clogfall 5 y ano no cip
"abill Jg ybal) ayolplssx1 2dall alll cJg aag Lwcl
#
gai jao bll i
aaiall slll gglg 1gaii j819 jalal aiee jiaabll aligall pajd aoasio (laes y) abjll aiiboll
aiaboll plsiil
(9 J) aia ball clog g oligall
a.bjglg aIall igSall jnn jaiaball pIiwl ciF
.aisball 10 cligall gog lac (MAX) aai jll iio go bss
a bll aia ball cagaa gag aag (alal aia ball) balsll aag aag aal ywll gilo .
eag a bll axball aog g (1) dall axball sclg ae lal ball aaball aag aeg .(11 Jcui) piso Jcui cuu jn (r) acull uacn oolsc uolgl (1) abll axball
("aai) aclll 1jia 5g jgo gagall aag Jc Ie s Jc aac Jc wJ,laal, aiaball .(ir Jti)
j0g2plssu21
"abill" 5ybil) yjg jqal dlolai jla lai plebll sbl jz
j4>11 p1ssi
aaggall aiaill Jds no uieell lll s yra. aclall ay jy cia o jy pssll jglll jc yegll llll baa
boll
aalllg aillgl gai j balsll plwul dlacayas. bsllg gbaillg qall wqll plwssu pao bslllia 11...dblbgs gdlg agslll gaxll mni j laol alxwl dlagog .lall clogaxio
plssssllbsllj
(1)
(1) bslll ceg e 5
| (1 JUS) plall usgll | |
| a juleo wls | A |
| b xll sccg elbc | B |
| b xll sccg | C |
| sguall wgo | D |
| wll gio aal | E |
| cljgall oag | F |
| jogall oag | G |
| pflll agl | H |
| (r g l) acjwall jrl | - |
| jlell glal / jcill jl | - |
| dacall | I |
| a jll ai ball sccg | J |
| a jll ai ball sccg | K |
| a i bally jwll gio aal | L |
| ai ball yjwll gio aag | M |
pLo
Jaiuall g jyjblg jglp 1i iie piaaill Jd o
#
aeea aaii baa .slll jaiall cia iieabai g jilw s gl clall g ljgagall dgg yae x
#
j 100000000000000000000000000000000000000000000000000000000000000000000000000000000000
y
413
aibll aiball clog gl aill aiaball clog gl bll clcg gl g jjgln ne cglgll jc lalgs y
jglll aagii jc dlll jglglc oolseell gl
Jio coowll j. Philips aty yogj gll yac alixo cIjlo no ejgl gl clao lo plaxwol lc lid go 2
. dx dlao xssx cijg jg ciaall oie
aiaball aegb gblall clog Je wogall sgiu uusu .
. () Jusu A = Lc :