
DigiFrame 1960 - Digital photo frame BRAUN - Free user manual and instructions
Find the device manual for free DigiFrame 1960 BRAUN in PDF.
| Product type | Digital photo frame |
| Brand | Braun |
| Model | DigiFrame 1960 |
| Screen size | 19 inches (48 cm) |
| Screen resolution | 1280 x 1024 pixels (5:4 format) |
| Supported photo formats | JPEG |
| Supported video formats | MPEG-1/4, M-JPEG AVI, DivX (model with video function) |
| Supported audio formats | MP3 (model with MP3 function) |
| Power supply | AC 100-240 V, 50-60 Hz power adapter, DC 12 V, 4 A output |
| Speakers | 2 x 3 Watts |
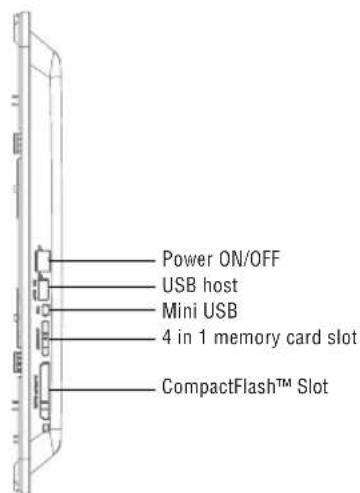
| Ports | USB 2.0 (mini USB) |
| Compatible memory cards | SD, MMC, MS, MS Pro, MS Duo, CF, USB key |
| Internal memory | Yes (capacity not specified) |
| Remote control | Yes, with CR2025 battery |
| Main functions | Slideshow with background music, photo rotation and zoom, file management, calendar and alarm, ArcSoft effects (dynamic light, face beautification, face tracking) |
| Screen cleaning | Soft non-abrasive cloth; do not apply liquid directly to the screen |
| Safety precautions | Do not expose to moisture, unplug before maintenance, do not obstruct ventilation openings |
| Package contents | Frame, power adapter, remote control, USB cable, user manual |
| Wall mounting | Possible (mounting plate included) |
| Repairability | No user-serviceable parts; refer all servicing to qualified personnel |
Frequently Asked Questions - DigiFrame 1960 BRAUN
User questions about DigiFrame 1960 BRAUN
0 question about this device. Answer the ones you know or ask your own.
Ask a new question about this device
Download the instructions for your Digital photo frame in PDF format for free! Find your manual DigiFrame 1960 - BRAUN and take your electronic device back in hand. On this page are published all the documents necessary for the use of your device. DigiFrame 1960 by BRAUN.
USER MANUAL DigiFrame 1960 BRAUN
Internal Memory, Photo, Music, Video, File, Time.
Important Safety Precautions. 11
Cleaning the LCD Screen. 11
Cleaning the Digital Photo Frame 11
Introduction 12
Main features 12
Memory card slots 12
Package Contents. 12
Operating Elements. 13
Remote Control. 13
Setting up the Digital Photo Frame 14
Operating the Digital Photo Frame 14
Selecting mode 14
General settings 14
Selecting card 14
Displaying photos 15
Displaying photos with music
(only model with MP3 function) 15
Playing movies (only model with video function).....16
File management. 16
Calendar and alarm function 16
Replacing the Remote Control Battery 17
Frequently Asked Questions. 17
List of Menus and Functions. 18/19
Technical data 19
Important Safety Precautions
Always follow these basic safety precautions when using your Digital Photo Frame. This will reduce the risk of fire, electric shock, and injury.
Warning: To reduce the risk of fire or shock hazard, do not expose this product to rain or moisture.
Warning: To prevent the risk of electric shock, do not remove the cover. There are no user-serviceable parts inside. Refer all servicing to qualified personnel.
The Digital Photo Frame is for indoor use only.
- Unplug the Digital Photo Frame before performing care and maintenance.
- Do not block the ventilation holes on the back of the Digital Photo Frame.
- Keep your Digital Photo Frame out of direct sunlight and heat sources.
- Protect the power cord. Route power cords so that they are not likely to be walked on or pinched by items placed on or against them. Pay particular attention to the point where the cord is plugged into the Digital Photo Frame.
- Only use the AC adapter included with the Digital Photo Frame. Using any other power adapter will void your warranty.
- Unplug the power cord from the outlet when the Digital Photo Frame is not in use.
Cleaning the LCD Screen
Treat the screen gently. The screen is made of glass and can be scratched or broken.
To clean fingerprints or dust from the LCD screen, we recommend using a soft, non-abrasive cloth such as a camera lens cloth.
If you use a commercial LCD cleaning kit, do not apply the cleaning liquid directly to the LCD screen, but moisten a soft cloth with the liquid.
Cleaning the Digital Photo Frame
Clean the outer surface of the Digital Photo Frame (excluding the screen) with a soft cloth moistened with water.
ENGLISH12
Introduction
Welcome to the Digital Photo Frame!
Now you can display your digital photos directly from your memory card without needing a computer. Simply insert a memory card into the Digital Photo Frame, turn it on, and you will be treated to a slideshow of your photos.
It's as easy as that.
You can also display individual photos, play video clips, or play background music with your slideshow (only model with video and MP3 functions).
To learn more about your new Digital Photo Frame's features and take full advantage of them, please take a few minutes to read these operating instructions.
Important!
Please note that this Digital Photo Frame comes in different versions. The detailed features of the specific model are specified on the package.
Main features
- Plays digital photos as slideshow with background music (only model with MP3 function)
- Plays music and videos (only model with video and MP3 functions)
Rotates and zooms photos - ArcSoft(tm) effects: Dynamic Lighting
Face Beautify
Face Tracking
- Brightness, contrast and color can be adjusted
Built-in memory - Easy to use on-screen menus & button controls
Memory card slots
- Secure Digital (SD)
- Multi Media Card (MMC)
- Memory Stick (MS), MS Pro, MS Duo,
- C compact Flash (CF)
- USB stick
Package Contents
Digital Photo Frame
Power adapter (DC 12 V, 4 A)
Remote control
USB cable
ENGLISH 13
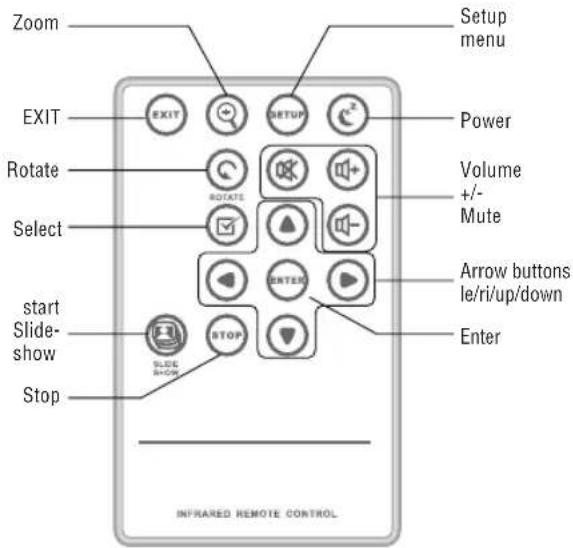
Remote Control
Control buttons of the remote control
EXIT Return to previous screen
ZOOM Zoom photo
SETUP Open setup menu
POWER Turn on/off the digital photo frame
ROTATE Rotate photo
MUTE Turn on/off sound
V+/V-Increase/decrease volume
SELECT Mark file for selection
/ Arrow buttons
ENTER Confirm selection or action
SLIDESHOW Start slideshow
STOP Stop slideshow, audio or video file

ENGLISH14
Setting up the Digital Photo Frame
Connect the AC power adapter to the Digital Photo Frame and a wall outlet, move the ON/OFF switch to ON position.
The photo frame also offers a plate for wall mounting.
To switch off the frame, press the On/Off button of the remote control or move the ON/OFF switch to OFF position.
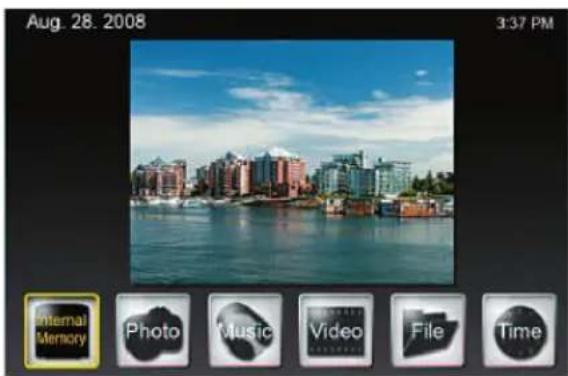
Operating the Digital Photo Frame
When you switch on the photo frame, a slideshow will start automatically after 2 seconds. By pressing the EXIT button, you can open the mode selection screen.
Selecting mode
The mode selection offers 6 options:
Internal Memory, Photo, Music, Video, File, Time.
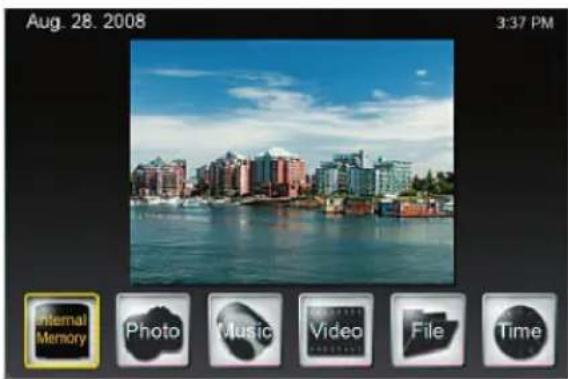
If no memory card is inserted, the first icon shows Internal Memory. If you insert a memory card, this icon will show the type of the memory card (e.g. SD).
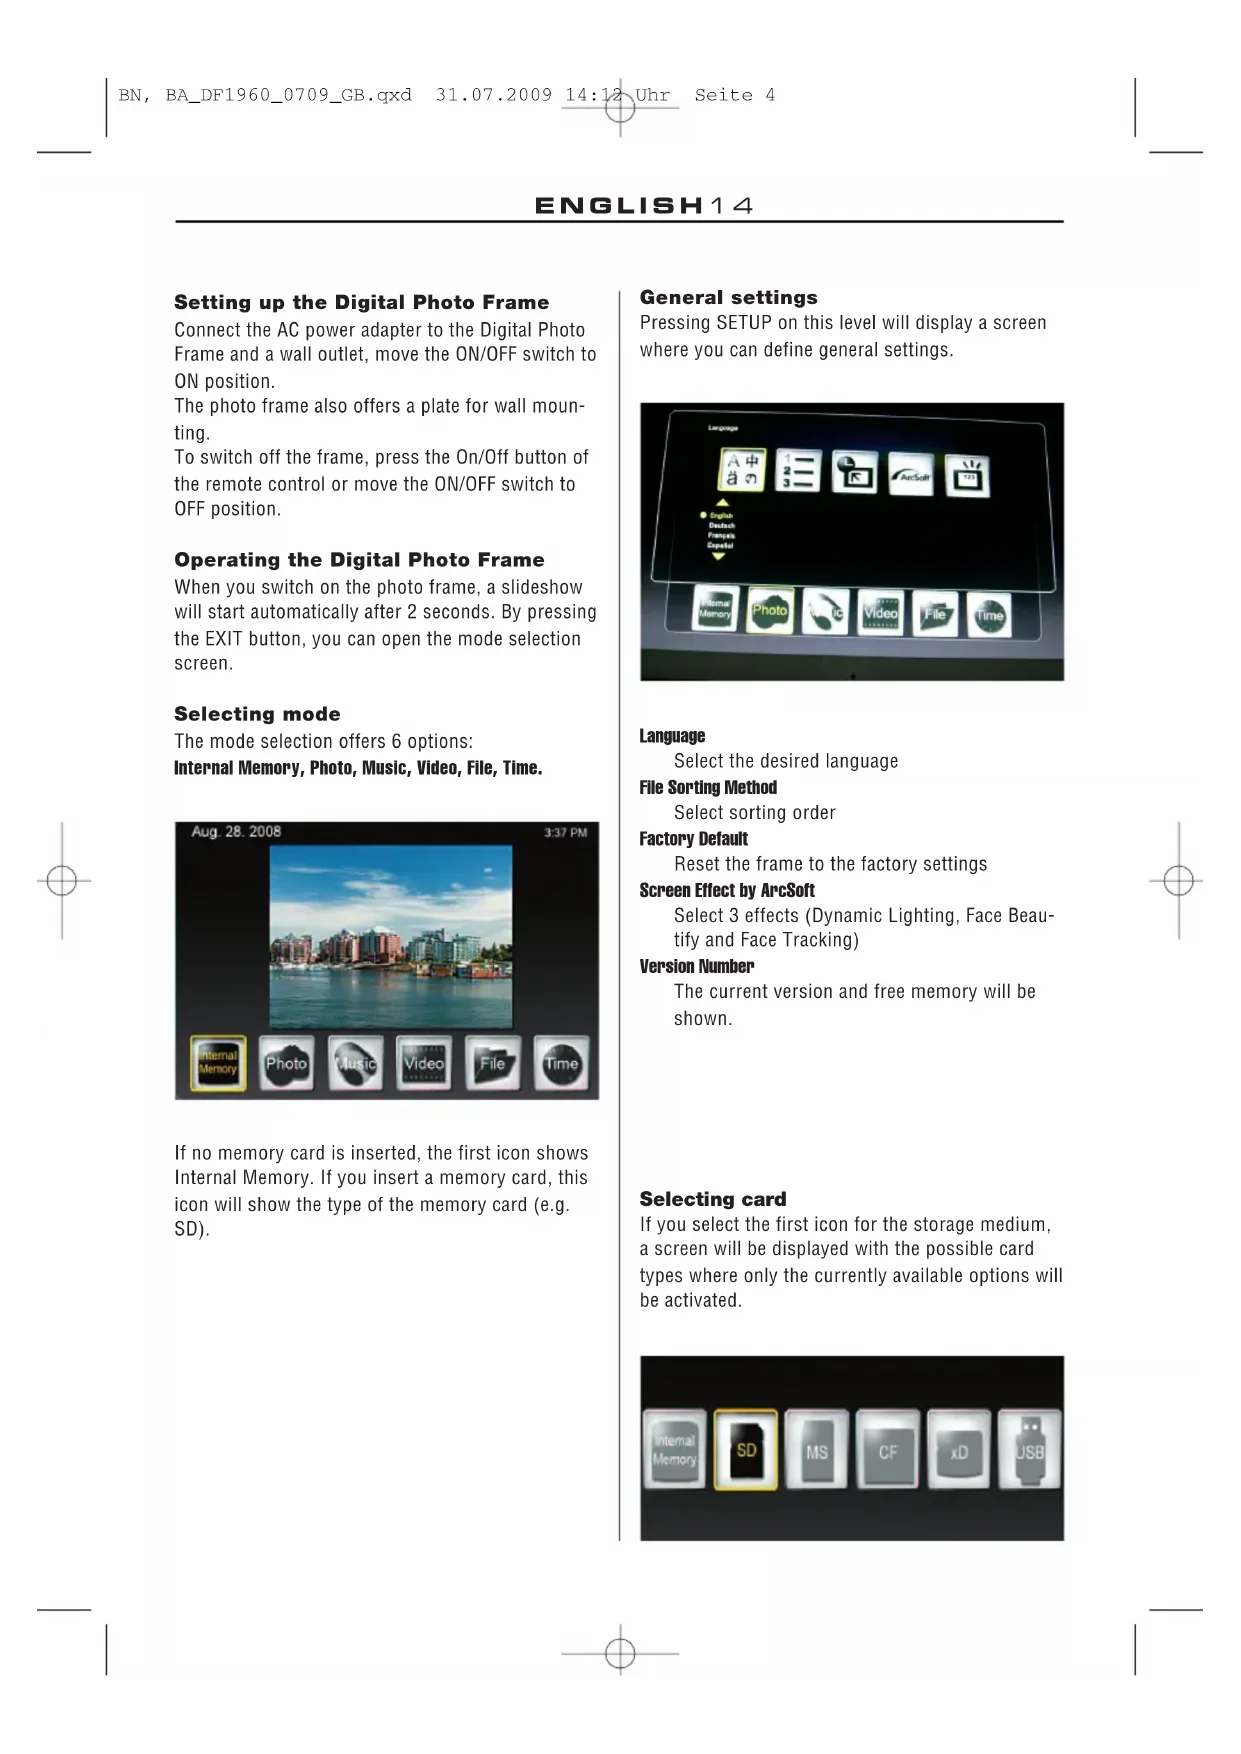
General settings
Pressing SETUP on this level will display a screen where you can define general settings.
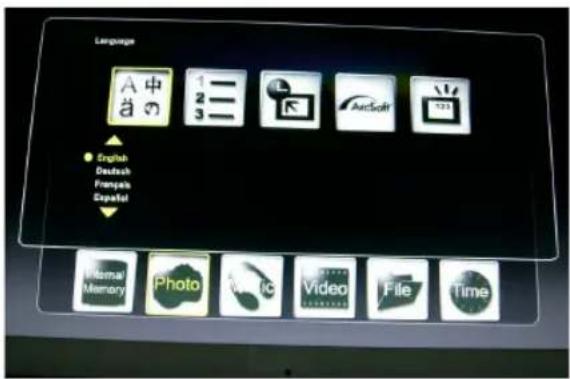
Language
Select the desired language
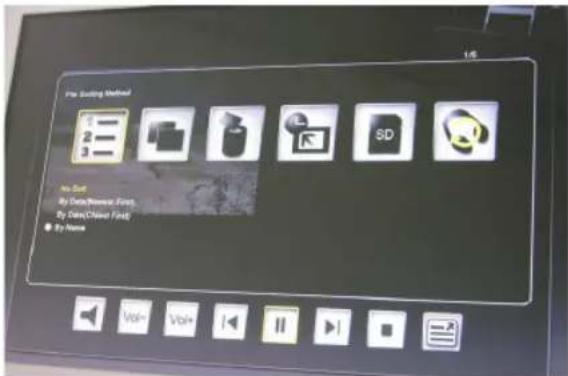
File Sorting Method
Select sorting order
Factory Default
Reset the frame to the factory settings
Screen Effect by ArcSoft
Select 3 effects (Dynamic Lighting, Face Beauty and Face Tracking)
Version Number
The current version and free memory will be shown.
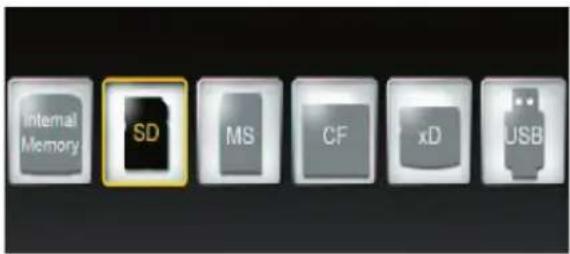
Selecting card
If you select the first icon for the storage medium, a screen will be displayed with the possible card types where only the currently available options will be activated.
ENGLISH 15
Displaying photos
-
In the mode selection screen, use the arrow buttons to select Photo and press ENTER. Use the arrow buttons [] / [] to select the desired file in the thumbnail screen and press ZOOM or ENTER to display the photo.
-
I The following operations are available:
-
ENTER: Start or stop slideshow
-ZOOM:Zoom photo -
ROTATE: Rotate photo 90^ counterclockwise
-
If you press SETUP in the full screen mode, you can select various functions where the currently available functions only will be activated:
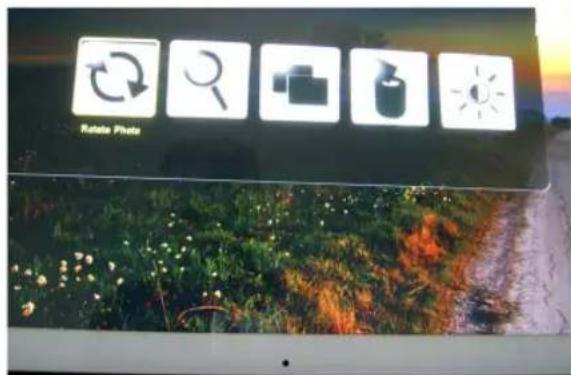
Rotate Photo: Rotate photo 90^ clockwise
Zoom Photo: Zoom photo (3 levels)
Copy Photo: Copy files from memory card to internal memory
Delete Photo: Delete files from internal memory
Adjust Screen: Press ENTER to adjust brightness, contrast, color and tint
- If you press SETUP in the thumbnail screen, you can select additional functions where the currently available only will be activated:
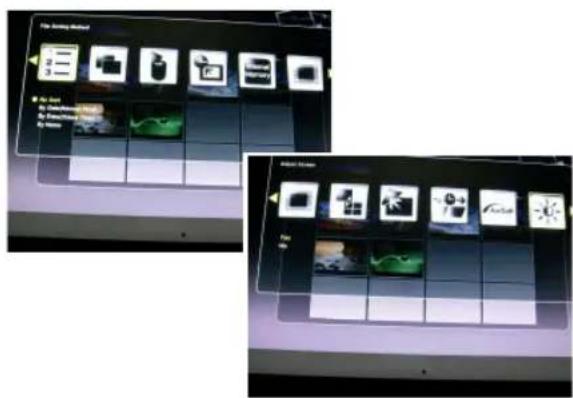
File Sorting Method: Select sorting order
Copy Photo: Copy files from memory card to internal memory
Delete Photo: Delete files from internal memory
Factory Default: Reset the frame to the factory settings
Select Card: Select the storage medium
Image Display Size: Select the size of the displayed file
Magic Window: Display four photos at the same time
Slideshow Transition Effect: 6 special effects used for the transition from one photo to the next in a slideshow
Slideshow Speed: Define the speed of the slideshow (display interval of photos)
Screen Effect by ArcSoft: Select 3 effects (Dynamic Lighting, Face Beautify and Face Tracking)
Adjust Screen: If you select Yes, you can adjust brightness, contrast, color and tint
- With SELECT, you can select several files for copying or deleting at the same time (checkmark appears in file icon).
Displaying photos with music
(only model with MP3 function)
- In the mode selection screen, use the arrow buttons to select Music and press ENTER.
The slideshow will be played with background music. The right part of the screen shows information on the music file and duration. - With SLIDE SHOW button the images are displayed in full screen mode with selected music. The function buttons to control the file are shown at the bottom of the screen.
To display a list of the music files, select the most right icon. - With SETUP, you can select various functions where the currently available functions only will be activated:

ENGLISH16
File Sorting Method: Select sorting order
Copy Music: Copy files from memory card to internal memory
Delete Music: Delete files from internal memory
Factory Default: Reset the frame to the factory settings
Select Card: Select the storage medium
Music Repeat Mode: Select the repeat mode (Repeat Single, Repeat All, No Repeat)
Playing movies
(only model with video function)
In the mode selection screen, use the arrow buttons to select Video and press ENTER. A list with all available video files will be displayed. The preview is shown in the right part of the screen.
- Use the arrow buttons [] / [] to choose the desired file and press ENTER. Using the arrow buttons [] / [] , you can rewind or forward the file. Use the arrow buttons [] / [] to play the previous or next file.
- With SETUP, you can select various functions where the currently available functions only will be activated:
File Sorting Method: Select sorting order
Copy Film: Copy files from memory card to internal memory
Delete Film: Delete files from internal memory
Factory Default: Reset the frame to the factory settings
Select Card: Select the storage medium
Video Repeat Mode: Select the repeat mode (Repeat Single, Repeat All, No Repeat)
File management
- In the mode selection screen, select File using the arrow buttons.
The file list will be shown in the left half and the thumbnail screen in the right half. With music and video files, the file information will be displayed.
- When you press ENTER on a music or video file, the file will be played. When you press ENTER on an image file, the file will be displayed in full screen mode. Pressing ENTER again will start the slideshow.
- With SELECT, you can select several files for copying or deleting at the same time (checkmark appears in file icon).
-
With SETUP, you can select various functions where the currently available functions only will be activated:
-
Copy files (from memory card to internal memory)
-Delete files (from internal memory) - Reset photo frame to factory default
- Select memory card

Calendar and alarm function
- In the mode selection screen, select Time using the arrow buttons.
The slideshow will be shown in the left half and the calendar in the right half. The current time will be shown at the bottom.
If the alarm function is activated, a red alarm clock will be shown.
The date of the day is highlighted in yellow.
- Using SETUP, you can set the alarm: The first option sets the alarm interval (3, 5, or 10 minutes).
The second option sets the alarm once or daily.
ENGLISH 17
Replacing the Remote Control Battery
If the remote control stops working or works improperly, replace the battery of the remote control (Li battery CR2025).
- Pull out the battery compartment from the remote control.
- Remove the old battery and insert a new battery with "+" facing up.
- Insert the battery compartment again.
Note:
Batteries may explode in case of improper treatment. Do not charge or disassemble the batteries. Do not throw them into the fire.
Notes:
- When the Lithium battery becomes weak, the operating distance of the remote control may shorten or the remote control does not work properly. In this case, replace the battery by a new battery of the CR2025 type. Using another battery may present a risk of fire or explosion.
- Dispose of used batteries in accordance with local ordinance regulations.
- Do not leave the remote control in very hot and humid places.
- Improper use of the battery may cause leakage or corrosion.
- Remove the battery, if the remote control is not used for a longer period of time to prevent leakage or corrosion.
Frequently Asked Questions
Q: How do I set up my Digital Photo Frame?
A: It is very simple to get your Digital Photo Frame out of the box and running in just a few minutes. Just plug the power adapter into the Digital Photo Frame and into a standard wall socket. Insert a memory card into the appropriate card slot on the side of the Digital Photo Frame, and turn it on. Your first slideshow will automatically start to play.
Q: What memory cards can the Digital Photo Frame read?
A: Compatible memory cards are Secure Digital™, MultiMedia Card™, Memory Stick™, Memory Stick Pro™, Memory Stick Duo™ and Compact Flash™.
Q: I set up the Digital Photo Frame. Why won't it turn on?
A: The power adapter is not inserted properly in the digital photo frame or the frame was switched unintentionally with the On/Off button of the frame or the remote control. Check the cabling and switch on the photo frame with the On/Off button.
Q: I have a memory card in the Digital Photo Frame. Why can't I view my photos?
A: First, make sure that you are using a memory card included in the list above and that the files on the card are in a compatible format (cf. section "Technical data"). Second, turn the Digital Photo Frame off and make sure that the memory card is inserted all the way into the card slot and is facing in the correct direction. Third, turn the frame on again. Now, you should see the mode selection screen (cf. "Operating the Digital Photo Frame").
Note: Some digital cameras save images in other formats. Please refer to your camera's manual if your photos are not in a compatible format.
Q: Why is the photo display slower with some photos and faster with others?
A: Higher resolution photos usually load slower. Try using photos with lower resolution or down sampling your images. See your camera's operating manual for details on down sampling photos.
Q: Does the photo frame support all JPEG files?
A: No, it supports JPEG files taken from a digital camera. The Digital Photo Frame may not read image files downloaded from the internet or from other software graphics applications.
ENGLISH18
List of Menus and Functions
Display option Settings Description
| Setup Internal Memory Select storage medium Photo Display photos or slideshow Music Play music file (MP3) Video Play movie file (MPEG 1/4, AVI) File Display file list Time Display/set calendar, time and alarm | ||
| SETUP Language Select the desired language In mode selection File Sorting Method Select sorting order Factory Default Reset the frame to the factory settings Screen Effect by ArcSoft Select 3 effects (Dynamic Lighting, Face Beautify and Face Tracking) Version Number The current version and free memory will be shown. | ||
| SETUP In Photo mode (full screen) | Rotate Photo | Rotate photo 90° counter clockwise |
| Zoom Photo | Zoom photo (3 levels) | |
| Copy Photo | Copy files from memory card to internal memory | |
| Delete Photo | Delete files from internal memory | |
| Adjust Screen | If you select Yes, you can adjust brightness, contrast, color and tintown. | |
| SETUP in Photo mode (threshold screen) | File Sorting Method Select sorting order Copy Photo | Copy files from memory card to internal memory |
| Delete Photo | Delete files from internal memory | |
| Factory Default Reset the frame to the factory settings Select Card | Select the storage medium | |
| Display Image Size | Select the size of the displayed file | |
| Magic Window | Display four photos at the same time | |
| Slideshow Transition | 6 special effects used for the transition from one photo to the next in a slideshow | |
| Slideshow Speed | Define the speed of the slideshow (display interval of photos) | |
| Screen Effect by ArcSoft Select 3 effects (Dynamic Lighting, Face Beautify and Face Tracking) | ||
| Adjust Screen | If you select Yes, you can adjust brightness, contrast, color and tint | |
| SETUP In Music mode | File Sorting Method Select sorting order Copy Music | Copy files from memory card to internal memory |
| Delete Music | Delete files from internal memory | |
| Factory Default Reset the frame to the factory settings Select Card | Select the storage medium | |
| Music Repeat Mode | Select the repeat mode (Repeat Single, Repeat All, No Repeat) | |
ENGLISH 19
List of Menus and Functions
Display option Settings Description
SETUP in Video mode File Sorting Method Select sorting order
Copy Film Copy files from memory card to internal memory
Delete Film Delete files from internal memory
Factory Default Reset the frame to the factory settings
Select Card Select the storage medium
Video Repeat Mode Select the repeat mode (Repeat Single, Repeat ALL,
No Repeat)
Technical data
Product 19" Digital photo frame
LCD screen (48cm)
Resolution: 1280 × 1024 pixel (5:4),
Photos: JPEG
Video: MPEG 1/4, M-JPEG, AVI, Divx
(only model with video function)
Audio: MP3
(only model with MP3 function)
Certifications: CE, FCC, RoHS
Right to technical and design modifications reserved.

This symbol on the product or in the instructions means that your electrical and electronic equipment should be disposed at the end of its life separately from your household waste. There are separate collection systems for recycling in the EU. For more information, please contact the local authority or your retailer where you purchased the product.
ENGLISH10
FRANCAIS
Certificates: CE, FCC, RoHS
Copia deotos:Copy files from memory card to internal memory
Eliminar fotos: Delete files from internal memory
Ajuste de pantalla: Press ENTER to adjust brightness, contrast, color and tint
Resolution: 1280 x 1024 pixels (5:4), 19" (48cm)
- Secure Digital (SD)
- Multi Media Card (MMC)
Memory Stick (MS), MS Pro, MS Duo, - Compact Flash (CF)
- USB-stick
In de Verpakking
Certificaties: CE, FCC, RoHS
Resolucao: 1280× 1024 pixels (5:4)
Fotos: JPEG
Video: MPEG 1/4, M-JPEG, AVI, Divx
Certificacoes: CE, FCC, RoHS