
DigiFrame 10X WiFi - Digital photo frame BRAUN - Free user manual and instructions
Find the device manual for free DigiFrame 10X WiFi BRAUN in PDF.


| Product Type | Digital Photo Frame |
| Screen Size | 10 inches |
| Display Resolution | 1024 x 600 pixels |
| Connectivity | Wi-Fi 802.11 b/g/n |
| Supported Memory Cards | SD, SDHC, MMC |
| USB Port | USB 2.0 (host for USB drives) |
| Photo Formats | JPEG, BMP, PNG |
| Video Playback | MPEG-4, AVI, MOV (via USB/SD) |
| Audio Playback | MP3 |
| Built-in Memory | 2 GB (internal) |
| Remote Control | Included (IR) |
| Clock / Calendar | Yes, with alarm |
| Slideshow Modes | Multiple transition effects, adjustable speed |
| Dimensions (with stand) | 10.2 x 8.5 x 1.2 inches (260 x 215 x 30 mm) |
| Weight | 1.3 lbs (590 g) |
| Power Supply | DC 5V, 1.5A (adapter included) |
| Power Consumption | 7.5 W (typical) |
| Wall Mountable | Yes (keyhole slots) |
| Stand Type | Detachable stand with tilt |
| Management Software | Compatible with FrameManager (PC/Mac) |
| Cleaning Instructions | Wipe with soft dry cloth; do not use liquids |
| Safety Warnings | Keep away from moisture; use only provided adapter |
| Spare Parts Availability | Remote, stand, adapter available via support |
| Repairability | Limited; contact authorized service center |
Frequently Asked Questions - DigiFrame 10X WiFi BRAUN
User questions about DigiFrame 10X WiFi BRAUN
0 question about this device. Answer the ones you know or ask your own.
Ask a new question about this device
Download the instructions for your Digital photo frame in PDF format for free! Find your manual DigiFrame 10X WiFi - BRAUN and take your electronic device back in hand. On this page are published all the documents necessary for the use of your device. DigiFrame 10X WiFi by BRAUN.
USER MANUAL DigiFrame 10X WiFi BRAUN
Digital Wi-Fi picture frame with 10.1" Touchscreen LCD Display
User's Manual

BRAUN
Art. 21253
Model BRAUN DigiFrame 10X WiFi
Copyright © 2017 BRAUN Photo Technik GmbH. All rights reserved.
Cautions
Precautions and maintenance
- For indoor use only.
- To avoid risk of fire or electric shock, do not expose the unit to moisture or condensation.
- To avoid overheating, do not block the ventilation holes on the back of the digital photo frame.
- Keep the digital photo frame out of direct sunlight.
- Do not dismantle the digital photo frame. There is a risk of electric shock and there are no user-serviceable parts inside. Dismantling the digital photo frame will void your warranty.
Cleaning the LCD Screen
- Treat the screen with care. The screen of the digital photo frame is made of glass and is easily broken or scratched.
- If fingerprints or dust accumulate on the LCD screen, we recommend using a soft, non-abrasive cloth such as a camera lens cloth to clean the LCD screen.
- Moisten the cleaning cloth with the cleaning solution and apply the cloth to the screen.
WARNING:
Please power off the unit before inserting or removing a card or USB device.
Failure to do so may cause damage to the card/USB and the unit. To reduce the risk of fire or electric shock, do not expose this appliance to rain or moisture.
Note: This device is for private use only and not designed for commercial utilization.
Introduction:
Thank you for purchasing the BRAUN DigiFrame 10X WiFi. The product is designed to allow quick and easy viewing of photos taken from your digital camera, mobile phone, or from a memory storage card. Please read this user manual carefully to learn the correct way to use the digital photo frame.
Features:
- Supported picture formats: JPEG
- Supported memory cards: Micro SD
- USB-connection: Micro USB
- Auto slideshow
- Pre-installed Frameo-Software
- 16GB internal memory
- Adjustable brightness
- Copy and delete files in the built-in memory and memory card
- OSD languages: English and other languages selectable
- Transfer photos and short videos possible (15s)
Packaging Check List:
- 10.1 Inch (25.7 cm) digital photo frame 1 piece
- AC/DC adapter 1 piece
- User's manual 1 piece
- Bracket 1 piece
- Screw 1 piece
Contents
Getting started. 4
Frameo app....4
Frameo quick setup. 5
Start using Frameo. 6
Connecting a new friend 6
Navigating your Frameo 7
Settings 9
My frame 9
Manage photos 10
My Friends 11
Display 11
Slideshow 11
Wi-Fi 12
Notifications 13
Backup and Restore 14
Help 14
About 15
Stand Instructions 16
Privacy 16
Technical Support. 17
Radio and TV Interference Statement 17
Getting started
Congratulations with your brand new Frameo photo frame!
If you are new to using Frameo then start by following the Frameo quick setup or follow the on-screen guide when powering it on for the first time.
Once you have set up your Frameo frame, you can start connecting it to your friends and family.
Frameo app
To send photos to your frame, use the Frameo app for iOS or Android.

Find the Frameo app by scanning this code:

For Android:
Search for "Frameo" on Google Play.
For iOS:
Search for "Frameo" on App Store.
Frameo quick setup
When starting your frame for the first time, you will need to setup the frame.
- Select a language. This will be the language used on the Frameo.
- Connect your frame to the internet by connecting it to a Wi-Fi.
- Frameo may ask you to update to the latest version. It is recommended to update your frame before continuing if asked to.
- Enter your name, and the location where you have placed your frame e.g. "John Doe" and "Living room", "Kitchen" or "Office". Finally set the timezone if not already correct.
Start using Frameo
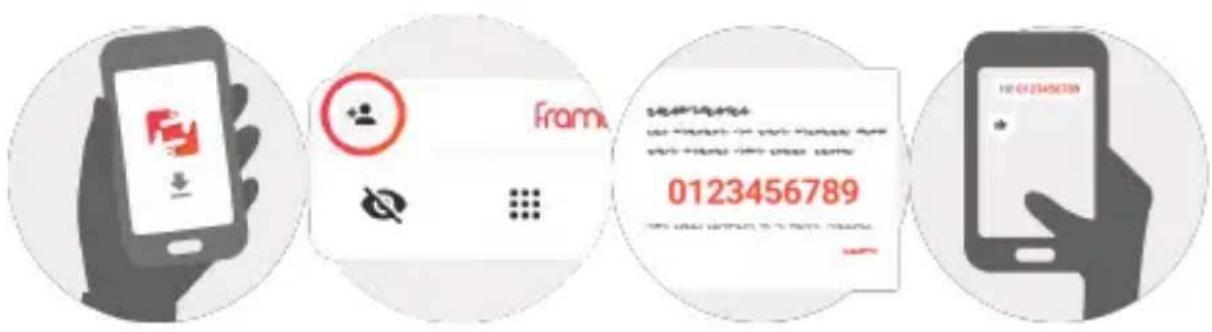
Next step is to connect Frameo with your friends and family by providing them with a code from your frame.
If you want to be able to send photos to the frame yourself, start by downloading the app for iOS or Android on App Store or Google Play. Then use the code to connect your frame and app as described below.
Connecting a new friend
Make sure that your friend has downloaded and installed the Frameo app.
Click the add friend icon on your frame 🙏. A dialog will appear showing a connection code, which is valid for 12 hours.
Now share this code in whatever fashion you prefer e.g. SMS, E-Mail, IM, phone call, to your friend.
Once your friends have added the code in their Frameo app, they will automatically appear on your frame and be able to send you photos.
Read chapter Change options for a friend to allow connected friends, to retrieve and share the connection code via the smartphone app.
Navigating your Frameo
Swipe left or right to go through your photos.
To access the menu, simply tap once on the screen.


In the menu you will find the most used features.

Add friend
This will generate a code that you can share with your friends and family so they can connect and send photos to your frame.

Settings Opens
the Settings.

Power menu Opens
the Power menu

Hide photo
Hides the current photo. This means that the photo will no longer be shown in the slideshow. If needed the photo can be shown again through the settings menu.

Gallery
Opens a gallery which allows for easy and fast navigation through your photos.

Fit to frame/Fill frame
This toggles how the photo is shown.
The Fill frame option is the default. The photo is scaled so that it fills the whole screen. It will be centered around what is selected as the most important part. See the first picture below.
Fit to frame will make sure that the entire photo is shown on the screen. See the second picture below.


Adjust photo
Allows you to adjust the position of the photo in the frame for an even better fit. Here you can also use to rotate your photo.
Interacting with videos
When a video is shown two additional controls are shown. One for play/pause of the video and one to control the volume level for video sounds.
Press to start the video playback. Pressing
Press 🖼️ to open the volume slider. Use the slider to adjust the volume level for video sounds.
Pressing will mute the video while pressing will unmute the video.

Power menu
Tap the power icon ⏻ to access the power menu. Here you can power off using ⏻, restart your frame using ⏻ or enter sleep mode using ⏻.

NB. Make sure to always use the power off button on the device or in the power menu to turn Frameo off. Never disconnect power when Frameo is running.
Settings
Through the settings, you can personalize your frame to your needs.
My frame
Frame name
Changes the name of your frame. This is also the name that connected friends and family will see in their list of connected frames in the smartphone app.
Frame location
Changes the location of your frame. This is the location displayed on your friends' and family's list of connected frames which can help to distinguish frames from each other.
Set language
Sets the language used on the frame.
Set time zone
Sets the time zone used on the frame.
Enable/Disable 24-hour format
Enables, and disables, 24-hour time format.
Manage photos
In the manage photos menu you can see how many photos are on your frame and the storage they use. You can also see the amount of storage left available on your device for storing new photos.
Show/hide photos
Select which photos to hide by tapping them. Hidden photos will NOT be deleted from your frame and you can always select them to be shown again.
Use to hide or show all photos.
Delete photos
Select photos that you want to permanently delete from your frame by tapping the photo.
Use to select or deselect all and to permanently delete the selected photos.
Import photos
Allows you to import photos from an external storage (e.g., microSD card).
Before you try to import photos, make sure you have an external storage (e.g., microSD card) inserted into your frame with the photos you wish to import.
Start by selecting the photos that you want to import onto your frame. Once selected, tap the import button ⚡ to start the import process.
Use to select or deselect all photos on the external storage (e.g., microSD card).
Use ≡ to set the sort order of photos before import and ^ to order by ascending/descending.
It is currently not possible to add a caption or define the most important part of the photo when using the import function. An alternative for this is to add yourself to your friend list and send the photos using the app.
Export photos
Allows you to export photos from the frame to external storage (e.g., microSD card).
The export function will export all photos on the frame as well as profile pictures.
My Friends
This list contains all the connected friends that are allowed to send photos to your frame.
Change options for a friend
Click the options icon to open the friend options menu. From here you can allow or disallow if a friend may share the code to the frame. If this is enabled, the friend can retrieve and share the code to the frame from his/her app.
From the options menu you can also delete a friend by pressing the DELETE FRIEND button. This will remove the friend from the list and thereby remove their permission to send photos to the frame. You will then be asked to confirm the removal and if you would like to remove all photos previously received from this friend.
Add person
To allow a new person to send you photos, simply tap the add friend button and share the presented code in whatever way you prefer.
Display
Brightness level
Adjust the brightness level of the screen.
Sleep mode
Frameo offers a sleep mode which turns off the screen to reduce power consumption. The default setting is to turn off the screen at 23:00 and turn on the screen again at 07:00. To change this, just set the sleep mode start/end time.
Your frame is not powered down or in standby, so you will still be able to receive photos during sleep mode.
Slideshow
Timer
Set the duration that a photo should be displayed before showing the next photo.
Show caption
Sets whether or not to display the captions that your friends have sent with the photo.
Check to display captions. Uncheck to hide captions.
Fill frame
Sets the default frame photo setting. Check to set default to fill which makes the photos fit the device screen according to the most important part of the photo. Uncheck to make the photo fit inside the screen of the device, adding blurred bars on the sides or top/bottom
Photo display order
Sets the order in which your photos are displayed on the frame.
- By date: Photos are shown newest to latest.
- Shuffle: Photos are shuffled and shown in a random order.
Autoplay
Enables/disables autoplay of videos in the slideshow. Videos can always be manually started regardless of this setting.
Video playback
Determines how videos should be played when autoplay is enabled.
- Loop videos: The video will loop until the slideshow timer is up.
- Play once: The video will play once and show its thumbnail until the timer is up.
- Play once and continue: The video will play once and continue to the next photo, or video, once it completes.
Video volume
Adjust the volume level for video sounds on the frames.
Wi-Fi
Set which Wi-Fi the frame connects to. If you are connecting to a network with a captive portal, Connection status will say that Wi-Fi login is required and show . Tap this to open a login screen where you can enter credentials to access the network.
The portal connection status will indicate that Wi-Fi login is required and display a notification. Tap this notification to open a login screen where you can enter your credentials to access the network.
Use ⓘ to show details about the current connected Wi-Fi.
Use ⓘ to show details about the current connected Wi-Fi.
Use : to delete all Wi-Fi information and restart your frame.
Use : to delete all Wi-Fi information and restart your frame.
Show notifications
Enables/disables whether notifications are shown in the slideshow (e.g. when a new photo is received).
Enables/disables whether notifications are shown in the slideshow (e.g., when a new photo is received).
Adjust the volume level for notification sounds.
Adjust the volume level for notification sounds.
Storage space
Enables/disables notifications shown when frame storage is low.
Backup
Enables/disables notifications shown if automatic backup has failed.
Network connection
Enables/disables notifications showing network connection status.
New photos
Enables/disables notifications shown when receiving new photos.
New friends
Enables/disables notifications shown when new friends are added.
Software update
Enables/disables notifications shown when a software update has been installed.
Feature news
Enables/disables notifications shown when new exciting features are added.
Backup and Restore
Backup frame to external storage (e.g. microSD card)
Tap to make a backup of your photos, friends and settings. The time of the latest successful backup is also displayed here.
Any existing backup on the external storage will be overridden!
Automatic backup
If checked, your frame will automatically take a backup within 30 hours of receiving new photos or making changes to your frame.
Restore from backup
Before you attempt to restore your frame, start by confirming that your backup is up-to-date. This is done by confirming the date under “Backup frame to external storage (e.g. microSD card)”. If e.g. the last backup is too old or if no backup is made, then press the “Backup frame to external storage (e.g. microSD card)” button to make a new backup.
NB: To keep both the old and the new frame operational at the same time after restoring from backup, please make sure that both frames are updated to the latest version beforehand.
If you wish to restore a backup on a frame that has already been setup, then you must first reset the frame. This is done by pressing the “Reset frame” button. This will delete all data on the Frameo and reset the Frameo to its setup screen.
On the setup screen you can select the “Restore from backup” button which will restore your frame according to the backup.
If the “Restore from backup” button isn’t visible, then confirm that the external storage (e.g. microSD card) is correctly mounted.
Reset frame
Removes all data from your frame.
This will permanently remove all your photos, friends/connections and settings.
Help
Open source libraries
Opens a list of open source libraries used in the app and their licenses.
Share anonymous analytics data
Sharing anonymous analytics data helps us tremendously to improve the Frameo software. We understand if you do not wish to share this data with us. Keep it checked if you wish to help us improve Frameo. Set unchecked to deny the sharing of anonymous analytics data.
Guide
Opens the quick start guide, that was shown when you first started the frame.
About
Android version
See what version of Android that is installed on the frame.
Peer ID
This is a unique ID for your photo frame. When contacting our support, please provide this ID with your message.
MAC
Shows the MAC address of your frame.
Frameo version
Shows what version of the Frameo software is currently installed on your frame.
Uptime
Shows how long the photo frame has been powered on.
Check for update
Check if an update is available for your frame.
Beta program
If checked, the device will join the Beta program where it will receive updates more frequently and before normal release devices.
Stand Instructions
Insert the bracket into the slot of the digital photo frame and rotate the bracket clockwise. Please make sure the stand is locked in before you put it on the table steadily. Please refer to the illustration below.

Technical Specifications
- Adapter: Input AC 100-240 V 50/60 Hz, Output DC: 5 V/2 A ● Picture Formats: JPEG ● Video formats: MP4 ● Memory Cards: Micro SD
- USB: Micro USB
- Screen Parameter:
Screen size: 10.1 inches (25.7 cm) LCD
Brightness: 260 cd/m²
Viewing angle: approx. 180° (horizontal)
For more information regarding privacy, please visit privacy.frameo.net
Technical Support
We are committed to providing the best customer service support. If you need assistance with your BRAUN product, please contact the BRAUN Technical Support department prior to returning this device. Reach out to us in any of the following ways:
Radio and TV Interference Statement
WARNING! This equipment has been tested and found to comply with the limits of a Class B digital device, pursuant to part of the CE rules. These limits are designed to provide reasonable protection against harmful interference in a residential installation.
This equipment generates, uses, and can radiate radio frequency energy and, if not installed and used in accordance with the instructions, may cause harmful interference to radio communications. However, there is no guarantee that interference will not occur in a particular installation. If this equipment does cause harmful interference to radio or television reception, which can be determined by turning the equipment off and on, the user is encouraged to try to correct the interference by one or more of the following measures:


- BRAUN
- CAUTIONS
- PRECAUTIONS AND MAINTENANCE
- CLEANING THE LCD SCREEN
- WARNING
- INTRODUCTION
- FEATURES
- PACKAGING CHECK LIST
- CONTENTS
- GETTING STARTED
- FRAMEO APP
- FRAMEO QUICK SETUP
- START USING FRAMEO
- CONNECTING A NEW FRIEND
- NAVIGATING YOUR FRAMEO
- ADD FRIEND
- SETTINGS OPENS
- POWER MENU OPENS
- HIDE PHOTO
- GALLERY
- FIT TO FRAME/FILL FRAME
- ADJUST PHOTO
- POWER MENU
- SETTINGS
- MY FRAME
- FRAME NAME
- FRAME LOCATION
- SET LANGUAGE
- SET TIME ZONE
- ENABLE/DISABLE 24-HOUR FORMAT
- MANAGE PHOTOS
- SHOW/HIDE PHOTOS
- DELETE PHOTOS
- IMPORT PHOTOS
- EXPORT PHOTOS
- MY FRIENDS
- CHANGE OPTIONS FOR A FRIEND
- ADD PERSON
- DISPLAY
- BRIGHTNESS LEVEL
- SLEEP MODE
- SLIDESHOW
- TIMER
- SHOW CAPTION
- FILL FRAME
- PHOTO DISPLAY ORDER
- AUTOPLAY
- VIDEO PLAYBACK
- VIDEO VOLUME
- WI-FI
- USE Ⓘ TO SHOW DETAILS ABOUT THE CURRENT CONNECTED WI-FI
- USE : TO DELETE ALL WI-FI INFORMATION AND RESTART YOUR FRAME
- SHOW NOTIFICATIONS
- ENABLES/DISABLES WHETHER NOTIFICATIONS ARE SHOWN IN THE SLIDESHOW (E.G. WHEN A NEW PHOTO IS RECEIVED)
- ADJUST THE VOLUME LEVEL FOR NOTIFICATION SOUNDS
- STORAGE SPACE
- BACKUP
- NETWORK CONNECTION
- NEW PHOTOS
- NEW FRIENDS
- SOFTWARE UPDATE
- FEATURE NEWS
- BACKUP AND RESTORE
- BACKUP FRAME TO EXTERNAL STORAGE (E.G. MICROSD CARD)
- AUTOMATIC BACKUP
- RESTORE FROM BACKUP
- RESET FRAME
- HELP
- OPEN SOURCE LIBRARIES
- SHARE ANONYMOUS ANALYTICS DATA
- GUIDE
- ABOUT
- ANDROID VERSION
- PEER ID
- MAC
- FRAMEO VERSION
- UPTIME
- CHECK FOR UPDATE
- BETA PROGRAM
- STAND INSTRUCTIONS
- TECHNICAL SPECIFICATIONS
- TECHNICAL SUPPORT
- RADIO AND TV INTERFERENCE STATEMENT
Brand : BRAUN
Model : DigiFrame 10X WiFi
Category : Digital photo frame