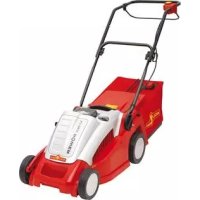
LIION Power 37 - Lawn mower Wolf Garten - Free user manual and instructions
Find the device manual for free LIION Power 37 Wolf Garten in PDF.


| Product type | Cordless lawn mower |
| Brand | Wolf Garten |
| Model | LIION Power 37 |
| Cutting width | 37 cm |
| Cutting height | Continuously adjustable, recommended 40-50 mm |
| Power supply | Rechargeable lithium-ion battery, charger 230 V ~ |
| Charging time | Approx. 5-6 hours (when discharged) |
| Functions | Mowing, collecting, mulching (CCM switch) |
| Safety | Two-hand switch, safety key, safety stirrup, automatic engine stop |
| Fill level indicator | Yes, on the collection bag |
| Charge status display | LED (green, yellow, red) |
| Handle adjustment | Adjustable height |
| Maintenance | Clean with brush or cloth, do not use water |
| Spare parts | Wolf Garten original (blade, bag, battery, charger) |
| Warranty | According to manufacturer's conditions, free repair for material/manufacturing defects |
Frequently Asked Questions - LIION Power 37 Wolf Garten
User questions about LIION Power 37 Wolf Garten
0 question about this device. Answer the ones you know or ask your own.
Ask a new question about this device
Download the instructions for your Lawn mower in PDF format for free! Find your manual LIION Power 37 - Wolf Garten and take your electronic device back in hand. On this page are published all the documents necessary for the use of your device. LIION Power 37 by Wolf Garten.
USER MANUAL LIION Power 37 Wolf Garten
Original operating instructions 12
natural_image
Diagram of a manual lawn mower with an inset showing a mechanical clamp or bracket (no text or symbols present)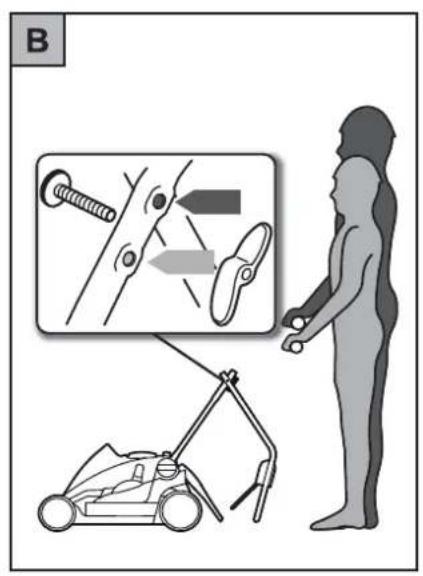
text_image
B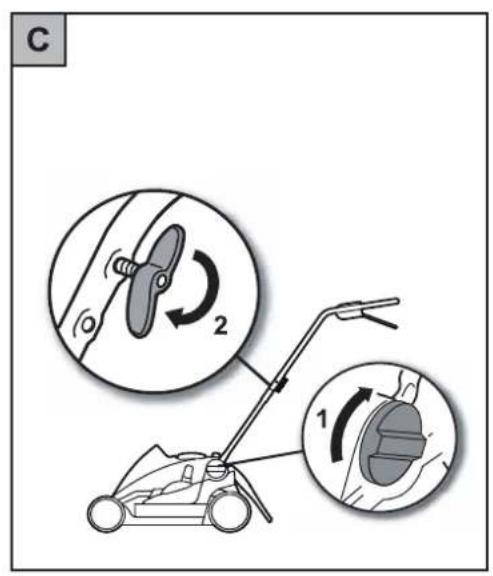
text_image
C 1 2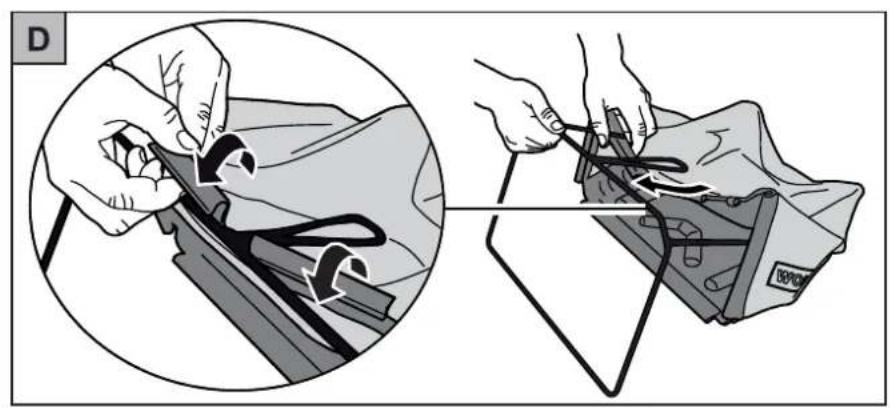
natural_image
Illustration showing two steps of a medical procedure: adding force to a patient's arm and using a pressure monitor (no text or symbols present)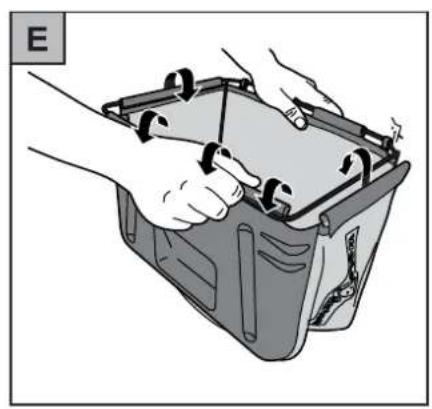
natural_image
Illustration of hands installing or adjusting a mechanical component with clamps (no text or symbols visible)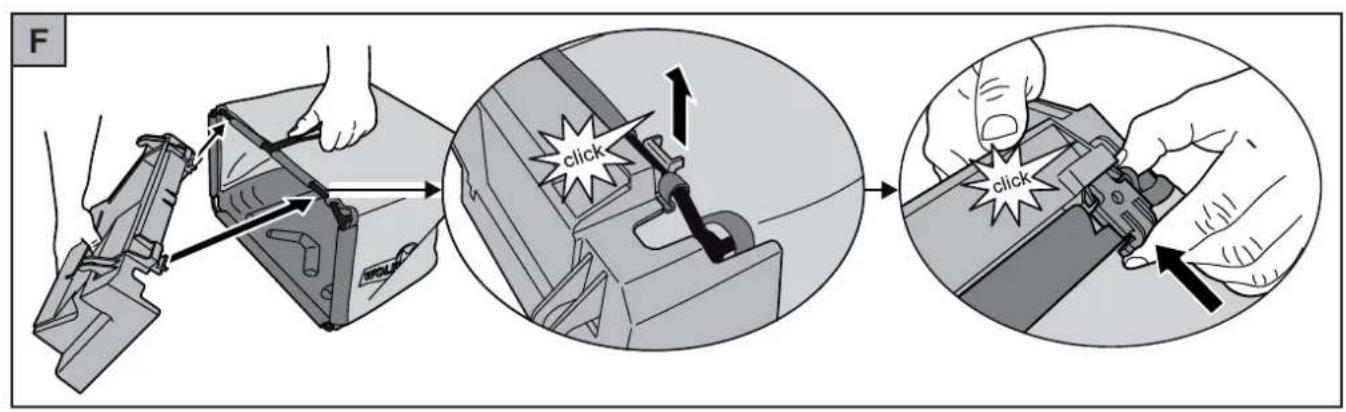
text_image
F click click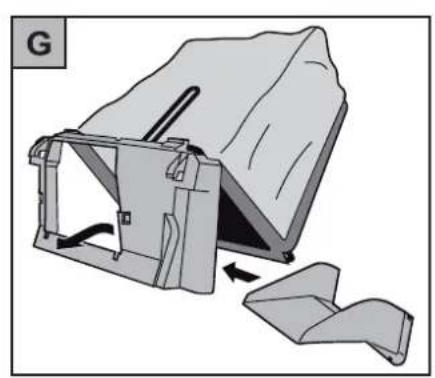
natural_image
Diagram of a mechanical device with a folded component and a separate piece, showing no text or symbols.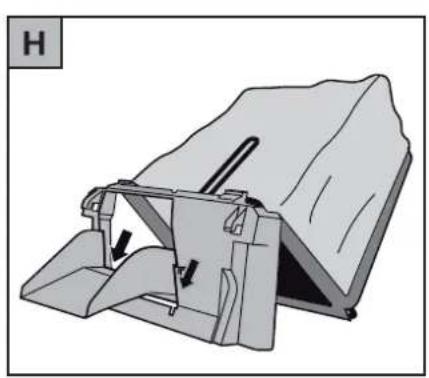
natural_image
Mechanical assembly diagram showing a folded structure with arrows indicating force or movement (no text or symbols)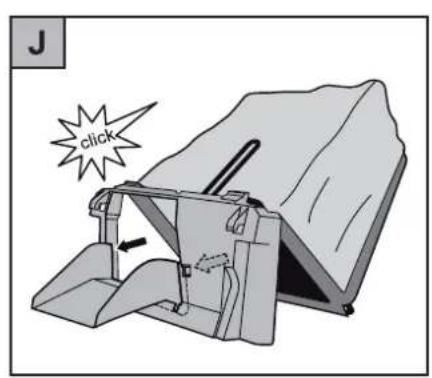
text_image
J click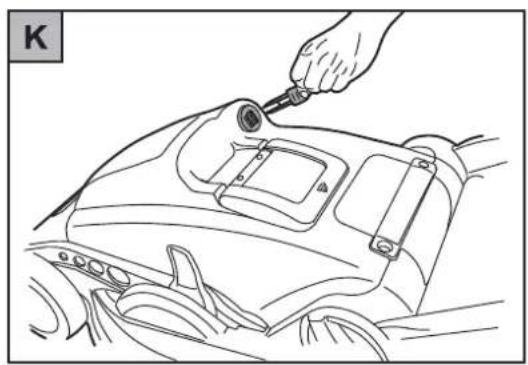
natural_image
Line drawing of a car interior with a hand adjusting a tool, no text or symbols present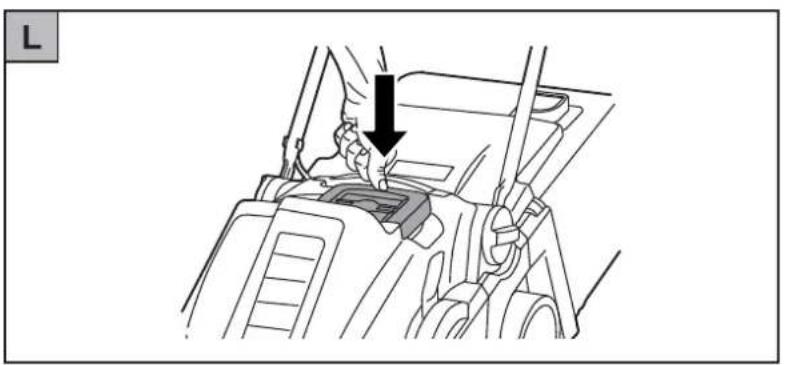
natural_image
Mechanical assembly diagram showing a hand operating a component with a black arrow indicating force direction (no text or symbols present)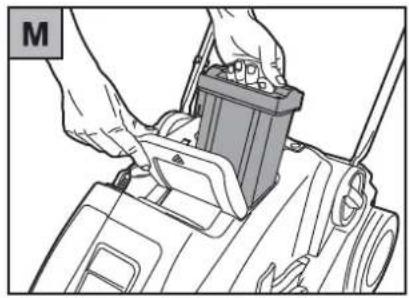
natural_image
Illustration of hands installing or adjusting a mechanical component with a battery (no text or symbols visible)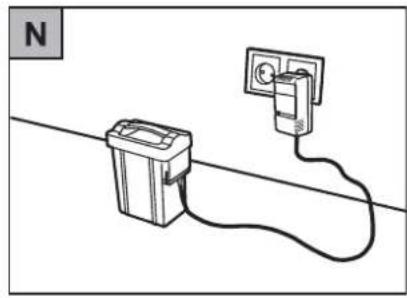
natural_image
Simple line drawing of a battery connected to an electrical outlet (no text or symbols)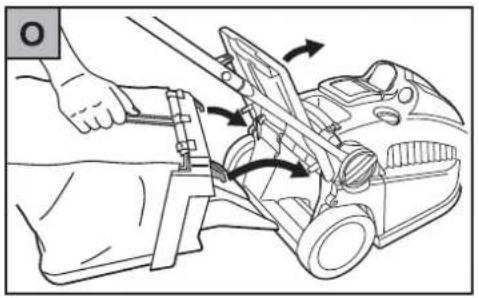
natural_image
Line drawing of a person using a belt switch to adjust or install a vehicle (no text or symbols present)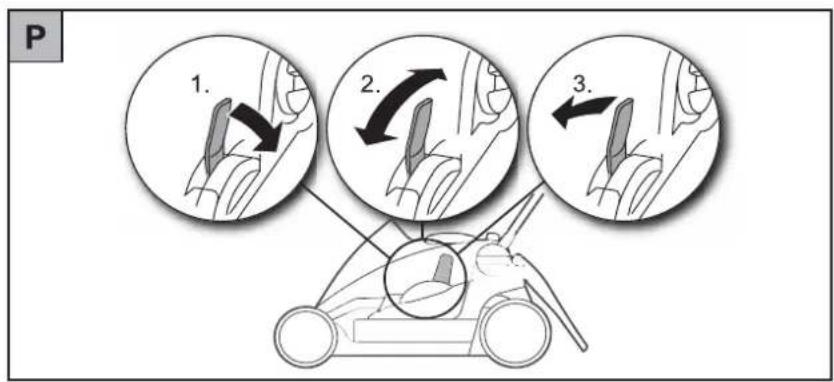
text_image
P 1. 2. 3.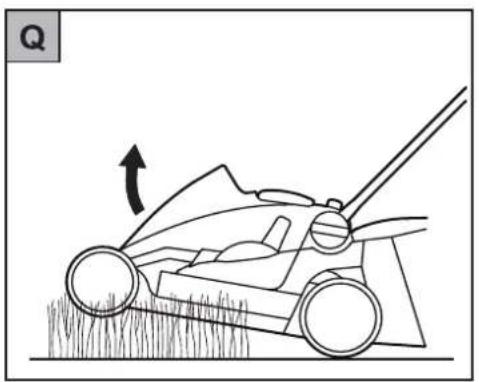
natural_image
Line drawing of a lawn mower with grass blades and a tool, showing motion direction (no text or symbols)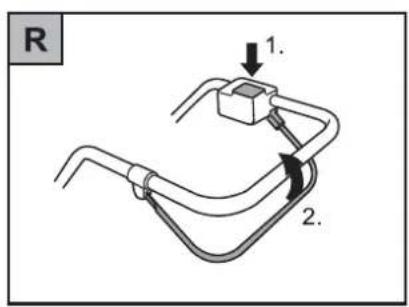
text_image
R 1. 2.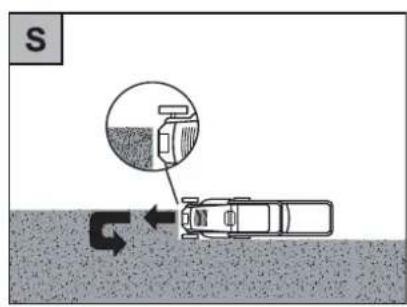
text_image
S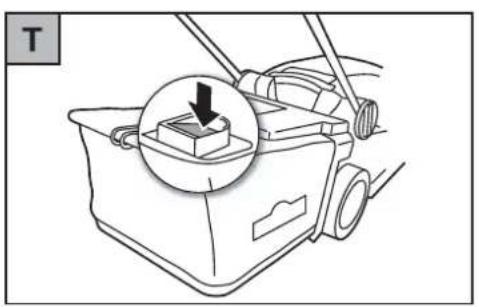
natural_image
Line drawing of a mopener with a magnified inset showing a square object being inserted (no text or symbols)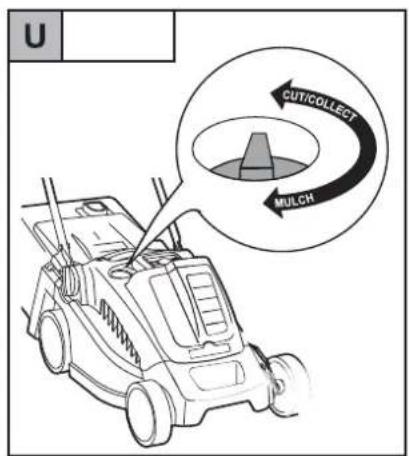
text_image
U CUT/COLLECT MULCH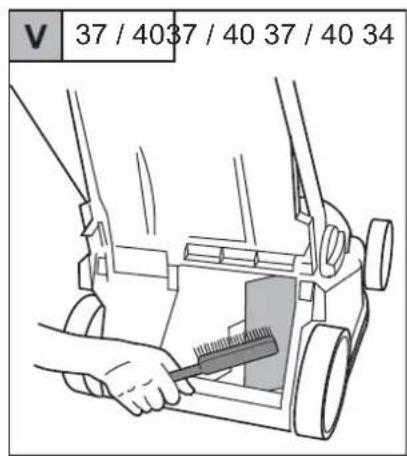
text_image
V 37 / 4037 / 40 37 / 40 34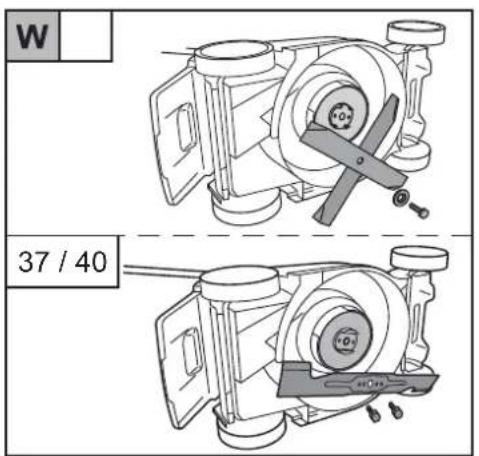
text_image
W 37 / 40LI-ION POWER 34 - LI-ION POWER 37 - LI-ION POWER 40
D
1 On-/Off-switch
2 Operator presence bail arm
3 Cable anti-king protection
4 Filling indicator
5 Collector
6 CCM switch (cut-collect-mulch) - LI-ION POWER 37, LI-ION POWER 40
7 Deflector plate
8 Exchangeable battery
9 Handle height adjustment
10 Height adjustment
11 Indicator to cutting
12 Charge status indicator
13 Contact key
F
natural_image
Close-up of a black cable with a small connector, circled in a circle (no text or symbols visible)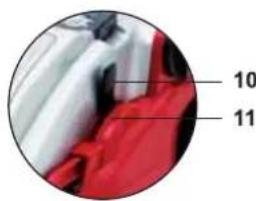
text_image
10 11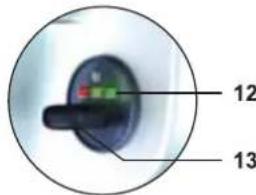
text_image
12 13Congratulations on your purchase of a WOLF-Garten lawn mower
Contents
Safety instructions .....12
Assembly....14
Operation....14
Transporting the appliance .....16
Maintenance .....16
Faults and how to remedy .....17
Spare parts....17
Warranty .....17
Safety instructions
Meaning of the symbols

Attention!
Read instruction
manual before
use!
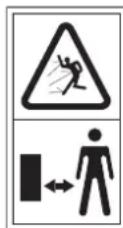
Keep bystanders away!
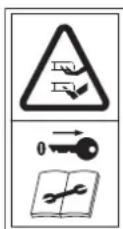
Caution! - Sharp cutting blade - before carrying out maintenance work, remove contact key and disconnect battery!
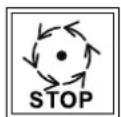
Caution! Blades continue rotation when the motor is switched off! Wait until all rotating parts have come to a halt!
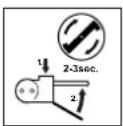
For technical re-
asons, it might
take 2 to 3 se-
conds before the
motor starts up.
General information
●This appliance is approved solely for use
- in accordance with the descriptions and safety instructions specified in this user's guide;
- to mow the lawns of domestic and leisure gardens.
● Any other use is not as intended. Improper use is not covered by the warranty and the manufacturer will reject any liability. The user is liable for all damage caused to third parties and their property. Unauthorized modifications made to the mower rule out any liability on the part of the manufacturer for damage resulting therefrom.
- Never mow the lawn if others – in particular children and animals – are in the vicinity.
- Do not expose the lawnmower to temperatures exceeding 40^ C. Never mow for longer periods of time in direct sunlight where there is no shade.
●Before using the appliance for the first time, read and follow these operating instructions carefully. Keep these instructions in a safe place for future reference. Never allow children or other per-sons to use the lawnmower who do not know the operating instructions. If the appliance changes ownership, hand over the operating instructions.
- When working with or on the appliance you must wear protective clothing. This includes:
- safety shoes,
- trousers,
- close-fitting garments,
-
protective goggles, etc.
-
Operate the vehicle only when it is in good technical condition as stipulated and delivered by the manufacturer.
- Information on rating plate: These details are very important for identifying your appliance when you order spare parts or contact our aftersales service. The rating plate is found near the engine. Enter all the details on your appli-ance's rating plate in the following fields. This and other appliance information can be found on the separate CE declaration of conformity which is a component of these operating instructions.
Before mowing
- Check the site on which the machine is to be used, and remove all items which could be caught and ejected.
-
Check the line and connection cable fitted to the outside of the lawnmower for damage and ageing (brittleness). Only use if in perfect condition.
●Only have the cable repaired by a qualified person.
●Before using the appliance, -
check whether the grass catcher works and the deflector closes correctly. Replace damaged, worn out or missing parts immediately.
- check for any wearing or damage to the cutters, fastening pins, and the whole cutter unit. All worn or damaged parts must be replaced in sets at a specialist workshop in order to rule out imbalances.
- Operate the appliance only when it is in good technical condition Subject the appliance to a tho-rough visual check before using it. In particular, check the safety devices, controls and threaded connections for damage and secure attachment. Replace damaged parts before operating the unit.
●Persons using the appliance must not be under the influence of intoxicants, e.g. alcohol, narcotics, medication, etc.
- Persons younger than 16 years of age must not use this lawnmower – local regulations can determine the minimum age of the users.
●This appliance is not intended for use by persons (including children) with reduced physical, sensory or mental capabilities, or lack of experience and knowledge, unless they have been given supervision or instruction concerning use of the appliance by a person responsible for their safety.
●Children should be supervised to ensure that they do not play with the appliance.
When mowing
- Do not tilt the lawnmower when switching on the motor, unless the lawnmower has to be tilted when starting. If that is the case, do not tip the lawnmower more than absolutely necessary, and only lift the part furthest removed from the user. Always ensure that both hands are in the operating position before replacing the lawnmower on the ground.
●Maintain the safety distance prescribed by the handle bars. - Only switch on the motor if your feet are at a safe distance from the cutting gear.
●Take care to ensure a safe and stable position, especially on slopes. Never run; always walk calmly forward.
●Mowing on inclines:
— Always mow at right angles to the incline, not up and down
— Take particular care when changing direction.
— Do not mow very steep ground
- Be especially careful when mowing backwards and pulling the lawnmower towards you.
●Caution: do not touch running cutters. - Do not stand in front of the grass ejector opening.
●Never open the guard flap while the motor is still running. - Never drive across gravel while the motor is running – impacting stones!
- If the ground is wet the mower could slip due to reduced traction and overturn. Mow only when the grass is dry.
●Work only by daylight or in good artificial lighting.
● In the following circumstances, the machine must be switched off, the contact key must be removed and the mowr must come to a standstill:
— When leaving the lawnmower
— When releasing a blocked blade
— When adjusting the cutting height
— When emptying the bag
— After an obstacle has been hit (ensure that the mower or the cutting parts have not been damaged; in this case, first repair the damage)
- When the mower begins to vibrate heavily due to unbalance (switch off immediately and identify the cause)
— When the power line has been damaged during operation
— Before lifting the mower
— Before tilting the mower or transport it (e.g. from one lawn across a road to another)
Maintenance

Attention! Rotary cutter blade
Before all maintenance and cleaning work:
- Remove contact key and disconnect battery.
- Do not touch running blades.
● Regularly check and tighten all visible screws and nuts, especially those relating to the cutting bar, to ensure a firm fit.
●Never park your lawnmower in damp rooms.
●For safety reasons, replace worn or damaged parts.
- Spare parts and accessories must satisfy the requirements specified by the manufacturer.
●Therefore use original spare parts and original accessories only or spare parts and accessories authorised by the manufacturer.
Charger
●This charger should only be used with WOLF-Garten-Battery Mower LI-ION POWER 34.
- Do not store or use charger in humid or wet conditions but in dry room only.
- Disconnect charging units from mains socket by holding plug only. Do not pull on cable as this can cause damage to internal connections and make the unit unsafe.
●Never use the charger if the cable, plug or any part of the mower itself should be faulty. Any repair should be carried out by a qualified person.
- Ensure that the cooling of the charging unit is always guaranteed by keeping the cooling slots open and clean. Do not use it close to a radiator or other heating appliances.
- Never attempt opening the casing of the unit. If it does not function properly take it to a qualified service centre for inspection.
●To charge the battery, use only the specified WOLF-Garten changers. The use of other chargers might damage the machine or cause fire.
Battery
- As a result of incorrect use, fluid can leak from the rechargeable battery. Avoid contact with the fluid. In case of accidental contact, rinse with water. In case of fluid contact with the eyes, seek medical aid. Leaking battery fluid can cause irritation of the skin or burns.
●In the event of improper use of the battery pack, there is a risk of escaping hazardous vapours. Always ensure proper ventilation and immediately consult a doctor, if you feel unwell. The vapours might irritate the respiratory track.

Risk of fire!
●Never charge batteries near acids or flammable materials.
- Charge battery only at ambient temperatures between 0 and +40 °C. After heavy use, allow battery to cool down before charging it.

Risk of explosion!
Protect the battery against heat and fire!
- Do not place the battery on radiators. Avoid prolonged direct exposure to sunlight.
- Use battery only at ambient temperatures between 0 and +40 °C.

Risk of short circuit
- For disposal, transport or storage, pack the battery in a plastic bag or a cardboard box, or isolate the contacts with adhesive tape.
●Do not open the battery pack.
Dispose of batteries in an environmentally responsible manner

●Batteries are best suited for battery-powered electric appliances, according to the state of the art. Li-ION batteries are harmful to the environment if disposed of with other household waste.
Disposal
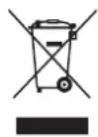
- Do not dispose of electrical equipment in domestic waste. Recycle equipment, accessories and packaging in an environment-friendly manner.
Assembly
Fasten
handle
Karb C

Caution!
The cable can be damaged while folding up or pulling out the handle bar.
●Inlay the cable in the bend protection . A
- When adjusting the handle height take care that the cable is not crimped B
- Fold the bottom part of the handle up and screw it tight with the two hand wheels Ⓐ1).
- Set the handle to the desired height . B
- Fold the upper part of the handle out and screw it tight with the wing nuts (2).
Mount the collecting bag D E F G H J
- See illustrations.
Operation
General
Contact key K

Caution! Rotating blade
Before carrying out any adjustments:
- Remove the contact key.
●Do not touch rotating blades.

The mower is only powered with electricity if the contact key is inserted.
Operating times
- Please check noise abatement regulations prevailing in your country.
Instructions for the use of WOLF-Garten battery-powered mowers

The area that can be mown by your battery-powered mower is dependent on various factors. These are: Type of lawn
Battery-powered lawnmowers are suitable for lawns the are mown frequently, normally, and, to a certain extent, for lawns that have not been cut for a while after holidays. The surface area that can be mown does however decrease in the order given above. Battery-powered mowers are not suitable for infrequently-mown meadows or similar.
Lawn structure
The area that can be mown decreases in proportion to the density of the grass. The mowing capability is lowest on extremely dense grass, e. g. golf greens.
Lawn condition
The condition of the lawn (dry, damp with dew, wet) has a major influence on the area of lawn which can be mowed. If the lawn is dry, this will give the maximum area which can be mowed. If the lawn is wet, more energy is required for the mowing and collection and thus this is the condition where the area which can be mowed is at a minimum.
Mowing/walking speed
The walking speed influences the duration of mowing and therefore the area that can be covered. We therefore recommend rapid mowing. The mowing path should not be covered twice if possible and the overlap of mowing tracks should be kept as minimal as possible. Frequently switching the mower on and off likewise decreases the battery's power.
Charging the battery

Caution! The charger must only be operated in dry rooms!

General charging instructions
To prolong the service life of the battery, observe the following instructions:
●Before first use, the battery needs to be charged for about 5-6 hours.
- If the battery voltage is too low, the lawnmower switches off automatically. In such a case, recharge the battery.
●The Lithium iron battery must also be recharged before prolonged periods of non-use, for example at the beginning of winter.
●The charging time is 5-6 hours for a battery that is completely empty.
●The Lithium ion battery can be recharged at any charge level, and charging can be interrupted and resumed without any damage to the battery (no memory effect).
- Remove the contact key K
- Release the battery cover by pushing it down L.
- Remove the battery from the recess M
- Connect the battery to the charger N.
- Connect the charger to the mains socket (230 V \~) N .

Instructions for the handling of the charger:
●Red LED is on: Battery is being charged
●Green LED is on: Charge process completed
- If the charger is connected to a power socket without a battery, the LEDs are off.
- In order to prolong the life the battery, it should not be charged for a period longer than two days.

Instructions regarding the charge status indicators:

Green LED is on:
- Battery capacity =


Yellow LED is on:
- Battery capacity =


Red LED flashing (battery nearly flat):
- Battery capacity =

— The battery should be recharged

Red LED is continuously on (device switches off):
- Battery capacity = or

- fault (e.g. battery too hot)
Hang up collection bag O

Attention! Rotary cutter blade
Undertake adjustments on the equipment only after the motor is switched off and the cutting tool has come to a standstill.
- Switch off the motor and remove the contact key.
-
Do not attach the collection bag until your feet are at a safe distance from the cutting tool.
-
Lift the protective flap.
- Hang the grass bag in the chassis with the hooks in the recesses (see arrow).
- Replace the protective flap.
Set cut height P

Attention! Rotary cutter blade
Undertake work/adjustments on the equipment only after the motor is switched off and the cutting tool has come to a standstill.
●Switch off the motor and remove the contact key.
- Pull the lever out.
- Set the desired cutting height.
- Press the lever back in.
Selection of Cutting height
- If possible, mow when grass is dry in order to protect turf. Do not se cutting position too low when mowing very hight or wet grass.
●We recommend an average cutting height of 40-50 mm.
Starting and Stoping
- Switch on motor with mowerplaced on level and firm ground.
●not in high grass - alternatively tilt slightly . Q
Switch-on motor R
- Depress button and hold (1).
- Lift up bar (2).
- Release button (1).
Switch-off motor R
Release bar (2).

Tip for mowing:
To prevent strips of grass from being left unmowed, the cutting paths must always overlap a few centimeters S
Overload protection

In case of overload or blocking, the motor shuts down automatically!
Switch off the motor and remove the contact key.
●Overload: Cutting height is too low, or forward speed is too fast
- Blocking: Foreign object in cutting area (e.g. branches)
●The machine can be switched on again after about 5 min.
Emptying of Grassbox T
When the collection bag is full, the flap lowers by itself.

Attention! Rotary cutter blade
Undertake adjustments on the equipment only after the motor is switched off and the cutting tool has come to a standstill.
●Switch off the motor and remove the contact key.
●Empty collection bag.
- Remove potential blockages in the cutting space before starting.
i Instructions for level indicator:
For an efficient functioning of the level indicator, regularly clean the holes under the level indicator in the collection bag with a hand brush.
Cut / Collect (LI-ION POWER 37, LI-ION POWER 40)
Activate cut/collect function U

Attention! Rotary cutter blade
Undertake adjustments on the equipment only after the motor is switched off and the cutting tool has come to a standstill.
- Do not start the motor until your feet are at a safe distance from the cutting tool.
- Remove the grass collecting bag.
- Turn the switch to "CUT/COLLECT".
- Hang up the collection bag if necessary.
- Start the motor.
Mulch (LI-ION POWER 37, LI-ION POWER 40)
„Mulching“ is a process in which the grass is finely chopped by a special cutting system and then deposited on the ground. The result is that the grass does not have to be collected and disposed of. „Mulching“ also prevents the lawn from drying out.

Instructions for mulching
We recommend:
- Depending on the growth of grass, mulch 1 – 2 x per week
●The grass should not be too high nor too wet!
●Go slow while mulching
●Take care that the blade channels do overlap.
●Do not cut grass more than 20 mm.

Note:
Mulching is not advisable in case of moss-affected or entangled grass, because the cut material stays on the moss surface and/or entanglement and thus cannot be absorbed by the ground.
● Regularly scarify and manure the lawn.
Activating the mulch function U

Attention! Rotary cutter blade
Undertake adjustments on the equipment only after the motor is switched off and the cutting tool has come to a standstill.
- Do not start the motor until your feet are at a safe distance from the cutting tool.
- Remove the grass collecting bag.
- Set the switch to „MULCH“.
- Start the motor.
Transporting the appliance

Attention!
Before transport on or in a vehicle:
●Switch off the motor and remove the contact key.
- Allow engine to cool (approx. 30 minutes).
- For transport on or in a vehicle, secure the appliance adequately against slipping.

Attention!
- First stop the engine before moving it over surfaces other than grass.
Maintenance
General

Caution! Rotating blade
Before carrying out any maintenance or cleaning work:
- Remove the contact key.
- Remove the battery.
- Do not touch rotating blades.
Cleaning

Caution!
Wear protective gloves.
●Clean mower thoroughly after each mowing with cloth or brush.
●Never spray the mower with water.
- Clean the mulch flap at regular intervals with a small broom (LI-ION POWER 37, LI-ION POWER 40). V
Winter Storage
●Clean mower thoroughly before storing away.
●Have your mower thoroughly checked once a year by an approved Service Centre.
- Do not store it in a wet or humid place.
●The Lithium iron battery must also be recharged before prolonged periods of non-use, for example at the beginning of winter.
Blade change W

Caution! Rotating blade
Before carrying out any maintenance or cleaning work:
- Remove the contact key.
- Remove the battery.
- Do not touch rotating blades.
●Wear protective gloves.

Attention!
An unbalance can develop after regrinding of the blade.
●Always regrind the blades in a specialist workshop, because an unbalance check should be undertaken according to the safety regulations.
●Always change blades in a specialist workshop. A torque spanner of 10 mm is mandatorily required. Fastening torque of the screws: 6 - 7 N-m (LI-ION POWER 34, LI-ION POWER 37).
●Always change blades in a specialist workshop. A torque spanner of 13 mm is mandatorily required. Fastening torque of the screws: 16-18 N-m (LI-ION POWER 40).
●Use only original WOLF-Garten spare parts.
Faults and how to remedy
| Problem Possible causes | Remedy | |
| Jerky run, machine heavily vibrating | Blade damaged • Contact WOLF-Garten Service workshop | |
| Blade loose | See page 17 (Blade change) | |
| Battery flat | See page 15 (Charging the battery) | |
| Motor fails to start | Battery defective | See page 17 (Spare parts) |
| Contact key not inserted | See page 14 (General) | |
| Poor cutting/catching performance | Blade blunt • Contact WOLF-Garten Service workshop | |
| Bag blocked | See page 15 (Emptying of Grassbox) | |
| Incorrect cutting height | See page 15 (Set cut height) | |
| Battery defective | See page 17 (Spare parts) | |
Spare parts
| Order no. | Product | Description |
| 4904 031 | Grass bag, complete (LI-ION POWER 34) | |
| 4907 031 | Grass bag, complete (LI-ION POWER 37) | |
| 4970 031 | Grass bag, complete (LI-ION POWER 40) | |
| 4908 096 | Vi 34 X | Blade bar 34 cm |
| 4939 096 | Vi 37 A | Blade bar 37 cm |
| 4949 096 | Vi 40 A | Blade bar 40 cm |
| 4919 096 | LI-ION POWER Pack 2 | Exchangeable battery |
| 4939 090 | LI-ION POWER Pack 1 | Exchangeable battery |
| 4939 072 | Charger (standard) |
Warranty
The warranty rules issued by our company or the importer apply to every country. As part of the warranty, we remedy malfunctions on your appliance free of charge provided that this malfunction is caused by a material or manufacturing defect. In the event of a warranty claim, please turn to your dealer or the nearest branch office.
●Voir illustrations.
Fonctionnement
Général
Clé de contact K

● Regularly scarify and manure the lawn.
Aktiviranje funkcije kompostiranja U

OX26 4UR Bicester, Oxfordshire

0 18 69 36 36 36

0 18 69 36 36 20
H
MTD Hungária Kft
Dózsa György út 1
8248 Nemesvámos

06 88 51 55 00

06 88 50 55 20
NL
MTD Poland sp. z o.o.
UL. Ogrodnicza 1
84-252 Orle

058 57 20 701

058 57 20 699
RUS
natural_image
Red plastic push truck with white snow on ground, no visible text or symbols
natural_image
Man operating a red lawn mower on a grassy field with hedges in the background (no visible text or symbols)
natural_image
A rhomel with a hilt and a straw crop in a garden setting, surrounded by fresh lettuce leaves (no text or symbols visible)
natural_image
Close-up of a red spray gun with a yellow flame next to a green hedgehog (no text or symbols visible)
natural_image
Red and white hairless tool in a grassy field with blurred greenery background (no text or symbols visible)
natural_image
Woman cleaning a red lawn mower in a garden, no visible text or symbols
natural_image
Hand spraying water from a red WOLF Gasengtün spray bottle against a green grass background (no text or symbols on the spray itself)
natural_image
Red and white lawn mower on grass under a blue sky with clouds (no text or symbols visible)