
FIMS531J K.A IX - Oven INDESIT - Free user manual and instructions
Find the device manual for free FIMS531J K.A IX INDESIT in PDF.
| Product type | Built-in oven |
| Brand | Indesit |
| Model | FIMS531J K.A IX |
| Dimensions (W x H x D) | 43.5 x 32.4 x 40.6 cm |
| Volume | 58 L |
| Power supply | 220-240 V~ 50/60 Hz, 2250 W max |
| Installation type | Built-in under worktop or in column |
| Cooking programs | Traditional, Multi-cooking, Top heat, Grill, Gratin |
| Thermostat | Adjustment from 60°C to Max |
| Timer | Independent sound indicator |
| Electronic programmer | Clock, cooking duration, end of cooking |
| Interior lighting | Bulb 25 W, E14 socket |
| Cooling ventilation | Yes, delayed stop after cooking |
| Number of levels | 5 levels with slides |
| Supplied accessories | Grid, drip tray, slides |
| Cleaning | Non-abrasive sponge, removable door |
| Safety | Automatic shutdown, resistant glass surface, child lock not specified |
| Weight | Approximately 30 kg (estimate) |
| Repairability index | Bulb replaceable, other parts by after-sales service |
Frequently Asked Questions - FIMS531J K.A IX INDESIT
User questions about FIMS531J K.A IX INDESIT
0 question about this device. Answer the ones you know or ask your own.
Ask a new question about this device
Download the instructions for your Oven in PDF format for free! Find your manual FIMS531J K.A IX - INDESIT and take your electronic device back in hand. On this page are published all the documents necessary for the use of your device. FIMS531J K.A IX by INDESIT.
USER MANUAL FIMS531J K.A IX INDESIT
Operating Instructions OVEN
Contents
Operating Instructions,1
Warnings,3
Assistance,8
Description of the appliance,10
Description of the appliance,12
Installation,21
Start-up and use,23
Cooking modes,23
The electronic programmer*,25
Precautions and tips,26
Maintenance and care,26
FR
François
Mode d'emploi
FOUR
Sommaire
Mode d'emploi,1
Avertissements,4
Assistance,8
WARNING: The appliance and its accessible parts become hot during use. Care should be taken to avoid touching heating elements. Children less than 8 years of age shall be kept away unless continuously supervised. This appliance can be used by children aged from 8 years and above and persons with reduced physical, sensory or mental capabilities or lack of experience and knowledge if they have been given supervision or instruction concerning use of the appliance in a safe way and understand the hazards involved. Children shall not play with the appliance. Cleaning and user maintenance shall not be made by children without supervision.
Do not use harsh abrasive cleaners or sharp metal scrapers to clean the oven door glass since they can scratch the surface, which may result in shattering of the glass.
Never use steam cleaners or pressure cleaners on the appliance.
WARNING: Ensure that the appliance is switched off before replacing the lamp to avoid the possibility of electric shock.
! When you place the rack inside, make sure that the stop is directed upwards and in the back of the cavity.
FR
Avertissements
BHIMAHNE:Проверъ,чTo6bln3dJIeNe 6blIO BbIKJUOyeHO,пepd 3aMeHoi IamNoCKN BO n36ExKaHne BO3MOxHbIX ydapOB TOKOM.
!Pn yctaHOBKe peWetKn npOBepNTb, UTO6bl qNKcatOp 6blI NOBepHyT BBepx C3aHHei CTOpOHbl BbIEMKN.
HU
Figyelmeztetések
! Never use the services of an unauthorised technician.
Please have the following information to hand:
- The type of problem encountered.
The appliance model (Mod.).
The serial number (S/N).
The latter two pieces of information can be found on the data plate located on the appliance.
FR
Assistance
! He 3eptaTeCn no donomory Do He ynoBHOBeHoro nepcoHaJy.
Tobidomnt:
TnHecnpabHocTi;
Modenb npnnay (Mod.)
- CepiHnHOMep (S/N)
Li dani 3haojraTbCn Ha Ta6nuci 3 daHmHa cAmomy npnana.
IT
Description of the appliance
Overall view
1 POSITION 1
2 POSITION 2
3 POSITION 3
4 POSITION 4
5 POSITION 5
6 GUIDES for the sliding racks
7 DRIPPING PAN
8 GRILL
9 Control panel
PT
Description of the appliance
Control panel
1 SELECTOR knob
2 TIMER knob
3 THERMOSTAT knob
4 THERMOSTAT indicator light
5 ELECTRONIC programmer
* Only available in certain models.
FR
! Please keep this instruction booklet in a safe place for future reference. If the appliance is sold, given away or moved, please make sure the booklet is also passed on to the new owners so that they may benefit from the advice contained within it.
! Please read this instruction manual carefully: it contains important information concerning the safe operation, installation and maintenance of the appliance.
Positioning
! Do not let children play with the packaging material; it should be disposed of in accordance with local separated waste collection standards (see Precautions and tips).
! The appliance must be installed by a qualified professional in accordance with the instructions provided. Incorrect installation may damage property or cause harm to people or animals.
Built-in appliances
Use an appropriate cabinet to ensure that the appliance operates properly:
- The panels adjacent to the oven must be made of heat-resistant material.
- Cabinets with a veneer exterior must be assembled with glues which can withstand temperatures of up to 100^ .
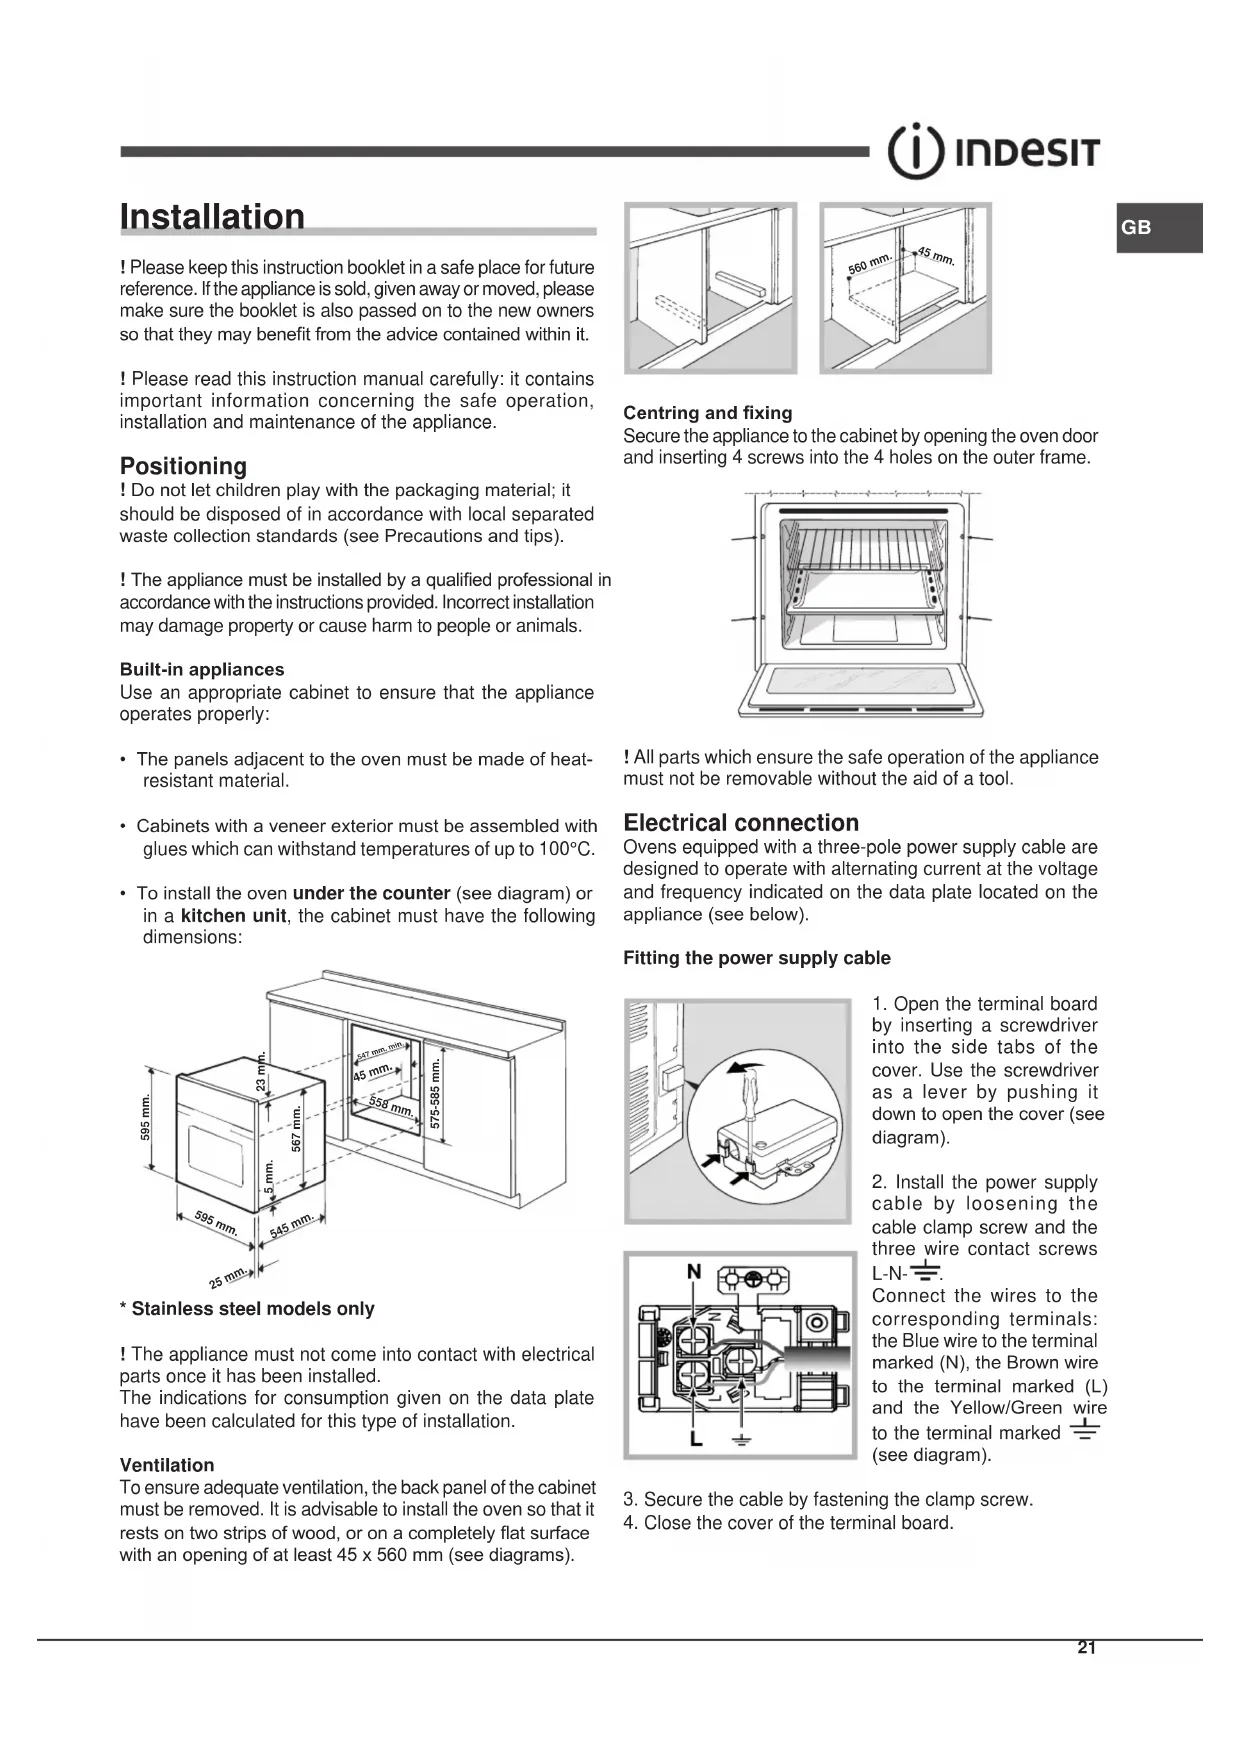
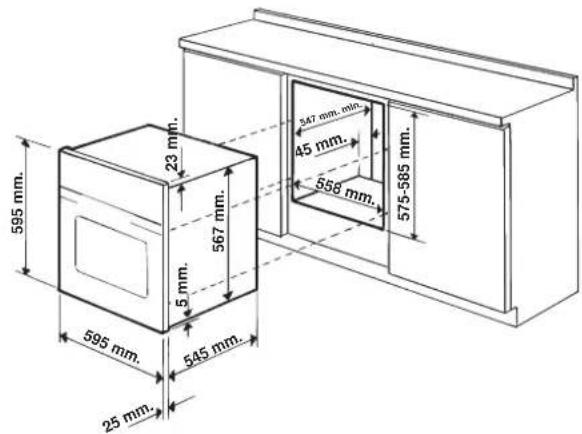
- To install the oven under the counter (see diagram) or in a kitchen unit, the cabinet must have the following dimensions:
* Stainless steel models only
! The appliance must not come into contact with electrical parts once it has been installed.
The indications for consumption given on the data plate have been calculated for this type of installation.
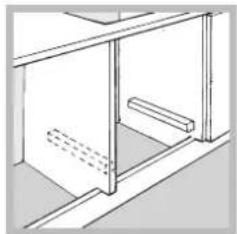
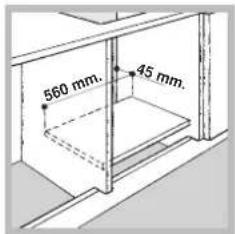
Ventilation
To ensure adequate ventilation, the back panel of the cabinet must be removed. It is advisable to install the oven so that it rests on two strips of wood, or on a completely flat surface with an opening of at least 45 × 560 ~mm (see diagrams).


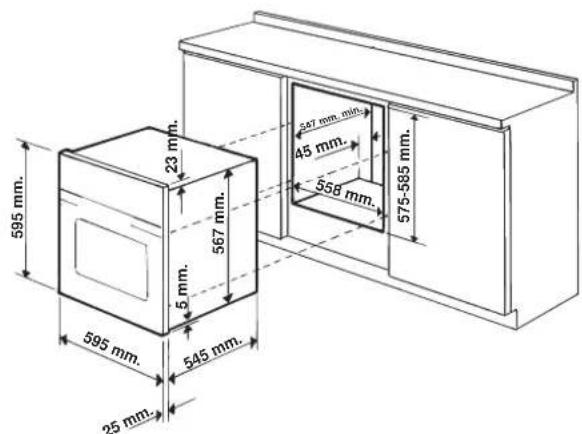
Centring and fixing
Secure the appliance to the cabinet by opening the oven door and inserting 4 screws into the 4 holes on the outer frame.
! All parts which ensure the safe operation of the appliance must not be removable without the aid of a tool.
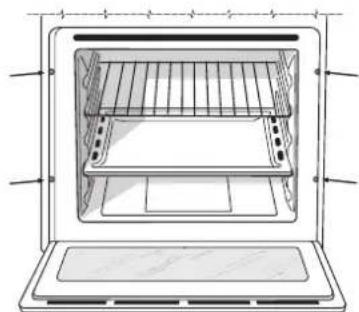
Electrical connection
Ovens equipped with a three-pole power supply cable are designed to operate with alternating current at the voltage and frequency indicated on the data plate located on the appliance (see below).
Fitting the power supply cable

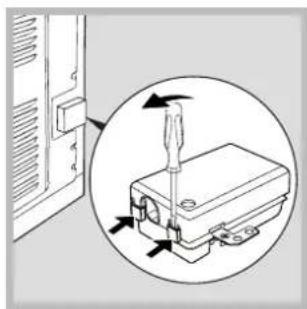
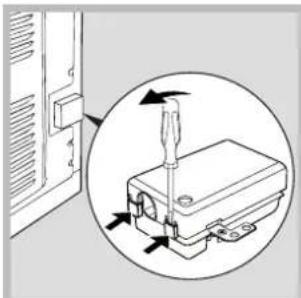
- Open the terminal board by inserting a screwdriver into the side tabs of the cover. Use the screwdriver as a lever by pushing it down to open the cover (see diagram).
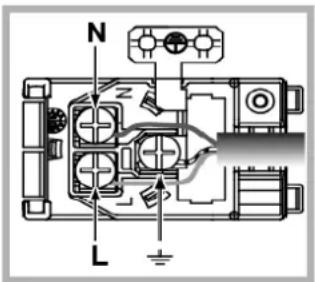
- Install the power supply cable by loosening the cable clamp screw and the three wire contact screws L-N-
Connect the wires to the corresponding terminals: the Blue wire to the terminal marked (N), the Brown wire to the terminal marked (L) and the Yellow/Green wire to the terminal marked 12 (see diagram).
- Secure the cable by fastening the clamp screw.
- Close the cover of the terminal board.
GB
Connecting the supply cable to the mains
Install a standardised plug corresponding to the load indicated on the data plate (see table).
The appliance must be directly connected to the mains using an omnipolar switch with a minimum contact opening of 3 mm installed between the appliance and the mains. The switch must be suitable for the charge indicated and must comply with current electrical regulations (the earthing wire must not be interrupted by the switch). The supply cable must be positioned so that it does not come into contact with temperatures higher than 50^ at any point (the back panel of the oven, for example).
! The installer must ensure that the correct electrical connection has been performed and that it is fully compliant with safety regulations.
Before connecting the appliance to the power supply, make sure that
- The appliance is earthed and the plug is compliant with the law.
- The socket can withstand the maximum power of the appliance, which is indicated on the data plate.
- The voltage is in the range between the values indicated on the data plate.
- The socket is compatible with the plug of the appliance. If the socket is incompatible with the plug, ask an authorised technician to replace it. Do not use extension cords or multiple sockets.
! Once the appliance has been installed, the power supply cable and the electrical socket must be easily accessible.
! The cable must not be bent or compressed.
! The cable must be checked regularly and replaced by authorised technicians only (see Assistance).
! The manufacturer declines any liability should these safety measures not be observed.
| APPLIANCE SPECIFICATIONS | |
| Dimensions* | width 43.5 cm height 32,4 cm depth 40.6 cm |
| Volume* | 58 l |
| Dimensions** | width 45.5 cm height 32,4 cm depth 40.6 cm |
| Volume** | 60 l |
| Electrical connections | Voltage: 220 - 240 V~ 50/60 Hz (see data plate) maximum power absorbed 2250 W |
| ENERGY LABEL and ECODESIGN | Regulation (EU) No 65/2014 supplemen- ting Directive 2010/30/EU. Regulation (EU) No 66/2014 implementing Directive 2009/125/EC. Standard EN 60350-1 Standard EN 50564. Models with cooling ventilation: Energy consumption for Natural convection heating mode: Convection Declared energy consumption for Forced convection Class heating mode: Multi-cooking Models without cooling ventilation Energy consumption for Forced convection heating mode: Multi-cooking Declared energy consumption for Natural convection Class heating mode: Convection |
| CE | This appliance conforms to the following European Economic Community directives: - 2006/95/EEC dated 12/12/06 (Low Voltage) and subsequent amendments. - 2004/108/EEC dated 03/05/89 (Electromagnetic Compatibility) and subsequent amendments. - 93/68/EEC dated 22/07/93 and subsequent amendments. - 2012/19/EC and subsequent amendments. |
- Only for models with drawn rails.
** Only for models with wire rails.
Start-up and use
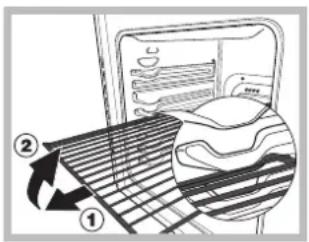
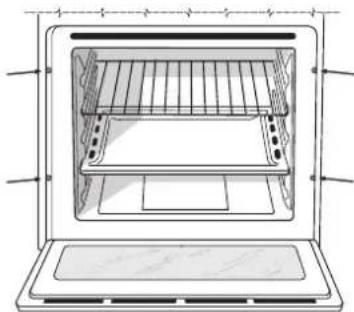
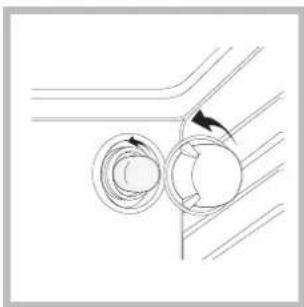
WARNING! The oven is provided with a stop system to extract the racks and prevent them from coming out of the oven (1).
As shown in the drawing, to extract them completely, simply lift the racks, holding them on the front part, and
pull (2).
! The first time you use your appliance, heat the empty oven with its door closed at its maximum temperature for at least half an hour. Ensure that the room is well ventilated before switching the oven off and opening the oven door. The appliance may emit a slightly unpleasant odour caused by protective substances used during the manufacturing process burning away.
Setting the clock
- Select the desired cooking mode by turning the SELECTOR knob.
- Select the desired temperature using the THERMOSTAT knob. A list detailing cooking modes and suggested cooking temperatures can be found in the Cooking advice table (see Cooking modes).
- The THERMOSTAT indicator light indicates that the oven is heating up to the temperature set.
-
During cooking it is always possible to:
-
change the cooking mode by turning the SELECTOR knob;
- adjust the temperature by turning the THERMOSTAT knob;
- stop cooking by turning the SELECTOR knob to the "0" position.
! Never put objects directly on the bottom of the oven; this will prevent the enamel coating from being damaged.
! Always place cookware on the rack(s) provided.
Cooling ventilation
In order to cool down the external temperature of the oven, a cooling fan blows a stream of air between the control panel and the oven door, as well as towards the bottom of the oven door.
! Once cooking has been completed, the cooling fan continues to operate until the oven has cooled down sufficiently.
Oven light
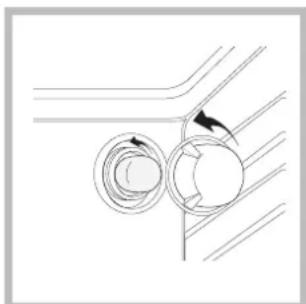
When selecting with the SELECTOR knob the oven light goes on. It remains lit when a cooking mode is selected.
How to use the timer*
- To set the buzzer, turn the TIMER knob clockwise almost one complete revolution.
-
Turn the knob anticlockwise to set the desired time: align the minutes shown on the TIMER knob with the indicator on the control panel.
-
The timer operates in minutes: when the selected time has elapsed, a buzzer will sound.
! The timer does not turn the oven on or off.
Cooking modes
Cooking modes
! A temperature value between 60^ and MAX can be set for all cooking modes except the following:
- GRILL (recommended: set only to MAX power level)
- GRATIN (recommended: do not exceed 200^ ).

TRADITIONAL OVEN mode
Both the top and bottom heating elements will come on. When using this traditional cooking mode, it is best to use one cooking rack only. If more than one rack is used, the heat will be distributed unevenly.

MULTILEVEL mode
All the heating elements (top, bottom and circular) switch on and the fan begins to operate. Since the heat remains constant throughout the oven, the air cooks and browns food in a uniform manner. A maximum of two racks may be used at the same time.

TOPOVENmode
The top heating element comes on. This mode can be used to brown food at the end of cooking.

GRILL mode
The top heating element comes on. The extremely high and direct temperature of the grill makes it possible to brown the surface of meats and roasts while locking in the juices to keep them tender. The grill is also highly recommended for dishes that require a high temperature on the surface: such as beef steaks, veal, rib steak, filets, hamburgers etc... Some grilling examples are included in the "Practical Cooking Advice" paragraph. Always cook in this mode with the oven door closed.

GRATIN mode
The top heating element, as well as the fan, will come on. This combination of features increases the effectiveness of the unidirectional thermal radiation provided by the heating elements through forced circulation of the air throughout the oven. This helps prevent food from burning on the surface and allows the heat to penetrate right into the food. Always cook in this mode with the oven door closed.
GB
Practical cooking advice
! Do not place racks in position 1 and 5 during fan-assisted cooking. This is because excessive direct heat can burn temperature sensitive foods.
! In the GRILL and GRATIN cooking modes, particularly when using the rotisserie spit, place the dripping pan in position 1 to collect cooking residues (fat and/or grease).
MULTI-COOKING
- Use positions 2 and 4, placing the food which requires more heat on 2.
- Place the dripping pan on the bottom and the rack on top.
GRILL
- Place the rack in position 3 or 4. Position the food in the centre of the rack.
- We recommend that the power level is set to maximum. The top heating element is regulated by a thermostat and may not always operate constantly.
PIZZA
- For best results when cooking pizza, use the MULTI-COOKING mode.
- Use a light aluminium pizza pan. Place it on the rack provided.
For a crispy crust, do not use the dripping pan (prevents crust from forming by extending cooking time).
- If the pizza has a lot of toppings, we recommend adding the mozzarella cheese on top of the pizza halfway through the cooking process.
Cooking advice table
| Cooking modes | Foods | Weight (in kg) | Rack position | Pre-heating time (min) | Recommended temperature | Cooking time (minutes) |
| Convection Oven | Duck | 1 | 3 | 15 | 200 | 65-75 |
| Roast veal or beef | 1 | 3 | 15 | 200 | 70-75 | |
| Pork roast | 1 | 3 | 15 | 200 | 70-80 | |
| Biscuits (short pastry) | - | 3 | 15 | 180 | 15-20 | |
| Tarts | 1 | 3 | 15 | 180 | 30-35 | |
| Multi-cooking | Pizza (on 2 racks) | 1 | 2 and 4 | 15 | 230 | 15-20 |
| Lasagne | 1 | 3 | 10 | 180 | 30-35 | |
| Lamb | 1 | 2 | 10 | 180 | 40-45 | |
| Roast chicken + potatoes | 1+1 | 2 and 4 | 15 | 200 | 60-70 | |
| Mackerel | 1 | 2 | 10 | 180 | 30-35 | |
| Plum cake | 1 | 2 | 10 | 170 | 40-50 | |
| Cream puffs (on 2 racks) | 0.5 | 2 and 4 | 10 | 190 | 20-25 | |
| Biscuits (on 2 racks) | 0.5 | 2 and 4 | 10 | 180 | 10-15 | |
| Sponge cake (on 1 rack) | 0.5 | 2 | 10 | 170 | 15-20 | |
| Sponge cake (on 2 racks) | 1 | 2 and 4 | 10 | 170 | 20-25 | |
| Savoury pies | 1.5 | 3 | 15 | 200 | 25-30 | |
| Top oven | Browning food to perfect cooking | - | 3/4 | 15 | 220 | - |
| Grill | Soles and cuttlefish | 1 | 4 | 5 | Max | 8-10 |
| Squid and prawn kebabs | 1 | 4 | 5 | Max | 6-8 | |
| Cod filet | 1 | 4 | 5 | Max | 10 | |
| Grilled vegetables | 1 | 3 or 4 | 5 | Max | 10-15 | |
| Veal steak | 1 | 4 | 5 | Max | 15-20 | |
| Cutlets | 1 | 4 | 5 | Max | 15-20 | |
| Hamburgers | 1 | 4 | 5 | Max | 7-10 | |
| Mackerels | 1 | 4 | 5 | Max | 15-20 | |
| Toasts | 4 | 4 | 5 | Max | 2-3 | |
| Gratin | Grilled chicken | 1.5 | 2 | 5 | 200 | 55-60 |
| Cuttlefish | 1.5 | 2 | 5 | 200 | 30-35 |
The electronic programmer*
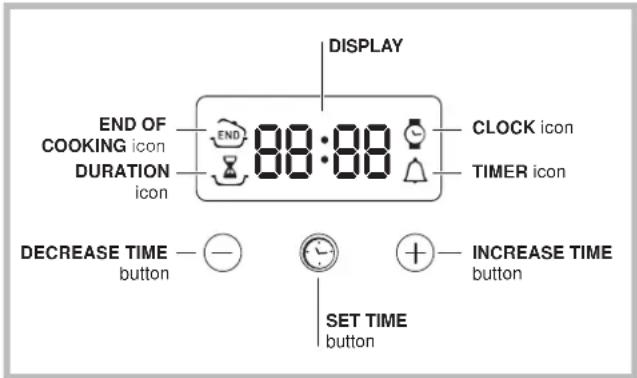
Setting the clock
! The clock may be set when the oven is switched off or when it is switched on, provided that a the end time of a cooking cycle has not been programmed previously.
After the appliance has been connected to the mains, or after a blackout, the icon and the four numerical digits on the DISPLAY will begin to flash.
- Press the button several times until the icon and the four digits on the display begin to flash.
- Use the " ^+ and " " buttons to adjust the time; if you press and hold either button, the display will scroll through the values more quickly, making it quicker and easier to set the desired value.
- Wait for 10 seconds or press the button again to finalise the setting.
Setting the timer
! This function does not interrupt cooking and does not affect the oven; it is simply used to activate the buzzer when the set amount of time has elapsed.
- Press the button several times until the icon and the three digits on the display begin to flash.
- Use the "and" buttons to set the desired time; if you press and hold either button, the display will scroll through the values more quickly, making it quicker and easier to set the value.
- Wait for 10 seconds or press the button again to finalise the setting.
The display will then show the time as it counts down. When this period of time has elapsed the buzzer will be activated.
Programming cooking
! A cooking mode must be selected before programming can take place.
Programming the cooking duration
-
Press the button several times until theoon and the three digits on the DISPLAY begin to flash.
-
Use the ^+ and 一 buttons to set the desired duration; if you press and hold either button, the display will scroll through the values more quickly, making it quicker and easier to set the value.
- Wait for 10 seconds or press the button again to finalise the setting.
-
When the set time has elapsed, the text END appears on the DISPLAY, the oven will stop cooking and a buzzer sounds. Press any button to stop it.
-
For example: it is 9:00 a.m. and a time of 1 hour and 15 minutes is programmed. The programme will stop automatically at 10:15 a.m.
Setting the end time for a cooking mode
! A cooking duration must be set before the cooking end time can be scheduled.
- Follow steps 1 to 3 to set the duration as detailed above.
- Next, press the button until the icon and the four digits on the DISPLAY begin to flash.
- Use the ^+ and " - " buttons to adjust the cooking end time; if you press and hold either button, the display will scroll through the values more quickly, making it quicker and easier to set the desired value.
- Wait for 10 seconds or press the button again to finalise the setting.
-
When the set time has elapsed, the text END appears on the DISPLAY, the oven will stop cooking and a buzzer sounds. Press any button to stop it.
Programming has been set when the and buttons are illuminated. The DISPLAY shows the cooking end time and the cooking duration alternately. -
For example: It is 9:00 a.m. and a duration of 1 hour has been programmed. 12:30 is scheduled as the end time. The programme will start automatically at 11:30 a.m.
Cancelling a programme
To cancel a programme:
- Press the button until the icon corresponding to the setting you wish to cancel and the digits on the display are no longer flashing. Press the " " button until the digits 00:00 appear on the display.
-
Press and hold the "+" and "-" buttons; this will cancel all the settings selected previously, including timer settings.
-
Only available in certain models.
GB
Precautions and tips
! This appliance has been designed and manufactured in compliance with international safety standards. The following warnings are provided for safety reasons and must be read carefully.
General safety
- The appliance was designed for domestic use inside the home and is not intended for commercial or industrial use.
- The appliance must not be installed outdoors, even in covered areas. It is extremely dangerous to leave the appliance exposed to rain and storms.
- When moving or positioning the appliance, always use the handles provided on the sides of the oven.
- Do not touch the appliance while barefoot or with wet or damp hands and feet.
- The appliance must be used by adults only for the preparation of food, in accordance with the instructions provided in this booklet. Any other use of the appliance (e.g. for heating the room) constitutes improper use and is dangerous. The manufacturer may not be held responsible for any damage caused as a result of improper, incorrect and unreasonable use of the appliance.
- Do not touch the heating elements or certain parts of the oven door when the appliance is in use; these parts become extremely hot. Keep children well away from the appliance.
- Make sure that the power supply cables of other electrical appliances do not come into contact with the hot parts of the oven.
- The ventilation and heat dispersal openings must never be obstructed.
- Always grip the oven door handle in the centre: the ends may be hot.
Always use oven gloves when placing cookware in the oven or when removing it. - Do not use aluminium foil to line the bottom of the oven.
- Do not place flammable materials in the oven: if the appliance is switched on accidentally, the materials could catch fire.
Always make sure the knobs are in the "●"/"○" position when the appliance is not in use. - When unplugging the appliance, always pull the plug from the mains socket; do not pull on the cable.
- Do not perform any cleaning or maintenance work without having disconnected the appliance from the electricity mains.
- If the event of malfunctions, under no circumstances should you attempt to perform the repairs yourself. Contact an authorised Service Centre (see Assistance).
- Do not rest objects on the open oven door.
- Do not let children play with the appliance.
- The appliance should not be operated by people (including children) with reduced physical, sensory or mental capacities, by inexperienced individuals or by anyone who is not familiar with the product. These individuals should, at the very least, be supervised by someone who assumes responsibility for their safety or receive preliminary instructions relating to the operation of the appliance.
- The appliance is not intended to be operated by means of an external timer or separate remote-control system.
Disposal
- When disposing of packaging material: observe local legislation so that the packaging may be reused.
- The European Directive 2012/19/EC on Waste Electrical and Electronic Equipment (WEEE), requires that old household electrical appliances must not be disposed of in the normal unsorted municipal waste stream. Old appliances must be collected separately in order to optimise the recovery and recycling of the materials they contain and reduce the impact on human health and the environment. The crossed out "wheeled bin" symbol on the product reminds you of your obligation, that when you dispose of the appliance it must be separately collected.
Consumers should contact their local authority or retailer for information concerning the correct disposal of their old appliance.
Maintenance and care
Switching the appliance off
Disconnect your appliance from the electricity supply before carrying out any work on it.
Cleaning the appliance
- The stainless steel or enamel-coated external parts and the rubber seals may be cleaned using a sponge that has been soaked in lukewarm water and neutral soap. Use specialised products for the removal of stubborn stains. After cleaning, rinse and dry thoroughly. Do not use abrasive powders or corrosive substances.
- The inside of the oven should ideally be cleaned after each use, while it is still lukewarm. Use hot water and detergent, then rinse well and dry with a soft cloth. Do not use abrasive products.
- All accessories - with the exception of the sliding racks - can be washed like everyday crockery, and are even dishwasher safe.
- We recommend that detergents are not sprayed directly onto the control panel, but that a sponge is used instead.
! Never use steam cleaners or pressure cleaners on the appliance.
Cleaning the oven door
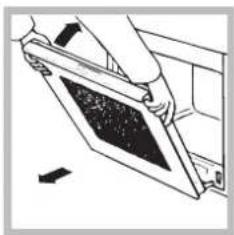
Clean the glass part of the oven door using a sponge and a non-abrasive cleaning product, then dry thoroughly with a soft cloth. Do not use rough abrasive material or sharp metal scrapers as these could scratch the surface and cause the glass to crack. For more thorough cleaning purposes, the oven door may be removed:
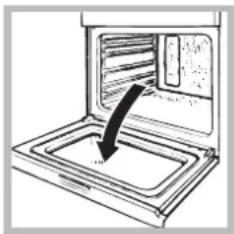
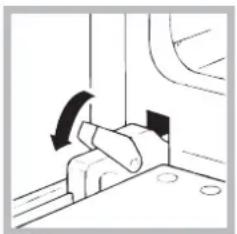
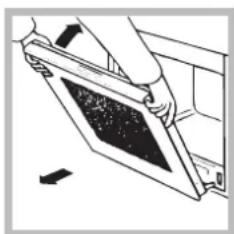
- Open the oven door fully (see diagram);

- Lift up and turn the small levers located on the two hinges (see diagram);
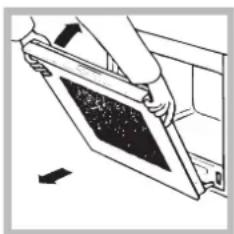
- Grip the door on the two external sides and close it approximately half way. Pull the door towards you, lifting it out of its slot (see diagram).
To replace the door, reverse this sequence.
Inspecting the seals
Check the door seals around the oven regularly. If the seals are damaged, please contact your nearest Service Centre (see Assistance). We recommend that the oven is not used until the seals have been replaced.
Respecting and conserving the environment
GB
- Always keep the oven door closed when using the GRILL and GRATIN modes: This will achieve improved results while saving energy (approximately 10% ).
- Whenever possible, avoid pre-heating the oven and always try to fill it. Open the oven door as little as possible because heat is lost every time it is opened. To save a substantial amount of energy, simply switch off the oven 5 to 10 minutes before the end of your planned cooking time and use the heat the oven continues to generate.
- Keep gaskets clean and tidy to prevent any door energy losses
- If you have a timed tariff electricity contract, the "delay cooking" option will make it easier to save money by moving operation to cheaper time periods.
- The base of your pot or pan should cover the hot plate. If it is smaller, precious energy will be wasted and pots that boil over leave encrusted remains that can be difficult to remove.
Cook your food in closed pots or pans with well-fitting lids and use as little water as possible. Cooking with the lid off will greatly increase energy consumption - Use purely flat pots and pans
- If you are cooking something that takes a long time, it's worth using a pressure cooker, which is twice as fast and saves a third of the energy.
FR
Installation
To replace the door, reverse this sequence.
Contrôle des joints
!BHHMaTeNbHO npOHTaNTe HnCTpyKuIN:B HNX COepkataBaxHbIe CBeDeHnO6 yCTaHOBKe,3KcNpyatauIN 6e3oNaCHOCTn N3dEJIa.
PacnoJoxeHne
! He pa3pewante detam nrpatb c ynaKOBouHbIMMaTePnAaMn. YnaKOBouHbIe MaTePnAJIbI DoJXHbI 6blTbYHHTOKeHbIB COOTBeTCTBnC nPaBnAmn pa3deJIbHorOc6opa Mycopa (cm. PpeoctopoxkHOCTn peKOMeHaaun).
!MoHTax n3dennn npON3BODNTC B COOTBETCTBn C DaHHbIMN HcTpyKcIyMa KBaJIHcNpUPOBaHHbIMN cneuaJIINCTaMn. HenpaBUNbHbIMoHTax n3dennn MOHTAX n3dennn MOKeT cTaTb npuHOn IOBpeXdEHNr IMyEcCTBa N pnuHHTb yuePb IIOJAM N DOMaunHM XNBOTHbIM.
BcTpoEHHbIMoHTaX
Дя obecneeynЯ ncpabHoro ФункионpoBaHnBCTpanBaemoro n3dJIy KxOHHb 3IeMeHT DoJKeH NMeTb COOTBeTCTByUOuNe xapakTePncTkn:
- NaHeJI KxOHHbIX 3JIeMeHToB, PnIneraIOUnx K DyXOBOMy
Ukaqy, DOJNXbI 6bITb BbIIOJIHeHb I3 TepMOCTOnKOrO
MaTePvAnla;
KNe Kxohhbx 3JEMeHTOB 3JIeMeHTOB, IIOHOPOBaHHbIX DepeBOM, DOnXeH 6bITb yCTOuHBbIM K TemnepaType 100^
-ДЯВCTpaBHaNЯДуXOBOrOшkaФа NOД KYXOHHbIM TOnOM(CM.Cxemy)ИИB NeHaJ HnWa KYXOHHO 3JIeMeHTa DOIXHnA IMETb CNeDyUOuNE pa3Mepbl:
!Iocne BcTpaBAHnN 3dEINN B KxyOHbI 3JeMeH TdoJXHa 6bITb NCKIOUeHa BO3MOXHOCTb KacaHr K 3JIeKTPuYeCKMn YactmN.
Pacxod 3nEeKtpo3HepRn, yka3aHHbHa nacnopTHoT Tabnueke H3deNIA, 6bl 3amepRdJa daHHoro Tnna MOHTaxa.
Bentnla
IIO oecneHnHaJIeXaIeB eHTINrIuH HeoXoIMO CHaTb 3aHIO NaHEn HnN KxOHHO 3JemeHTa.
PekomeHdyetc yctahOBNTb dyxOBn IkaΦ Ha dBa DepeBHHbIX 6pycka NnHa cNIOwHoe OCHOBaHne C OTBepCTnEM DnAmETpOM He Mehee 45 x 560 MM (CM YePTexn).
UeHTpoBka n KpenJeHne
IINKpennnHnN3dEINN K KyxOHmOy 3neMeHTy:OTKpoTRe DBepuy dYXOBORo WkaFpa N 3aBnHTnte 4 wypna InIepeBbHHbIX nHaHeNe B 4 OTBepCTraBnepnMeTpabHbHO paMe.
!Bce3aunTHbIe 3IemeHbIdoJXHbI6bIT3akpenneHbTAKIMo6pa3OM,TO6bIXMOKHO6blIOCHrTBTOJbKO pIN NOMOcNcuaJIbHOrO HCTpyMeHTa.
3neKtpnuecko noknoueHne
DyXOBbIe 1kaObl, yKOMNIEKTOBaHHBIE TpExnIOHCHbIM CeTeBBIM KaBeIem, pacHTaHbI Ha cyHKUHOHPOBaHne C npeMeHHbIM TOKOM C HapRjKeHEm N aactOTOn 3JIeKTPoNTaHnry, yKa3aHHbIM Na NaCnOpTHoT Ta6NIuHKe C daHHbIM (CM. HIXke).
PoeHne cTeBoro ka6e
- OTkpoIte 3aJxMHyKopo6Ky, Haxab npn NOMOuNOTBepTKHa BbICTyblc 60KOB KpbILIK: NOTAHHTe N OTKPOITe KpbILIKy (CM.CXEMy).
RS
2.ПорядOK NOДСоЕДИНЕНЯ cTeBOrO Ka6JIe:OTBnHTNITe BnHT Ka6JIbHOrO caIbHnIka n TpN BnHTa KOHTaKToB L-N- 1 n 3aTeM npKpeNITe npOBoJa NOrTOJOBKaAMn BnHTOB,CoBIOJdA rEBToByO mapKnipOBky CnHn (N) KopuHeBly (L) XKeIto-3eJIeHbI (cm.Cxemy). 3.3akpeNITE cTeBoi
Ka6eJIb B CneuaJbHOM Ka6eJbHOM caJbHKe.
- 3akpoIe KpbIuKy 3axmHoiKOPO6Kn.
IopcoeHHeHne cTeBoro uHypa n3dEJnK ceTn 3JeKTPoNTaHH
YCTAHOBInTe Ha CTeBOI Ka6eINb HOpMaIN3OBAHNyU
WTENCeINbHYIO BUNKy, pacHTaHHyIO Ha HArpy3Ky, yKa3aHHyIO
Ha nacnopTHO Tabnue (CM. c6Oky).B cnyae npramoro
NOKJIIOHcENr K CETn 3JNeKTPoINTaHHm MExdy n3dEnm
H CetbIO He06XODIMO YCTAHOBInb MHORONIOCHbIi
BbIKIOuATEJB C MNHMajlbHbIM pacCToRHNem MeKdY
KOHTAKTM 3 MM, pacHTaHHbI HA daHHyIO HArpy3Ky
N COOTBeTCTBYUOn DeNCTBYUOnM HopMaTHBaM
(BbIKIOUATeINb HE DOJKeH pa3MbKaTb NPOBOD 3a3EmneHnA
CTeBOI Ka6eINb DOJKeH 6bITb PACNoIOxEH TaKNM
O6pa3OM, YTO6bl H N B ONDHO TOnke erO TempePaTyPA He
PpeBliana TEMpePaTyP NoMeSeHHa 6Oonee Yem Ha 50^ (HanpImep, 3aHnra NaHeB dYxOBOrO uKaFa).
!3eKtpomOHep Hecet OTBETCTBeHHocTb 3a npabnIbHoe nOdkNoueHHe N3denn K 3eKtpueckOn CETn 3a co6JIOeHne npabn6e3oNaChocTn.
Ipeep noKJIoueHem n3dJIy K cETn 3JKeKTPoNTaHn npOBebpTe cneDyUoUee:
- p03eTka DoJnxHa 6bItb CoeDInHeHa C 3a3EmnEnHem I COOTBETCTBOBaTb HOpMaTnBaM;
- ceteBa p03eTka dOJXHa 6bIb paccuTaHa Ha MaKcImaJIbHyIO NOTpe6JrEmyIO MOUHOCt b N3dJIIny, yKa3aHHyIO B Ta6Jnue TeXHnueckx XapaKTePncTnK;
HAnpXeHne N qactota TOKa CETN DOnXhbl COOTBETCTBOBaTb 3JIeKtpnueckm DaHHbIM N3dEInr; - ceteBaJ po3eTKa DOnkHa 6bItb COBMeCTnMa Co
UTeNCeIbHON BuNKoN 3dEInr. B npOTNBOM cnYuae
3aMeHIne po3eTKy INN BuNKy; He nCNoJIb3yIne
yDInHIneTIu INN TpOHNKn.
!N3dJIne D0JXHO 6bITb yCTAHOBHeHO TAKIM O6pa3OM, YTO6bl 3NEKtpnuecknn npoBOD n CTeBaH po3etKa 6blnn JERKO DOCTynHbl.
!3nektpnuecknn npoBOD n3dennr He doJIkeH 6bITb cOrHyT nn CkAT.
!Perynnapno npobepaute coctoHne ka6enr 3JIeKtponntAHn IB cnyuae HeoXoDmocTn nopyuTe erO 3aMeHy TOnbKO yNoJHOMOeHHbIM TexHnKaM (CM. TexHnueckoe o6cnykBaHne).
!Pon3BOAnTeJIb He HecET OTBeTCTBeHHocTn 3a nocneCTBnH Heco6JIHOeHNr NpeueNCHeHHbIX Bblwe Tpe6oBaHH.

AIO 77
!HnKorda He CTaBbTe HnKaNX NpeDMeTOB Ha DHO DxyOBOrUkaDpa, TAK KAK OHN MOrY TNOBpeDITb 3MaHINPOBaHHoe NOKpbTHe.
!Bcerda ctabbte nocydy Ha npnilaraioyioe peweTky.
OxnaInteBHaB eHTnIaIy
IINHIXEHN TEMNEPAtpbI CHAPyKu DxyOBoro 6kaΦaOxNaIDTeNbHbI BeHTnIaTOp CO3dae TNOTOK BO3dyMaMeJy nepeDHe NaneBIO, DBepueu DxyOBoro 6kaΦa INHXHM Kpaem DBepCuI DxyOBKn.
!No3aBepseHnnpiroTOBneHnBeHTnJIrTop npoOJIkaet pa6oTaTb BnIOTb Do HaNnexKaUeTo OXnaJKeHn DyXOBKn.
OcBeHHe DyXOBoro WkaΦa
3aropaetc npn BbIbope npn nomoyn pyKoTkn PPOrPAMMbI. Octaetc BkInoueHHoN npn Bblbope nporpammbi npiroTOBHeHn.
Popraok nCnoB3OBAHnTaMepa\*
- Празду BCRO Heo6xOДМо 3aBecTu Taimep, NOBepHyB pykoTky TAIMEP no yacOBоI CTpeJIke NOUTn Ha Odnn noJIhbl o6opOT.
* IMeETcra TOJIbKO B HEKOTOpbIX MoDeJIAx.
2.Поворачивая рукову obpaTHO, npOTNB YacOBON CTpeJIKN,ЗадаETСН HxHObE BpEMa - MHyTbI Ha pyKoTKe TAIIMEPA DoJnxHbI COBNaCTb C OTMeTKAMn BpEmeHn Ha naHEn ynpabNeHn.
3. TaImeP OTCuHTbIaET BpEmBaObpaTHOM nopAKe: no nCTeueHn 3aDaHHOro BpeMeHn pa3daetc3BykoBoi CnHaJ.
!TaHmep He ynpabJareT BkHoueHnem NIN BBKIOueHnEM dyXOBORO WkaFa.
Ppormmbi
PporpaMMbI npnroTOBJeHna
!BCEX nporpaMM MOxHO 3aTaTb TemnepaTy pO 60^ do MAKC Kpome:
- ΓΡΙΝΙν (pekOMeHДуETcA yCTaHaBЛиВaTb TOnIbKO MAKC. TemnepaTyP);
3AANEKAHKA (pekomehnyetc Hne npebbwaTb Temnepatypy 200^

Programma TPAДИЦИОНHAДУXYOBKA
BknnoyaoTc DaHarpeBaTeNbHbIX 3JeMeHTa: HnKHN n BepxHn. B pexmte TpaDnucnOHoro nprirotOBneHn pekomehnyetc NcNoB3OBAt ToIbKO OINuH ypOBeH: npn NCNoB3OBAHn HeckoNbKnx ypOBHei pacnPepJeHne TEMnepaTypb6ydt HeONTMmaJIbHbIM.

Iporpamma ODHOBPEMEHHOE PNIIGOTOBJEHNE
BknnoaOTcBce HarpBeBaTeIbHbIe 3IemeHTbl (BepxHn, HxHn n KpyIbI) n BEHTnIATop. TaK KaK Jap ABJAE TcN OCToHHbIM BO BcEM dYXOBOM IkaFy, Bo3dYx ObecneuBAET OndopOHO npiroTOBJIeHne n NpOpyMaHNBaHne npOdyKTa. MoKHO OdnOBpeMeHNO IcNoJIb3ObaTb He 60JIee DByx yPOBHe B dYxOBKe.

Iporpma BEPXHN HAFPEBATEJb
BknHuaeTcBepxHnHarpeBaTeJbHbIn 3IeMeHT. 3TaФyHKUNMOKET6bITbNCIOJIb3OBAHaДЯ DOBO rTOOBbIX6NIO.

Iporpamma PnJb
BkHIOaETcBepxHn HArpeBaTeIbHbIn 3JeMeHT.3HaHTeJIbHAp TEmnepaTpy nprrMO DeNCTBn rpiJr N03BOJAEr NOyHTb 6bICTpoe o6pa3OBAHn KOpOuKn Ha nobepxHOCTn IpOdyKT, KOtopa npenrTCTByET BixOy COKOB IN CoXPAHReT PPOdYKT HeHHbIM n CoHybIM BHyTpNI. IcNoJIb3OBAHn FyHKunrPiNb B OOCoBeHNocTH peKOMeHNyETc DnA 6NIO, dNra pnproTOBHeHn KOTopbIX Tpe6yETc BICOKa JOBepxHOCTHa TEMpeaTypa: TeJIyBuNX ITOB8KbNx 6NΦwTEKCoB, aHTpeKOTOB, Bbipe3KN, ram6yprepOB n T.D. B naparpaFe «IpPaTKueckne COBeTbI NO pnproTOBNEHNO» npINBOJrTc HekOTOpBie pnpmepbl IcNoJIb3OBAHn DxyOBOr OkaFa. fOTOBTe 6NIOda C 3aKpbITOn DBePcEN DxyOBOr OkaFa.
Bknuetae T BepxHn HarpBeaTeNbHbI 3neMeHT n BepTe. CoheTaet ODHOHAnpaBHeHHOe BbIeNeHne Japa C npHyDnteLbHOU npKyIaueN BO3dyxa BHYTpN DxyOBoro WkaΦa. 3TO npenTCTByET oBropAHIO NOBepxHOCTn npOyKTOB, NOBbIaar npOHKaIOUyIO CNOC6HOCT b Japa. FOTOBtE 6nOda c 3akpyTo IDBepue N DxyOBoro WkaΦa.
Ppaktnueckne coBebI no npnroTOBneHIO
!BpeKnmeBeHTnnpyemoro npuroToBHeHneNcNoB3yIte1-bin 5-bi npOBHN:OnnNoDBepraOTcnpaMOMy BO3dEiCTBnIO ropraHero BO3dyxa,KOTOpbIMoKETCKeHb DeJIHKaTHbIe IpOdyKTbl.
!Pn nCnoJb3ObaHnn PnIb n NOpYMaHNBAHNE,OCo6eHNO C cyHKuuei BepTeJa, NOMeCTnTE npOTnBeHb Ha1-bi ypoBeHb IJIa c6opa KnKocTeB, BblJeIeMOrO npNjkapke (cok n/nnn Jnp).
ODHOBPEMEHHOE PIPROTOBULEHNE
- IcnoIb3yIOCTc 2-0n 4-bI ypoBHN, Ha 2-0n NOMEuaOTc npOdyKtbl, Tpe6yIOUe 6oJee nHTeHCNBHoro Jkapa.
- YctaHOBInTe npontBeHb Chn3y, a peWetKy CBepxY.
PnIb
- YctaHOBnte peWetky Ha ypoBeHb 3 nn 4, nomecTne npOdyKtbl B ceHTp peWetKn.
- PeKOMeHnyETcB Bbl6paTb MaKcMmaJIbHyIO MOUHOCTb dYxOBKn. He BeCnOKoTecb, ecnn BepXnHm 3IeMeHT He OCTaETcNoCTOraHHo BKJIOueHHbIM: erp pa6ota ynpabJIaTeTc TepMOCTaTom.
NiuLAA
-ДяВынчКВуСHои NИцьИсNoЛьЗУпTe nporpaMMy OДНOBPEMEHHOE ПИГOTOBLEHNE.
- IcnoIb3yInTe npotnBeHb 3JerKoro aJIOMnHnY, yctahabJIbBa erO ha npinlarauoUycOpeWetky.
Pn nCnoJb3OBAHnn npoTnBeH Bpem BblneKyn yDnHHaTc,TO 3aTpPydHreT noIyuHHe xpyCTaen Nlucbl.
B cIyuae BbIeukn NIIcIb C 6bnbHOn HauNkO peKoMeHdyeTcnoIOXKnTb Ha NIIcUy cbIp MoIapeJIa B cepEINHe BblneKn.
Ta6nua npuroTOBJeHna
Iopraok OTMeHb3aNPorpaMMPOBaHHoro 3NaueHnA:
- HaxnMaTb Ha KHONky Do Tex nop, noka Ha dncnnee He hauHET MrraTb CMBON yCTaHOBKN, KOtOpbHyKHO OTMeHHTb, n cnpbl. HaxnMaTb Ha KHONky " do Tex nop, noka Ha dncnnee He noRaTc uOcPpb0 00:00.
-
OndHOBpeMeHHo HaxKaTb N yDepeKnBaTb KHOJIKN “+” n “-”; TAKIM o6pa3OM OTMeHЯIOTcBce 3aJaAHHbIe yCTaHOBKn, BKJIIOUa TaIMep.
-
UMeetcra ToJIbKO B HeKOTOpbIX MoDeJIaX.
RS
IpeodoctopoXHocTn npekomehdaun
!N3dJIe NcPoeKTIPOBaHO N3ROTOBHeO B COOTBeTCTBm C MeJxHyapOaHbIMn HOpMaTuBaMn No 6e3OnaChocTn. Heo6xoIIMO BHNMaTeJIbHo npouHTaTb HaCToAunne npEduPpeXeHHra, CoCTaBNeHHbIe B ueJax BaWeu 6e3OnaChocTn.
06uine Tpe6oBaHnK 6e3onacHocTn
-Данhoeиденипpeнha3haayetcдн He npocceccnoHaIbHoro nCNoIb3OBAHnB DOMaWHnx ycIOBnX.
3anpeaetc yctHaHbNtBaTb n3dJIne Ha yIuIe, daKe IoI HABECOM, TAK KAK Bo3JeCTBHe Ha Hero DoXJn I rpo3bl YBnEe TcYpe3BbUaHIO ONaChbIM.
-Дпя nepemeшени Изdenя Bcerda Берпесь 3a cneцальнBLEpyKN,pacnoLoKeHHblec6okOBdYxOBOr okaфa.
He npukacaiTebc K n3deJnIO BnaXbIMn pykam, a TaKke HaxoJaCb 6ocNkom mC MOKpbIMn HORAM.
- N3dennpeDHa3HauEnO nI npuroToBneHnNueBBIX npoDyKTOB,MOXET 6bITb NCNOJb3OBAHO TOJbKO B3pocblIM NlcaAMN B COOTBeTCTBNC HnHCTpyKcUaMn, pPnBeDeHHbIMN B daHOM texHnueckom pykoBODCTBe. JIO6oe dpyroeero nCNoJIb3OBaHne (Hanpumep: OtonneHne nomeeHn) cHTaETcR HeHaJNeXaUm n CneoBATEJIbHO onachbIM. POn3BODntelb He HeceT OTBeTCTBeHHOCt 3a BO3MOxHbI yIep6, Bbl3BaHHbI HeHaJNeXaUm, He npaBUNbHbIM n Hepa3ymHbIM NCNoJIb3OBaHHem N3dennr.
B npouecce 3kcnnyataunn H3dennn HarpeBaTeIbHbIe 3JemeHTbI N HeKOTOpbIe qactn DBePcIyDxOBOrO WkaΦa CnIbHo HarpeBaOTcR. Heo6xoDMo npoBnTb OCTPOXHOCTb BO n36exKaHne KOHTAKTOB C 3TNM YacTAMN H He pa3peWATb DeTAm np6nnKAtbc K dYxOBKe.
CneIte,yTo6bI cTeBbIe HHypbl dpynx 6bITOBbIX 3JIeKTPoPn6OpOB He npKacJINc b K ropYm YactrM dyXOBOrO Wka.
He 3akpbBaIte BeHTnJIauHOHHbIe peWetKn N OTBepCTna paccenBaHnra TeJIa.
- Bepntecb 3a pyky DBepuB B ueHTpe: C 60KOB OHa MoKeT 6bIb ropuey.
Bcerda HaneBaTe KxOHHbIe BapeKKn, Korda CTaBnte nnBbIHMaTe 6nOda n3 dYxOBKn.
- He nokpbBaIte dHOn dYXOBOrO uKaΦaΦoJIbRoI.
He xpaHnTe BdyxOBom 1ka4y Bo3ropaembIe npedMeTbI: npN CnyaHOM BKIOueHEN N3dJIra TaKne MaTePnaJbI MOrY T3arOpetbcr.
Bcerda npoBepaTe, cyoIpeyIaTOpbI HaxOuINbc B noIOXeHn " ^ 一 / " , KOrDa n3dJIeHe nCNOlb3yeTCa.
- He TAHNTe 3a Ka6eB 3neKTPoNTaHnIg dIg OTcoEINHeHn BUNKu 3dJeNnIg N3 ceTeBOu PO3eTKU, BO3bMUTecb 3a BUNKy pyko.
- Ipeed Haayalom YNCTKN ININ TexHnueckoro 06cIyKnBaHnN IN3dEInna Bcerda OTcoeDnHnTe WTeNCeJIbHyIO BUNKy IN3 cTeBOI PO3ETKn.
B Cnyae HecnpabHocTn KaTeOpunCeckn 3anpeaetc OTKpbIBaTB BHyTpEHnE MexAHm3Mb i N3dJIeNc CZeJIbIO nxCamOCToTehHoro pemOnTa. ObpaauTeCb B LHeTp CepBnCHOrO obCyKuBaHnA (CM.CepBnCHOe obCnyKuBaHne).
He cTabbTe npedMeTbHa OTKpbTyu DBepu y DuxoBoro 1kaFa.
- He pa3peuaiTe DeTm HrpaTb C 6bITOBbIM 3JNeKToPnp6Opom.
- 3Kcnnyataunn H3dennn JInuamn (BkIouyae Detey) C orpaHnueHHbIMn Fm3NueCKMn, ceHCOPhbIMn nn yMCTBeHHbIMn CnOCo6HoCTaMn, HeONbITbIMn JInuamn nn JInuamn, He3NaKOBMbIMn C npabUJAMn EKnCnIpyataunn daHHoro n3deJInna, 3anpeuaetc863 KOHTpOJa co cTOpOnbI JInu, OTBeUauUeero 3a ux 6e3OnacHOCTb, nn 6e3 oByehnnpabUJAM noJIb3OBAHnN 3dennm.
- I3dJIHe He paccHTaHO Ha BJIIOueHne NocpeIcTBOM BHeuHrO cHxPOHN3aTopa INn OTdEINbHO CnCTeMbI dNCTAHUONHOrO ynpabLeHH
yTnnaa
- YHNUTOXKeHne yNAKOBOUHbIX MaTePnANoB: co6NIOdaNTe MeCThIe HopMaTINbbl C cIeJIb IO NOBtOpHO rNCNOJb3OBAHnryyNAKOBOUHbIX MaTePnANoB.
Cornacno Ebponeenckon DnpekTne 2012/19/CE kacaTeNbHO yTNIN3aunn 3NeKtpoHHbIX n 3NeKtpnuecknx 3NeKtpponp6opOB 3NeKtpponp6opbl He DoJXHbI Bb6paCbBaTcB MecTe CObbHbIM rOpOdCKM Mycopom. BbIEdeHHbIe N3 cTpor np6obpl DoJXHbI co6npatbcr OTJeBHO dJa ONTmN3aunn IN x yTNIN3aunn IN pekyepauun COCTABJIHOUx IN MaTePnaIOB, a TaKke dnn 6eONacHOCTN OkpykaUoien CpdeI IN 3DopOBb. CmBON 3auepkHytaR myCopHra KOp3INHa, IMeIOuNcRa Ha BCex pnp6opax, cnYkNT HAnOMnHaHnem O6 INx OTDeJbHOn yTNIN3aunn.
CTapbIE 6bIOBbIe 3JIeKTpOpnp6OpbIMoYr 6bITb NpepaHb B O6UecTBHeHHbI UeHTP yTNJIN3aUN, OTBe3EHb B CneuaNbHbIe MyHnUInaNbHbIe 3OHb IIN, ecNn 3TO npeDyCMOTpeHO HaUNoHaJbHbIMn HOpMaTnBaMn, BO3BpaUeHb IB Mara3IN npN oKynKe HOBOr N3dJIra aHaJOrnHOro Tnna.
Bce Beyuine npoun3bOaHTeN 6bIToBbIX 3JeKtpnpn6OpOB coDenCTByIO Tc03aHnIO uYnpaBHeHIO CnCTeMaMn IO c6Opy n yTuIN3aun CTapBX 3JeKtpnpn6OpOB.
3KoHOMn 3JeKtpO3Heprnn n OxpaHa OkpykaUoce Cpebl
- PekomeHdyetc Bcerda roTobntb B pexax FPNJb n 3ANEKAHKA c 3akpbToI dBepue: 3TO Heo6xOIMo Dnna 3NaHTeJIbHOI 3KOHOMn 3JeKTpo3Heprn (PpImepHO 10% ), a TaKke nn JyUnx pe3yJbTaTOB npiroTOBneHna.
- ПО BO3MOXHOCTHи36eRaTe npedBapnteHoro pa3oRpeBa neuИ BCERda CTapaTecb 3aONHЯTbe ee. OTKpbIbAte DBepU neu KaK MoXHO MeHbIe, TAK KaK KaJdbI pa3 npn OTkpbltn NDBepU bIMeET MecTo Notepra Tennla.ДЯ 3HaHTeJbHOr 3KOHOMN 3JIeKTPO3Heprn BbIKIOuaTe PNTy 3a-10 MNHTdo 3aBepueHn Ipocecca npriTOBLeHn I nCNoJIb3yTe TENlLO, KOTOpoe NeYb npOOnkaaet reHepnpOBaTb.
- YnnotHnteIbHbIe npoknaIkn DoJIKHbI coepKaTbcr qNCTbIMn dIy npedotBpaueHn Notepn 3Heprn.
- Ecniy Bac NmEeTcKoHTpaKT Ha NoaCy 3JeKeTpueCTBaNo TaMnPOBaHHOMy TaPHy, OnuYra OToNKeHHoe npuroTOBHeHne》6yTe CnOCo6CTBOBaTb 3KOHOHMn DeHer 3a Cuet NepeKnOuyehnHa 6OJee DeUeBbIe INTEpBaJIbI BpemeHn.
RS
- OchoBaHHe rOpWka HnKacTpOJn DOJXHO NOKpbHBaTb BapOHyIO NobExHocTb. Ecnn OHO 6yDet MeHbIIm, 6yDet NMeTb MecTo NoTepr 3Heprrn, IN B pe3yNbTaTe BBIKnHaHn JxNkOCTn n3 rOpWKOB Ha BapOCHo NOBepxHocTn 6ydyT OCTaBaTbCRA OctaTKn 3TOJ KxNkOCTn, KOtOpBle CNOJHo ydaJIInTb.
XpaHnTe npOdyKtbl B 3akpbItbIX ropkKaX nn KactpIOnx C nIOTHO 3aKpbIbAOUcIMNcR KpbIuKamn N cNoIb3yIe TE MINHMaJIbHOE KOINueCTBO BOIbl. B Cnyae nprirotOBneHn 6e3 KpbIuKn 6yJeT IMeTb MeCTo notpe6JIeHn 3HaHTeJIbHOrO KOINueCTBa 3Heprnn. - IcnoJb3yIe TepoKn KacTpHn C coBepSeHHO pIOCKM DHom.
Bcnyae npiroTOBHeHn6bI0da B TeueHne dIITeNBHO BpemeHN cIeNyEtucNtob3ObaTb ckopoBapky, KOtopa rTOBNT B Da paa 6bICTpee n no3BOJraTcbepey TpeTB 3Heprnn.
TexHnueckoe obcnyxnbAHne
nyxoad
OTKJIHOUeHHe 3JIeKTpONHTaHnA
Ipeed hauanom kakoi-Jn6o onepaunno 6cnykBaHIO nJINuCTKe OTCOeHNHTe N3deJIne OT cETN 3NeKTPONTuHNA.
UncTkau3dennna
Hapyxhble 3MaInpoBaHHble 3JeMeHTbI IIN DeTaII IN3 HepXabeIOUeI CTAn, a TaKke pe3HOBbIe yNIOTNHeHnmoXHO npTpaTB r6KO, CMOeHNHO B TENNO BODe IIN B pAcTBope HeITpAIBHO MOUcero CpeDCTBa. Dna YdaJIeHnO cO60 TpydHbIX nTeH NcNoB3yInTe CneuaNBbIe YnCTaUne CpeDCTBa, IMeIOUneCBA INpoDAKe. Pocne YnCTKn peKOMeHdyETc TuaTeJbHO ydaIITb OCTATKN MOUcero CpeDCTBa BlaxHoN TprIKoN IN BblCyuINb DYxOBky. He NCNoB3yInTe a6pa3NBbIe NopoUkn IN KoppO3NbHbe BeueCTBa.
CneIyET npOn3BOINb BHYTpEHIOU qNCTky dYXOBORO ⅢkaΦa nocLe kaxdOro erO nCnONb3OBaHnA, He DoxNJaacB erO noJHoro oxnaKDeHnA. NcNoB3yJTe TEnNyBOy I MOOooe cpeDCTBO, ONOLOCHnte I npOTpnte MmKoT prAnKo. N36eraTe nCnONb3OBaHnA a6pa3NBbIX cpeDCTB.
CbeHbIe DetaJIIM MOxHO JERKO BbIMbITb KAK NIO6yIO DpyrIIO NOcyDy, TaKKe B NOCyIDOMOeHNo MauHHe 3a NCKJIIOUeHHe MBdBNXKbIX HAnpabNIAOUXX.
- PekomeHnyeTcH He pa36pb3rHbTaB MoIOuHe CpeDCTBa HENOCpeDCTBeHHo Ha peryJrTopb, a Ha ry6ky.
!He nCnoJb3yTe napOBle uNCTaIue arperaTbI nn arperaTbIOB BBICOKIM DaBLeHem DnA YNCTKN N3dEJIIN.
Ynctka DBepubl
IyNCTKNCTKNa DBePcBbNCNoB3yNeTHea6pa3NBbIe Iy6Kn N YnCTaUe CpeDCTBa, 3aTe BbITpNTe HacyXo MraKo TpAnKo. He NCNoB3yNe TBePdIe a6pa3NBbIe MaTePnaIbI INOCTpbIE MetaJIInueckne CKpe6Kn, KOToPbIE MOrY TNoapanaTb NOBepxHOCTb pa3bNTb CTEKIO. JI
50one TtataTeJbHOH YnCTKN MoXHO CHrTb DBepu DYXOBKn.

- nonHocTbO OTKpoIe TBepuy duXOBKn (cm.Cxemy);
- NOДнИМЛТЕ И NOВЕРНITE 於NOHKNHa DByx WapHnPax (CM.CXemy);
3.Bo3bMntecb 3aДверуpykaMu n C DByx CTOpOH,Плавно 3akpoite ee, HO He NOnHocTbIO.3aTeM NotraHnte Dberpuy Ha ce6y, Chmamae ee CO CBOero rHe3da (CM.CXemy).
Дя yctaHOBN nBepuHa MeCTO BbINOHNTE BbiweonncAHbIe OepauIN B o6paTHOM npRKe.
PpOBepka ynpToHEnn
Perynnpno npOBepnTe coCToHne yNIOTHHeB BOKpyr DBepebdyxOBOro 1kaFa. B Cnyuae nobpejdeHnryIyNIOTHHeN O6paAaTecb B 6nKauWn LcHTp CepBnCHOrO 06ClykBaHn (cm.CepBnCHoe 6cnJyKuBaHne). He peKOMeHdyETcNOb3OBAtbcraDyXOBKOc NOBpejDeHHbIM yNIOTHHeHem.
3aMeHaJaMNoUcN
3aMeHa nAmnoQKn B DxyXOBOM uKafty:
- OTBnHTnte CTeknHHyK pblkny nnaΦoHaJAMNOyKn;
- BbikpyTne JAmnokyu 3aMeHnTe ee Ha HOByIO TAKORO Xe TUNa: MOUHOCTb 25BT,pe36aE14.
3.YcTaHOBnTe KpbIuKy Ha MecTo (CM.Cxemy).
!He nCnoJb3yIe lamnOuy Ky dYxOBoro 0kaΦa nIgOCBeseHn NOMEeHn.
Uzembe helyezés
BcTaHOBNeHHH Hhpy KMBnEHH
- BiKpnIte KJIeMHy Kopo6Ky, CKOpNCTaBUnc6b BnKpyTKoIO YK BaXeJIeM, HATnCKyUOn HeO Ha 6iHi Ra3uKN KpNIkN: NotrHITb Ta BiKpnIte KpNIkK (DINB. MaHOHOK).
2.Пirotyte Ta BCTaHObITb WHPJXNBHeHr:3HIMITb TBnHTN 3 3aTnCKyBaHa i TpN TBnHTN 3 KOHTAKTIB L-N,NOTIM 3akpiitb XnnPiI RoiBkAmr TBnHTiB, DOTPMUYOuNCb KOnbOpIB CnHi (N) KopuHBeBn (L) KOBtN-3eJeHn (1一) -INB.MaIOHOK. - 3aφikcyte shyp BiINOBIHIM 3aTnCKaYem.
4.3akpuTe KpNkoKoKJEMHy Kopo6ky.
UA
IiKIOeHn Ihpy XNBHeHH Do eEKeTpUHOI MepeXi 3a6e3neute HHP BUNKO, npdaTHOIO nBkA3aHOro Ha Ta6JIuCi 3 daHmN HabaHTaxeHH (INB.nopyu). Y pa3 6e3nocepeHboro iIKIOeHH Do MEPEXI Heo6XiHn nepeIbauHTmIXpnaJOM i MEPEXEo BCENIOJIOCHMI BIMNKa4 3 MihimaIbHO HO BiCTaHHIO MIX KOHTaTMy 3 MM JkN BtPmMyc HabaHTaxeHH i BiNobIAe YHHMn HopMa (dpit 3a3emJIeHH He Mae nepePbBaTncr BIMNKaueM).
Pn po3aWbAHHi shHpy XNBHeHH cNkYnte, 0o6 TemepaTypa y npMiuEHH He nepeBnUyBa nA 50^ B HiaKIO TOU.
!MOtaxnK E BiJIOBiaIbHm 3a npabNlbHe eNeKtpnHe niiKnIOueHH Ta doTpmaHH HOpM 6e3neKn.
Iepu HIX BnKohyBaTu NIKIOueHH,pekoHaTecB TOMy,io:
- po3etka Mae 3a3emIeHHy BiiNobiDHOCTi DO BCTAHOBJIeHIX HOpM;
p03eTka po3paxObaHa Ha MaKcImMaJIbHe HaBaHTaKeHHy MExkx NotyXhOCTi npnlaNy, 3a3haYe h Ta6nci 3 xapaKTePncTikamn (INB. HIXue); - Hanpyra JINBJIeHHJ 3HaxOJNTbc8 B MExkA 3HaueHb, Bka3aHnX Ha Ta6NcUci 3 XapakTepnCTnKamn (INB.HNKe)
- po3eTka cymicha 3 BnKIOO npnnay. B IHOWMy BnnaKy 3amHiTb po3eTky a60 BnIky; He BnKOpNCtOBynte noDobkYBaui TpiHnKn.
!YBCTaHOBJeHomy npnajaMa6byT3a6e3neHnIerKnIOCTyn Do eNeKtpuHoro shHpy i po3eKn.
!Hyp He NOBHeH MaTn 3rHnIB a6o yTuCKiB.
!HypMaepioDnHo nepeBipTnci 3amHOBaTnci TInbKn BNOHBoBAxKeHMn qaxibzMn (INB. DOnomora).
! Komnai 3Hima 3 ce6e BiINOBiJaIbHiCt b y pa3i HeDToPMaHH Bka3AHx HOpM.
IyBIMKHeHHBn6paTnpeYnyrTopom IPOrPAM. Iid Yac Bn6bopy nporpamnpnroTyBaHHBOHa Cbitntbcra.
YK BHKOPNCOTOBaTn TaMep\*
1.ПершзаВсe,Нeo6хiДно3aБeCTи 6уДиьнК,ОбeрТaIOчпperуЛЯтOp TАИМЕРУ Ha noBиь оБeрТ 3a roДиHHNKOBOHO cTpiKoH.
- 06eptaOuHa3aI, npOTn rOunHHNKoBoi cTpiKn, 3aJaTe 6axaHn yac, CTkyOuXbUNHn, Bka3aHi Ha per'nyTopi TAIMEpy 3 HepyxOMOIO BiDMtKOHO NaHeJI KepyBaHHJ.
- TaMep-ze liuHbHK XBnIH: npo BnuepnaHHaC yCnoBiuae 3ByKOBn CnHaJ.
!TaMnep He KOHTpOJIIOe YbIMKHeHHa Ta BIMKHeHHa DYXOBKn.
Pporgamn
Iporpamn npirotoYbaHna iXi
!Bcix nporpam TemnepaTypa 3adaetbcb B iHTepbaJI mix 50^ i MAX,okpim:
- PUNJIb (pekOMeHdyEtbcra BnCTabJrtn TiJbKn Ha MAX);
- KOHBEKLIHHI IPNJIb (peKOMeHNyETbcr HnepeBnUyBaTn TemnepaTyB 200°C).
Pporpama TPAUNUHA DYXOBKA
PraioDbHaHarpBaIbHi eIemHeTI-HxHi I BepXHi.
Ptn TraiuiHOMy roTyBaHHI Kpaue BxNbaTN Nnwe OINH
piBeH: PnBxNbaHHI KeKbKox pIBHB TemnepaTypa
po3noiinTbcHepiBHomipHO.
PpOpaMa OJHOUACHE PnIFO TYBAHH
PpaIObB Cb HarpBaIbHi eIeMeHTN (BepXhi i HxHni) i BEHTnIaTOp. OckbKn Teno po3noiJeHO pIBHomipHO NO BcII dYXoBci, npiroTyBaHH I KbiD6yBaetbC3aBdKPiBHomipHomy HarpiBy nobITpr. MoKHa BkOpNCToBvBatHe 6Inbwe DBOX pIBHIB ODHouacHO.
PporpaBEPXHryDyXOBKA
Ppaioe Bepxhi HarpibaHn enemt. Lq yHKU MoKe BKNOPNCTOByBaTnCdIy3aBepuaHnx DII 3 roTybaHHr.
Pporpama PnIb
Ipaioe BepxHn HarpBaIbHn enemt. Bncoka temnepatypa 6e3nocepEnb0 3 rpnIO 3a6e3neuey MNTBE yTBopeHHraym'aHOI WkipoQHK, JaKa 3aTpMByE BNTiKaHHa coky, i TOMy cTpaBA BCEpeHNi 6yde 6iNbM'koHO. CmaxenHa rpnIi oco6nBO peKoMeHdyEcBcIg Tnx cTpaB, kIOTpe6yOHT BNCOKY temnpatpy dIg NOBepxHi: BiΦwTeKcn 3 TeJIaTNH nJNOBUnHn, aHTpeKOTn, fIneHi qactuHn, ram6byrepri, too... Deaki npknadn HabOJaTbcR y po3dini "KopncHn nopAdn 3 npiroTyBaHH".Pi d ac npiroTyBaHH dBepuTa DxyOBKn MaIOb 6yt NaHHeHi.
X Ptorpama KOHBEKLJHnI IprNJIb
Ppaioe Bepxhi HarpibaIbHn eIemEt I BeHTmIaTOp. TaKIN peXIMo6EHNyE OJHOCTOPOHHe TEnIOBE BNpOMIHOBAHHH 3 PpIMycBOIOU cNPKyIaICIO NOBITpr ycepeDNI dyXOBKn.
Le nepeuokjkae NOBepxhebomy niropnHc TpaBn, 36iNbuyOu CNy npOHKnHeHH TeNna. NiJ cac npiroTyBaHH DaBepaTa DxyOBKn MaIOTb 6yTn 3aunHeHi.
- HāRBnH nIiSe y DejKnx MOneJx.
Kopnci nopadn 3 npurotybaHna iKi
!Pn nprirotyBaHHi 3 KOHBeKUeHO He BnKOpNCToByTe
no3uui dna pIBH 1 i5: cnpmaoHaI NOTKn rapyoro nobITpy
MOKyTB npNBecTn Do NiDROPAHHA DeNkATHX npOdyKTIB.
!y peximax npirotoYbaHHa BAPSEKIO i KOHBEKLINHNI IPNb po3aWyTe dekyB no3nucio 1 nna 3bnpaHHa 3aIIuKIBi npirotoYbaHHa (niDnBn i/abo xnp).
ODHOUACHE FOTYBAHH
BukopncToBynte no3nui pibHb 2i4, nomiuohny ha pibehb 2 ctpaBn, kki BmaraHb 6inbwoTe nna.
-Помістіть Deков Bнз i rpaTky yBepx.
ΓPnJIb
BCTaBTe r'paTky B no3nciio 3 a6o 4,po3miuoynpoaykTu y ceHTpi r'paTkn.
- PekomeHdyetybc BnCTabTu MaKcunMaNbHy eNeKtpoepriio. He Typ6yntecra, kkuo BepxHi HarpiBaIbHni enemt He 3aJInuAeTbcN oCtiHo yBimKHeHm: Ioro po60ta KOHTpOIOEhbcr TepMoCTaTOM.
NILU4A
-Дя nprirotybaHHЯ Пици краше 3a BCE niidxoanTb nporpama ODHOUCHAGO TOTYBAHH.
BukopncToByTe Hn3bky fOpMy 6e3 pyKu 3 NerKoro anHomHIO, BCTaHOBBUN II Ha r'paTu 3 KOMNKeTy NOCTaayHH.
3 Dekom 36inbwyetbcq yac npiroTybaHHa
i noraHO BHXoDntb XpycTka niua.
- Y pa3i cnilbHO HANOBHeHx niu DoOJIbHO DoaTMOUcapeNny B cepeHH npiroTuBaHH.
Ta6npu npirotoybaHHa
EneKtpoHnI npoRpaMaTOp roTyBaHHa*

JaHaTaTyBaTu rOAnHHNK
!IqDHHNK MoXHa HanaUyBaTu npu yBIMKHeHia 6o BmKHeHnyXOBci, kUO He 3anporpamOBaHO KHeLb npiroTyBaHH.
IicnpiiknoeHHdoeneKtpuHoiMepexi a6o BnpbHa HcBtna 6nMaTmMytb iOKHa pa3om 3 YoTPma uOpaMa Ha DCNJI.
- Hatncitb deikibka pa3ib Ha KHonky, Dokn He noyHe
6JIIMaTI IKOHka pa3OM 3 YoTnpMa cHcpamn Ha NICPJIeI; - Khonkamn “i” nalaunTyne yac; npu ytpmyBaHHi KHONOK MOXHa 3HaUHO WbUdwe nepernHyTu cHpnp i Ierwe 3aDAtu yac.
- 3auekaTe 10 cek. a6o noBtOpHo HaTnCHiTb Ha KhoNky, iO6 niTBePdntu 3aDaHn yac.
Ja3aataTaMep
!L4fynKui He nepepnae roTybaHHa,BOHa 3anExnTb BID BNKOpncTaHH DaXOBKn;3aBdAni InporpaMyEcTbcra 3BykOBn CnHn no 3akHeHHi 3daHoro Yacy.
- HatnciTb dekiIbKa pa3iB Ha KhoNky,doKn He noUHe 6JIMaTu IKoHka pa3OM 3 Tpboma UcPamn Ha DCNCJIeI;
- Khonkamu i 3aada Te 6aKaHn qac; npn yTpmyBaHHI KHOK MOXHa 3HaUHO WbUdWe nepeRJIHyTu cnfpn i Jere 3aDaTn qac.
- 3auekaTe 10 cek. a6o noBtOpHo HaTnCHiTb Ha KhoNky, iO6 niTBePdntu 3aDaHn Yac.
BvBOOntbc3BOpOTnHi BIDnIK, npo noro 3aKiHcHn H cNoBICTb 3ByKOBn CnHaJ.
J3anporpamybatn rotybaHn iK
!IporpamyBaHHaMOKJIbBe TiJIbKn nicra Bn6Opy nporpaMn npiroToYBaHHa.
- HārBnīn Niùe y DejKnx MoDeJx.
Jk 3anporpamyBaTn TpuBanicTb npiroTybaHH
- Hatncihtb deikibka pa3ib Ha KhoNky,doKn He noHcbeNIMaTHIKOHKa 3pa3OM 3 Tpboma UcPamHa NUCJIIE;
- Khonkamu "H" 3aJaTe 6aKaHaTy TpBAnicTb; npu yTpMByaHHi KHOJOK MOKHa 3HaUHO WbUdWe nepeRJIHyTu cnfpn i Jerewe 3aDaTu NapaMeTp.
- 3auekaIte 10 cek. abo noBtOpHo HaTnCHiTb Ha KhoNkY, iO6 niTBePdInTu 3aDaHn napaMeTp.
- nicra BnuepnaHry hcy Ha DCNPEI 3'ABTcBc HAnIC "END", npo 3aBepuHry rotyBaHHc cNoBicNTb 3ByKOBn CnHan.
- Hanpinkan: notochun yac: 9:00, 3daeTbcra TprBaJIicTb 1 roDHa 15 xBnHn. PporpaMa aBTOMaTHo 3yInHae po6Oty y 10:15.
Jk 3anporpamyBaTN KHeue npnroTybaHHA
!3anporpamyBtni 3akInHuEHH npnroTyBaHH moKHa JnWe nicra 3aDaHH TpuBaNoCTi roTyBaHH.
- Binkohai Te npoceDpy 1-3 nna 3aahnHra TpnbaoctiroTsyBaHHra;
- Hatncihb dekiibka pa3iB Ha KhoNky,doKn He noHHe 6JIMATNIOKHcpa30M 3 YoTnpMa uDpamHa DNCJIIE;
- Khonkamn "i Haanawtyte cac 3aikHcHn npiroTyBaHH; npy ytpmByaHHKHOKONK MoXHa 3HaH0 WbDwe neperJHyTu cnpn i nepwe 3adatu cac.
4.3auekaIte 10 cek. a6o noBtOpHo HaTnCHiTb Ha KhoNkY C, iO6 niTbepDnTu 3aDaHn napaMeTp. - Nicra BnuepnaHryaCyHa DNICNIIE 3'ABNCTbC HAnic "END", npo 3abepuHry rotyBaHHc cNoBicNTb 3ByKOBn CnHan.
YBIMKHei iIKOHKnIONBIuaIbnpo3diChene nporpaMyBaHHa. Ha DCNJIe I no cep3i 3'ABnEcbcAac 3akHcHnnpiroToyBaHHa ItpnbaiicTb.
KcacyBaTH nporpamyBaHH
Uo6ckacyBaTn nporpaMyBaHHa:
- HatnckaTe Ha KhoNky,doKHe noUHe 6bnMaTH iKoHka npaMeTpY, kKn CJIiCkacyBaTn, pa3OM 3 uΦpAMn Ha DnCnIe.i. HatnckaTe Ha KhoNky ",doKn Ha DnCnIeI He 3'BAuTBcA 00:00.
- Ytpmmye OndHocHO KHONK ““,ekacobyTbcBc Bci BnKOHaHIporpaMyBaHH, BKJIooaIOu TaMep.
3anobixhi 3axoDi Ta nopadi
!DyXOBka po3po6JeHa i cKoHCTpyNoBaHa BiIDnoBIDHO do MxkapoDHnx CTaHdaptIb 6e3neKn. LJI nonepedkeHHa HadaIObTc8 3aIra BaWoI 6e3neKn: yBaXHO O3HaHOMTeC3 HMM.
3araJbHa 6e3neka
-Духова пизначеса дя Ненрocсйного ВИКОпСТАнь BCEpeДИнHi JIITJIOBx npIMiць.
3a6opohreTcBCTaHOBNIObATn NO3a npmiiueHHam, HabITb 3axuieHIX Micx, TOMy IIO dyke He6e3neHOniDaBATn Ioro BnNBy douy i rpo3n.
-Дяпесуваньnpилamyob'3koBOckopntaTEcneцiaJBHIMpyKAMn,Як3haxOJrTbC360kIBdYxOBKN.
- He TopkaTecra MaunHrOJIMn HORAMn abo MOKpMn YN BOJOrHMn PYKAMN HORAMn.
- PpHnad Mac BnKOpNCToBvBaTncI nI npiroTyBaHH Ixi, TinbKn Dopocnnm Ooc6amn i 3riDHO IHCTpykciJRM, BkazAHM y ciu 6poWpyi. Bydb-Ke iHwe BnKOpNCaHH (HanpNKlaI: dIy o6irpiBy npmiueHb) BBaxKaTHMeTbcA He 3a npns3haeHNHm i, To6To, HeKopeKTHM. Bnpo6hNk BiXnJIe 6yDb-ky BiIDNOIBaJIbHICTh 3a MOxINBI 36NTKN BHaCNI0K BnKOpNCaHH He 3a npns3haeHHM, NOMIKOBORO a6o Hepo3ymHoro 3actOcyBaHH.
-Пд ус роботи пиладу harpiBaNBHi elementTu dBepaTa duXOBKn B Deeknx Micux dyxeharpiBaHbC. BydTe obepekHi: He TopkaTecr iXi TpMaTe diTeH na 6e3neuHi BiDcTaHi.
CπiδkyIte,山o6 shHpy JxNBHeHHB BID iHux no6yTOBnx npnnaDIB He TOpKaJIncra rapaunx qactnH dYXOBKn.
- He 3akpnbaiTe BeHTnIaIHi OTbOpN NOTBOpN IJI BIDBeHHe Tennla.
-Дя BiДКрпTTЯ DBерцTбepiТьсЯ pyчky y ueHTpi: 360kIB BOHa MoKe 6yTu rapAHO.
3abKdN BnKOpNCOByTe pyKaBnCi IJIa 3aBaHTaXeHHa6o BnTgAHHMICTKOCTe 3I cTpabAM.
- He nokpmbaTe dNo dYxOBKn pOJIeIO.
He knaiditb ropuyi MaTepiannBdyxOBky: npn Bnpankobomy yBimKHeHH npunaMy MoKe CTaTcN 3aImaHn.
KoHn Bn He KopncTyecr npuJaOM o6OB'3KOBo nepeBipraTe, 06 peYJrTopn nepe6yBaNn B no3nii " 一 ^ / _ 口 ^
- Пи Ви Манни Вилки 3 eNEKtpnHoi po3eTkn TpmaItecra Tinbkn 3a camy BnKy i Hi B ykomy pa3i 3a shyp.
Bci onepaui 3 uuieHHn a6o texHCHoro o6cnyroBaHH MaOTb BnKOHyBaTncra, nonepeHbO BnTgHyBwn BuJky 3 eNeKtpnHoi p0eTKn.
- Y KODHOMy BUNaIKy He pO6Ib Cnp06 camocTINHO BKNOHn peMOHT BHYTpIiHIX MexaHi3MIB. 3BepHi7bcY cepBicHH ueHTp (DnB. DOnomora).
He cTaBte BaKki npEmdTe Ha BiDkpNTi DBepuTAt yXOBKn.
He nepe6bauaeTbc BNKOpNCTaHH npnla dy ocobamn (BKNHuaOu nDiTei) 3OBmEKeHMn pizHMM, cHcOpHMM a6o po3yMOBUMn 3di6HOCTaMn, HeocBiDuEHMMn OC6aMn a6o TaKIMn, uo He O3HaOnMUNC 3 BnPObOM, 3a BNKIOUeHHMa BnAaKIB HaJIy 3 60ky OC6b, BiNDaJIbHOI 3a IXHIO Be3neKy; He nepe6baueTbcBn KOpNCTAHH npnla dy OC6aMn, kI He OTPmaJIN NonepeDHIX BkazibOK uo do noo BVKnOPNCTAHH.
CTeKTe,IO6 DIITn He rpaIINc3 npnaDOM.
Ytulizuaia
- Ytunlizaig naKyBaIbHOro MaTepiany: DoepKyuTecb MicceBux HOpM, TaK JaK naKyBaHHa MoKe 6yTu BnKOpNCtAhe NOBTOPHO.
- Ecbponecbska DnpekTb2012/19/CE 3 BiDxOdbiD eNektpnHoi i eneKtpoHoi anapatypn (RAEE), nepe6baue, 10 no6yTObi eneKtponpnuAin He MoKyTB nepepo6IaTncy y 3BwauHOMy npraky dny TBepdx MicbKnX BiXODIB. 3HRTi 3 ekcnlyataui nob6yTObi npnuAin MaHOt b 6yTN 36paHi OKPem OnONIM3aCi CTyneHIO BiHOBHeHH N NOBTOHRO 3AcTOCyBaHH MaTePiJIb, 10 BXOJrB Do IXhBOrO CKNaIy, Ta 3 MeTOIO ycHeHH NotEHINHOI WKOIN DnE 3DOPOB' Ta DOBKINII. CmBON 3akpcneHOrO CMITTEBOr KOHTeHepa, 3O6paKeHH Ha BCix BnPo6ax, Hara dyE npo Heo6XiHicTB OkpemoYtNiIsaui.
Дя noДаьwoi inhopmaui zuo npabnIbHoi ytni3aui nobyTOBI TexhIKN, IXHI BnACHNI MOkyT bEbpHyTncA Do BiIOBIDHX MicbKnx Cnyk6 a6o Do NOCTaayBnka.
Oxopohai 6aJIbIe BiIDHOseHHr do DOBkInn
- YbimKHeHHaYOBKn B npomixkky 3 ni3HbOro nicIyO6iHbOro yacy Do paHHbOro paHKy Do3BOnNTb 3MeHNHTn HabaHTaxKeHHa NiInpnEMCTBa-BuPo6HnKn eEkeTpoeHeprii. HaadiMoXJIbBOcTI ODO nPaHyBaHHa nporpam, 3OKpema "BiDCTPOye He roTyBaHHa" (INB. Iporpam) i "BiDCTPOye He ABTomATnUHe OUnSeHHa" (INB. TexHiue ObCnyRObyBaHHa Ta DORJIA) DOnomaraIOTb oprahi3yBaTnc 3aneKHO Bid yacy.
- PnpirotybaHH y peximax BAPSEKIO i KOHBEKLHNI IPNJb noTpe6yIob 3akpntnx DBePcrt dyxOBKn: ce Do3BOINtB OTPMaTn Kpaqi pe3yIbTaTn i 3aoaAnTN eNeKTPoeHeprio (np6bn3HO 10%
PiTpmyTe Bpo6Omy CtaHi i MInIte yuJIbHIOBaHi TaK, 06 BOHn Do6pe npnIraJn Do DBepaT i He BnKnKaJn 6 BtpaTn TenJa.
Texhichne obcnyroByBaHHaTao
K BiKIOHHTN eJEKtpnHn cTpyM
Ipeed npoBeeHnM 6yNb-koI onepaui BnTgHiB BuJky 3 eNEKtpuHoi pO3eKn.
K ouhcTn npna
3OBHIHl eMaJIbOaHI a6o HeipXabIIOHi DeTani I rYMOBI yIiNbHIOBaHi MoXHa MNTu 3BOJNOKeHO O Y TeNII BODI r6KOIO I HeITpaJIbHM MnOM. Jnra BnBeJeHHr CTINKx PnM BnKOpNCTOByTe CneuaJIbHi 3acObn. Do6pe 06NoJIoCHtB BOIO IO i BucyWitb Nicra MTTA. He BnKOpNCTOByTe a6p3aNBI nopoUKN a6o iDki peOvBNH.
- PekomeHnyeTcMa MTN duyxOBky BCEpeuHi KOxHoro pa3y nicra BnKOpncTaHHa, KOI BOHa e ige TeNIO. MInTe rapAHO BOIOI i MIOUHM 3acO6OM, NOTIM O6noNCHiB I BNCyuiMbM'koHO raHhipKO. YHnKaIte a6pa3uBHX 3acO6iB.
- Akcecyapu MoKyTB MNTnCRA K 3BnuaHnN NOcyD, TAKOX B NOCyDMnHiMaunHi, 3a BnHrTKOM KOB3HNX HAnpMnX.
!3a6oPoHЯETbCBAKOpNCtHaHHa anapatib Dnry OunueHHa npoAO BnCOkIM TnCKOM.
K OUHCTHTN DBePcTa
MnTe cKnIO DBePcT dYxOBKn rY6KOTo Ta Hea6pa3NBHMn 3ac06amN BHTnpaTe M'koTO TKAHHOHO; He BKNOpNCTOByte wepwaBI a6pa3NBHi MaTepiAn a6o 3arocTpehi MeTaJIeBi CKe6Kn, kI MoKyTB NOpDpNaTu NOBepXHi a60 BNKnKATn TpICKaHHcKnA.
ДябишpeTeHbHOrO OuHSeHHaMOxHa 3HЯТnDbepTuTa DxyOBKn:

1.NOBHICTU BiKpnTe DBepeTa (INB.MaIIOHOK);
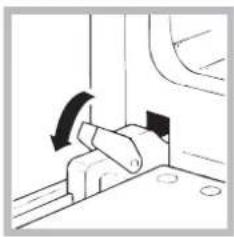
2.niBedeitb i o6epHItb Mahehki Baxeni, k3 haxoTbCn Ha DBOX 3aBicax (INB.MaJIIOHOK);
3.Bo3bMntecb 3a DBepu pykamn C DByX CTOpOH, PnabHO 3akpoTne ee, HO He NpHocTBIO. 3aTeM NotrHnTe DBepu Ha Ce6ra, ChImaar ee co CBOero rHe3da (CM.Cxemy).
IobepHItbDbepuTaHaMicue,BnKohyIOuN npOeDpyy 3BOpOTHomYnpAky.
Ipebeipka yuinbHOBaivB
NepioDnHn nepeBipraTe cTah yuJIbHIOBaYIB HABKOJNO DBePcT dYxOBKn. Y pa3i IX NOWkoJXeHHN 3BepHiTbcB Hn6nnKChn cepBicHN ueHtp(DNB.Donomora). He peKOMeHdyeTbc BnKOpNCTOByBatn dYxOBKy do 3aBepWeHHr peMOHTy.
Jk 3amHHTn JAmnoOky
Uo6 3amHn NaMNoOky DnOcBITHeHHyDyXOBKn:
- 3HIMITb cKJnHy KpUkky naTPOHa.
- BnBnHTiB lamnoky i 3amHITb II aHaIorIyHOIO: NotyxHicTB 25 BT, uKoNBJ E14.
- NobepHITb KpuKyu Ha Micue (INB.MaJIHOHK).
!He BnKOpNCToBnyTe NaMNoUky DuxOBKn dIa OCBITNeHH npmiiEh.
UA
UA
Indesit Company S.P.A.
Viale Aristide Merloni.47
60044 Fabriano (AN)
www.indesit.com