
Esiena iF360BT - Docking station EDIFIER - Free user manual and instructions
Find the device manual for free Esiena iF360BT EDIFIER in PDF.
| Product type | Docking station |
| Brand | Edifier |
| Model | Esiena iF360BT |
| Dimensions (W x H x D) | 390 mm × 145 mm × 237 mm |
| Net weight | Approximately 3.3 kg |
| Total output power | 30 W RMS × 2 |
| Speakers | 78 mm (3 inches), magnetically shielded, 6 Ω |
| Frequency response | 65 Hz – 20 kHz (±5 dB) |
| Signal-to-noise ratio | ≥85 dBA |
| Connectivity | Bluetooth, iPod/iPhone, USB, SD, AUX, FM |
| FM presets | 27 channels (3 groups of 9) |
| Alarm | 5 independent alarms, duration 5 min, snooze 10 min (max 3 repetitions) |
| Sleep timer | 15, 30, 45, 60, 75, 90 minutes |
| Remote control | Included, range 7 m |
| Power supply | Mains (power cord supplied) |
| Maintenance | Clean with a soft, dry cloth |
| Safety | Do not expose to rain or moisture; do not open; repair by qualified personnel |
| Package contents | Docking station, remote control, 3.5mm audio cable, wire antenna, power cord, docking station adapters, manual |
| iPod/iPhone compatibility | Dedicated docking station with connector |
Frequently Asked Questions - Esiena iF360BT EDIFIER
User questions about Esiena iF360BT EDIFIER
0 question about this device. Answer the ones you know or ask your own.
Ask a new question about this device
Download the instructions for your Docking station in PDF format for free! Find your manual Esiena iF360BT - EDIFIER and take your electronic device back in hand. On this page are published all the documents necessary for the use of your device. Esiena iF360BT by EDIFIER.
USER MANUAL Esiena iF360BT EDIFIER
Manusl Edition 1.0, May, 2012
B-200-M03608-00
EDIFIER
Esiena BT
iF360BT-Home Music Centre
Editor Internationa Ltd.,
Elite 1810
16th Floor, Tower 12,
Lipp: Coriña
59 Quatkevay
Hong Kong
Tel: +052 2522 6300
Fax: 1852 2527 1369
www.cifier.orientational.com
© 2012 Edifier International Limited. All rights reserved.
Protected in China
NOTICE:
For the need of technical improvement and system upgrade information contained herein may be subject to change
from time to time without prior notice.
Products of Edifier will be customized for different applications. Pictures and Illustrators shown on this manual may
oe slightly different from actual product. If any difference is found, the actual product prevails.
User manual | Manuel d'utilisateur | Manual de usuario | Bedienungsanleitung
Manuale dell'utente | Manuel do utilizador | Instrukcija obsługi
Important safety instruction Important safety instruction
WARNING: To reduce the risk of fire or electric shock, do not expose this apparatus to rain or moisture.
Thank you for purchasing this Efter product. For generations, Efter tries to provide powered speaker products to satisfy the need of our end customers, even the most demanding ones. This product can add to your home entertainment, personal computer, and mini home theater great source performance. Please read this manual carefully to obtain the best of this system.

The lighting flesh with snowhead slide
the angle is intended to alter the user to the reference of an-inclated eigenvalue
ed,ze within the product's enclosure
the may be a sufficient negotiate is compilately a sort of other blocks in ourers

To prevent the risk of electric shock, do not.
return cost (or loss). No user-service Parts include. Día: version to modified
Service personnel only

The exclusion point inside the image
is intended to alter the use to the presence of industrial containing and performance.
[sercang] instructians in the literature
In proof
-
Read these instructions.
-
Need of carriages
-
Do not use the application for water.
-
Do not block any ventilation components.
-
Do not install, near any best sources to
-
Do not detect the safety purpose of the polarized or grounding-type ping. A polarized ping has two blades with one wider than the other.
A grounding type plus has two blades and a third grounding prong. The wide blade or the third prong are provided for your safety. If the
-
Protect the ocean core from a river, along on or pointed partly, led at all of us, confluence, encounted
-
Protect the pose of the self, has been an art piece, particularly on pages, concrete, places, and the park where it can't off the apparatus.
-
Only use attachments/accessories specified by the manufacturer.
-
Unclug this apparatus during lightning storms or when unused for long periods of time.
-
Here is all serving to quarter service personnel, servicing is required when the apparatus has been damaged in any way, such as
water supply can, or drug is tariffalent, if so has been spared in subjects, have taken into the apparatus, the apparatus has been exposed to rain or moisture, does not encourage damage, or has been damaged.
- The MANSPure or an appliance coupler is used as the disconned device, the disconnect device shall remain readily operable
Note: The marking is located on the bottom enclosure of the speaker. There is a rechargeable Li-ion battery in the remote control. The battery shall
not be exposed to excessive heat such as sunshine, fire or the fire. Danger of explosion if the battery is incorrectly replaced.
Replace only with the same or equivalent type
the RIVR's plug or an appra"be ouple" is used as the disconnected device, the disconnect device that remains ready operate
FCC Caution:
"Changes or modifications not expressly approved by the part responsible for compliance could void the user's authority to operate the equipment."
FCC statement:
This service complies with Part. 15 of the FCC Rules. Operation a subject to the following two conditions
(1) This device may not cause harmful interference, and
[2] This device must accept any interference received, including interference that may cause uncontrolled operation.
This equipment has been tested and found to comply with the links for a Class B digital device, pursuant to part 15 of the FCC Rules.
These limits are designed to provide reasonable protection against harmful interference in a residential installation. This equipment generates, uses
and can radiate basic frequency energy and, if not installed and used in accordance with the instructions, may cause harmful interference to radio consumption. However, there is no guidance that progress was not seen in a particular installation.
control: Kane's, however, there is no guarantee that interest is not clear in a particular situation. If this is important, does cause harmful interference to radio or television or reception, which can be determined by turning the environment off and on the
User is encouraged to try to correct the interference by one or more of the following measures:
—Reorient or relocate the receiving antenna.
—Increase the separation between the equipment and receiver.
—Contact the equipment into an outlet on a circuit different from that to which the receiver is connected.
—Consult the dealer or an experienced radio/TV technician for help.
IC statement
This device comches with Industry Canada license-exempt FSG standards). Operation is subject to the following two conditions:
(1) this device may not cause interference, and
[2] This device must accept any interference, including interference that may cause an desired operation of the device. This Class [3]
digital apparatus occupies with Canadian CIS-003.
Use only with the cart, stand, tripod, bracket, or back specified by the manufacturer, or sold with the apparatus. When a cart is used, use caution when moving the cart/ascarpus combination to avoid injury from lip over.

Correct Disposal at this product. This marking indicates that this product should not be disposed with other household owners throughout the EU. To prevent possible harm to the confront front or human health from uncontrolled waste disposal, recycling it responsible by to promote the sustainable reuse of material resources. To return your use device, please use the return and collection systems or contact the retailer where the product was purchased. They can take this product for environmental sale recycling.

This equipment is a Class II or double insulated electrical appliance. It has been designed in such a way that it does not require a safety correction to electrical earth.
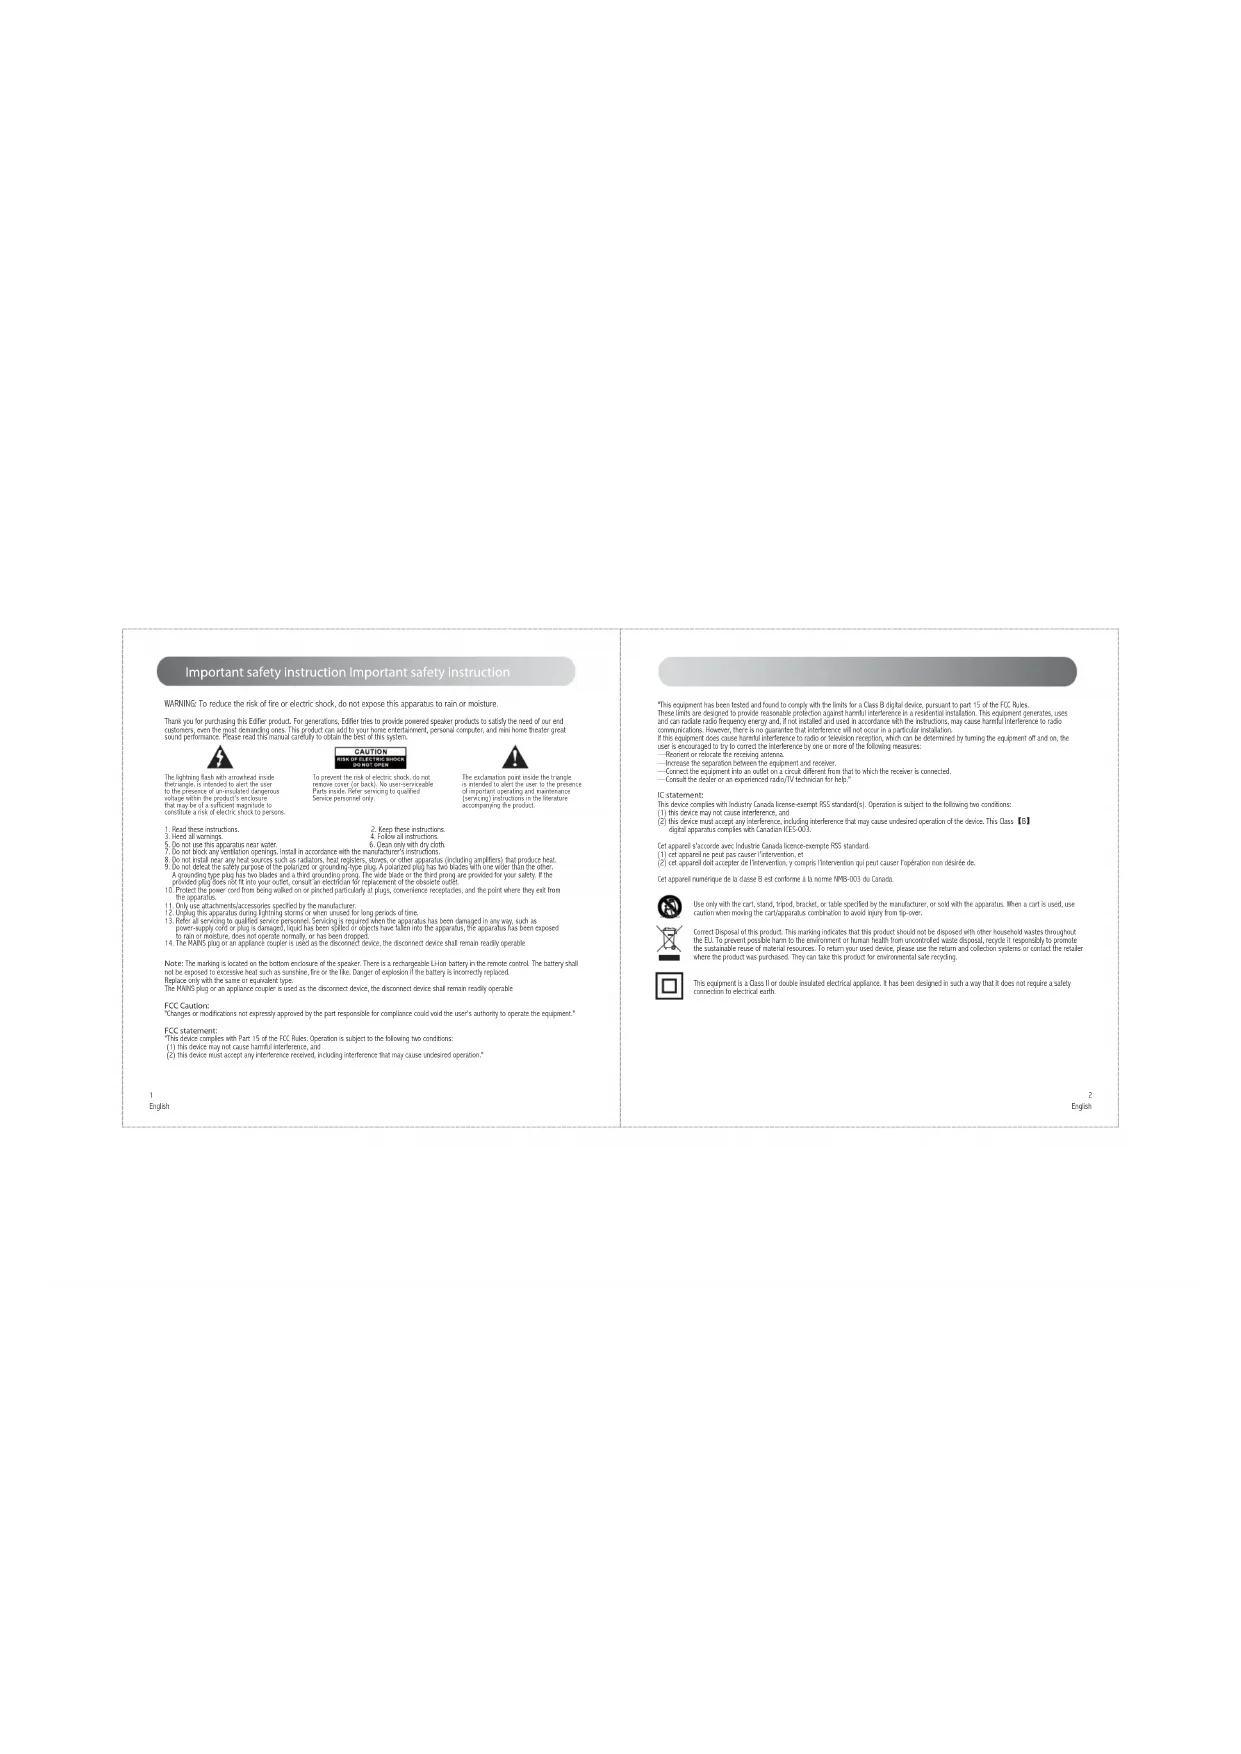
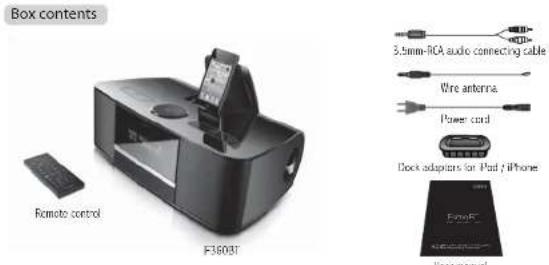
Unpack the Box & Connectivity
text_image
Box contents Remote control F3603T 3.5mm-RCA audio connecting cable Wire antenna Power cord Dock adapters for iPad iPhone FinoES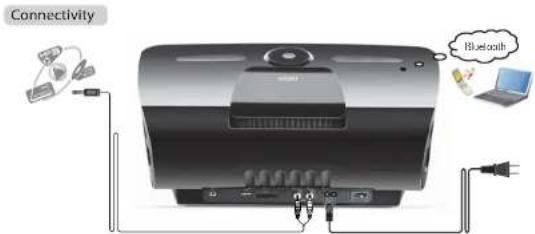
text_image
Connectivity Bluetooth3 English
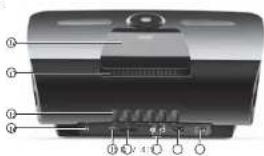
Illustrations and functional depiction
-
☑ Touch: Previous track (Bluetooth, iPod, USB, SD card mode); Lower channel frequency (FH mode)
-
☑ Touch: Adjustment for Bass, Treble, Time setting. Alarm setting and Sleep time (Adjust by using together with the circular touch sensitive volume control dial)
-
✉ Touch once to more. Press again to resume audio playback.
-
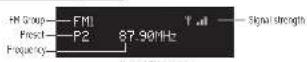
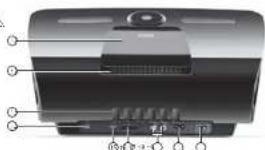
Digital display panel
-
Speaker grill
-
iPod iPhone trucks
-
⏱ Touch: Next track (Bluetooth, iPod, USB, SD card mode):
higher channel frequency (HM mode)
Note: F\H channel presets must be set first
- In each input touch to
• FM input: Start auto FM search;
- iPod/iPhone input: Sloo iPod player
- SD card input: Stop SD card music (the display panel will show the track played and card capacity)
- USB input: Stop USB music (the display panel will show the track played and rand capacity).
-
Touch to select input mode: Bluetooth - iPodiPhone - FM - USB - SD - AUX
-
Play / Pause (Not available in FM / AUX mode)
Press to activate the system. The system will automatically revert to the last input/audio source
Press & hold: The system will go into standby mode.
- Rotary touch-sensitive volume control (clockwise: volume
Increase: Counter-clockwise: volume decrease
-
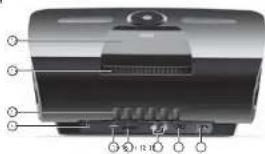
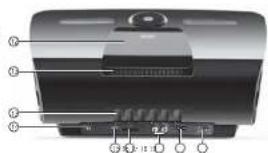
Pod/Phone dock cover
-
Ventilation slots
-
FH wire antenna jack connector
15 USB port
-
SD card port
-
BCA 3/1 rput jacks
-
Power cord correction
-
Master power switch

text_image
Labeled diagram of a printer with numbered parts for identificationFront view

text_image
Diagram of a device rear panel with labeled ports and buttons, showing internal structure and control buttons.Rear View
English
Operational guide for remote control
The remote control will operate within a distance of (22 ft) from the F360BT. Always point the remote in the direction to the front of speaker
text_image
EDIFIER(16)21일/12/5
| Keys | Input | Press to |
| ESC | TMOSASO AUX iPod Bluetooth | Resume in normal operation of soundlet test menu and settings double the arm |
| RE | Note: | |
| (1) | Phone on / Standby | |
| 3~9 | FM | Press ▲▼ to select posted station. Press & hold a numeric 0-2" say for approx. 2 seconds to assign the selected station to that numeric key. |
| USB / SD | Play the selected track. | |
| ▲▼ | FM | Previously to be the higher - fast frequency in meters of 0.1MHz per repetition |
| USB / SD | Previous / next timer | |
| IPod | Navigate and scroll up / down the FosL/Phone menu. | |
| HINJ | FM | Press take to select your region. |
| USB / SD | View file, antenna to name and album files. | |
| IPod | Navigate the FosL/Phone sub-mode / Pagelet, antenna, Scape, Vireous and Vare. | |
| HHH | FM | Physics and asset channel, press & hold access a faster - fast radio frequency |
| USB / SD | Previous / next track. | |
| Press & hold previous / next timer. | ||
| IPod | Previous / next track. | |
| Press & hold next speed of forward in current track. | ||
| Bluetooth | Physics / next track. | |
| FH-SE-USB-AUR-Psd - Q | Select the corresponding data input. FH-SE-USB-AUR-IPod Bluetooth | |
| SELECT | Send Tom-Play | |
| ▶ | Play (Press not available in FM / AU mode).Press 5 hard to switch system between standby and +/-. | |
| +/- | Volume +/- (0~50); Trade +/- (0~+8); Boss +/- (0~+8). | |
| ALARM TIME | Time / Alarm / Sleep settingPress & hold to switch between 12 hour and 24 hour clock | |
| RPT. | Select track repair mode, all repair, folder repeat | |
| SHTL | Switch between "all repeat" and Shuffle. | |
Operational guide

Power on
- Connect the power cable to the speaker, then to the wall socket. The system is powered on.
- Press-by remote control (or press 5 to down on the top of speaker), to switch the system between standby and on.
- Press "INPUT" to select source for playback.

FM tumor controls
Selecting FM region
REGION SELECTION
EUROPE
-
Press "HOU" twice, "Region Selection" appears on the screen
-
Press "SELECT" to select the region you require (China, Japan, United States, Australia, Wide
Parge and Europe
- Press men, I do ed
Auto / Manual search & store presets
Automatic Press
- Press "HEU" once, "Star Auto Seek" appears on the screen.
- Press "SELECT" key to enable system to start auto search and store the radio station.
- Press to select previous / next press, press & hold to seek a higher / lower radio frequency.
Hally's Freset:
There are 3 FH groups, FN1, FN2 and FN3 where each group can store 9 press channels. Each group can be manually programmed to store 9
preferred FF stations for multiple users or personal preferences.
1. Press the FN button on the remote to choose group FN1, FN2 or FN3
2. Press ▲/▼ Naturally tune to a higher / lower frequency in increments / decrements of 0.1/Hz per operation.
3. When you find the frequency to set, press & hold a number 1-9 for 2 seconds to assign the radio stations.
Tip a. Connect the wire string to the rear panel of the system for better mode sign.
b. Once the display has switched back to the default home screen, the radio is ready to play.
c. There are 9 available presels in each FM1, FM2 and FM3 making a total of 27 available presels.
d. For multiple user preferences, first manually fill the FH1 9 presets to allow a second set to be manually preset in FH2 and repeat for FH3.
Operational guide


SD / USB input
SD MP3
[Unreadable]
The image is too blurry to recognize any text content.
TRÉ
CK 001
HELLO
The image is too blurry to recognize any text content.
The image is too blurry to recognize any text content.
[Unreadable]
00:28
USE
1
m = 311
2
20:28
10:25
1
M
0Y-
7-3812
The Ground Truth image displays a single, solid horizontal line. According to Rule 2 (UNDERSCORE & LINE RULES), this is a stylistic or background line, not a placeholder underscore. Therefore, the OCR result must ignore it and output nothing or only meaningful text. The provided OCR content is "____", which consists of four underscores. This is an incorrect interpretation of the line as a fill-in-the-blank placeholder, violating the rule that stylistic lines must be ignored. The OCR has hallucinated underscores where none should exist based on the GT's visual context. Hence, the OCR result is inconsistent with the Ground Truth.
m = 311
The image is too blurry to recognize any text content.
(1)
The Ground Truth image displays a single, solid horizontal line. According to Rule 2 (UNDERSCORE & LINE RULES), this is a stylistic or background line, not a placeholder underscore. Therefore, the OCR result must ignore it. The provided OCR content is "____", which consists of four underscores. This is an incorrect interpretation of the line as a placeholder, violating the rule that stylistic lines must be ignored. The OCR has hallucinated underscores where none should exist in the GT. Therefore, the OCR result is inconsistent with the Ground Truth.
a. When said
g di
ter
in. ing
s. the SOY
- When the
p
the
system
is reductos
AUX
in
计
(1)
1
2.5
•
The image is too blurry to recognize any text content.
[Unreadable]
UNIT
POT
AY-01-2012
0:1
。
[Unreadable]
p
d
nr
tech
1
18
PUT
21
HY-01-2012
[Non-Text]
[Non-Text]
[Non-Text]
-
-

Bluetooth
General guideline for portable devices
m = 311
BLUETOOTH DISCONNECTED
BLUETOOTH
CONNECTED
7
Cryse
- Connect SD card/USB flash drive (MP3 or MPA format) to SD/USB connector.
- Select audio input press "M-UI" on the top of the speaker or "SO" / "USB" key on the remote control to select the desired input.
- Previous / next back press ▶▶▶▶▶
Previous / next front press ▶▼ [or press & hold ▶▶▶▶ for 2 seconds]
Play / Pause press ▶▶
hole: System will automatically play the first track after 8 seconds on the SD card/USB flash drive if no track or faller is being selected.
I will automatically play the as: played track when the 50/USB input is re-selected.
stem will reveal back to play the first track in the SD care/USB flash drive. - Connect speaker to the external audio device (PC, MP3, MP4, mobile phone, etc.) with the 3.5mm RCL audio connecting cable.
- Audio input selections press "MPJ" on the top of speaker or "MLX" key on the remote control to select the MLX inad.
Tic: 144/981 / 91 / ▲▼ are not available in U.S. mode. - Connect iPod iPhone (MP3 or MVA format audio source) to the dock
- Select audio input press "I" on the top of the speaker or "Pod" key on the remote control to select the iPod-pol
- Press "HENU" to navigate the iPod Phone sub-menus - Playlist, Artists Songs. Videos are here.
- Press ▲▼ to navigate and scroll up / down the iPod/iPhone menu Top: Press "RUTE" on the top of speaker or "電" key on remote control to shut speaker output
- Press "INPUT" on the top of the speaker or "①" say on the remote control to select the Bluetooth input, the screen displays "Bluetooth Connected".
- Set your device (mobile phone, tablet device, MP3 player etc.) to search and select "EDIFIER Exiona BT", When the connection is made, the screen will display "Bluetooth Connected".
- Press "INPUT" or the top of the speaker or "①" say on the remote control to select the Bluetooth input, the screen displays "Bluetooth Connected".
- Set your device (mobile phone, tablet device, MP3 player etc.) to search and select "EDIFIER EsDSA BT", "When the connection is made, the screen will display 'Bluetooth Connected'".
- Press "INPUT" or the top of the speaker or "①" say on the remote control to select the Bluetooth input, the screen displays "Bluetooth Connected".
- Press "INPUT" or the top of the speaker or "①" say on the remote control to select the Bluetooth input, the screen displays "Bluetooth Connected".
- Press "INPUT" or the top of the speaker or "①" say on the remote control to select the Bluetooth input, the screen displays "Bluetooth Connected".
- Press "INPUT" or the top of the speaker or "①" say on the remote control to select the Bluetooth input, the screen displays "Bluetooth Connected".
- Press "INPUT" or the top of the speaker or "①" say on the remote control to select the Bluetooth input, the screen displays "Bluetooth Connected".
- Press "INPUT" or the top of the speaker or "①" say on the remote control to select the Bluetooth input, the screen displays "Bluetooth Connected".
- Press "INPUT" or the top of the speaker or "①" say on the remote control to select the Bluetooth input, the screen displays "Bluetooth Connected".
- Press "INPUT" or the top of the speaker or "①" say on the remote control to select the Bluetooth input, the screen displays "Bluetooth Connected".
- Pass, "Input" or "Output" to the result of a set of values by the output of the results in which
- Press "INPUT" or the top of the speaker or "①" say on the remote control to select the Bluetooth input, the screen displays "Bluetooth Connected".
- Press "INPUT" or the top of the speaker or "①" say on the remote control to select the Bluetooth input, the screen displays "Bluetooth Connected".
- Press "INPUT" or the top of the speaker or "①" say on the remote control to select the Bluetooth input, the screen displays "Bluetooth Connected".
- Press "INPUT" or the top of the speaker or "①" say on the remote control to select the Bluetooth input, the screen displays "Bluetooth Connected".
- Press "INPUT" or the top of the speaker or "OK" key on the remote control to select the Bluetooth input, the screen displays "Bluetooth Disconnecter".
- Press "INPUT" or the top of the speaker or "OK" key on the remote control to select the Bluetooth input, the screen displays "Bluetooth Disconnecter".
- Press "INPUT" or the top of the speaker or "OK" key on the remote control to select the Bluetooth input, the screen displays "Bluetooth Disconnecter".
- Press "INPUT" or the top of the speaker or "OK" key on the remote control to select the Bluetooth input, the screen displays "Bluetooth Disconnecter".
- Press "INPUT" or the top of the speaker or "OK" key on the remote control to select the Bluetooth input, the screen displays "Bluetooth Disconnecter".
Alarm time (min) - When alarm sound is activated, touch any key on the top of the speaker, to scoze the alarm for 13 minutes.
- During a close mode, a "z22" loop and current line will be disclosed.
- I on sex is pressed in 5 minutes during alarm activation, the alarm will go up
a detail sequence of flame-5poxide-flam-5poxide-flam-SUE7 before
entering garden space.
- CANCEL ALARM: press "id" or ▶ on the top of the speaker.
Note 1. Only connected cyclic sources can be set as the alarm source. Not including Bluecath connected devices.
2. If the original alarm source is disconnected from the system, the first preset TN station will automatically replace the original one as a
default alarm source.
Sleep time setting
SLEEP
-
Press "ALAIN THE" or "FUNC" key on the speaker unit "SLEEP" - is displayed.
-
Press "SELECT" key to enter a sleep time setting, "-" links.
-
Press ▲/▼ or make the touch sensitive volume dial to adjust settings
-
Press "SELECT" to pin
Note: 1. Sleep setting is the time specified for music to play before the system automatically turns to standby mode.
- Press © on remote control or press & hold ▶ on the top of speaker to power on the system.
Reset the system
BLUETOOTH
MUTE
SYSTEM RESET FIRMWARE VER0.98
-
Rule the system: press on remove sound (or "NOTE" on speaker).
-
Display the system version: press 5 hard "MENU" for two seconds.
-
Press "SELECT" key to reset the system.
Note: The sequence of the three steps above all reset and erase all settings and restore the
and to the original factory default settings.
Technical information
Total power output: RMS 50W × 2 (THD + N = 10%, f0=2.5KHz, DRC off)
Signal to noise rate: ≥85dB4
Frequency response: 65Hz\~20KHz (±5dB)
Input sensitivity: 1050mV ± 50mV
Speaker units: 3" (78mm), magnetically shielded, 6Ω
Input type: Bluetooth / iPod / iPhone / USB / SD / AUX / FM
FH Preset 27 preset channels
Region selections EU / ASIA /US / AUS (87.5\~108.0MHz),
JAP (76.0-90.0MHz), wide range (76.0-108.0MHz)
Alarms: 5 independent
Alarm sound time: 5 minutes
Snooze time: 10 minutes, max snooze repeat times: 3
Sleep timer options: 15, 30, 45, 60, 75, 90 minutes.
System dimension: 390mm × 145mm × 23/mm (W x H x D)
Not weight: /approx. 3.3kg
Gross weight: Approx. 4.5kg
g
Engie
10
English
Troubleshooting
■ Not all speakers function:
Please first check if the speaker wires are connected securely; then check if the Line-in connectors are reversed; check also if the audio source is at fault.
■ One satellite speaker does not function when playing CD from computer:
This kind of phenomena is prone to happen on new computer systems that one satellite does not function when playing CD, but system works line when playing KNV formatted files. This is mainly due to the fault connection of CD-ROM and sound card, that one channel of signal is shorted in the ground. Please refer to the manual of CD-ROM and sound card to adjust the wire connection.
■ System does not work at all:
-
Please check if power is connected, and if the wall outlet is switched on
-
Please check if the amplifier is shot in 51BY mode.
-
Please check if the master volume is turned to minimum.
-
Please check if the audio input cable is connected correctly.
-
Please check if there is signal from audio source.
■ Noise coming from speakers:
Amplifier circuitry of this product generates little noise, while the background noise of some VCD/DVD player or computer sound card are too high. Please keep the system in active mode and remove the audio source, if no sound can be heard at 1 meter away from the system, then there is no problem with this product.
■ Magnetic Interference:
This system is complete magnetically shielded, and can be paced near TV or monitor. But since magnet of the subwoofer driver is large, some magnetism leakage is inevitable when the system is too close to the monitor, and it is recommended to keep a 1 meter distance between the speaker system and monitor or TV set.
If you have any further questions or concerns regarding Edifier Products;
Please visit our website at www.edlier.com, or email. Either Support for further assistance at: main@edlier.com, if you prefer, you may contact us by phone, Tel Free: 1-877 EDIER (334-3437).
Consignes de securite importantes
text_image
Diagram showing wireless connection between a device and a laptop, with labeled components and a thought bubble indicating 'Bluetooth'.13 Français
The following table is provided in the image.

text_image
Labeled diagram of a printer with numbered parts for identificationFace award
text_image
Diagram of a device rear panel with labeled ports and connectorsFace are there
14
Français
BLUETOOTH DISCONNECTED
text_image
Labeled diagram of a printer with numbered parts for identificationVista anterior
text_image
Diagram of a device rear panel with labeled ports and indicatorsVista posterior
24
Español
BLUETOOTH DISCONNECTED
text_image
Diagram showing wireless device connection with Bluetooth signal and connected cables12 Deutsch
text_image
Diagram of a printer with numbered parts labeled for identificationVorderansicht
text_image
Diagram of a device rear panel with numbered labels pointing to different ports or features.[Public-World-China-Borderings report] undersorben
ALARM SETTING ALARM-1 ON 16:06PM
Systematic characteristics
system zurücksetzen

Se. RUTE an adsorbed
text_image
Diagram showing wireless connection between a device and a laptop, with labeled components and Bluetooth signal.43 Italian
text_image
Labeled diagram of a printer with numbered parts for identificationVista frontale
text_image
Diagram of a device with numbered parts labeled in Chinese, showing internal structure and component labels.Vista posteriore
44
Italiana
The source image is illegible due to extreme pixelation and distortion. No characters, symbols, or punctuation can be reliably identified. Therefore, no valid OCR text can be generated that matches the visual content of the source image.
JAP (75.0-30.0MHz), wide range (75.0-108.0MHz)
Poso netto 3,3kg circa
Peso lorde: 4,5kg circa
30
Haliano