
OV1414 - Cooker TRISTAR - Free user manual and instructions
Find the device manual for free OV1414 TRISTAR in PDF.
| Product type | Cooker with oven and hob |
| Brand | TriStar |
| Model | OV1414 |
| Dimensions (W x D x H) | 615 x 435 x 450 mm |
| Weight | 12 kg |
| Power supply | 220-240 V ~ 50 Hz |
| Total power | 3100 W |
| Number of cooking zones | 2 (large 800 W, small 500 W) |
| Oven heating types | Top and bottom heat (natural convection) |
| Temperature range | 100 °C to 250 °C |
| Timer | Yes, up to 120 minutes (approx.) |
| Number of oven levels | 3 (top, middle, bottom) |
| Included accessories | Rack, baking tray, handle |
| Main material | Steel, glass door |
| Care and cleaning | Clean with dish soap and water, avoid abrasives |
| Safety | Automatic shut-off, handle for removal, glass door |
| Warranty | 1 year |
| Use | Household use only |
| Repairability | By an authorized service center |
Frequently Asked Questions - OV1414 TRISTAR
User questions about OV1414 TRISTAR
0 question about this device. Answer the ones you know or ask your own.
Ask a new question about this device
Download the instructions for your Cooker in PDF format for free! Find your manual OV1414 - TRISTAR and take your electronic device back in hand. On this page are published all the documents necessary for the use of your device. OV1414 by TRISTAR.
USER MANUAL OV1414 TRISTAR
natural_image
Black microwave oven with open kitchen pan and cooking dish, accompanied by fresh vegetables and a blue pan (no text or symbols visible)OV-1414
NL
natural_image
Black Willysian 3-wheeled toaster oven with two top ovens and control knobs (no visible text or labels)
natural_image
Illustration of a tray with a lid and radiating lines, no text or symbols presentnatural_image
Symbol of a trash bin crossed with diagonal lines, no text or numbers presentGeneral safety instructions
Check if the tension of your supply corresponds with the voltage indicated on the rating plate of your appliance.
- Before commissioning this device please read the instruction manual carefully and keep this so that you can check them later.
- Please keep these instructions, the guarantee certificate, the sales receipt and, if possible, the carton with the inner packaging!
- The device is intended exclusively for private and not for commercial use! Keep it away from direct heat, sun and moist and protect it against sharp impacts.
- Always remove the plug from the socket whenever the device is not in use, when attaching accessory parts, cleaning the device or whenever a disturbance occurs. Switch off the device before. Pull on the plug, not on the cable.
- This appliance is not intended for use by persons with reduced physical, sensory or mental capacities, or lack of experience and knowledge (including children), unless they have been supervised or instructed concerning use of the appliance by a person responsible for their safety.
- In order to protect children from the dangers of electrical appliances, never leave them unsupervised with the device. Consequently, when selecting the location for your device, do so in such a way that children do not have access to the device. Take care to ensure that the cable does not hang down.
- Test the device, plug and the cable regularly for damage. If there is damage of any kind, the device should not be used but the appliance must be repaired by a qualified technician in order to avoid a hazard. Only original spare parts must be used.
- A damaged cord or plug must be replaced by an authorized technician to avoid a hazard. Do not repair the device yourself,.
- Keep the device and the cable away from heat, direct sunlight, moisture, sharp edges and such like.
- Never use the device unsupervised! Switch off the device whenever you are not using it, even if this is only for a moment.
- Do not use the device outdoors.
- Under no circumstances must the device be placed in water or other liquid, or come into contact with such. Do not use the device with wet or moist hands.
- Should the device become moist or wet, remove the mains plug from the socket immediately. Do not reach into the water.
- Use the device only for the intended purpose.
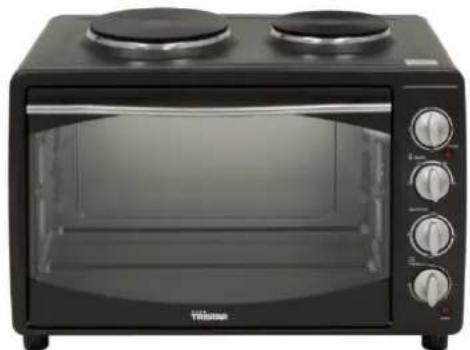
Product Description
What is included in the box
- The oven
- 1 wire rack
- 1 Baking tray
- 1 Handle
- This user manual
natural_image
Black office kitchen oven with two top ovens and control knobs (no visible text or labels)Carefully inspect the oven when you take it out of the box. Is it complete? If the oven is damaged or incomplete then place it back in its original box unused and take it back to the place of purchase.
The pictures and drawings supplied may be different from the actual device.
You will enjoy cooking even more with your new Tristar oven and cook plates all-in-one system! Because it has a lot to offer.
The oven has a top and a bottom heating element for temperature sensitive dishes and meat with a crispy crust, or to bake your favorite pies.
Apart from that, it has very easy cook plate controls for preparing delicious meals.

Please read this user manual carefully before using the oven.
Never use this product without reading the safety instructions first. Keep this manual in a safe place.
Always keep children and/or incapable people away from this appliance.
During and after using the oven, the cooking elements will be very hot. You could burn yourself. Do not touch these parts.
Technical Specifications
Model no.: OV-1414
Power supply: 220-240V 50 Hz
Power consumption: 3100 W
Dimensions: 615X435X450 mm
Weight: 12 kg.
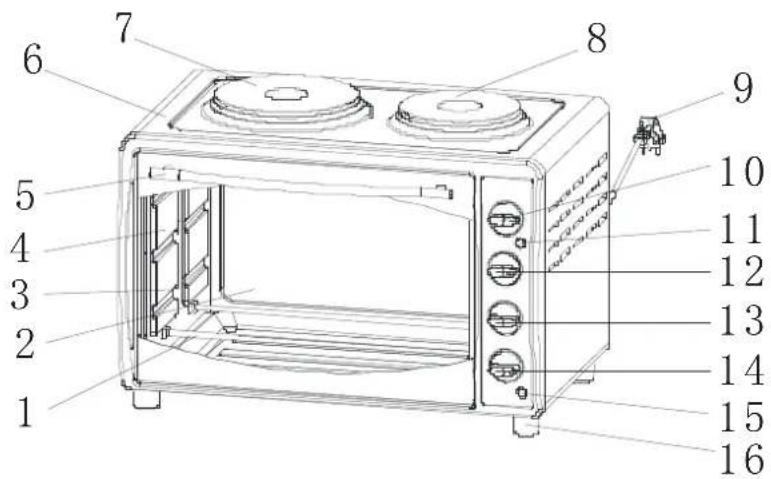

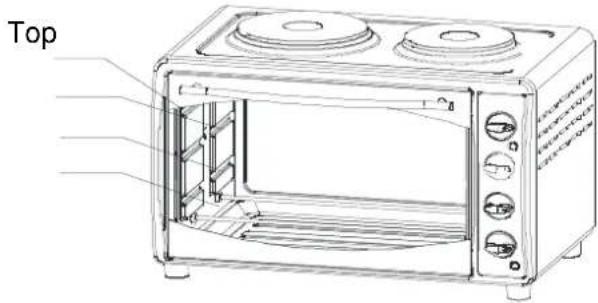
01.Heating element
02.Glass door
03.Food tray support
04.Side panel
05. Door handle
06.Oven top
07.Large cook plate (800W)
08.Small cook plate (500W)
09.Cord + plug
10.Turning knob cook plates
11. Warning light cook plates
12.Turning knob temperature
13.Turning knob oven modes
14. Timer oven and cook plates
15. Warning light oven
16.Stand
17.Wire rack
18.Handle
19.Baking tray
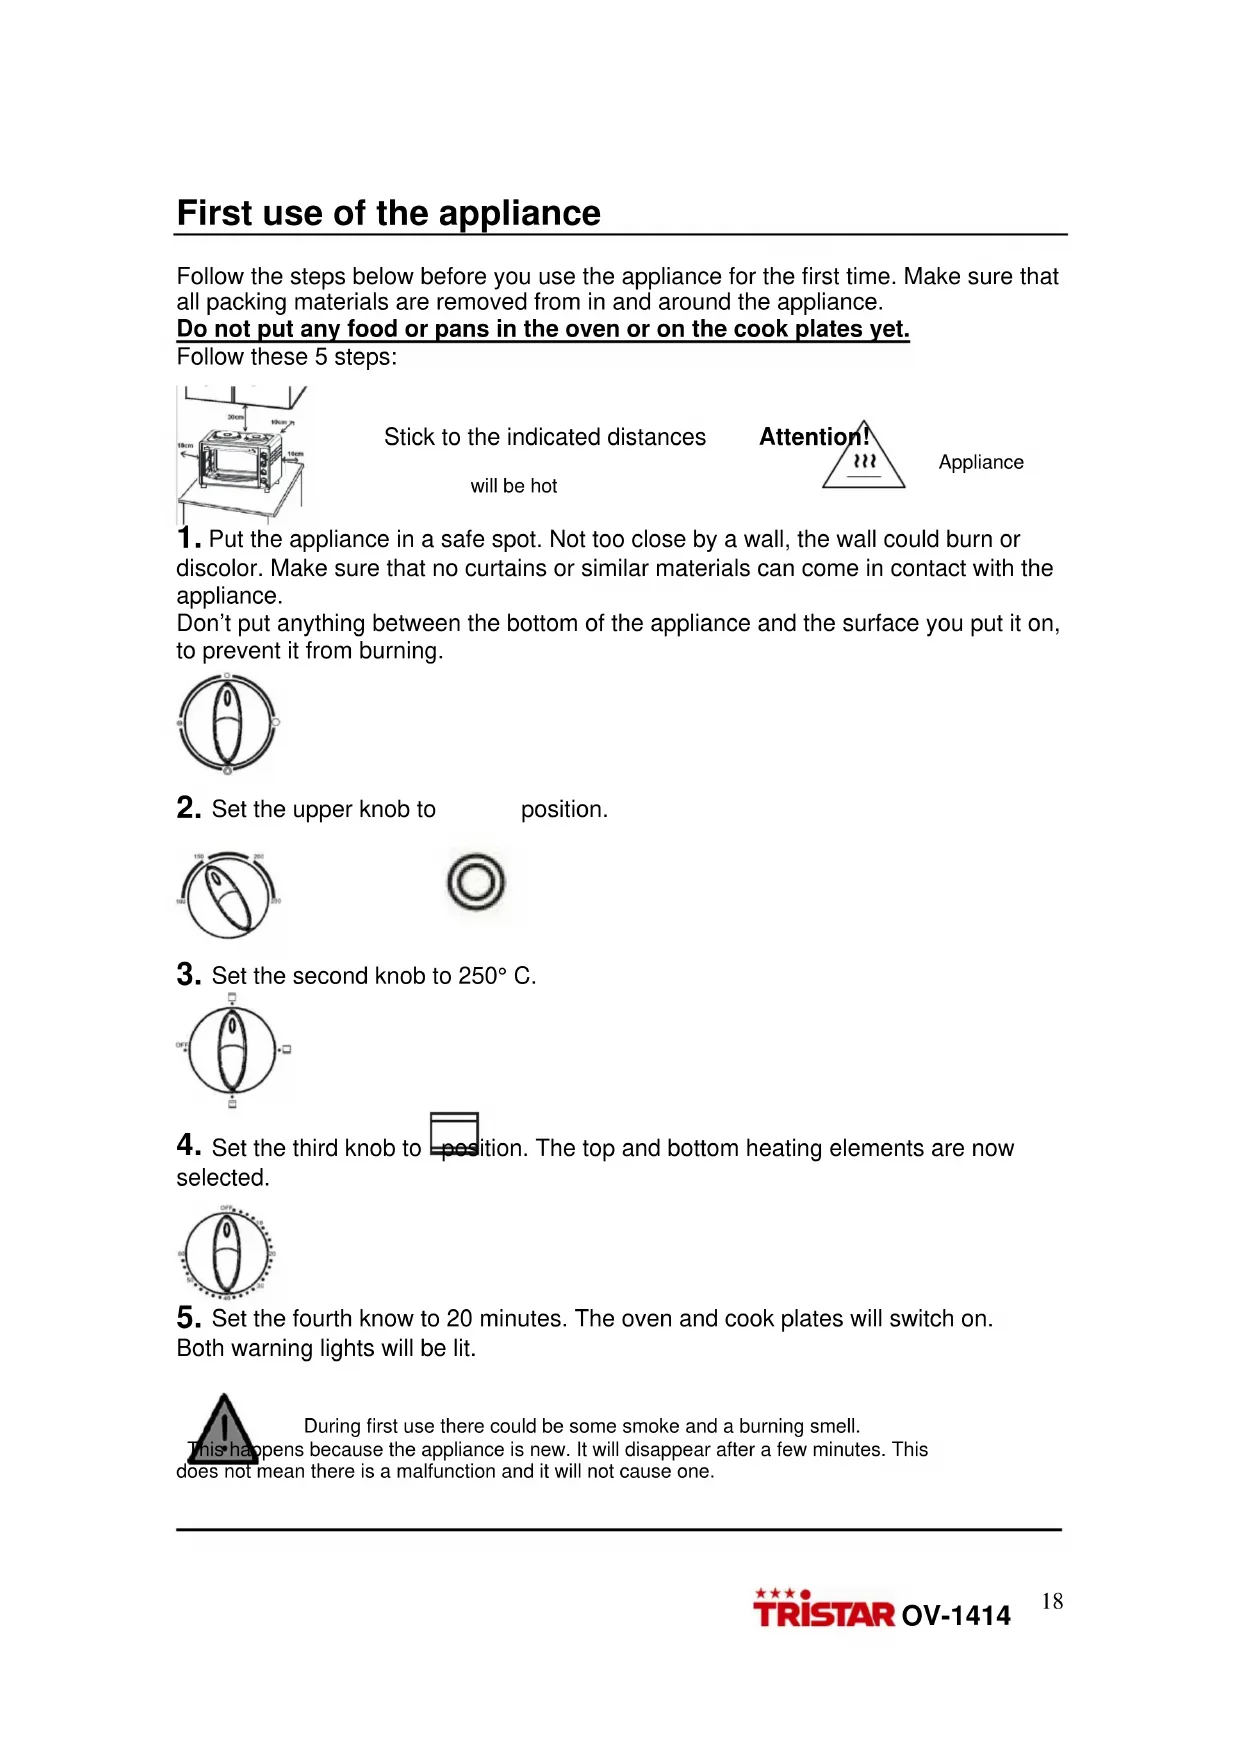
First use of the appliance
Follow the steps below before you use the appliance for the first time. Make sure that all packing materials are removed from in and around the appliance.
Do not put any food or pans in the oven or on the cook plates yet.
Follow these 5 steps:

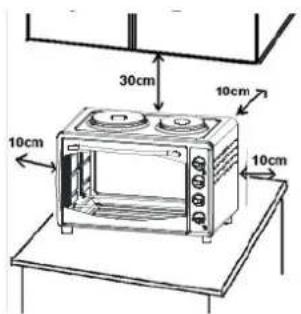
Stick to the indicated distances
will be hot
Appliance
- Put the appliance in a safe spot. Not too close by a wall, the wall could burn or discolor. Make sure that no curtains or similar materials can come in contact with the appliance.
Don't put anything between the bottom of the appliance and the surface you put it on, to prevent it from burning.
- Set the upper knob to position.

- Set the second knob to 250°C.
- Set the third knob to position. The top and bottom heating elements are now selected.
- Set the fourth know to 20 minutes. The oven and cook plates will switch on. Both warning lights will be lit.
During first use there could be some smoke and a burning smell.
This happens because the appliance is new. It will disappear after a few minutes. This does not mean there is a malfunction and it will not cause one.
Operation of the appliance
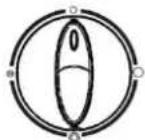
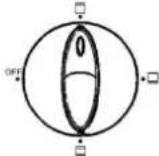
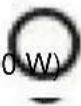
Upper knob → Cook plate control
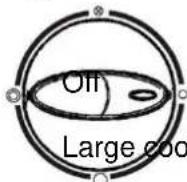
○ Small cook plate
Large cook plate

Both cook plates


This knob lets you select with cook plate you will be using.
Always use the fourth knob to select the desired cooking time as well, the upper red warning light (no. 11) will then light up. Your cook plate will heat up. Use the second knob to set the desired temperature. When you only use the cook plates, then leave the third knob in the OFF position.
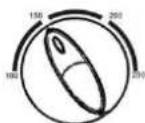
Second knob → Setting the temperature
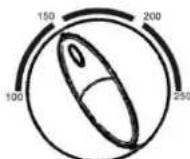
Select, clockwise, which temperature you need to prepare your dish. The temperature ranges from 100^ C up to 250^ C.
This knob is used for the cook plate temperature as well as the oven temperature.
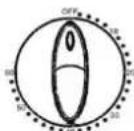
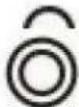
Third knob → Oven heating element selection
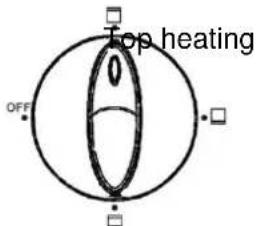
Top & bottom heating

Bottom heating

Select the desired heating element, which depends on the dish you are preparing.
Fourth knob → Timer
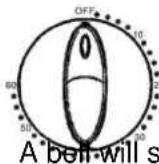
Select the desired cooking time (in minutes) with the timer, which depends on the dish you are preparing.
Select the time by turning the timer knob clockwise.
The appliance will turn off automatically after the time you selected is over.
A bell-will sound.
When selecting the time the oven will If you wish to select a time of less than 5 min. turn on if the third knob is set to an then turn the knob to more than 6 min. and then element, the red light (no. 15) will light up. turn it back to your desired time. You can turn the Red light no. 11 will light up if you also appliance off manually during use by turning the set the cook plates to ON. timer knob counter clockwise to the OFF position.

During and after using the oven, the cooking elements will be very hot. You could burn yourself. Do not touch these parts.
You just want to use the cook plates
Set the upper knob (the cook plate control knob) to the desired setting, using one or two cook plates.
Set the desired temperature of the cook plates with the second knob (the temperature setting knob)
Set the desired time.
The upper warning light (no.11) will light up.
You can start cooking.
You just want to bake in the oven
Leave the first knob (the cook plate control knob) in the OFF position.
Set the desired temperature with the second knob (the temperature setting knob).
Set the third knob (oven heating element selection knob) to the desired oven setting.
Set the desired time.
The bottom warning light (no. 15) will light up.
You want to use the oven and cook plates at the same time
Set the upper knob (the cook plate control knob) to the desired setting, using one or two cook plates.
Set the desired temperature of the cook plates and the oven with the second knob (the temperature setting knob).
Set the third knob (oven heating element selection knob) to the desired oven setting.
Set the desired time.
The warning lights no.11 and no. 15 will light up.
You can start cooking and place your dish in the oven.
Accessories
Baking tray
How to use the handle
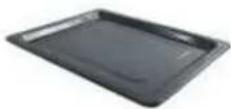
Baking tray, to be used for example: for preparing chicken, hamburgers, gratin, pound cake and many other oven dishes.
Wire rack
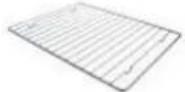
Wire rack, for dry dishes, like (French) bread
Baking tray with wire rack inside
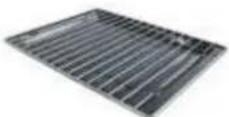
For dishes that could be leaking a lot of grease.
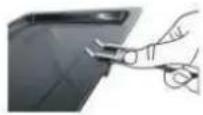
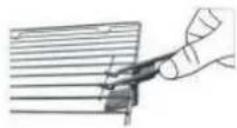
Always use the supplied handle.
You can place the baking tray or wire rack on three different levels, 1 depending on which dish you are preparing. 2 3 Bottom
1 Upper tray support
2 Middle tray support
3 Lower tray support
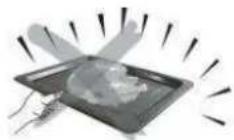
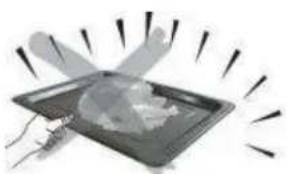
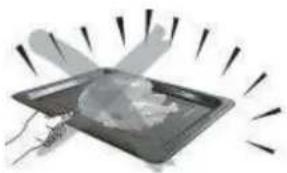
Be careful when removing the wire rack or the baking tray, these can be very hot! Always use the supplied handle.
Before cleaning, unplug and let the oven cool down.
Do not use a hard brush or other abrasive materials to clean the
inside or the outside of the appliance, to prevent scratching the surface and the inside of the appliance.
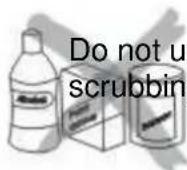
Do not use any toxic or abrasive cleaning supplies like petrol, scrubbing powder or solvent.
Regular kitchen cleaner or dishwashing liquid with water will do.
Cleaning the cook plates.
This is how to do it:
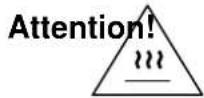
■ After boiling over remove the remains immediately. Attention! This part is hot.
- Clean the cook plates with dishwashing liquid and some water.
- Heat the cook plates up for a short time, otherwise they could rust.
- Treat with maintenance solution.
Cleaning the oven.
This is how to do it:
- Do not use any hard scrubbing pads.
- Fruit juice leaking down the baking tray will make stains that cannot be removed, even with oven cleaner. Do not overfill the baking tin when baking moist fruitcake.
- A slightly dirty oven can be cleaned with just some dishwashing liquid, warm water and a splash of vinegar.
Always let the oven and cook plates cool down well before cleaning them.
The baking and cooking process can take longer when the oven is dirty inside.
Never use this product without reading the safety instructions first. Always follow these instructions.
Put the appliance in a safe spot. Not too close by a wall, the wall could burn or discolor. Make sure that no curtains or similar materials can come in contact with the appliance. Don't put anything between the bottom of the appliance and the surface you put it on, to prevent it from burning.
natural_image
Illustration of a tray with a lid and radiating lines, no text or symbols presentAlways use the supplied handle when you take a wire rack or baking tray out of the oven. Touching these with bare hands can cause serious burns.
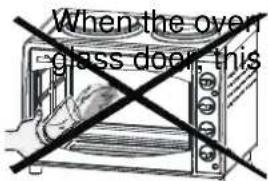
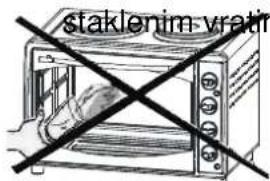
When the oven is hot, then use no water on the glass door, this could cause the glass to break.
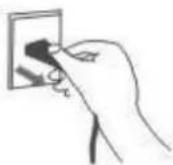
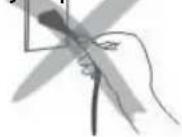
When unplugging the electricity, always pull the plug. Never pull the wire, this could cause the cord to break.
Don't use the appliance with wet hands. Make sure the electric cord does not get wet. Always unplug the appliance when it's not being used.
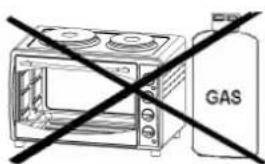
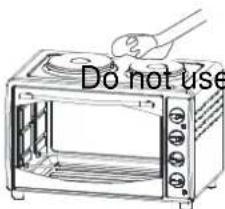
When the appliance is being used, don't put a gas burner or other heat source nearby. This is to prevent dangerous situations and so that it does not influence the temperature control.
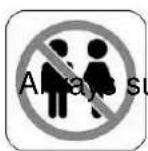
supervise. Keep children and/or incapable people away.
Don't put anything on the appliance when it's being used. The heat can cause deforming, cracks etc..
Food in bottles or cans cannot be heated directly. Cracked bottles or cans can cause serious injuries.
Be careful! Don't burn yourself during or right
after using the appliance.
The metal parts and glass door become very hot during use.
Pay attention when opening and closing the door.
Plug directly into a wall socket. Do not use any adaptors.
Important warnings
■ Before plugging in the appliance, make sure the power supply matches that of the appliance, the socket has a minimum of 16A and is grounded. We deny any responsibility if this safety precaution is not followed.
- Do not move the appliance during use.
- Do not use the appliance when the cord is damaged, the appliance fell down, shows signs of damage or doesn't function correctly. In such cases, immediately take the appliance back to its place of purchase to prevent risks.
- Do not use the appliance as a heat source.
- Never put paper, cardboard or plastic in the appliance and do not put any other objects in it, like kitchen appliances.
- Do not stick any objects into the ventilation grills. Do not block them.
- If food or certain parts of the appliance happen to catch fire, then do not, under any circumstances, try to put out the flames with water. Keep the oven door closed, unplug the appliance en smother the flames with a wet cloth.
■ This appliance has not been design to be built in.
- When the door is open then pay attention to the following: don't put pressure on the door by putting heavy objects on top of it. Never put any hot or heavy dishes you just took out of the oven on the door.
Terms of guarantee and service
Damage caused by not following the directions in the user manual voids your guarantee! We cannot be held accountable for consequential loss caused by this. We cannot be held accountable for property or personal damage caused by inexpert usage or not following the safety directions. In such cases any claims for guarantee become void.
Other then cleaning, as detailed in this manual, no other maintenance is necessary for this appliance.
In case repairs need to be done, then this should only be done by an authorized company.
This appliance is only meant for DOMESTIC use and not for commercial or industrial use. This appliance was designed for the preparation of food. It should not be used for any other purpose. The product cannot be changed or altered.
If any problems occur within 1 year after the date of purchase, which are covered by the manufacturer's warranty, TRISTAR will, by means of its service department, repair or replace the appliance.
Only material- and/or manufacturing defects are covered by this warranty. TRISTAR cannot be held responsible for damage:
1) Caused by a drop or an accident
2) If the appliance has been technically modified by the customer or a third party
3) Because of improper use of the appliance
4) Damage caused by wear because of normal use
The original warranty period of 1 year will not be extended because of repairs. This warranty is only valid in Europe. This warranty does not cancel out the user rights according to European Guideline 1944/44CE.
If you have any questions or complaints then go to your place of purchase. Always keep your proof of sale, without this proof of sale you cannot claim any type of guarantee.
Baking tips
Your oven is very well suited to prepare the most fantastic dishes with.
In the table below you will find some tips about preparation time, temperature and the oven settings for a diversity of dishes.
The printed temperatures and times are only an indication. Baking results may vary depending on the recipes, the dishes used and the ingredients.
Oven settings

1
2
3
| Recipe | Quantity | Temp. °C | Cooking time | Oven setting |
| Fresh pizza 400 g 200 °C 25 min. 3 | ||||
| Salted pie 600 g 200 °C 35 min. 3 | ||||
| Frozen pizza 450 g 220 °C | 15 min. 3 | |||
| Lasagna 1500 g 200 °C 40 min. 3 | ||||
| Whole chicken 1500 g | 220 °C | 90 min. | 3 | |
| Meatballs 1000 g 200 °C 60 min. 3 | ||||
| Eggplant with cheese 1700 g | 200 °C 30 min. | 1 | ||
| Grill meat 1000 g | 220 °C 20 min | 1 | ||
| Breaded potatoes 1500 g | 200 °C 40 min. | 1 | ||
| Apple-pie 1000 g | 190 °C | 90 min, | 3 | |
| Wrapped trout 800 g | 190 °C | 40 min. | 2 | |
Add about 5 minutes to the preparation time for preheating the oven.
Tips for saving energy
- Only use pans with a diameter equal to the diameter of the cook plates.
- Only use pots and pans with a flat bottom.
- Keep the lid on the pan if possible.
- Cook vegetables, potatoes, etc. with little water, in order to keep the preparation time as short as possible.
- Use proper temperatures for the different dishes you are preparing.
Packing
The packing material is 100% recyclable, as indicated by the ⚙ symbol. Separate the packing materials when trashing them.
Product
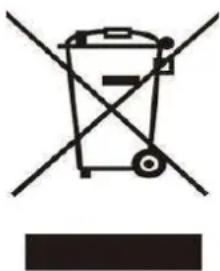
This appliance is supplied with the mark according to European Guideline 2002/96/EG with regard to Discarded Electrical and Electronical Devices (DEED). By making sure that this product is disposed of in the correct way, you will help prevent probable negative consequences for the environment and human health.
EC Declaration of conformity
This appliance has been designed to come in contact with food products and is designed in accordance with EG Guideline 89/109/EEC.
This appliance has been designed, manufactured and put on the market in agreement with: the safety purposes of the “low voltage guideline” no. 73/23/EG, the protection directions of the EMC-guideline 89/336/EG “Electromagnetic compatibility” and the requirement of guideline 93/68/EG.
natural_image
Symbol of a trash bin crossed with diagonal lines, no text or numbers presentDirections to protect the environment.
This product cannot be disposed of with the regular domestic garbage, but should be deposited at a special collection location for reuse of electric and electronic devices. The symbol on the article, user manual and packaging will point this out to you. The raw materials used are suitable to be reused. When reusing used devices or raw materials you are contributing considerably to the protection of our environment. Enquire at your local authorities for the location of the collection location mentioned.

DE
natural_image
Black Trimmate oven with two top ovens and control knobs (no visible text or symbols)
natural_image
Line drawing of a microwave oven with three top-tiered dish holders and control knobs (no text or labels)natural_image
Illustration of a tray with a bag and radiating lines, no text or symbols presentnatural_image
Symbol of a trash bin crossed with diagonal lines, no text or numbers presentnatural_image
Black Tristpan oven with two top ovens and control knobs (no visible text or symbols)
Petite plaque chauffante (500 W)
Grande plaque
natural_image
Illustration of a tray with a globe and radiating lines, no text or symbols presentnatural_image
Symbol of a trash bin crossed with diagonal lines, no text or labels presentnatural_image
Black rectangular toaster oven with two top ovens and control knobs (no visible text or labels)
natural_image
Line drawing of a microwave oven with two top outlets and control knobs (no text or symbols)natural_image
Line drawing of a microwave oven with a hand holding a spoon above it (no text or symbols)natural_image
Illustration of a tray with a lid and radiating lines, no text or symbols presentnatural_image
Symbol of a trash bin crossed with diagonal lines, no text or numbers presentnatural_image
Black Tristpan electric stove with two top ovens and control knobs (no visible text or symbols)
natural_image
Illustration of a tray with a lid and radiating lines, emitting vapor or light (no text or symbols)natural_image
Symbol of a trash bin crossed with diagonal lines, no text or numbers presentnatural_image
Black office microwave oven with two top ovens and control knobs (no visible text or symbols)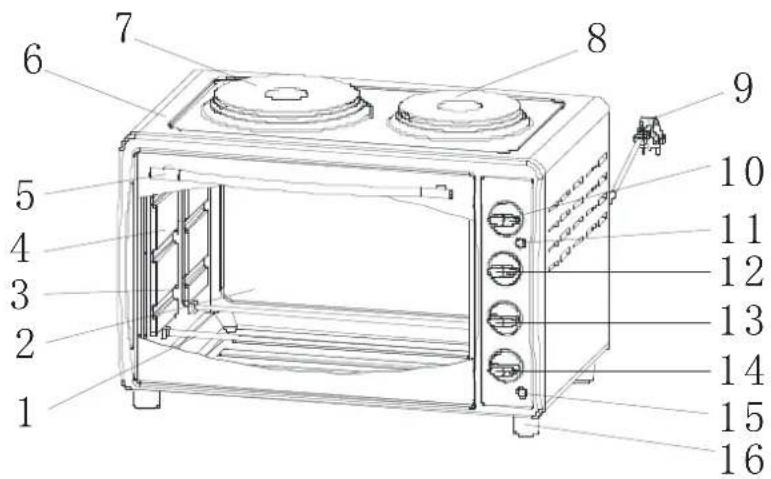

natural_image
Line drawing of a microwave oven with three top-tier handles and internal grilles (no text or labels)natural_image
Line drawing of a microwave oven with two top-tiered appliances and a hand holding a tool above it (no text or symbols)natural_image
Illustration of a tray with a lid and radiating lines, no text or symbols presentnatural_image
Symbol of a trash bin crossed with diagonal lines, no text or labels presentnatural_image
Black rectangular toaster oven with two top ovens and control knobs (no visible text or symbols)Pažljivo pregledajte pećnicu kad je izvadite iz kutije. Je li kompletna? Ako je pećnica oštećena ili nije kompletna, vratite je nekorištenu natrag u originalnu ambalažu i i odnesite na mjesto gdje ste je i kupili.
Slike i crteži u priručniku mogu se razlikovati od stvarnog uređaja.
Uživat ćete u pripremanju hrane još i više s vašom novom pećnicom Tristar i grijaćim pločama i to sve u jednom sustavu! Budući da može ponuditi puno.
Pećnica raspolaže gornjim i donjim grijaćim elementom za hranu koja je osjetljiva na temperaturu kao i za meso s hrskavom korom ili za pečenje vaših omiljenih kolača.
Bez obzira na to, posjeduje regulatore za lako pripremanje hrane i ukusnih jela.

Grijaći element
Staklena vrata
Nosač plitice za hranu
Bočna ploča
Ručica vrata
Gornja strana pećnice
Velika ploča za pripremu hrane (800 W)
Mala ploča za pripremu hrane (500 W)
Kabel + utikač
natural_image
Line drawing of a microwave oven with two top-tiered appliances and a hand holding a tool above it (no text or symbols)Odložite uređaj na sigurno mjesto. Ne preblizu zidu jer se zid može zapaliti ili promijeniti boju. Pobrinite se da zavjese ili sličan materijal ne dođe u dodir s aparatom. Nemojte stavljati ništa između dna aparata i površine na koju ga stavljate, moglo bi doći do požara.
natural_image
Illustration of a tray with a bowl and radiating lines, no text or symbols presentUvije koristite dobivenu ručku kad vadite žičanu mrežu ili pliticu za pečenje van iz pećnice. Doticanje golim rukama može izazvati ozbiljne opekline.
Kad je pećnica vruća, nemojte koristiti vodu na dovesti do pucanja stakla.
Uvijek prilikom iskopčavanja kabela iz utičnice
natural_image
Symbol of a trash bin crossed with diagonal lines, no text or numbers presentnatural_image
Black Tristpan oven with two top ovens and control knobs (no visible text or symbols)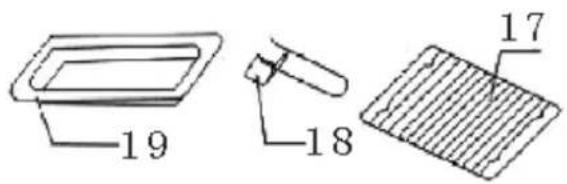
natural_image
Illustration of a tray with a light source and radiating lines, no text or symbols present
- NL
- General safety instructions
- Product Description
- First use of the appliance
- Operation of the appliance
- Second knob → Setting the temperature
- Third knob → Oven heating element selection
- Fourth knob → Timer
- You just want to use the cook plates
- You just want to bake in the oven
- You want to use the oven and cook plates at the same time
- Accessories
- Baking tray
- How to use the handle
- Wire rack
- Baking tray with wire rack inside
- Cleaning the cook plates.
- Cleaning the oven.
- Important warnings
- Terms of guarantee and service
- Baking tips
- Tips for saving energy
- Packing
- Product
- EC Declaration of conformity
- Directions to protect the environment.
- DE
Brand : TRISTAR
Model : OV1414
Category : Cooker