
Avance Collection HR7951 - Food Processor PHILIPS - Free user manual and instructions
Find the device manual for free Avance Collection HR7951 PHILIPS in PDF.
| Product type | Food processor with mixing bowl and blender |
| Brand | Philips |
| Model | Avance Collection HR7951 |
| Number of speeds | 7 speeds + pulse (P) |
| Mixing bowl capacity | Up to 750 g of flour (approx. 3.5 L) |
| Blender capacity | 1 litre maximum (foaming liquids) |
| Motor power | 1000 W (estimate) |
| Power supply | 220-240 V, 50/60 Hz |
| Automatic shutdown | After 16 minutes of continuous operation |
| Overload protection | Yes, automatic shutdown and manual reset |
| Included accessories | Mixing bowl, blender, dough hook, whisk, beater, splash guard |
| Bowl material | Stainless steel (mixing bowl) / plastic (blender) |
| Noise level | 82 dB(A) |
| Care and cleaning | Removable parts dishwasher safe (except motor unit) |
| Child safety | Not suitable for children; do not leave unsupervised |
| Spare parts and repairability | Available from Philips or authorized centers |
| Warranty | International warranty (2 years standard) |
| Weight | Approximately 5 kg (estimate) |
| Dimensions (L x W x H) | Approximately 30 x 25 x 35 cm (estimate) |
| EAN code | 8710103632355 (example) |
Frequently Asked Questions - Avance Collection HR7951 PHILIPS
User questions about Avance Collection HR7951 PHILIPS
0 question about this device. Answer the ones you know or ask your own.
Ask a new question about this device
Download the instructions for your Food Processor in PDF format for free! Find your manual Avance Collection HR7951 - PHILIPS and take your electronic device back in hand. On this page are published all the documents necessary for the use of your device. Avance Collection HR7951 by PHILIPS.
USER MANUAL Avance Collection HR7951 PHILIPS
Spare your skin with a soft, warm, and
A

Always there to help you

K7520
134
13752
138250
139250
137250
Congratulations on your purchase and welcome to Philips! To fully benefit from the support that Philips offers, register your product at www.philips.com/welcome.
Read this user manual carefully before you use the appliance and save it for future reference.
Warning
- Do not immerse the motor unit in water nor rinse it under the tap.
- Before you connect the appliance to the power, make sure that the voltage indicated on the bottom of the appliance corresponds to the local power voltage.
- Do not use the appliance if the power cord, the plug, protecting cover, rotating sieve or any other parts are damaged or has visible cracks.
- If the power cord is damaged, you must have it replaced by Philips, a service center authorized by Philips, or similarly qualified persons to avoid a hazard.
- This appliance can be used by persons with reduced physical, sensory or mental capabilities or lack of experience and knowledge if they have been given supervision or instruction concerning use of the appliance in a safe way and if they understand the hazards involved.
Children shall not play with the appliance.
- This appliance shall not be used by children. Keep the appliance and its cord out of reach of children.
- Never let the appliance run unattended.
- Be careful when you are emptying the bowl, handle or clean the discs, the blade, and the juicer sieve. The cutting edges are very sharp.
- Remove the beater, whisk or dough hook from your kitchen machine before washing.
- Do not touch the blades, especially when the appliance is plugged in. The blades are very sharp.
- If the blades and bowl tools get stuck, unplug the appliance before you remove the ingredients that block the blades and bowl tools.
- If food sticks to the wall of the blender jar, food processor bowl, or mixing bowl, switch off the appliance and unplug it. Then use a spatula to remove the food from the wall.
- Never stick or use your fingers or an object (for example, a spatula) into to the mixing bowl when using any of the bowl tools while the appliance is running.
- Never stick or use your fingers or an object (for example, a spatula) to push ingredients into the feeding tube of the food processor or the meat mincer hopper while the appliance is running. Use only the provided pusher for the food processor or meat mincer.
- Be careful if hot liquid is poured into the bowl, food processor or blender as it can be ejected out of the appliance due to a sudden steaming.
- Never unlock the kitchen machine's arm when other accessories (such as food processor, blender, mill or meat mincer, etc) are attached.
- Never attach and use more than one tool or accessory on the kitchen machine at the same time.
- This appliance is intended for household use only.
Caution
-
Always switch off and unplug the appliance if it is left unattended, and before assembling, disassembling, cleaning and changing accessories, or approaching parts that move in use.
-
In order to avoid a hazard due to inadvertent resetting of the thermal cut-out, this appliance must not be supplied through an external switching device, such as a timer, or connected to a circuit that is regularly switched on and off by the utility.
Always switch off the appliance by turning the knob to 0 position. - Always wait until the moving parts stop running after switching off, and then unplug the appliance before lifting the arm of the stand, or opening, disassembling or removing the parts of any of the accessories from the stand.
- Do not exceed the maximum capacity as indicated on the accessories (bowl, jar, mill). Follow the quantities, processing time and speed when using the kitchen machine tools, as indicated in the user manual.
-
Thoroughly clean the parts that come into contact with food before you use the appliance for the first time. Refer to the instructions and table for cleaning given in the user manual.
-
Never use any accessories or parts from other manufacturers that Philips does not specifically recommend. If you use such accessories or parts, your guarantee becomes invalid.
- Let hot ingredients cool down before processing them. Do not add ingredients 60^ C hotter than ambient temperature.
Always let the appliance cool down to room temperature after each batch that you process. - Certain ingredients such as carrots may cause discolorations on the surface of the parts. This does not have a negative effect on the parts. The discolorations usually disappear after some time.
Noise level: Lc = 82dB [A]
Electromagnetic fields (EMF)
This Philips appliance complies with all standards regarding electromagnetic fields (EMF). If handled properly and according to the instructions in this user manual, the appliance is safe to use based on scientific evidence available today.
Recycling

Your product is designed and manufactured with high quality materials and components, which can be recycled and reused.
When you see the crossed-out wheel bin symbol attached to a product, it means the product is covered by the European Directive 2002/96/EC:

Never dispose of your product with other household waste. Please inform yourself about the local rules on the separate collection of electrical and electronic products. The correct disposal of your old product helps prevent potentially negative consequences on the environment and human health.
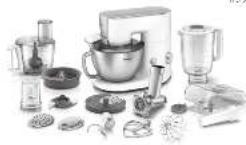
2 Overview (Fig. 1)
Kitchen machine
① Tool connector
② Arm release button
③ Speed selector (Rotary knob)
(4) Bowl
⑤ Splash guard
Dough hook
⑦ Whisk
8 Beater
Blender
9 Measuring cup
⑩ Blender lid
⑪ Blender jar
⑫ Sealing ring
⑬ Detachable blender blade unit
Food processor
⑭Pusher
15 Lid
⑥ Tool holder
(17) Food Processor bowl
18 Blade unit
Disc insert
19 Insert holder
② Insert for granulating
② Insert for slicing
② Insert for shredding
Citrus press
23 Press cone
②Sieve
Mill
⑤ Mill jar
② Sealing ring for mill
②7 Detachable mill blade unit
Meat mincer
② Screw ring
29 Fine grinding disc
③ Cutter/Knife
③ Worm shaft
② Extra gear for the worm shaft
③ Metal hopper
34 Pusher for metal hopper
⑤ Feeding tray
③ Tray cover
⑦ Innovative cleaning tool
3 Before first use
Before you use the kitchen machine and accessories for the first time, thoroughly clean the parts that come into contact with food.
You can only plug in and switch on the appliance after you correctly assemble the accessories. Refer to Fig. 2 to 8 for the proper assembly.
Auto stop
Your kitchen machine will be automatically turned off after 16 minutes of continuous operation. This can avoid potential safety problems due to prolonged usage.
Overload protection
Your kitchen machine will also automatically stop working when overloaded.
To reset the appliance in case of overload and auto stop protection, follow the steps below:
1 Turn the knob to 0 position and then unplug it.
2 Remove some of the ingredients to reduce the load.
3 Allow the appliance to cool down for a few minutes.
4 Connect the power plug to the power supply and reselect the desired speed.
4 Use your kitchen machine
Mixing bowl tools

Note
Before switching on your kitchen machine, make sure the knob is at 0 position and then attach the whisk, beater or dough hook.
- Up to 750g of flour plus other ingredients can be processed in the bowl.
- Follow the recommended quantities, processing time and speed as indicated in Fig. 9. Do not exceed the suggested processing speed to avoid damage to the machine.
- It is normal that the tool connector will rotate with the gear cover, during the use of other accessories such as blender, food Processor, etc.
Make sure the outlet covers on the arm are well locked before using your kitchen machine.
Before you start, make sure that you pick the desired attachment from following and assemble according to Fig. 2.
| Name | Purpose | |
| Dough hook | ·For making bread and roll ·Suggested processing speed: 1-3 | |
| Beater | ·For making cakes, cookies, pie, pastry, mashed potato, pasta dough, gluten free bread, and cold butter ·Suggested processing speed: 1-4 | |
| Whisk | ·For making egg white, cream, meringues, moustes, and souffles ·Suggested processing speed: 7 |

Tip
-
To avoid splashing, always increase speed gradually.
-
Splash guard: fit the splash guard onto the stand before using the bowl tools. You do not need to remove the splash guard to change tools. You can add ingredients through the spout of the splash guard.
- Whisking: before whisking egg whites or cream, make sure that the bowl and the whisk are dry and free from grease.
- Kneading: use the dough hook to knead yeast dough for bread and pizzas. You need to adjust the amount of liquid to form the dough according to the humidity and temperature condition.
If you want to re-knead the dough with your kitchen machine, press the dough down to the bottom of the bowl to avoid the dough wrapping on the tool. Make sure that you re-knead the dough within the recommended speed.
Recipes: Bread dough (maximum x1.5 quantity)
Ingredient:
- 500g flour
- 50g olive oil
1 teaspoon salt
1 teaspoon sugar - 7g yeast
260ml warm water

1 Add all the dry ingredients to the bowl and turn the rotary knob to speed 1.
2 Pour in the water and then the oil.
3 Switch to speed 2-3 and continue kneading until one smooth dough ball is formed.
4 Grease a bowl with vegetable oil.
5 Put the dough ball to this bowl and cover it with cling film.
6 Let it rise for 1 hour until it is doubled in size.
7 Remove the air from the raised dough.
Fold it into a log shape and fit it into a loaf pan.
9 Cover it and let it rise in the tray for 1 hour.
10 Bake at 180^ for 40 minutes.
Recipe: Cake batter
Ingredient:

3 eggs
150g butter
150 g castor sugar
150g flour
- 3g baking powder
1 Cut the butter into cubes of 2cm
2 Put the cubes with sugar in the bowl and mix them with speed 1.
3 Gradually increase the speed from 1 to 4.
4 Add the eggs one by one and keep mixing with speed 4 until you receive a creamy consistency.
5 Fold in baking powder and flour to the mixture and mix with speed 1 until all the ingredients are well mixed.
6 Put the batter into a 30 cm long aluminum tin.
7 Place it in the middle of the oven.
8 Bake it for 30-40 minutes at the temperature of 180^
Recipe: Pie pastry

Ingredient:
- 340g cups all-purpose flour, plus extra for rolling
- 227g cold unsalted butter, cut into 2 cm inch cubes
1 teaspoon salt
1 teaspoon sugar - 6 to 8 tablespoon ice water
1 Put all the dry ingredients to the bowl and turn the rotary knob to speed 1.
2 Add the cold butter into the dry ingredients and gradually increase the speed from 1 to 3.
3 Add 1 tablespoon iced water at a time to the mixture until it forms crumbly dough.
If the dough doesn't hold together, add a little more water and mix it for a longer time. Do not add too much water. Otherwise, it will make the crust tough.
4 Form the dough into the shape you want and wrap it with plastic wrap.
5 Keep it in the refrigerator for at least 1 hour and up to 2 days.
6 Rest the dough in the room temperature for a few minutes before rolling and baking.
Recipe: Meringue

Ingredient:
4 egg whites
- 1 cup (200 grams) superfine orcaster sugar
1 Whisk the egg whites with speed 7 until soft peaks are formed.
2 Gradually add the sugar while processing with speed 4 until firm peaks are formed.
3 Spoon the meringue onto a baking tray which is covered with baking paper.
4 Preheat your oven to 105^ and place the tray with the meringue in the center of the oven.
5 Bake the meringues for approximately 1-1.5 hours until they are dry and crisp.
6 Turn off the oven and dry the meringues in the oven for 1.5 hours.
Blender (HR7951/HR7952/ HR7954/HR7958 only)
Before you start, make sure that you assemble according to Fig. 3.
Blender: for blending smoothies, shakes, juices and crushing ice
Follow the recommended quantities, processing time and speed as indicated in Fig. 9.
For ice crushing, turn the knob to speed P repeatedly until the ice is finely crushed.

Note
- Never open the lid to put your hand or any object in the jar while the blender is running.
Always assemble the sealing ring onto the blade unit before you attach the blade unit to the blender jar.
To add liquid ingredients during blending, pour them into the blender jar through the feeding hole by removing the measuring cup. - Precut ingredients into small pieces before you process them.
- If you want to prepare a large quantity, process small batches of ingredients instead of a large quantity at once.
- To avoid spillage: When you process a liquid tends to foam (for example, milk), do not put more than 1 liter of liquid in the blender jar.
- Put the ingredients in the blender jar within the maximum level indication.
To achieve the best result when blending thick puree, fill the blender jar half full and process the ingredients in separate blending batches.
Food processor (HR7952/ HR7954/HR7958 only)
Blade unit (HR7952/HR7954/HR7958 only)
Before you start, make sure that you assemble according to Fig. 4.
Blade unit: for chopping, mixing and pureeing ingredients
To remove the food that sticks to the blade or bowl wall, stop processing and switch off the appliance first, and then use a spatula.

Note
Always put the blade unit in the bowl before you start to add the ingredients.
- Do not use the blade unit to chop hard ingredients, like coffee beans, turmeric, nutmeg, and ice cubes, as this may cause the blade to get blunt.
- Do not let the appliance run too long when you chop (hard) cheese or chocolate. Otherwise these ingredients become too hot, start to melt, and turn lumpy.
Disc with inserts (HR7952/HR7954/ HR7958 only)
Before you start, make sure you pick your desired insert from following and assemble according to Fig. 5.
| Name Purpose | ||
| Granulating insert | For granulating ingredients to small/fine pieces | |
| Slicing insert | For slicing ingredients | |
| Shredding insert | For shredding ingredients into small strips |

Caution
- Be careful when you handle the slicing blade of disc insert. It has a very sharp cutting edge.
- Never use the disc insert to process hard ingredients, like ice cubes.
- Do not exert too much pressure on the pusher when you press ingredients into the feed tube.

Note
- Precut large ingredients into chunks that fit in the feeding tube.
Follow the steps below to assemble the disc inserts (Step 1 in Fig. 5).
1 Place the opening of the insert over the shaft of the insert holder.
2 Push the opening of the insert over the projection on the shaft.
3 Press the insert onto the insert holder until it locks in position with a click.
Citrus press (HR7954/HR7958 only)

Before you start, make sure that you assemble according to Fig. 6.

Note
- Put the sieve for citrus press on the shaft in the bowl. Make sure that the projection on the sieve is locked in the slot of the bowl handle. When the sieve is fixed correctly, you hear a click.
- Press the citrus fruit onto the cone. Stop pressing to remove the pulp from the sieve if necessary. When you finish pressing or want to remove the pulp, turn the knob to 0 position and remove the bowl from the appliance with the accessories on it.
Meat mincer (HR7958 only)
Before you start, make sure you assemble according to Fig. 7-1.
The meat mincer is intended for mincing raw or cooked meat.
When the meat gets stuck in the hopper, follow the steps below to reset:
1 Switch off and unplug the appliance.
2 Detach the hopper assembly.
3 Clear the blockage.
4 Reassemble the hopper.
5 Connect the power plug to the power supply and reselect the desired speed.
Replace the gear
When the gear for the worm shaft is damaged, use the extra one to replace it according to Fig. 7-2.

Note
- Never grind bones, nuts, or other hard ingredients.
- Never use frozen meat! Before you grind the meat, defrost it first.
- Do not push too much meat or exert too much pressure when pushing the meat into the hopper. This can avoid overloading the appliance.
- Never grind dried or hard cured meat such as dried/white bacon or jerky.

Tip
- Remove bones, gristle, and sinews out of the meat to avoid blockage or any damage during grinding.
Mill (HR7958 only)
Before you start, make sure that you assemble according to Fig. 8.
You can use the mill to chop/grind coffee beans, peppercomns, nuts, herbs, dried fruits etc.
Dried fruits such as figs can be chopped and use as toppings for yoghurt or spread for your bread or biscuit.
For best results when processing dried black Mission figs, use max of 85g at speed P for 3 seconds.

Note
- Follow the recommended quantities, processing time and speed for the ingredients as indicated in Fig 9.
- Do not exceed the maximum level of the mill jar.
- You can order a mill (under service code 96510070528 and 996510070501) from your Philips dealer or a Philips service center as an extra accessory.

Tip
- Before opening the mill with processed ingredients
- Hold the mill jar upside down.
- Tap the mill jar a few times.
- Remove the blade assembly slowly.
5 Cleaning

Warning
Before you clean the appliance, unplug it.
Refer to the table (Fig. 10) for information on cleaning the parts with water, dishwashing machine and/or moist cloth.

Caution
- Make sure that the cutting edges of the blades and discs do not come into contact with hard objects. This may cause the blade to get blunt.
- The cutting edges are sharp. Be careful when you clean the disc inserts, and blade units of the food processor, blender, and mill.
1 Clean the motor unit with a moist cloth.
2 Clean the other parts in hot water (< 60^) with some washing-up liquid or in a dishwasher.
3 Store the appliance and accessories in a dry place after cleaning.
Quick cleaning
Follow the steps below to clean the food processor bowl and blender jar easier.
(Make sure that the blade is assembled in the bowl if you clean the food processor bowl.)
Pour lukewarm water (not more than 0.5 liters) and a few drops of washing-up liquid into the food processor bowl or blender jar.
2 Place the lid on the food processor bowl or blender jar, and then turn it clockwise to fix it.
3 Tum the knob to speed P. Let the appliance run for 30 seconds or until the food processor bowl or blender jar is clean.
4 After use, turn the knob to 0 position and then unplug the appliance.
5 Detach the blender jar or food processor bowl and rinse it with clean water.
6 Guarantee and service
If you have a problem, need service, or need information, see www.philips.com/support or contact the Philips Consumer Care Center in your country. The phone number is in the worldwide guarantee leaflet. If there is no Consumer Care Center in your country, go to your local Philips dealer.