Robust Collection - Food Processor PHILIPS - Free user manual and instructions
Find the device manual for free Robust Collection PHILIPS in PDF.

| Product type | Food processor |
| Brand | Philips |
| Model | Robust Collection |
| Usage | Domestic |
| Main functions | Chopping, mixing, blending, pureeing, slicing, grating, julienne/fries, kneading, beating, whisking, whipping egg whites, whipped cream, pasta |
| Included accessories | Pusher, feed tube, lid, bowl, drive block, tool support, julienne/fries disc, reversible slicing disc (thick/fine), reversible grating disc (thick/fine), double whisk, blade set, kneading accessory |
| Bowl capacity | Indicated by maximum level (not specified) |
| Bowl material | Not specified |
| Control type | Control buttons (speed 1, Pulse, stop 0, blade set button) |
| Speeds | 1 speed + Pulse |
| Safety | Integrated safety lock, overheating protection, anti-splash slow start |
| Noise level | 78 dB(A) |
| Power supply | Grounded mains socket (voltage not specified) |
| Cord length | Not specified |
| Care and cleaning | Motor unit cleanable with a damp cloth; all other parts are dishwasher safe |
| Spare parts | Available via Philips or authorized centers |
| Repairability | Repair by Philips or authorized center |
| Warranty | 3-year parts warranty extension after registration |
| General information | Complies with EMC standards; do not dispose of with household waste |
Frequently Asked Questions - Robust Collection PHILIPS
User questions about Robust Collection PHILIPS
0 question about this device. Answer the ones you know or ask your own.
Ask a new question about this device
Download the instructions for your Food Processor in PDF format for free! Find your manual Robust Collection - PHILIPS and take your electronic device back in hand. On this page are published all the documents necessary for the use of your device. Robust Collection by PHILIPS.
USER MANUAL Robust Collection PHILIPS
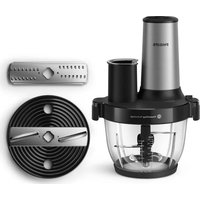
natural_image
Exterior view of a modern kitchen blender with a white handle and black top (no visible text or symbols)
text_image
Philips Robust Collection food processor ROBUST COLLECTION FR Manuel d'utilisation DE Gebrauchsanweisung RU Руководство пользователяUser manual
PHILIPS
Philips Robust Collection food processor
ROBUST COLLECTION
text_image
A B C D E F G H I J PHILIPS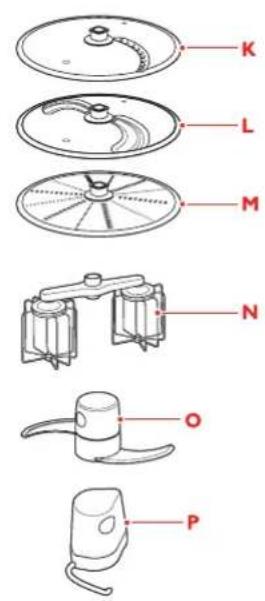
text_image
K L M N O P1
text_image
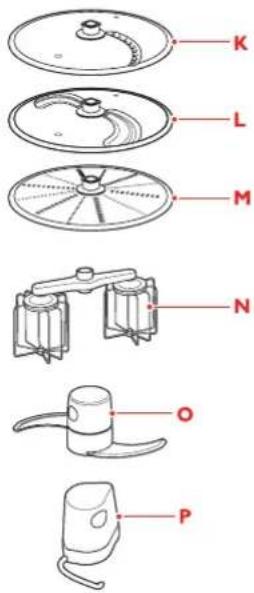
K L M N O PENGLISH 6
DEUTSCH 13
FRANÇAIS 21
РУССКИЙ 29
ENGLISH
Introduction
Congratulations on your purchase and welcome to Philips!
To fully benefit from the support that Philips offers,
register your product at www.philips.com/kitchen.
This food processor has been developed to confidently handle a broad variety of ingredients and recipes and to deliver a long-lasting performance. Its design is optimised for cleaning and all detachable parts and accessories are dishwasher safe.
General description (Fig. 1)
A Pusher
B Feeding tube
C Lid
D Safety lock
E Tool holder
F Bowl
G Drive unit
H Motor unit
Control buttons
J Cord storage groove
K Julienne/French fries disc
L Double-sided slicing disc (coarse/fine)
M Double-sided shredding disc (coarse/fine)
N Double balloon beater
Blade unit
P Kneading accessory
Important
Read this user manual carefully before you use the appliance and save it for future reference.
General
Danger
- Never immerse the motor unit in water or any other liquid, nor rinse it under the tap. Use only a moist cloth to clean the motor unit.
Warning
- Check if the voltage indicated on the appliance corresponds to the local mains voltage before you connect the appliance.
- Never connect this appliance to a timer switch in order to avoid a hazardous situation.
- If the mains cord is damaged, you must have it replaced by Philips, a service centre authorised by Philips or similarly qualified persons in order to avoid a hazard.
- Do not use the appliance if the plug, the mains cord or other parts are damaged.
- This appliance is intended for household use only. If the appliance is used improperly or for professional or semi-professional purposes or if it is not used according to the instructions in the user manual, the guarantee becomes invalid and Philips refuses any liability for damage caused.
- Never let the appliance run unattended.
- This appliance is not intended for use by persons (including children) with reduced physical, sensory or mental capabilities, or lack of experience and knowledge, unless they have been given supervision or instruction concerning use of the appliance by a person responsible for their safety.
- Children should be supervised to ensure that they do not play with the appliance.
- Never use your fingers or an object (e.g. a spatula) to push ingredients down the feeding tube while the appliance is running. Only use the pusher for this purpose.
- Do not touch the cutting edges of the blade unit or discs when you handle, clean or empty the bowl. They are very sharp and you can easily cut your fingers on them.
ENGLISH 7
Caution
- Only connect the appliance to an earthed wall socket.
- Always unplug the appliance before you assemble, disassemble or make adjustments to any of the parts.
- Never use any accessories or parts from other manufacturers or that Philips does not specifically recommend. If you use such accessories or parts, your guarantee becomes invalid.
- Do not exceed the top level indication on the bowl.
- Consult the table in this user manual for the correct quantities and processing times.
- Never fill the bowl with ingredients hotter than 80^ C.
- If food sticks to the wall of the bowl, switch off the appliance and unplug it. Then use a spatula to remove the food from the wall.
- Certain ingredients may cause discolourations on the surface of the parts. This does not have a negative effect on the parts. The discolourations usually disappear after some time.
- This appliance is intended for household use only.
- Noise level: Lc= 78 dB(A).
Electromagnetic fields (EMF)
This Philips appliance complies with all standards regarding electromagnetic fields (EMF). If handled properly and according to the instructions in this user manual, the appliance is safe to use based on scientific evidence available today.
Safety features
Thermal safety cut-out
This appliance is equipped with a thermal safety cut-out that automatically cuts off the power supply to the appliance in case of overheating. If the appliance stops running:
1 Remove the mains plug from the wall socket.
2 Let the appliance cool down for 1 hour.
3 Put the mains plug back into the wall socket.
4 Switch on the appliance again.
Please contact your Philips dealer or an authorised Philips service centre if the thermal safety cut-out is activated too often.
Built-in safety lock
This feature ensures that you can only switch on the appliance if you have assembled the bowl correctly on the motor unit and the lid correctly on the bowl. If the bowl and the lid are assembled correctly (see chapter 'Using the appliance'), the built-in safety lock will be unlocked.
Before first use
For hygiene reasons, clean the bowl and all detachable parts properly by hand with lukewarm water and some washing-up liquid.
Using the appliance
General
- The appliance is equipped with a built-in safety lock that prevents it from functioning if the bowl and lid are not assembled properly.
Food processor
1 Put the bowl on the motor unit (1) and turn it clockwise to fix it (2) (Fig. 2).
2 Place the tool holder on the drive unit on the bottom of the bowl, if you want to use one of the discs or the balloon beater.
If you want to use the blade unit or the kneading tool, you can place them directly on the drive unit in the middle of the bowl without placing the tool holder.
3 When you use the blade unit, the kneading accessory or the balloon beater, first put the tool in the bowl and then the ingredients to be processed.
4 Put the lid on the bowl (1). Turn the lid clockwise (2) to fix it ('click'). The projection of the lid completes the shape of the handgrip. (Fig. 3)
ENGLISH8
5 When you use one of the discs, add the ingredients through the feeding tube and push them down with the pusher.
6 Press the speed button that corresponds to the accessory in the bowl. Press speed 1 for the balloon beater, discs and kneading accessory and press the blade unit button for the blade unit.
7 When you have finished processing, press button 0.
Feeding tube and pusher
- Use the feeding tube to add liquid and/or solid ingredients (Fig. 4).
- Use the pusher to push solid ingredients down the feeding tube. (Fig. 5)
You can also use the pusher to close the feeding tube. This prevents ingredients from escaping through the feeding tube.
Blade unit
You can use the blade unit to chop, mix, blend or puree ingredients.
1 Put the blade unit on the drive unit on the bottom of the bowl (Fig. 6).
The cutting edges are very sharp. Do not touch them.
2 Put the ingredients in the bowl. Pre-cut large pieces of food into pieces of approx. 3 x 3 x 3cm (Fig. 7).
3 Put the lid on the bowl (1) and turn it clockwise to close it (2). Insert the pusher in the feeding tube to prevent spillage (Fig. 8).
4 Press the blade unit button (Fig. 9).
Tips
- When you chop onions, press the pulse button a few times to prevent the onions from becoming too finely chopped.
- Do not let the appliance run too long when you chop (hard) cheese or chocolate. Otherwise these ingredients become too hot, start to melt and turn lumpy.
- Do not use the blade unit to chop very hard ingredients like coffee beans, turmeric, nutmeg and ice cubes, as this may cause the blade to get blunt.
- The standard processing time for all chopping jobs is 30-60 seconds. - If food sticks to the blade or to the wall of the bowl, switch off the appliance and unplug it. Then use a spatula to remove the food from the blade or from the wall of the bowl.
Discs
Never process hard ingredients like ice cubes with the discs.
The cutting edges of the discs are very sharp. Do not touch them.
1 Put the tool holder on the drive unit on the bottom of the bowl (Fig. 10).
2 Place the desired disc on top of the tool holder (Fig. 11).
Note: Place the Julienne/French fries disc on top of the tool holder in such a way that the longer plastic part in the centre of the disc points upwards.
3 Put the lid on the bowl (1) and turn it clockwise to close it (2) (Fig. 12).
4 Put the ingredients in the feeding tube. (Fig. 13)
- Pre-cut large ingredients into chunks that fit in the feeding tube.
- Fill the feeding tube evenly for the best results.
- When you have to process a large amount of ingredients, process small batches and empty the bowl between batches.
5 Press speed button 1.
6 Press the pusher lightly onto the ingredients in the feeding tube.
7 When you have finished processing, press button 0.
Tip
- Do not use the discs to process chocolate. Only use the blade unit for this purpose.
Kneading accessory
You can use the kneading accessory to knead yeast dough for bread and pizzas.
ENGLISH 9
1 Put the kneading accessory on the drive unit on the bottom of the bowl (Fig. 14).
2 Put the ingredients in the bowl (Fig. 15).
3 Put the lid onto the bowl (1) and turn it clockwise to close it (2). Insert the pusher in the feeding tube to prevent spillage (Fig. 16).
4 Press speed button 1.
Never leave the appliance unattended when it is kneading.
5 When you have finished processing, press button 0.
Double balloon beater
You can use the double balloon beater to whip cream and to whisk eggs, egg whites, instant pudding, mayonnaise, sponge cake mixture and other soft ingredients.
Tips
- Do not use the balloon beater to prepare cake mixtures with butter or margarine or to knead dough. Use the kneading accessory for these jobs.
- Make sure the bowl and the balloon beater are dry and free from grease when you whisk egg whites. To get the best results the egg whites should be at room temperature.
1 Put the tool holder on the drive unit on the bottom of the bowl (Fig. 10).
2 Put the balloon beater on top of the tool holder (Fig. 17).
3 Put the ingredients in the bowl (Fig. 18).
4 Put the lid on the bowl (1) and turn it clockwise to close it (2). Insert the pusher in the feeding tube to prevent spillage (Fig. 19).
5 Press speed button 1.
6 When you have finished processing, press button 0.
7 Always clean the balloon beater after use.
See chapter 'Cleaning' for instructions on how to clean the balloon beater.
Cleaning
1 Make sure the appliance is switched off and unplugged.
2 Clean the motor unit with a moist cloth.
Never immerse the motor unit in water nor rinse it under the tap.
3 Clean the parts that have come into contact with food in hot water with some washing-up liquid immediately after use.
Clean the blade unit and the discs very carefully. The cutting edges are very sharp.
Note: All parts, except the motor unit can also be cleaned in the dishwasher.
- Make sure that the cutting edges of the blade and the discs do not come into contact with hard objects. This could cause them to become blunt.
Balloon beater
Always clean the balloon beater immediately after use.
You can disassemble the balloon beater for thorough cleaning.
1 Pull the beaters out of the bracket (Fig. 20).
2 Clean all parts in hot water with some washing-up liquid or in the dishwasher.
3 Reinsert the beaters in the bracket after cleaning them.
Storage
1 Store the mains cord in the cord storage groove by winding it round the base of the motor unit (Fig. 21).
Environment
- Do not throw away the appliance with the normal household waste at the end of its life, but hand it in at an official collection point for recycling. By doing this, you help to preserve the environment (Fig. 22).
ENGLISH10
Guarantee & service
Exceptional service and guarantee
You have bought a culinary tool for life and we want to ensure that you remain satisfied. We would like you to register your purchase, so that we can stay in contact with you and you can receive additional services and benefits from us. Register within 3 months of purchase to receive benefits including:
- 3 year product guarantee
- Fresh ideas for recipes via e-mail
- Tips and tricks to use and maintain your Robust product
- All the latest news on Robust Collection
The only thing you need to do to register your new product is visit
www.philips.com/kitchen or call your local freephone Philips consumer care hotline (United Kingdom 0800 331 60 15). If you have questions about your culinary tool (usage, maintenance, accessories etc) you can either consult our on line support at www.philips.com/
kitchen or call your local hotline. We have put all the maximum effort in developing, testing and designing this high quality product. However in the unfortunate case that your product needs repair, please call your local Philips consumer care hotline. They will help you with arranging any necessary repairs in a minimum time with maximum convenience - they can arrange a courier to come to your home to collect your product and bring it back when it is repaired. This way you can continue to enjoy your delicious homemade cooking.
Troubleshooting
This chapter summarises the most common problems you could encounter with the appliance. If you are unable to solve the problem with the information below, contact the Consumer Care Centre in your country.
Problem Solution
| When I push a process button or the pulse button, the appliance does not start to operate. | Make sure the bowl and lid are fixed properly ('click'). The appliance starts to operate when you press a speed button. |
| The appliance suddenly stops running. | The thermal safety cut-out has probably cut off the power supply to the appliance because the appliance has overheated. 1) Press the stop button 0. Unplug the appliance. 2) Let the appliance cool down for 1 hour. 3) Put the mains plug in the socket. 4) Switch on the appliance again. |
| The kneading accessory or the blade unit does not turn | Make sure the kneading accessory or the blade unit is assembled properly onto the drive unit. Also make sure the food processor bowl and the lid are assembled properly ('click'). |
| The appliance makes a lot of noise when I use the Julienne/French fries disc and the disc scratches the lid of the bowl. | You have assembled the Julienne/French fries disc upside down. Switch off the appliance immediately and assemble the Julienne/French fries disc in such a way that the longer plastic part in the centre of the disc points upwards. |
| After using the appliance, I cannot remove the tool holder, blade unit or kneading accessory from the bowl. | Empty the bowl. Fill it with 500ml of water. Wait one minute and then remove the tool holder, blade unit or kneading accessory. |
Question Answer
| How can I prepare whipped cream without turning it into butter? | Use cream directly from the fridge (5-8°C) and do not exceed the time mentioned in the quantities and processing times table in this user manual. |
| Why does the appliance become unstable when I knead dough? | When the dough has turned into a ball, the appliance becomes unbalanced because of the ball that turns around in the bowl. This does not damage the appliance, but do take care that the appliance does not fall off the table or worktop. Always use speed 1 for kneading. |
| Can I prepare shortbread dough with this appliance? | Yes, you can if you do not use butter and eggs directly from the fridge. |
| Why do the balloon beaters not turn? | Perhaps ingredients from a previous job stuck in the attachment points of the balloon beaters to the bracket. Remove the beaters and clean the attachment points. |
| How do I have to assemble the Julienne/French fries disc? | Assemble the Julienne/French fries disc in such a way that the longer plastic part in the centre of the disc points upwards. |
| Why does the appliance start running so slowly? | The appliance is equipped with a soft start mechanism. This reduces splashing of the ingredients. |
Recipes
Pizza San Daniele (6 portions)
Ingredients for the dough:
- 500g white flour
- 50ml oil
- 1 teaspoon sugar
- 1 teaspoon salt
- 1 sachet of quick yeast
- approx. 280ml warm water
Topping:
- 1 tin of peeled tomatoes
- 25ml olive oil
- Oregano, basil, garlic to taste
- 1/2 teaspoon salt
- 250g ham, thinly sliced
- 250g cheese
1 Heat the oven to 200°C.
2 Put the kneading accessory on the drive unit on the bottom of the bowl.
3 Put the dry ingredients in the bowl and add the water and the oil.
4 Knead this mixture for 1 minute.
5 Leave the dough to rise for 30 minutes.
6 Roll out the dough to a slab with a thickness of approximately 3mm and put it on a baking tray.
7 Shred the cheese with the shredding disc (see 'Using the appliance' under 'Discs').
8 Use the blade unit to chop the tinned peeled tomatoes and to mix the tomatoes with olive oil, oregano, basil, garlic and salt (see 'Using the appliance' under 'Blade unit').
9 Spread the tomato sauce evenly over the dough, add the thin slices of ham and top with the shredded cheese.
ENGLISH12
10 Put the pizza in the oven. Bake for 25 minutes at 200^ C.
The pizza is ready when the cheese has melted and turned somewhat brown.
Pitta breads
Ingredients:
- 1000g flour
- 2 tsp salt
- 2 tsp sugar
- 2 sachets of quick yeast
- 700ml lukewarm water
- Rosemary, fennel, cumin, oregano and/or sesame seeds to taste
1 Preheat the oven to 220°C.
2 Put the kneading accessory on the drive unit on the bottom of the bowl.
3 Put the dry ingredients in the bowl and add the water.
4 Knead the mixture for 30 seconds at a high speed (Fig. 9).
5 Remove the dough from the food processor bowl. Form a smooth ball. Cover it with a tea towel and let it rise for approximately 90 minutes.
6 Knead the dough carefully and shape it into a long roll. Cut the roll in 24 pieces. Form a round pitta bread from each piece.
7 Bake the pitta breads at 220^ C for 3 minutes or until they are brown. Then turn them over and bake them another two minutes.
Note: Do not process more than 1 batch without interruption. Let the appliance cool down to room temperature before you continue processing.
Einführung
Pizza San Daniele (6 portions)
100% recycled paper 100% papier recyclé
4203.064.5604.3WWW