
KE multifunzione 9F - Oven Foster - Free user manual and instructions
Find the device manual for free KE multifunzione 9F Foster in PDF.
| Product type | Multifunction built-in oven |
| Brand | Foster |
| Model | KE multifunzione 9F |
| Dimensions (W x H x D) | Approximately 60 x 60 x 55 cm |
| Weight | Approximately 35 kg |
| Power supply | 220-240 V / 50-60 Hz |
| Total power | Approximately 2800 W |
| Capacity | Approximately 70 liters |
| Door material | Large inner glass pane |
| Lighting | Side bulbs |
| Ventilation | Fan with cooling air outlet |
| Number of functions | 10 cooking modes (Conventional, Turbo, Grill, etc.) |
| Programming | Electronic clock with timer, duration, end of cooking, delayed start |
| Meat probe | Yes, with connector and temperature table |
| Included accessories | Wire rack, baking tray, roasting pan, telescopic guides |
| Cleaning | Clean with a damp cloth and mild detergent; do not use steam cleaners |
| Safety | Heating indicator light, programmed automatic shut-off, door must be closed for grill |
| Spare parts | Oven seal, heating element, bulbs, meat probe, racks, trays |
| Repairability | Repairability index not provided; parts available through after-sales service |
| General information | Built-in oven with 10 cooking modes, programmable electronic clock and meat probe. Manual available in multiple languages. |
Frequently Asked Questions - KE multifunzione 9F Foster
User questions about KE multifunzione 9F Foster
0 question about this device. Answer the ones you know or ask your own.
Ask a new question about this device
Download the instructions for your Oven in PDF format for free! Find your manual KE multifunzione 9F - Foster and take your electronic device back in hand. On this page are published all the documents necessary for the use of your device. KE multifunzione 9F by Foster.
USER MANUAL KE multifunzione 9F Foster
natural_image
Front view of a kitchen oven with control knobs and a digital display (no visible text or symbols)Foster
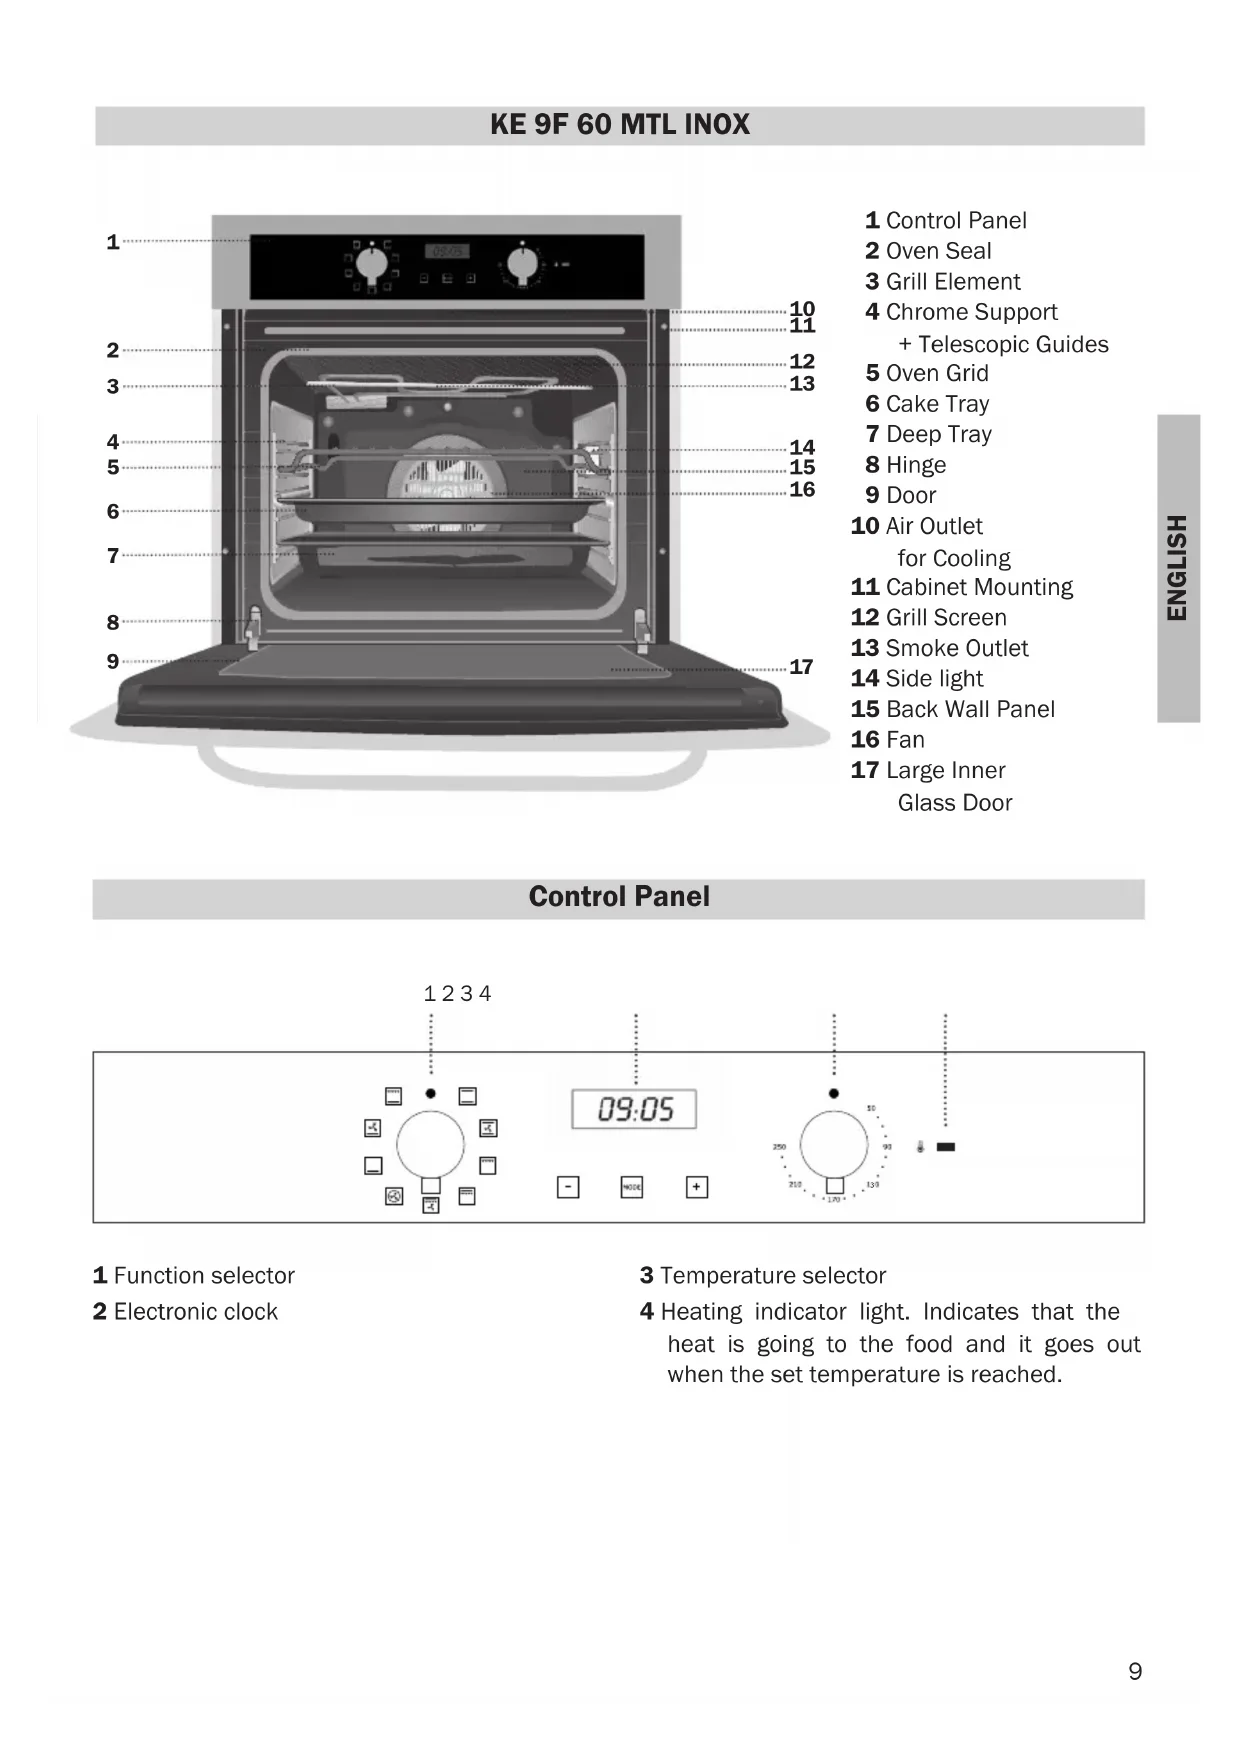
KE 9F 60 MTL INOX
natural_image
3D wireframe model of a computer mouse on a tray, no text or symbols presentnatural_image
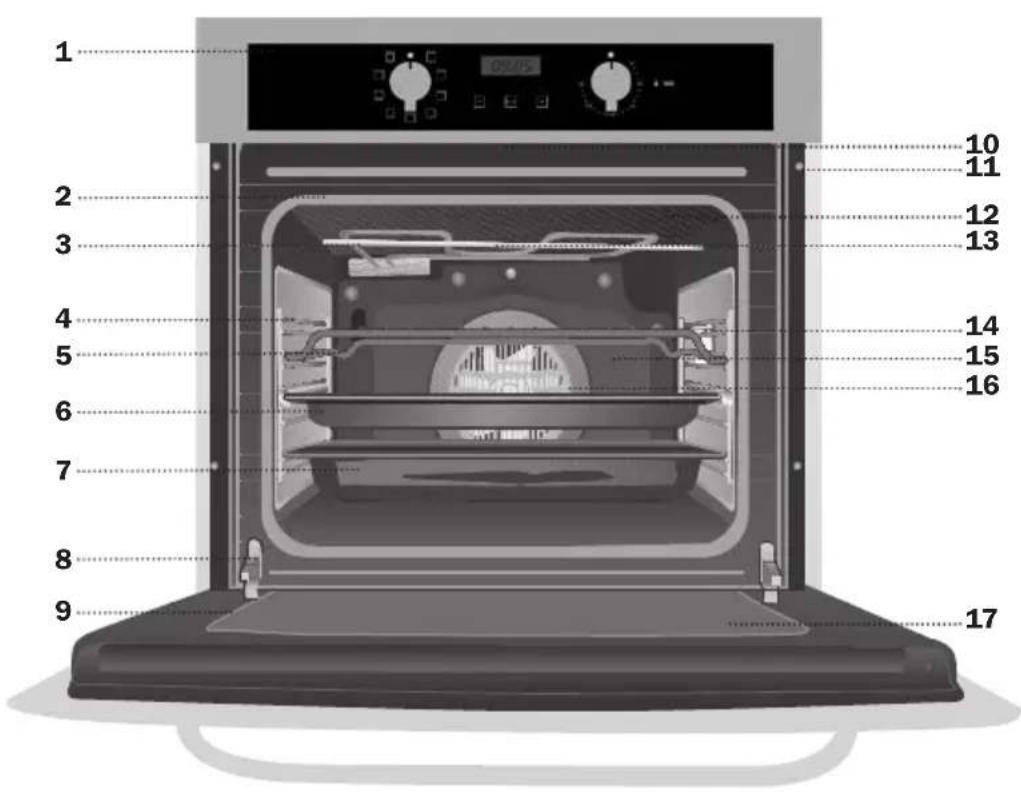
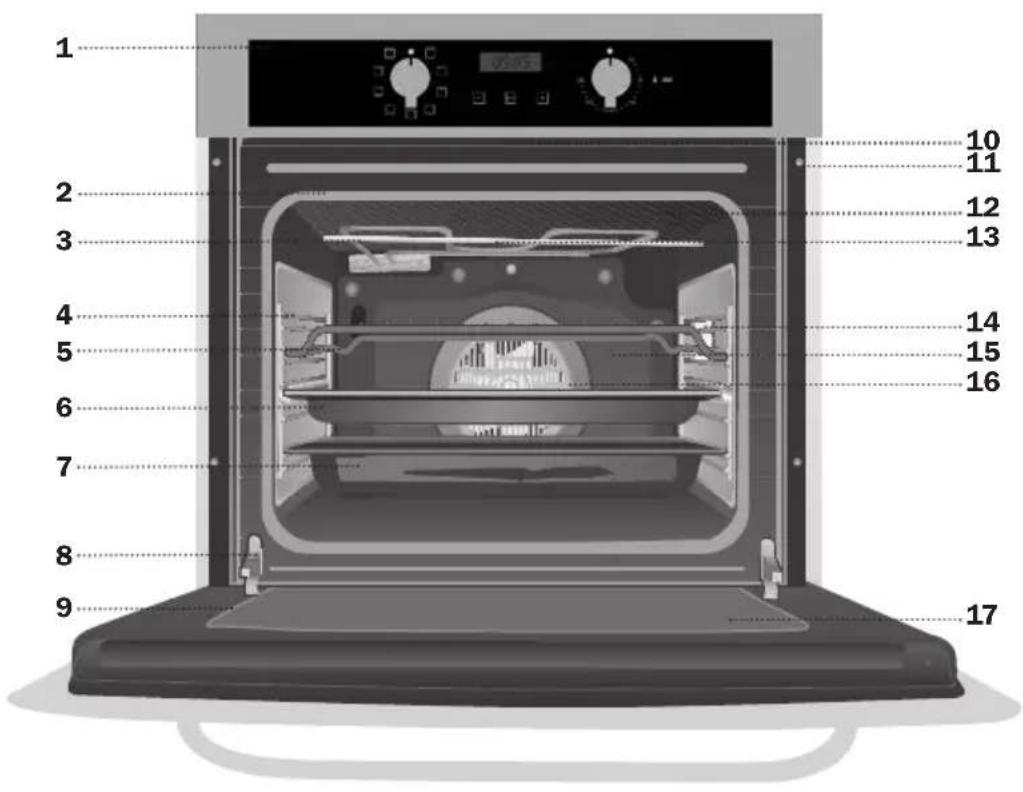
3D wireframe model of a mechanical component inside a housing (no text or symbols visible)1 Function selector
2 Electronic clock
3 Temperature selector
4 Heating indicator light. Indicates that the heat is going to the food and it goes out when the set temperature is reached.
- Switch off oven
Conventional
It is used for sponges and cakes where the heat received must be uniform to achieve a spongy texture.
Conventional with fan
Appropriate for roasts and cakes. The fan spreads the heat uniformly inside the oven.
Grill
For preparing dishes with superficial roasting. It allows the outer layer to be browned without affecting the inside of the food. Ideal for flat food, such as steaks, ribs, fish, toast.
MaxiGrill
Allows greater surfaces to be prepared, than with the grill, together with higher power reducing the time required for browning of the food.
MaxiGrill with fan
Allows uniform roasting at the same time as surface browning. Ideal for grills. Special for large volume pieces, such as poultry, game etc. It is recommended to put the item on a rack with a tray beneath to collect the stock and juices.
Caution
While using the Grill, MaxiGrill or MaxiGrill with fan, the door must be kept closed.
Turbo
The fan distributes the heat produced by an element located at the rear of the oven. Due to the uniform heat distribution, it allows roasting and baking to take place at two heights at the same time.
This cooking mode allows defrosting of food. To do this, set the temperature selector to position.
Lower element
Heats only from beneath. Suitable for heating dishes and raising pastry and similar.
Lower element with fan
It distributes the heat from the lower part of the oven and is ideal for cakes with jam or fruit filling, which only require heating from beneath. Pre-heating is always necessary.
Grill and Lower element
Special for roasts. It can be used for any piece, whatever its size.
Note
The pilot light remains on in any cooking function.
Setting the Electronic Clock
When you switch on the oven, you will notice that the word AUTO will flash on the display with 0:00. Press the + and - symbols until you hear a beep and see a dot flashing between the digits of the clock. Then set the clock time by pressing on the + or - symbols. You will hear a beep to confirm that the time has been set. The symbol will remain lit.
Should you wish to change the time, follow these instructions again.
Manual Operation
After setting the clock, the oven is ready for use. Select a cooking temperature and function by pressing and turning the oven controls.
To turn off the oven, set the controls to .
Electronic Clock Functions
Timer Alarm: An audible signal is produced at the programmed time, even if the oven is not being used.
Cooking Time: This function allows you to programme cooking time length, after which the oven will turn off automatically.
Cooking Stop Time: This function allows you to programme the time for cooking to stop, after which the oven will turn off automatically.
Cooking Time and Cooking Stop Time: This function allows both cooking time length and the stop time to be programmed. The oven switches on automatically at the set time and operates for the cooking time it has been programmed for. It switches itself off automatically at the entered stop time.
Changing the Clock Alarm Tone
1 Press + and - at the same time. You will notice a dot light up between the + and - symbols on the clock display.
2 Press MODE and you will see "ton1" light up on the clock display.
3 The alarm tone can be changed by repeatedly pressing on the - symbol.
Programming the Timer Alarm
1 Press on MODE. The symbol will flash on the clock display.
2 Select the length of time after which you want the alarm to sound by pressing on + or -.
3 The alarm will be confirmed by two consecutive beeps and the display will show the current time. The 🔒 symbol will remain lit.
4 At the programmed time, the alarm will sound and the 🔔 symbol will begin to flash.
5 Press on any symbol to turn off the alarm. The 🔔 symbol will continue to flash.
6 Keep pressing MODE until the function is switched off.
You can see how much time is left at any time by pressing MODE until the 🔔 symbol flashes. You can then change the selected time by pressing + or -. The beep you hear will confirm the new time has been set.
Programming Cooking Time
1 Press MODE until you hear a beep. Press MODE again and the word "dur" will appear on the clock display.
2 Select the cooking time by pressing + or -.
3 You will then hear a beep and the present time and the word "AUTO" will light up to show that the oven will switch off automatically.
4 Select a cooking function and temperature.
5 When the set cooking time is over, the oven will turn off and an alarm will sound.
6 Press any symbol to turn off the alarm. The oven will remain off and AUTO will continue to flash.
7 Keep pressing on MODE until you hear a beep to show the function is now off. Then set the controls to switch off the oven.
You can see how much time is left and change the remaining cooking time. Follow the previous instructions.
To cancel this function, just press + and - at the same time.
Programming the Cooking Stop Time
1 Press MODE until you hear a beep. Then press MODE until the word "End" appears on the clock display.
2 Select the cooking stop time by pressing + or -.
3 You will then hear a beep and the present time and the word "AUTO" will light up to show that the oven will switch off automatically.
4 Select a cooking function and temperature.
5 When it is the time for cooking to stop, the oven will switch off and an alarm will sound.
6 Press any symbol to turn of the alarm. The oven will remain off and AUTO will continue to flash.
7 Keep pressing on MODE until you hear a beep to show the function is now off. Then set the controls to switch off the oven.
You can use this function even if you are coo-king with the oven. If this is the case, follow all of the above instructions except No. 4.
You can see the stop cooking time at any time by following instruction No.1.
Programming Cooking Time and Cooking Stop Time
1 Press MODE until you hear a beep. If you press MODE again, the word "dur" will appear on the clock display.
2 Select the cooking time by pressing + or -.
3 A beep will then sound and the present time and AUTO will show.
4 Press MODE until you hear a beep. Then press MODE until the word "End" appears on the clock display.
5 Select the stop cooking time by pressing + or -.
6 A beep will then sound and the present time and AUTO will show.
7 Select a cooking function and temperature.
8 The oven will remain off with AUTO on the clock display. The oven is now programmed.
9 When it is the time for cooking to start, the oven will switch on and cooking will continue for the selected time. The symbols AUTO and 📄 will light up on the clock display.
10 When the programmed time is reached, the oven will switch itself off and an alarm will sound.
11 Press any symbol to stop the alarm. The oven will remain off and AUTO will continue to flash.
12 Press MODE until you hear a beep in order to switch off the function. Then set the controls to ● switch off the oven.
You can see the state of the timer at any time by following instructions 1 and 4.
If you wish to modify the timer setting, you must cancel the function by pressing + and - at the same time. Re-programme the oven by following the instructions given.
Caution
In the event of power failure, your electronic clock timer settings will be erased and 00:00 will flash on the display. Reset the clock and programme again.
Cooking with the meat probe
The meat probe measures the temperature inside a roast. When the probe detects a previously set temperature, the oven will turn off automatically.
Cooking with the meat probe ensures optimum results for any type of meat or size of roast.
Inserting the meat probe.
- Use only the original meat probe, supplied with the oven.
- Insert the probe before roasting begins.
- Insert the probe into the side of the roast so that the point reaches its centre.
- Insert the entire probe, up to the handle.
natural_image
3D wireframe model of a computer mouse on a rectangular base (no text or symbols)- It is recommended to turn the roast over half-way through cooking. Bear this in mind when placing the probe to avoid problems with it later.
- The point of the probe must not be touching the bone or fatty areas. Also, it should not be in a hollow area, which could happen with poultry.
Using the meat probe
1 Put the roast with the probe already in it into the oven.
2 Plug the probe into the socket in the upper left side of the oven.
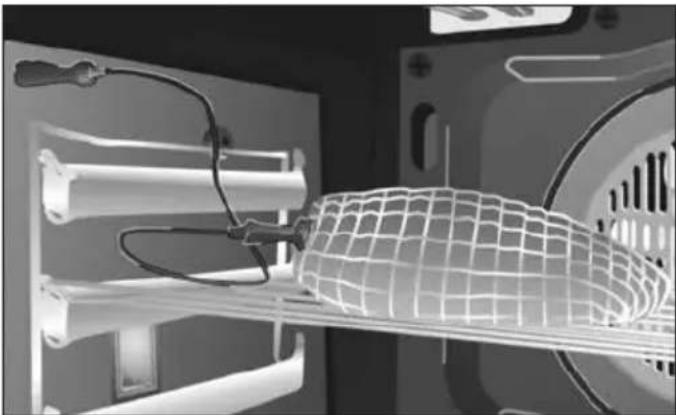
natural_image
3D rendering of a mechanical assembly with a wire mesh structure inside a housing (no visible text or symbols)3 After turning on the meat probe, the temperature currently measured by the meat probe can be seen on the left side of the clock display, the default temperature for the probe (80 °C) can be seen on the right side.
NB
If the meat probe measures a low temperature (chilled products), the clock display will read 30 °C. On the contrary, if the probe measures high temperatures, the clock display will show 99 °C.
If the probe does not connect properly, an alarm will sound indicating that it is not properly connected.
4 Pressing the symbols + or - will change the desired temperature for the inside of the roast. When pressing either symbol for the first time, hold down for a few seconds. Then, you can press quickly and repeatedly.
5 Select a cooking function and temperature.
6 When the probe detects that the temperature selected for the roast has been reached, the oven will turn off and an alarm signal will sound.
7 Press any symbol to stop the alarm.
8 Set the controls to position and turn off the meat probe.
9 The roast is just right and ready to serve.
Caution
While cooking with the meat probe, the timer setting functions such as the alarm can be accessed by pressing MODE. The clock display will always show the probe temperature but if the symbol is lit up, this indicates that the alarm is programmed.
Cooking chart: suggested temperatures for cooking with the meat probe.
| CUT | Probe Temperature | Notes |
| Roast-Beef 35 - 40 | °C RARE | |
| Roast-Beef 45 - 50 | °C | MEDIUM |
| Roast-Beef 55 - 60 | °C | WELL DONE |
| Leg of lamb | 65 - 70 °C | |
| Ham hock | 80 - 85 °C | |
| Loin of pork | 65 - 70 °C | |
| Roast ham | 80 - 85 °C | |
| Chicken | 75 - 80 °C | |
| Turkey | 80 - 85 °C |
natural_image
3D wireframe model of a computer mouse on a rectangular base (no text or symbols)natural_image
3D wireframe model of a mechanical component with internal structure (no text or symbols visible)natural_image
3D rendered image of a computer mouse with mesh pattern on a tray, no text or symbols visiblenatural_image
3D rendering of a mechanical assembly with a wire mesh component inside a housing (no visible text or symbols)natural_image
3D wireframe model of a computer mouse on a tray, no text or symbols presentnatural_image
3D rendering of a mechanical assembly with a wire mesh component inside a housing (no visible text or symbols)natural_image
3D wireframe model of a computer mouse on a rectangular base (no text or symbols)natural_image
3D wireframe diagram of a mechanical component with internal structure (no text or symbols)natural_image
3D wireframe model of a computer mouse on a tray, no text or symbols presentnatural_image
3D rendering of a mechanical assembly with internal components and mesh structure (no visible text or symbols)natural_image
3D wireframe model of a computer mouse on a tray, with a cable inserted (no text or symbols)natural_image
3D wireframe model of a mechanical component with internal components and mounting holes (no text or symbols visible)natural_image
3D wireframe model of a computer mouse on a tray, no text or symbols presentnatural_image
3D wireframe model of a mechanical component with internal structure (no text or symbols visible)


- KE 9F 60 MTL INOX
- - Switch off oven
- Conventional
- Conventional with fan
- Grill
- MaxiGrill
- MaxiGrill with fan
- Caution
- Turbo
- Lower element
- Lower element with fan
- Grill and Lower element
- Note
- Setting the Electronic Clock
- Manual Operation
- Electronic Clock Functions
- Changing the Clock Alarm Tone
- Programming the Timer Alarm
- Programming Cooking Time
- Programming the Cooking Stop Time
- Programming Cooking Time and Cooking Stop Time
- Cooking with the meat probe
- Inserting the meat probe.
- Using the meat probe
- NB
Brand : Foster
Model : KE multifunzione 9F
Category : Oven