
7191 061 - Oven Foster - Free user manual and instructions
Find the device manual for free 7191 061 Foster in PDF.


| Product Type | Built-in Electric Oven |
| Brand | Foster |
| Model | 7191 061 |
| Dimensions (H x W x D) | 595 x 595 x 548 mm |
| Weight | Approx. 35 kg |
| Power Supply | 220-240 V, 50/60 Hz |
| Total Power Consumption | 2900 W |
| Oven Capacity | 78 L |
| Energy Class | A+ |
| Heating Functions | Convection, Grilling, Top and Bottom Heat, Defrosting, Light |
| Control Type | Rotary knobs and digital display |
| Cleaning | Catalytic enamel back panel, easy-to-clean interior |
| Safety | Child lock, cooling fan, automatic shut-off |
| Spare Parts Availability | Contact Foster authorized service centers |
| Repairability Index | 8.0 / 10 |
| Included Accessories | One baking tray, one wire rack |
Frequently Asked Questions - 7191 061 Foster
User questions about 7191 061 Foster
0 question about this device. Answer the ones you know or ask your own.
Ask a new question about this device
Download the instructions for your Oven in PDF format for free! Find your manual 7191 061 - Foster and take your electronic device back in hand. On this page are published all the documents necessary for the use of your device. 7191 061 by Foster.
USER MANUAL 7191 061 Foster
USER'S MANUAL FOR BUILT-IN OVEN
KS 60 gas, cod. 7191 061
Foster spa
via M.S. Ottone, 18/20
42041 Brescello (RE) - Italy
natural_image
Symbol of a trash bin crossed with no text or labels
EN The symbol on the product or on its packaging indicates that this product may not be treated as household waste. Instead it shall be handed over to the applicable collection point for the recycling of electrical and electronic equipment. By ensuring this product is disposed of correctly, you will help prevent potential negative consequences for the environment and human health, which could otherwise be caused by inappropriate waste handling of this product. For more detailed information about recycling of this product, please contact your local city office, your household waste disposal service or the shop where you purchased the product.
DE Dieses Produkt darf am Ende seiner Lebensdauer nich über den normalen Haushaltsabfall entsorgt werden, sondern muss an einem Sammelpunkt für das Recycling von elektrischen und elektronischen Geräten abgegeben werden. Das Symbol auf dem Produkt, der ebrauchsanleitung oder der Verpackung weist darauf hin. Die Werkstoffe sind gemäß ihrer Kennzeichnung wiederverwertbar. Mit der Wiederverwendung, der stofflichen Verwertung oder anderen Formen der Verwertung von Altgeräten leisten Sie einen wichtigen Beitrag zum Schutze unserer Umwelt. Bitte erfragen Sie bei der Gemeindeverwaltung die zuständige Entsorgungsstelle.
IT Il simbolo sul prodotto o sulla confezione indica che il prodotto non deve essere considerato come un normale rifiuto domestico, ma deve essere portato nel punto di raccolta appropriato per il riciclaggio di apparecchiature elettriche ed elettroniche. Provedendo a smaltire questo prodotto in modo appropriato, si contribuisce a evitare potenziali conseguenze negative per l'ambiente e per la salute, che potrebbero derivare da uno smaltimento inadeguato del prodotto. Per informazioni più dettagliate sul riciclaggio di questo prodotto, contattare l'ufficio comunale, il servizio locale di smaltimento rifiuti o il negozio in cui è stato acquistato il prodotto.
FR Ce symbole figure sur le produit ou sur son emballage en application de la directive européenne 2002/96/CE sur les Déchets d'Equipement Électrique et Électronique (DEEE). Cette directive sert de règlement cadre à la reprise, au recyclage et à la valorisation des appareils usagés dans toute l'Europe. Ce produit doit donc faire l'objet d'une collecte sélective. Lorsque vous ne l'utiliserez plus, remettez-le à un service de ramassage spécialisé ou à une déchèterie qui traite les DEEE ; vous contribuerez ainsi à éviter des conséquences néfastes pour la santé et l'environnement. Pour tout renseignement sur la mise au rebut et le recyclage de ce produit, veuillez contacter la mairie ou le service de la propreté de votre commune, ou encore le magasin dans lequel vous l'avez acheté.
ES Este aparato lleva el marcado CE en conformidad con la Directiva 2002/96/EC del Parlamento Europeo y del Consejo sobre residuos de aparatos eléctricos y electrónicos (RAEE). La correcta eliminación de este producto evita consecuencias negativas para el medioambiente y la salud. El símbolo en el producto o en los documentos que se incluyen con el producto, indica que no se puede tratar como residuo doméstico. Es necesario entregarlo en un puntode recogida para reciclar aparatos eléctricos y electrónicos. Deséchelo con arreglo a las normas medioambientales para eliminación de residuos. Para obtener información más detallada sobre el tratamiento, recuperación y reciclaje de este producto, póngase en contacto con el ayuntamiento, con el servicio de eliminación de residuos urbanos o la tienda donde adquirió el producto.
PT O símbolo no produto ou na embalagem indica que este produto não pode ser tratado como lixo doméstico. Em vez disso, deve ser entregue ao centro de recolha selectiva para a reciclagem de equipamento eléctrico e electrónico. Ao garantir uma eliminação adequada deste produto, irá ajudar a evitar eventuais consequências negativas para o meio ambiente e para a saúde pública, que, de outra forma, poderiam ser provocadas por um tratamento incorrecto do produto. Para obter informações mais pormenorizadas sobre a reciclagem deste produto, contacte os serviços municipalizados locais, o centro de recolha selectiva da sua área de residência ou o estabelecimento onde adquiriu o produto.
RUS Символ на изделии или на его упаковке указывает, что оно не подлежит утилизации в качестве бытовых отходов. Вместо этого его следует сдать в соответствующий пункт приемки электронного и электрооборудования для последующей утилизации. Соблюдая правила утилизации изделия, Вы поможете предотвратить причинение окружающей среде и здоровью людей потенциального ущерба, который возможен, в противном случае, вследствие неподобающего обращения с подобными отходами. За более подробной информацией об утилизации этого изделия просьба обращаться к местным властям, в службу по вывозу и утилизации отходов или в магазин, в котором Вы приобрели изделие.
UA Цей символ на виробі або на його упаковці позначає, що з ним не можна поводитися, як із побутовим сміттям. Замість цього його необхідно повернути до відповідного пункту збору для переробки електричного та електронного обладнання. Забезпечуючи належну переробку цього виробу, Видопомагаєте попередити потенційні негативні наслідки для навколишнього середовища та здоров'я людини, які могли би винижнути за умов неналежного позбавлення від цього виробу. Щоб отримати детальнішу інформацію стосовно переробки цього виробу, зверніться до свого місцевого офісу, Вашої служби утилізації або до магазина, де Ви придбали цей виріб.
NL Het symbool op het product of op de verpakking wijst erop dat dit product niet als huishoudafval mag worden behandeld. Het moet echter naar een plaats worden gebracht waar elektrische en elektronische apparatuur wordt gerecycled. Als u ervoor zorgt dat dit product op de correcte manier wordt verwijderd, voorkomt u mogelijk voor mens en milieu negatieve gevolgen die zich zouden kunnen voordoen in geval van verkeerde afvalbehandeling. Voor meer details in verband met het recyclen van dit product, neemt u het best contact op met de gemeentelijke instanties, het bedrijf of de dienst belast met de verwijdering van huishoudafval of de winkel waar u het product hebt gekocht.
RO Simbolul de pe produs sau de pe ambalaj indică faptul că produsul nu trebuie aruncat împreună cu gunoiul menajer. Trebuie predat la punctul de colectare corespunzător pentru reciclarea echipamentelor electrice și electronice. Asigurându-vă că ați eliminat în mod corect produsul, ajutați la evitarea potențialelor consecințe negative pentru mediul înconjurător și pentru sănătatea persoanelor, consecințe care ar putea deriva din aruncarea necorespunzătoare a acestui produs. Pentru mai multe informații detaliate despre reciclarea acestui produs, vă rugăm să contactați biroul local, serviciul pentru eliminarea deșeurilor sau magazinul de la care l-ați achiziționat.
PL Symbol na produkcie lub na opakowaniu oznacza, że tego produktu nie wolno traktować tak, jak innych odpadów domowych. Należy oddać go do właściwego punktu skupu surowców wtórnych zajmującego się złomowanym sprzętem elektrycznym i elektronicznym. Właściwa utylizacja i złomowanie pomaga w eliminacji niekorzystnego wpływu złomowanych produktów na środowisko naturalne oraz zdrowie. Aby uzyskać szczegółowe dane dotyczące możliwości recyklingu niniejszego urządzenia, należy skontaktować się z lokalnym urzędem miasta, służbami oczyszczania miasta lub sklepem, w którym produkt został zakupiony.
SK Symbol na výrobku alebo na jeho obale znamená, že s výrobkom sa nesmie zaobchádzať ako s domovým odpadom. Namiesto toho ho treba odovzdat' v zbernom stredisku na recykláciu elektrických alebo elektronických zariadení. Zabezpečte, že tento výrobok bude zlikvidovaný správnym postupom, aby ste predišli negativnym vplyvom na životné prostredie a lůdské zdravie, čo by bolo spôsobené nesprávnym postupom pri jeho likvidácii. Podrobnejšie informácie o recyklácii tohto výrobku získate, ak zavoláte miestny úrad vo Vašom bydlisku, zberné suroviny alebo obchod, v ktorom ste výrobok kúpili.
CZ Symbol na výrobku nebo jeho balení udává, že tento výrobek nepatří do domácího odpadu. Je nutné odvézt ho do sběrného místa pro recyklaci elektrického a elektronického zařízení. Zajištěním správné likvidace tohoto výrobku pomůžete zabránit negativním důsledkům pro životní prostředí a lidské zdraví, které by jinak byly způsobeny nevhodnou likvidací tohoto výrobku. Podrobnější informace o recyklaci tohoto výrobku zjistíte u příslušného místního úřadu, služby pro likvidací domovního odpadu nebo v obchodě, kde jste výrobek zakoupili.
EC DECLARATION OF CONFORMITY
This appliance, in the parts that are to come into contact with food substances, is compliant with provisions of directive EEC 89/109.
This appliance is compliant with European Directives 73/23/ EEC, 89/336/ EEC, respectively replaced by 2006/95/CE and 2004/108/EC and subsequent modifications; compliance is also with the European Directive 2009/142/CE concerning gas appliances.
GENERAL WARNINGS
This manual is an integral part of the appliance.
It is necessary to keep it for the life cycle of the oven and to read it carefully for the installation, use, maintenance, cleaning and handling of the appliance.
Unplug the appliance before undertaking any sort of intervention on it.
Attention: earth connection is required by law.
Packaging materials (sheets, polystyrene) may be hazardous to children (danger of suffocation). Keep packaging materials out of the reach of children.
This appliance is not intended for use by persons (including children) with reduced physical, sensory or mental capabilities, or lack of experience and knowledge, unless they have been given supervision or instruction concerning use of the appliance by a person responsible for their safety.
Children should be supervised to ensure that they do not play with the appliance.
Heat forms during cooking and the appliance door, especially if made in glass, can become very hot. To prevent burns, do not touch the door and keep children away.
This appliance was designed for home use only.
The manufacturer will not be held liable for any damage to persons or property caused by improper installation, or by improper, wrong or senseless use.
The manufacturer reserves the right to make any changes to the product which are felt to be useful or necessary without any advance notice.
Do not carry out any modifications, tampering or repair attempts, especially with tools such as screwdrivers on the inside or outside of the appliance.
Repair work, especially on the electrical parts, must be performed only by specialized personnel. Improper repair work can cause serious accidents, damage the appliance and equipment as well as impair proper operation.
In case of a failure in operation or an indispensable repair job, ask for the intervention of the customer technical service centre. If the appliance shows visible signs of damage, do not use it; unplug it and contact the assistance service.
The oven must be unplugged as soon as an operating problem is discovered.
Make sure the power cord of the appliance is not crushed by the oven door as this may damage the electrical insulation.
If the power cord has been damaged, it must be replaced by the technical service centre in order to avoid the creation of hazardous situations.
Before closing the oven door, make sure there are no foreign bodies or pets inside the oven.
The oven gets extremely hot during operation and remains hot for a long time, even after it has been turned off, then cools down very slowly until reaching room temperature. Wait for a suitable period of time before carrying out any work such as cleaning.
Do not place heat-sensitive or flammable materials in the oven such as detergents, oven sprays, and so on. Superheated grease and oil may easily catch fire.
The rack, the plates and the cooking containers become extremely hot.
Use insulated glove or pot holders.
Never use water in an attempt to extinguish burning grease or oil (there is the danger of explosion). Suffocate the fire with wet cloths.
When using and maintaining the oven, be careful not to get fingers caught in the door hinges to avoid crushing or other injuries. This is specially important when children are around.
Never clean the appliance with high pressure water or steam cleaning equipment.
Do not use the appliance to heat the room.
If the door is open there is the hazard of tripping or crushing the fingers; leave the door open only in an ajar position.
Do not sit or lean on the door and do not use it as a work surface.
For maintenance, moving, installation and cleaning of the appliance use suitable prevention and protection equipment (gloves, etc.).
Lifting and moving of appliances weighing more than 25 kg must be carried out using proper equipment, or by two persons, in order to avoid risks or injuries.
Oven dimensions:
Height: 591 mm
Width: 597 mm
Depth: 445 mm
Volume: 58 L Voltage regulations: 220/240V\~50/60Hz
| L.P.G. (G30/G31)4NATURAL GAS (G20) | |||||||
| BURNERS | POWER | kW (H.s.) | By-pass 1/100 | INJECTOR 1/100 | POWER g/h | INJECTOR 1/100 | POWER g/h |
| MAX4MIN | 4(mm)4(mm/ | 00)4G30/G31 | 4(mm/100)4G | 20 | |||
| OVEN BURNER | 2,70 | 0,85 | 48 | 80 | 196 | 115 | 196 |
| GRILL BURNER | 2,40 | 80 | 175 | 115 | 175 | ||
| PRESSURE | NOMINAL | 28-30/37 | 20 | ||||
| MIN | 20 | 17 | |||||
| MAX | 35 | 25 | |||||
INSTALLATION
ATTENTION: This appliance can be installed and operated only in rooms that are continuously ventilated according to UNI 7129/UNI 7131.
IMPORTANT: The installation must be carried out by professionally qualified personnel following the manufacturer's instructions. Any maintenance on the appliance must be performed with the appliance disconnected from the electrical power supply and with the gas supply tap closed. The installation must be carried out in compliance with the current regulations in the country in which the appliance will be used.
Gas connection
For the connection of the appliance to the gas distribution system or a gas cylinder, use the rigid metal pipe in copper or steel with relative fittings compliant with the standard UNI-CIG 7129 or the flexible hose in stainless steel with continuous wall compliant with standard UNI-CIG 9891. The pressure regulators used must be compliant with the standard UNI-CIG 7432.
Electrical connection
The electrical connection must be carried out by a qualified technician according to the manufacturer's instructions and in compliance with current local standards. Make sure the voltage matches the value indicated on the technical data plate visible, with the door open, on one of the side edges of the cavity. If the plug is not easily accessible, the installer must provide an omni-polar switch with a contact opening distance of at least 3 mm. The appliance is supplied with a plugless cable. A normalized plug must be used, taking into consideration that:
$$ \text { YELLOW - GREEN } = \text { EARTH } $$
$$ \text { BLUE } = \text { NEUTRAL } $$
$$ \mathbf {B R O W N} = \mathbf {P H A S E} $$
The appliance is required by law to have an earth connection.
Do not use multiple sockets or extension cords.
Installation room
For proper operation of the gas appliance, it is essential that the room has a natural air flow from openings on the external walls providing sufficient air for combustion of the gas. These openings must have a free air-flow cross-section of at least 100 cm^2 (it is possible to make one or more openings).
The exhaust of the combustion residual products must occur through hoods connected to chimney flues or directly to the outdoors. If it is not possible to install a hood, an electric fan must be applied to the external wall or window of the room provided that the room has the required air inlet openings according to current standards. This electric fan must have a capacity that guarantees, for a kitchen, an hourly air renewal of 3-5 times its volume.

natural_image
Isometric line drawing of a kitchen or oven setup with a chimney, stove, and tiled floor (no text or symbols)INSTRUCTIONS FOR INSTALLATION
It is important that all installation procedures are performed only by a qualified technician. The appliance can be inserted either under a worktop or into a column. In either case comply with the dimensions shown in the drawings on the very first page of the booklet.
Once having unpacked the oven, in order to install, rest it on its base without damaging it. Do not lift the oven by the door handle, but hold it at the sides.
Do not lift the oven by the gas connection.
Make sure that the appliance has not been damaged during transport.
Kitchen units in contact with the oven must be heat resistant:
min. 100^ C during periods of operation.
House the oven in the unit cavity, lifting it at the sides and making sure that the supply cable is not trapped.
Secure the oven to the kitchen unit with the 4 screws "A" which are on the oven frame.
When the oven is installed, make sure that the sides do not touch the front edges of the unit or the adjacent drawers and doors.
Do not use the door as a lever when installing the oven.
Do not place excessive pressure on the oven door when it is open.
To allow a proper air flowing, we recommend that you leave an opening of at least 85-90mm in the lower section of the housing.
Also provide for at least 5mm clearance between the top of the oven and the lower edge of the worktop.
Warning:
never close or block any cooling - air flowing opening by strips or unit reinforcing pieces.
CONNECTION TO THE GAS SUPPLY
The supply system must be compliant with the current local standards in the country of use. The type of gas for which the oven has been regulated is indicated on the serial number plate located on one of the side edges of the cavity (visible with the door open) and on the packaging. Before carrying out the connection, the oven must be adapted to the type of gas that will be used. The connection between the gas fitting, ramp and pipe can be carried out in one of the following ways (see the following drawing):
- Using an attachment without seals (the oven attachment is conical: (the oven attachment is conical: ISO R 7).
- Using the seal provided.
Attention: when finished, check that there are no gas leaks.
Use soap and water or special liquids to make sure that there are no gas leaks.
DO NOT USE OPEN FLAMES WHEN SEARCHING FOR GAS LEAKS.
Warning: the use of a rubber flexible hose fastened with hose clamps is prohibited because it cannot be inspected.

flowchart
graph TD
    A["RAMP"] --> B["FLEXIBLE HOSE"]
    C["SEAL"] --> D["FLEXIBLE HOSE"]
    style A fill:#f9f,stroke:#333
    style B fill:#ccf,stroke:#333
    style C fill:#cfc,stroke:#333
    style D fill:#fcc,stroke:#333
Adaptation to the gas in use
Other types of gas can be used by changing the burner setting as follows:
1) Make sure that the oven is not connected to the electrical mains.
2) Open the oven door completely.
3) Extract the bottom of the oven after having removed the retaining screws
4) Take off the burner by unscrewing the screw.
5) Unscrew the injector and replace it according to the injector table provided separately. Reassemble the burner and the bottom of the oven, following the above steps in the reverse order.
Flame adjustment
To adjust the flame, proceed as follows:
loosen the screw C and turn the ring nut D to position N for natural or methane gas, and position GPL for cylinder gas, aligning the movable pointer on the ring nut with the fixed pointer on the burner. An adjusted flame is obtained in this manner.

Setting of the minimum
The oven thermostat is equipped with a by-pass for the minimum; when changing the type of gas it is also necessary to adjust the setting in the following manner:
- Remove the thermostat knob;
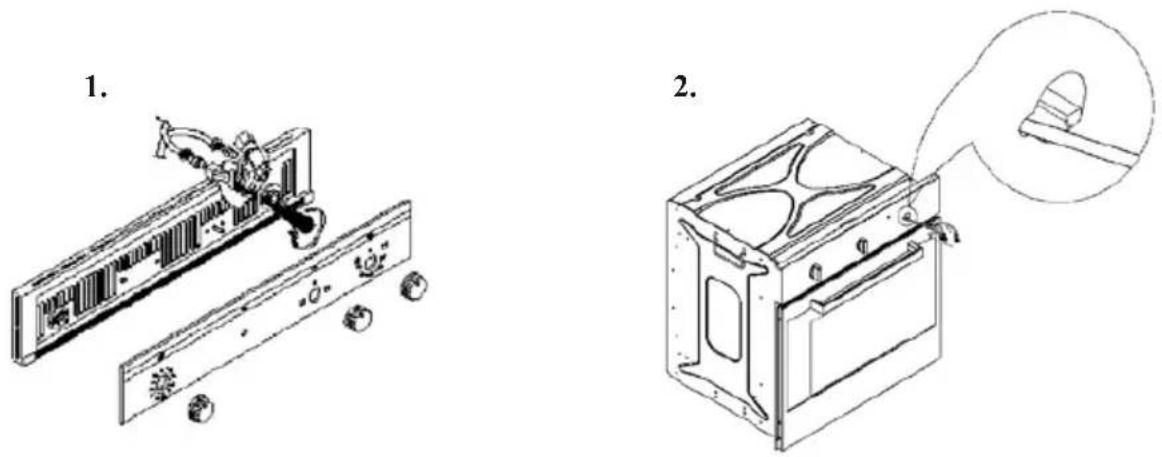
- If the front panel is in glass, remove it by unscrewing the two locking ring nuts located under the other two knobs (fig. 1);
- If the control panel is in metal, the adjustment can be made through the opening located on the left side of the thermostat knob housing (fig. 2);
- Turn on the oven and let it operate at maximum with the door closed for at least 30 minutes;
- Move the oven thermostat knob to the minimum and set the by-pass to the minimum so as to obtain a reduced but stabilized flame. Perform this operation with the oven door closed;
- Use a screwdriver to operate on the notch of the by-pass screw. A few turns of the by-pass screw is sufficient to adjust the minimum when passing from liquid gas to methane gas;
IMPORTANT: after having adjusted the burner, open and close the oven door to check that the flame remains lit at the minimum. If the flame goes out, adjust the by-pass setting.
For operation with G30/G31, the adjustment screw of the by-pass must be screwed in completely.
When these operations are finished (injector replacement, air adjustment and minimum setting), turn off the oven and replace the data plate with the new data plate indicating the operating gas.
BEFORE USING THE OVEN - PRECAUTIONS AND GENERAL SUGGESTIONS
• Unplug the appliances before performing any maintenance and/or cleaning.
- Any repairs or other work on the appliances must be carried out by qualified technicians only.
• Make sure that the electrical cables of other appliances used near the cooktop or oven do not touch the hot parts or get stuck in the oven door.
• Use oven gloves to remove pots and accessories when the oven is hot.
• Do not cover the bottom of the oven with aluminium foil.
- Do not place flammable material inside the oven. If the appliance is turned on accidentally, it could catch on fire.
- After using the oven, make sure that the pointer of the knob is in the 'off position and close the tap of the gas pipeline or cylinder.
- Do not store flammable materials inside the oven cavity.
- The oven is equipped with a fan to cool the internal parts, the components of the oven and create a slight air flow that exits from the slot under the control panel.
This cooling fan turns on immediately and shuts down 10-30 minutes after the oven is switched off (depending on oven temperature).
If the fan does not work, do not use the oven and call the service centre.
If there is a power failure, do not use the appliance;
if a power failure occurs while the appliance is operating, turn off the appliance and do not use it again until power is restored.
In the grill function, the cooling fan starts immediately with the door open or closed and stops as in the preceding function.
• During use, the internal glass of the oven door may steam up.
- Do not place heavy objects on the door in order to avoid damaging the oven cavity or door hinges.
- Do not block the cooling or exhaust openings or slots.
- If the oven burner knob becomes increasingly difficult to turn, call the service centre to replace the tap.
Attention: to reduce consumption and avoid overheating, the oven door should be kept closed unless specifically required otherwise.
TURNING ON THE OVEN

The oven is equipped with electric ignition. To turn on the oven, open the door completely. Press the thermostat knob slightly and turn it counter-clockwise to the maximum. Press the knob completely to trigger the electric ignition and keep the knob pressed for a few seconds. However, do not activate the device for more than 15 seconds.
If the burner does not light in 15 seconds, keep the door completely open and wait at least 1 minute before trying again.
NOTE: when the oven is turned on for the first time, it is normal to have to repeat the operation several times due to the presence of air in the gas supply line. Once the flame is lit, keep the thermostat knob pressed for a few seconds to activate the safety thermocouple that would otherwise block the gas supply. Check the successful lighting of the burner through the slots located in the front part of the oven plate; if it is not lit, repeat the operation.
The proper operation of the burner should be checked with the oven door closed.
DURING OPERATION
Keeping the door closed, check that the cooling fan is operating properly. If the fan does not work, proceed as follows:
-
check the power supply; if there is a power failure stop baking, turn off the appliance and wait for power to be restored.
-
if there is no power failure, do not use the oven and contact the service centre. If the oven door is opened during use, the fan stops to prevent the flow of hot air in the direction of the user; once the door is closed again the fan resumes operation; if this does not occur, perform the checks listed in points 1 and 2.
Warning
The oven burner has a safety valve which block the gas flow in the following cases:
- If the thermostat knob is accidentally turned with immediate gas flow.
- If the burner flame is accidentally cut off.
- In the case of lack of gas depending by the gas provider.
Ignition: the oven is switched on with the door wide open.
If the door is just partially open, a safety system blocks the automatic ignition of burners.
How to use the oven
It allows to choose the preferred temperature of cooking.
By turning the knob anticlockwise the temperature can be selected between 150°C and Max.
Pilot light
The light turns on when the selector knob is in any position different from 0.
Selector knob
It allows to choose between the different cooking functions.
Use of the selector and symbols

: Oven light
To turn the oven light on.

USING THE SPIT
Slide the food onto the spit rod between the two forks, securing it in a stable position by means of the forks to prevent straining the motor.
Fit the spit rod into the hole of the spit motor and rest it on the support provided.
Place the collecting plate on the lowest shelf. Switch the grill on.

natural_image
Diagram of a mechanical device with a magnified inset showing internal components and motion arrows (no text or symbols)SWITCHING THE GAS GRILL ON

The grill is controlled by the right knob (turning it in a clockwise direction) and is provided with an electronic ignition.
To switch the gas grill on, proceed as follows:
open the oven door (if the door is closed the ignition device does not start), slightly press the knob and turn it clockwise to the end, to the grill position.
If the knob is not pressed, the grill ignition device starts but there is not gas flowing, which means the burner cannot work.
As the grill ignition device is provided with a safety device (as well as the oven burner), once the burner has been started it is necessary to keep the knob pressed for some seconds before releasing it, in order to enable the gas flowing until the safety device is ready.
Note: when doing the electric ignition for the first time, it is quite normal having to try many times the electric ignition, because of the air inside the gas pipe.
Before switching the gas grill on place the rack on the desired level.
We suggest to warm up the grill for 2 minutes before introducing food.
When grilling, use the rack and the tray provided with the oven.
Warning:
Always grill with the door open.
The accessible parts of the oven can be very hot when using the grill: keep away the children.
Always use oven gloves when moving food in or out of the oven cavity.
Oven cooling system:
In order to ensure the control of the oven inner temperature, it is provided with a cooling fan which always turns on when at least one of the two knobs is in a position different from zero.
The cooling fan starts with the oven turned off, if it is still hot after a cooking cycle.
USING THE 60 MINUTE MINDER
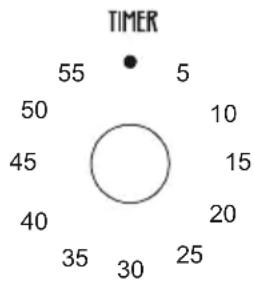
This run-back timer can be used independently of an oven cooking cycle for up to 60 minutes of timing. The oven will not be turned off automatically. To set the timer turn the knob fully clockwise until it stops and then back to the required time.
A short sound will advise that the cooking time is over.
INSTRUCTIONS FOR INSTALLING KNOB GUARD
natural_image
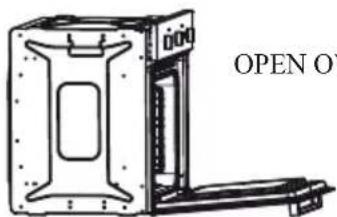
Technical line drawing of a mechanical device with no visible text or symbolsOPEN OVEN DOOR
INSTALL KNOB GUARD IN SLOTS OF FRONT

natural_image
Technical line drawing of an oven with handlebars and ventilation slots (no text or symbols)
natural_image
Technical line drawing of a door frame with handlebars and mounting brackets (no text or symbols)FASTEN KNOB GUARD ONTO FRONT BY MOVING IT TO THE RIGHT
MAKE SURE THE KNOB GUARD IS ATTACHED BY PULLING IT OUTWARDS

natural_image
Technical line drawing of a mechanical assembly or assembly with no visible text or symbols
natural_image
Technical line drawing of a mechanical housing or enclosure with mounting flanges and internal components (no text or symbols)CLOSE OVEN DOOR
ATTENTION:
During operation the knob guard gets very hot.
Use kitchen gloves.
COOKING TABLE
| Type of food | Temp. °C | Runners(starting from the bottom) | Cooking time in minutes |
| Butter cakes baked in a cake pan | Recommended | Your time | ||
| Pancttonc or focaccia | 175 | 2 | 55-65 |
| Real focaccia | 175 | 3 | 60-70 |
| ‘Sublime’ cake | 175 | 3 | 60-70 |
| Short pastry cakes baked in a cake pan | |||
| Pic crust | 200 | 3 | 8-10 |
| Pie crust with soft cheese | 200 | 3 | 25-35 |
| Pie crust with fruit | 200 | 3 | 25-35 |
| Yeast cakes baked in a cake pan | |||
| Pic crust | 180 | 3 | 30-45 |
| White bread – 1Kg of flour | 200 | 3 | 25-35 |
| Small sweets | |||
| Short pastries | 200 | 3 | 10-15 |
| Cream puff pastries | 200 | 2 | 35-45 |
| Biscuit pastries | 200 | 3 | 15-20 |
| Lasagna | 225 | 2 | 40-50 |
| Meat | |||
| Long-cooking roasts (e.g. roast veal) | 200 | 2 | 120-150 |
| Short-cooking roasts (e.g. roast beef) | 200 | 2 | 60-90 |
| Minced meat roll | 200 | 2 | 30-40 |
| Poultry | |||
| Duck 1 1⁄2 kg | 200 | 2 | 120-180 |
| Goose 3 kg | 200 | 2 | 150-210 |
| Roast chicken | 200 | 2 | 60-90 |
| Turkey 5 kg | 175 | 2 | kb. |
| Wild game | |||
| Hare | 200 | 2 | 60-90 |
| Leg of roe buck | 200 | 2 | 90-150 |
| Leg of venison | 175 | 2 | 90-180 |
| Vegetables | |||
| Roast potatoes | 220 | 2 | 30-40 |
| Cooked vegetable mould | 200 | 2 | 40-50 |
| fish | |||
| Trout | 200 | 2 | 40-50 |
| Grey mullet | 200 | 2 | 40-50 |
| Pizza | 240 | 3 | 10-20 |
| Grill | |||
| Chops | 4 8-12 | ||
| Sausages | 4 | 10-12 | |
| Grilled chicken | 2 | 25-35 |
Notes:
Pre-heat the oven to the required cooking temperature before putting food inside
When using the grill function, we recommend turning the food being grilled.
The figures shown are approximate because the type of cooking and/or the time will depend on the quantity of food and individual taste.
CLEANING AND MAINTENANCE OF THE OVEN
Important: Before performing any maintenance, you must either unplug the oven or disconnect the power supply via the omni-polar switch of the electrical system.
Cleaning the oven:
- Let the oven cool after each use and clean it to keep burnt on residues from being repeatedly heated.
- For tough dirt, use a product specifically for oven cleaning. Follow the instructions on the container of the product.
- Clean the outside with a sponge dampened with warm water.
- Never clean the appliance with high pressure water or steam cleaning equipment.
- Do not use abrasive substances or materials to clean the glass as they may damage it.
- Wash accessories in a dishwasher or by hand using a product for oven cleaning.
ATTENTION: use protective gloves for the following tasks.
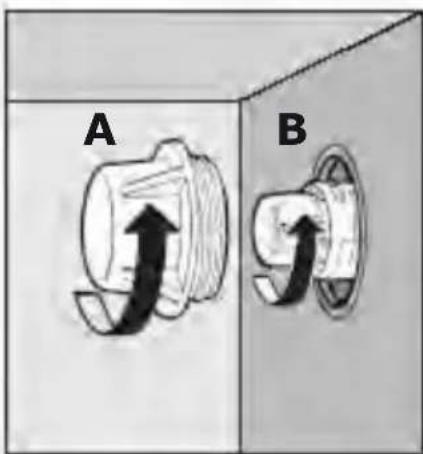
How to remove the oven door
To make it easier to clean the oven, it is possible to remove the door from the hinges as follows:
The hinges A are equipped with 2 mobile U-bolts B.
When the U-bolts B are lifted, the hinges are disconnected from their housing.
- After this, lift the door up and pull it outwards, holding the door on both sides near the hinges.
To re-install the door:
- Slide the hinges into the grooves and open the door all the way.
- Turn the mobile U-bolts to their starting position before closing the door again.

natural_image
Technical line drawing of a mechanical assembly with labeled components A and B (no text or symbols beyond labels)Cleaning the side racks
The side racks has to be hooked onto the wall of the oven. Slide the racks and tray provided into the side rails.
To remove the side racks press on part A as shown.

natural_image
Technical line drawing of an open oven with internal components and labeled parts (no text or symbols present)Replacing the oven bulb
• Disconnect the oven from the electrical power supply
• Use a screwdriver to remove the light cover A
- Replace the lamp B
• Put the light cover back
- Restore the power supply
N.B.: use only lamps that are 25W 220-240V\~, type E -14, T 300°C.
The lamp used in this appliance is a 'special purpose lamp' intended only for the usage with this appliance; it is not intended for household room illumination.



- USER'S MANUAL FOR BUILT-IN OVEN
- EC DECLARATION OF CONFORMITY
- GENERAL WARNINGS
- Oven dimensions:
- INSTALLATION
- Gas connection
- Electrical connection
- Installation room
- INSTRUCTIONS FOR INSTALLATION
- CONNECTION TO THE GAS SUPPLY
- DO NOT USE OPEN FLAMES WHEN SEARCHING FOR GAS LEAKS.
- Adaptation to the gas in use
- Flame adjustment
- Setting of the minimum
- BEFORE USING THE OVEN - PRECAUTIONS AND GENERAL SUGGESTIONS
- TURNING ON THE OVEN
- DURING OPERATION
- Warning
- How to use the oven
- Pilot light
- Selector knob
- Use of the selector and symbols
- : Oven light
- USING THE SPIT
- SWITCHING THE GAS GRILL ON
- Warning:
- Oven cooling system:
- USING THE 60 MINUTE MINDER
- INSTRUCTIONS FOR INSTALLING KNOB GUARD
- CLEANING AND MAINTENANCE OF THE OVEN
- Cleaning the oven:
- How to remove the oven door
- Cleaning the side racks
- Replacing the oven bulb
Brand : Foster
Model : 7191 061
Category : Oven