MT923 - Sander Maktec - Free user manual and instructions
Find the device manual for free MT923 Maktec in PDF.
| Product type | Orbital sander |
| Brand | Maktec |
| Model | MT923 |
| Pad size | 92 mm x 185 mm |
| Abrasive paper size | 93 mm x 228 mm |
| Net weight | 1.4 kg |
| Safety class | Double insulation (Class II) |
| Power supply | Single-phase, mains voltage corresponding to nameplate |
| Main uses | Sanding large surfaces of wood, plastic, metal and painted surfaces |
| Sound pressure level (LpA) | 75 dB(A) with uncertainty K=3 dB(A) |
| Vibrations (ah) | 5.0 m/s² with uncertainty K=1.5 m/s² |
| Dust collection system | Dust bag (optional accessory) and dust box with filter |
| Abrasive paper attachment type | Mechanical clamping (lever) or hook-and-loop (optional pad) |
| Switch | ON/OFF rocker switch |
| Overall length | 252 mm |
| Maintenance | Clean with a damp cloth, do not use solvents. Have repairs carried out by an authorized Makita service center. |
| Spare parts and repairability | Spare parts available from authorized Makita service centers |
| Included accessories | Instruction manual, standard pad, clamping wrench (screwdriver) |
Frequently Asked Questions - MT923 Maktec
User questions about MT923 Maktec
0 question about this device. Answer the ones you know or ask your own.
Ask a new question about this device
Download the instructions for your Sander in PDF format for free! Find your manual MT923 - Maktec and take your electronic device back in hand. On this page are published all the documents necessary for the use of your device. MT923 by Maktec.
USER MANUAL MT923 Maktec
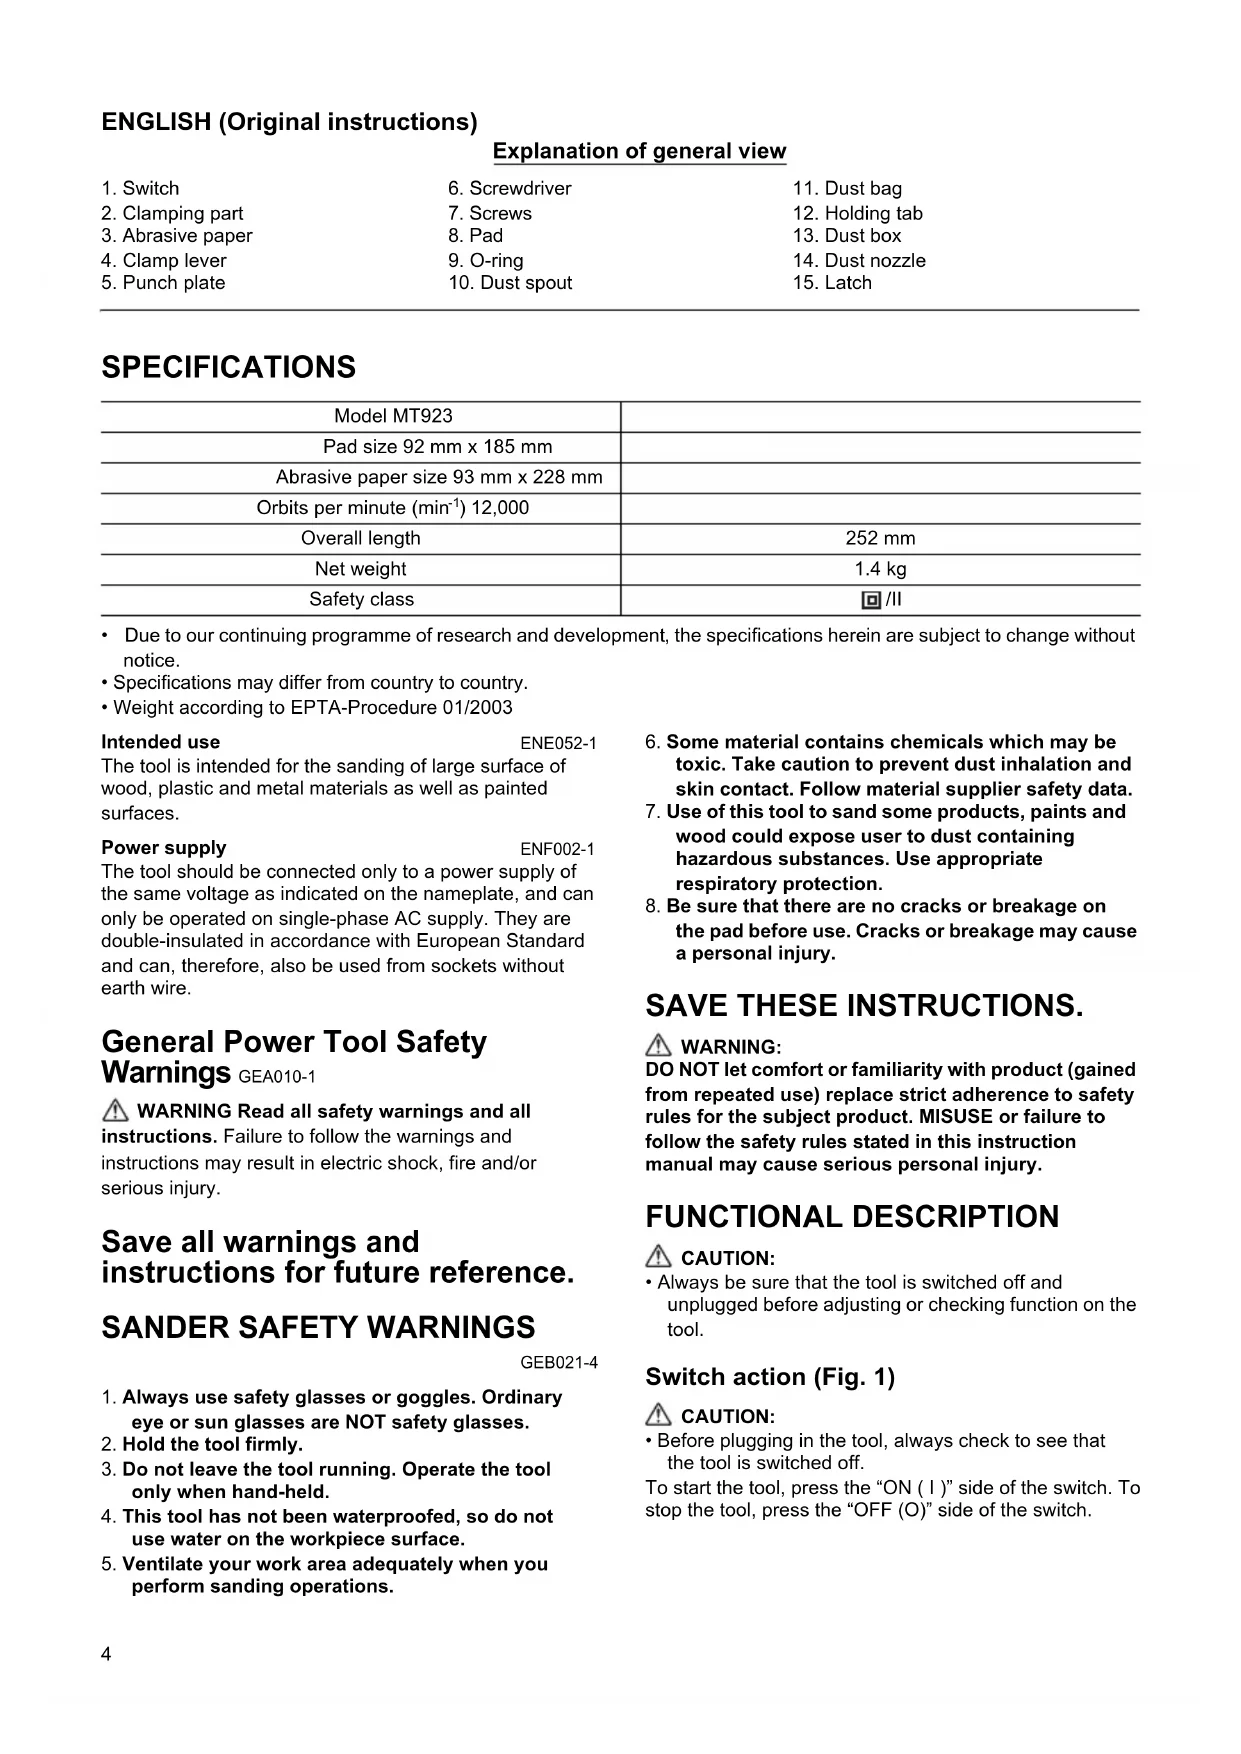
GB Finishing Sander Instruction manual
ENGLISH (Original instructions)
Explanation of general view
| 1. Switch | 6. Screwdriver | 11. Dust bag |
| 2. Clamping part | 7. Screws | 12. Holding tab |
| 3. Abrasive paper | 8. Pad | 13. Dust box |
| 4. Clamp lever | 9. O-ring | 14. Dust nozzle |
| 5. Punch plate | 10. Dust spout | 15. Latch |
SPECIFICATIONS
| Model MT923 | |
| Pad size 92 mm x 185 mm | |
| Abrasive paper size 93 mm x 228 mm | |
| Orbits per minute (min-1) 12,000 | |
| Overall length | 252 mm |
| Net weight | 1.4 kg |
| Safety class | 回/II |
- Due to our continuing programme of research and development, the specifications herein are subject to change without notice.
- Specifications may differ from country to country.
Weight according to EPTA-Procedure 01/2003
Intended use
ENE052-1
The tool is intended for the sanding of large surface of wood, plastic and metal materials as well as painted surfaces.
Power supply
ENF002-1
The tool should be connected only to a power supply of the same voltage as indicated on the nameplate, and can only be operated on single-phase AC supply. They are double-insulated in accordance with European Standard and can, therefore, also be used from sockets without earth wire.
General Power Tool Safety Warnings GEA010-1
WARNING Read all safety warnings and all instructions. Failure to follow the warnings and instructions may result in electric shock, fire and/or serious injury.
Save all warnings and instructions for future reference.
SANDER SAFETY WARNINGS
GEB021-4
- Always use safety glasses or goggles. Ordinary eye or sun glasses are NOT safety glasses.
- Hold the tool firmly.
- Do not leave the tool running. Operate the tool only when hand-held.
- This tool has not been waterproofed, so do not use water on the workpiece surface.
-
Ventilate your work area adequately when you perform sanding operations.
-
Some material contains chemicals which may be toxic. Take caution to prevent dust inhalation and skin contact. Follow material supplier safety data.
- Use of this tool to sand some products, paints and wood could expose user to dust containing hazardous substances. Use appropriate respiratory protection.
- Be sure that there are no cracks or breakage on the pad before use. Cracks or breakage may cause a personal injury.
SAVE THESE INSTRUCTIONS.
WARNING:
DO NOT let comfort or familiarity with product (gained from repeated use) replace strict adherence to safety rules for the subject product. MISUSE or failure to follow the safety rules stated in this instruction manual may cause serious personal injury.
FUNCTIONAL DESCRIPTION
CAUTION:
Always be sure that the tool is switched off and unplugged before adjusting or checking function on the tool.
Switch action (Fig. 1)
CAUTION:
- Before plugging in the tool, always check to see that the tool is switched off.
To start the tool, press the "ON (I)" side of the switch. To stop the tool, press the "OFF (O)" side of the switch.
ASSEMBLY

CAUTION:
- Always be sure that the tool is switched off and unplugged before carrying out any work on the tool.
Installing or removing abrasive paper
For conventional type of abrasive paper with prepunched holes (standard equipment): (Fig. 2)
Open the paper clamp by raising on the lever to release from the locking port and then insert the paper end into the clamping part, aligning the paper edges even and parallel with the sides of the base. (Bending the paper beforehand makes attachment easier). Once the paper is in place, return the lever to its original position. Repeat the same process for the other end of the base, maintaining the proper paper tension.
After inserting the paper, make sure the clamping part hold it securely. Otherwise the paper will be loose and subject to slippage, resulting in uneven sanding operation. To remove the paper, release the clamper as stated above.
For conventional type of abrasive paper without prepunched holes (available on the market): (Fig. 3)
Open the paper clamp by raising on the lever to release from the locking port and then insert the paper end into the clamping part, aligning the paper edges even and parallel with the sides of the base. (Bending the paper beforehand makes attachment easier). Once the paper is in place, return the lever to its original position. Repeat the same process for the other end of the base, maintaining the proper paper tension.
After inserting the paper, make sure the clamping part hold it securely. Otherwise the paper will be loose and subject to slippage, resulting in uneven sanding operation. Place the punch plate (optional accessory) over the paper so that the guide of the punch plate is flush with the sides of the base. Then press the punch plate to make holes in the paper.
To remove the paper, release the clamper as stated above.
For hook-and-loop type of abrasive paper with prepunched holes (optional accessory):

CAUTION:
- Always use hook-and-loop type of abrasive papers. Never use pressure-sensitive abrasive paper. (Fig. 4) Remove the pad for the conventional type of abrasive paper from the tool with a screwdriver. Install the pad for the hook-and-loop type of abrasive paper (optional accessory) on the tool. Tighten the screws firmly to secure the pad. (Fig. 5)
Remove all dirt or foreign matter from the pad. Attach the paper to the pad, aligning the holes in the paper with those in the pad. (Fig. 6)

CAUTION:
- When removing the pad, O ring may come out of the tool. When this occurs, return the O ring to the original position and then install the pad.
Dust bag (optional accessory) (Fig. 7)
Attach the dust bag onto the dust spout. The dust spout is tapered. When attaching the dust bag, push it onto the
dust spout firmly as far as it will go to prevent it from coming off during operation.
For the best results, empty the dust bag when it becomes approximately half full, tapping it lightly to remove as much dust as possible.
Installing filter (optional accessory) (Fig. 8)
Make sure that the logo on the cardboard lip and the logo on the dust box are on the same side, then install the filter by fitting the cardboard lip in the groove of each holding tab. (Fig. 9)
Make sure that the logo on the cardboard lip and the logo on the dust nozzle are on the same side, then install the dust nozzle on the dust box. Removing dust box and filter. (Fig. 10)
Remove the dust nozzle by pushing the two latches. (Fig. 11)
Remove the filter first by pinching the logo side of its cardboard lip, then by pulling the cardboard lip downwards to move it out of the holding tab of the dust box.
OPERATION
Sanding operation (Fig. 12)

CAUTION:
- Never run the tool without the abrasive paper. You may seriously damage the pad.
- Never force the tool. Excessive pressure may decrease the sanding efficiency, damage the abrasive paper and/or shorten tool life.
Hold the tool firmly. Turn the tool on and wait until it attains full speed. Then gently place the tool on the workpiece surface. A finishing sander is generally used to remove only a small amount of material at a time. Since the quality of the surface is more important than the amount of stock removed, do not bear down on the tool. Keep the base flush with the workpiece at all times.
MAINTENANCE

CAUTION:
- Always be sure that the tool is switched off and unplugged before attempting to perform inspection or maintenance.
- Never use gasoline, benzine, thinner, alcohol or the like. Discoloration, deformation or cracks may result. To maintain product SAFETY and RELIABILITY, repairs, carbon brush inspection and replacement, any other maintenance or adjustment should be performed by Makita Authorized Service Centers, always using Makita replacement parts.
Noise
ENG905-1
The typical A-weighted noise level determined according to EN60745:
Sound pressure level (L_pA) : 75 dB (A)
Uncertainty (K): 3 dB (A)
The noise level under working may exceed 80 dB (A).
Wear ear protection.
Vibration
ENG900-1
The vibration total value (tri-axial vector sum) determined according to EN60745:
Work mode: sanding metal plate
Vibration emission (a_h) .. 5.0~m / s^2
Uncertainty (K): 1.5m / s^2
ENG901-1
- The declared vibration emission value has been measured in accordance with the standard test method and may be used for comparing one tool with another.
- The declared vibration emission value may also be used in a preliminary assessment of exposure.

WARNING:
- The vibration emission during actual use of the power tool can differ from the declared emission value depending on the ways in which the tool is used.
- Be sure to identify safety measures to protect the operator that are based on an estimation of exposure in the actual conditions of use (taking account of all parts of the operating cycle such as the times when the tool is switched off and when it is running idle in addition to the trigger time).
For European countries only
ENH101-14
EC Declaration of Conformity
We Makita Corporation as the responsible manufacturer declare that the following Makita machine(s):
Designation of Machine:
Finishing Sander
Model No./ Type: MT923
are of series production and
Conforms to the following European Directives:
2006/42/EC
And are manufactured in accordance with the following standards or standardised documents:
EN60745
The technical documentation is kept by our authorised
representative in Europe who is:
Makita International Europe Ltd.,
Michigan Drive, Tongwell,
Milton Keynes, MK15 8JD, England
26.2.2010

Tomoyasu Kato
Director
Makita Corporation
3-11-8, Sumiyoshi-cho,
Anjo, Aichi, JAPAN
Michigan Drive, Tongwell,
Milton Keynes, MK15 8JD, Angleterre
26.02.2010

Tomoyasu Kato
Director
Makita Corporation
3-11-8, Sumiyoshi-cho,
Anjo, Aichi, JAPAN
Michigan Drive, Tongwell,
Milton Keynes, MK15 8JD, England
26.2.2010

Tomoyasu Kato
Direktor
Makita Corporation
3-11-8, Sumiyoshi-cho,
Anjo, Aichi, JAPAN
Michigan Drive, Tongwell,
Milton Keynes, MK15 8JD, Inghilterra
26.2.2010

Tomoyasu Kato
Direttore
Makita Corporation
3-11-8, Sumiyoshi-cho,
Anjo, Aichi, JAPAN
VEILIGHEIDSWAARSCHUWINGEN SCHUURMACHINE GEB021-4
Michigan Drive, Tongwell,
Milton Keynes, MK15 8JD, England
26.2.2010

3-11-8, Sumiyoshi-cho,
Anjo, Aichi, JAPAN
ESPANOL (Instrucciones originales)
Michigan Drive, Tongwell,
Milton Keynes, MK15 8JD, Inglaterra
26.2.2010

Tomoyasu Kato Director
Makita Corporation
3-11-8, Sumiyoshi-cho,
Anjo, Aichi, JAPAN
Tomoyasu Kato Director
Makita Corporation 3-11-8, Sumiyoshi-cho,
Anjo, Aichi, JAPAN
Michigan Drive, Tongwell,
Milton Keynes, MK15 8JD, England
-
- 2010

Tomoyasu Kato
Direktør
Makita Corporation
3-11-8, Sumiyoshi-cho,
Anjo, Aichi, JAPAN
aToneAeI npaywyn Oe epa kai
Euupopwvctai e Tnv aokoue N Eupwnaikn Osyia: 2006/42/EK
Kai kataokeuaetai ouuovva e ta npakatw protutna
TUTTOINIeva Eyypaqα: EN60745
O eouoiobotnEvoc avntipoos otyn Eupwn biatnpei ta texvika eyypapa, o oioic ivai:
Makita International Europe Ltd., Michigan Drive, Tongwell,
Milton Keynes, MK15 8JD, England
26.2.2010

Tomoyasu Kato
AIEUoUVtns
Makita Corporation
3-11-8, Sumiyoshi-cho,
Anjo, Aichi, JAPAN
Makita Corporation
Anjo, Aichi, Japan
884981B991 www.makita.com