Trendy DJ029BB - Camera LEXIBOOK - Free user manual and instructions
Find the device manual for free Trendy DJ029BB LEXIBOOK in PDF.
| Product type | Digital camera |
| Brand | Lexibook |
| Model | Trendy DJ029BB |
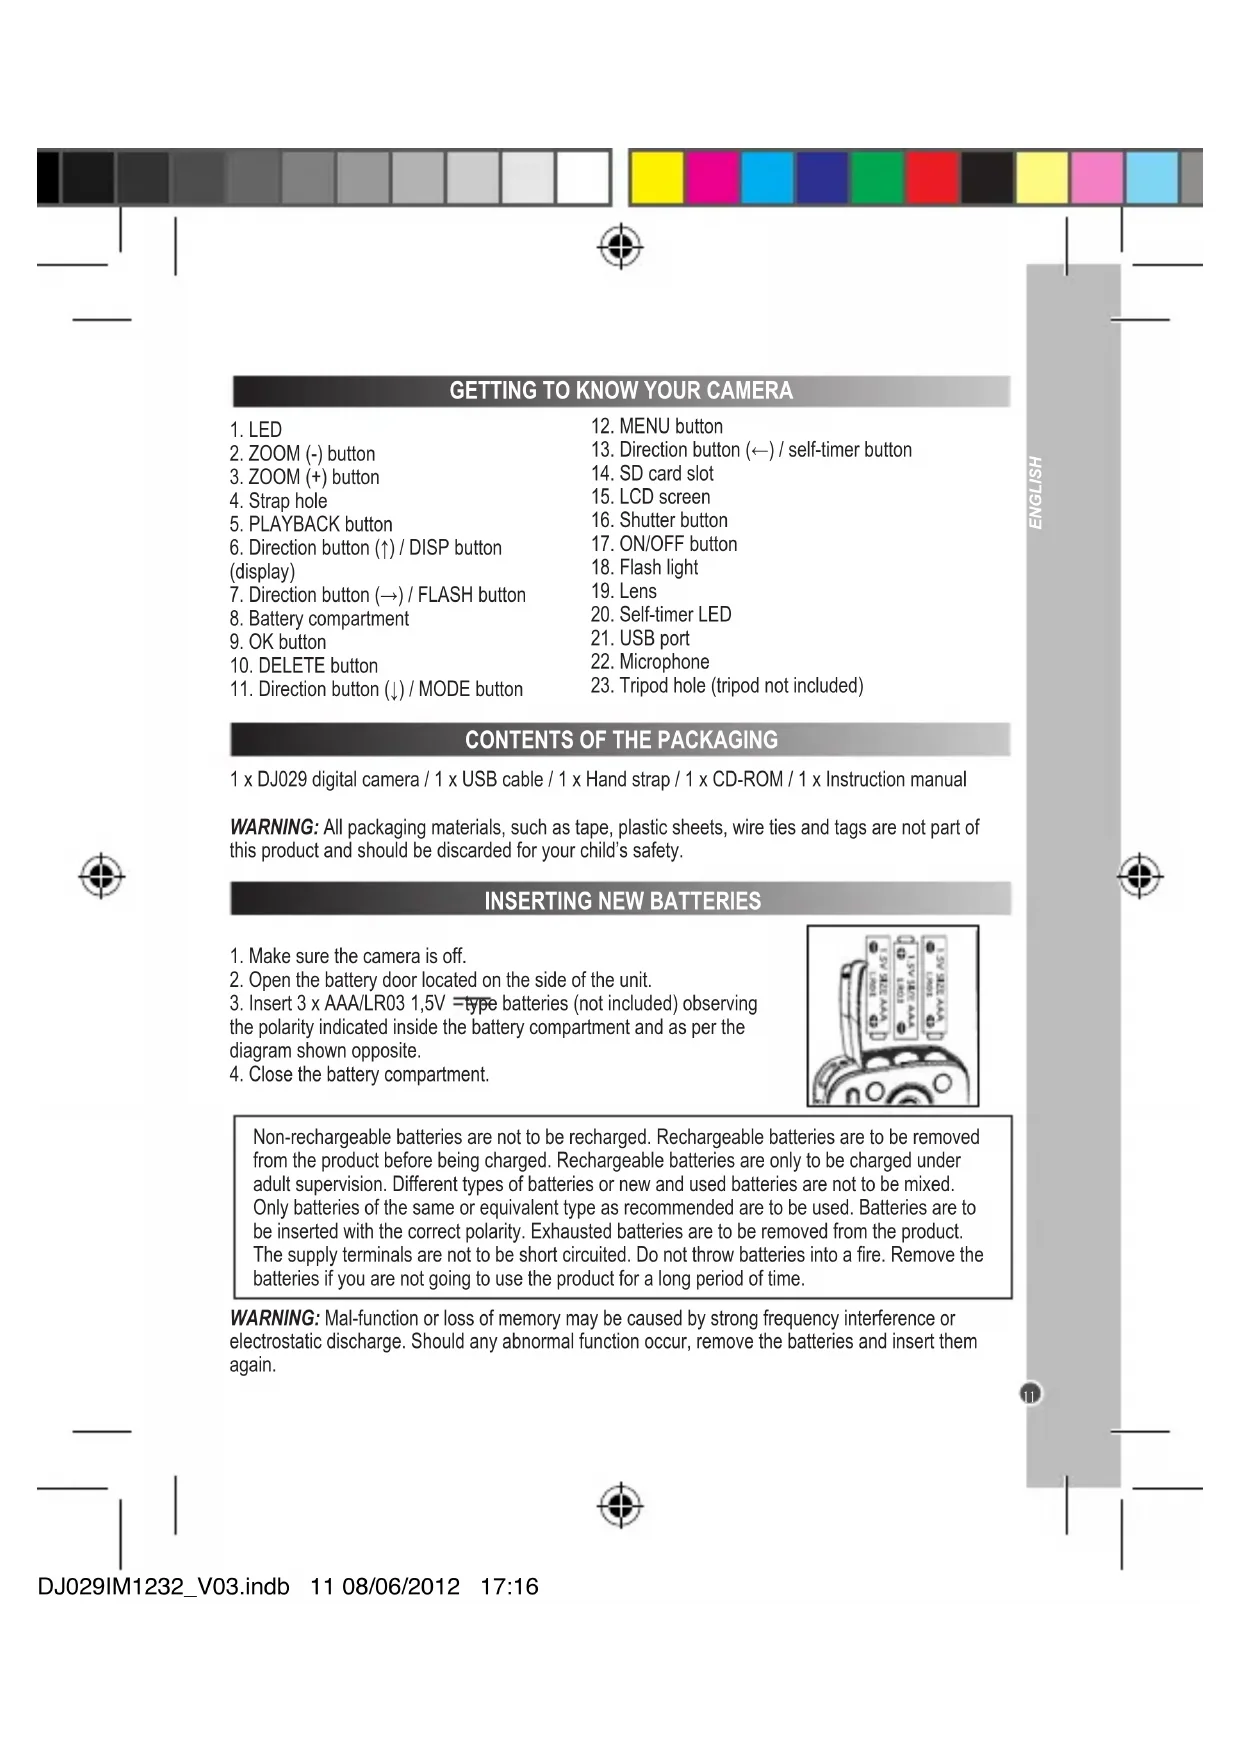
| Power supply | 3 AAA/LR03 1.5V batteries (not included) |
| Maximum photo resolution | 8 megapixels |
| Maximum video resolution | 345,000 pixels |
| Modes | Photo, video, voice recorder, webcam |
| Functions | Digital zoom, flash, self-timer (2s/10s), burst (3 photos), photo frames |
| Memory | SD card (not included) |
| Screen | LCD |
| Connectivity | USB |
| Included software | MAGIX Video easy SE, MAGIX Photo Manager 10 |
| Maintenance | Clean with a slightly damp cloth, no detergent |
| Safety | Do not expose to heat, moisture, do not disassemble |
| Warranty | 2 years |
Frequently Asked Questions - Trendy DJ029BB LEXIBOOK
User questions about Trendy DJ029BB LEXIBOOK
0 question about this device. Answer the ones you know or ask your own.
Ask a new question about this device
Download the instructions for your Camera in PDF format for free! Find your manual Trendy DJ029BB - LEXIBOOK and take your electronic device back in hand. On this page are published all the documents necessary for the use of your device. Trendy DJ029BB by LEXIBOOK.
USER MANUAL Trendy DJ029BB LEXIBOOK
- Insert the CD Software (included) into your CD-ROM drive.
- In the main menu, first install the driver by clicking "Install Driver" and wait until the end of the installing process.
- In the main menu, click "Install MAGIX Video easy SE" and wait during the extraction.
- Select the language and then click "OK".
- The "MAGIX Video easy SE configuration" window displays. Follow the onscreen instructions and click "Install" to begin the installation.
- Once you have finished installing, the "MAGIX Video easy SE" shortcut will appear on the desk of your computer.
- To start using "MAGIX Video easy SE", double click on the shortcut.
System requirements: Intel® Pentium 4 or AMD® Athlon® 1 GHz and higher, 512 MB RAM, 400 MB free hard disk memory and a DVD drive for program installation, graphics card with a screen resolution of at least 1024 x 768, sound card.
Supported devices: Video, TV, or graphics cards with video input.
INSTALLING THE PHOTO SOFTWARE (Magix Photo Manager 10)
- Insert the CD Software (included) into your CD-ROM drive.
- In the main menu, first install the driver by clicking "Install Driver" and wait until the end of the installing process.
- In the main menu, click "Install MAGIX Photo Manager 10" and wait during the extraction.
- Select your language and click "OK".
- "The MAGIX Photo Manager 10 configuration" window displays. Follow the onscreen instructions and press "Install" to begin the installation.
- Once you have finished installing, the "MAGIX Photo Manager 10" shortcut will appear on the desk of your computer.
- To start using "MAGIX Photo Manager 10", double click on the shortcut. The pictures taken with the camera automatically appear on the home screen.
System requirements (minimum configuration): Microsoft® Windows® 2000 XP I Vista® I 7. PC with Intel® Pentium® or AMD® Athlon® 700 MHz or higher, 256 MB RAM, 120 MB hard disk space for program files, SVGA graphics card with min. 4 MB RAM, (min. resolution 1024 x 600, 16-bit high-color), Microsoft® compatible mouse.
Note: To enjoy unlimited use of "MAGIX Photo Manager 10" and "MAGIX Video easy SE", you need to register first.
Display (Photo, Video)
The DISP button enables to quickly modify the LCD screen displaying type. By default, the LCD screen displays various data. Press DISP once to make the data disappear. Press DISP again to deactivate the LCD screen (black screen). Press DISP again to return to the default display.
Self-timer (Photo)
By default, the camera is set on "single shooting" mode (1 photo is taken when the shutter button is pressed). The self-timer button enables to quickly activate the self-timer of the camera. Press the button once to activate the 2 seconds self-timer (the photo will be taken 2 seconds after pressing the shutter button). Press the button once again to activate the 10 seconds self-timer (the photo will be taken 10 seconds after pressing the shutter button). Press the button once again to activate the "continuous shooting" mode (3 photos will be taken continuously after pressing the shutter button). Press the button once again to return to the default mode (single shooting).
Flash (Photo)
The FLASH button enables to quickly set the flash type that will be used to take a photo. By default, the flash is deactivated. Press FLASH once to activate the flash (the flash will be active for each photo taken). Press FLASH once again to activate the "automatic flash" mode (the unit will, or won't activate the flash according to the conditions). Press FLASH once again to return to the default mode (deactivated flash).
Zoom (Photo)
The ZOOM (-) and ZOOM (+) buttons enable to zoom in and zoom out. Press ZOOM (+) as many times as desired to zoom in. Press ZOOM (-) as many times as desired to zoom out.
SELECTING THE RESOLUTION (PHOTO /VIDEO)
Once the desired mode (photo / video) has been selected, press MENU to access the mode menu. Use the direction buttons ( ) to select the corresponding function, and then press OK to confirm your choice. Then use the direction buttons ( ) to select one of the available options, and then press OK to confirm your choice.
Note: In "photo" mode, the resolution varies between 307 000 and 8 million pixels. In "video" mode, the resolution varies between 77 000 and 345 000 pixels.
DOWNSLOADING YOUR PHOTOS / VIDEOS
- Connect the camera to a computer with the USB cable supplied.
- On your desktop, open the folder "Dual Mode Camera", and then double click "My Dsc".
- Download your photos and videos by clicking the icon. Then the photos and videos are displayed on the screen.
- Select the photo(s) and video(s) you want to save. Click the icon to select them all, or click directly the photo(s)/video(s) of your choice (a red frame will appear around each photo/video) if you don't want to save them all.
- Save the selected photo(s) and video(s) by clicking the icon. Then choose a name and a location for the folder in which the selected photo(s) and video(s) will be saved.
Once you have saved your photo(s) and video(s) in your computer, you can use "MAGIX Photo Manager" to display them, numerize them, print them, create albums...
- Connect the camera to a computer with the USB cable supplied.
- On your desktop, double click on the "MAGIX Photo Manager 10" shortcut.
- Reach the photos and videos by selecting the location where they have been saved.
- According to what you want to do, follow the corresponding software's instructions.
Publishing your photos on social networking sites:
- Using "Magix Photo Manager 10", select the photo that you wish to publish on Facebook or Flickr.
- The selected image appears in an orange frame.
- In the menu bar, click the "Online" tab and select "Upload media to other web services" and then either "Upload media to Flickr" or "Upload media to Facebook".
- The "Upload" window will be displayed on screen. Fill in the various fields (file name, description, key words, etc.).
- Click "Upload" to confirm.
- Depending on your upload destination, you will either open the Facebook or the Flickr home page.
- Next follow in the instructions displayed on the screen to finish uploading.
To increase the resolution of you photos, please follow the instructions below:
- Open the file "Dual Mode Camera" on your desktop, and then double click "My Dsc".
- Download your photos by clicking on the icon, and then select the photo(s) that you wish to extrapolate.
- Click on the icon, modify, if you want, the light ("brightness") and the colours ("contrast") of the selected photo(s), and then tick the "High Quality Mode" box. Finally, click "OK" to end the operation.
WEBCAM MODE
Connected to your PC, your camera can be used as a webcam.
Webcam mode
- Connect the video camera to your computer using the USB cable provided.
- Open the "Dual Mode Camera" folder on the desktop, then double-click the "PCCam" icon to view the real-time images taken by the webcam.
Instant messaging (chat)
You can use your camera as a webcam with your instant messaging client (Yahoo Messenger, MSN Messenger, Skype...).
MAINTENANCE AND WARRANTY
Only use a soft, slightly damp cloth to clean the unit. Do not use detergent. Do not expose the unit to direct sunlight or any other heat source. Do not immerse the unit in water. Do not dismantle or drop the unit. Do not try to twist or bend the unit.
Note: Please keep this instruction manual, it contains important information. This product is covered by our 2-years warranty. For any claim under the warranty or after sale service, please contact your distributor and present a valid proof of purchase. Our warranty covers any manufacturing material and workmanship defect, with the exception of any deterioration arising from the non-observation of the instruction manual or from any careless action implemented on this item (such as dismantling, exposition to heat and humidity, etc.). It is recommended to keep the packaging for any further reference.
In a bid to keep improving our services, we could implement modification on the colours and the details of the product shown on the packaging. United Kingdom & Ireland
Reference: DJ029series
Designed and developed in Europe - Made in China
© 2012 Lexibook®
United Kingdom & Ireland
For any further information, please call:
0808 100 3015
http://www.lexibook.com

This product is not a toy.

Environmental Protection
Unwanted electrical appliances can be recycled and should not be discarded along with regular household waste! Please actively support the conservation of resources and help protect the environment by returning this appliance to a collection centre (if available).


FAMILIARICESE CON SU CAMARA
MANUTENÇAO E GARANTIA
T. +(351) 220 824 521 | lexibook@ajaguiar.com
http://www.lexibook.com