
Sofia The First - Camera LEXIBOOK - Free user manual and instructions
Find the device manual for free Sofia The First LEXIBOOK in PDF.


| Product Type | Digital Camera for Kids |
| Brand | Lexibook |
| Model | Sofia The First |
| Dimensions | Approximately 10 x 7 x 5 cm |
| Weight | Approximately 200 g (with batteries) |
| Power Supply | 3 AA batteries (not included) |
| Photo Resolution | 5 megapixels (interpolated) |
| Screen | 2.4 inch color LCD |
| Internal Memory | Built-in (a few MB) + SD card (not included, max 32 GB) |
| Main Functions | Photo taking, video recording, playback, built-in games, photo effects, Sofia frame |
| Connection | USB port (cable included) for transfer to computer |
| Battery Life | Approximately 2 hours of continuous use (depending on batteries) |
| Safety | Adult supervision recommended |
| Cleaning | Soft dry cloth, do not use liquid products |
| Spare Parts and Repairability | Not available, device not user-serviceable |
| Warranty | 2 years |
Frequently Asked Questions - Sofia The First LEXIBOOK
User questions about Sofia The First LEXIBOOK
0 question about this device. Answer the ones you know or ask your own.
Ask a new question about this device
Download the instructions for your Camera in PDF format for free! Find your manual Sofia The First - LEXIBOOK and take your electronic device back in hand. On this page are published all the documents necessary for the use of your device. Sofia The First by LEXIBOOK.
USER MANUAL Sofia The First LEXIBOOK
natural_image
Two horizontal color swatches: black, gray, white with no text or symbols
natural_image
Top-down line drawing of a camera lens assembly (no text or symbols)MODE D'EMPLOI - INSTRUCTION MANUAL
LEXIBOOK®
DJ024series

natural_image
Two horizontal color swatches: black, gray, white with no text or symbols
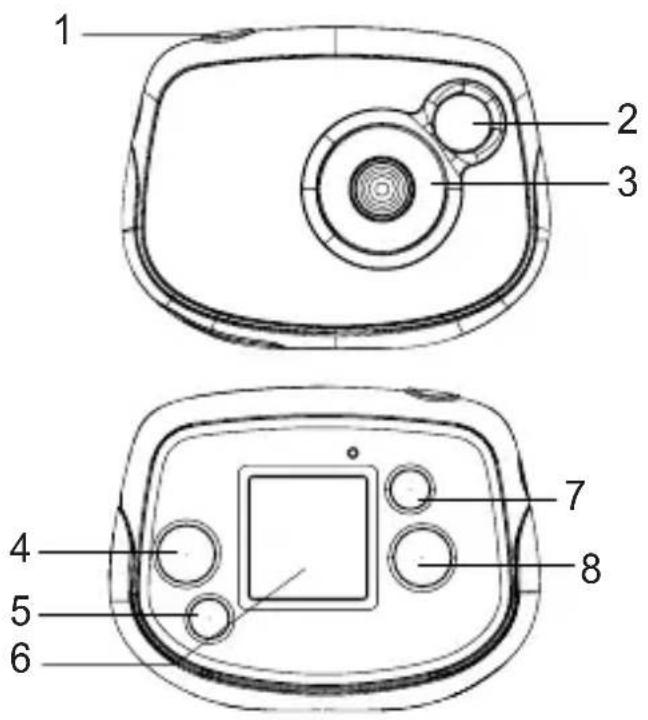


PRÉSENTATION DE VOTRE APPAREIL PHOTO
-
"Shutter/set" key
-
Flash
-
Lens
-
"Up" button
-
"Playback mode" key
-
LCD screen
-
"Power/Mode" key
-
"Down/Flash" key
-
Strap hole
-
Battery compartment
-
USB port
CONTENTS OF THE PACKAGING
1 x DJ024 digital camera / 1 x USB cable / 1 x hand strap / 1 x CD-ROM / 1 x instruction manual
WARNING: All packaging materials, such as tape, plastic sheets, wire ties and tags are not part of this product and should be discarded for your child's safety.
INSERTING NEW BATTERIES
- Make sure the camera is off.
- Using a screwdriver, open the battery door located under the unit.
- Insert 2 x AAA/LR03 1,5V type batteries = (not included).
- Close the battery compartment and tighten the screw.

Non-rechargeable batteries are not to be recharged. Rechargeable batteries are to be removed from the product before being charged. Rechargeable batteries are only to be charged under adult supervision. Different types of batteries or new and used batteries are not to be mixed. Only batteries of the same or equivalent type as recommended are to be used. Batteries are to be inserted with the correct polarity. Exhausted batteries are to be removed from the product. The supply terminals are not to be short circuited. Do not throw batteries into a fire. Remove the batteries if you are not going to use the product for a long period of time.
WARNING: Mal-function or loss of memory may be caused by strong frequency interference or electrostatic discharge. Should any abnormal function occur, remove the batteries and insert them again.
Important note: all the files stored into the unit's internal memory will be lost when replacing the batteries. Make sure you transfer the files to your computer before changing the batteries.
INSTALLING THE VIDEO SOFTWARE (Magix Video easy SE)
- Insert the CD Software (included) in your CD-ROM drive.
- In the main menu, click "Install MAGIX Video easy SE" and wait during the extraction.
- Follow the onscreen instructions and press "Install" to begin the installation.
- To launch "Magix Video easy SE" double click on the shortcut.
System requirements: Intel® Pentium 4 or AMD® Athlon® 1 GHz and higher, 512 MB RAM, 400 MB free hard disk memory and a DVD drive for program installation, graphics card with a screen resolution of at least 1024 x 768, sound card.
INSTALLING THE PHOTO SOFTWARE (Magix Photo Manager 10)
- Insert the CD Software (included) into your CD-ROM drive.
- In the main menu, click "Install MAGIX Photo Manager 10" and wait during the extraction.
- Select your language and click "OK".
- "The MAGIX Photo Manager 10 configuration" window displays. Follow the onscreen instructions and press "Install" to begin the installation.
- Once you have finished installing, the "MAGIX Photo Manager 10" shortcut will appear on the desk of your computer.
- To start using "MAGIX Photo Manager 10", double click on the shortcut. The pictures taken with the camera automatically appear on the home screen.
System requirements (minimum configuration): Microsoft® Windows® 2000 XP I Vista® I 7. PC with Intel® Pentium® or AMD® Athlon® 700 MHz or higher, 256 MB RAM, 120 MB hard disk space for program files, SVGA graphics card with min. 4 MB RAM, (min. resolution 1024 x 600, 16-bit high-color), Microsoft® compatible mouse.
Note: To enjoy unlimited use of "MAGIX Photo Manager 10" and "MAGIX Video easy SE", you need to register first.
TURNING THE CAMERA ON AND OFF
- Press the "Power/Mode" key to turn the camera on. The camera will make a "beep" sound to confirm that it is ready for use.
- Press and hold the "Power/Mode" key for a few seconds again to turn it off.
Note: The camera will auto power off after 30 seconds of inactivity.
TAKING PHOTOS (Camera Mode)
Single shooting
You are already in "Single shooting" mode when you switch on the camera (the icon is displayed on screen). Press the Shutter key to take a photo. The number of pictures that you can take in memory is shown on the LCD screen.
Continuous shooting
- When you are in "Single shooting" mode, press the "Power/Mode" key once.
- Then press the Shutter key repeatedly until the "Continuous shooting" mode icon is displayed on the screen.
- Press the Power/Mode" key once again to go back to camera mode then press the Shutter key to take 3 pictures continuously.
- To go back to "Single shooting" mode, repeat steps 1 and 2 above pressing repeatedly the Shutter key until the icon is displayed on screen. Then press the "Power/Mode" key to go back to camera mode.
Note: The flash is disabled in "Continuous shooting" mode.
FLASH FUNCTION
To use the flash, repeatedly press the "Down" key until your desired setting is shown by the icon on the screen:

Flash is on / Automatic flash is on / Flash is off
- Press the "Power/Mode" key once.
- Press the Shutter key repeatedly until the "Self-timer" icon is displayed on screen.
- Press the "Power/Mode" key one more time to go back to camera mode then press the Shutter key to start the 10-second countdown and take the photo.
- To turn off the self-timer feature and go back to "Single shooting" mode, repeat
steps 1 and 2 above pressing repeatedly the Shutter key until the icon is displayed on screen. Then press the "Power/Mode" key to go back to camera mode.
SELECTING THE PHOTO RESOLUTION
-
Press the "Power/Mode" key once then use the "Up" and "Down" keys to select the "Resolution" icon
-
Press the Shutter key repeatedly to select the desired resolution.
There are 2 resolution modes:

High resolution (640x480 pixels). / Low resolution (320x240 pixels).
- Press the "Power/Mode" key to go back to camera mode.
SELECTING THE IMAGE QUALITY
-
Press the "Power/Mode" key once then use the "Up" and "Down" keys to select the "Image quality" icon
-
Press the Shutter key repeatedly to select the desired image quality.
There are 2 levels of quality:

High quality. /Flow quality.
- Press the "Power/Mode" key to go back to camera mode.
SELECTING THE LIGHT SOURCE FREQUENCY
-
Press the "Power/Mode" key once then use the "Up" and "Down" keys to select the "Frequency" icon
-
Press the Shutter key repeatedly to select the desired frequency: "50HZ" or "60HZ".
-
Press the "Power/Mode" key to go back to camera mode.
CAPTURING VIDEO CLIPS (Video Mode)
-
Press the "Power/Mode" key.
-
Press the Shutter key repeatedly until the video icon is displayed on screen.
-
Press the "Power/Mode" key one more time to go to video.
-
Press the Shutter key to start shooting videos. The recording length is displayed on the LCD screen.
-
Press the Shutter key again to stop recording and automatically save the video in AVI format.
-
To go back to "Single shooting" mode, repeat steps 1 and 2 above pressing repeatedly the Shutter key until the icon is displayed on screen. Then press the "Power/Mode" key to go back to camera mode.
Note:
• The flash is disabled in video mode.
- You can use Media player and Quick time (not included on the software CD to play AVI files on your computer.
PLAYBACK MODE
Viewing your files
- Switch on the camera and press the "Playback mode" key.
- Use the "Up" and "Down" keys to browse through your photos and your videos (the

icon is displayed on the upper-left corner of the screen).
-
Press the Shutter key to start or stop a video.
-
Press the "Playback mode" key at any time to go back to camera mode.
Note: "No Photo" appears when there are no stored photos or videos.
Deleting files
- In playback mode, use the "Up" and "Down" keys to display the desired photo or video, then press the "Power/Mode" key.
- Press the "Up" and "Down" keys to select "YES" and press the Shutter key to confirm and delete the photo or the video.
DELETING ALL YOUR PHOTOS/VIDEOS
-
If you want to delete all your pictures/videos when you are not in playback mode, press the "Power/Mode" key then use the "Up" or "Down" keys to select the "Delete all" icon.
-
Press the Shutter key then use the "Up" and "Down" keys to select "YES". Press the Shutter key once more to confirm and delete all your photos/videos.
Using "MAGIX Photo Manager 10":
- Connect the supplied USB cable to the camera and the computer's USB port.
- Turn on the camera. "Mass storage" appears on the screen when connection to the computer has been successfully completed.
- Double click on the shortcut "MAGIX Photo Manager 10". The pictures taken with the camera automatically appear on the home screen.
- Press "Import" button on the main menu (up left).
- You can copy and paste the pictures into any directory you choose.
Publishing your photos on social networking sites:
- Using "Magix Photo Manager 10", select the photo that you wish to publish on Facebook or Flickr.
- The selected image appears in an orange frame.
- In the menu bar, click the "Online" tab and select "Upload media to other web services" and then either "Upload media to Flickr" or "Upload media to Facebook".
- The "Upload" window will be displayed on screen. Fill in the various fields (file name, description, key words, etc.).
- Click "Upload" to confirm.
- Depending on your upload destination, you will either open the Facebook or the Flickr home page.
- Next follow in the instructions displayed on the screen to finish uploading.
DOWNLOADING AND EXTRAPOLATING YOUR PHOTOS
To increase the resolution of you photos, please follow the instructions below:
- Open the file "Dual Mode Camera" on your desktop, and then double click "My Dsc".
- Download your photos by clicking on , and then select the photo(s) that you wish to extrapolate.
- Click on, then tick the boxes "Increase resolution" and "High Quality Mode". Finally, click OK to end the operation.
- Your photos will automatically be saved in 1.3 Megapixels.
WEBCAM MODE
Connected to your PC, your camera can be used as a webcam.
Webcam mode
- Connect the video camera to your computer using the USB cable provided.
- Open the "Dual Mode Camera" folder on the desktop, then double-click the "PCCam" icon to view the real-time images taken by the webcam.
Instant messaging (chat)
You can use your camera as a webcam with your instant messaging client (Yahoo Messenger, MSN Messenger, Skype...).
MAINTENANCE
Only use a soft, slightly damp cloth to clean the unit. Do not use detergent. Do not expose the unit to direct sunlight or any other heat source. Do not immerse the unit in water. Do not dismantle or drop the unit. Do not try to twist or bend the unit.
WARRANTY
NOTE: Please keep this instruction manual, it contains important information. This product is covered by our 2-years warranty. To make use of the warranty or the after-sales service, please contact your retailer and supply proof of purchase. Our warranty covers material or installation-related defects attributable to the manufacturer, with the exception of wear caused by failure to respect the instructions for use or any unauthorised work on the equipment (such as dismantling, exposure to heat or damp, etc).
Reference: DJ024series
Designed in Europe – Made in China
© 2014 Lexibook®
United Kingdom & Ireland
For any further information, please call 0808 100 3015
http://www.lexibook.com

This product is not a toy.

Environmental Protection
Unwanted electrical appliances can be recycled and should not be discarded along with regular household waste! Please actively support the conservation of resources and help protect the environment by returning this appliance to a collection centre (if available).

IM code: DJ024seriesIM1264

natural_image
Color palette bar with grayscale and solid color swatches (no text or symbols)
FRANCE
2, avenue de Scandinavie 91953 Courtaboeuf Cedex
Mon avis compte
LEXIBOOK S.A
C
Affranchir
YOUR OPINION MATTERS / VOTRE AVIS COMPTE


- PRÉSENTATION DE VOTRE APPAREIL PHOTO
- CONTENTS OF THE PACKAGING
- INSERTING NEW BATTERIES
- INSTALLING THE VIDEO SOFTWARE (Magix Video easy SE)
- INSTALLING THE PHOTO SOFTWARE (Magix Photo Manager 10)
- TURNING THE CAMERA ON AND OFF
- TAKING PHOTOS (Camera Mode)
- Single shooting
- Continuous shooting
- FLASH FUNCTION
- SELECTING THE PHOTO RESOLUTION
- SELECTING THE IMAGE QUALITY
- SELECTING THE LIGHT SOURCE FREQUENCY
- CAPTURING VIDEO CLIPS (Video Mode)
- Note:
- PLAYBACK MODE
- Viewing your files
- Deleting files
- DELETING ALL YOUR PHOTOS/VIDEOS
- Using "MAGIX Photo Manager 10":
- DOWNLOADING AND EXTRAPOLATING YOUR PHOTOS
- WEBCAM MODE
- Instant messaging (chat)
- MAINTENANCE
- WARRANTY
- Environmental Protection
- FRANCE
- YOUR OPINION MATTERS / VOTRE AVIS COMPTE
Brand : LEXIBOOK
Model : Sofia The First
Category : Camera