
Optima Legend - Blender TAURUS - Free user manual and instructions
Find the device manual for free Optima Legend TAURUS in PDF.

| Product type | Blender |
| Brand | TAURUS |
| Model | Optima Legend |
| Net weight | 3 kg |
| Gross weight | 3.3 kg |
| Power supply | Mains, 230 V, 50 Hz (earthed plug, 10 A min.) |
| Blade material | Stainless steel |
| Number of speeds | Variable with rotary selector (position 0 to max) |
| Special functions | Turbo, Ice crush (depending on model), self-cleaning function |
| Mill accessory | Available on Optima Legend Mill model (optional) |
| Bowl capacity | Not specified (do not exceed the maximum level) |
| Operating temperature | Do not blend hot liquids |
| Safety | Overheat shutdown, locked blades, sealing gasket |
| Maintenance and cleaning | Removable parts (jug, lid, measuring cup, mill lid) dishwasher safe; removable blades; removable sealing gasket |
| Spare parts | Blades, gasket, retaining ring, measuring cup, lid, bowl |
| Repairability | Repair by authorized technical service only |
| General information | For domestic use; do not immerse the motor; compliance with low voltage directive and electromagnetic compatibility |
Frequently Asked Questions - Optima Legend TAURUS
User questions about Optima Legend TAURUS
0 question about this device. Answer the ones you know or ask your own.
Ask a new question about this device
Download the instructions for your Blender in PDF format for free! Find your manual Optima Legend - TAURUS and take your electronic device back in hand. On this page are published all the documents necessary for the use of your device. Optima Legend by TAURUS.
USER MANUAL Optima Legend TAURUS
natural_image
Line drawing of a three-tiered blender with handles and control knobs (no text or symbols)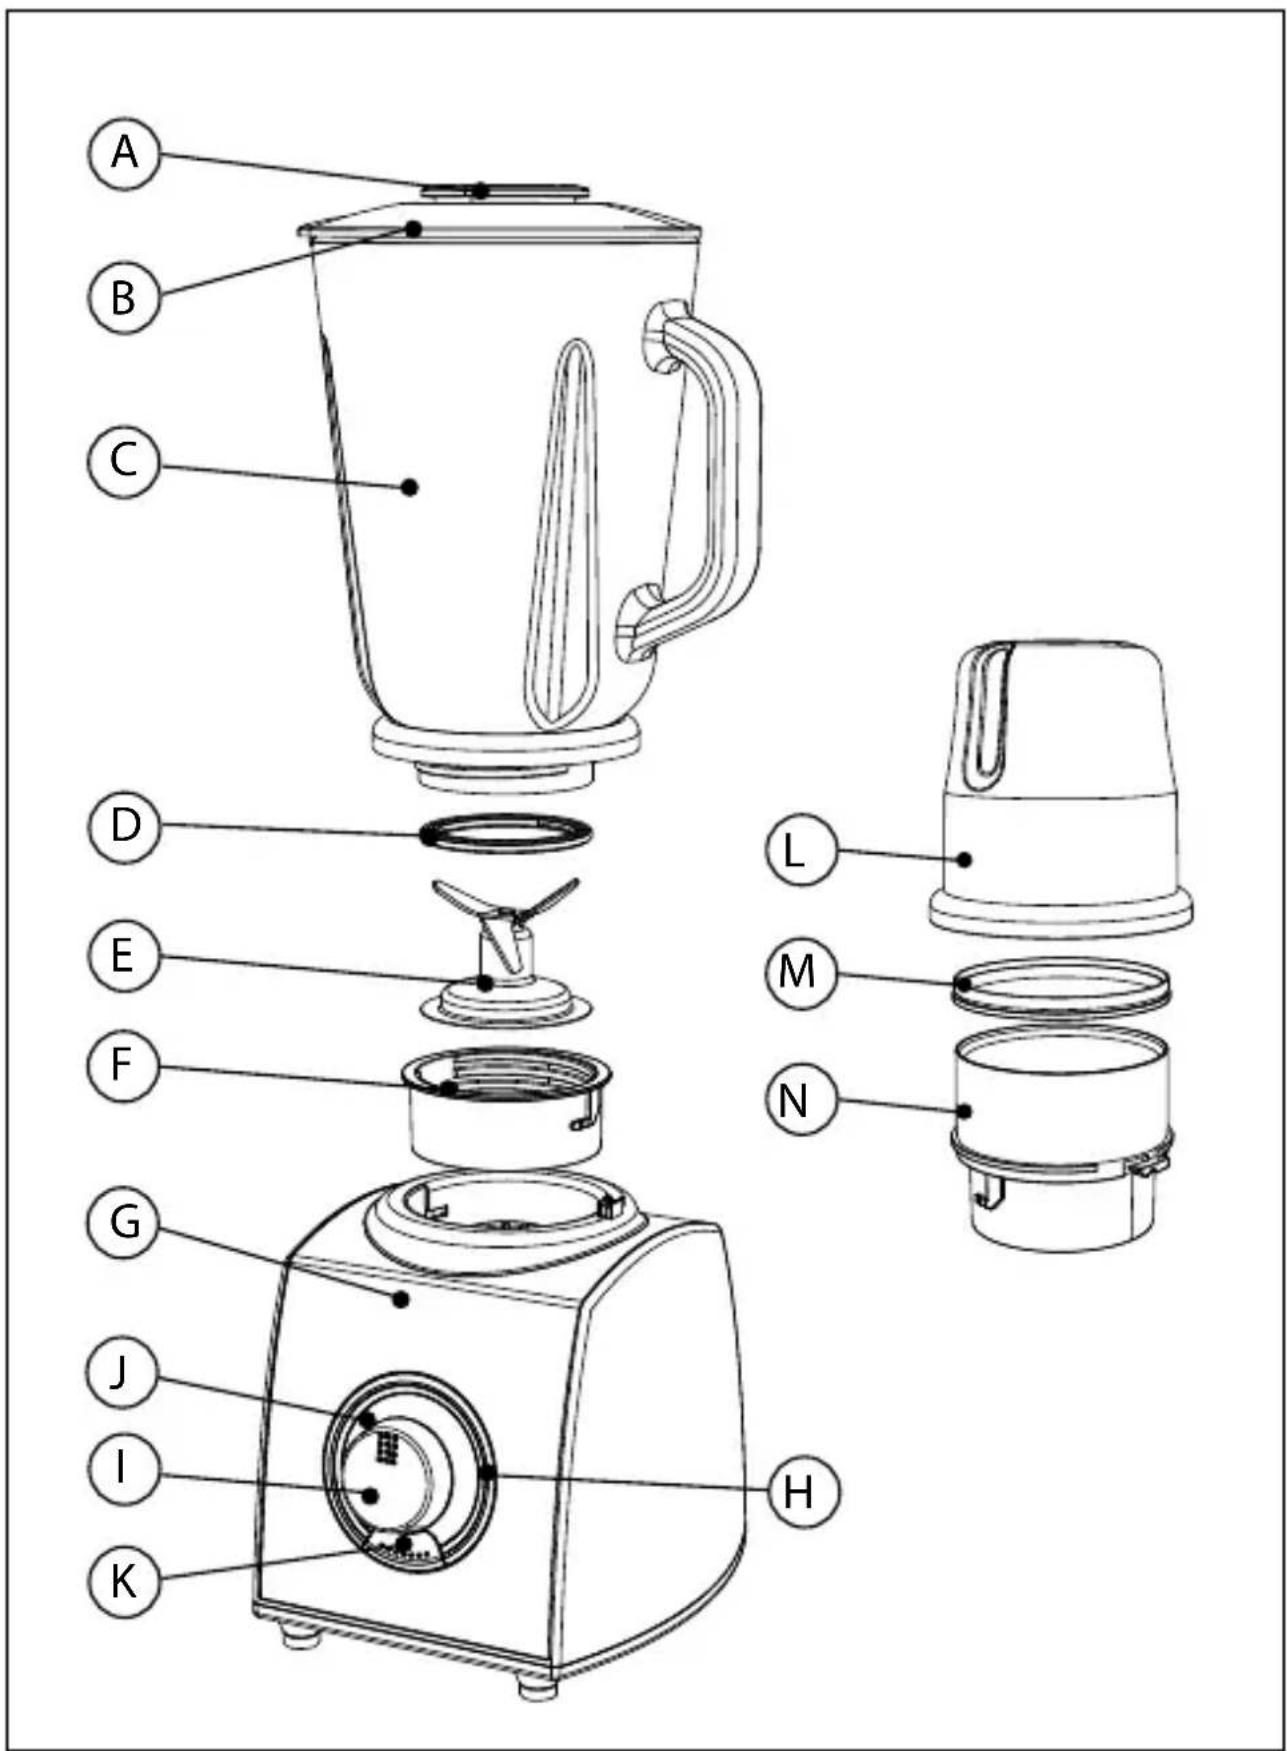
Fig. 1

natural_image
Line drawing of a kettle with a lid and a base, showing an upward arrow indicating motion (no text or symbols)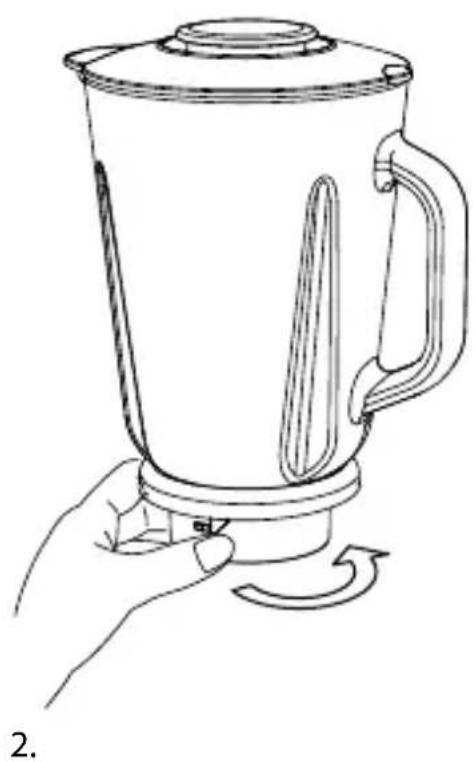
natural_image
Line drawing of a hand holding a container with a handle and arrow indicating rotation (no text or symbols)Fig. 2
natural_image
Line drawing of a blender being placed into a square kitchen appliance (no text or symbols)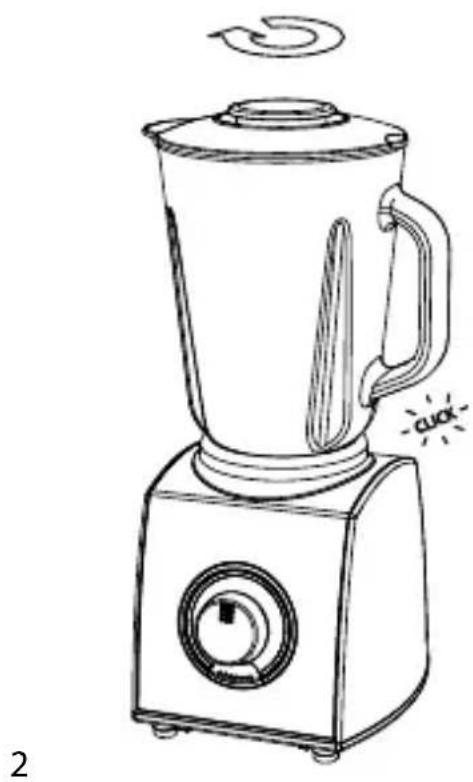
natural_image
Line drawing of a blender with a handle and control knob, showing no text or symbolsFig. 3
natural_image
Technical line drawing of a mechanical component with an upward arrow indicating assembly or motion (no text or symbols)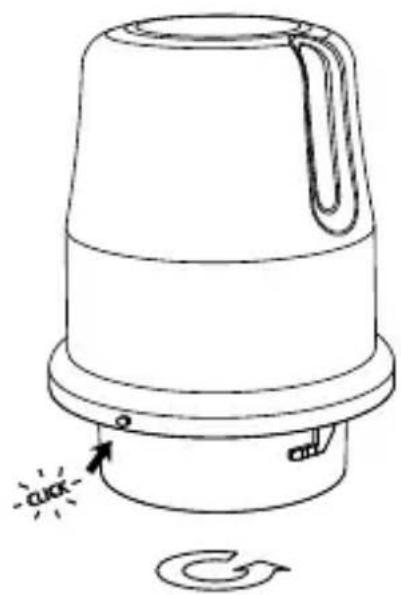
natural_image
Line drawing of a mechanical component with a curved handle and circular base, showing no text or symbols.2
Fig. 4
1
natural_image
Line drawing of a kitchen appliance with a lid and handle, showing a downward trend from top to bottom (no text or symbols)2
natural_image
Line drawing of a portable thermos with a circular dial and a scroll icon, no text or symbols presentFig. 5
natural_image
Line drawing of a hand holding a kettle with a handle and rotating button (no text or symbols)1.
natural_image
Line drawing of a blender with handle and base, showing internal components (no text or symbols)2.

Fig. 6
natural_image
Line drawing of a hand holding a magnifying glass over a container, with an arrow indicating downward motion (no text or symbols)Batidora
Optima
Optima Glass
Optima Legend
Optima Legend Mill

natural_image
Symbol of a trash bin crossed with a diagonal line, no text or numbers presentnatural_image
Simple line drawing of a trash bin with no text or symbolsMany thanks for choosing to purchase a TAURUS brand product. Thanks to its technology, design and operation and the fact that it exceeds the strictest quality standards, a fully satisfactory use and long product life can be assured.
Description
A Measuring cup
B Jar Lid
C Jar
D Sealing Ring
E Blade Set
F Blade Fixing Ring
G Motor body
H Illuminated Ring (*)
I Speed Selector
J Turbo Button
K Ice-Crush Button (*)
(**) Mill Accessory
L Lid
M Sealing Ring
N Grinder Bowl
(*) Only available in model Optima Legend & Optima Legend Mill
(**) Only available in model Optima Legend Mill

Safety advice and cautions
- Read these instructions carefully before switching on the appliance and keep them for future reference. Failure to follow and observe these instructions could lead to an accident.
Electrical safety:
- Do not use the appliance if the cable or plug is damaged.
- Ensure that the voltage indicated on the rating label matches the mains voltage before plugging in the appliance.
- Connect the appliance to a socket that can supply a minimum of 10 amperes.
- Do not leave the appliance out in the rain or exposed to moisture. If water gets into the appliance, this will increase the risk of electric shock.
- If any of the appliance casings breaks, immediately disconnect the appliance from the mains to prevent the possibility of an electric shock.
- Do not use the appliance if it has fallen on the floor, if there are visible signs of damage or if it has a leak.
- Do not touch the plug with wet hands.
Personal safety:
- Take the necessary measures to avoid starting the appliance involuntarily.
- Do not touch any of the appliance's moving parts while it is operating.
- Before using the appliance ensure that the blade is properly fixed in place.
Use and care:
- Fully unroll the appliance's power cable before each use.
- Do not use the appliance if the parts or accessories are not properly fitted.
- Do not use the appliance if it is empty.
- Do not use the appliance if the on/off switch does not work.
- Do not turn the appliance over while it is in use or connected to the mains.
- Do not overload the appliance's weight capacity.
- Disconnect the appliance from the mains when not in use and before undertaking any cleaning task
- This appliance is for household use only, not professional, industrial use.
- This appliance is intended for adult use. Ensure that this product is not used by the disabled, children or people unused to its handling.
-During emptying and cleaning the jar, take care on handling the sharp cutting blades. - This appliance is not a toy. Children should be supervised to ensure that they do not play with the appliance.
- This appliance should be stored out of reach of children and/or the disabled.
- Keep the appliance in good condition. Check that the moving parts are not misaligned or jammed and make sure there are no broken parts or anomalies that may prevent the appliance from operating correctly.
- Never leave the appliance connected and unattended if is not in use. This saves energy and prolongs the life of the appliance.
-Do not forget to place the sealing ring on the blade unit. Otherwise, leakage may occur.
-Do not run the jar blender for more than 2 minutes at a time. Do not run the mill for more than 20 seconds at a time (*). If the motor unit is overheated, switch off and cool down the appliance before you let it run again.
-This product is not designed to cater hot liquid. Please do not mix hot liquid in the jar blender.
-To crush ice cubes, put no more than 4 ice cubes at one time. If you wish to add more ice, pull out the measuring cup and insert the ice cubes consecutively.

Instructions for use
Use:
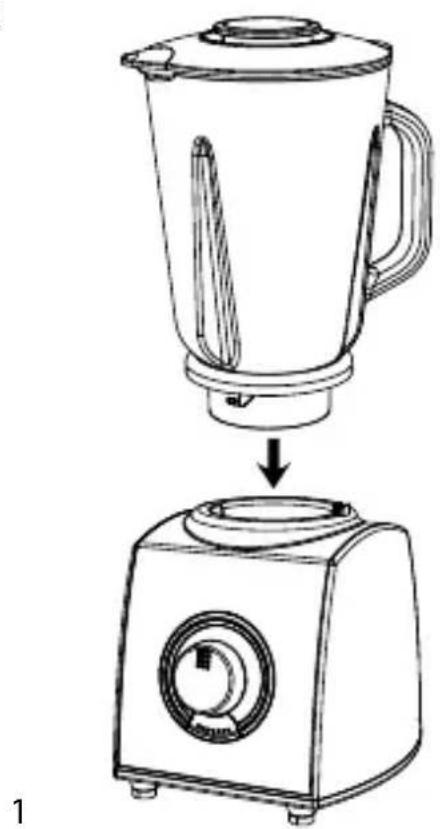
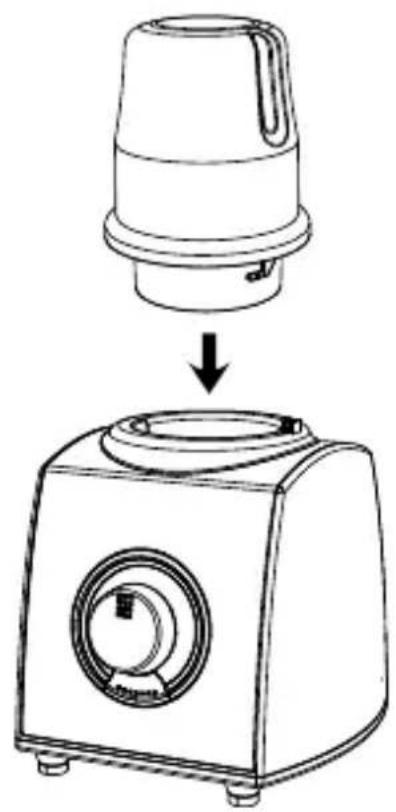
-Fit the jar onto the motor body.
-Put the ingredients, after having first chopped them into small piece, into the jar with liquid (do not exceed the maximum marker)
-Put the measuring cup in the lid.
-Put the lid on the jar, make sure it is properly fixed in place.
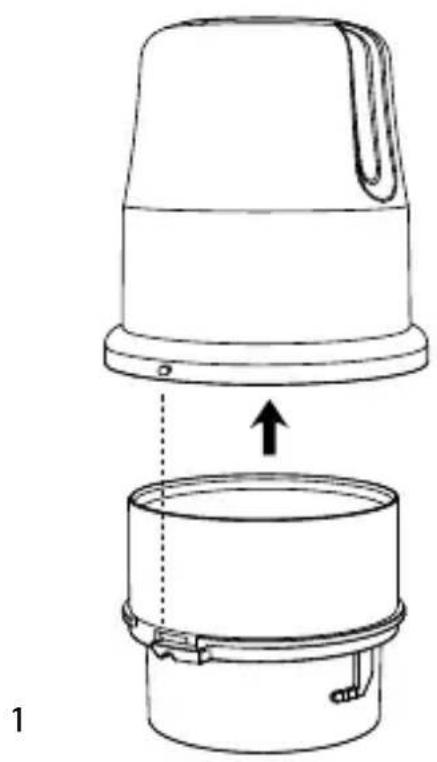
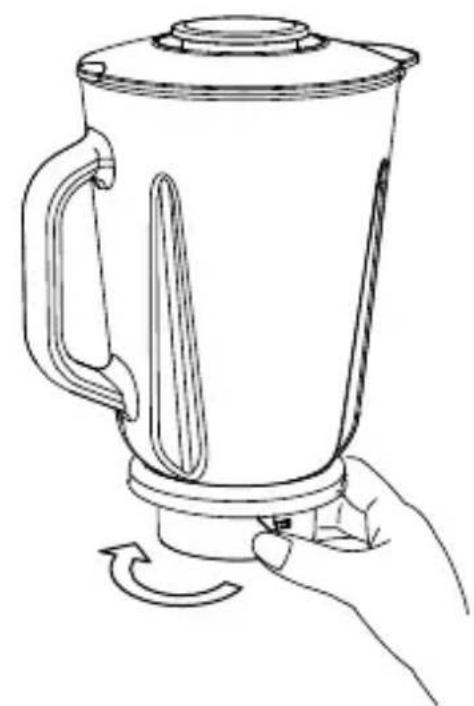
-Ensure the blade fixing ring is fixed properly to the jar (by turning counter clockwise) before putting on the motor body. (Fig.1)
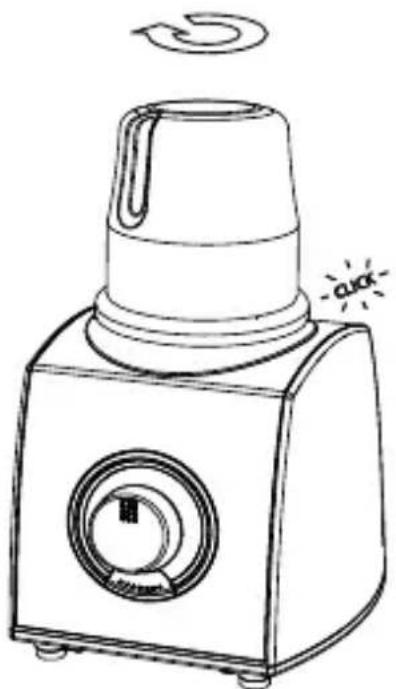
-Place the jar onto to the motor unit, turn clockwise until the lock clicks into place. (Fig.2)
-Connect the appliance to the mains.
- Choose desired speed and start blending.
-If you wish to add more ingredients pull out the measuring cup
-Add the ingredients and replace the measuring cup.
-To stop the appliance set the speed back to "0".
Once you have finished using the appliance:
-Select the "0" position at the speed selector.
-Turn the jar blender counter closewise and lift it from the motor body.
-Unplug the appliance from the mains.
-Clean the appliance.
"Turbo" function
-The appliance works in highest speed to achieve optimal performance.
-Turn this button to operate and release the button when you wish to stop operating.
"Ice-Crush" Function (\*)
-This function gives optimal result for ice-crushing, up to desired snowy level.
-It is recommended to operating cycles of 3 seconds and repeat the same cycle until you achieve the optimal result.
Mill Accessory (\*\*)
-Open the lid by turning it in clockwise direction.
-Put the ingredient into the grinder bowl.(only dry ingredients). Do not overfill the bowl.
-Close the lid by turning counter clockwise until the lock clicks into place. (Fig.3)
-Place the lid onto the grinder bowl. Turn the mill unit clockwise until the lock clicks into place. (Fig.4)
-Connect the appliance to the mains.
-Choose desired speed to start grinding.
-To stop the appliance set the speed back to "0".
Once you have finished using the appliance:
-Select the "0" position at the speed selector.
-Turn the mill unit counter closewise and lift it from the motor body.
-Turn the lid clockwise to open it.
-Unplug the appliance from the mains.
-Clean the appliance.

Cleaning
- Unplug the appliance from the mains and allow to cool before starting any cleaning.
- Clean the equipment with a damp cloth with a few drops of washing-up liquid and then dry.
- Do not use solvents, or products with an acid or base pH such as bleach, or abrasive products, for cleaning the appliance.
- Do not let water or any other liquid get into the air vents to avoid damage to the inner parts of the appliance.
- Never submerge the appliance in water or any other liquid or place it under running water.
- During the cleaning process, take special care with the blades, as they are very sharp.
- It is advisable to clean the appliance regularly and remove any food remains.
- If the appliance is not in good condition of cleanliness, its surface may degrade and inexorably affect the duration of the appliance's useful life and could become unsafe to use.
- The following pieces may be washed in a dishwasher:
- Jar
- Jar lid
- Measuring cup
- Mill lid
Self-cleaning function:
- Put water and a small amount of washing up liquid in the jar.
- Select the function "Turbo".
Removable Blades for Effective Cleaning (Jar Blender Only)
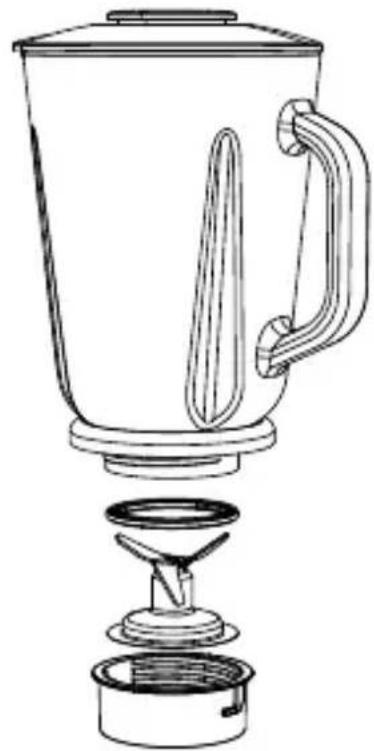
-Loosen the blade fixing ring by turning it in clockwise direction.
-Remove the blade fixing ring, blade set, sealing ring and clean them. (Fig.5)
-After cleaning, replace the blade set and turn blade fixing ring in opposite direction.
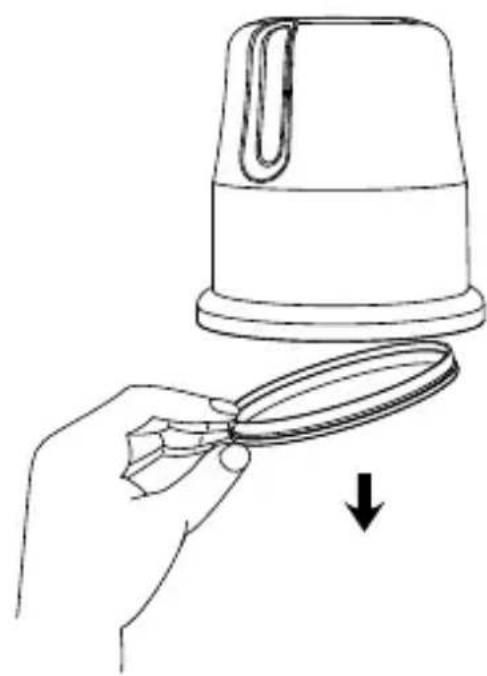
(\*\*)Removable Mill's Sealing Ring for Cleaning
-Remove the mill's sealing ring inside the lid. (Fig.6)
-Clean it and replace the ring in original position.

Anomalies and repair
- Take the appliance to an authorised technical support service if product is damaged or other problems arise. Do not attempt to disassemble or repair the appliance yourself as this may be dangerous.
- If the connection to the mains has been damaged, it must be replaced and you should proceed as you would in the case of damage.
For EU product versions and/or in case that it is requested in your country: Ecology and recyclability of the product
- The materials of which the packaging of this appliance consists are included in a collection, classification and recycling system. Should you wish to dispose of them, use the appropriate public containers for each type of material.
- The product does not contain concentrations of substances that could be considered harmful to the environment

natural_image
Symbol of a trash bin with crossed lines and a solid black rectangle below (no text or labels)- This symbol means that; should you wish to dispose of the product once its working life has ended, take it to an authorised waste agent for the selective collection of Waste from
Electric and Electronic Equipment (WEEE). This appliance complies with Directive 2006/95/EC on Low Voltage and Directive 2004/108/EC on Electromagnetic Compatibility.
RECIPES
COLD CREAM OF MELON SOUP
Ingredients:
•1 plain yoghurt
- 100 g of single cream
•salt
- white pepper
•half a squeezed lemon
- 700 g of crushed melon
Preparation:
Place all the ingredients in the blender container. Blend for 40 seconds at maximum speed. Serve very cold. Accompany with diced ham, croutons and melon balls.
COFFEE MILK SHAKE
Ingredients:
•1 sachet of instant coffee
- 500 ml of milk
•300 g of vanilla ice-cream
- 2 tablespoonsful of sugar (if required very sweet)
Preparation:
Place all the ingredients in the container and blend until a smooth mix is obtained. Serve immediately. For decoration top off with whipped cream with shavings of coloured fruit or cinnamon.
| Fast version | ||
| Place all the ingredients in the blender container | 40 sec. Max.speed | |
| Fast version | ||
| Place all the ingredients in the blender container | Max.speed |
MARGARITA
Ingredients:
- 40 ml lemon juice
- 20 ml Cointreau
•40 ml tequila - Table salt
Preparation:
Place all the ingredients in the container and blend at Turbo speed giving 2 or 3 turns. Strain the resulting mix. Serve in a tall glass with the edge drenched in lemon-juice and covered with table salt.
BLOODY MARY
Ingredients:
- 50 ml vodka
- 120 ml tomato juice
- 10 ml lemon juice
- 1 dash of Tabasco sauce
•1 dash of Worcestershire sauce - 1 pinch of salt
- 1 pinch of pepper
- 2 ice cubes
Preparation:
Place all the ingredients in the container and blend at speed for 10 seconds. Add the 2 ice-cubes and serve. Decorate with a slice of lemon.
| Fast version | ||
| Place all the ingredients in the blender container | 2-3 turns | Turbo |
| Fast version | ||
| Place all the ingredients in the blender container | 10 sec. Max.speed | |
Mixeur
Optima
Optima Glass
Optima Legend
Optima Legend Mill

Cher client,
natural_image
Symbol of a trash bin crossed with a diagonal line and a horizontal bar below (no text or labels)natural_image
Symbol of a trash bin crossed with a diagonal line and a horizontal bar below (no text or labels)natural_image
Symbol of a trash bin crossed with a diagonal line and a horizontal bar below (no text or labels)natural_image
Symbol of a trash bin with crossed lines indicating no waste or discharge, and a solid black rectangle below (no text or labels)natural_image
Symbol of a trash bin crossed with a diagonal line and a horizontal bar below (no text or labels)natural_image
Simple line drawing of a trash bin with crossed lines and a blank rectangular base (no text or symbols)natural_image
Symbol of a trash bin crossed with diagonal lines, no text or numbers presentnatural_image
Simple line drawing of a trash bin with crossed lines and a blank rectangular base (no text or symbols)natural_image
Symbol of a trash bin crossed with a diagonal line and a horizontal bar below (no text or labels)natural_image
Symbol of a trash bin with crossed lines and a solid black rectangle below (no text or labels)natural_image
Simple line drawing of a trash bin with crossed lines and a blank rectangular base (no text or symbols)ن Selbst الوعاء في وحدة المحرك وقم بادارتها باتجاه عقارب Csاعة حتى تثبيتها بشكل صحيح في (2 Fig.) (+ Waste in the way to be a bit of the way to be a bit of the way to be a bit of the way to be a bit of the way to be a bit of the way to be a bit of the way to be a bit of the way to be a bit of the way to be a bit of the way to be a bit of the way to be a bit of the way to be a bit of the way to be a bit of the way to be a bit of the way to be a bit of the Way
natural_image
Blank gray image with no visible content, text, or symbolstaurus
taurus
Avda. Barcelona, s/n
E 25790 Oliana
Spain
www.taurus.es
Product weight (approximate)


- Batidora
- Optima
- Optima Glass
- Optima Legend
- Optima Legend Mill
- Description
- Safety advice and cautions
- Electrical safety:
- Personal safety:
- Use and care:
- Instructions for use
- Use:
- Once you have finished using the appliance:
- "Turbo" function
- "Ice-Crush" Function (\*)
- Mill Accessory (\*\*)
- Cleaning
- Self-cleaning function:
- Removable Blades for Effective Cleaning (Jar Blender Only)
- (\*\*)Removable Mill's Sealing Ring for Cleaning
- Anomalies and repair
- RECIPES
- COLD CREAM OF MELON SOUP
- Ingredients:
- Preparation:
- COFFEE MILK SHAKE
- MARGARITA
- BLOODY MARY
- Mixeur
- Cher client,
- taurus
Brand : TAURUS
Model : Optima Legend
Category : Blender