DCT 6172 Combo - Phone SWITEL - Free user manual and instructions
Find the device manual for free DCT 6172 Combo SWITEL in PDF.
User questions about DCT 6172 Combo SWITEL
0 question about this device. Answer the ones you know or ask your own.
Ask a new question about this device
Download the instructions for your Phone in PDF format for free! Find your manual DCT 6172 Combo - SWITEL and take your electronic device back in hand. On this page are published all the documents necessary for the use of your device. DCT 6172 Combo by SWITEL.
USER MANUAL DCT 6172 Combo SWITEL
COMMUNICATION PRODUCTS
DCT6172C
natural_image
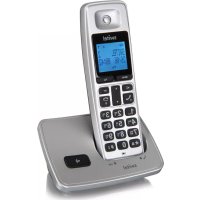
Two electronic landline phones: a mobile phone with a keypad and a standard telephone, both shown in grayscale (no visible text or symbols)Bedienungsanleitung
Mode d'emploi
Operating Instructions
DCT6172C
SWITEL COMMUNICATION PRODUCTS
Operating Instructions 96
Inhalt
^1 CLIP: Calling Line Identification Presentation
Calls can still be answered in the normal way when the keylock is on.

Changer le code PIN, 57
Private Branch Exchanges (centralini interni)
Private Branch Exchanges (centralini interni)
14. Private Branch Exchanges (centralini interni)
Private Branch Exchanges (centralini interni)
Private Branch Exchanges (centralini interni), 90
R
4 Operating the Telephone .....101
5 Telephoning .....104
6 Using the Menu, Telephone Base .....109
7 Phone Book, Telephone Base .....111
8 Calls List, Telephone Base .....112
9 Using the Menu, Cordless Handset .....113
10 Phone Book, Cordless Handset .....115
11 Calls List, Cordless Handset .....116
12 Using the Answering Machine .....117
13 Using Remote Access .....119
14 Private Branch Exchanges .....120
15 If Problems Occur .....122
16 Technical Properties .....123
17 Default Settings ..... 124
18 Maintenance/Guarantee .....125
19 Index 126
1 Safety Information
Please read this operating instruction manual thoroughly.
Intended use
The telephone is suitable for telephoning within a public telephone network system. Any other use is considered unintended use. Unauthorised modification or reconstruction is not permitted. Under no circumstances open the device or complete any repair work yourself.
Installation location
Prevent excessive exposure to smoke, dust, vibration, chemicals, moisture, heat and direct sunlight.
Power supply

Caution: Only use the power adapter plug supplied because other power supplies could damage the telephone. Ensure access to the power adapter plug is not obstructed by furniture or such.
Power failure
Only the telephone base can be used when there is a power failure. See page 108.
Rechargeable batteries
Do not throw the batteries into a fire or immerse them in water.
Hearing aid compatibility
The telephone is compatible with most popular hearing aids on the market. However, due to the wide range of hearing aids available, there is no guarantee that the telephone will function 'problem free' with every model

Caution: This telephone is capable of producing very high volume levels when the 'Boost' is switched on and the volume control is set to maximum. Extreme caution should be taken if the handset is to be shared between users with normal hearing and those with hearing impairment.
Medical equipment
DO NOT use your telephone near emergency/intensive care medical equipment; if you have a pacemaker fitted or during an electrical storm.
Disposal
You are obliged to dispose of consumable goods properly in accordance with the applicable legal regulations. The adjacent symbol on the telephone indicates that electrical and electronic apparatus and batteries no longer required must be disposed of separately from domestic waste.

Electrical and electronic devices must be disposed of at suitable collection points provided by the public waste authorities.

Batteries must be disposed of at the point of sale or at the appropriate collection points provided by the public waste authorities.
Packaging materials must be disposed of according to local regulations.
Starting Up
2 Starting Up
Safety note

Caution: It is essential to read the Safety Information in Chapter 1 before preparing the telephone for use.
Check the contents of the package
The package contains:
| Content | DCT6172C | DCT6173C | DCT6 | 74C DCT6175C | |
| Base unit | 1 | 1 | 1 | 1 | |
| Charger unit | 1 | 2 | 3 | 4 | |
| Cordless handset | 1 | 2 | 3 | 4 | |
| Battery cover | 1 | 2 | 3 | 4 | |
| Power adapter plug | 2 | 3 | 4 | 5 | |
| Telephone connection cable | 1 | 1 | 1 | 1 | |
| AAA 1.2V 800mAh NiMH rechargeable batteries | 2 | 4 | 6 | 8 | |
| Operating manual | 1 | 1 | 1 | 1 |
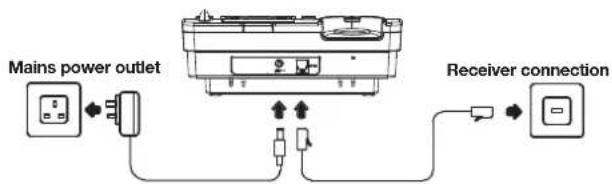
Connecting the telephone base
Connect the telephone base as illustrated in the diagram. For reasons of safety, only use the power adaptor plug and telephone connection cable supplied.
flowchart
graph TD
    A["Mains power outlet"] --> B["Switch"]
    B --> C["Receiver connection"]
    C --> D["Switch"]
    style A fill:#f9f,stroke:#333
    style D fill:#ccf,stroke:#333
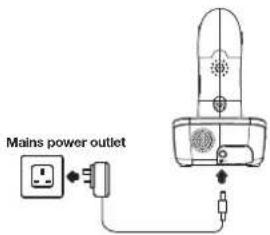
Connecting the charger base
Connect the charger base as illustrated in the diagram. For reasons of safety, only use the power adaptor plug supplied.
text_image
Mains power outletInserting the batteries
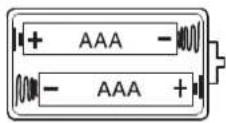
Insert the 2 x AAA 1.2V 800mAh NiMH rechargeable batteries supplied, into the handset battery compartment. Take care to note the '+' and '-' markings and position the batteries the correct way around. Close the battery compartment cover.
Charging the batteries
Place the handset in the base to charge for a minimum of 15 hours before first use.
Private branch exchanges
The information on Page 120 explains how to install your telephone on a private branch exchange.
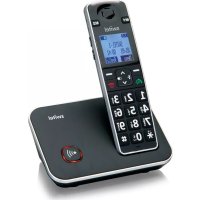
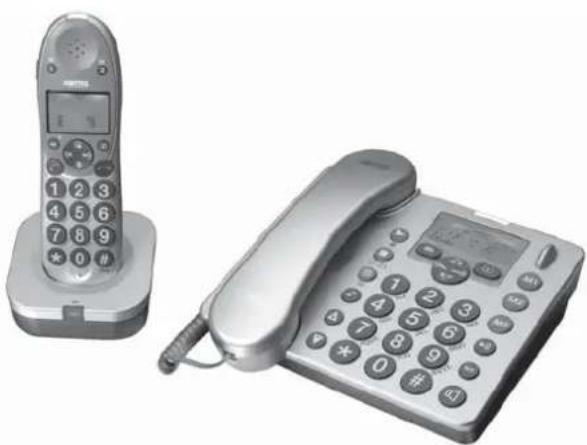
3 Telephone answering machine base
text_image
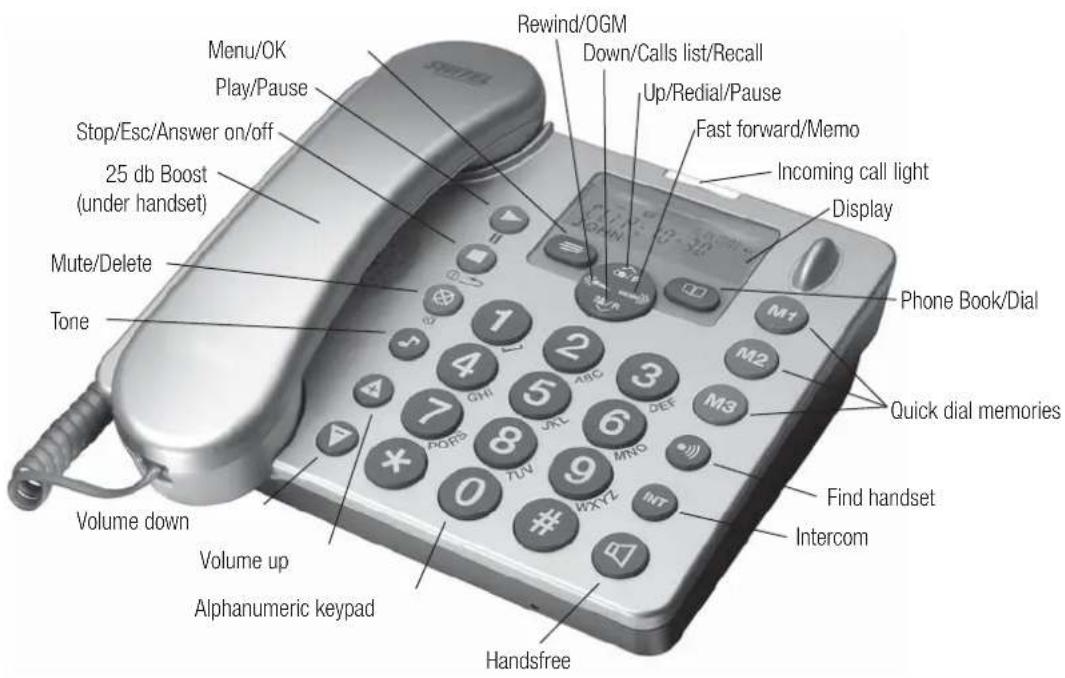
Menu/OK Play/Pause Stop/Esc/Answer on/off 25 db Boost (under handset) Mute/Delete Tone Volume down Volume up Alphanumeric keypad Rewind/OGM Down/Calls list/Recall Up/Redial/Pause Fast forward/Memo Incoming call light Display Phone Book/Dial Quick dial memories Find handset Intercom HandsfreeCordless handset and base
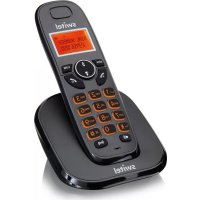
text_image
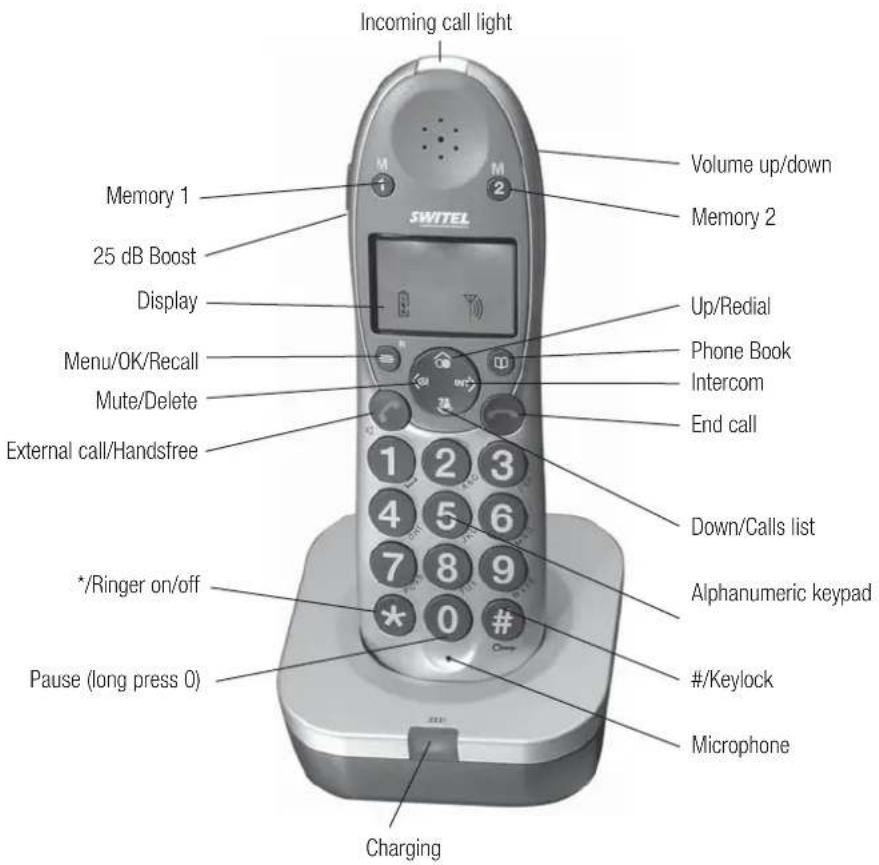
Incoming call light Volume up/down Memory 2 SWITEL Memory 1 25 dB Boost Display Up/Redial Menu/OK/Recall Phone Book Mute/Delete Intercom End call External call/Handsfree 1 2 3 4 5 6 7 8 9 * /Ringer on/off Pause (long press 0) Charging Alphanumeric keypad #/Keylock MicrophoneOperating the Telephone
4 Operating the Telephone
The instructions throughout this guide are for both the telephone base and the cordless handset, unless stated otherwise.
Display and explanation of operation sequences.
| Enter digits or letters | |
| Press the button shown, briefl y | |
| 2 x ✕ | Press the button shown, twice briefl y |
| 2 sec ✕ | Press the button shown for 2 seconds |
| Press and hold ✕ | Press and hold the button shown |
| Release ✕ | Release button shown |
| Handset rings | |
| Base station rings | |
| Lift the handset | |
| Replace the handset | |
| Cordless handset external call button | |
| End a call and/or return to standby on the cordless handset | |
| VOLUME 1 or ✕ | Text or icon in the display |
Icons in the telephone base station display
| Icon Description | |
| Phone Book mode | |
| Ringer off | |
| Handsfree mode | |
| Call in progress | |
| Boost receiver volume is on | |
| Handset microphone is muted | |
| You have new calls | |
| Internal call in progress | |
Operating the Telephone
Icons in the handset display
| Icon Description | |
| Phone Book mode | |
| There are more digits to view on the left | |
| There are more digits to view on the right | |
| Battery status | |
| Ringer off | |
| Keylock is on | |
| Handsfree mode | |
| Call in progress | |
| Boost receiver volume is on | |
| Handset microphone is muted | |
| You have new calls | |
| When steady indicates that the handset is in range of the base. When fl ashing indicates that the handset is out of range of the base. | |
| Internal call in progress | |
| Message waitingNote: This feature is not compatible with the UK 1571 service | |
Navigating in the menu
All telephone base and cordless handset functions can be accessed via the menu. Please refer to 'Using the menu' on pages 109 and 113 for information on how to access each function.
All descriptions in this operating manual assume that the handset is in Standby mode.
| or ≡ | Open the main menu |
| ▲ or ▼ | Select the submenu required |
| or ≡ | Open the submenu |
| ▲ or ▼ | Select the function required |
| or ≡ | Open the function |
| ▲ or ▼ | Select the setting required |
| Enter digits or letters using the relevant keys | |
| or ≡ | Confir rm the entries |
| or ≡ | Cancel and return to standby mode |
Every process is automatically cancelled if there is no input within 20 seconds. The handset will return to standby mode.
Operating the Telephone
Creating phone book entries in the telephone base - example
This example explains how to navigate and create entries in the phone book. Proceed as in this example for all the settings.
| 2 sec | Opens add phone book entry mode |
| Enter the name (max. 16 letters) and confi rm it | |
| Enter the phone number (max. 24 digits) and confi rm it |
Creating phone book entries in the cordless handset - example
| 2 sec | Opens add phone book entry mode |
| Enter the name (max. 12 letters) and confi rm it | |
| Enter the phone number (max. 24 digits) and confi rm it |
Storing a quick dial entry in the telephone base
| 2 sec M1, M2 or M3 Opens add quick dial entry mode | |
| 门禁 | Enter the name (max. 16 letters) and confi rm it |
| 门禁 | Enter the phone number (max. 24 digits) and confi rm it |
Storing a quick dial entry in the cordless handset
| 2 sec M1 or M2 Opens add quick dial entry mode | |
| 隣 ≡ | Enter the name (max. 12 letters) and confi rm it |
| 隣 ≡ | Enter the phone number (max. 24 digits) and confi rm it |
| If you see a < or > icon, there are more digits to be viewed than can be shown on the display. Press the = key to view the digits. |
Telephoning
5 Telephoning
Making a call using the telephone base
| 隣 | Enter the phone number (max. 24 digits) |
| Following incorrect input, press to delete the last digit | |
| Dial the phone number |
It is also possible to press the external call button first to obtain dialling tone. The digits entered will then be dialled immediately. It is not possible to correct wrong digits individually using this dialling procedure.
Making a call using the cordless handset
| ### | Enter the phone number (max. 24 digits) |
| Following incorrect input, press to delete the last digit | |
| Dial the phone number |
It is also possible to press the external call button first to obtain dialling tone. The digits entered will then be dialled immediately. It is not possible to correct wrong digits individually using this dialling procedure.
End a call
| GB | End the call |
Take a call
| Take the call | |
| Redial using the telephone baseYour telephone stores the last 5 telephone numbers dialled(max. 24 digits each). | |
| Open the redial list | |
| ▲ or ▼ or ▲ | Select an entry and dial the number |
| Redial using the cordless handsetYour telephone stores the last 3 telephone numbers dialled(max. 24 digits each). | |
| Open the redial list | |
| ▲, ▶ | Select an entry and dial the number |
| Calling back missed callsYour telephone stores the last 30 incoming calls in the calls list. | |
| Open the calls list | |
| ▲ or ▼, ▲ or ▽ | Select an entry and dial the number |
Telephoning
Dialling phone numbers from the phone book
There must be phone numbers stored in the phone book.
See pages 111 & 115. Your telephone can store up to 50 name and number entries in the phone book.
| or | Open the phone book |
| or▼, | Select an entry and dial the number |
Quick dial
Phone numbers must have been stored as quick dial pers. See page 103.
M1, M2 or M3 Press the required quick dial button


Dial the number
Chain dialling, cordless handset
This feature is used for more complex telephone services, eg for telephone banking or calling card procedures. Several numbers stored in the phone book can be dialled successively when a connection has already been made. It is also possible to combine numbers from the phone book with numbers entered manually. Numbers stored in the phone book can be chained and transmitted as required.
| Open the phone book when a connection has been made | |
| ▲ or ▼ or | Select the phone book entry and transmit the number |
Adjusting the receiver volume, telephone base
The receiver volume of your DCT6172C telephone is louder than with a standard telephone.

When in a call, adjust the setting with the volume buttons
Adjusting the receiver volume, cordless handset
The receiver volume of your DCT6172C telephone is louder than with a standard telephone. Push up or down and release for each volume step.

When in a call, adjust the setting with the side switch
Boosting the receiver volume
When in a call, you can increase the loudness of each volume setting if you press the 25dB button.

Press the button, an icon fl ashes in the display
Handsfree, using the telephone base
Use Handsfree to listen to your caller via the loudspeaker

Switch on handsfree mode

Deactivate handsfree mode
Handsfree, cordless handset
Use Handsfree to listen to your caller via the loudspeaker

Switch on handsfree mode

Deactivate handsfree mode
Telephoning
Adjusting the Handsfree volume, telephone base
There are 5 handsfree volume levels available. The '25dB' feature is available in handsfree mode.

Adjust the volume with the volume buttons
Adjusting the Handsfree volume, cordless handset
There are 5 handsfree volume levels available. The '25dB' feature is available in handsfree mode.


Adjust the volume with the side switch or up and down arrows
Talk time display
The duration of each call is displayed in minutes and seconds during the call.
Tone, telephone base only
Everyone's hearing is different and some people can hear higher frequencies more clearly that others. Press the ⏻ button to adjust the tone and high frequencies within a call, until it's right for you.

Adjust the tone with the left and right buttons
Muting the microphone, telephone base
The microphone can be activated and deactivated during a telephone conversation when you are in handset or handsfree mode.

Switch the microphone off (Mute).

Switch the microphone on
Muting the microphone, cordless handset
The microphone can be activated and deactivated during a telephone conversation when you are in handset or handsfree mode.

Switch the microphone off (Mute).

Switch the microphone on
Ringer on/off, cordless handset only
You can turn the bell of the ringer on and off.

Switches the bell ringer off

Switches the bell ringer on
Keylock, cordless handset only
Calls can still be answered in the normal way when the keylock is on.

Locks the keypad

Unlocks the keypad
Telephoning
Making internal calls
When making internal calls the telephone base is 'HS0' and the cordle handset is HS1. Internal calls are free of charge.
| HS0: [IMAGE], [IMAGE], eg 1 | Dial the internal call number of the required handset |
| HS1: [IMAGE] | Accept the internal call on the other handset |
| HS0/HS1: [IMAGE] | End the internal call |
Transferring external calls internally
| During an external call, dial the number of the required handset | |
| HS1: | Accept the internal call on the other handset |
| HS0: | External call is transferred to the other handset |
If the called handset does not answer, you can take the call back by pressing the INTERCOM button.
Conference calls
s You can hold a conference call between 1 external and 2 internal callers.
| During an external call, dial the number of the required handset | |
| HS1: | |
| HS0: 2 sec | Accept the internal call on the other handset |
| HS0/HS1: | Activates conference call |
| HS0/HS1: | Put external call on hold |
| End conference call |
Handset registration
You only need to register a handset that has become deregistered from the base or if you have purchased a new handset.
New handsets must be fully charged before you attempt to register them.
At the base
| 10 sec •Register | Activate registration mode |
| At the handset | |
| = , ▲ or , ▼ = | Open the menu, select ‘REGISTER’ |
| πππ | Enter the base number (1,2,3 or 4) |
| πππ , 0 0 0 0 = | Enter the PIN code and confi rm |
Telephoning
Handset deregistration, telephone base
| -, ▲r , ▼ | Open the menu, select 'Remove HS' |
| 隠 , | Enter the handset number and confirm |
Handset deregistration, cordless handset
| -, ▲r ,▼ ≡ | Open the menu, select 'REMOVE HS' |
| 隣 ,○○○○ ≡ | Enter the PIN code and confi rm |
| REMOVE HS?, 隣 , ≡ | Enter the handset number and confi rm |
Power fail, telephone base
If you have a mains power failure, you can still use your telephone base to make and receive telephone calls but the display will only function when you lift the handset.
You can also use the following functions when the handset is lifted:
- View or dial from the phone book or M1, M2 or M3 keys
- View or dial from the calls list
- Dial out Recall (Flash) and pause
- Adjust the receiver volume
- Mute the microphone
The phone will ring for an incoming call in power fail mode but the incoming call light will not function and the callers' details will not be stored in the calls list.
Using the Menu, Telephone Base
6. Using the menu
Ringer tone
There are 9 different ringing melodies available for External and Internal calls.
| -, ▲ or , ▼ | Open the Menu, select 'Ringer Tone' |
| ▲ or ▼EXT Melody or INT Melody, | Select and confi rm the melody to change |
| Melody 8 The current setting is shown | |
| ▲ or ▼ | Select and confi rm a ringing melody |
Ringer Volume
| There are 5 different volume settings available and 'OFF'. | |
| -, ▲ or , ▼ | Open the Menu, select 'Ringer Tone' |
| ▲ or ▼ | Select 'Volume' |
| Ring Vol 5 The current setting is shown | |
| ▲ or ▼ | Select and confirm a ringing volumeor 'Ring Off' |
Key Tone
| Choose to turn the key tone 'ON' or 'OFF' | |
| -, ▲, ▼ | Open the Menu, select 'Key Tone' |
| ON The current setting is shown | |
| ▲ or ▼ | Select and confirm 'ON' or 'OFF' |
Contrast
| There are 3 different contrast levels available so that you can set the display to how you find it most easy to read. | |
| -, ▲ or , ▼ | Open the Menu, select 'Display' |
| ▲ or , ▼ | Select 'Contrast' |
| 2 The current setting is shown | |
| ▲ or , ▼ | Select and confirm the contrast setting |
Language
| There are 5 languages available, English, German, French, Spanish and Italian. | |
| ○, ▲ or , ▼ ○ | Open the Menu, select 'Display' |
| ▲ or ▼ ○ | Select 'Language' |
| German The current setting is shown | |
| ▲ or ▼ ○ | Select and confirm a language |
Boost Mem
| With this feature set to 'ON', if you use thebutton, your handset will remember and use your last Boost setting for each call. | |
| ○, ▲ or , ▼ ○ | Open the Menu, select 'Settings' |
| ▲ or ▼ ○ | Select 'Boost Mem' |
| OFF The current setting is shown | |
| ▲ or ▼ ○ | Select and confirm 'ON' or 'OFF' |
Using the Menu, Telephone Base
Date/Time
| , ▲ or , ▼ | Open the Menu, select 'Time' |
| ▲ or ▼ | Select 'Date & Time' |
| □□□□, □ | Enter the day, month and year and confi rm |
| □□□□, □ | Enter the hours (24 hour clock) and confi rm |
When setting the time and date (on the telephone base), it is also possible to use the left and right keys to move backward and forward to make corrections. This also applies when entering phonebook entries.
Time Format
| You can set the time to be displayed in 24 or 12 hour clock | |
| -, ▲ or , ▼ | Open the Menu, select 'Time' |
| ▲ or ▼ | Select 'Format' |
| 24 hour The current setting is shown | |
| ▲ or ▼ | Select and confi rm 24 or 12 hour |
Phone Book, Telephone Base
7. Phone Book
Fifty names and phone numbers can be stored in the phone book with a maximum of 16 letters and 24 digits for each entry.
* Always enter the area dialling code with each phone book entry.
* The phone book entries are managed alphabetically.
To go quickly to a phone book entry, enter the first letter of the corresponding entry.
Entering a name
The digit keys are also labelled with letters for the entry of the respective letters. Pressing the respective key the necessary number of times enables capital letters and digits to be entered.
| 0 | Space |
| 8 | Delete |
| 1 | Special characters |
| To enter the same letter twice, press the button to enter the letter. Wait until the cursor moves forward one place. Enter the letter again. |
Creating phone book entries
| 2 sec | Opens add phone book entry mode |
| Enter the name (max. 16 letters) and confi rm it | |
| Enter the phone number (max. 24 digits) and confi rm it |
Editing phone book entries
| Open the phone book | |
| ▲ or ▼ | Select a phone book entry |
| Open phone book options, select 'Edit' | |
| Edit the name (max. 16 letters) and confi rm it | |
| Edit the phone number (max. 24 digits) and confi rm it |
Deleting single phone book entries
| Open the phone book | |
| ▲ or ▼ | Select a phone book entry |
| Open phone book options, select 'Delete' | |
| Delete?, or | Confir rm the deletion or Cancel |
Deleting all phone book entries
| Open the phone book | |
| ▲ or ▼ | Select a phone book entry |
| Open phone book options, select 'Delete All' | |
| Delete All? ☑ or ☐ | Confir rm the deletion or Cancel |
Calls List, Telephone Base
8. Calls List
The Calls List on your telephone works together with the Caller number display (CLIP) service supplied by your telephony network provider. Please contact your telephony network provider to arrange for subscription to this service.
The number of the caller (or name if stored in the Phone Book) appears in the display when the phone rings. If the caller has withheld their phone number, a corresponding message appears in the display. The phone number is not displayed and will not be stored in the calls list.
A total of 30 incoming calls, with a maximum of 16 letters for the name and 23 digits for the number can be stored in the calls list. The number of new calls received will be shown in the display along with the flashing 'CLIP' icon.
Displaying calls list entries
| ?√R | Opens the calls list at most recent entry |
| ▲ or ▼ | Select an entry |
Other messages that you may see in the display, if your telephone network provider supports this service, are:
| WITHHELD PRIVATE | The caller has withheld their number or the information is not available |
| INTERNATIONA The caller is dialling you whilst abroad or may be using an internet telephony service. | |
| PAYPHONE The caller has dialled you from a public payphone | |
| OPERATOR Call from a network operator | |
Storing calls list entries in the phone book
| A phone number stored in the calls list can be stored directly to the phone book |
| 24/R | Opens the calls list at most recent entry |
| ▲ or ▼ | Select an entry |
| -, ▲r , ▼ | Open the Options Menu, select 'Save to PB' |
| 阴语 , | Enter the name and confi rm it |
| 阴语 , | Edit the number and confi rm it |
Deleting calls list entries
Deleting a single calls list entry
| ?√/R | Opens the calls list at most recent entry |
| ▲ or ▼ | Select an entry |
| -, ▲ or , ▼ □ | Open the Options Menu, select 'Delete' |
| Delete? □ or □ | Confir rm the deletion or Cancel |
Deleting all calls list entries
| ?R | Opens the calls list at most recent entry |
| ▲ or ▼ | Select an entry |
| ○, ▲r, ▼ ○ | Open the Options Menu, select 'Delete All' |
| Delete All?, ○ or ■ | Confir rm the deletion or Cancel |
Using the Menu, Cordless Handset
9. Using the menu
Handset name
| You can personalise your handset by naming it (max. 9 letters) | |
| Open the Menu, select 'HS NAME' | |
| Delete the current name | |
| Enter new name and confi rm it | |
| Date/Time | |
| Open the Menu, select 'DATE/TIME' | |
| Enter the year and confi rm | |
| Enter the month and confi rm | |
| Enter the day and confi rm | |
| Enter the hours (24 hour clock) and confi rm | |
| Enter the minutes and confi rm | |
| Handset Ringing melodyThere are 9 different ringing melodies available. | |
| Open the Menu, select 'HS MELODY' | |
| MELODY 7 The current setting is shown | |
| Select and confi rm a ringing melody | |
Handset Ringing volume
| There are 5 ringing volume settings available and 'OFF' | |
| -, ▲r, ▼ ≡ | Open the Menu, select 'HS RING VOL' |
| VOLUME 5 The current setting is shown | |
| ▲ or ▼ ≡ | Select and confi rm a ringing tone volume or 'OFF' |
| Base Ringing melodyThere are 9 different ringing melodies available. | |
| -, ▲r, ▼ ≡ | Open the Menu, select 'BS MELODY' |
| MELODY 7 The current setting is shown | |
| ▲ or ▼ ≡ | Select and confi rm a ringing melody |
| Base Ringing volumeThere are 5 ringing volume settings available and 'OFF' | |
| -, ▲r, ▼ ≡ | Open the Menu, select 'BS RING VOL' |
| VOLUME 5 The current setting is shown | |
| ▲ and ▼ ≡ | Select and confi rm a ringing tone volume |
Using the Menu, Cordless Handset
Boost Mem
With this feature set to 'ON', if you use the button, your handset will remember and use your last Boost setting for each call.

Open the Menu, select 'BOOST MEM
OFF The current setting is shown

Select and confirm 'ON' or 'OFF'
Auto talk
With this feature set to 'ON', your handset will automatically answer the call when you pick up the handset from the base. This is the default setting.

Open the Menu, select 'AUTO TALK'
ON The current setting is shown

Select and confirm 'ON' or 'OFF'
Language
There are 5 languages available, English, German, French, Spanish and

Open the Menu, select 'LANGUAGE'
GERMAN The current setting is shown

Select and confirm a language
Phone Book, Cordless Handset
10. Phone Book
Fifty names and phone numbers can be stored in the phone book with maximum of 12 letters and 24 digits for each entry.
* Always enter the area dialling code with each phone book entry.
* The phone book entries are managed alphabetically.
To go quickly to a phone book entry, enter the first letter of the corresponding entry.
Entering a name
The digit keys are also labelled with letters for the entry of the respective letters. Pressing the respective key the necessary number of times enables capital letters and digits to be entered.

Space

Delete

To enter the same letter twice, press the button to enter the letter. Wait until the cursor moves forward one place. Enter the letter again.
Creating phone book entries
| 2 sec | Opens add phone book entry mode |
| Enter the name (max. 12 letters) and confirm it | |
| Enter the phone number (max. 24 digits) and confirm it |
Editing phone book entries
| Open the phone book | |
| ▲ or ▼ | Select a phone book entry |
| 2 sec | Activate the editing process |
| 隠 ≡ | Edit the name (max. 12 letters) and confi rm it |
| 隠 ≡ | Edit the phone number (max. 24 digits) and confi rm it |
Deleting phone book entries
| Open the phone book | |
| ▲ or ▼ | Select a phone book entry |
| ◀, DELETE? | Activate the deletion process |
| : ○ or ○ | Confir rm the deletion or Cancel |
Calls List, Cordless Handset
11. Calls List
The Calls List on your telephone works together with the Caller number display (CLIP ^® ) service supplied by your telephony network provider. Please contact your telephony network provider to arrange for subscription to this service.
The number of the caller (or name if stored in the Phone Book) appears in the display when the phone rings. If the caller has withheld their phone number, a corresponding message appears in the display. The phone number is not displayed and will not be stored in the calls list.
A total of 30 incoming calls, with a maximum of 12 letters for the name and 23 digits for the number can be stored in the calls list. The flashing indicates new calls in the calls list.
Displaying calls list entries
| Opens the calls list at most recent entry | |
| ▲ or ▼ | Select an entry |
| 1x - 2x ≡ | To display further information. |
Other messages that you may see in the display, if your telephone network provider supports this service, are:
| WITHHELD PRIVATE | The caller has withheld their number or the information is not available |
| INTERNATIONA The caller is dialling you | whilst abroad or may be using an internet telephony service. |
| PAYPHONE The caller has dialled you from a public payphone | |
| OPERATOR Call from a network operator | |
^1 CLIP: Calling Line Identification Presentation
Storing calls list entries in the phone book
A phone number stored in the calls list can be stored directly to the phone book
| Opens the calls list at most recent entry | |
| ▲ or ▼ | Select an entry |
| Open the phone book | |
| 隣, ≡ | Enter the name and confi rm it |
| 隣, ≡ | Edit the number and confi rm it |
Deleting calls list entries
Deleting a single calls list entry
| Opens the calls list at most recent entry | |
| ▲ or ▼ | Select an entry |
| ◀, DELETE? | Activate the deletion process |
| ⊖ or ○ | Confi rm or Cancel |
Deleting all calls list entries
| Opens the calls list at most recent entry | |
| 2 sec ,DELETE ALL? | Activate the deletion process |
| or | Confir rm or Cancel |
Using the Answering Machine
12. Answering Machine
Your answering machine can be ready for use within a few seconds of plugging in the telephone line cord and switching on the mains power. Just follow the steps in this section to set up and use your answering machine.
Switch on/off
| Switches the answering machine on or off. The current answer mode is announced. |
Set the voice prompt language
| x 2 | Open the answering machine menu |
| ▲ or ▼ | Select 'Language' |
| ▲ or ▼ | Select 'German' or 'French' and confi rm. |
Set the answer mode
| Switch the answering machine on | |
| 2 sec | To change the mode between 'Answer & Rec.', 'Answer Only' or 'Answer Off' |
Record your outgoing message (OGM)
| Your answering machine comes with a default outgoing message but you can record your own personal OGM of up to 2 minutes long. |
| 2 sec | Record your message after the beep |
| Press to end your recording |
Check your OGM
| The current OGM is announced |
Set the answer delay
| x 2 | Open the answering machine menu |
| ▲ or ▼ | Select 'Answer Delay' |
| 3 rings The current setting is shown | |
| ▲ or ▼ | Select and confirm the number or rings (1-9) or 'Time Saver'. |
Time saver: This feature can save you the cost of a call when you ring in to listen to your messages from another phone. If your answering machine answers after 2 rings you have new messages, if it answers after 5 rings then there are no new messages. Hang up after the 2nd ring and you will not be charged for the call.
Using the Answering Machine
Record a memo
You can use your answering machine to record memo messages for ot users to listen to later.
| 2 sec | Record your memo after the beep |
| Press to end your recording |
Listening to your messages/memos
Your messages/memos are played back in the order that they were received. New messages are played before old messages. The time and date of each recording is announced before each message is played back.
| Play/Pause | |
| Stop | |
| Rewind | |
| Fast forward |
Delete a single message/memo
| Play the message to be deleted | |
| 2 sec | Delete the message |
Delete all messages/memos
| x 2 | Open the answering machine menu |
| ▲ or ▼, Delete All? | Select 'Del All Msgs' |
| ⊗ or □ | Confir rm or cancel |
Memory Full
Should your answering machine become full either during a recording or after the memory has become full, 'Answering Machine Full' will be announced and the Answer Mode will change automatically to 'Answer Only'. You will need to delete some messages before any new messages can be recorded.
13. Remote Access
You can call your answering machine from any Touch phone or mobile phone whilst you are away from home to listen to your messages.
PIN Code for remote access
A 3-digit PIN code is required for remote access to your answering machine. The default code is '000' but for security reasons you should change this to a code personal to you.
Changing the PIN code
| x 2 | Open the answering machine menu |
| ▲ or ▼ | Select 'PIN Code' |
| 門話 | Enter the old PIN code and confi rm it |
| 門話 | Enter the new PIN code and confi rm it |
| Call in to check your messages | |
| 門話 | Dial your own phone number |
| 3 x ★, 門話 | Switch to remote access and enter your 3 digit PIN code |
| If you enter your PIN code incorrectly 3 times, the answering machine will hang up the call. | |
If you enter your PIN code correctly you can now remotely control your answering machine by using the digits on the keypad.
Remote commands
| Digit Function |
| 1 Rewind |
| 2 Play/Pause |
| 3 Fast Forward |
| 4 1st OGM Playback (Answer & Record) |
| 5 1st OGM Recording |
| 6 Stop |
| 7 Delete current message |
| 8 Answer Off |
| 9 Answer On |
| 0 Delete all old messages |
| * Skip announcement |
| ** Switch to remote access |
| # Record a memo |
Private Branch Exchanges
14. Private Branch Exchanges
R button on private branch exchanges
If the telephone is connected to a private branch exchange, functions as transferring calls and automatic call back can be used via the R button. Please refer to the operating manual supplied with your private branch exchange to determine which recall (Flash) time must be set in order to use these functions. The dealer where you purchased the exchange can provide information as to whether the telephone will work properly with the exchange.
Setting the Recall time, telephone base
| Two recall timings are available. Short 100ms and Long 300ms. | |
| -, ▲ or , ▼ | Open the Menu, select 'Settings' |
| ▲ or ▼ | Select 'Recall' |
| Short | The current setting is shown |
| ▲ or ▼ | Select and confi rm 'Short' or 'Long' |
| Setting the Recall time, cordless handsetTwo recall timings are available. Short 100ms and Long 300ms. | |
| -, ▲ or , ▼ | Open the Menu, select 'RECALL' |
| SHORT The current setting is shown | |
| ▲ or ▼ | Select and confi rm 'SHORT' or 'LONG' |
Dialling pause
In the case of private branch exchanges, it is necessary to enter an access code to get an outside line with its corresponding dialling tone. When using some older private branch exchanges, it takes a little time before the dialling tone becomes available. Particularly in the case of such private branch exchanges, it is possible to insert a dialling pause after the number for the outside line so that the number can be dialled in a continuous process without having to wait for the dialling tone.
Telephone base
| Enter digit/s, Insert a dialling pause. 'P' is shown in the display. | |
| Cordless handset | |
| 2 sec 0 | Insert a dialling pause. 'P' is shown in the display. |
| The pause can also be entered with the phone number in the phone book. | |
Private Branch Exchanges
R button and Supplementary services
Your telephone supports the supplementary services offered by your telephone network provider, such as call brokering, call waiting and conference calls. The supplementary services can be used in conjunction with the R button. Please contact your telephone network provider with regard to enabling the supplementary services and which recall time must be used.
Dial mode, telephone base
Two dialling modes are available, Tone and Pulse. Only change this set if you are advised to do so by your private branch exchange dealer.
| -, ▲ or , ▼ | Open the Menu, select 'Settings' |
| ▲ or ▼ | Select 'Dial Mode' |
| Tone The current setting is shown | |
| ▲ or ▼ | Select and confirm 'Tone' or 'Pulse' |
Dial mode, cordless handset
Two dialling modes are available, Tone and Pulse. Only change this setting if you are advised to do so by your private branch exchange dealer.
| -, ▲r, ▼ | Open the Menu, select 'DIAL MODE' |
| TONE The current setting is shown | |
| ▲ or ▼ | Select and confi rm 'TONE' or 'PULSE' |
Reset to default settings, telephone base
You can reset the telephone base to its original default settings.

Caution: The phone book, calls list, redial list and any answering machine messages and memos are deleted when you reset the telephone base.
| ○, ▲ or , ▼ ○ | Open the Menu, select 'Reset' |
| ng | |
| Base Reset?, = or ☐ | Confir rm or Cancel |
Reset to default settings, cordless handset
You can reset your handset to its original default settings. The phone book, calls and redial lists are not deleted when you reset the handset.
| =, ▲r , ▼ = | Open the Menu, select 'RESET' |
| 附 , 0 0 0 0 = | Enter the PIN code and confi rm |
15. If Problems Occur
Service Hotline
Service Hotline
Should problems arise with the telephone, please refer to the following information fi rst. In the case of technical problems, you can contact our hotline service, Tel. 0900 00 1675 within Switzerland (cost via Swisscom at time of going to print CHF 2.00/min). In the case of claims under the terms of the guarantee, contact your sales outlet. There is a 2 year period of guarantee.
| Problem Solution | |
| No telephone calls possible The telephone line is not connected properly or is defective. Only use the telephone connection cable supplied. Test the telephone line/socket by using another telephoneThe power adaptor is not plugged in/switched on or there is a complete power failure.Ensure that you are in range of the base (300m outdoors and 50m indoors in ideal conditions) | |
| Connection is disturbed or cut off Ensure that you are in range of the base (300m outdoors and 50m indoors in ideal conditions)The base station is in an unsuitable location | |
| The handset switches itself off Place the handset in the base station to charge for 15 hours.Replace the rechargeable batteries. | |
| The system no longer responds or is in an undefi ned state | Reset all the functions to their default settings. See page 121. |
| The caller number display (CLIP) does not function | Check that you have this service on your telephone line. Please call your network provider.The caller has withheld their telephone number |
| The handset does not ring Check that the ringer is not set to off.See pages 109 & 113. | |
| Buzzing noise on radio, TV or computer | We recommend that you leave a distance of 1 metre from electrical equipment and mobile phones. |
| The answering machine does not record messages/memos | Check that the answering machine is connected correctly and switched on.Is the memory full? See page 118. |
| Remote access does not work Check that the PIN is correct and that you are using a touchtone phone.See page 119. | |
Technical Properties
- Technical data
| Feature | Value |
| Standard DECT | ^1 GAP ^2 |
| Power supply (base station) Input: | 100~240VAC 50/60Hz 150mAOutput: 6VDC 420mA |
| Power supply (charging station) Input: | 100~240VAC 50/60Hz 150mAOutput: 7VDC 420mA |
| Range Outdoors Approx 300m | Indoors Approx 50m |
| Standby Up to 100 h | |
| Max. talk time Up to 10 h | |
| Rechargeable batteries AAA 1.2V | 800mAh NiMH |
| Dialling mode Tone (DTMF) | Pulse |
| Permissible ambient temperature | 0°C to 45°C |
| Permissible relative humidity 20% to 80% | |
| Recall | 100, 300 ms |
^1 DECT: Digital Enhanced Cordless Telecommunication = Standard für cordless telephones.
2 GAP: Generic Access Profile = Standard for the interoperation of handsets and base stations from different manufacturers.
Electrical consumption
The electrical consumption of the base (6 V, 420 mA DC) is:
- in operation mode (idle/call): approx. 1.1 / 1.12 W.
The adaptor input power without load is approx. 0.06 W.
The average efficiency is approx. 71%.
The electrical consumption of the charger (7 V, 420 mA DC) is:
- without handset charging: approx. 0.06 W.
- during charging of the handset: approx. 0.95 W.
The adaptor input power without load is approx. 0.06 W.
The average efficiency is approx. 71.8%.
Default settings
17. Default settings
Telephone base
The default settings can be restored via the menu. Refer to page 121 for the sequence of menu option selections.
| Language German | |
| Answer mode Answer and record | |
| PIN-Code for remote access 000 | |
| Answer delay 3 | |
| Internal melody 9 | |
| External melody 8 | |
| Ringer volume 5 | |
| Contrast 2 | |
| Boost memory Off | |
| Time format 24 Hour | |
| Recall time 100 ms | |
| Dialling mode Tone |
Cordless handset
The default settings can be restored via the menu. Refer to page 121 for the sequence of menu option selections.
| Language German | |
| Handset name DCT6172C | |
| Ringer melody 7 | |
| Ringer volume 5 | |
| Boost Memory Off | |
| Auto answer | On |
| Recall time 100 ms | |
| Dialling mode | Tone |
| PIN-Code | 0000 |
Maintenance/Guarantee
18. Maintenance/Guarantee
Maintenance
• Clean the product surfaces with a soft, fl uff-free cloth
• Never use cleaning agents or solvents
Guarantee
SWITEL equipment is produced and tested according to the latest production methods. The implementation of carefully chosen materials and highly developed technologies ensure trouble-free functioning and a long service life. The terms of the guarantee do not apply where the cause of the equipment malfunction is the fault of the telephone network operator or any interposed private branch extension system. The terms of guarantee do not apply to the rechargeable batteries or power packs used in the products. The period of guarantee is 24 months from the date of purchase.
All defi ciencies resulting from material of production faults which occur during the period of guarantee will be eliminated free of charge. Rights to claims under the terms of guarantee are annulled following intervention by the purchaser or third parties. Damage caused as a result of improper handling or operation, incorrect positioning or storing, improper connection or installation, Acts of God or other external influence are not covered by the terms of guarantee. In the case of complaints, we reserve the right to repair or replace defect parts of provide a replacement device. Replacement parts or devices become our property.
Rights to compensation in the case of damage are excluded where there is no evidence or intent or gross negligence by the manufacturer.
If your equipment shows signs of defect during the period of guarantee, please return it to the sales outlet in which you purchased the SWITEL equipment together with the purchase receipt. All rights to claims under the terms of the guarantee in accordance with this agreement must be asserted exclusively with regard to your sales outlet.
Two years after the purchase and transfer of our products, claims under the terms of guarantee can no longer be asserted.
Declaration of Conformity
This device fulfi is the requirements stipulated in the EU directive: 1999/5 EU directive on radio equipment and telecommunications terminal equipment and the mutual recognition of their conformity.
Conformity with the above mentioned directive is confirmed by the CE symbol on the device.
To view the complete Declaration of Conformity, please refer to the free download available on our website www.switel.com.
CE
Index
19. Index
A
Adjusting the handsfree
volume, 106
Adjusting the receiver
volume, 105
Auto talk, 114
B
Base ringing melody, 113
Base ringing volume, 113
Boost mem, 109, 114
Boosting the receiver
volume, 105
C
Calling back missed calls, 104
Call in to check your
messages, 119
Calls list, 112, 116
Chain dialling, 105
Changing the PIN code, 119
Charging the batteries, 98
Check the contents of the package, 98
Conference calls, 107
Connecting the telephone
base, 98
Connecting the charger base, 98
D
Date/time, 110, 113
Declaration of Conformity, 125
Default settings, 124
Delete a message/memo, 118
Deleting calls list
entries, 112, 116
Deleting all calls list
entries, 112, 116
Deleting phone book
entries, 111, 115
Dialling phone numbers from the
phone book, 105
Dialling pause, 120
Dial mode, 121
Displaying calls list
entries, 112, 116
E
Editing phone book
entries, 111, 115
End a call, 104
Entering a name, 111, 115
G
Guarantee, 125
H
Handset deregistration, 108
Handset name, 113
Handset registration, 107
Handset ringing melody, 113
Handset ringing volume, 113
Handsfree, 105
|
If problems occur, 122
Inserting the batteries, 98
K
Keylock, 106
L
Language, 109, 114
Listening to your messages, 118
M
Maintenance, 125
Making a call, 104
Making internal calls, 107
Memory full, 118
Muting the microphone, 106
N
Navigating in the menu, 102
0
Operating the telephone, 101
P
Phone book, 111, 115
Power fail, 108
Private branch exchanges, 120
Q
Quickdial, 105
R
R button and supplementary services,
121
R button on private branch
exchanges, 120
Record a memo, 118
Record your outgoing
message, 117
Redial, 104
Remote commands, 119
Reset to default settings, 121
Ringer on/off, 106
S
Safety information, 97
Set the answer delay, 117
Set the answer mode, 117
Setting the recall time, 120
Set the voice prompt
language, 117
Starting up, 98
Storing a quickdial entry, 103
Storing calls list entries in the
phone book, 112, 116
T
Take a call, 104
Talk time display, 106
Technical properties, 123
Telephoning, 104
Time format, 110
Tone, telephone base only, 106
Transferring external calls
internally, 107
U
Using remote access, 119
Using the answering
machine, 117
Using the menu, 109, 113
Y
Your DCT6172C Combo, 99