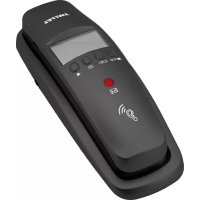
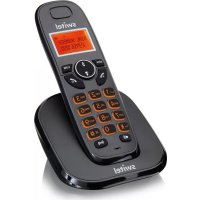
DC 621 - Phone SWITEL - Free user manual and instructions
Find the device manual for free DC 621 SWITEL in PDF.
User questions about DC 621 SWITEL
0 question about this device. Answer the ones you know or ask your own.
Ask a new question about this device
Download the instructions for your Phone in PDF format for free! Find your manual DC 621 - SWITEL and take your electronic device back in hand. On this page are published all the documents necessary for the use of your device. DC 621 by SWITEL.
USER MANUAL DC 621 SWITEL
COMMUNICATIONPRODUCTS
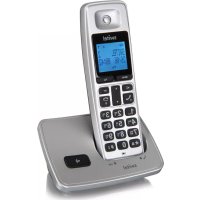
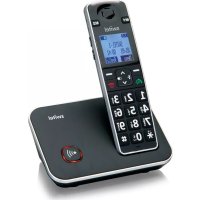
Cordless DECT/GAP amplifier telephone with XL buttons
DC62x
Bedienungsanleitung Mode d'emploi Istruzioni per l'uso Operating Instructions

SWITEL
Operating Instructions 93.
Declaration of Conformity 124. . .
RUFTON INT. MELODIE 1-10
LAUTSTARKE LAUTSTARKE 1-5, AUS
Speichern, 11, 16, 19
Stand-by-Modus, 10
3 sec. Activer le microphone
11 Installations PABX / Services comfort
Touche R et services comport
Communications internes, 51
Selection directe, 48, 51
Services comfort, 54
Structure du menu, 42
IMPOSTA ORA CONFERMA?
IMPOSTA ORA CONFERMA?
PORTATILE
MELODIA MELODIA EST MELODIA 1-10
MELODIA INT MELODIA 1-10
VOL.SUONERIA VOLUME 1-5, OFF
IMPOSTA DATA/ORA DATA
FORMATODATA
CONFERMA?
ORA
CONFERMA?
GG/MM
MM/GG
Struttura dei menu
| AMPLIFICATO ON BASSO | |
| AMPLIFICATO ON BASSO | ORA 12 H |
| 124 H | |
| TONI ON/OFF | MEDIO |
| ALTO | |
| CONTRASTO LIVELLO 1-8 | OFF |
| NOME DEL TELEFONO | |
| ILLUMINAZ. 5-30 SECONDI | |
| RISPOSTA AUTO ON/OFF | |
| LINGUA 1 | |
| RESET CONFERMA? | |
UP1 / UP2: Conclude la chiamata in conferenza
Please read this operating instruction manual thoroughly.
Intended use
The telephone is suitable for telephoning within a public telephone network system. Any other use is considered unintended use. Unauthorized modification or reconstruction is not permitted. Under no circumstances open the device or complete any repair work yourself.
Installation location
Prevent excessive exposure to smoke, dust, vibration, chemicals, moisture, heat and direct sunlight.
Do not use the handset in potentially explosive areas.
Power adapter plug

Attention: Only use the power adapter plug supplied because other power supplies could damage the telephone. Ensure access to the power adapter plug is not obstructed by furniture or such.
Rechargeable batteries

Attention: Never throw batteries into a fire. Only use batteries of the same type. Pay attention to correct polarity. Incorrect polarity of the batteries represents a risk of explosion during charging.
Power failure
The telephone cannot be used to make calls in the event of a power failure. Always keep a cord connected telephone which operates without an external power supply available in case of emergency situations.
Medical equipment

Attention: Never use the telephone in the vicinity of medical equipment. Effects on such equipment cannot be fully ruled out.
Hearing aid compatible
The telephone is compatible with most popular hearing aids on the market. However, it cannot be guaranteed that all hearing aids will work perfectly.
DECT1 telephones can cause an unpleasant humming sound in hearing aids.
1DECT: Digital Enhanced Cordless Telecommunication = Standard for cordless telephones.
Disposal
In order to dispose of your device, take it to a collection point provided by your local public waste authorities (e.g. recycling centre). The adjacent symbol indicates that the device must not be disposed of in normal domestic waste! According to laws on the disposal of electronic and electrical devices, owners are obliged to dispose of old electronic and electrical devices in a separate waste container.
Batteries must be disposed of at the point of sale or at the appropriate collection points provided by the public waste authorities.
Packaging materials must be disposed of according to local regulations.


2 Preparing the Telephone
Safety information

Attention: It is essential to read the Safety Information in Chapter 1 before starting up.
Checking the package contents
The package contains:
| Content | Model DC62x1 | |||
| 621 622 | 623 624 | |||
| Base station with power adapter plug 1 1 1 1 | ||||
| Charging station with power adapter plug - 1 2 3 | ||||
| Handset 1 2 3 4 | ||||
| Telephone connection cable 1 1 1 1 | ||||
| Batteries 2 4 6 8 | ||||
| Operating instructions 1 1 1 1 | ||||
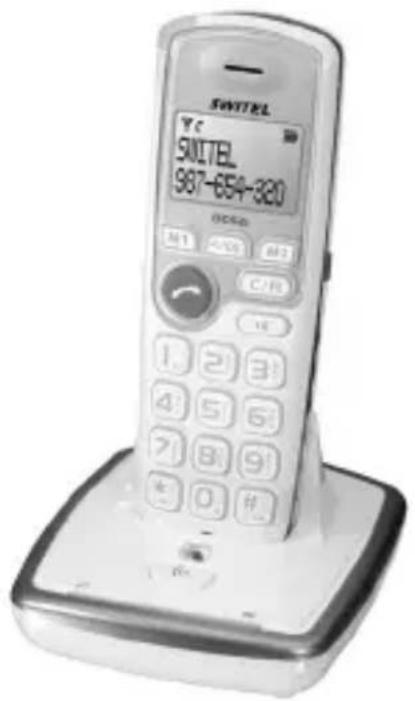
Connecting the base station

Attention: Position the base station at least 1m away from other electronic devices, otherwise there is a risk of mutual disturbance.
Connect the base station as illustrated in the diagram. For reasons of safety, only use the power adapter plug and telephone connection cable supplied with the product.
1 Visit www.switel.com to find out whether the telephone/telephone set is already available.
Preparing the Telephone
For the base station, use the power adapter plug labelled with no.
VD060025D (or BD060025D) and output data 6 V, 250 mA.
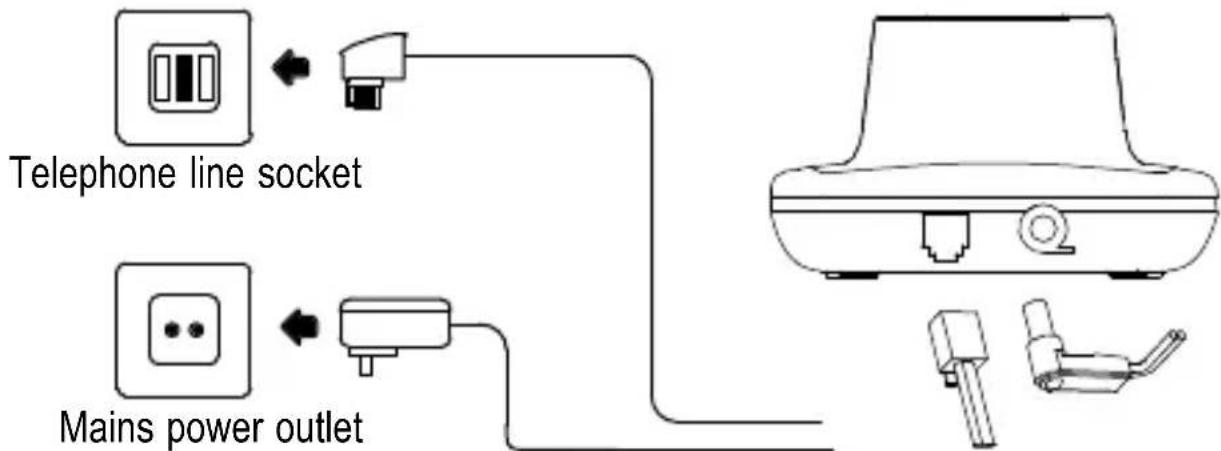
Connecting the charging station
Connect the charging station as illustrated in the diagram. For safety reasons, only use
the power adapter plug supplied.
For the charging station, use the power adapter plug labelled with no.
VD060015D (or BD060015D) and output data 6 V, 150 mA.
Inserting the batteries
Insert the batteries in the open battery compartment. Only use batteries of the type AAA NiMH 1.2 V. Pay attention to correct polarity. Close the battery compartment cover.
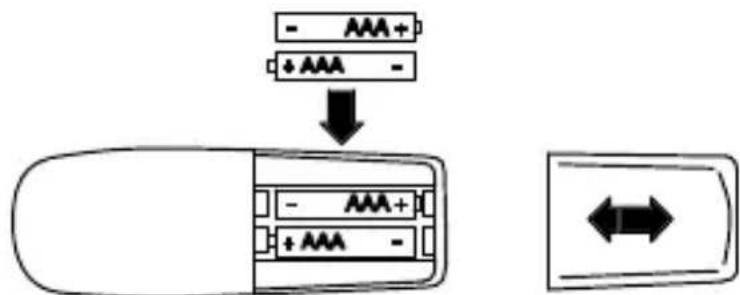
1 Only applies to telephone sets with at least two handsets; “Checking the package contents” on Page 95.
Charging the batteries

Before the handset is used for the first time, insert it in the base station/charging station for at least 16 hours.
[When the handset is correctly inserted in the base station / charging station, an acoustic signal issued.] [When the handset is correctly inserted in the base station / charging station, the charge control lamp lights up.] The handset warms up during the charging process. This is normal and does not represent a risk. Do not charge the handset with charging units from other manufacturers. The current battery charge status is indicated in the display:


Full Half empty Low Empty
Setting the display language
Select the required language (also refer to "Menu Structure"):
MOBILTEIL >SPRACHE >...
>HSSETTINGS>LANGUAGE>
The German, French, Italian and English languages are available for selection.
Setting the time and date on the handset
The time and date are set via the menu. Refer to Page 103 for the sequence of menu option selections.
Automatic answering
If the Auto Talk function is activated, an incoming call is taken when the handset is removed from the base station. The automatic answering function is activated and deactivated using the menu. Refer to Page 104 for the sequence of menu option selections.
Private branch exchanges
The information on Page 114 explains how to install your telephone in a private branch exchange.
Low-radiation operation (ECO mode)
The level of radiation is considerably lower than that of standard DECT cordless telephones when in Standby mode when the handset is in the base station.

In talk mode, radiation is reduced (depending on the distance between the handset and base station).
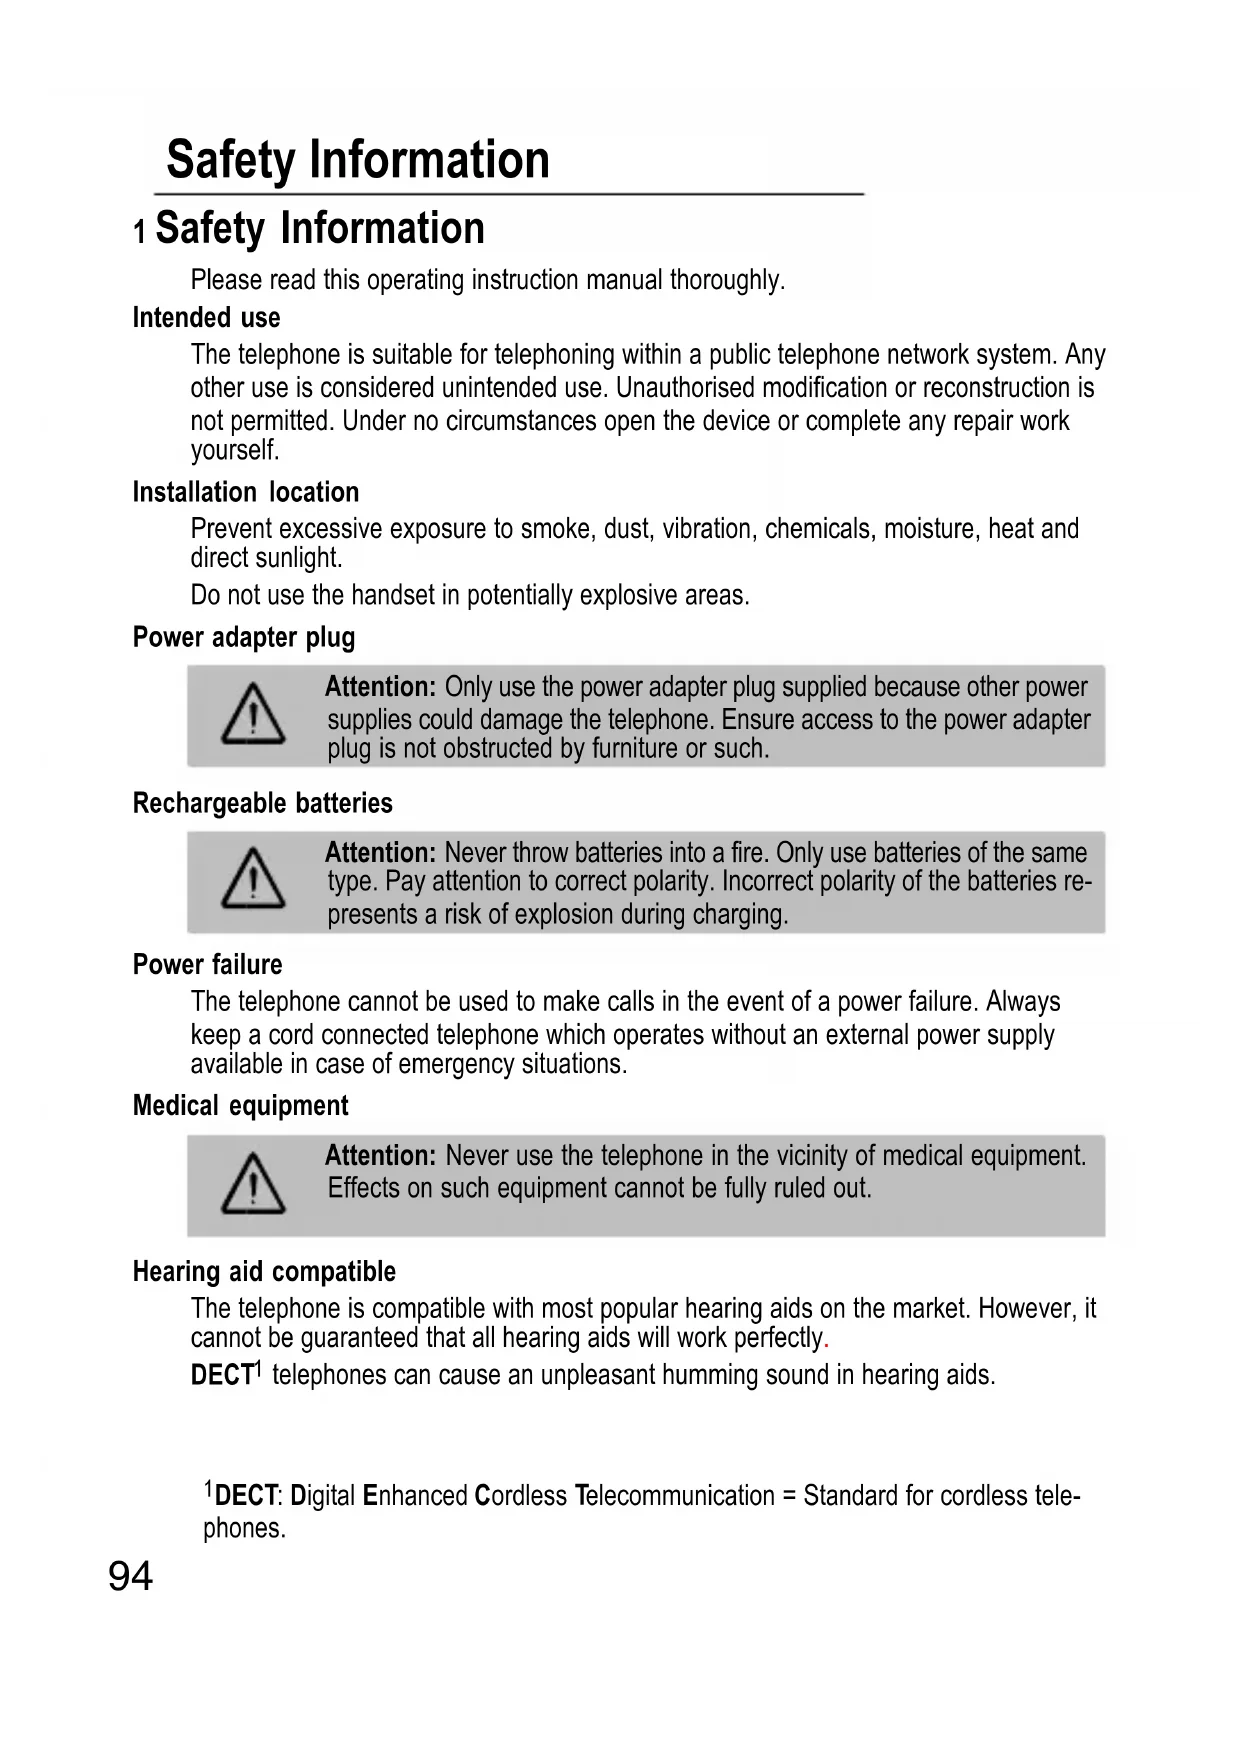
Operating Elements
3 Operating Elements
The buttons in this operating manual are subsequently depicted with a uniform contour. Therefore, slight deviations in the appearance of the symbols on the telephone buttons compared to those depicted here are possible.
Handset
1 Loudspeaker
2 LCD display
3 Menu / OK button
4 Quick dial button M2
5 Headset connection
6 Delete /R button
7 Handsfree button
8 Digit keys
9 # button / Key lock
10 Microphone
11 Pause button
12*button/Internal call
13 Call / On-hook button
14 Scroll down / Call log
15 Quick dial button M1
16 Scroll up / Redial
17 LED
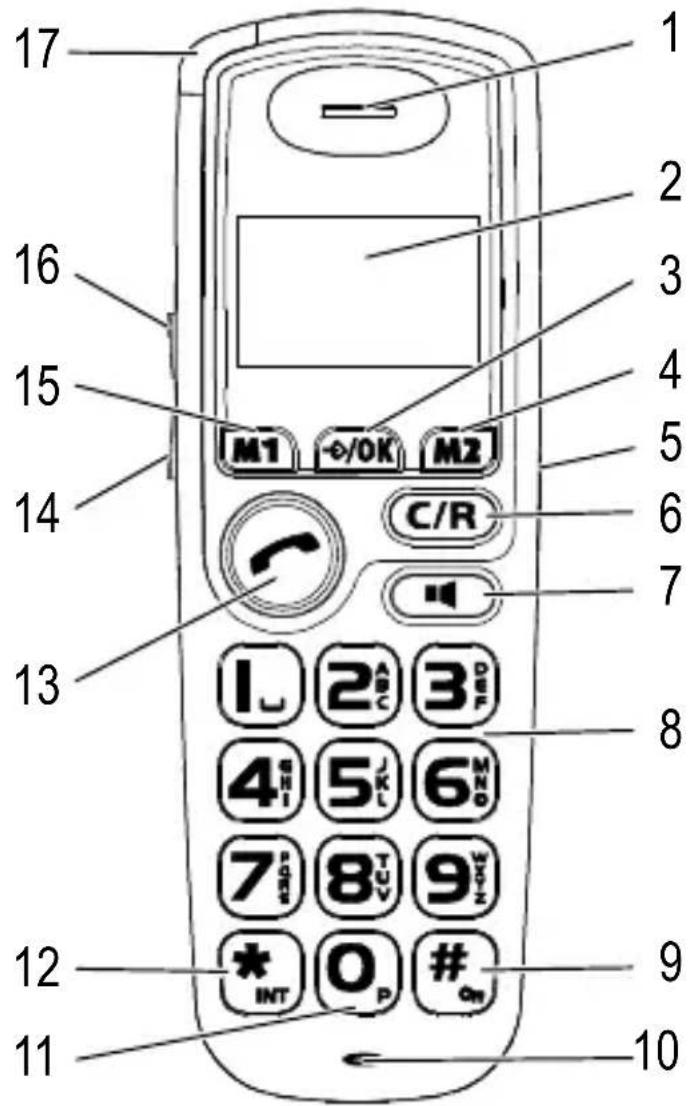
Connecting the headset
The headset can be connected using a connection port located on the right-hand side of the handset. Use a 2.5 mm stereo phone jack to connect the headset. There is no guarantee the headset will function properly.
Preliminary Information
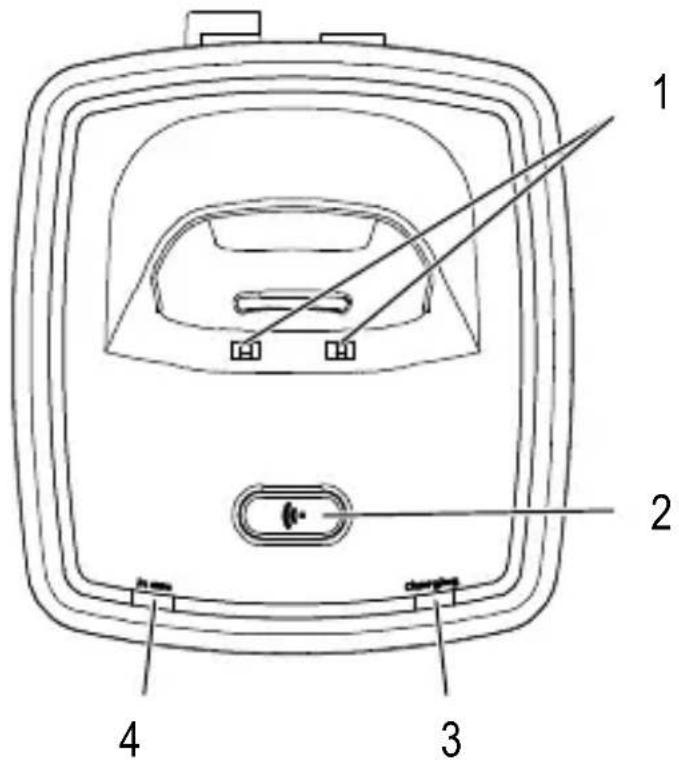
Base station
1 Charging contacts
2 Paging button
3 Charging LED
4 Operating status LED
4 Preliminary Information
This chapter provides basic information on using the operating instruction manual and the telephone.
Description of operating sequences in the manual
Display Description
Displays the contour of buttons
Press the button depicted briefly
2 sec. Press the button depicted for 2 seconds
Enter digits or letters
Handset rings
Remove the handset from the base station
Place the handset in the base station

Depicts text in the display

Depicts icons in the display
Icons and texts in the handset display
Icon Description

On: Battery charge capacity indicator.
Flashing: The batteries must be charged.
Run-through segments: The batteries are being charged;
Page 97.
Internally assigned call number of the handset; Page 113.
12--59 Displays the time; Page 103.

A call is currently being made Page 110.

You have accessed the call log.
New calls have been registered in the call log; Page 108.

The ringing tone has been switched off; Page 103.

The handsfree facility is activated; Page 112.

The key lock function is activated; Page 112.

The alarm function is enabled.
MESSAGE WAITING
Answering machine provided in the telephone network.
VMWI^1 - Supplementary service offered by telephone network providers; Page 115.

The connection to the base station is good.
Standby mode
All descriptions in this operating manual assume that the handset is in Standby mode which is the case when you are not talking on the phone and if a menu is not open. Press the C button, several times if necessary, to enable the Standby mode.
^1 VMWI: Visual Message Waiting Indication = Visual indicator that new messages have been recorded.
Navigating in the menu
All the functions can be accessed via the various menus. Refer to Menu Structure Page 102 for information on how to access each respective function.
Open the main menu
or Select a submenu
Open the submenu
or Select a function
Open the function
or Select a setting
Use the digit keys to enter numbers or letters
Confirm the input
C Move one level back
C several times, if necessary Cancel the programming and saving processes and return to Standby mode
Every process is automatically cancelled if there is no input within 15 seconds.
Creating phone book entries - example
The way in which to navigate through the menus and select settings is explained by means of the example Creating phone book entries. Proceed as in this example for all the settings.
Open the main menu
PHONEBOOK Open the phone book
Skip selection of entries
ADD NEW ENTRY Select the submenu and confirm it
Enter the name (max. 12 characters) and confirm it
Enter the phone number (max. 24 digits) and confirm it
Menu Structure
5 Menu Structure
Main menu
Press the button to open the main menu. Then move to and select an entry using the or button and confirm your selection by pressing the button. Further information on the menu and operation; Chapter 4.
PHONEBOOK, select an entry skip selection
| ADD NEW ENTRY NAME 1 NUMBER |
| EDIT NAME NUMBER |
| DELETE RECORD CONFIRM? |
| DELETE ALL CONFIRM? |
CALLLOG2,selectanentry/,skipselection
| SAVE TO PHONEBOOK NAME NUMBER |
| DELETE RECORD CONFIRM? |
| DELETE ALL CONFIRM? |
1Letters are also imprinted on the digit keys. Letters, digits and special characters are entered by pressing the relevant key the respective number of times.
2 The call number display (CLIP3) is required to be able to display and store phone numbers in call log. The caller number display (CLIP) is a supplementary service offered by your telephone network provider. Contact your network provider for further information. For further information on the CLIP feature, refer to Page 108.
3 CLIP: Calling Line Identification Presentation = Displays the caller's phone number.
REDIAL, select entry / , skip selection
SAVE TO PHONEBOOK NAME NUMBER
DELETE RECORD CONFIRM?
DELETE ALL CONFIRM?
ALARMS
ALARM1CLEAR
SET TIME CONFIRM?
ALARM2 CLEAR
SET TIME CONFIRM?
HS SETTINGS
RINGER MELODY EXTERNAL CALL ME- MELODY 1-10 LODY
INTERNAL CALL ME- MELODY 1-10 LODY
HS RINGER VOLUME VOLUME 1-5, OFF
DATE/TIME SETTINGS DATE/TIME DATE
CONFIRM?
TIME
CONFIRM?
DATE/TIME FORMAT DATE
Menu Structure
| Boost MODE ON LOW | ||
| AUTO | MEDIUM | |
| HIGH | ||
| OFF | ||
| KEY TONE ON/OFF | ||
| DISPLAY CONTRAST LEVEL 1-8 | ||
| HANDSET NAME | ||
| BACKLIGHT SETTING 5-30 SECONDS | ||
| AUTO TALK ON/OFF | ||
| LANGUAGE1 | ||
| SET DEFAULT CONFIRM? | ||
1For the languages available, refer to Chapter 2.
BS SETTINGS,INPUTPIN
| BASE RINGER MELODY MELODY 1-5 | |
| HS RINGER VOLUME VOLUME 1-5, OFF | |
| CHANGE PIN1 | NEW PIN CONFIRM PIN |
| DIAL MODE | TONE |
| FLASH TIME SHORT | PULSE |
| VMWI2 | MEDIUM |
| LONG | |
| VMWI OFF? | |
| SET DEFAULT CONFIRM? | |
REGISTRATION
| REGISTER INPUT PIN | ||
| SELECT BASE BASE 1-4 | ||
| REMOVE HANDSET | INPUT PIN | HANDSET 1-4 |
| REMOVE BASE | BASE 1-4 | |
1The default PIN code is "0000".
2VMWI: Visual Message Waiting Indication = Visual indication of new messages.
6 Phone Book
You can use the phone book to store up to 100 phone numbers together with the associated names.
- Always enter the area access code with the phone numbers so that incoming local calls can also be assigned to a phone book entry.
- When the memory capacity is used up, the message
- MEMORY FULL appears when an attempt is made to store another number. To create space, an existing entry must first be deleted.
- The phone book entries are arranged alphabetically.
Entering names
Letters are also imprinted on the digit keys. Letters, digits and special characters are entered by pressing the relevant key the respective number of times.
1 Enter a space
cDelete characters
or Moves the cursor
To enter the same letter twice, press the button to enter the letter. Wait until the cursor skips one position forwards. Enter the letter again.
Creating phone book entries
Open the main menu
PHONEBOOK Open the phone book
Skip selection of entries
ADD NEW ENTRY Select the submenu and confirm it
Enter the name (max. 12 characters) and confirm it
Enter the phone number (max. 24 digits) and confirm it
Editing phone book entries
Open the main menu
PHONEBOOK Open the phone book
or Select and confirm an entry
or EDIT Select the submenu and confirm it
Change the name and confirm it
Change the phone number and confirm it
Deleting phone book entries
Deleting an entry
Open the main menu
PHONEBOOK Open the phone book
or , Select and confirm an entry
or l DELETE RECORD
Select the submenu and confirm it
CONFIRM? , or c
Confirm the deleting process or cancel it
Deleting all entries
Open the main menu
PHONEBOOK Open the phone book
Skip selection of entries
or l DELETEALL Select the submenu and confirm it
CONFIRM? , or c
Confirm the deleting process or cancel it
Call Log
Quick dial
You can assign one phone number each to the quick dial buttons M1 and M2. Storing phone numbers as quick dial numbers
Enter the phone number or select one from the phonebook, redalling list or call log.
3 sec. M1 or M2
Assign the selection to the corresponding one-touch dialling button
Entries assigned to the quick dial buttons cannot be deleted, they must be overwritten.
7 Call Log
A total of 20 calls are stored in the calls log.
The caller number display (CLIP 1) is a supplementary service offered by your telephone network provider. The caller's number appears in the display if the service is offered by your telephone network provider. Contact your network provider for further information.
Messages in the display:
| OUT OF AREA | The phone number is received only partially or with errors. |
| LONG DISTANCE | Information related to the phone number is not available. This could signify an international call. |
| PRIVATE | The caller has suppressed the transmission of their phone number. |
Displaying numbers in the call list
? , or
Display the call log and select an entry
Press the * button, several times if necessary, to switch between the "Name", "Number" and "Received time/date" displays.
1 CLIP: Calling Line Identification Presentation = Displays the caller's phone number.
Storing a phone number in the calls log in the phone book
A phone number in the call list can be stored in the phone book directly.
?or
Display the call log and select an entry
Open the menu
or SAVE TO PHONEBOOK,
Select and confirm the submenu
Enter the name (max. 12 characters) and
confirm it
Change the phone number and confirm it
As soon as the phone number in the phone book has been saved together with a name, the name entered appears in the call list.
Deleting phone numbers from the call list
Deleting individual phone numbers
?or
Display the call log and select an entry
Open the menu
or l DELETE RECORD
Select the submenu and confirm it
CONFIRM? , or C
Confirm the deleting process or cancel it
Deleting all phone numbers
? Open the call log
Open the menu
or DELETEALL Select the submenu and confirm it
CONFIRM? , or C
Confirm the deleting process or cancel it
Telephoning
8 Telephoning
Taking a call

Take the call
Ending a call

Making a call
Enter the phone number (max. 24 digits)
C deletes the last digit if incorrect
or Dials the phone number

It is also possible to press the Call button first to obtain the dialling tone for an outside line. The digits then entered are dialled immediately. It is not possible to correct wrong digits individually using this dialling procedure.
Redialling
The telephone stores the last 10 phone numbers dialled in a redalling list.

Open the redalling list and select an entry
Dial the number
Editing phone numbers on the redalling list is identical to editing phone numbers on the call log; Chapter 7.
Calling back calls received
Your telephone stores 20 phone numbers in a call log.

Display the call log and select an entry

Dialling numbers from the phone book
Phone numbers must have been stored in the phone book for this function;
Chapter 6.
Open the main menu
PHONEBOOK

Open the phone book

Select an entry and dial the number
Quick dial
Phone numbers must have been stored in the phone book for this function;
Chapter 5.

Execute the quick dial call
Internal calls1
Making internal calls
There must be two or more handsets (HS1, HS2, ...) registered on your base station in order to make internal calls free of charge.
HS1: 3 sec. INT Activate the internal call function
e.g. 2ABC Dial the internal call number of the handset required
HS2: Other handset answers the call
HS1/HS2: End the internal call
Forwarding external calls internally
HS1: 3 sec. INT During an external call
e.g. 2^ABC Dial the number of the internal handset
HS2: Other handset answers the call
HS1: Forward the call
If the handset called does not answer, the external call is returned to the calling handset after 30 seconds.
Making conference calls
An external call can be transferred to another internal handset for a conference call.
HS1: 3 sec. INT During an external call
e.g. 2ABC Dial the number of the internal handset
HS2: Other handset answers the call
HS1: 3 sec. INT Start the conference
HS1 / HS2: End the conference
Setting the receiver volume
The volume can be adjusted to one of 5 levels during a call.
or Select a volume level
Boost mode
There are further boosted volume levels in addition to the 5 basic levels;
Chapter 5. Activate the boost level required to be able to use it.
BOOST MODE Function
OFF Only volume levels 1-5 are available
1 Internal calls are only possible when at least two handsets are registered in the system;“Checking the contents of the package” on Page 95.
Telephoning
ON, LOW Additional low boost can be selected
ON, MEDIUM Additional low and medium boost can be
selected
ON, HIGH Additional low, medium and high boost
can be selected
AUTO Press for 2 sec., the loudest setting is
automatically selected
Displaying the duration of a call
The duration of a call is displayed in hours, minutes and seconds during the call.
Handsfree
This function is used to listen to the caller via the loudspeaker.
Enables handsfree conversation
Disables handsfree conversation
Muting the microphone in the handset
The microphone in the handset can be activated and deactivated during a telephone conversation.
3 sec. Switch the microphone off (muting)
3 sec. Switch the microphone on
Key lock
The key lock feature prevents functions assigned to buttons being activated accidentally.
3 sec. 0 Locks the keys

Incoming calls can still be taken in the normal way even when the key lock function is activated.
3 sec. 0-Unlocks the keys
Searching for the handset (Paging)
If you have mislaid your handset, you can sound a paging tone to find it.
Base station 1
Sound the paging tone
or Stops sounding the paging tone
Extending the Telephone System
9 Extending the Telephone System
The internationally approved GAP^1 standard regulates the compatibility of handsets and base stations from different manufacturers. As a result, it is possible to integrate SWITEL devices and devices from other manufacturers together in one telephone system. It is possible, however, that some functions are not available.
Multiple handsets
Up to 5 handsets can be registered on the base station.
Registering handsets
Before starting to register a handset, switch the base station to Registration mode.
15 sec. Enables the Registration mode
Now register the handset; Chapter 5.
Use your current PIN code, Chapter 5, to register it.
The handset is automatically assigned an internal call number following registration.
The internal call number appears in the display.
To register handsets from other manufacturers, please refer to the operating manual supplied with them.
Deregistering handsets
A handset can only be deregistered from a base station by using another handset registered to the same base station.
Handsets are deregistered via the menu. Chapter 5 indicates the position in the menu.
^1 GAP: Generic Access Profile = Standard for the interoperation of handsets and base stations from different manufacturers.
Special Functions
Multiple base stations
You can increase the range of your handset by registering it on several base stations. The handset can be registered on up to 4 different base stations simultaneously. Each base station requires its own telephone line socket. Connections can be used with the same call number or with different ones.
Calls in progress cannot be transferred from one base station to another.
10 Special Functions
Dialling mode
The telephone can be operated in analogue exchanges (PULSE mode) as well as new, digital exchanges (TONE/DTMF mode). The dialling mode is controlled via the menu. Chapter 5 indicates the position in the menu.
11 PABX / Supplementary Services
R-button on private branch exchanges
If the telephone is connected to a private branch exchange, functions such as transferring calls and automatic call back can be used via the R button. Refer to the operating manual provided with your private branch exchange as to which Flash time must be set in order to use these functions. The sales outlet where you purchased the exchange can provide information as to whether the telephone will work properly with the exchange. The Flash time is set using the menu. Chapter 5 indicates the position in the menu.
Dialling pause
When using private branch exchanges, it is necessary to dial an access code to obtain the dialling tone for an outside line. When using some older private branch exchanges, it takes a little time before the dialling tone becomes audible. In the case of such private branch exchanges, a dialling pause can be inserted after the number for an outside line in order to continue dialling directly without having to wait for the dialling tone. The dialling pause is inserted by pressing and holding the P button for 3 seconds.
The actual phone number is dialled a certain time after the number for an outside line.
The dialling pause can also be entered with the phone numbers in the phone book.
R-button and supplementary services
Your telephone supports supplementary services provided by your telephone network provider, such as brokering, call waiting and conference facilities. These supplementary services can be used by implementing the R button. Please contact your telephone network provider regarding which Flash time must be set to use the supplementary services. Contact your telephone network provider with regard to enabling supplementary services. The Flash time is set using the menu. Chapter 5 indicates the position in the menu.
Caller number display (CLIP)
The caller number display (CLIP) is a supplementary service offered by your telephone network provider. Contact your network provider for further information.
If this function is available with your telephone line, the number of the caller appears in the display when the phone rings. If the caller has suppressed transmission of his phone number, the corresponding message appears in the display. The phone number is not displayed and, as a result, is not stored in the call list.
Answering machine in the telephone network
An answering machine in the telephone network is a supplementary service offered by many telephone network providers. If your telephone network provider offers an answering machine in the telephone network for you, an icon on the display informs you of new messages received (VMWP2). This function can only be used when your telephone network provider actually offers the service. Contact your network provider for further information.
You can switch the new message indicator icon off. Refer to Chapter 5, VMWI OFF?.
12 In Case of Problems
Service Hotline
Should problems arise with the telephone, please refer to the following information first. In the case of technical problems, you can contact our hotline service, Tel. 0900 00 1675 within Switzerland (Swisscom fees at time of going to print: CHF 2.60/min). In the case of claims under the terms of guarantee, please contact your sales outlet. The period of guarantee is 2 years.
1 CLIP: Calling Line Identification Presentation = Displays the caller's phone number.
2VMWI: Visual Message Waiting Indication = Visual indicator that new messages have been recorded.
In Case of Problems
Problems and solutions
| Problems Solutions | |
| No telephone calls possible - The telephone is not connected properly or is defective. Only use the telephone connection cable supplied. - Test whether the telephone connection is in order by using another telephone. - The power adaptor plug is not plugged in or there is a complete power failure. - The rechargeable batteries are empty or defective. - The handset is too far from the base station. - The wrong dialling mode is set; Page 105. | |
| No connection to base station possible | - Check that the handset has been registered on the base station with the correct PIN code; Page 105. |
| Connection is disturbed or cut off - The handset is too far from the base station. - The base station is in an unsuitable location. | |
| The system no longer responds - Reset all the functions to their default settings; Page 104/105. - Disconnect the power adapter plug briefly from the power socket. | |
| The batteries are empty within a short time | - The batteries are empty or defective. - Place the handset in the base station properly. Clean the contact surfaces on the handset and base station with a soft, dry cloth. - Place the handset in the base station for 16 hours. |
| The caller number display (CLIP¹) does not function | - The caller number display (CLIP) is a supplementary service offered by your telephone network provider. Contact your network provider for further information. - The caller has suppressed the transmission of their phone number. |
13 Technical Properties
Technical data
| Feature Value | |
| Standard DECT1-GAP | 2 |
| Power supply (base station) Input: 220/230 V | 50 Hz Output: 6 V, 250 mA |
| Power supply (charging station) Input: 220/230 V | V, 50 Hz Output: 6 V, 150 mA |
| Range Outdoors: Approx. 300 m | Indoors: Approx. 50 m |
| Standby time Up to 100 h | |
| Max. talk time Up to 10 h | |
| Rechargeable batteries 2 x AAA NiMH 1.2 V | |
| Dialling mode Tone dialling mode | Pulse dialling mode |
| Permissible ambient temperature 10°C to 30°C | |
| Permissible relative humidity 20% to 75% | |
| Flash function 100 ms, 300 ms, 600 ms |
1 DECT: Digital Enhanced Cordless Telecommunication = Standard for cordless telephones.
2GAP: Generic Access Profile = Standard for the interoperation of handsets and base stations from different manufacturers.
Technical Properties
Default settings
Handset
The default settings can be restored via the menu. Refer to Page 104 for the sequence of menu option selections.
| LANGUAGE = GERMAN | PHONEBOOK= Empty |
| CALL LOG = Empty REDIAL = Empty | |
| M1, M2 = Empty | ALARMS 1/2 = OFF |
| EXTERNAL CALL MELODY =1 INTERNAL CALL MELODY = 2 | |
| HS RINGER VOLUME = 3 AUTO TALK = ON | |
| BOOST MODE = AUTO | |
| BACKLIGHT SETTING = 10 sec. |
Base station
The default settings can be restored via the menu. Refer to Page 105 for the sequence of menu option selections.
| BASE RINGER MELODY = 2 | HS RINGER VOLUME = 1 |
| DIAL MODE = TONE | PIN = 0000 |
Declaration of Conformity
This device fulfils the requirements stipulated in the EU directive:
1999/5/EC directive on radio equipment and telecommunications terminal equipment and the mutual recognition of their conformity. Conformity with the above mentioned directive is confirmed by the CE symbol on the device.
To view the complete Declaration of Conformity, please refer to the free download available on our web site www.switel.com.

14 Maintenance / Guarantee
Maintenance
- Clean the housing surfaces with a soft, fluff-free cloth.
- Do not use any cleaning agents or solvents.
Guarantee
SWITEL equipment is produced and tested according to the latest production methods. The implementation of carefully chosen materials and highly developed technologies ensure trouble-free functioning and a long service life. The terms of guarantee do not apply where the cause of equipment malfunction is the fault of the telephone network operator or any interposed private branch extension system. The terms of guarantee do not apply to the batteries or power packs used in the products. The period of guarantee is 24 months from the date of purchase.
All deficiencies related to material or manufacturing errors within the period of guarantee will be redressed free of charge. Rights to claims under the terms of guarantee are annulled following tampering by the purchaser or third parties. Damage caused as the result of improper handling or operation, normal wear and tear, incorrect positioning or storage, improper connection or installation or Acts of God and other external influences are excluded from the terms of guarantee. In the case of complaints, we reserve the right to repair defect parts, replace them or replace the entire device. Replaced parts or devices become our property. Rights to compensation in the case of damage are excluded where there is no evidence of intent or gross negligence by the manufacturer.
If your device does show signs of a defect within the period of guarantee, please contact the sales outlet where you purchased the SWITEL device, producing the purchase receipt as evidence. All claims under the terms of guarantee in accordance with this agreement can only be asserted at the sales outlet. No claims under the terms of guarantee can be asserted after a period of two years from the date of purchase and handover of the product.
15 Index
A
Alarm, 103
Answering machine in the telephone network, 115
B
Base station, 95, 114
Battery charge status, 97
Boost mode, 111
C
Call back, 110
Call log, 102, 108
Caller number display, 108, 115
Charging, 97
Charging station, 96
CLIP, 115
Conference calls, 111
Connecting the headset, 98
Creating, 101, 106
D
Date, 97
Declaration of Conformity, 118
Default settings, 104, 105, 118
Deleting, 107, 109
Deregistration, 105, 113
Dialling, 110
Dialling mode, 105, 114
Dialling pause, 114
Display, 100
Display icons, 100
Display language, 97
Display messages, 108
E
ECO mode, 97
Editing, 107
Ending a call, 110
Entering names, 106
Entering text, 106
Extending, 113
F
Forwarding calls, 111
Functions, 114
G
Guarantee, 119
H
Handset, 113
Handsfree, 112
1
Icons, 100
Inserting the batteries, 96
Internal calls, 111
K
Key lock, 112
L
Low-radiation, 97
M
Main menu, 102
Maintenance, 119
Making a call, 110
Menu structure, 102
Messages, 108
Muting, 112
Muting button, 112
N
Notation, 99
0
Operating elements, 98
Operation, 99
P
Package contents, 95
Paging, 112
Phonebook,102,106,110
Phone book entries, 101, 106
Private branch exchanges, 114
Problems, 115
Problems and solutions, 116
Pulse dialling mode, 105, 114
Q
Quick dial, 108, 110
R
R-button, 114, 115
Receiver volume, 111
Redalling, 103, 110
Registering, 113
Registration, 105
Replace receiver, 110
Ringing melody, 103, 105
s
Safety information, 94
Saving, 101, 106
Searching for the handset, 112
Service-Hotline, 115
Standby mode, 100
Starting up, 95
Storing, 109
Supplementary services, 114
T
Taking a call, 97, 110
Talk time, 112
Technical data, 117
Telephoning, 110
Time, 97
Tonediallingmode,105,114
Troubleshooting, 115
V
VMWI, 115
Notes
Notes
Notes
SWITEL Declaration of Conformity
CE
This equipment complies with the European R&TTE directive. To view the complete Declaration of Conformity, please refer to the free download available at our web site: www.switel.com.
Service Hotline
In the event of technical problems, you can contact our hotline service, Tel. 0900 00 1675 within Switzerland (cost via Swisscom at time of going to print: CHF 2.60/min).