
E903 - Hair Straightener SOLAC - Free user manual and instructions
Find the device manual for free E903 SOLAC in PDF.
| Brand | SOLAC |
| Model | E903 |
| Product Type | Multifunctional heating styling brush |
| Power | 1000 W |
| Power Supply | Mains, 220-240 V ~ 50/60 Hz |
| Temperatures | 2 selectable positions |
| Cold air | Yes, button with two modes (temporary or continuous) |
| Ionizer | Yes, with green indicator light |
| Included accessories | Round brush 20 mm, round brush 38 mm, curling clamp, Always Perfect, concentrator |
| Hairstyle types | Straightening, curling, volume, ringlets, highlights |
| Cord length | Approximately 1.8 m (estimated) |
| Weight | Approximately 0.5 kg (excluding accessories) |
| Body material | Heat-resistant plastic |
| Safety | Automatic shutdown in case of overheating, do not immerse |
| Maintenance | Clean with a damp cloth, do not use solvent |
| Removable accessories | Yes, clip attachment with push button |
| Use | Household use only |
Frequently Asked Questions - E903 SOLAC
User questions about E903 SOLAC
0 question about this device. Answer the ones you know or ask your own.
Ask a new question about this device
Download the instructions for your Hair Straightener in PDF format for free! Find your manual E903 - SOLAC and take your electronic device back in hand. On this page are published all the documents necessary for the use of your device. E903 by SOLAC.
USER MANUAL E903 SOLAC
Solac is a registered Trade Mark
02/04
6-10 · ESPÁÑOL
11-14·ENGLISH
15-18 • FRANÇAIS
19-23 · DEUTsCH
24-28·PORTUGUES
29-33 · ITALIANO
34-37·NEDERLANDS
38-41·ČESKY
42-45·POLSKA
46-49 • SLOVENSKY
50-55·MAGYAR
56-60·6bIrapck
61-65·HRVATSKA
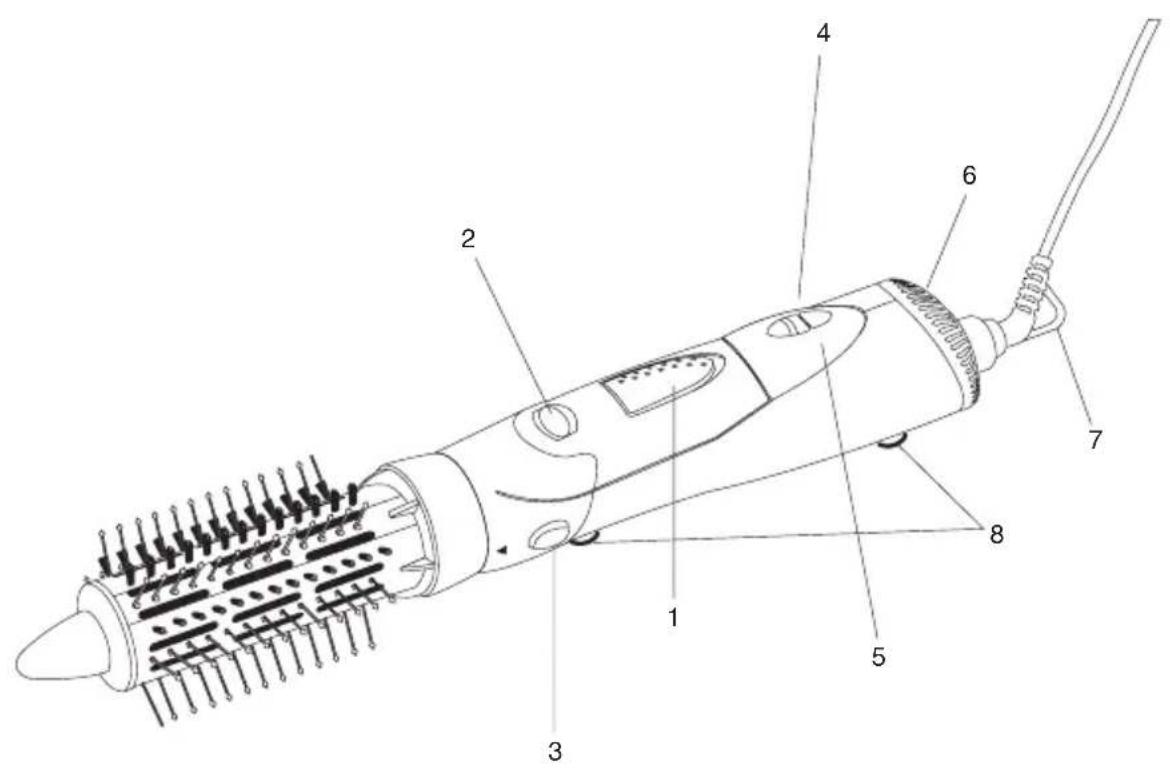
Fig. 1
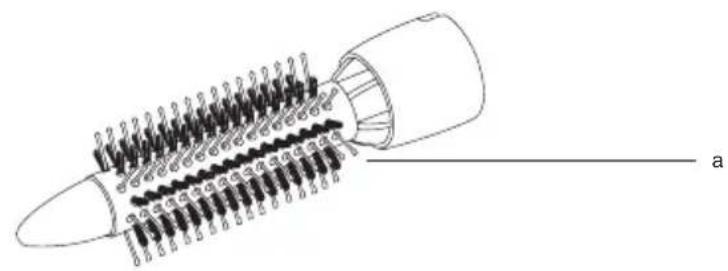
Fig. 2
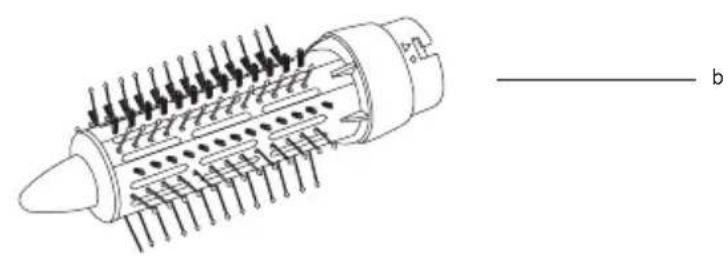
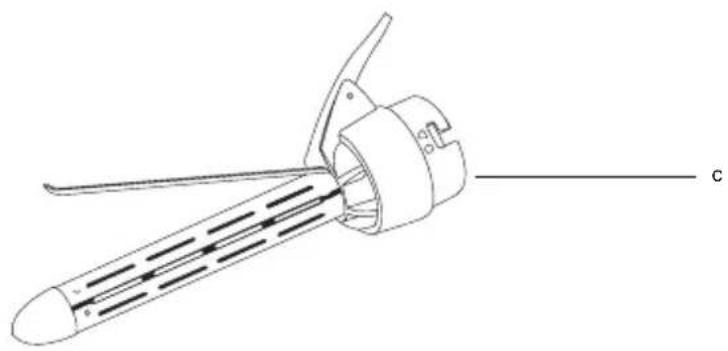
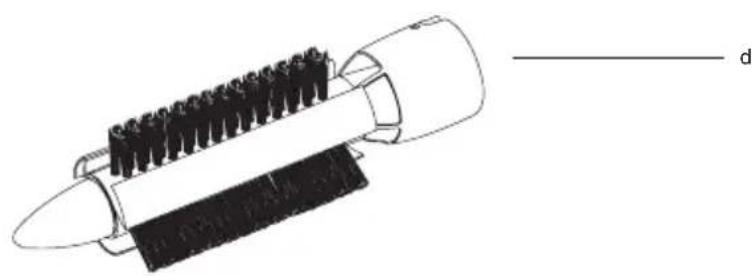
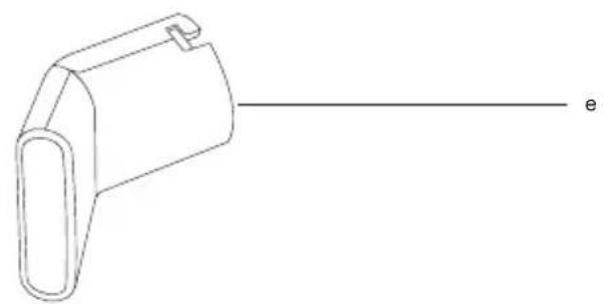
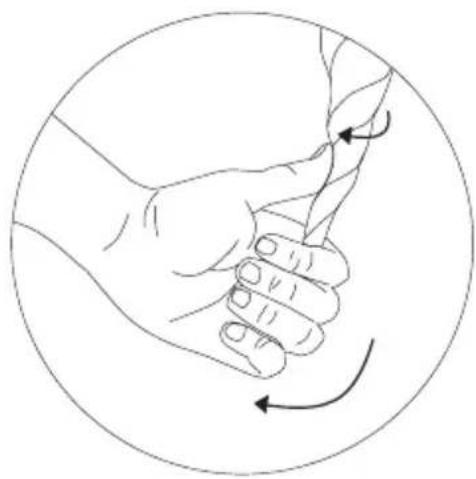
Fig. 3
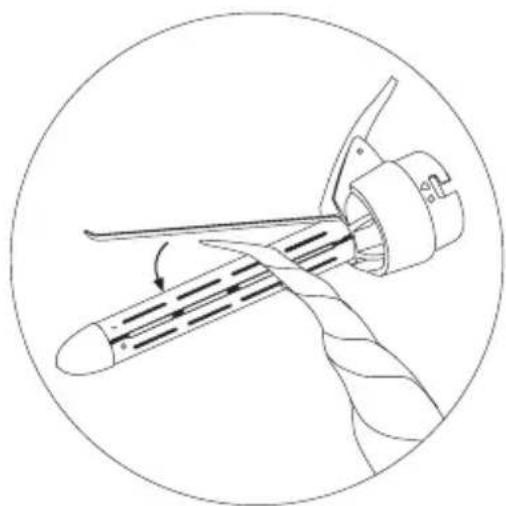
Fig. 4
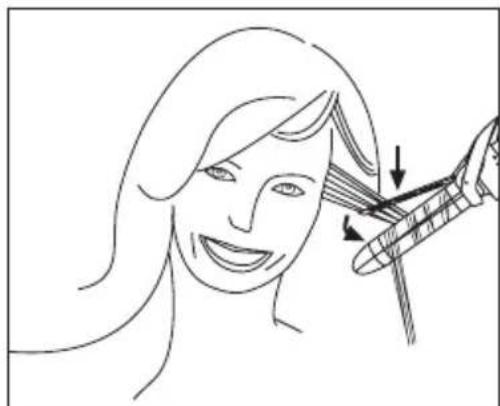
Fig. 5
- ESPÁÑOL
-
Read the instructions carefully before using the appliance. Keep the instructions for future consultation.
-
Keep the appliance out of the reach of children, as well as the items of packaging.
-
Do not plug in the appliance without first checking that your home mains voltage matches that stated on the nameplate.
-
Never leave the appliance outdoors exposed to the elements.
-
Do not touch the appliance with wet hands when it is working.
DO NOT IMMERSE THE APPLIANCE IN WATER OR USE IT WHILE TAKING A BATH OR SHOWER. MAKE SURE THAT NEITHER THE APPLIANCE NOR THE POWER CORD GET SPLASHED.
-
Do not use the appliance near the bath, washbasin or any other similar receptacle containing water.
-
The appliance should not be in contact with water while being cleaned.
-
Never leave the appliance working on a wet surface or cloth.
-
Unplug the appliance from the mains after use.
-
When unplugging the appliance, do not pull on the power cord or the appliance..
-
Do not let the attachments come in contact with your skin during use, as they will get hot.
-
Keep the appliance away from children as it contains small parts that could be dangerous.
-
Adult supervision is necessary when the appliance is to be used by a child.
-
If the appliance does not work, unplug it and do not tamper with it. If repair is needed, please contact Customer Service.
-
Never use the appliance if the power cord is damaged or the appliance has a fault. Certain operations, such as replacing the power cord, will have to be done at an authorized service centre as special tools are needed.
-
This appliance is designed for domestic use only. Any other use apart from what is specified in this handbook will be considered improper.
-
The appliance is provided with an overload safety system, which means that the appliance stops working if it overheats. This usually happens if the air intake or outlet get blocked. If the moulder stops working during use, set the switch at position 0 and wait for 5 minutes. Switch the appliance on again after removing the cause of the blocking.
-
For supplementary protection, we recommend installing a residual differential current device (RDD) not exceeding 30mA in the electrical circuit that supplies the bathroom. Ask your installer for advice.
ENVIRONMENTAL PROTECTION
For environmental protection, when you decide finally to make no further use of the appliance, consult your Local Authority or Town Council so as to comply with the proper procedure for waste disposal.
MAIN COMPONENTS Fig.1
- Temperature selector switch (2 temperature positions)
- Cold air button-switch
- Push button for attachments
- Ionizer switch
- Ionizer pilot light
- Air intake grille
- Hanger
- Non-slip legs
- Attachments: Fig.2
a) Round brush 20 mm
b) Round brush 38 mm
c) Curling tongs
d) Always Perfect
e) Concentrator
OPERATION
FITTING THE ATTACHMENTS ON THE MOULDER
- To fit any attachment to the central body of the moulder, position the attachment so that the mark on the underside lines up with the mark on the top of the central body. Turn the attachment anticlockwise until you hear a click. The mark on the attachment has to be above the mark on the central body.
- To remove any of the attachments, you just have to press the "push" button, turn the attachment clockwise and pull up.
COLD AIR BUTTON-SWITCH: Fig.1 (2)
- This button-switch has two positions. In one of them you just press the button all the time and cold air will issue as long as you go on pressing.
-
The second position consists of pressing the button and sliding it up so that the switched is fixed, and in this way you will get a continuous flow of air.
-
To shut it off, just slide it upwards.
IONIZER SWITCH Fig.1 (4)
- Ionic technology successfully fragments the molecules of water so that they penetrate the cuticle and root of the hair more readily. This results in extra-moisturizing, which gives the hair a healthier, brighter and softer look.
- We advise you to switch on the ionizer Fig.1 (4) while drying and moulding your hairstyle, so as to achieve a better finish and additional care. The green pilot light Fig.1 (5) will come on to show that the ionizer is in operation.
ATTACHMENTS: Fig.2
- To learn how to use every attachment included with this moulder, refer to the ANNEX (Book of Hairstyles), where you are given guidelines on how to use them and the result you will obtain with each one.
CLEANING AND MAINTENANCE
- Unplug the appliance from the mains before proceeding to clean it.
- Never immerse the appliance in water.
- The appliance requires no special maintenance. It may be wiped first with a damp cloth and then with a dry one.
- Never use a wet cloth or one impregnated with solvents or abrasive detergents.
- Remove the attachments first before cleaning them.
- It is recommended to clean the air intake hole regularly Fig 1 (6) with a brush so as to remove any possible traces of dirt or hairs from the grille.
ANNEX
BOOK OF HAIRSTyles
To change the attachments, refer to the Operation section: Fitting attachments on the moulder.
20 OR 38 MM BRUSHES Fig.2 (a-b)
- TIPS INWARDS AND OUTWARDS: To mould the tips of your hair outwards or inwards, you have to use the brush attachment.
To achieve the tips effect, take a lock of hair and apply the brush at the tips twisting it inwards or outwards. Repeat this operation several times until you
get the desired effect. Mod.A
You can vary the size of the brush, depending on the finish you prefer.
VOLUME FOR LONG HAIR: You can successfully give your hair added volume by tilting your head back and combing from the root to the tips. At the beginning it is best go over the part close to the root and then continue with the rest.
Mod B
VOLUME AT THE TOP OF YOUR HAIR: To achieve volume at the top of your hair, take not too thick a lock, apply the brush to the root and raise it slightly. Repeat the operation several times until your hair is dry. Finish off the operation by pressing the cold air switch (2) to set the hairstyle. The smaller the locks, the more volume you will achieve. Mod C
TONGS Fig.2 (c)
- RINGLETS: Select a fine lock about 2cm wide. Secure the tip of the lock and twist it round. Fig 3. Open the clamp of the tongs and place the tip of the lock between the tong and the moulder tube, close the clamp Fig 4 Start to coil the lock on the clamp up to the root and hold this position. Switch on the appliance and let the hot air dry your hair. Conclude the styling by applying cold air for a few moments Fig.1 (2) so as to achieve better setting. To remove the curler, unwind it half way and then open the clamp until the lock slips out. Mod.D
- NATURAL CURLS: Select a fine lock about 2cm wide. Secure the tip of the lock and twist it round. Fig 3. Open the clamp of the tongs, place it at the root of your hair and wind it round the moulder rod from the root to the tip. When you have curled the whole lock, close the clamp. Fig 5. Hold this position. Switch on the appliance and let the hot air dry your hair. Conclude the styling by applying cold air for a few moments Fig.1 (2) so as to achieve better setting. To remove the curler, open the clamp and let all your hair slide out. Mod E
- To give both hairstyles a more natural look, slide your fingers amongst the curls and ringlets.
- If you want to mark your curls or waves or touch up your hairstyle, you can work dry with the Always Perfect attachment.
CONCENTRATOR Fig.2 (e)
- The air concentrator enables you to direct the flow of air at a given spot so as to act in depth or else dry one part of your hair. You may dry the whole of your hair thanks to its 1000 W output.
FRANÇAISE
POSE DES ACCESSOIRES SUR LA BROSSE COIFFANTE
PINCE A BOUCLER Fig.2 (c)
CONCENTRATORE Fig.2 (e)
SOUSTREDNY FEN Obr.2 (e)
- Timto fenem muzete soustredit proud vzduchu na urcitou ccast vasich vlasu. Pusobite tak na vlasy dukladne a muzete dobre vysusit ccast, kterou si zvolite. Diky prikonu 1000 W je mozné vysusit i vlasy celé.
POLSKA
STIPALJKE Crtež 2 (c)
- DUGACKI UVOJCI: Izaberite jegan tanki pramen od jegno 2 cm širine. Primate vrh pramena i zavrnite ga. Crtež 3 Otvorite štipaljku i stavite vrh pramena izmedu štipaljke i cijevi uredajza modeliranje kose, zatvorite štipaljku Crtež 4 Počnite namatati pramen na štipaljku sve do korijena, držeci ga u toj poziciji. Ukljucite uredaj i pustite da vruci zrak osusi kosu. Zavrsite frizuru koristeci nekoliko sekundi hladan zrak Crtež 1 (2) kako bi bolje fiksirali frizuru. Da bi skinuli štipaljku za kovrčanje kose, odomotaje ga do pola i nakon toga otvorite štipaljku takado uvojak klizne prema dolje.
- PRIRODNE KOKRCE: Izaberite jegan tanki pramen od jegno 2 cm širine. Primite vrh pramena i zavrnite ga. Crtež 3 Otvorite štipaljku i stavite na korijen kose i namotajte oko cijevi uredaja za modeliranje kose od korijena prema vrhu. Kad namotate cijeli vrh zatvorite štipaljku Crtež 5 Držite ga u toj poziciji. Uključite uredaj i pustite da vruci zrak osusi kosu. Zavrsite frizuru koristeci nekoliko sekundi hladan zrak Crtež 1 (2) kako bi bolje fiksirali frizuru. Da bi skinuli štipaljku za kovrčanje kose, odmotajte ga do pola i nakon toga otvorite štipaljku takod sa vsa kosa klizne prema dolje. Mod. E
- Da bi objema frizurama dai prirodniji izgled, provucite prste kroz uvojke ili kovrce.


- - ESPÁÑOL
- ENVIRONMENTAL PROTECTION
- MAIN COMPONENTS Fig.1
- OPERATION
- FITTING THE ATTACHMENTS ON THE MOULDER
- COLD AIR BUTTON-SWITCH: Fig.1 (2)
- IONIZER SWITCH Fig.1 (4)
- ATTACHMENTS: Fig.2
- CLEANING AND MAINTENANCE
- ANNEX
- BOOK OF HAIRSTyles
- OR 38 MM BRUSHES Fig.2 (a-b)
- Mod B
- TONGS Fig.2 (c)
- CONCENTRATOR Fig.2 (e)
- FRANÇAISE
- POSE DES ACCESSOIRES SUR LA BROSSE COIFFANTE
- PINCE A BOUCLER Fig.2 (c)
- CONCENTRATORE Fig.2 (e)
- SOUSTREDNY FEN Obr.2 (e)
- POLSKA
- STIPALJKE Crtež 2 (c)
Brand : SOLAC
Model : E903
Category : Hair Straightener