
Juice Extractor 203040 - Juicer PRINCESS - Free user manual and instructions
Find the device manual for free Juice Extractor 203040 PRINCESS in PDF.
| Product type | Juice extractor (fruit press) |
| Brand | Princess |
| Model | Juice Extractor 203040 |
| Usage | Domestic, indoor only |
| Speeds | 2 (slow for soft fruits, fast for hard fruits) |
| Juice jug capacity | 1000 ml maximum |
| Pulp container | Integrated, empty regularly |
| Power indicator | Yes, lights up when switched on |
| Locking handle | Yes, to secure the lid |
| Thermal protection | Yes, automatic shutdown in case of overheating |
| Filter material | Stainless steel (common estimate) |
| Continuous operation time | 10 minutes maximum, then 5 minutes rest |
| Power supply | Mains (220-240 V ~ 50/60 Hz, not precisely specified) |
| Cleaning the appliance | Do not immerse, wipe with a damp cloth |
| Cleaning accessories | By hand with soapy water, not dishwasher safe |
| Pusher | Included for pushing food into the tube |
| Juice outlet | With lid for storage |
| Warranty | Not specified, refer to manufacturer |
| Included accessories | Juice jug, pulp container, filter, pusher, lid |
Frequently Asked Questions - Juice Extractor 203040 PRINCESS
User questions about Juice Extractor 203040 PRINCESS
0 question about this device. Answer the ones you know or ask your own.
Ask a new question about this device
Download the instructions for your Juicer in PDF format for free! Find your manual Juice Extractor 203040 - PRINCESS and take your electronic device back in hand. On this page are published all the documents necessary for the use of your device. Juice Extractor 203040 by PRINCESS.
USER MANUAL Juice Extractor 203040 PRINCESS
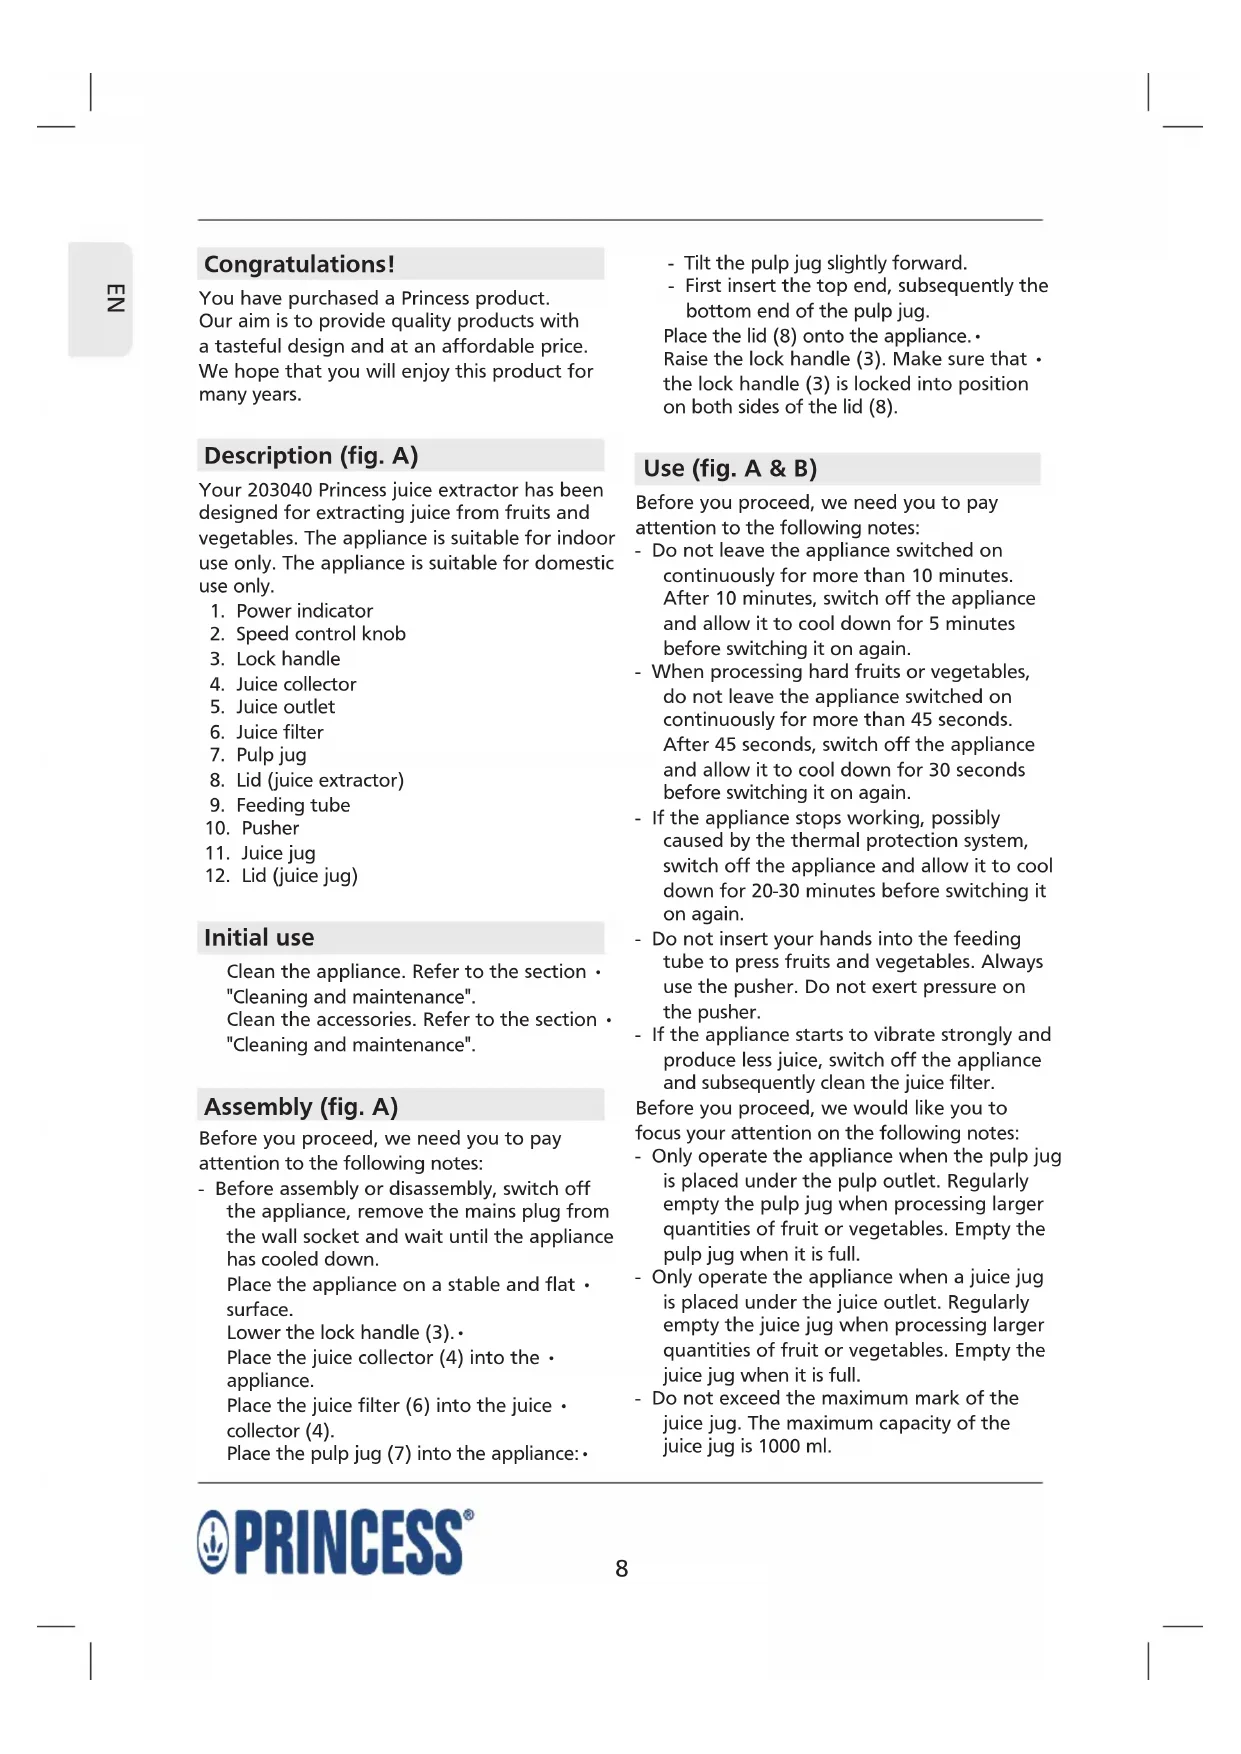
You have purchased a Princess product. Our aim is to provide quality products with a tasteful design and at an affordable price. We hope that you will enjoy this product for many years.
Description (fig. A)
Your 203040 Princess juice extractor has been designed for extracting juice from fruits and vegetables. The appliance is suitable for indoor use only. The appliance is suitable for domestic use only.
- Power indicator
- Speed control knob
- Lock handle
- Juice collector
- Juice outlet
- Juice filter
- Pulp jug
- Lid (juice extractor)
- Feeding tube
- Pusher
- Juice jug
- Lid (juice jug)
Initial use
Clean the appliance. Refer to the section "Cleaning and maintenance". Clean the accessories. Refer to the section "Cleaning and maintenance".
Assembly (fig. A)
Before you proceed, we need you to pay attention to the following notes:
- Before assembly or disassembly, switch off the appliance, remove the mains plug from the wall socket and wait until the appliance has cooled down.
Place the appliance on a stable and flat surface.
Lower the lock handle (3).
Place the juice collector (4) into the · appliance.
Place the juice filter (6) into the juice collector (4).
Place the pulp jug (7) into the appliance:
- Tilt the pulp jug slightly forward.
- First insert the top end, subsequently the bottom end of the pulp jug.
Place the lid (8) onto the appliance.
Raise the lock handle (3). Make sure that the lock handle (3) is locked into position on both sides of the lid (8).
Use (fig. A & B)
Before you proceed, we need you to pay attention to the following notes:
- Do not leave the appliance switched on continuously for more than 10 minutes. After 10 minutes, switch off the appliance and allow it to cool down for 5 minutes before switching it on again.
- When processing hard fruits or vegetables, do not leave the appliance switched on continuously for more than 45 seconds. After 45 seconds, switch off the appliance and allow it to cool down for 30 seconds before switching it on again.
- If the appliance stops working, possibly caused by the thermal protection system, switch off the appliance and allow it to cool down for 20-30 minutes before switching it on again.
- Do not insert your hands into the feeding tube to press fruits and vegetables. Always use the pusher. Do not exert pressure on the pusher.
- If the appliance starts to vibrate strongly and produce less juice, switch off the appliance and subsequently clean the juice filter. Before you proceed, we would like you to focus your attention on the following notes:
- Only operate the appliance when the pulp jug is placed under the pulp outlet. Regularly empty the pulp jug when processing larger quantities of fruit or vegetables. Empty the pulp jug when it is full.
- Only operate the appliance when a juice jug is placed under the juice outlet. Regularly empty the juice jug when processing larger quantities of fruit or vegetables. Empty the juice jug when it is full.
- Do not exceed the maximum mark of the juice jug. The maximum capacity of the juice jug is 1000ml .
Assemble the appliance. Refer to the section "Assembly".
Place the lid (12) onto the juice jug (11). Place the juice jug (11) under the juice outlet (5).
Insert the mains plug into the wall socket. The power indicator (1) comes on.
Switch on the appliance:
- To switch on the appliance with continuous low speed, turn the speed control knob (2) to the "1" position. The setting is suitable for processing soft fruits and vegetables (e.g. watermelons, grapes, raspberries, tomatoes and cucumbers).
- To switch on the appliance with continuous high speed, turn the speed control knob (2) to the "2" position. The setting is suitable for processing hard fruits and vegetables (e.g. apples, pears, carrots, cauliflower and broccoli).
Cut the fruits and vegetables into pieces that fit into the feeding tube (9).
Put the pieces of fruit and vegetables into the feeding tube (9).
Use the pusher (10) to press the pieces of fruit and vegetables through the feeding tube (9).
If necessary, empty the juice filter (6) and the pulp jug (7).
To switch off the appliance, turn the speed control knob (2) to the "0" position.
Remove the mains plug from the wall - socket. The power indicator (1) goes off. Allow the appliance to cool down - completely.
Before you pour the juice into a glass or before you store the juice into the refrigerator, make sure that the lid (12) is placed on the juice jug (11).
Hints for use
Preferably use fresh fruits and vegetables, as they contain more juice.
- Do not use fruits or vegetables with hard seeds or thick skins. Always remove hard seeds or thick skins.
-
When processing harder fruits or vegetables (e.g. carrot), use very small pieces only and do not exert more pressure on the pusher to prevent jamming of the appliance.
-
Very hard fruits, fibrous fruits and fruits with starch (e.g. bananas, mangos, papayas, avocados, dates and figs) are not suitable for the juice extractor. Use a food processor, blender or stick blender to process very hard fruits, fibrous fruits and fruits with starch.
- Very hard vegetables, fibrous vegetables and vegetables with starch (e.g. potatoes and sugar cane) are not suitable for the juice extractor. Use a food processor, blender or stick blender to process very hard vegetables, fibrous vegetables and vegetables with starch.
- It is recommended to drink the juice immediately after extraction, as the juice will quickly lose its taste and nutritional value. Add a little lemon juice or lime juice to slow down the process.
Refer to the below table for the nutritional values of a wide range of fruits and vegetables.
| Fruit/ vegetable | Nutrient | Energy |
| Apple | Vitamin C | 200g = 150kJ (72Cal) |
| Pear | Dietary fibres | 150g = 250kJ (60Cal) |
| Peach | Vitamin B3, C & K; Dietary fibres | 150g = 205kJ (49Cal) |
| Nectarine | Vitamin B3, C & K; Dietary fibres | 180g = 335kJ (85Cal) |
| Apricot | Vitamin K; Dietary fibres | 30g = 85kJ (20Cal) |
| Melon | Vitamin A & C; Dietary fibres; Folic acid | 200g = 210kJ (50Cal) |
| Kiwi | Vitamin C & K | 100g = 100kJ (40Cal) |
| Pineapple | Vitamin C | 150g = 245kJ (59Cal) |
| Grape | Vitamin B6, C & K | 125g = 355kJ (85Cal) |
| Raspberry | Vitamin C, Fe, K & Mg | 125g = 130kJ (31Cal) |
| Blueberry | Vitamin C | 125g = 295kJ (70Cal) |
| Tomato | Vitamin A, C & E; Dietary fibres; Folic acid | 1100g = 90kJ (22Cal) |
| Cucumber | Vitamin C | 280g = 120kJ (29Cal) |
| Carrot | Vitamin A, B6 & C; Dietary fibres | 120g = 125kJ (30Cal) |
| Celery | Vitamin C & K | 80g = 55kJ (7Cal) |
Cabbage Vitamin B6, C & K; Dietary fibres; Folic acid 100g = 110kJ (26Cal)
Beet Vitamin C & K; Dietary fibres; Folic acid 160g = 190kJ (45Cal)
Fennel Vitamin A, B6 & C; Dietary fibres 300g = 145kJ (35)
Brussels Vitamin B, B6, C & E; sprout Dietary fibres; Folic acid 100g = 110kJ (26Cal)
Cleaning and maintenance (fig. A)
Before you proceed, we need you to pay attention to the following notes:
- Before cleaning or maintenance, switch off the appliance, remove the mains plug from the wall socket and wait until the appliance has cooled down.
- Do not immerse the appliance in water or other liquids.
Before you proceed, we would like you to focus your attention on the following notes:
- Do not use aggressive or abrasive cleaning agents to clean the appliance.
- Do not use sharp objects to clean the appliance.
- Do not clean the appliance in the dishwasher. It is not recommended to clean the accessories in the dishwasher.
- Do not sterilise any accessories with water with a temperature higher than 80^ or in the microwave to prevent deformation or damage. The materials of all parts that come into contact with food must be clean and hygienic and comply with food hygiene certification.
Regularly check the appliance for possible damage.
Clean the outside of the appliance with a damp cloth. Thoroughly dry the outside of the appliance with a clean, dry cloth.
Clean the accessories:
- Disassemble the appliance.
-
Clean the accessories in soapy water. Rinse the accessories under running water. Thoroughly dry the accessories.
-
Assemble the appliance. Refer to the section "Assembly".
Storage
Put the appliance and the accessories in the original packaging.
- Store the appliance with the accessories in a dry and frost-free place, out of the reach of children.
Safety instructions
General safety
- Read the manual carefully before use.
- Keep the manual for future reference.
- Only use the appliance and the accessories for their intended purposes. Do not use the appliance and the accessories for other purposes than described in the manual. Children should be supervised to ensure that they do not play with the appliance.
- The appliance is not intended for use by persons (including children) with reduced physical, sensory or mental capabilities, or lack of experience and knowledge, unless they have been given supervision or instruction concerning use of the appliance by a person responsible for their safety.
- Do not use the appliance if any part or any accessory is damaged or defective. If a part or an accessory is damaged or defective, it must be replaced by the manufacturer or an authorised repair agent.
- Do not use the appliance near bathtubs, showers, basins or other vessels containing water.
- Do not immerse the appliance in water or other liquids. If the appliance is immersed in water or other liquids, do not remove the appliance with your hands. Immediately remove the mains plug from the wall socket. If the appliance is immersed in water or other liquids, do not use the appliance again.
- This appliance is intended to be used in domestic and similar applications such as staff kitchen areas in shops, offices and other working environments; farm houses; by clients in hotels, motels and other residential type environments; bed-and-breakfast type environments.
Electrical safety
Before use, always check that the mains voltage is the same as the voltage on the rating plate of the appliance.
The appliance is not intended to be operated by means of an external timer or separate remote-control system.
Connect the appliance to an earthed wall - socket. If necessary, use an earthed extension cable of a suitable diameter (at least 3 × 1 ~mm^2 ).
For additional protection, install a residual - current device (RCD) with a rated residual operating current that does not exceed 30mA .
Make sure that water cannot enter the contact plugs of the mains cable and the extension cable.
Always fully unwind the mains cable and the extension cable.
Make sure that the mains cable does not hang over the edge of a worktop and cannot be caught accidentally or tripped over.
Keep the mains cable away from heat, oil and sharp edges.
Do not use the appliance if the mains cable or the mains plug is damaged or defective. If the mains cable or the mains plug is damaged or defective, it must be replaced by the manufacturer or an authorised repair agent.
Do not pull the mains cable to disconnect the mains plug from the mains.
Disconnect the mains plug from the mains when the appliance is not in use, before assembly or disassembly and before cleaning and maintenance.
Safety instructions for juice extractors
Do not use the appliance outdoors.
Do not use the appliance in damp environments.
Place the appliance on a stable and flat surface.
Place the appliance on a heat-resistant and - splash-proof surface.
Do not place the appliance on a hob.
Make sure that the appliance does not
come into contact with flammable material.
- Keep the appliance away from heat sources. Do not place the appliance on hot surfaces or near open flames.
Make sure that your hands are dry before touching the appliance. - Beware of sharp parts. Do not touch moving parts.
- Store the appliance in a dry place when not in use. Make sure that children do not have access to stored appliances.
U.K. Wiring instructions
The wires in the mains lead are coloured in accordance with the following code:
BLUE NEUTRAL
BROWN LIVE
As the colours of the wire in the mains lead of this appliance may not correspond with the colour markings identifying the terminals on your plug, proceed as follows:
The wire which is coloured BLUE must be connected to the terminal which is marked with the letter N or coloured black.
The wire which is coloured BROWN must be connected to the terminal which is marked with the letter L or coloured red.
This is a double-insulated appliance and does not need an earth connection.
Warning! On no account should either the live or neutral wires be connected to the earth terminal.
Disclaimer
Subject to change; specifications can be changed without further notice.
Felicitations!
ConcombretVitamine C 280g = 120kJ (29Cal)
Carotte Vitamines A, B6 & C;
Fibres alimentaires 120g = 125kJ (30Cal)
Celeri Vitamines C & K 80g = 55kJ (7Cal)
Chou Vitamines B6, C & K;
Fibres alimentaires;
Acide folique 100g = 110kJ (26Cal)
Betterave Vitamines C & K;
Sedano Vitamina C & K 80g = 55kJ (7Cal)
Cavolo Vitamina B6, C & K;
Fibre alimentari;
Acido folico 100g = 110kJ (26Cal)
Barbabetola Vitamina C & K;
Fibre alimentari;
Acido folico 160g = 190kJ (45Cal)
Finocchio Vitamina A, B6 & C;
Fibre alimentari 300g = 145kJ (35Cal)
Cavolini Vitamina B, B6, C & E;
Foolihappo 160g = 190kJ (45Cal)
Fenkoli A-, B6- & C-vitamiinit;
Ravintokuituja 300g = 145kJ (35Cal)
ExTe ayopaoEi eva npoiov nC Princess.
Tóxoc macéivai vaacnapéxoume TIOIOTiKa Tpoiovtae wpaio oxediagmo oikovouke C Tlnc. EAnizouve aatolauoente auto to Tpoiov yia tonla xpovia.
περιγραφή (εικ. A)
O aioxuomega 203040 Princess exi oxiaotie yia va otubete xmuoc ato qpuota kai laxavika. H ouakeun npooipietai mvo yi xpnoan e oewtepiokouc xwpouc. H ouakeun npooipietai yia oikiakn xpnoon mvo.
- Evdeiŋ λειοργίας
- Koupié λέγχου ταχύτητας
- Kλειδωματος
- ΣυλλΕκτης χμύου
- E\xo0oc xuou
- Φιλτρο χμού
- Kavata TnAou
- KaTnaki (aToxuWThC)
- 尼 tpofooioa
- NIEOTnS
- Kavata xmuou
- KaTaki (kavata xmuou)
Apxikn xpno
Kaaiote n ouakeun. Avapepeite oToV toea "Kaapiaoos kai ouvtnpan".
Piv PPOxwpnoTe, PPETEVA OuykEvtpwoeTe TIV PPOoxn oac otic napakatw oneiwoeic:
AeitoupyeiTE TNOUKEun otav n kavata TIOATOU EXI TOTOOTNEI KATOW TO OTMO Eoou TIOAU. ADeiaZETAKTKa TNV KAVATA IOAU OTV ETIEEPYAcOTE PEyALUTEPC TIOOTNTEC FOOUTWV NlambdaVIKw. ADeiaZETnV KAVATA IOAU OTAV Eivai YEATN.
AeioyieTn oukeun movotavia kavata xmuou exei totoetnei katw aTo otomio efoou xuou.Aeiazete taktikat nV kavata xuou otav etepyaote μeyalutepe TIOOTNTc PPOUTW n Laxavikw. Aeiazete Tnv kavata xuou otav evai ymuatn.
Mny utepbaive t n oneio meyiotn 1nnpwn ts kavatac xmuu. H meyiotn xwpntikotnta tnc kavatac xuou eivai 1.000 ml.
Avavac Brqivn C 150g = 245kJ (59Cal)
Ayyoupi Brqivn C 280g = 120kJ (29Cal)
Kapóto Birtaquivn A, B6 & C;
aiat tk csi c120g = 125kJ (30Cal)
Aayavaki BnaiivB,B6,C & E;
Aolal Aoi
Jdally, plaiy Jia yjlll l j 1
Laiiall g E jy
Caiolaiy f! Caiall y jgall pni
g Caiall g jgall pni
. Jaiuaiy
Jaiuaiy
Y jn Jn Jn Jn Jn Jn Jn Jn Jn Jn Jn Jn Jn Jn Jn Jn Jn Jn Jn Jn Jn Jn Jn Jn Jn Jn Jn Jn Jn Jn Jn Jn Jn Jn Jn Jn Jn Jn Jn Jn Jn Jn Jn Jn Jn Jn Jn Jn Jn Jn Jn
jia jia jia (3) jia jia Jue
(8) 150
(BgA)
Cllla 1001111111111111111
:
J 1
10 10
5 24 40 jie
S21
ai a ai all i , j a j a
45 1 j
j5 45
30 24
11 111 111 111 111 111 111 111
jll jil 1
30-20 乙
A
10 2
- 选自自logit
aaiolai gie biwai
jai jai ji jia jia jia jia jia jia
aai jglal jiai jaiy jao
juaan li
15 15
ailll blll
1 1
1 1
jgl 1 jia jia jia jia jia jia jia jia jia jia
ailll jia 1y y
jgl 2 jgl
jinao ginszhaowie jiaqiu
(·3)
jgl 4