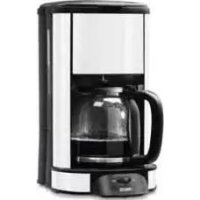
242650 - Coffee machine PRINCESS - Free user manual and instructions
Find the device manual for free 242650 PRINCESS in PDF.


| Brand | Princess |
| Model | 242650 |
| Type | Drip coffee maker |
| Power Supply | 220-240 V ~ 50/60 Hz |
| Power | 700-1000 W (estimated) |
| Water Tank Capacity | Approximately 1.25 L |
| Carafe Material | Glass |
| Functions | Pause & serve, keep warm |
| Filter Type | Permanent filter included (compatible with 1x4 paper filters) |
| Water Level Indicator | Yes |
| Hot Plate | Yes |
| Carafe Cleaning | Dishwasher safe |
| Appliance Cleaning | Damp cloth, do not immerse |
| Descaling | Every 25 uses, use a suitable descaling agent |
| Included Accessories | Permanent filter, filter holder, measuring spoon |
| Safety | For household use only, do not immerse, do not use near water |
Frequently Asked Questions - 242650 PRINCESS
User questions about 242650 PRINCESS
0 question about this device. Answer the ones you know or ask your own.
Ask a new question about this device
Download the instructions for your Coffee machine in PDF format for free! Find your manual 242650 - PRINCESS and take your electronic device back in hand. On this page are published all the documents necessary for the use of your device. 242650 by PRINCESS.
USER MANUAL 242650 PRINCESS
You have purchased a Princess appliance. Our aim is to provide quality products with a tasteful design and at an affordable price. We hope that you will enjoy this appliance for many years.
Description (fig. A)
Your 242650 Princess coffee maker has been designed for making coffee. You can make coffee using the supplied coffee filter or using paper coffee filters (1x4). The appliance is suitable for indoor use only. The appliance is suitable for domestic use only.
- On/off switch
- On/off indicator
- Coffee filter
- Coffee filter holder
- Cover
- Water reservoir
- Water level indicator
- Coffee pot
- Coffee level indicator
- Heating plate
- Coffee scoop
Note: The coffee pot is not suitable for use in the microwave.
Initial use
To clean the inside of the appliance before first use, only use water for the first few times. Refer to the section "Hints for use". Do not use a coffee filter or any ground coffee. When finished, dispose of the water. Clean the appliance. Refer to the section "Cleaning and maintenance". Clean the accessories. Refer to the section "Cleaning and maintenance".
Use
Filling the water reservoir (fig. B)
Before you proceed, we need you to pay attention to the following notes:
-
Before filling the water reservoir, switch off the appliance and remove the mains plug from the wall socket.
-
Do not fill the water reservoir with more water than required for making the coffee. Only use the amount of water required for making the coffee.
Before you proceed, we would like you to focus your attention on the following notes: - Do not use the appliance without water in the water reservoir.
- Do not exceed the maximum mark when you fill the water reservoir. Make sure that the water level is always above the minimum mark during use.
- Only use cold water to fill the water reservoir.
- Do not use carbonated water or other liquids to fill the water reservoir.
Open the cover (5).
Fill the water reservoir (6) with water up to the required mark on the water level indicator (7).
Close the cover (5).
Switching on and off (fig. A)
To switch on the appliance, set the on/off switch (1) to the 'I' position. The on/off indicator (2) comes on. The appliance starts to make the coffee.
To switch off the appliance, set the on/off switch (1) to the '0' position. The on/off indicator (2) goes off.
Hints for use (fig. A - C)
Before you proceed, we would like you to focus your attention on the following notes:
- If you use other coffee filters, only use paper coffee filters (1x4) that are suitable for the appliance.
Place the coffee pot (8) on the heating plate (10).
Open the cover (5).
Fill the water reservoir (6) with the required amount of water.
Place the coffee filter holder (4) in the appliance. Push the coffee filter holder (4) with the tabs (12) through the recesses (13) until it locks into place.
Before you proceed, we need you to pay attention to the following notes:
- If the coffee filter holder is not locked into place, the cover will not fully close and steam will escape from the appliance.
Take one of the following actions:
- Place the supplied coffee filter (3) in the coffee filter holder (4).
- Place a suitable paper coffee filter in the coffee filter holder (4).
Put the required amount of coffee in the. · coffee filter.
Close the cover (5).
Insert the mains plug into the wall socket.
To switch on the appliance, set the on/off switch (1) to the 'I' position. The on/off indicator (2) comes on. The appliance starts to make the coffee.
Before you proceed, we need you to pay attention to the following notes:
- Do not remove the cover from the water reservoir while the water is boiling.
Note: The appliance has a pause-and-serve function which makes it possible to remove the coffee pot from the heating plate while the coffee is being made. Remove the coffee pot from the heating plate to pour a cup of coffee. Place the coffee pot back on the heating plate in time to prevent the coffee filter from overflowing. The pause-and-serve function only works when the coffee filter holder is locked into place.
If the process is completed, the appliance will switch to keep-warm mode.
To switch off the appliance, set the on/off switch (1) to the '0' position. The on/off indicator (2) goes off.
Remove the mains plug from the wall socket.
Allow the appliance to cool down completely.
Cleaning and maintenance
Before you proceed, we need you to pay attention to the following notes:
-
Before cleaning or maintenance, always switch off the appliance, remove the mains plug from the wall socket and wait until the appliance has cooled down.
-
Do not immerse the appliance in water or any other liquids.
Before you proceed, we would like you to focus your attention on the following notes - Do not use aggressive or abrasive cleaning agents to clean the appliance.
- Do not use sharp objects to clean the appliance.
- The coffee pot can be cleaned in the dishwasher. Do not clean the appliance and the other accessories in the dishwasher.
Regularly check the appliance for possible damage.
Clean the accessories:
- Clean the coffee pot in soapy water or in the dishwasher.
- Clean the coffee filter and the coffee filter holder in soapy water.
- Thoroughly dry the accessories.
- Clean the outside of the appliance with a damp cloth. Dry the outside of the appliance with a clean, dry cloth.
- Store the appliance in a dry and frost-free place, out of the reach of children.
Descending the appliance (fig. A & C)
The appliance must be descaled after every 25 uses. If the appliance must be descaled, use a suitable descending agent. Special descending agents are available from our service station.
Note: Princess will not be responsible for any damage caused by descending agents.
Damage caused by not regularly descending the appliance is not covered by the guarantee.
Before you proceed, we need you to pay attention to the following notes:
- Before descending the appliance, remove the mains plug from the wall socket and wait until the appliance has cooled down.
- Do not immerse the appliance in water or any other liquids.
Before you proceed, we would like you to focus your attention on the following notes
- Be careful when descending the appliance to prevent damage to furniture or clothing.
- Do not use vinegar or vinegar concentrate to descale the appliance.
- Do not use citric acid to descale the appliance.
Fill the water reservoir (6) with a suitable - descending agent.
Place the coffee pot (8) on the heating plate (10).
Insert the mains plug into the wall socket. Switch on the appliance using the on/off switch (1).
Let the appliance run until 1/3 of the ·.
descaling agent is in the coffee pot (8).
Switch off the appliance using the on/off switch (1).
Let the descending agent work for approximately 30 minutes.
Switch on the appliance using the on/off switch (1).
Let the appliance run until the remaining - descending agent is in the coffee pot (8).
Rinse the appliance with clean water:
- Fill the water reservoir (6) with clean water up to the maximum mark on the water level indicator (7).
- Place the empty coffee pot (8) on the heating plate (10).
- Switch on the appliance using the on/off switch (1).
- Let all water run out of the appliance.
Remove the mains plug from the wall - socket.
Allow the appliance to cool down completely.
Clean the appliance. Refer to the section
"Cleaning and maintenance".
Safety instructions
General safety
Read the manual carefully before use. Keep the manual for future reference.
Only use the appliance and the accessories for their intended purposes. Do not use the appliance and the accessories for other purposes than described in the manual.
-
Do not use the appliance if any part or any accessory is damaged or defective. If a part or an accessory is damaged or defective, it must be replaced by the manufacturer or an authorised repair agent.
Children should be supervised to ensure that they do not play with the appliance. -
The use of this appliance by children or persons with a physical, sensory, mental or motorial disability, or lack of experience and knowledge can give cause to hazards. Persons responsible for their safety should give explicit instructions or supervise the use of the appliance.
- Do not use the appliance near bathtubs, showers, basins or other vessels containing water.
- Do not immerse the appliance in water or other liquids. If the appliance is immersed in water or other liquids, do not remove the appliance with your hands. Immediately remove the mains plug from the wall socket. If the appliance is immersed in water or other liquids, do not use the appliance again.
- This appliance is intended to be used in domestic and similar applications such as staff kitchen areas in shops, offices and other working environments; farm houses; by clients in hotels, motels and other residential type environments; bed-and-breakfast type environments.
Electrical safety
- Before use, always check that the mains voltage is the same as the voltage on the rating plate of the appliance.
- The appliance is not intended to be operated by means of an external timer or separate remote-control system.
- Connect the appliance to an earthed wall socket. If necessary, use an earthed extension cable of a suitable diameter (at least 3 × 1 ~mm^2 ).
- Make sure that water cannot enter the contact plugs of the mains cable and the extension cable.
Always fully unwind the mains cable and the extension cable.
Make sure that the mains cable does not hang over the edge of a worktop and cannot be caught accidentally or tripped over.
- Keep the mains cable away from heat, oil and sharp edges.
- Do not use the appliance if the mains cable or the mains plug is damaged or defective.
If the mains cable or the mains plug is damaged or defective, it must be replaced by the manufacturer or an authorised repair agent.
Do not pull the mains cable to disconnect the mains plug from the mains.
Disconnect the mains plug from the mains when the appliance is not in use, before assembly or disassembly and before cleaning and maintenance.
Safety instructions for coffee makers
Place the appliance on a stable and flat surface.
Place the appliance on a heat-resistant and splash-proof surface.
Do not place the appliance on a hob.
Do not place the appliance on hot surfaces or near open flames.
Make sure that the appliance does not come into contact with flammable material.
Keep the appliance away from heat - sources.
Be careful with hot water and steam to avoid burns.
Store the appliance in a dry place when not in use. Make sure that children do not have access to stored appliances.
U.K. Wiring instructions
The wires in the mains lead are coloured in accordance with the following code:
BLUE NEUTRAL
BROWN LIVE
GREEN/YELLOW EARTH
As the colours of the wire in the mains lead of this appliance may not correspond with the colour markings identifying the terminals on your plug, proceed as follows:
The wire which is coloured BLUE must be connected to the terminal which is marked with the letter N or coloured black.
The wire which is coloured BROWN must be connected to the terminal which is marked with the letter L or coloured red.
The wire which is coloured GREEN/YELLOW must be connected to the terminal which is marked with the letter E or ( ) and is coloured GREEN or GREEN/YELLOW.
If a 13Amp (BS1363) plug is used, a 13Amp (BS1362) fuse must be fitted, or if any other type of plug is used, a 13Amp fuse must be fitted, either in the plug or adaptor, or on the distribution board.
Warning! This appliance must be earthed.
Disclaimer
Subject to change; specifications can be changed without further notice.
Felicitations!
Sous reserve de modifications;
Piv PPOxwpnoTe, PPETeI VA OuykEVPwoTe TIV PPOOxH oac otis napakatw oneiwoeic:
-Mv npoiotoeite duata n diaipwtka kaapotnka yia va kathetaeTe tn ouakeun.
-Mx npoiopoioaneixunpaavikeiEvayvaKaOapoeTe noukeun.
To doxio Tou kae μTopei va kaθapiotei OTO Tlauvtnpio Tiatow. Mny kaθapizTe Tn Suokeu n KAI ta aaaa εaaptnmuata oTo Tlauvtnpio Tiatow.
ELeyxTe TAKTIa Tn OoKEun Yia TiOavcs Znmues.
KaatapioTe a eaptnmuata:
J 1 J 1 J 1 J 1 J 1 J 1 J 1 J 1 J 1 J 1 J 1 J 1 J 1 J 1 J 1 J 1 J 1 J 1 J 1 J 1 J 1 J 1 J 1 J 1 J 1 J 1 J 1 J 1 J 1 J 1 J 1 J 1 J 1 J 1 J
#
jaiwoguiwzbs jglalgai
pagao gaii dian zbs jglalgai
. jrall
aiaia jglalgaiy
jajjaiygiiaiau zbs jglalgaiy
. gaiall y
aayjaiyaiy jglalgyi piicn a5li
Jaiiy
J 1 J 1 1 1 1 1 1 1 1 1 1 1 1 1 1 1 1 1 1 1 1 1 1 1 1 1 1 1 1 1 1
1111111111111111111
A. 1,2,3 , 4,5 , 6,7\
Jai jn Jn Jn Jn Jn Jn Jn Jn Jn Jn Jn Jn Jn Jn Jn Jn Jn Jn Jn Jn Jn Jn Jn Jn Jn Jn Jn
a_i = 70%
a
aee
Jdally 1
Jiaiunall 4y11 y2
Cldi 8! Cldaall jglal prn
a 1
- 1.
jL jI iJi
25 1s jgljll jgljll jll j
S = 81
j_a = 1
(·6)cllljzclpa
A
(10) (8)
bilaill jia 5y
alj/ jiei claiall pliyjgliljuy
(1)
allj 1/3 j5
(8)
/1jaii ciiaal jaiy jaii jaiy
.(1)
30 30
山
/1j. 10
(2)
aaiia 1
olii 1iio jj i0jbiil alolso
ai = bi
Jia 1
yoo 00 y
a
Jglgl J 00g j glal gJgljw2
JlJI J5 J1 11 jj j j 11 gblal alg J
:Jllblal
i1i
jglll golll cwlil y 2. jglall allw e gall say - 111111111111111111
aall 1i1y
8gall jalol g 8gall jilal a lill y - 1. gall g all lall .alaj lalal
a b j 1000000000000000000000000000000000000000000
.(10)
alall jai (·6)cllljz cay
Jilldl (4) 8gall Jala Lc
Cus Gaa (13) glll (12)
a_i (S,a, ,0) jai
gagll jla Jyaiu Gaaal 12
jie 1
1
Jol (3) joll gall jla 4
Jalai wlll l gall jia
(4)
.8gall jilie gail ball 8gall Jia
(·5)
Jilll Jilll
1
.0001 2
alil 1i jj jglgbll alolg
iilll lalxll
elall jull clll all jjs jce bzz
iia 1
c 10000000000000000000000000000000000000000000000000
g j 0 g j 1 j 1 j 1 j 1 j 1 j 1 j 1 j 1 j 1 j 1 j 1 j 1 j 1 j 1 j 1 j 1 j 1 j 1 j 1 j 1 j 1 j 1 j 1 j 1 j 1 j 1 j 1 j 1 j 1 j 1 j 1 j 1 j 1 j 1
jaiol gao laic bao jaoi plai jic ailsa oogall jia Jolz
g jll Jjaiy jaiai Jaii S
ai + 1 = 12ai
1
(B)
alilil 1g jj gblal
ydl
l_BC = 5.
Jg jia jie aall alal all jai jaii
aiaaa aa aee
- “pssssssssssssssssssssssssssssssssssssssssssssssssssssssssssssssssssssssssss
0gai 15gi jia li jia jia jia jia jia
alall joo alisi .gaii lioic .aiyaball
"ill" p 11. jlaaity
"ii
aill" a 1
"iiil



- Description (fig. A)
- Initial use
- Use
- Filling the water reservoir (fig. B)
- Switching on and off (fig. A)
- Hints for use (fig. A - C)
- Cleaning and maintenance
- Descending the appliance (fig. A & C)
- Safety instructions
- General safety
- Electrical safety
- Safety instructions for coffee makers
- U.K. Wiring instructions
- Disclaimer
- Felicitations!
- #
- 1111111111111111111
- 1,2,3 , 4,5 , 6,7\
- a
- aee
- aaiia 1
- 1
- (B)
Brand : PRINCESS
Model : 242650
Category : Coffee machine