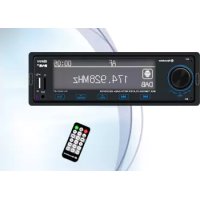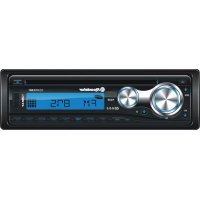
CD810UMPN - Car stereo ROADSTAR - Free user manual and instructions
Find the device manual for free CD810UMPN ROADSTAR in PDF.


User questions about CD810UMPN ROADSTAR
0 question about this device. Answer the ones you know or ask your own.
Ask a new question about this device
Download the instructions for your Car stereo in PDF format for free! Find your manual CD810UMPN - ROADSTAR and take your electronic device back in hand. On this page are published all the documents necessary for the use of your device. CD810UMPN by ROADSTAR.
USER MANUAL CD810UMPN ROADSTAR
This product meets the essential requirements laid down by EEC Directive 89/336 and has been built in accordance with European standards EN50013, EN50020.
Car Stereo CD-MP3 Player with PLL / RDS AM/FM Stereo Radio, USB-Port, 4 x 7 W RMS.
CD-810UMP
Instruction manual
Bedienungsanleitung
Roadstar is a registered Trademark of Roadstar S.A. - Switzerland All rights reserved
Português
61
ATENÇÃO

MANUAL DE INSTRUÇÕES
text_image
KEYS HEX NUT PLAIN WASHER MOUNTING STRAP SPRING WASHER TAPPING SCREW HEX BOLT MOUNTING SLEEVEPTY music group —— PTY speech group —— OFF
MUSICA DISCURSO
UNKNOWN SONGNAME> UNKNOWN ARTIST> NO ALBUM TITLE >UNKNOWN
YEAR > NO COMMENTS
text_image
KEYS MOUNTING STRAP HEAVOLT SPRING WASHER TAMF MASS CREAM MOUNTING DUBEVE19. TECLA REPEAT 'REPEAT'
UNKNOWN SONGNAME> UNKNOWN ARTIST> NO ALBUM TITLE > UNKNOWN
YEAR > NO COMMENTS
ACCENSIONE/SPEGNIMENTO(1)
C. Ricerca per album (Directory)
UNKNOWN SONGNAME> UNKNOWN ARTIST> NO ALBUM TITLE > UNKNOWN
YEAR > NO COMMENTS
Correct Disposal of This Product (Waste Electrical & Electronic Equipment)
This marking shown on the product or its literature, indicates that it should not be disposed with other household wastes at the end of its working life. To prevent possible harm to the environment or human health from uncontrolled waste disposal, please separate this from other types of wastes and recycle it responsibly to promote the sustainable reuse of material resources.
Household users should contact either the retailer where they purchased this product, or their local government office, for details of where and how they can take this item for environmentally safe recycling. Business users should contact their supplier and check the terms and conditions of the purchase contract. This product should not be mixed with other commercial wastes for disposal.
FrançaisFr
CD-810UMP
flowchart
graph TD
    A["HEX BOLT"] --> B["MOUNTING SLAVE"]
    B --> C["MOUNTING STRAP"]
    C --> D["KEYS"]
    D --> E["HEX NUT PLAIN WASHER"]
    C --> F["SPIRNG WASHER"]
    C --> G["TAPPING SCREW"]
    B --> H["MOUNTING SLEEVE"]
REPLACEMENT DES FUSIBLES
In TA seek mode, the current station can be changed to the completely different station because the unit searches TP station when the field strength of the current station is very weak, or the current station has no TP signal.
-Mode ALARMETA:
5.SOCIAL, RELIGION, TELEPHONE
- VOYAGES, DIVERTISSEMENT, DOCUMENTAIRES
(B) MODALITE LECTEUR MP3 (CD/USB)
- PAUSE 2. BALAYAGE 3. REPETITION 4. CASUEL
LA FONCTION RDS. QU'EST-CE QUE LE SYSTEMER DRS?
UNKNOWN SONGNAME> UNKNOWN ARTIST> NO ALBUM TITLE > UNKNOWN YEAR > NO COMMENTS
text_image
KEYS MOUNTING STRAP HEX NUT PLAIN WASHER SPRING WASHER TAPPING SCREW HICK BOLT MOUNTING SLEEVEUNKNOWN SONGNAME> UNKNOWN ARTIST> NO ALBUM TITLE > UNKNOWN
YEAR > NO COMMENTS
The exclamation point within the triangle is a warning sign alerting the user of important instructions accompanying the product.

The lightening flash with arrowhead symbol within the triangle is a warning sign alerting the user of "dangerous voltage" inside the unit.

To reduce the risk of electric shock, do not remove the cover. No user serviceable parts inside the unit. Refer all servicing to qualified personnel.

Invisible laser radiation when the unit is opened or interlocks defeated. Avoid exposure to laser beam. Use of controls, adjustments or procedures other than those specified herein may result in hazardous radiation exposure.

This unit must not be exposed to moisture or rain.

This unit should be positioned so that it is properly ventilated.

Do not expose this unit to direct sunlight or heat radiating sources.
1
2
EnglishEng
CD-810UMP
Car Stereo CD-MP3 Player with PLL AM / FM Stereo Radio RDS with PTY and USB. Detachable Front Panel System
INSTRUCTION MANUAL
Please read this instruction manual carefully and familiarize yourself with your new Radio before using it for the first time. Please retain this manual for future reference.
TABLE OF CONTENTS
- Location of Controls
- Features
- Installation
• Precautions and Maintenance
- Operating Instructions
- Specifications
LOCATIONS OF CONTROLS
-
POWER ON/OFF
-
FUNCTION SELECT BUTTON: BASS/TREBLE/BALANCE/FADER / TA SEEK / PI / LOUDNESS/BEEP/AUDIO DSP/LOC-DX(/STEREO. "ENTER" IN MP3 MODE.
-
VOL UP/VOL DOWN FOR BASS/TREBLE/BALANCE/FADER
-
PRESET STATIONS (1,2,3,4,5,6)
-
'AF' function (ALTERNATIVE FREQUENCIES)
-
'TA' function (TRAFFIC ANNOUNCEMENT)
-
'PTY' function (PROGRAM TYPE)
-
- 10 BUTTON (CD / MP3)
-
MODE BUTTON (MODE)
-
BAND BUTTON
-
AUTOMATIC OR MANUAL TUNING (FREQ UP >> OR FREQ DOWN << / CD - USB (MP3) TRACK SKIP BUTTON
-
- 10 BUTTON (CD / MP3
-
LCD DISPLAY
-
PANEL RELEASE BUTTON
-
USB PORT
-
CD SLOT-IN
-
PAUSE BUTTON
-
INTRO BUTTON (CD SCAN)
-
REPEAT BUTTON (REPEAT)
-
RANDOM BUTTON (SHUFFLE)
-
RESET BUTTON (on main unit)
-
CD EJECT BUTTON

3
FEATURES
The unit features a detachable front control panel, AM/FM stereo RDS, CD - USB:
• Electronic Volume, Bass, Treble, Fader and Balance control.
• CD Player with antishock protection
- Precision electronic tuning with phase-lock loop (P.L.L.) circuitry.
- Programmable 30 preset memory tuning (18 for FM and 12 for AM)
- Loudness control
- Manual / Auto (Seek) / up and down tuning control
• Band selector for FM1/ FM2 / FM3 / MW1 / MW2
- Clock Function in RDS
- MP3 Repeat Function
- Preamplified Line-out
- Detachable front panel protects against theft
- Lighting system
• RDS Function: PI (Program Identification) TA (Traffic Announcement)
PS (Program Service Name) PTY (Program Type)
AF (List of Alternative Frequencies)
TP (Traffic Program)
INSTALLATION
PRECAUTIONS
- Choose the mounting location carefully so that the unit will not interfere with the normal driving functions of the driver.
- Avoid installing the unit where it would be subject to high temperatures, such as from direct sunlight or hot air from the heater, or where it would be subject to dust, dirt or excessive vibration.
- Use only the supplied mounting hardware for a safe and secure installation.
- Be sure to remove the front panel before installing the unit.
Mounting angle adjustment
Adjust the mounting angle to less than 20^ .
4
EnglishEng
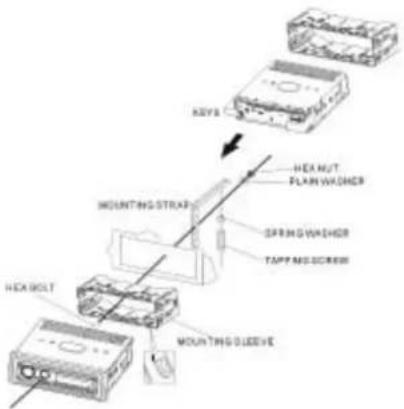
MOUNTING EXAMPLE
Installation in the dashboard
text_image
HEA BOLT MOUNTING STRAP BEETING STRAP BEETING SLABEVE BEETING PLANE WASHER BEETING WASHER TAPPE AND SCREW BEETING PLANE WASHER BEETING PLANE WASHER BEETING PLANE WASHER BEETING PLANE WASHER BEETING PLANE WASHER BEETING PLANE WASHER BEETING PLANE WASHER BEETING PLANE WASHER BEETING PLANE WASHER BEETING PLANE WASHER BEETING PLANE WASHER BEETING PLANE WASHERNote: Keep the release key in the safe place as you may need it in future to remove the unit from the car.
Detaching and attaching the front panel
The front panel of this unit can be detached in order to prevent the unit from being stolen.
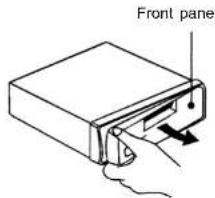
DETACHING THE FRONT PANEL
Before detaching the front panel (14), be sure to press the PWR button (1) To OFF first. Pull out the panel towards you in order to detach completely the panel from the main unit. Refer to below instruction.

5
text_image
Front panel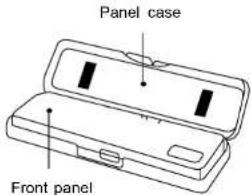
text_image
Panel case Front panelATTACHING THE FRONT PANEL
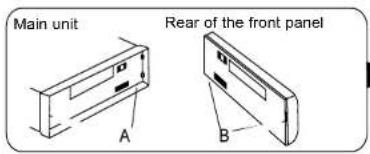
Make sure the front panel is the right way up when attaching it to the unit as it cannot be attached upside down. Bring side B of panel to side A of main unit.
Insert the panel in and push until it clicks.
Panel is attached.
text_image
Main unit A B Rear of the front panel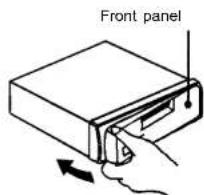
text_image
Front panelNotes:
- Do not press the front panel hard against the unit when attaching it. It can be easily attached by pressing it lightly against the unit.
- When you carry the front panel with you, put it in the supplied front panel case.
- Do not press hard or give excessive pressure to the display window of the front panel when attaching it to the unit.
6
EnglishEng
BUILT-IN ISO CONNECTOR
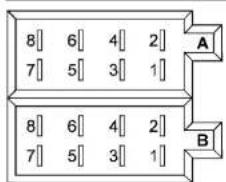
text_image
8|| 6|| 4|| 2|| 7|| 5|| 3|| 1|| A B 8|| 6|| 4|| 2|| 7|| 5|| 3|| 1||RCA Jack Line Out (Rear) -
Gray : Red (right)
: White (left)
CONNECTOR A
- MEMORY +12V
- AUTO ANTENNA OUTPUT
- +12V (TO IGNITION KEY)
- GROUND
Note: 12 V wire (connector A no. 7) must be connected by car ignition key in order to avoid that car battery becomes weak when the car will be not used for long period.
CONNECTOR B
- REAR RIGHT SPEAKER (+)
- REAR RIGHT SPEAKER (-)
- FRONT RIGHT SPEAKER (+)
- FRONT RIGHT SPEAKER (-)
- FRONT LEFT SPEAKER (+)
- FRONT LEFT SPEAKER (-)
- REAR LEFT SPEAKER (+)
- REAR LEFT SPEAKER (-)
Maintenance
FUSE REPLACEMENT
If the fuse blows, check the power connection and replace the fuse. If the fuse blows again after the replacement, there may be an internal malfunction. In this case, consult your nearest repairing centre.

7
Warning
Use the specified amperage fuse for each lead. Use of a higher amperage fuse may cause serious damage.
OPERATING INSTRUCTIONS
POWER ON/OFF (1) (PWR)
Insert the front panel in the unit and push Power button in order to switch on the unit. Push PWR button newly in order to switch off the unit and push REL button (14) to release the front panel.
Note: Never release the front panel when the unit is on. Power remains on even when car radio is off.
SELECT (2) VOLUME UP/DOWN (3)
Rotate the VOLUME Knob (3) to control the VOLUME. To select other functions, press the SELECT (2) button shortly until the desired functions is shown on the display. Figure 1 shows how control functions are selected using the SELECT button.
- VOLUME (rotate knob)
- SELECT (push down)
- BASS
- TREBLE
- BALANCE
- FADER
- LOUDNESS ON / OFF
- DSP (ROCK - POP - CLASS - SDP OFF)
- DX/LOC
- STEREO / MONO Fig. 1
3. VOLUME CONTROL
Rotate the VOLUME knob to increase or decrease the volume. This knob can be used to adjust the BASS, TREBLE, BALANCE and FADER.
This knob also selects the possible options in RDS function.
TA SEEK/TA ALARM (2)
When press the SEL button for more than 2 seconds, it is activated as selecting mode of these function. Turn the volume knob to select:
TA SEEK Mode or TA ALARM mode.
8
EnglishEng
- TA SEEK mode:
When newly turned station does not receive TP information for 5 sec., the radio returns to next station which has not the same station (PI) as the last station, but has the TP information.
In TA seek mode, the current station can be changed to the completely different station because the unit searches TP station when the field strength of the current station is very weak, or the current station has no TP signal.
- TA ALARM mode:
Any automatic return mode is not activated, just can be heard Beep sound.
PI SOUND / PI MUTE
- PI SOUND
When a car cruises some special area which has different PT code with same AF. PI sound (DIP) is heard once in a while, the DIP's sound will be heard for less than 1 second.
- PI MUTE
Under the above same situation, a mute sound will be heard for less than 1 sec.
RETUNE L / RETUNE S
The initial time of automatic TA search or PI search mode is selected. When PI information is not caught for return time, the radio start to return to next same PI station. When same PI station does not catch 1 cyclic search, the radio goes to last station and waits for 4-5 minute until PI code is received.
4. PRESET STATIONS (1,2,3,4,5,6)
(A) RADIO MODE:
When pressed short, these keys select a preset station directly. When pressed longer than 1 sec., current station is stored in preset memory bank. When PTY mode is selected, the PTY switch is shared as follows:
PTY music group ---- PTY speech group ---- OFF
MUSIC SPEECH
- POP M, ROCK M 1. NEWS, AFFAIRS, INFO
- M.O.R. M, LIGHT M 2. SPORT, EDUCATE, DRAMA
- CLASSICS, OTHER M 3. CULTURE, SCIENCE, VARIED
- JAZZ, COUNTRY 4. WEATHER, FINANCE, CHILDREN
- NATION M, OLDIES 5. SOCIAL, RELIGION, PHONE IN
- FOLK 6. TRAVEL, HOBBIES, DOCUMENT
USING THE RDS FUNCTION

9
What is RDS?
The RDS (Radio Data System) is a digital information system developed by the EBU (European Broadcast Union). Piggy-backed on normal FM broadcasts, RDS offers a variety of information services and automatic retuning functions for RDS-compatible car stereos.
In 1988, RDS became available in the United Kingdom, France, West Germany, Ireland and Sweden. Test transmissions are being conducted in many other european countries. It is expected that RDS will be available in most western european countries in the near future.
5. 'AF/REG' function (ALTERNATIVE FREQUENCIES)
When pressed, AF/REG switchig mode is selected.
When AF/REG switching mode is selected, the radio checks the signal strength of the AF all the time. When pressed long, it is activated as regional mode ON/OFF.
- Regional mode ON:
AF switching or PI SEEK is implemented to the station which have all PI codes same as current station. REG segment is turned on, in LCD display.
- Regional mode OFF
The regional code in the format of PI code is ignored when AF switching or PI SEEK is implemented.
6. 'TA' function (TRAFFIC ANNOUNCEMENT)
When pressed short, it is activated as TA mode on or off
When TA mode is on and traffic announcement is transmitted
- When the unit is it CD/MP3 mode, it will switch to radiomode temporarily.
- If the volume level was under the threshold point, it will be raised to the threshold point.
- When TP station is received, TP segment is turned on in LCD display.
7. 'PTY' function (PROGRAM TYPE)
While selecting PTY type, its selection is implemented by preset buttons as described in preset key. When PTY is selected, the radio starts to search corresponding PTY information, and stops if the corresponding PTY information, is detected.
8. + 10 BUTTON (CD / USB MP3)
Press this button to skip 10 tracks each time up of CD / USB MP3
9. MODE BUTTON (MODE)
By pressing this key, user can select.
RADIO mode or USB - CD mode.
10. BAND BUTTON (BAND)
Each band is toggled cyclically by pressing this key FM1—FM2—FM3—MW1—MW2.
In CD / USB (MP3) mode, when this key is pressed it is operated as the conversion of each display mode as follow:
10
EnglishEng
TITLE - SONG - ARTIST - DIRECTORY
11. AUTOMATIC OR MANUAL TUNING (FREQ UP >> OR FREQ DOWN <<)
(A) RADIO MODE
When pressed short, these keys are operated as MANUAL tuning mode.
When pressed longer than 1 sec., they are operated as SEEK tuning mode.
When pressed short, they are operated as TRACK UP or TRACK DOWN mode.
12. - 10 BUTTON (CD / USB MP3)
Press this button to skip 10 tracks each time back of CD / USB MP3
15. USB PORT
17. PAUSE BUTTON
During "PLAY", press (17) 'PAUSE' button to "PAUSE". Press it again to resume play.
18. INTRO BUTTON (MP3 SCAN)
When this button is pressed, 'SCN' indication is displayed and the first several seconds of each track of the disc are played. Press again to stop intro and listen to track.
19. REPEAT BUTTON 'REPEAT'
When this button is pressed, 'RPT' indication is displayed and play of the selected track will be continually repeated until the Track repeat mode is cancelled by pressing 'RPT' button again.
20. RANDOM BUTTON 'SHUFFLE'
When this button is pressed, 'SHF' indication is displayed and each track of the disc are played in random instead of normal progression. To cancel RANDOM mode, press 'SHF' button (20) again.
21. RESET BUTTON
Reset button (25) is placed on the housing
The reset button is to be activated for the following reason:
- Initial installation of the unit when all wiring is completed.
- All the function buttons do not operate properly.
- Error symbol on the display.
ID3 Tag
Press BAND button repeatedly to Display ID3 TAG information.
If the MP3 file is available with ID3 TAG, pressing the display button repeatedly will show information in the following sequence:
SONG TITLE > ARTIST > ALBUM TITLE > YEAR > COMMENTS
If any of the ID3-TAG information is not available, pressing the BAND button repeatedly will show information in the following sequence:
UNKNOWN SONGNAME> UNKNOWN ARTIST> NO ALBUM TITLE > UNKNOWN YEAR > NO COMMENTS
If the MP3 file is without ID3 TAG, pressing the BAND button, "NO ID3 TAG" will be displayed.
The file name & track number of the MP3 file will scroll repeatedly through the display during the playing of the MP3 file.
HOW TO SELECT MP3 FILES
A. Searching Track directly
Keep pressed the BAND Button (10) once, the displays shows "TRK SCH": select the MP3 track by rotate the Volume knob (3) to scroll through the numbers. Then press ENTER(VOLUME) to confirm.
B. Searching by Directory or File name
Keep pressed the BAND twice, the displays shows "FILE SCH". Enter the character directly. The unit searches files and directories which have the same character which is inputted by the user. The unit shows these sorted files and directories by VOLUME UP / DOWN (1) Knob. If the selected name is directory, the user can go into the selected directory by press MP3 ENTER BUTTON and continue to search the directory or file name in the directory by VOLUME UP / DOWN knob. The selected file can be played by pressing MP3 Enter Button.
Rotate the Volume knob (3) in both directions to scroll through the characters (alphanumerical). Then press ENTER (VOLUME) to confirm.
C. Searching from Directory
SEARCH DIRECTORY BY USING VOLUME UP / DOWN KNOB.
Under MP3 play mode, keep pressed BAND three times. Then the first Directory name is shown (DIR SCH). Move VOLUME UP/DOWN to navigate through the directory list, press MP3 ENTER BUTTON to select the desired directory. Select the tracks under the selected directory, press MP3 ENTER KNOB knob again to confirm when desired track is found. Rotate the Volume knob (1) in both directions to scroll through the characters (alphanumerical). Then press MP3 ENTER BUTTON (3) to confirm.
EnglishEng
SPECIFICATIONS
CD/MP3 PLAYER SECTION
Signal to Noise Ratio > 70dB
Channel Separation > 50 dB (1kHz)
Frequency Response 20Hz - 20 kHz
TUNER
Sensitivity 2 dBμ
Stereo separation 35 dB
Signal to noise radio 55 dB
FM Frequency range 87.5-108 MHz
MW Frequency Range: 522 - 1620 KHz
Channel step FM: 50 kHz
Channel step MW: 9 kHz
Intermediate frequency 10.7 MHz
LINE-OUT
Output 350mV max.
Impedance 10kOhm
GENERAL
Power Supply 13.8V DC
(10.8-15.6V allowable)
Speaker impedance 4 or 8 ohm
Output power 7 W (RMS) x 4CH
Note: Specifications and the design are subject to possible modification without notice due to improvement.

Correct Disposal of This Product (Waste Electrical & Electronic Equipment)
This marking shown on the product or its literature, indicates that it should not be disposed with other household wastes at the end of its working life. To prevent possible harm to the environment or human health from uncontrolled waste disposal, please separate this from other types of wastes and recycle it responsibly to promote the sustainable reuse of material resources.
Household users should contact either the retailer where they purchased this product, or their local government office, for details of where and how they can take this item for environmentally safe recycling. Business users should contact their supplier and check the terms and conditions of the purchase contract. This product should not be mixed with other commercial wastes for disposal.
INDEX
English Page 1
Deutsch Seite 13
Français Page 25
Italiano Pagina 37
Español Página 49
Portuguès Pagina 61

text_image
F=0 F=0- Your new unit was manufactured and assembled under strict ROADSTAR quality control. Thank-you for purchasing our product for your music enjoyment. Before operating the unit, please read this instruction manual carefully. Keep it also handy for further future references.