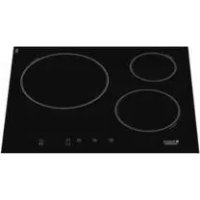
KIA 630 C (FR) S - Cooker HOTPOINT-ARISTON - Free user manual and instructions
Find the device manual for free KIA 630 C (FR) S HOTPOINT-ARISTON in PDF.



| Product type | Built-in induction hob |
| Brand | Hotpoint-Ariston |
| Model | KIA 630 C (FR) S |
| Number of cooking zones | 3 |
| Total power | 6600 W |
| Power of cooking zones | Rear left: 1400 W; Rear right: 3000 W (with booster 4000 W); Front left: 2200 W |
| Booster function | Yes, on the rear right cooking zone (3000/4000 W), maximum duration 4 minutes |
| Timer | Yes, from 1 to 99 minutes for each cooking zone |
| Minute minder | Yes, up to 99 minutes |
| Control lock | Yes, with indicator light |
| Pan detection | Yes, each cooking zone detects the presence of a suitable pan |
| Automatic safety shut-off | Yes, after a maximum duration depending on the power level (e.g., level 5: 5 hours) |
| Overheating protection | Yes, automatic shut-off and code display |
| Power supply | 220-240 V 1+N ~ 50 Hz (single-phase); possible 400 V 2+N, 220-240 V 3~, 400 V 3+N, 400 V 2+2N |
| Cooking surface | Ceramic glass |
| Care | Cleaning with a damp sponge and special ceramic glass cleaner; use a scraper for stubborn stains |
| Child safety | Control lock |
| Demo mode | Yes, accessible via key combination |
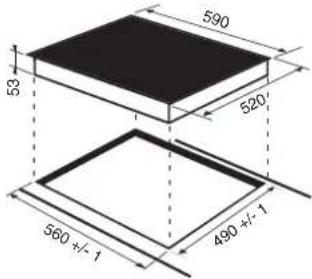
| Cut-out dimensions (W x D) | Approximately 560 x 490 mm (estimate); refer to the installation diagram |
| Weight | Approximately 8 kg (estimate) |
Frequently Asked Questions - KIA 630 C (FR) S HOTPOINT-ARISTON
User questions about KIA 630 C (FR) S HOTPOINT-ARISTON
0 question about this device. Answer the ones you know or ask your own.
Ask a new question about this device
Download the instructions for your Cooker in PDF format for free! Find your manual KIA 630 C (FR) S - HOTPOINT-ARISTON and take your electronic device back in hand. On this page are published all the documents necessary for the use of your device. KIA 630 C (FR) S by HOTPOINT-ARISTON.
USER MANUAL KIA 630 C (FR) S HOTPOINT-ARISTON
Operating Instructions HOB
Contents
Operating Instructions,1
WARNING,2
Description of the appliance - Control Panel, 7
Installation, 12
Start-up and use,14
Precautions and tips,18
Care and maintenance, 19
Technical description of the models, 19
FR
Français
Description of the appliance Control panel
The control panel described in this manual is only a representative example: it may not exactly match the panel on your appliance.
1 INCREASE POWER button switches on the hotplate and controls the power (see Start-up and use). 2 REDUCE POWER button controls the power and switches off the hotplate (see Start-up and use). 3 COOKING ZONE SELECTOR indicator shows a particular cooking zone has been selected and therefore various adjustments are possible. 4 COOKING ZONE SELECTOR button is used to select the desired cooking zone. 5 POWER indicator provides a visual display for the current heat level. 6 ON/OFF button switches the appliance on and off. 7 ON/OFF indicator light shows whether the appliance is on or off. 8 PROGRAMME TIMER button controls the cooking programme times (see Start-up and use). 9 PROGRAMME TIMER display shows which programme has been selected (see Start-up and use). 10 COOKING ZONE PROGRAMMED indicator lights show which cooking zones are being used during a cooking programme (see Start-up and use). 11 CONTROL PANEL LOCK button prevents accidental changes to the hob settings (see Start-up and use). 12 CONTROL PANEL LOCK indicator light shows the control panel has been locked (see Start-up and use). 13 BOOSTER button activates the booster function of the cooking zone (see Start-up and use). 14 BOOSTER indicator light shows that the booster function has been activated. 15 TIMER indicator light shows that the timer has been activated
This product complies with the requirements of the latest European Directive on the limitation of power consumption of the standby mode.
If no operations are carried out for a period of 2 minutes, after the residual heat indicator lights turn off and the fan stops (if present), the appliance automatically switches to the .off mode..
The appliance resumes the operating mode once the ON/OFF button is pressed.
* Only available in certain models.

!Before operating your new appliance please read this instruction booklet carefully. It contains important information concerning the safe operation, installation and maintenance of the appliance. !Please keep these operating instructions for future reference. Pass them on to any new owners of the appliance.
Positioning
!Keep all packaging material out of the reach of children. It may present a choking or suffocation hazard (see Precautions and tips). !The appliance must be installed by a qualified professional in accordance with the instructions provided. Incorrect installation may cause harm to people and animals or may damage property.
Built-in appliance
Use a suitable cabinet to ensure that the appliance functions properly.
- The supporting surface must be heat-resistant up to a temperature of approximately 100°C .
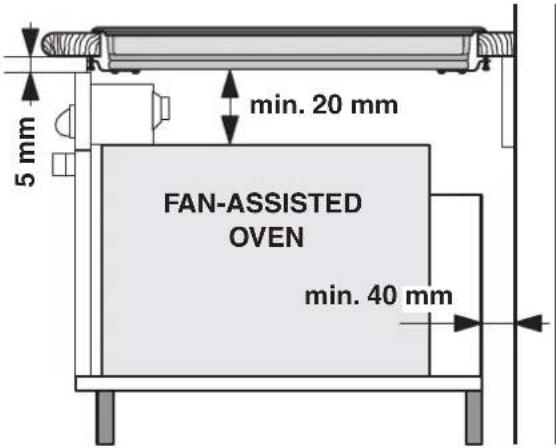
- If the appliance is to be installed above an oven, the oven must be equipped with a forced ventilation cooling system.
- Avoid installing the hob above a dishwasher: if this cannot be avoided, place a waterproof separation device between the two appliances. Depending on the hob you want to install, the cabinet must have the following dimensions (see figure):
Ventilation
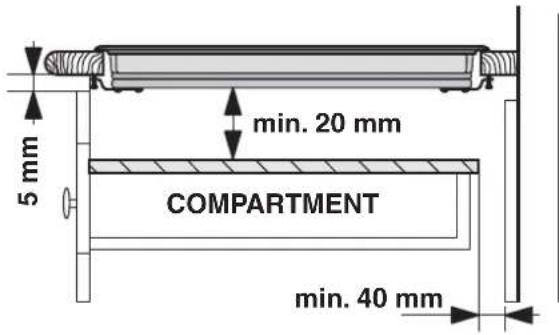
To allow adequate ventilation and to avoid overheating of the surrounding surfaces the hob should be positioned as follows:
- At a minimum distance of 40mm from the back panel or any other vertical surfaces.
- So that a minimum distance of 20 mm is maintained between the installation cavity and the cabinet underneath.
- Kitchen cabinets adjacent to the appliance and taller than the top of the hob must be at least 600 mm from the edge of the hob.

Fixing
The appliance must be installed on a perfectly level supporting surface.
Any deformities caused by improper fixing could affect the features and operation of the hob.
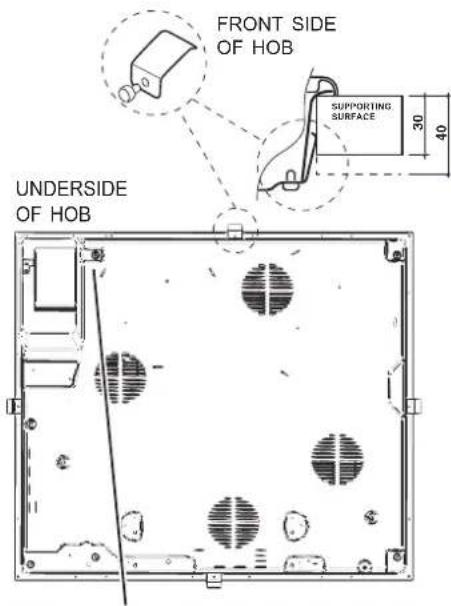
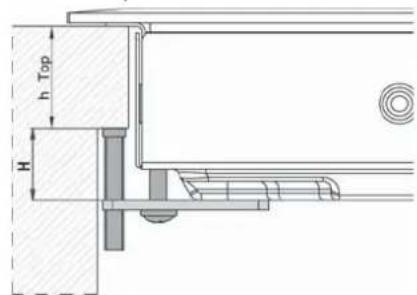
The thickness of the supporting surface should be taken into account when choosing the length of the screws for the fixing hooks:
- 30 mm thick: 23 mm screws
- 40 mm thick: 13 mm screws
Fix the hob as follows:
- Use short flat-bottomed screws to fix the 4 alignment springs in the holes provided at the central point of each side of the hob.
- Place the hob in the cavity, make sure it is in a central position and push down on the whole perimeter until the hob is stuck to the supporting surface.
- For hobs with raised sides: After inserting the hob into its cavity, insert the 4 fixing hooks (each has its own pin) into the lower edges of the hob, using the long pointed screws to fix them in place, until the glass is stuck to the supporting surface.
! The screws for the alignment springs must remain accessible.
! In order to adhere to safety standards, the appliance must not come into contact with electrical parts once it has been installed. ! All parts which ensure the safe operation of the appliance must not be removable without the aid of a tool.
Electrical connection
The electrical connection for the hob and for any built-in oven must be carried out separately, both for safety purposes and to make extracting the oven easier.
Single-phase connection
The hob is equipped with a pre-connected electricity supply cable, which is designed for single-phase connection. Connect the wires in accordance with the instructions given in the following table and diagrams:
| Voltage and mains frequency | Electrical cable Wire connection | |
| 220-240V 1+N ~ 50 Hz | N L | : yellow/green N: the two blue wires together L: brown and black together |
Other types of connection
If the mains supply corresponds with one of the following: Voltage and mains frequency
- 400V - 2+N ~ 50 Hz 220-240V3\~50Hz
- 400V 3 - N ~ 50 Hz
- 400V - 2+2N ~ 50 Hz
Separate the wires and connect them in accordance with the instructions given in the following table and diagrams:
| Voltage and mains frequency | Electrical cable Wire c | Connection |
| 400V - 2+N ~ 50 Hz | N L1 | : yellow/green; N: the two blue wires together L1: black L2: brown |
| 220-240V 3 ~ 50 Hz | ||
| 400V 3-N ~ 50 Hz | ||
| 400V - 2+2N ~ 50 Hz | N L1 L2 | : yellow/green; N1: blue N2: blue L1: black L2: brown |
Connecting the electricity supply cable to the mains
If the appliance is being connected directly to the electricity mains an omnipolar switch must be installed with a minimum opening of 3mm between contacts.
! The installer must ensure that the correct electrical connection has been made and that it is fully compliant with safety regulations.
Before connecting the appliance to the power supply, make sure that:
- The appliance is earthed and the plug is compliant with the law.
- The socket can withstand the maximum power of the appliance, which is indicated on the data plate located on the appliance itself.
- The voltage falls within the range of values indicated on the data plate.
- The socket is compatible with the plug of the appliance. If the socket is incompatible with the plug, ask an authorised technician to replace it. Do not use extension cords or multiple sockets.
!Once the appliance has been installed, the power supply cable and the electrical socket must be easily accessible.
The cable must not be bent or compressed. !The cable must be checked regularly and replaced by authorised technicians only.
!The manufacturer declines any liability should these safety measures not be observed.
! Do not remove or replace the power supply cable for any reason. Its removal or replacement will void the warranty and the CE marking. INDESIT does not assume liability for accidents or damage arising from replacement/removal of the original power supply cable. Replacement can only be accepted when carried out by personnel authorised by INDESIT and using an original spare part.
! The glue applied on the gaskets leaves traces of grease on the glass. Before using the appliance, we recommend you remove these with a special non-abrasive cleaning product. During the first few hours of use there may be a smell of rubber which will disappear very quickly.
! A few seconds after the hob is connected to the electricity supply, a buzzer will sound. The hob may now be switched on.
Types of noise during normal hob operation:
- Buzz: due to the vibration of the metallic parts that make up the induction element and the pot; it is generated by the electromagnetic field required for heating and increases as the power of the induction element increases.
- Soft whistle: heard when the pot placed on the heating zone is empty; the noise disappears once food or water is placed into the pot.
- Crackle: produced by the vibration of materials on the bottom of the pot due to the flow of parasitic currents caused by electromagnetic fields (induction); can be more or less intense depending on the material making up the bottom of the pot, and decreases as the pot dimensions increase.
- Loud whistle: heard when two induction elements of the same group function simultaneously at maximum power and/or when the booster function is set on the larger element while the other is auto-adjusted. Noise is reduced by decreasing the power level of the auto-adjusted induction element; pot bottom layers made of different kinds of materials are among the main causes of this noise.
- Fan noise: a fan is necessary to ensure the hob functions correctly and to safeguard the electronic unit from possible overheating. The fan functions at maximum power when the large induction element is at maximum power or when the booster function is on; in all other cases, it works at average power depending on the temperature detected. Furthermore, the fan may continue to work even after switching the hob off, if the temperature detected is high.
The types of noise listed above are due to induction technology and are not necessarily operational faults.
If the - or + button is pressed for an extended period of time, the display scrolls quickly through the power levels and timer minutes.
* Only available in certain models.
Switching on the hob
To switch the hob on, press and hold the button for approximately one second.
Switching on the cooking zones
Each cooking zone is controlled using a selector button
and a power adjustment device consisting of a
double - and + button.
- To begin operating a cooking zone, press the corresponding control button and set the desired power level (between 0 and 9) using the buttons - and +.
Booster function*
The booster function for some of the cooking zones may be used to shorten heating-up times. It may be
activated by pressing the button. The indicator light directly above the button will illuminate. This function boosts the power to 3000 W or 4000 W, depending on the size of the relevant cooking zone. The booster stops automatically after 4 minutes. While the booster for one of the cooking zones is active, the corresponding front or rear cooking zone will operate at a reduced power level (e.g. if the booster for the rear left-hand hotplate has been activated, the power level of the front left-hand hotplate will be reduced). For further information, please refer to the Technical description of the models.
Switching off the cooking zones
To switch off a cooking zone, select it using the corresponding selector button and:
- Press the button: the power of the cooking zone will progressively decrease until it is switched off.
Programming the cooking duration
! All the cooking zones may be programmed simultaneously, for a duration between 1 and 99 minutes.
- Select the cooking zone using the corresponding selector button.
- Adjust the power level of the cooking zone.
- Press the L programming button. The indicator light corresponding to the selected zone will start flashing.
- Set the cooking duration using the - and + buttons.
- Confirm by pressing the button or automatic selection occurs after 10 seconds. The timer begins counting down immediately. A buzzer sounds for approximately 1 minute and the cooking zone switches off when the set programme has finished. Repeat the above procedure for each hotplate you wish to programme.
Using multiple programmes and the display
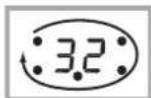
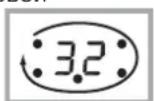
If one or more hotplates are programmed, the display will show the data for the hotplate with the least time remaining, and the light corresponding to the position of the hotplate will flash. The lights corresponding to the other hotplates programmed will be switched on. To visualise the time remaining for the other
programmed hotplates, press the L button repeatedly: the time remaining for each hotplate will be shown sequentially in a clockwise order, starting from the front left hotplate.
Changing the programme
- Press the L button repeatedly until the duration you wish to change is shown. 2. Use the buttons to set the new duration.
- Confirm by pressing the L button.
To cancel a programme, follow the above instructions.
At step 2, press the button: the duration decreases progressively until it reaches 0 and switches off. The programme resets and the display exits programming mode.
Timer
The hob must be switched on.
The timer can be used to set a duration up to 99 minutes.
- Press the L programming button until the timer indicator light is illuminated.
- Set the desired duration using the - and + buttons.
- Confirm by pressing the L button.
The timer begins counting down immediately. When the time has elapsed, a buzzer will sound (for one minute).
Control panel lock
When the hob is switched on, it is possible to lock the oven controls in order to avoid accidental changes being made to the settings (by children, during cleaning, etc.). Press the button to lock the control panel: the indicator light above the button will switch on.
cleaning, etc.). Press the button to lock the control panel: the indicator light above the button will switch on.
To use any of the controls (e.g. to stop cooking), you must switch off this function. Press the button for a few moments, the indicator light will switch off and the lock function will be removed.
Switching off the hob
Press the button to switch off the appliance - do not rely solely on the pan sensor.
If the control panel lock has been activated, the controls will continue to be locked even after the hob is switched on again. In order to switch the hob on again, you must first remove the lock function.
"Demo" mode
It is possible to set the hob to a demonstration mode where all the controls work normally but the heating elements do not switch on. To activate the "demo" mode the hob must be switched on, with all the hotplates switched off.
- Press and hold the + and - buttons simultaneously for 6 seconds. When the 6 seconds have elapsed, the ON/OFF and CONTROLS LOCKED indicator lights will flash for one second. Release the + and - buttons and press the button; The display will show the text DE and MO and the hob will be switched off.
- When the hob is switched on again it will be set to the "demo" mode.
To exit this mode, follow the procedure described above. The display will show the text DE and OF and the hob will be switched off. When it is next switched on, the hob will function normally.
Practical advice on using the appliance
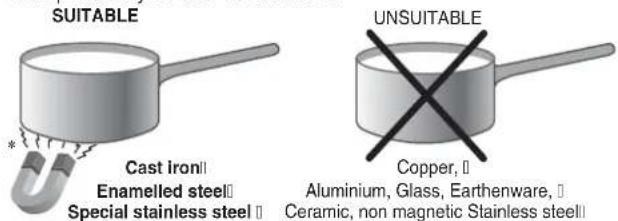
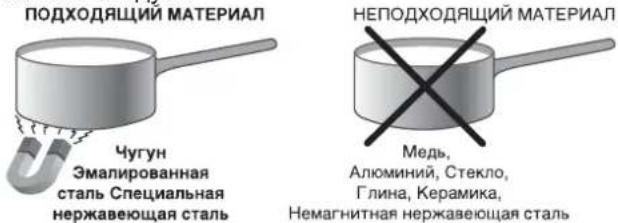
! Use cookware made from materials which are compatible with the induction principle (ferromagnetic material). We especially recommend pans made from: cast iron, coated steel or special stainless steel adapted for induction. Use a magnet to test the compatibility of the cookware.
In addition, to obtain the best results from your hob:
- Use pans with a thick, flat base in order to fully utilise the cooking zone.
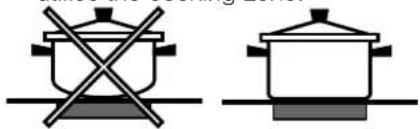
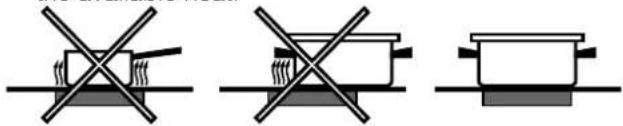
Always use pans with a diameter which is large enough to cover the hotplate fully, in order to use all the available heat. - Make sure that the base of the cookware is always clean and dry, in order to fully utilise and extend the life of both the cooking zones and the cookware. - Avoid using the same cookware which has been used on gas burners: the heat concentration on gas burners may distort the base of the pan, causing it not to adhere correctly.
Safety devices
Pan sensor
Each cooking zone is equipped with a pan sensor device. The hotplate only emits heat when a pan with suitable measurements for the cooking zone is placed on it. If the indicator light is flashing, it may indicate:
An incompatible pan, a pan whose diameter is too small, or the pan has been removed from the hotplate.
Overheating protection
If the electronic elements overheat, the hob switches off automatically and F appears on the display, followed by a flashing number. When the temperature has reached a suitable level, this message disappears and the hob may be used again.
Safety switch
The appliance has a safety switch which automatically switches the cooking zones off after they have been in operation for a certain amount of time at a particular power level. When the safety switch has been triggered, the display shows "0".
For example: the right rear hotplate is set to 5 and will switch off after 5 hours of continuous operation, while the front left hotplate is set to 2 and will switch off after 8 hours.
| Power level | Maximum operating time in hours |
| 1 | 9 |
| 2 | 8 |
| 3 | 7 |
| 4 | 6 |
| 5 | 5 |
| 6 | 4 |
| 7 | 3 |
| 8 | 2 |
| 9 | 1 |
Buzzer
This can also indicate several irregularities:
- An object (a pan, cutlery, etc.) has been placed on the control panel for more than 10 seconds.
- Something has been spilt on the control panel.
- A button has been pressed for too long. All of the above situations may cause the buzzer to sound. Remove the cause of the malfunction to stop the buzzer. If the cause of the problem is not removed, the buzzer will keep sounding and the hob will switch off.
Practical cooking advice
| Very high-flame cooking | 00 LO# | Pressure cooking Pressure cooker Grilling Boiling | Frying |
| High-flame cooking | 87 | Crêpes Cooking on a high flame and browning (roasts, steaks, escalopes, fish fillets, fried eggs) | |
| Medium-flame cookingLow-flame | 76 | Fast thickening (liquid juices) Boiling water (pasta, rice, vegetables) Milk | |
| 65 | Slow thickening (dense juices) | ||
| 54 | Bain-marie cooking | Pressure cooking after whistle | |
| cooking | 42 | Low-flame cooking (stews) | Reheating dishes |
| very low-flame cooking | 31 | Chocolate sauce Keeping food hot | |
!This appliance has been designed and manufactured in compliance with international safety standards. The following warnings are provided for safety reasons and must be read carefully.
This appliance conforms to the following European Economic Community directives:
- 2006/95/EEC dated 12/12/06 (Low Voltage) and subsequent amendments;
- 2004/108/EEC dated 15/12/04 (Electromagnetic Compatibility) and subsequent amendments;
- 93/68/EEC dated 22/07/93 and subsequent amendments.
- 1275/2008 stand-by/off mode.
General safety
!Make sure that the air inlet behind the fan grille is never obstructed. The built-in hob should, in fact, be provided with suitable ventilation for the cooling of the electronic components used in the appliance. !We advise against the installation of an induction hob above an under-the-counter refrigerator (heat) or above a washing machine (vibrations). In fact, there would be insufficient space for the ventilation of electronic components. - The appliance was designed for domestic use inside the home and is not intended for commercial or industrial use. - The appliance must not be installed outdoors, even in covered areas. It is extremely dangerous to leave the appliance exposed to rain and storms. - Do not touch the appliance when barefoot or with wet or damp hands and feet. - The appliance must be used by adults only for the preparation of food, in accordance with the instructions outlined in this booklet. Any other use of the appliance (e.g. for heating the room) constitutes improper use and is dangerous. The manufacturer may not be held liable for any damage resulting from improper, incorrect and unreasonable use of the appliance. - The glass ceramic hob is resistant to mechanical shocks, but it may crack (or even break) if hit with a sharp object such as a tool. If this happens, disconnect the appliance from the electricity mains immediately and contact a Service Centre. - Ensure that power supply cables of other electrical appliances do not come into contact with the hot parts of the hob. - Remember that the cooking zones remain relatively hot for at least thirty minutes after they have been switched off. An indicator light provides a warning when residual heat is present (see Start-up and use). - Keep any object which could melt away from the hob, for example plastic and aluminium objects, or products with a high sugar content. Be especially careful when using plastic film and aluminium foil or packaging: if placed on surfaces which are still hot, they may cause serious damage to the hob. - Always make sure that pan handles are turned towards the centre of the hob in order to avoid accidental burns.
- When unplugging the appliance, always pull the plug from the mains socket, do not pull on the cable.
- Never perform any cleaning or maintenance work without having disconnected the appliance from the electricity mains.
- The appliance should not be operated by people (including children) with reduced physical, sensory or mental capacities, by inexperienced individuals or by anyone who is not familiar with the product. These individuals should, at the very least, be supervised by someone who assumes responsibility for their safety or receive preliminary instructions relating to the operation of the appliance.
- For the attention of wearers of pacemakers or other active implants: The hob complies with all current standards on electromagnetic interference.
Your induction hob is therefore perfectly in keeping with legal requirements (89/336/CEE directives). It is designed not to create interference on any other electrical apparatus being used on condition that the apparatus in question also complies with this legislation.
Your induction hob generates short-range magnetic fields.
To avoid any interference between your induction hob and a pacemaker, the latter must be designed to comply with relevant regulations.
In this respect, we can only guarantee our own product conformity. Please consult the pacemaker manufacturer or your doctor concerning its conformity or any possible incompatibility.
- Do not let children play with the appliance.
- Do not place metal objects (knives, spoons, pan lids, etc.) on the hob as they may become hot.
- The appliance is not intended to be operated by means of an external timer or separate remote-control system.

Disposal
- When disposing of packaging material: observe local legislation so that the packaging may be reused.
- The European Directive 2002/96/EC relating to Waste Electrical and Electronic Equipment (WEEE) states that household appliances should not be disposed of using the normal solid urban waste cycle. Exhausted appliances should be collected separately in order to optimise the cost of re-using and recycling the materials inside the machine, while preventing potential damage to the atmosphere and to public health. The crossed-out dustbin is marked on all products to remind the owner of their obligations regarding separated waste collection.
For further information relating to the correct disposal of exhausted household appliances, owners may contact the public service provided or their local dealer.
Care and maintenance
GB
Switching the appliance off
Disconnect your appliance from the electricity supply before carrying out any work on it.
Cleaning the appliance
! Do not use abrasive or corrosive detergents (for example, products in spray cans for cleaning barbecues and ovens), stain removers, anti-rust products, powder detergents or sponges with abrasive surfaces: these may scratch the surface beyond repair.
! Never use steam cleaners or pressure cleaners on the appliance.
- It is usually sufficient simply to wash the hob using a damp sponge and dry it with absorbent kitchen towel.
- If the hob is particularly dirty, rub it with a special glass ceramic cleaning product, then rinse well and dry thoroughly.
- To remove more stubborn dirt, use a suitable scraper. Remove spills as soon as possible, without waiting for the appliance to cool, to avoid residues forming crusty deposits. You can achieve excellent results by using a rust-proof steel wire sponge - specifically designed for glass ceramic surfaces - soaked in soapy water.
- If any plastic or sugary substances are accidentally melted on the hob, remove them immediately with the scraper, while the surface is still hot.
- Once it is clean, the hob may be treated with a special protective maintenance product: the invisible film left by this product protects the surface from drips during cooking. This maintenance task
should be carried out while the appliance is warm (not hot) or cold.
- Always remember to rinse the appliance well with clean water and dry it thoroughly: residues can become encrusted during subsequent cooking processes.
Stainless steel frame (only in models with outer frame) Stainless steel can be marked by hard water which has been left on the surface for a long time, or by cleaning products containing phosphorus.
After cleaning, it is advisable to rinse the surface well and dry it thoroughly. If water is spilt on the surface, dry it quickly and thoroughly.
Some hobs have an aluminium frame which is similar to stainless steel. Do not use any cleaning or degreasing products which are not suitable for use with aluminium.
Disassembling the hob
If it is necessary to disassemble the hob:
- Loosen the screws fixing the alignment springs on each side.
- Loosen the screws holding the fixing hooks in each corner.
- Take the hob out of its installation cavity.
! Do not attempt to repair the appliance yourself. If the appliance breaks down, contact a Service Centre.
Technical description of the models
The induction system is the quickest existing way of cooking. Unlike traditional hotplates where the cooking zone heats up, with the induction system heat is generated directly inside pans which have ferromagnetic bases.
Key:
= single induction cooking zone B = booster: the power level of the cooking zone may be boosted to 3000/4000W * = the maximum power level is limited while the booster is activated for the relevant rear cooking zone (see Start-up and use).
| Hobs | KIA 630 C S |
| Cooking zone | Power (W) |
| Back Left | 1 1400 |
| Back Right | 1 3000 |
| Front Left | 1 2200 |
| Total power | 6600 |
Turn on the cooking zones
Turn off the cooking zones
- 400V - 2+N ~ 50 Hz 220-240V 3~50
- 400V 3 - N ~ 50 Hz
- 400V - 2+2N ~ 50 Hz
Separate the wires and connect them according to the table and the diagrams shown below:
The buttons of the power regulator, consisting of
double - n +.
To switch on single zones, press the corresponding button and adjust it.
Power when pressing the button
Booster voltage device*
To accelerate the heating of certain cooking zones, you can activate the booster device using
The button is switched on and the indicator on the button lights up. This function adds power up to 3000 W or 4000 W depending on the size of the cooking zone. The booster device automatically switches off after 4 minutes. While the booster function is activated for one of the cooking zones, the corresponding front or rear cooking zone will operate at reduced power (for example, if the booster device is activated for the left rear cooking zone, the power of the left front cooking zone is reduced). For more detailed explanations, see the technical description of the model.
Switch off the cooking zones
Select the steam zone by pressing the corresponding button, then:
Press the button: the steam zone power will gradually decrease until it turns off.
Programming the cooking duration
You can set all steam zones at the same time for cooking from 1 to 99 minutes.
Select the steam zone using the corresponding selection button.
- Select the steam zone using the corresponding selection button.
- Adjust the power level of the steam zone.
cooking using the buttons
5. Confirm; the preheating starts automatically after 10 seconds.
The countdown timer starts immediately. At the end of the set cooking time, an audible signal sounds (for 1 minute), and the steam zone turns off.
Repeat the above operation for each steam zone that needs to be programmed.
Visualization in case of programming several steam zones
Program for the development of school-age children's zones
The cooking program is programmed for several steaming zones. The display shows the cooking time of the steaming zone that is closest to completion, with an indication of its position by a corresponding indicator.
The indicators of the other programmed steaming zones remain lit.
To view the cooking time of the other programmed
steaming zones, press the button several times: the display will show the time of all programmed steaming zones, one after another, in a clockwise direction.
The display will show the time of all programmed steaming zones, starting from the left.
Changing the programming
- Press the button several times until the time of the steaming zone to be changed is displayed. 2. Using the - and + buttons, set the new duration. 3. Confirm the setting by pressing the button.
To cancel the programming, perform the operations described above. In step 2
press the button: the duration will gradually decrease until it turns off. The programming will be reset, and the display will exit programming mode.
Timer
The steaming oven must be switched on. The timer is used to set the cooking duration up to 99 minutes.
- Press the programming button until the timer indicator lights up.
- Set the desired duration
of cooking using the buttons. 3. Confirm the setting with the button. The timer countdown starts immediately. When the set time has elapsed, an audible signal sounds (for 1 minute).
During operation, the hob control can be locked to prevent accidental changes to settings (e.g., during cleaning, etc.).
When the controls are locked, the indicator above the key lights up. To unlock the controls (e.g., to interrupt cooking), press the key for a few seconds; the indicator goes out and the controls are unlocked.
Switching off the hob
Press key ①; the hob switches off, regardless of the sensor for the presence of cookware. If the hob controls were locked, they will remain locked even after switching the hob back on. To switch the hob back on, first unlock the controls.
“Demo” mode
You can set a demonstration mode in which the control panel works as usual (including the programming keys), but the heating elements are not switched on. To enter “demo” mode, the hob must be switched on and all cooking zones must be switched off:
Press and hold simultaneously
keys + and - for 6 seconds. After 6 seconds, the ON/OFF indicator and the CONTROL LOCK indicator flash once
second. Release keys + and press key L;
the inscription “demo” appears and the hob switches off. - When the hob is next switched on, it switches on in “demo” mode.
To cancel this mode, perform the operations described above. The inscription “de” and “of” appears and the hob switches off. When the hob is next switched on, it switches on in normal mode.
Practical tips for using the appliance
Use cookware made of a material suitable for induction heating (ferromagnetic material). It is recommended to use cookware made of: cast iron, enamelled steel or special steel for induction heating. To check the suitability of the cookware, it is sufficient to use a magnet.
In addition, for greater efficiency of the hob, it is recommended:
Use cookware with a thick, flat bottom, ideally fitting the heating zone;
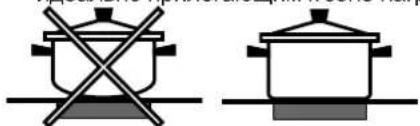
Place the cookware on the hob with a diameter that completely covers the cooking zone for optimal use of all the heat emitted.

Check that the cookware used is always perfectly dry and clean for perfect contact with the cooking zone for a long service life of both the hob and the cookware itself. Do not use cookware on this cooking zone that has been used on gas burners. The concentration of heat on gas burners can deform the bottom of the cookware and impair contact with the cooking zone;
Protective devices
Pan sensor
Each cooking zone is equipped with a pan sensor. The zone emits heat
only when cookware with dimensions corresponding to the zone is present on it. The indicator light may indicate:
- Unsuitable cookware
- Cookware of unsuitable diameter has been removed from the cooking zone
Overheating
In case of overheating of the electronic components, the cooking zone switches off automatically, and
an indicator light appears on the display. This message disappears, and the cooking zone returns to operating mode when the temperature drops to an acceptable level.
Safety switch
The appliance is equipped with a safety switch that automatically switches off the cooking zones after a certain period of operation at a given power level. During automatic shutdown, «0» appears on the display.
Example: the left cooking zone is set to 5, the right cooking zone is set to 2. The left cooking zone switches off after 5 hours of operation, the right after 8 hours.
Precautions and recommendations
This product was manufactured in accordance with international safety standards. You must carefully read these instructions, which have been written for your safety.
This equipment meets the requirements of the directives listed below.
European Community Directives: 2006/95/EC of 12/12/06 (Low Voltage) with subsequent amendments
-2004/108/EC of 15/12/04 (Electromagnetic Compatibility) with subsequent amendments -93/68/EC of 22.07.93 with subsequent amendments. - 1275/2008 stand-by/off mode.
General safety rules
! Check that the ventilation grille is always open. The built-in hood requires effective ventilation to cool the electronic components. ! It is not recommended to install the hood above a refrigerator, a built-in oven (heat) or above a washing machine (vibration). The gap required for ventilation of the electronic components in these cases will be insufficient.
This product is intended for household use only. It is forbidden to install the product outdoors, even under a canopy, because exposure to rain and thunderstorms is extremely dangerous. Do not touch the product with wet hands, barefoot or with wet feet. The product is intended for cooking food and may only be used by adults in accordance with the instructions in this technical manual. Any other use (for example: heating rooms) is considered improper and therefore dangerous. The manufacturer is not responsible for any damage caused by improper, incorrect or unreasonable use of the product. Do not use the hood as a table or for cutting products. The glass-ceramic hood is resistant to mechanical shocks, however it may crack (or even break) if struck by a sharp object or tool. In this case, immediately disconnect the product from the power supply and contact the technical service center. - Avoid touching the hot parts of the hood with other household electrical appliance cords. - Remember that the temperature of the cooking zones remains very high for thirty minutes after they are switched off. Residual heat is also indicated by the indicator (see Switching on and use). - Keep any items that may melt, such as plastic, aluminum or sugar-based foods, at a safe distance from the hood. Pay special attention to packaging materials, polyethylene or aluminum foil: if these materials are left on a still hot surface,
they can seriously damage the hood.
The plug must always be turned back in such a way that it cannot be accidentally switched on. Do not pull the cable to disconnect the plug from the mains socket; hold the plug itself. -Before cleaning or maintenance, always unplug the device from the mains socket. -Operation of the device by persons (including children) with reduced physical, sensory or mental capabilities, or by inexperienced or unskilled persons, or by persons unfamiliar with the operating rules of this device, is prohibited without supervision by a person responsible for their safety, or without instruction in the rules of use of the device. Warning for users of pacemakers or other implanted medical devices:
The steam iron fully complies with all applicable standards for electromagnetic interference. Therefore, this device fully meets all legal requirements (Directive 89/336/EEC). The device was manufactured in such a way as not to cause interference to electrical appliances, provided that these appliances also comply with the aforementioned standards. The operation of the steam iron generates electromagnetic fields of low range.
To avoid interference between the steam iron and a pacemaker, the latter must comply with applicable standards.
Therefore, we can guarantee compliance with standards only for our device. For information on possible problems due to incompatibility, contact your doctor or the manufacturer of the pacemaker.
Do not allow children to play with the household appliance. Do not place metal objects on the soleplate, etc., on the steam iron, as it can become very hot. The device is not designed for operation via an external timer or a separate remote control system.
Disposal
- Disposal of packaging materials: follow local regulations for the reuse of packaging materials. According to European Directive 2002/96/EC regarding the disposal of electronic and electrical appliances, appliances must not be disposed of with ordinary municipal waste. End-of-life appliances must be collected separately for the optimization of their disposal and the recovery of their components and materials, as well as for the safety of the environment and health. The symbol of a crossed-out wheeled bin, present on all appliances, serves as a reminder of their separate disposal.
For more detailed information on the correct disposal of household appliances, users can contact a specialized government organization or the store.
Technical service and care
RS
Disconnecting from the power supply
Before any maintenance or cleaning operation, disconnect the device from the power supply.
Cleaning the soleplate
Do not use abrasive or corrosive cleaning agents such as oven cleaners, stain removers, rust removers, scouring powders, or abrasive sponges: they can irreversibly damage the surface of the appliance. Do not use steam cleaners or high-pressure cleaners for cleaning. For regular care, it is sufficient to wipe the hob with a damp cloth and then dry it with a soft cloth. If the hob is heavily soiled, use a special cleaning product for glass-ceramic surfaces, rinse with water, and dry thoroughly. To remove stubborn dirt, use a special scraper. Remove dirt immediately, without waiting for the appliance to cool down, to prevent residues from hardening. A sponge made of stainless steel wire, specially designed for glass-ceramic surfaces, dipped in soapy water, is very convenient for cleaning. If sugar, plastic materials, or aluminum foil accidentally melt on the hob, remove them immediately with a scraper while the surface is still hot.
Technical description of the model
- After cleaning, the hob can be treated with a special protective product for glass-ceramic surfaces: this product forms an invisible protective film on the hob surface, protecting it in case of food spills during cooking. It is recommended to apply it when the hob is warm or cold. Always rinse the hob with clean water and wipe it dry: possible residues of cleaning agents may harden during subsequent cooking.
Stainless steel frame (only in models with frame)
On the stainless steel surface, limescale stains may form if water with a high mineral content acts on the surface for a long time, or when using cleaning agents containing chlorine. It is recommended to carefully rinse and wipe the hob after cleaning. In case of accidental water spills, remove them immediately.
Some hobs are equipped with an aluminum frame, placed on stainless steel. Do not use cleaning agents that are not suitable for aluminum to clean the frame.
Procedure for dismantling the hob
If it is necessary to dismantle the hob:
- Remove the screws securing the side central springs;
- loosen the screws of the fixing brackets at the corners;
- remove the hob from the panel. It is not recommended to open the internal components or attempt to repair it yourself. In case of malfunction, contact the Technical Service Center.
The induction heating system is one of the fastest among existing heating technologies. Unlike traditional hotplates, heating occurs not in the hob zone: the contents of the pan are heated directly, for which the pan must be ferromagnetic.
- OPERATING INSTRUCTIONS HOB
- DESCRIPTION OF THE APPLIANCE CONTROL PANEL
- POSITIONING
- BUILT-IN APPLIANCE
- VENTILATION
- FIXING
- ELECTRICAL CONNECTION
- SINGLE-PHASE CONNECTION
- OTHER TYPES OF CONNECTION
- CONNECTING THE ELECTRICITY SUPPLY CABLE TO THE MAINS
- THE MANUFACTURER DECLINES ANY LIABILITY SHOULD THESE SAFETY MEASURES NOT BE OBSERVED
- TYPES OF NOISE DURING NORMAL HOB OPERATION
- SWITCHING ON THE HOB
- SWITCHING ON THE COOKING ZONES
- BOOSTER FUNCTION
- SWITCHING OFF THE COOKING ZONES
- PROGRAMMING THE COOKING DURATION
- USING MULTIPLE PROGRAMMES AND THE DISPLAY
- CHANGING THE PROGRAMME
- TIMER
- CONTROL PANEL LOCK
- SWITCHING OFF THE HOB
- DEMO" MODE
- PRACTICAL ADVICE ON USING THE APPLIANCE
- SAFETY DEVICES
- PAN SENSOR
- OVERHEATING PROTECTION
- SAFETY SWITCH
- BUZZER
- GENERAL SAFETY
- DISPOSAL
- CARE AND MAINTENANCE
- SWITCHING THE APPLIANCE OFF
- CLEANING THE APPLIANCE
- DISASSEMBLING THE HOB
- TECHNICAL DESCRIPTION OF THE MODELS
- KEY
- TURN ON THE COOKING ZONES
- TURN OFF THE COOKING ZONES
- BOOSTER VOLTAGE DEVICE
- SWITCH OFF THE COOKING ZONES
- YOU CAN SET ALL STEAM ZONES AT THE SAME TIME FOR COOKING FROM 1 TO 99 MINUTES
- PROGRAM FOR THE DEVELOPMENT OF SCHOOL-AGE CHILDREN'S ZONES
- CHANGING THE PROGRAMMING
- DEMO” MODE
- PRACTICAL TIPS FOR USING THE APPLIANCE
- PROTECTIVE DEVICES
- OVERHEATING
- PRECAUTIONS AND RECOMMENDATIONS
- GENERAL SAFETY RULES
- TECHNICAL SERVICE AND CARE
- DISCONNECTING FROM THE POWER SUPPLY
- CLEANING THE SOLEPLATE
- TECHNICAL DESCRIPTION OF THE MODEL
- PROCEDURE FOR DISMANTLING THE HOB
Brand : HOTPOINT-ARISTON
Model : KIA 630 C (FR) S
Category : Cooker