
Film 2 SD Plus - To scan ION - Free user manual and instructions
Find the device manual for free Film 2 SD Plus ION in PDF.
| Product type | Film and slide scanner |
| Brand | ION |
| Model | Film 2 SD Plus |
| Supported film formats | 135 (positive, negative, black & white), 110 (negative), 126 (negative) |
| Screen | LCD (liquid crystal display) |
| Storage | SD card (not included) |
| Connectivity | USB 2.0, TV output (NTSC/PAL) |
| Power supply | Included AC adapter via USB cable or USB port |
| Included software | MediaImpression (Windows and Mac) |
| Main functions | Scanning, viewing, editing (auto/manual enhancement, red-eye correction, cropping, straightening, background blur, clone, healing brush) |
| Included accessories | Negative carrier, rapid-load slide carrier, cleaning brush, USB cable, TV cable, software CD, quick start guide, safety instructions |
| System compatibility | Windows XP SP2, Vista, 7, 8 (32/64-bit); Mac OS X 10.5 to 10.8 |
| Minimum PC configuration | Pentium 4 1.6 GHz, 512 MB RAM, 500 MB disk |
| Minimum Mac configuration | Power PC G5 or Intel Core Duo, 768 MB RAM, 500 MB disk |
| Maintenance and cleaning | Use the provided cleaning brush for lenses and carriers |
| Safety | Read the safety instructions before use |
| Spare parts and repairability | Contact ION Audio technical support or your retailer |
Frequently Asked Questions - Film 2 SD Plus ION
User questions about Film 2 SD Plus ION
0 question about this device. Answer the ones you know or ask your own.
Ask a new question about this device
Download the instructions for your To scan in PDF format for free! Find your manual Film 2 SD Plus - ION and take your electronic device back in hand. On this page are published all the documents necessary for the use of your device. Film 2 SD Plus by ION.
USER MANUAL Film 2 SD Plus ION
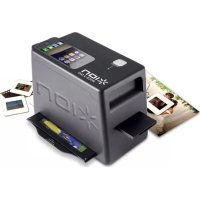
Film 2 SD Plus
Negative Holder
Rapid Slide Feeder
Cleaning Brush
USB Cable
- TV Adapter Cable
Software CD
Power Adapter
Quickstart Guide
- Safety Instructions & Warranty Information Booklet
READ SAFETY INSTRUCTION BOOKLET BEFORE USING THE PRODUCT
Registration & Support
Please go to www.ionaudio.com to register your Film 2 SD Plus. Registering your product ensures that we can keep you up-to-date with any new product developments and provide you with world-class technical support, should you run into any problems.
BEFORE RETURNING THE PRODUCT, please contact ION Audio or your retailer for technical support. Contact information can be found in the Safety Instruction Booklet included with this product.
www.ionaudio.com/support
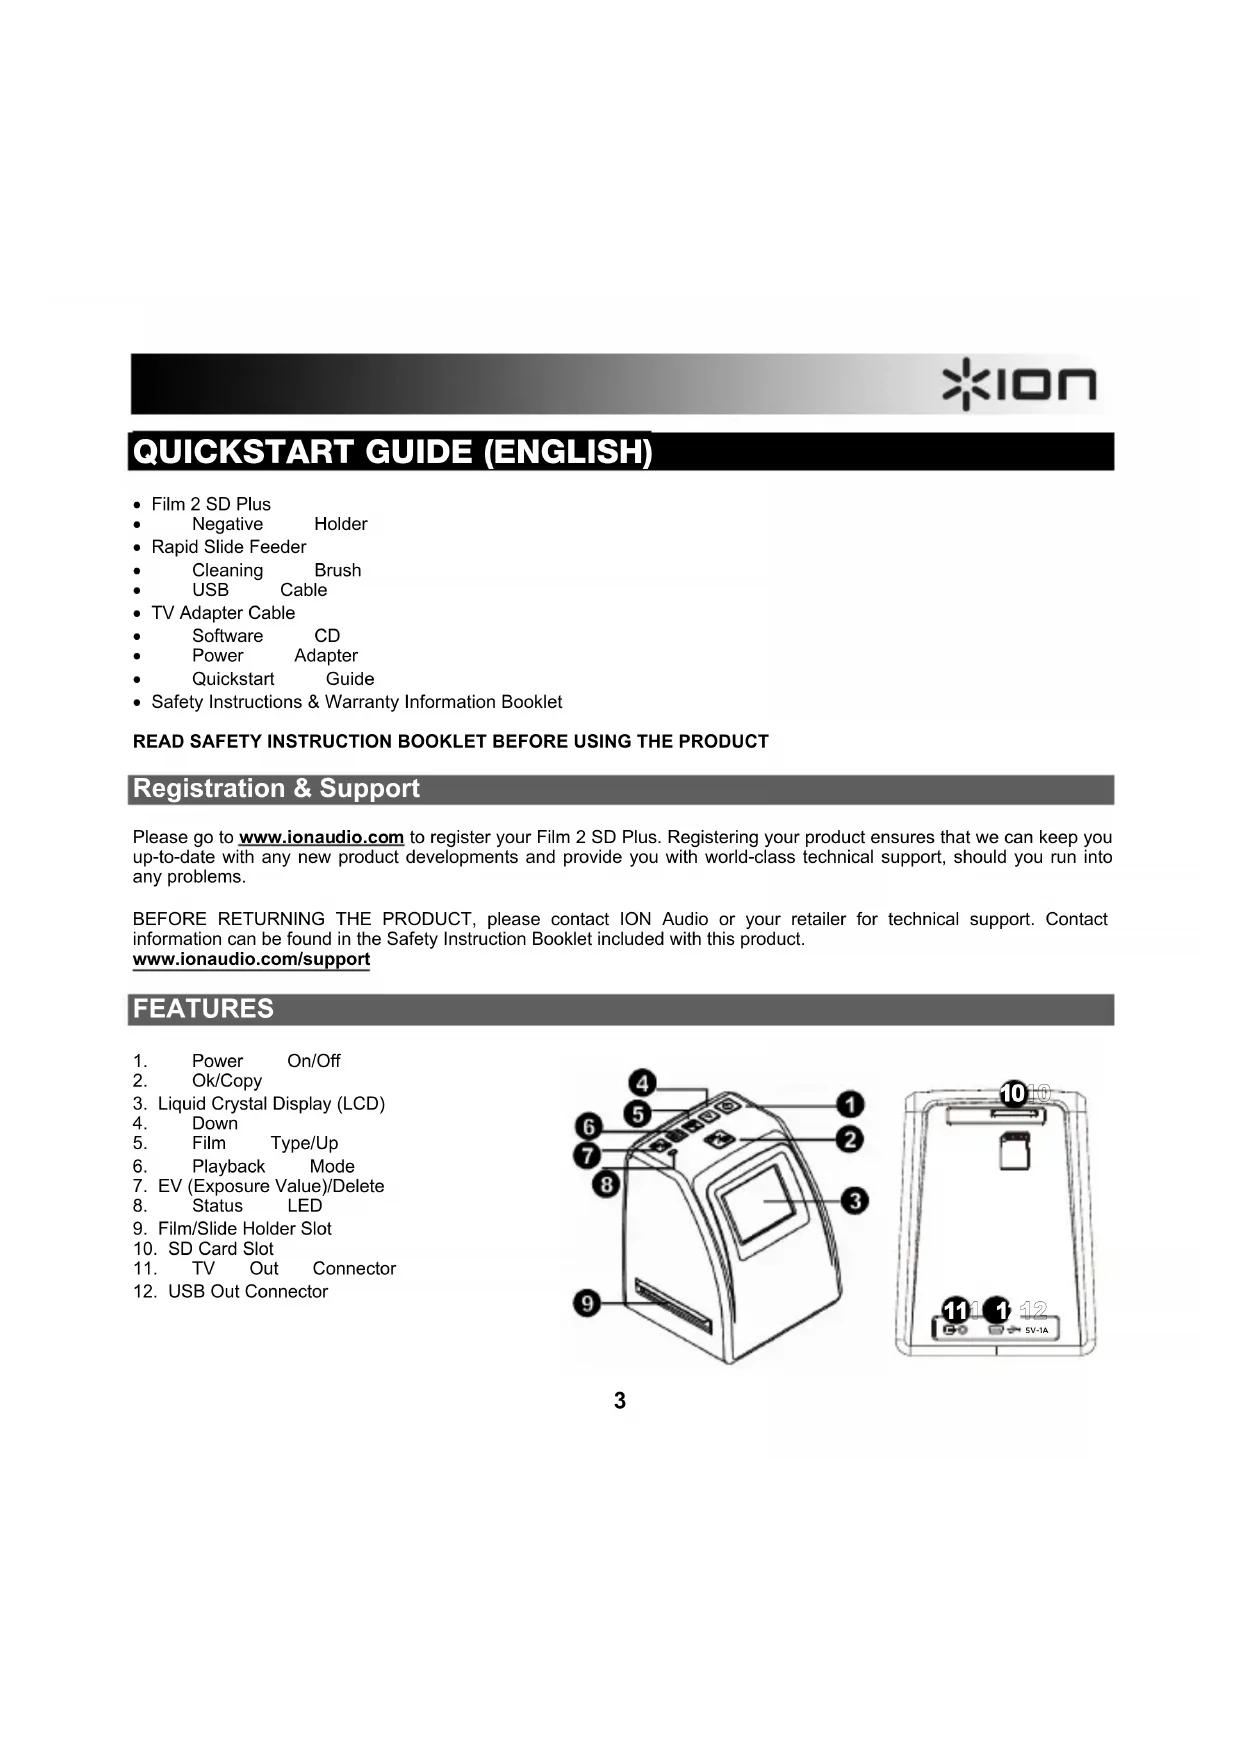
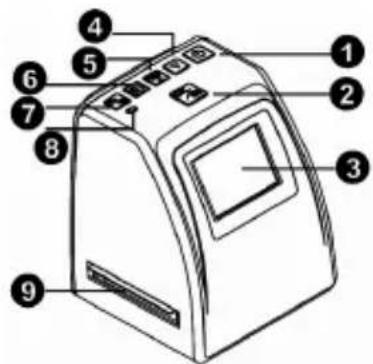
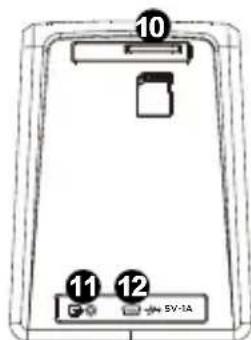
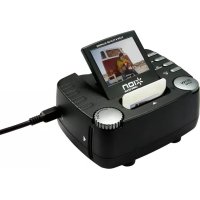
FEATURES
- Power On/Off
- Ok/Copy
- Liquid Crystal Display (LCD)
- Down
- Film Type/Up
- Playback Mode
- EV (Exposure Value)/Delete
- Status LED
- Film/Slide Holder Slot
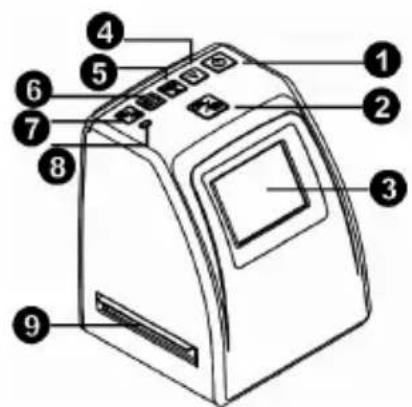
- SD Card Slot
- TV Out Connector
- USB Out Connector
SOFTWARE INSTALLATION
PC:
PC System Requirements
Pentium 4, 1.6GHz or equivalent AMD Athlon
USB2.0 port
512MB RAM
- 500MB free hard disk sp
1024 x 768 pixel color monitor
CD-ROM drive
Windows XP Service Pack 2, Windows Vista (32/64 bit), Windows 7 (32/64 bit), Windows 8 (32/64 bit)
Software Installation
Insert the CD into your CD-ROM drive. On the window that appears after you insert the disc, click "Install Software." If this window does not automatically appear, double-click "My Computer" then double-click the name of the CD. The window should appear. If the window still does not appear, right-click the name of the CD and select "Explore." Once the CD's contents are shown, double-click the ".exe" file. Please refer to the sticker with the serial number located on the CD label for the installation license key.
Mac:
Mac System Requirements
- PowerPC G5 or Intel Core Duo processor recommended
USB 2.0 port
768MB RAM - 500MB free hard disk space
1024 x 768 color monitor
CD-ROM drive
Mac OSX 10.5 - 10.8
Software Installation:
Double-click the CD, then double-click the MediaImpression installer file. Follow the on-screen instructions to install the software. Please refer to the sticker with the serial number located on the CD label for the installation license key.
Note: You may need to enter your system's password during the install process.
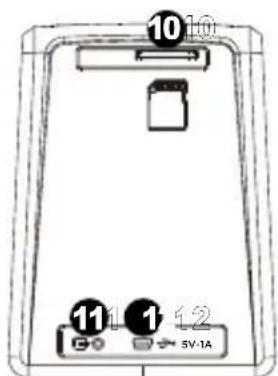
USING THE FILM HOLDER
- Hold the film holder with the glossy surface facing up.
- Open the film holder.
- Put the film into the holder.
- Close the film holder, making sure the magnets lock in place.
USING THE RAPID SLIDE FEEDER
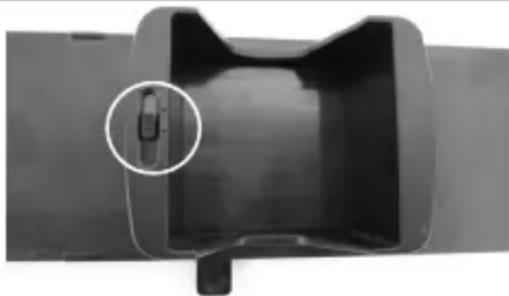
- With the lever all the way to the right, stack your slides in the rapid slide feeder.
Large Dot: If your slides are less than 1.6mm thick, set the switch to the "1.1-1.6" position.
Medium Dot: If your slides are more than 1.6mm thick, set the switch to the "1.6-2.2" position.
- Small Dot: If your slides are more than 2.2 ~mm thick, set the switch to this position.
Note: If you do not know the thickness of your slides, leave this switch alone. However, if your slides are sticking in the rapid slide feeder, remove the rapid slide feeder, set the switch to the opposite setting, and try again.
- Place the rapid slide feeder into the FILM HOLDER SLOT.
- Push the lever towards the left, then pull the lever back to the right again to load a slide from the feeder into Film 2 SD Plus. Repeat this step for subsequent slides (which will push the used slides out the other side).
SCANNING YOUR IMAGES
- Connect Film 2 SD Plus to your computer's USB port or to a power outlet with the included power adapter.
- Turn on Film 2 SD Plus with the Power button.
- Insert your SD card into the SD card slot with the gold contacts pointed up and away from you. When you save your scanned images, they will be stored on the SD card.
- Place your slide(s) or negative into the appropriate holder.
-
Insert the holder into the appropriate Film/Slide Holder Slot, matching the triangle or circle shapes on Film 2 SD Plus to the film/slide holder.
-
Press the Film Type button to select the film type that you are using:
135 positive (slide)
135 negative
135 black & white
110 negative
126 negative

Note: Improper selection of the film type may give undesirable results.
- To adjust the brightness (exposure), press EV/Delete button to adjust the exposure value. Press the Up or Down button to adjust the exposure compensation from +2EV to -2EV in 0.5 increments.
- Capture your image by pressing the OK button.
VIEWING YOUR IMAGES
When you enter Playback Mode, your captured images will be displayed in a slideshow, allowing you to preview them. If there are no images saved to the SD card while in Playback Mode, a "?" icon will appear on the screen.
To remove the SD card to view your images elsewhere:
- Turn Film 2 SD Plus off by pressing the Power button.
- Eject your SD card by pushing it in first, then pulling it out of the slot.
- To view your pictures, insert the SD card into an SD-compatible device, such as a digital picture frame, computer, or television.
Note: To view your images on your TV rather than the display of Film 2 SD Plus, connect the TV OUT of Film 2 SD Plus to your TV's video input with the included TV output cable.
Viewing your images from a TV:
- Set your TV to the appropriate video input mode, and connect the TV cable from Film 2 SD Plus to the TV.
- Press the Playback button on Film 2 SD Plus for viewing images on the TV.
- Choose whether your country is using the NTSC or PAL system. (Residents of North America, Central America, some parts of South America, and Japan should select NTSC. Most others should select PAL.)
- Press the Up button to advance through photos and press the Down button to review previous photos.
- Press the Playback button once again to display a photo slideshow on the TV. Stop the slideshow by pressing the Up or Down button. Continue the slideshow by pressing the Playback button again.
- Press the Playback button during the slideshow to exit TV mode.
Deleting your images:
- In Playback Mode, to delete the current image, press the Delete button once, then press the OK button.
- To delete all images, press the Delete button twice, then press the OK button.
- To format the SD card, press the Delete button three times, then press the OK button.Note: Formatting the SD card will delete all files on the card. If you do not want to delete the images, press the Down button once to select "NO," then press the OK button.
TRANSFERRING YOUR IMAGES
To transfer your images from the SD card to your computer:
- Connect the included USB cable from Film 2 SD Plus to your computer's USB port and then turn Film 2 SD Plus on using the Power button.
- The display will show "SD TO PC". To enter USB mode, press the Up button to select "Yes", and then press the Ok button.
Note: While Film 2 SD Plus is in USB Mode, you will not be able to scan other pictures. To enable scanning again, turn off Film 2 SD Plus, then turn it on again and enter Capture Mode.
- Film 2 SD Plus will appear as "Film 2 SD Plus" in My Computer (Windows) or on your Desktop (Mac).
A. To use Film 2 SD Plus as an SD card reader to transfer images: Open the Film 2 SD Plus drive/folder, then click and drag the pictures to a folder on your computer's hard drive.
B. To use Medialmpression to import photos from the SD card: Open the Medialmpression software and select the Import menu. By default, Media Impression will select all scanned photos found on the SD card for import. If you only want to import some of them, select only the files you want to import. Then click the Import button to start the transfer.
- When you are finished, press the power button on Film 2 SD Plus to turn it off.
Using Film 2 SD Plus with your iPad:
Using Film 2 SD Plus with your iPad requires the Apple iPad Camera Connection Kit (available in the Apple Store). The Camera Connection Kit includes two adapters – one with an SD card slot and one with a USB connection.
- Connect the adapter with an SD card slot to your iPad.
- Remove the SD card from Film 2 SD Plus.
- Gently insert your SD card (with your scans) into the adapter's SD card slot.
- After making the connection, you will be prompted to transfer your scans from your SD card to your iPad. These scans will appear in the Photos library of your iPad. You can now access them as you normally would on your iPad, transfer them to your computer, etc.
EDITING YOUR IMAGES
First, click on the picture to select it; then use the Medialmpression tools to edit the pictures as you wish. The Photo Editing Tools module includes a complete set of photo enhancement, editing and retouching controls. The windows can be stretched to provide a large size view of the active photo. Double-click the module's tool bar to maximize the window to fill the computer screen. In addition to the large photo workspace, the Photo Editing Tools module includes five distinct sets of controls:
ADJUST
ENHANCE - The Enhance feature includes two types of controls:
AUTO ENHANCE - Click the "Auto Enhance" button to improve the overall quality of your pictures with a single click.

MANUAL FIX - For precise image enhancement control, adjust the brightness, contrast and sharpen sliders.
How to enhance a photo manually:
- Move the sliders to adjust the level of brightness, contrast, saturation, hue and sharpen for adjustment.
- Use the zoom slider to get a closer look at how the adjustment affects the photo.
- Click "Apply" if you like the result. Click "Cancel" if you do not.
COLOR - This feature is designed to fix digital photos that have unnatural color or appear too dark. It's also great for fixing scanned versions of old prints that have faded or whose colors have changed after many years.
How to fix the color of a photo:
- Drag the color balance sliders to make the photo color appear more natural. Add red or yellow to make the photo warmer. Add blue or green to make the photo cooler.
- Drag the Lighter/Darker slider to the left to reveal details hidden in a dark photo or to the right to make a faded photo look new again.
- Click "Apply" if you like the result. Clock "Cancel" if you do not.
RED-EYE - This feature makes it easy for you to fix a red-eye - a common problem in flash photography.
There are two ways to fix red-eye:
AUTO FIX
- Simply click the "Fix Red-Eye" button to automatically find and fix all red-eye.
- If not all of the red eye is fixed, use the "Click to Fix" method.
MANUAL FIX
- Use the zoom slider on the toolbar to zoom in on the photo.
- Drag the small white box inside the zoom navigator to move over a red eye.
- Place your cursor directly over the red eye and click.
- Repeat the process until all the red eyes are fixed.
- Click "Undo" if you make a mistake or don't like the result.
CROP - This feature enables you to trim photos for a dramatic effect or cut off the distracting parts of a picture. How to use the crop function:
- Choose the crop orientation (portrait or landscape).
- Select a fixed proportion for the crop rectangle (4:6, 5:7, 8:10) or choose "Custom" if you want to use a different proportion.
- Resize the crop rectangle by clicking and dragging the red lines.
- Move the crop rectangle into position by clicking and dragging inside the red box.
- Click "Crop". The area inside the rectangle will be kept, the area outside will be trimmed away.
- Click "Undo" if you make a mistake or don't like the result.
STRAIGHTEN – This feature enables you to fix photos that appear to be tilted. How to use Straighten:
- Move the slider (or click the rotate buttons) until the photo appears straight.
- Use the superimposed grid lines for vertical and horizontal reference.
- Click "Apply" if you like the result. Click "Cancel" if you do not.
BLUR BACKGROUND - This feature can be used in subtle way - to tone down unimportant background details, or for dramatic effect by making the main subject of a photo "pop out" of the picture. How to use the Blur Background function:
- With your cursor, trace a line around the person or object you want to strand out. When you release the mouse button, the area outside the traced line will become slightly blurred.
- Drag the first slider to make the transition between the blurred and non-blurred area sharp or smooth.
- Drag the second slider to increase or decrease the amount of blur.
- Click "Apply" if you like the result. Click "Cancel" if you do not.
SAVING YOUR RESULTS - When you're done editing a photo, click "Save as" to save your results. You can choose to overwrite the original file or save a new one. Click "Close" to exit the Photo Editing Module.
RETOUCH
HEALING BRUSH - The Healing Brush is good for fixing dust, scratches and removing skin blemishes.

How to use the Healing Brush to fix a skin blemish:
- Establish a source point for the Healing Brush by holding the Shift key and clicking on an area of the skin that is close in color and texture to the area you want to heal.
- Use the zoom control to zoom in on the blemish.
- Adjust the size of the healing brush so the cursor (circle) is only slightly larger than the blemish.
- Paint over the blemish. The area will be concealed. Click "Undo" if you make a mistake or don't like the result.
CLONE - The Clone tool is good for the removing of unwanted elements from a photo. It can also be used for a fun effect, like moving a nose from one person to another.
How to use the Clone tool to remove a telephone pole from the background of a photo:
- Establish a source point for the Clone tool by holding the Shift key and clicking on an area of the sky that you want to use to paint over the telephone pole.
- Adjust the brush size so the cursor (circle) is only slightly larger than the widest part of the Telephone pole.
- Click and hold your mouse button and carefully paint over the telephone pole. Do not release the mouse button until the job is done. The sky will be cloned into place.
- Click "Undo" if you make a mistake or don't like the result.
LIGHTEN/DARKEN - The Light/Darken tool is good for adjusting specific areas of a photo.
SMUDGE - Simulate the smearing of wet paint. Please click and drag the sliders below to change the brush size and sharpness.
SHARPEN - Sharpen blurry areas. Click and drag the sliders below to change the brush size and transparency.
BLUR - Smooth out rough areas. Click and drag the sliders below to change the brush size and intensity.
PAINT BRUSH - Allows you to "paint" on your image when you click and drag the mouse. Click and drag the sliders below to change the brush size and transparency.
LINE - Draw a straight line in the photo. Click and drag the sliders below to change the line width and transparency.
ERASER - Simulate an eraser, removing the image painting by paintbrush and line tools from your photo. Click and drag the sliders below to change the eraser size and effect.

CLIPBOARD
The Clipboard controls are used for selecting, copying and pasting elements from photo to photo. Select from Rectangular, Elliptical, Freehand, Magic Wand and Magnetic.
Note: For more detailed information, please refer to the [Help section] of the program.
GUIA DE INICIO RAPIDO (ESPANOL)
www.ionaudio.com/support
CHARACTERISTIQUES
TRANSFERT DES IMAGES
www.ionaudio.com/support
CARATTERISTICHE
www.ionaudio.com/support
FUNKTIONEN
PC SYSTEMANFORDERUNGEN
MAC SYSTEMANFORDERUNGEN
www.ionaudio.com/support
FUNCTIES
- Power On/Off
- Ok/Copy
- Liquid Crystal Display (LCD)
- Down
- Film Type / Up
- Playback Mode
- EV (Belichtingswaarde) / Delete
(Verwijderen)
- Status-LED
- Film/Diahouder Slot
- SD Card Slot
- TV Out Connector
- USB Out Connector
SOFTWARE INSTALLATIE
PC:
Image Sensor: 1/2.33", 14 megapixel CMOS sensor
Preview and Review: 2.4" Color LCD Display
Lens Specification: F = 4.5 , f = 14mm
File Type: JPEG
Color Balance: Automatic
Color Space: sRGB
White Balance: Auto
Exposure Control: Automatic & Manual adjustment
Exposure adjustment: + / - 2.0EV
Metering: Center-weighted Average
Focusing: Fixed Focus
USB Interface: USB 2.0
Light Source: 3 white LED's
Power: USB 2.0 port; Power Adapter: 5v DC, 1A
TV System: NTSC and PAL
Dimensions (L x W x H): 4.3" x 4.2" x 5.6"; (108 mm x 106 mm x 143 mm)
Specifications are subject to change without prior notice.
www.ionaudio.com

- READ SAFETY INSTRUCTION BOOKLET BEFORE USING THE PRODUCT
- Registration & Support
- FEATURES
- SOFTWARE INSTALLATION
- PC:
- PC System Requirements
- Mac:
- Mac System Requirements
- Software Installation:
- USING THE FILM HOLDER
- USING THE RAPID SLIDE FEEDER
- SCANNING YOUR IMAGES
- VIEWING YOUR IMAGES
- To remove the SD card to view your images elsewhere:
- Viewing your images from a TV:
- Deleting your images:
- TRANSFERRING YOUR IMAGES
- To transfer your images from the SD card to your computer:
- Using Film 2 SD Plus with your iPad:
- EDITING YOUR IMAGES
- ADJUST
- AUTO FIX
- MANUAL FIX
- RETOUCH
- CLIPBOARD
- GUIA DE INICIO RAPIDO (ESPANOL)
- CHARACTERISTIQUES
- TRANSFERT DES IMAGES
- CARATTERISTICHE
- FUNKTIONEN
- PC SYSTEMANFORDERUNGEN
- MAC SYSTEMANFORDERUNGEN
- FUNCTIES
- SOFTWARE INSTALLATIE
Brand : ION
Model : Film 2 SD Plus
Category : To scan